YAMAHA GRIZZLY 450 2014 Owners Manual
Manufacturer: YAMAHA, Model Year: 2014, Model line: GRIZZLY 450, Model: YAMAHA GRIZZLY 450 2014Pages: 174, PDF Size: 3.99 MB
Page 141 of 174
8-49
8
not work smoothly, you could be unable to
control the ATV, which could lead to an acci-
dent or collision.
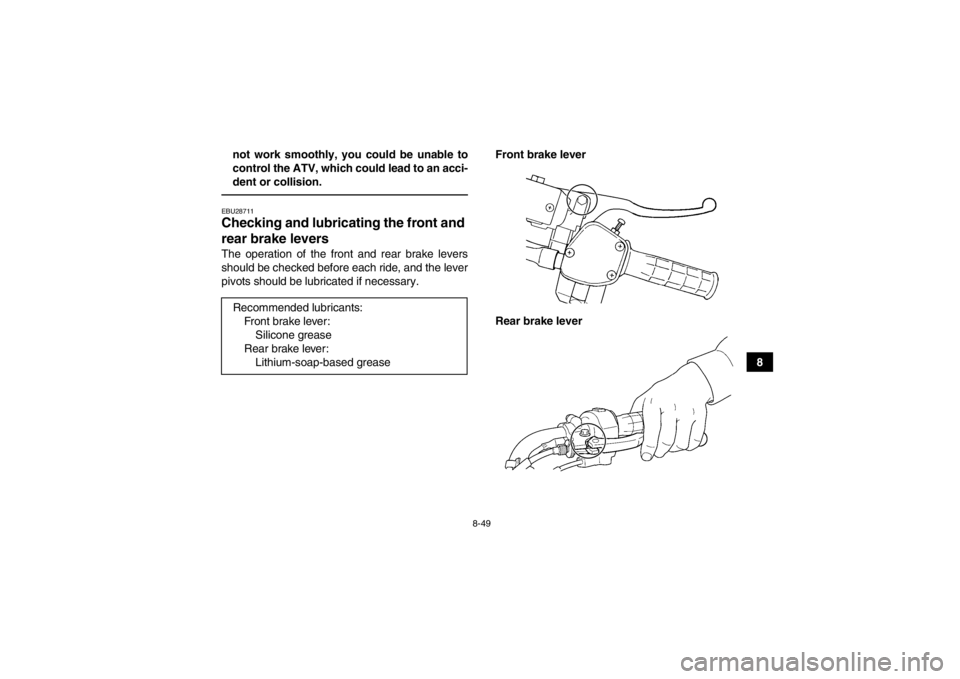
EBU28711Checking and lubricating the front and
rear brake levers The operation of the front and rear brake levers
should be checked before each ride, and the lever
pivots should be lubricated if necessary.
Front brake lever
Rear brake lever
Recommended lubricants:
Front brake lever:Silicone grease
Rear brake lever: Lithium-soap-based greaseU2LC60E0.book Page 49 Friday, March 8, 2013 1:18 PM
Page 142 of 174
8-50
8
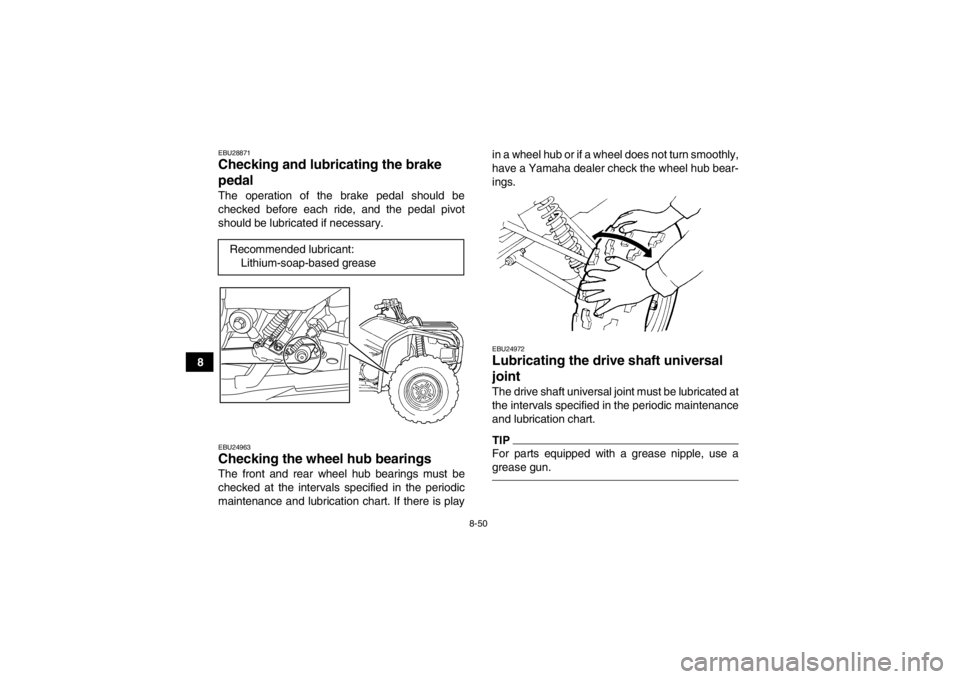
EBU28871Checking and lubricating the brake
pedal The operation of the brake pedal should be
checked before each ride, and the pedal pivot
should be lubricated if necessary.EBU24963Checking the wheel hub bearings The front and rear wheel hub bearings must be
checked at the intervals specified in the periodic
maintenance and lubrication chart. If there is playin a wheel hub or if a wheel does not turn smoothly,
have a Yamaha dealer check the wheel hub bear-
ings.
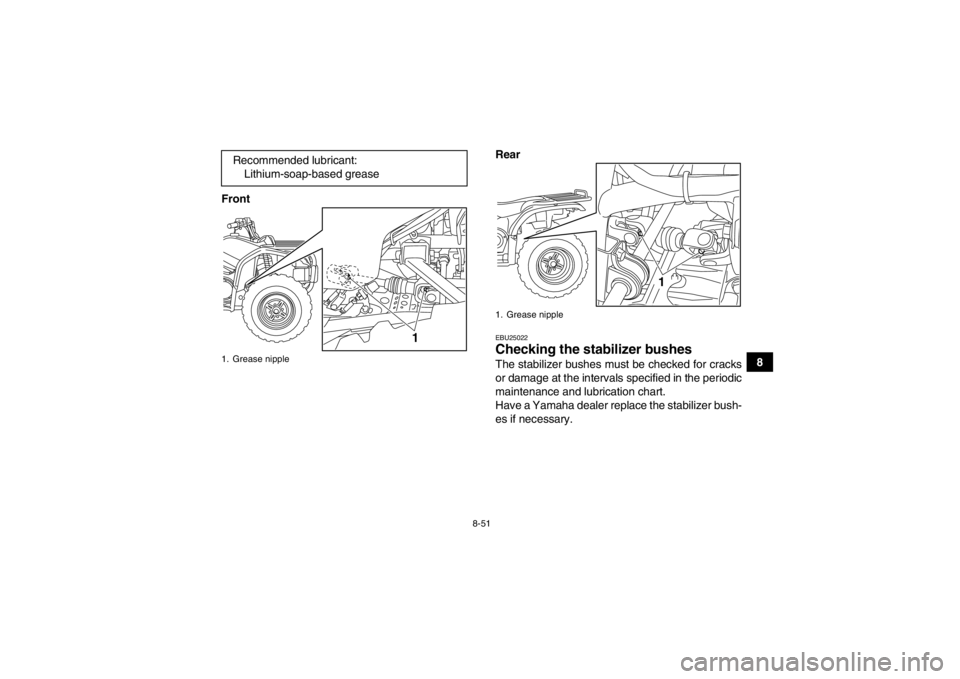
EBU24972Lubricating the drive shaft universal
joint The drive shaft universal joint must be lubricated at
the intervals specified in the periodic maintenance
and lubrication chart.TIPFor parts equipped with a grease nipple, use a
grease gun.
Recommended lubricant:
Lithium-soap-based grease
U2LC60E0.book Page 50 Friday, March 8, 2013 1:18 PM
Page 143 of 174
8-51
8
Front
Rear
EBU25022Checking the stabilizer bushes The stabilizer bushes must be checked for cracks
or damage at the intervals specified in the periodic
maintenance and lubrication chart.
Have a Yamaha dealer replace the stabilizer bush-
es if necessary.
Recommended lubricant:
Lithium-soap-based grease
1. Grease nipple
1
1. Grease nipple
1
U2LC60E0.book Page 51 Friday, March 8, 2013 1:18 PM
Page 144 of 174
8-52
8
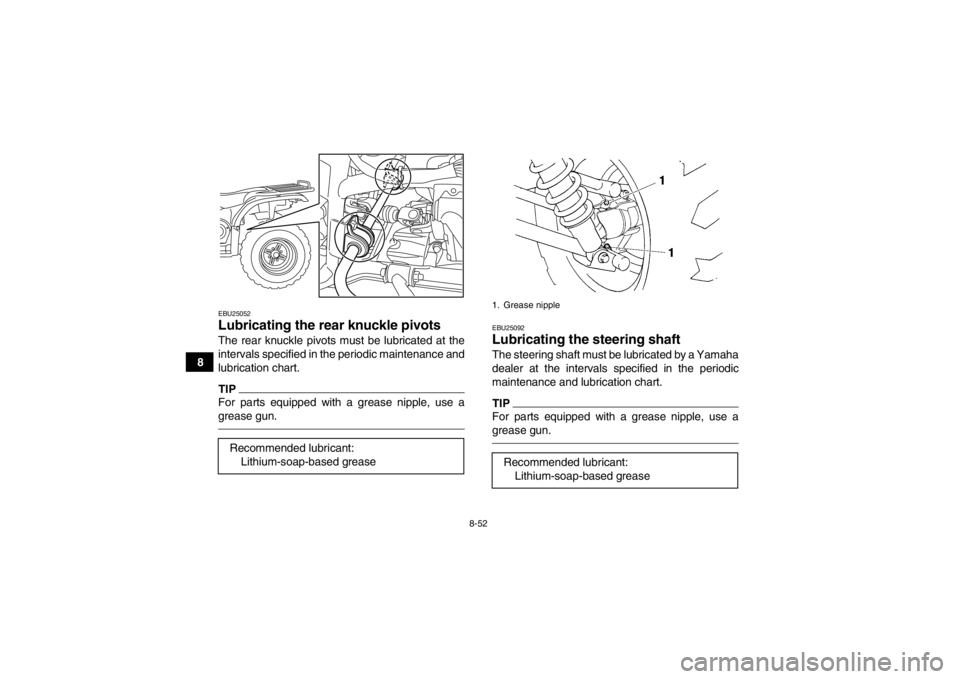
EBU25052Lubricating the rear knuckle pivots The rear knuckle pivots must be lubricated at the
intervals specified in the periodic maintenance and
lubrication chart.TIPFor parts equipped with a grease nipple, use a
grease gun.
EBU25092Lubricating the steering shaft The steering shaft must be lubricated by a Yamaha
dealer at the intervals specified in the periodic
maintenance and lubrication chart.TIPFor parts equipped with a grease nipple, use a
grease gun.
Recommended lubricant:Lithium-soap-based grease
1. Grease nippleRecommended lubricant:Lithium-soap-based grease
U2LC60E0.book Page 52 Friday, March 8, 2013 1:18 PM
Page 145 of 174
8-53
8
EBU29189Battery The battery is located under the seat. (See page
4-18.)
This model is equipped with a VRLA (Valve Regu-
lated Lead Acid) battery. There is no need to check
the electrolyte or to add distilled water. However,
the battery lead connections need to be checked
and, if necessary, tightened.
WARNING
EWB02160Battery electrolyte is poisonous and danger-
ous, as it contains sulfuric acid, which can
cause severe burns. Avoid contact with skin,
eyes or clothing. Always shield your eyes
when working near batteries.
Antidote:
EXTERNAL: Flush with water.
INTERNAL: Drink large quantities of water or
milk. Follow with milk of magnesia, beaten egg
or vegetable oil. Call a physician immediately.
EYES: Flush with water for 15 minutes and get
prompt medical attention.
Batteries produce explosive gases. Keep
sparks, flame, cigarettes or other sources of ig-
nition away. Ventilate when charging or using
in an enclosed space.KEEP OUT OF REACH OF CHILDREN.
NOTICEECB00620Never attempt to remove the battery cell seals,
as this would permanently damage the battery.To remove the battery
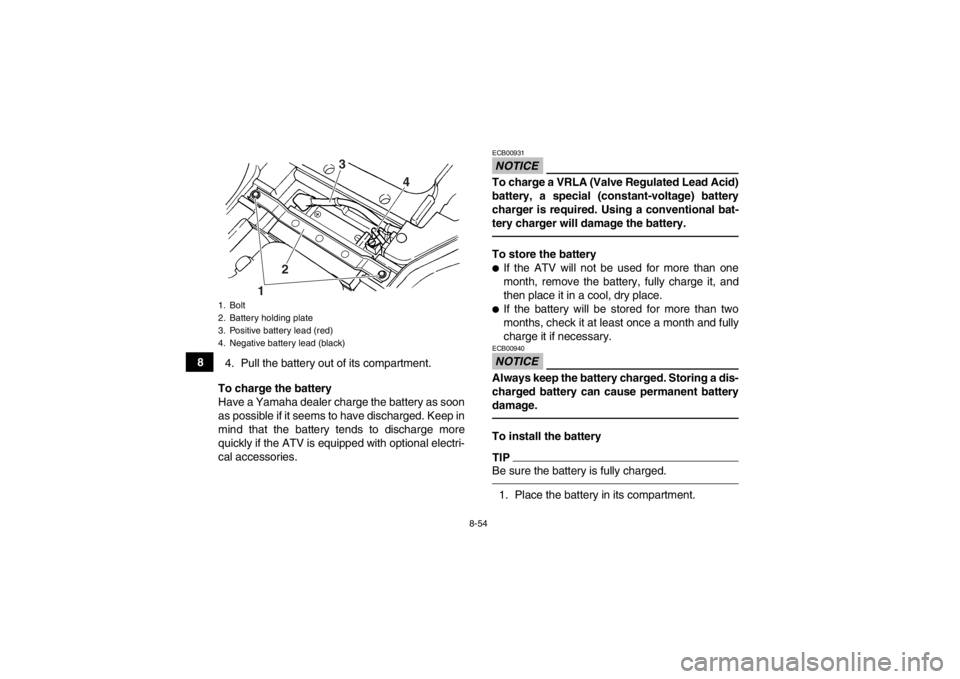
1. Remove the seat. (See page 4-18.)
2. Remove the battery holding plate by removing the bolts.
3. Disconnect the negative battery lead first, then the positive battery lead by removing
their bolt. NOTICE: When removing the bat-
tery, the main switch must be off, and the
negative lead must be disconnected be-
fore the positive lead.
[ECB01001]
U2LC60E0.book Page 53 Friday, March 8, 2013 1:18 PM
Page 146 of 174
8-54
84. Pull the battery out of its compartment.
To charge the battery
Have a Yamaha dealer charge the battery as soon
as possible if it seems to have discharged. Keep in
mind that the battery tends to discharge more
quickly if the ATV is equipped with optional electri-
cal accessories.
NOTICEECB00931To charge a VRLA (Valve Regulated Lead Acid)
battery, a special (constant-voltage) battery
charger is required. Using a conventional bat-
tery charger will damage the battery.To store the battery●If the ATV will not be used for more than one
month, remove the battery, fully charge it, and
then place it in a cool, dry place.●If the battery will be stored for more than two
months, check it at least once a month and fully
charge it if necessary.NOTICEECB00940Always keep the battery charged. Storing a dis-
charged battery can cause permanent battery
damage.To install the batteryTIPBe sure the battery is fully charged.1. Place the battery in its compartment.
1. Bolt
2. Battery holding plate
3. Positive battery lead (red)
4. Negative battery lead (black)
3 4
1 2
U2LC60E0.book Page 54 Friday, March 8, 2013 1:18 PM
Page 147 of 174

8-55
8
2. Connect the positive battery lead first, then
connect the negative battery lead by installing
their bolt. NOTICE: When installing the bat-
tery, the main switch must be off, and the
positive lead must be connected before
the negative lead.
[ECB01110]
3. Install the battery holding plate by installing the bolts.
4. Install the seat. (See page 4-18.)
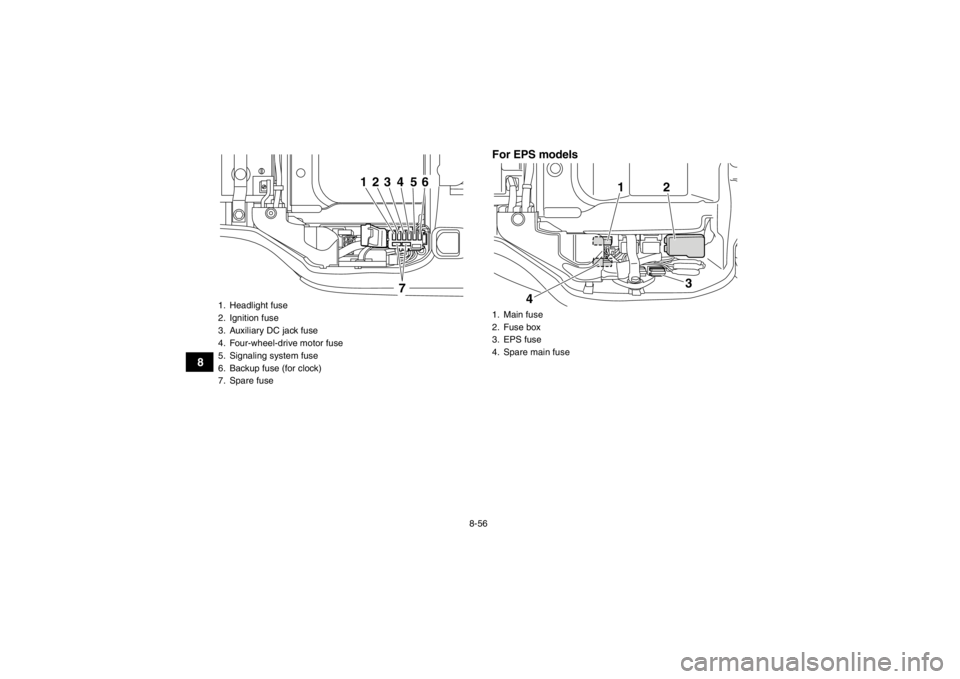
EBU30800Replacing a fuse The main fuse, the EPS fuse, and the fuse box are
located under the seat. (See page 4-18.)
For non-EPS models
1. Positive battery lead (red)
2. Negative battery lead (black)
1
2
1. Main fuse
2. Fuse box
3. Spare main fuse
1
2
3
U2LC60E0.book Page 55 Friday, March 8, 2013 1:18 PM
Page 148 of 174
8-56
8For EPS models
1. Headlight fuse
2. Ignition fuse
3. Auxiliary DC jack fuse
4. Four-wheel-drive motor fuse
5. Signaling system fuse
6. Backup fuse (for clock)
7. Spare fuse
1
2
3
4
5
6
7
1. Main fuse
2. Fuse box
3. EPS fuse
4. Spare main fuse
12
3
4
U2LC60E0.book Page 56 Friday, March 8, 2013 1:18 PM
Page 149 of 174
8-57
8
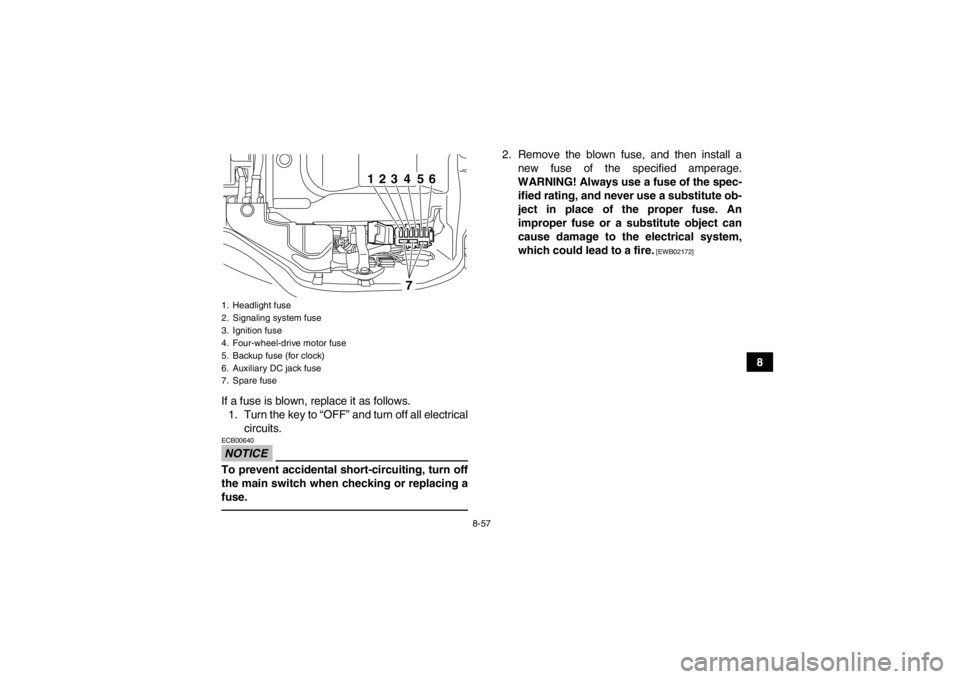
If a fuse is blown, replace it as follows. 1. Turn the key to “OFF” and turn off all electrical circuits.
NOTICEECB00640To prevent accidental short-circuiting, turn off
the main switch when checking or replacing a
fuse.
2. Remove the blown fuse, and then install anew fuse of the specified amperage.
WARNING! Always use a fuse of the spec- ified rating, and never use a substitute ob-
ject in place of the proper fuse. An
improper fuse or a substitute object can
cause damage to the electrical system,
which could lead to a fire.
[EWB02172]
1. Headlight fuse
2. Signaling system fuse
3. Ignition fuse
4. Four-wheel-drive motor fuse
5. Backup fuse (for clock)
6. Auxiliary DC jack fuse
7. Spare fuse
1
2
3
4
5
6
7
U2LC60E0.book Page 57 Friday, March 8, 2013 1:18 PM
Page 150 of 174
8-58
83. Turn the key to “ON” and turn on the electricalcircuits to check if the devices operate.
4. If the fuse immediately blows again, have a Yamaha dealer check the electrical system.
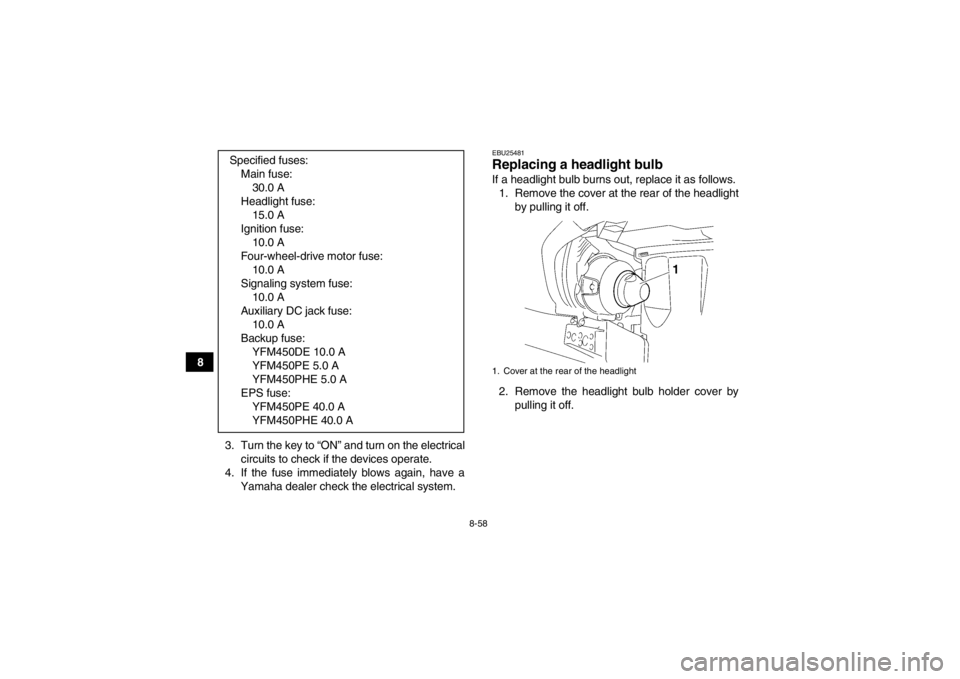
EBU25481Replacing a headlight bulb If a headlight bulb burns out, replace it as follows.1. Remove the cover at the rear of the headlight by pulling it off.
2. Remove the headlight bulb holder cover by pulling it off.
Specified fuses:
Main fuse:30.0 A
Headlight fuse: 15.0 A
Ignition fuse: 10.0 A
Four-wheel-drive motor fuse: 10.0 A
Signaling system fuse: 10.0 A
Auxiliary DC jack fuse: 10.0 A
Backup fuse: YFM450DE 10.0 A
YFM450PE 5.0 A
YFM450PHE 5.0 A
EPS fuse: YFM450PE 40.0 A
YFM450PHE 40.0 A1. Cover at the rear of the headlight
U2LC60E0.book Page 58 Friday, March 8, 2013 1:18 PM