Seat YAMAHA KODIAK 450 2018 Owners Manual
[x] Cancel search | Manufacturer: YAMAHA, Model Year: 2018, Model line: KODIAK 450, Model: YAMAHA KODIAK 450 2018Pages: 162, PDF Size: 4.86 MB
Page 9 of 162

EBU17421
TABLE OF CONTENTS
LOCATION OF THE WARNING AND
SPECIFICATION LABELS .............................. 1-1
SAFETY INFORMATION ................................ 2-1
DESCRIPTION................................................ 3-1Left view ...................................................... 3-1
Right view.................................................... 3-1
Controls and instruments............................ 3-2
INSTRUMENT AND CONTROL
FUNCTIONS ................................................... 4-1 Main switch ................................................. 4-1
Indicator lights and warning lights .............. 4-2
Display unit ................................................ 4-4
Self-diagnosis device .................................. 4-6
Handlebar switches .................................... 4-6
Throttle lever ............................................... 4-8
Speed limiter ............................................... 4-9
Front brake lever ....................................... 4-10
Brake pedal and rear brake lever .............. 4-10
Drive select lever ....................................... 4-11
Fuel tank cap ............................................ 4-11
Fuel ........................................................... 4-11 Seat .......................................................... 4-13
Storage compartment............................... 4-14
Front carrier .............................................. 4-15
Rear carrier ............................................... 4-15
Adjusting the front and rear shock
absorber assemblies ............................. 4-15
Auxiliary DC jack....................................... 4-17
Winch pre-wiring ...................................... 4-17
PRE-OPERATION CHECKS .......................... 5-1 Fuel ............................................................. 5-3
Engine oil .................................................... 5-3
Final gear oil ............................................... 5-3
Differential gear oil ...................................... 5-3
Coolant ....................................................... 5-3
Front and rear brakes ................................. 5-3
Throttle lever ............................................... 5-4
Tires ............................................................ 5-4
Chassis fasteners ....................................... 5-6
Instruments, lights and switches ................ 5-6
OPERATION .................................................. 6-1 Starting the engine ..................................... 6-1UBB560E0.book Page 1 Tuesday, May 9, 2017 5:31 PM
Page 43 of 162
![YAMAHA KODIAK 450 2018 Owners Manual 4-13
4
3. Wipe up any spilled fuel immediately.
NOTICE: Immediately wipe off spilled fuel
with a clean, dry, soft cloth, since fuel may
deteriorate painted surfaces or plastic
parts.
[ECB00982]
4. T YAMAHA KODIAK 450 2018 Owners Manual 4-13
4
3. Wipe up any spilled fuel immediately.
NOTICE: Immediately wipe off spilled fuel
with a clean, dry, soft cloth, since fuel may
deteriorate painted surfaces or plastic
parts.
[ECB00982]
4. T](/img/51/50544/w960_50544-42.png)
4-13
4
3. Wipe up any spilled fuel immediately.
NOTICE: Immediately wipe off spilled fuel
with a clean, dry, soft cloth, since fuel may
deteriorate painted surfaces or plastic
parts.
[ECB00982]
4. Turn the fuel tank cap fully clockwise to make sure it is securely closed.
WARNING
EWB02532Gasoline is poisonous and can cause injury or
death. Handle gasoline with care. Never siphon
gasoline by mouth. If you should swallow some
gasoline or inhale a lot of gasoline vapor, or get
some gasoline in your eyes, see your doctor
immediately. If gasoline spills on your skin,
wash with soap and water. If gasoline spills on
your clothing, change your clothes. NOTICEECB00071Use only unleaded gasoline. The use of leaded
gasoline will cause severe damage to internal
engine parts, such as the valves and piston
rings, as well as to the exhaust system.
Your Yamaha engine has been designed to use
regular unleaded gasoline with a research octane
number of 91 or higher (95 or higher for Europe). If
knocking (or pinging) occurs, use a gasoline of a
different brand. Use of unleaded fuel will extend
spark plug life and reduce maintenance costs.EBU34141SeatTo remove the seat
Pull up the seat at the rear, and then pull the seat
rearward.1. Seat
1
UBB560E0.book Page 13 Friday, March 10, 2017 10:20 AM
Page 44 of 162
4-14
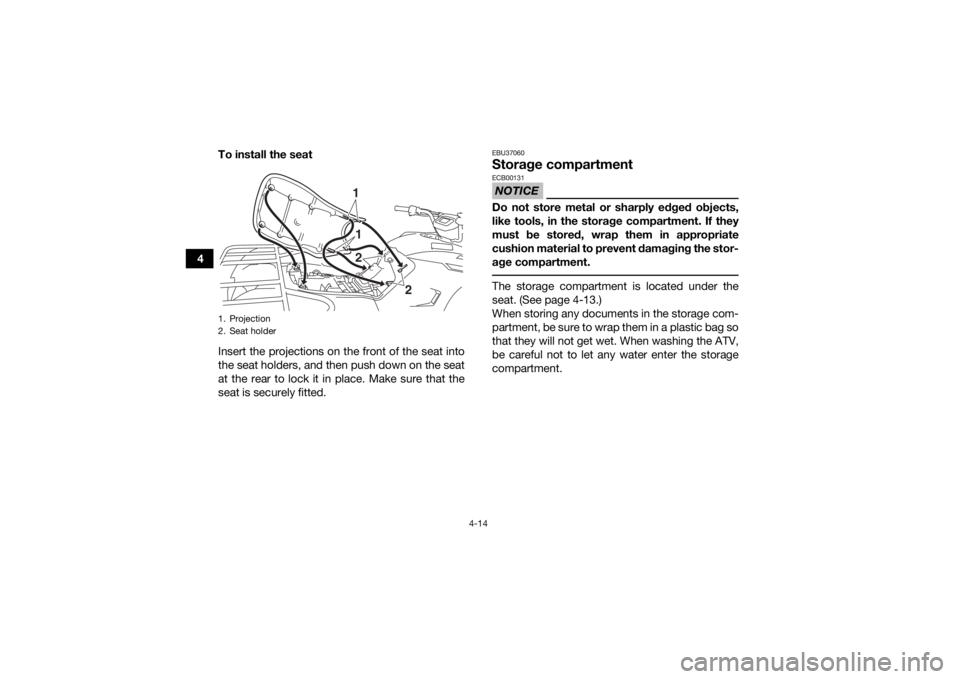
4To install the seat
Insert the projections on the front of the seat into
the seat holders, and then push down on the seat
at the rear to lock it in place. Make sure that the
seat is securely fitted.
EBU37060Storage compartmentNOTICEECB00131Do not store metal or sharply edged objects,
like tools, in the storage compartment. If they
must be stored, wrap them in appropriate
cushion material to prevent damaging the stor-
age compartment. The storage compartment is located under the
seat. (See page 4-13.)
When storing any documents in the storage com-
partment, be sure to wrap them in a plastic bag so
that they will not get wet. When washing the ATV,
be careful not to let any water enter the storage
compartment.
1. Projection
2. Seat holder
1
12
2
UBB560E0.book Page 14 Friday, March 10, 2017 10:20 AM
Page 51 of 162

5-4
5
Brake fluid leakage (front brake)
Check to see if any brake fluid is leaking out of the
hose, joint or brake fluid reservoir of the front
brake. Apply the brake firmly for one minute. If the
lever moves slowly inward, there may be a leak in
the brake system. If there is any leakage, the brake
system should be checked by a Yamaha dealer.
Brake operation
Test the brakes at slow speed after starting out to
make sure they are working properly. If the brakes
do not provide proper braking performance,
check the brake pads and friction plates for wear.
(See page 8-37.)
EBU19762Throttle leverCheck the operation of the throttle lever. It must
open smoothly and spring back to the idle position
when released. Have a Yamaha dealer correct if
necessary.EBU19816TiresCheck tire pressure regularly to make sure it is at
the recommended specifications. Also check for
wear and damage. Tire pressure
Use a tire pressure gauge to check and adjust tire
air pressure when the tires are cold. The tire air
pressure must be equal on both sides.
WARNING! Operation of this vehicle with im- proper tire pressure may cause severe injury or
death from loss of control or rollover. Tire
pressure below the minimum specified could
also cause the tire to dislodge from the rim un-
der severe riding conditions.
[EWB02542]
Recommended tire pressure: Front35.0 kPa (0.350 kgf/cm², 5.0 psi)
Rear 30.0 kPa (0.300 kgf/cm², 4.4 psi)
Minimum tire pressure: Front32.0 kPa (0.320 kgf/cm², 4.6 psi)
Rear 27.0 kPa (0.270 kgf/cm², 4.0 psi)
Maximum tire seating pressure: Front250 kPa (2.5 kgf/cm², 36 psi)
Rear 250 kPa (2.5 kgf/cm², 36 psi)
UBB560E0.book Page 4 Friday, March 10, 2017 10:20 AM
Page 59 of 162
6-6
6
sold by Yamaha or modifications not specifically
recommended by Yamaha, even if sold and in-
stalled by a Yamaha dealer.
Aftermarket parts, accessories, and modifica-
tions
While you may find aftermarket products similar in
design and quality to genuine Yamaha Accesso-
ries, recognize that some aftermarket accessories
or modifications are not suitable because of po-
tential safety hazards to you or others. Installing
aftermarket products or having other modifica-
tions performed to your ATV that change any of
the vehicle’s design or operation characteristics
can put you and others at greater risk of serious
injury or death. You are responsible for injuries re-
lated to changes in the vehicle.
Keep the following in mind when considering an
accessory or operating an ATV which has acces-
sories.
Accessories should be rigidly and securely
mounted. An accessory which can shift position
or come off while you are riding could affect
your ability to control the ATV.
Do not mount an accessory where it could inter-
fere with your ability to control the ATV. Exam-
ples include (but are not limited to) a heavy or bulky object attached to the handlebars which
could make steering difficult, an accessory that
limits your ability to move around on the seat, or
one that limits your view.
Use extra caution when riding an ATV with ac-
cessories. The ATV may handle differently than
it does without accessories.
EBU21042Loading
WARNING
EWB00821Never exceed the stated load capacity for this
ATV. Overloading this ATV or carrying or tow-
ing cargo improperly could cause changes in
ATV handling which could lead to an accident.
Cargo should be properly distributed and se-
curely attached. Reduce speed when carrying
cargo or pulling a trailer. Allow greater dis-
tance for braking. Cargo or a trailer can change the stability and han-
dling of an ATV.
You must use common sense and good judgment
when carrying cargo or towing a trailer. Keep the
following points in mind:
UBB560E0.book Page 6 Friday, March 10, 2017 10:20 AM
Page 63 of 162
7-3
7
the time to learn the basic techniques well before
attempting more difficult maneuvers. Become fa-
miliar with this ATV at slow speeds first, even if you
are an experienced operator.
Not recommended for children under 16 years
of age.
WARNING
EWB01391A child under 16 should never operate an ATV
with engine size greater than 90 cc. Use by
children of ATVs that are not recommended for
their age can lead to severe injury or death of
the child.
This ATV is designed to carry the operator and
cargo only – passengers prohibited.
The long seat is to allow the operator to shift posi-
tion as needed during operation. It is not for carry-
ing passengers.
WARNING! Never carry a
passenger. Carrying a passenger on this ATV
greatly reduces your ability to balance and
control this ATV. You could have an accident,
resulting in severe injury or death to you and/or
your passenger.
[EWB01402]
UBB560E0.book Page 3 Friday, March 10, 2017 10:20 AM
Page 73 of 162
7-13
7
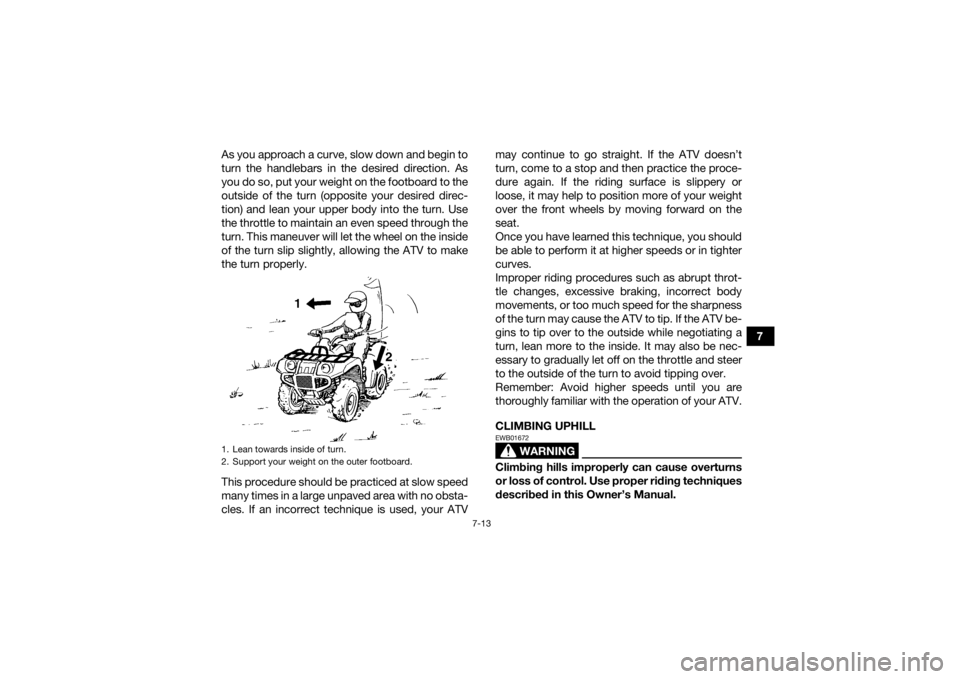
As you approach a curve, slow down and begin to
turn the handlebars in the desired direction. As
you do so, put your weight on the footboard to the
outside of the turn (opposite your desired direc-
tion) and lean your upper body into the turn. Use
the throttle to maintain an even speed through the
turn. This maneuver will let the wheel on the inside
of the turn slip slightly, allowing the ATV to make
the turn properly.
This procedure should be practiced at slow speed
many times in a large unpaved area with no obsta-
cles. If an incorrect technique is used, your ATV may continue to go straight. If the ATV doesn’t
turn, come to a stop and then practice the proce-
dure again. If the riding surface is slippery or
loose, it may help to position more of your weight
over the front wheels by moving forward on the
seat.
Once you have learned this technique, you should
be able to perform it at higher speeds or in tighter
curves.
Improper riding procedures such as abrupt throt-
tle changes, excessive braking, incorrect body
movements, or too much speed for the sharpness
of the turn may cause the ATV to tip. If the ATV be-
gins to tip over to the outside while negotiating a
turn, lean more to the inside. It may also be nec-
essary to gradually let off on the throttle and steer
to the outside of the turn to avoid tipping over.
Remember: Avoid higher speeds until you are
thoroughly familiar with the operation of your ATV.
CLIMBING UPHILL
WARNING
EWB01672Climbing hills improperly can cause overturns
or loss of control. Use proper riding techniques
described in this Owner’s Manual.
1. Lean towards inside of turn.
2. Support your weight on the outer footboard.UBB560E0.book Page 13 Friday, March 10, 2017 10:20 AM
Page 76 of 162
7-16
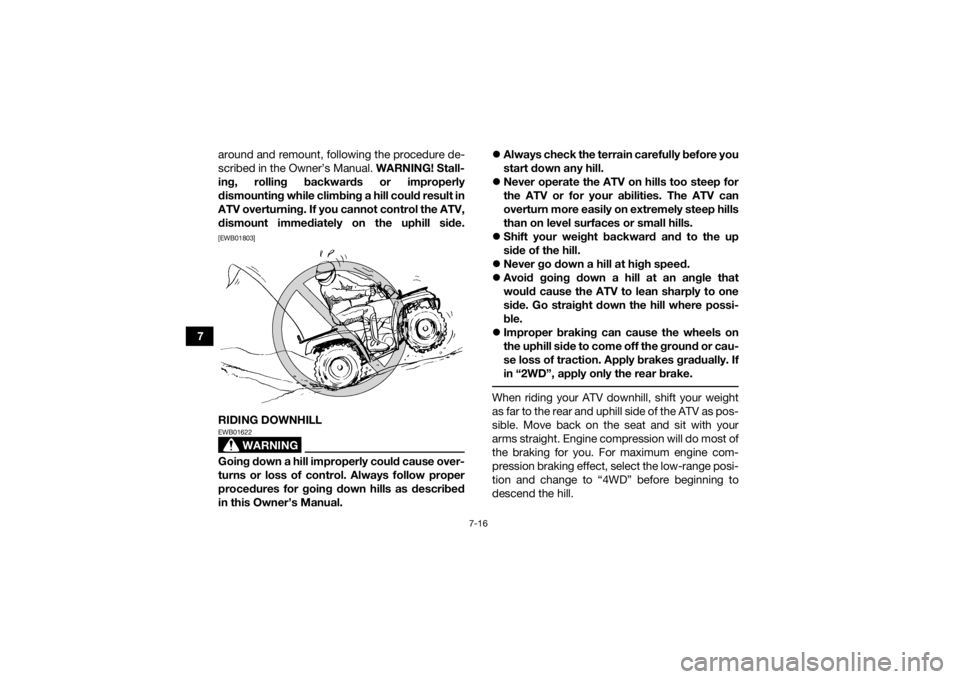
7around and remount, following the procedure de-
scribed in the Owner’s Manual. WARNING! Stall-
ing, rolling backwards or improperly
dismounting while climbing a hill could result in
ATV overturning. If you cannot control the ATV,
dismount immediately on the uphill side.
[EWB01803]RIDING DOWNHILL
WARNING
EWB01622Going down a hill improperly could cause over-
turns or loss of control. Always follow proper
procedures for going down hills as described
in this Owner’s Manual.
Always check the terrain carefully before you
start down any hill.
Never operate the ATV on hills too steep for
the ATV or for your abilities. The ATV can
overturn more easily on extremely steep hills
than on level surfaces or small hills.
Shift your weight backward and to the up
side of the hill.
Never go down a hill at high speed.
Avoid going down a hill at an angle that
would cause the ATV to lean sharply to one
side. Go straight down the hill where possi-
ble.
Improper braking can cause the wheels on
the uphill side to come off the ground or cau-
se loss of traction. Apply brakes gradually. If
in “2WD”, apply only the rear brake.
When riding your ATV downhill, shift your weight
as far to the rear and uphill side of the ATV as pos-
sible. Move back on the seat and sit with your
arms straight. Engine compression will do most of
the braking for you. For maximum engine com-
pression braking effect, select the low-range posi-
tion and change to “4WD” before beginning to
descend the hill.
UBB560E0.book Page 16 Friday, March 10, 2017 10:20 AM
Page 85 of 162
8-2
8
For odometer or hour meter-equipped vehicles,
follow the month maintenance interval if the ATV
isn’t ridden for the stated mileage or engine op-
erating hours.
Items marked with an asterisk should be per-
formed by a Yamaha dealer as they require spe-
cial tools, data and technical skills.
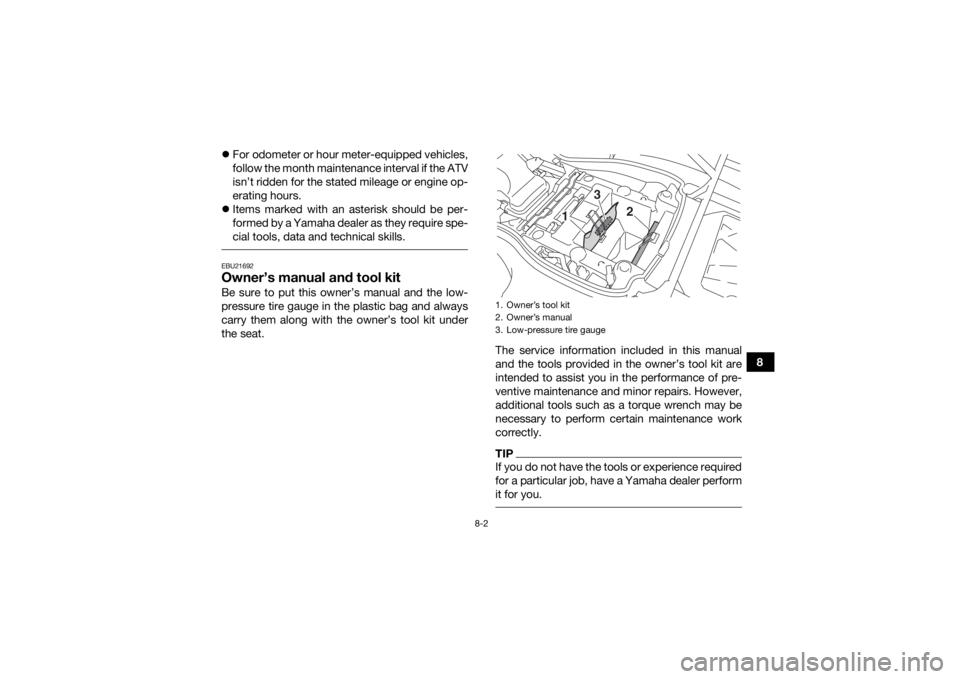
EBU21692Owner’s manual and tool kitBe sure to put this owner’s manual and the low-
pressure tire gauge in the plastic bag and always
carry them along with the owner’s tool kit under
the seat.
The service information included in this manual
and the tools provided in the owner’s tool kit are
intended to assist you in the performance of pre-
ventive maintenance and minor repairs. However,
additional tools such as a torque wrench may be
necessary to perform certain maintenance work
correctly.
TIPIf you do not have the tools or experience required
for a particular job, have a Yamaha dealer perform
it for you. 1. Owner’s tool kit
2. Owner’s manual
3. Low-pressure tire gauge
13
2
UBB560E0.book Page 2 Friday, March 10, 2017 10:20 AM
Page 92 of 162
![YAMAHA KODIAK 450 2018 Owners Manual 8-9
8
EBU27605Panel A
When removing or installing panel A, the fuel tank
cap must be removed. NOTICE: Make sure that
no foreign material enters the fuel tank.
[ECB01052]
To remove the panel1. Remove YAMAHA KODIAK 450 2018 Owners Manual 8-9
8
EBU27605Panel A
When removing or installing panel A, the fuel tank
cap must be removed. NOTICE: Make sure that
no foreign material enters the fuel tank.
[ECB01052]
To remove the panel1. Remove](/img/51/50544/w960_50544-91.png)
8-9
8
EBU27605Panel A
When removing or installing panel A, the fuel tank
cap must be removed. NOTICE: Make sure that
no foreign material enters the fuel tank.
[ECB01052]
To remove the panel1. Remove the seat. (See page 4-13.)
2. Remove the bolts and quick fasteners.
3. Remove the fuel tank cap, and then pull thepanel off.1. Bolt
1
1. Quick fastener
1. Fuel tank cap
1
1
1
UBB560E0.book Page 9 Friday, March 10, 2017 10:20 AM