coolant YAMAHA MT-03 2018 Owners Manual
[x] Cancel search | Manufacturer: YAMAHA, Model Year: 2018, Model line: MT-03, Model: YAMAHA MT-03 2018Pages: 96, PDF Size: 5.84 MB
Page 5 of 96

Table of contents
Safety information ............................1-1
Description ........................................2-1
Left view ..........................................2-1
Right view........................................2-2
Controls and instruments ................2-3
Instrument an d control functions ....3-1
Main switch/steering lock ...............3-1
Indicator lights and warning lights...............................3-2
Multi-function meter unit .................3-4
Handlebar switches.......................3-11
Clutch lever ...................................3-12
Shift pedal .....................................3-13
Brake lever ....................................3-13
Brake pedal ...................................3-14
ABS ...............................................3-14
Fuel tank cap.................................3-15
Fuel................................................3-16
Fuel tank overflow hose ................3-17
Catalytic converter ........................3-18
Seats .............................................3-18
Helmet holders ..............................3-20
Storage compartment ...................3-21
Adjusting the shock absorber assembly ....................3-21
Luggage strap holders ..................3-22
Sidestand ......................................3-23
Ignition circuit cut-off system........3-23
For your safety – pre-
operation checks ..............................4-1
Operation an d important
ri din g points ......................................5-1
Starting the engine ..........................5-2
Shifting ............................................5-3
Engine break-in ...............................5-4
Parking ............................................5-4
Perio dic maintenance
an d a djustment .................................6-1
Owner’s tool kit ...............................6-2
Periodic maintenance chart for the emission control system ........6-3 General maintenance
and lubrication chart.................... 6-4
Checking the spark plugs ............... 6-7
Canister........................................... 6-8
Engine oil and oil filter cartridge ..... 6-8
Coolant ......................................... 6-11
Replacing the air filter element and cleaning the check hose..... 6-13
Checking the throttle grip free play.............................. 6-14
Valve clearance ............................. 6-15
Tires .............................................. 6-15
Cast wheels .................................. 6-17
Adjusting the clutch
lever free play ............................ 6-18
Checking the brake lever free play ............................ 6-19
Brake light switches ...................... 6-19
Checking the front and rear brake pads ......................... 6-20
Checking the brake fluid level....... 6-21
Changing the brake fluid............... 6-22
Drive chain slack ........................... 6-22
Cleaning and lubricating the drive chain ........................... 6-24
Checking and lubricating
the cables .................................. 6-24
Checking and lubricating the throttle grip and cable ......... 6-25
Checking and lubricating the brake and shift pedals ............... 6-25
Checking and lubricating the
brake and clutch levers ............. 6-26
Checking and lubricating the sidestand ............................. 6-26
Lubricating the swingarm pivots ........................ 6-27
Checking the front fork ................. 6-27
Checking the steering ................... 6-28
Checking the wheel bearings ....... 6-28
Battery .......................................... 6-29
Replacing the fuses ...................... 6-30
Replacing the headlight bulb ........ 6-32
Auxiliary light ................................. 6-33
Tail/brake light .............................. 6-33
UB9AE0E0.book Page 1 Thursday, March 23, 2017 2:48 PM
Page 12 of 96

Description
2-1
2
EAU63371
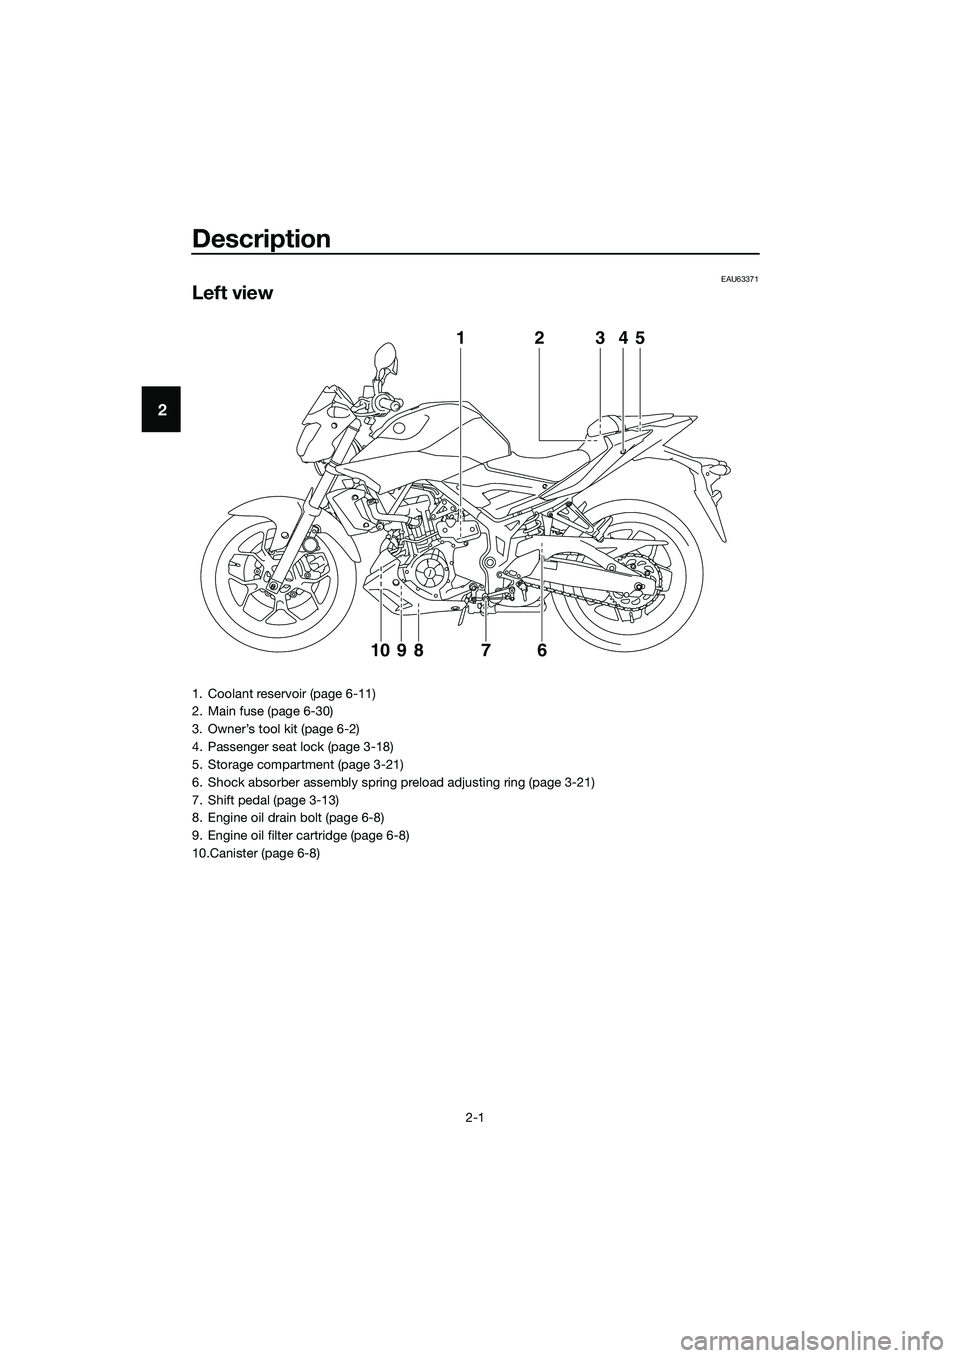
Left view
12345
761098
1. Coolant reservoir (page 6-11)
2. Main fuse (page 6-30)
3. Owner’s tool kit (page 6-2)
4. Passenger seat lock (page 3-18)
5. Storage compartment (page 3-21)
6. Shock absorber assembly spring preload adjusting ring (page 3-21)
7. Shift pedal (page 3-13)
8. Engine oil drain bolt (page 6-8)
9. Engine oil filter cartridge (page 6-8)
10.Canister (page 6-8)
UB9AE0E0.book Page 1 Thursday, March 23, 2017 2:48 PM
Page 18 of 96

Instrument and control functions
3-4
3 b
rakin g. Have a Yamaha dealer
check the brake system an d electri-
cal circuits as soon as possi ble.
TIP
If the start switch is pushed while the
engine is running, the ABS warning
light will come on, but this is not a mal-
function.
EAU62470Shift timin g in dicator li ght
This indicator light can be set to come
on and go off at the desired engine
speeds and is used to inform the rider
when it is time to shift to the next high-
er gear. (See page 3-9 for a more de-
tailed explanation of this indicator light
and on how to set it.)
The electrical circuit of the indicator
light can be checked by turning the key
to “ ”. The indicator light should
come on for a few seconds, and then
go off.
If the indicator light does not come on
initially when the key is turned to “ ”,
or if the indicator light remains on, have
a Yamaha dealer check the electrical
circuit.
EAUN1470
Multi-function meter unit
WARNING
EWA12423
Be sure to stop the vehicle before
makin g any settin g chan ges to the
multi-function meter unit. Chang ing
settin gs while ri din g can d istract the
operator an d increase the risk of an
acci dent.
The multi-function meter unit is
equipped with the following:
�z a speedometer
�z a tachometer
�z a clock
�z a fuel meter
�z a coolant temperature meter
�z a transmission gear display
�z a multi-function display
�z a shift timing indicator light
1. “SEL” button
2. “RES” button
3. Tachometer
4. Fuel meter
5. Shift timing indicator light
6. Clock
7. Transmission gear display
8. Speedometer
9. Multi-function display
10.Coolant temperature meter
1091 3
246578
km/hkm/L
L/100kmMPH
mileMPG
UB9AE0E0.book Page 4 Thursday, March 23, 2017 2:48 PM
Page 20 of 96

Instrument and control functions
3-6
3 The fuel meter indicates the amount of
fuel in the fuel tank.
When the key is turned to “ ”, the dis-
play segments of the fuel meter will
sweep once across the fuel level range
and then return to the current amount
in order to test the electrical circuit.
The display segments of the fuel meter
disappear from “F” (full) towards “E”
(empty) as the fuel level decreases.
When the last segment starts flashing,
refuel as soon as possible.
TIP
If a problem is detected in the fuel me-
ter electrical circuit, the fuel meter will
flash repeatedly.
Coolant temperature meter
The coolant temperature meter indi-
cates the temperature of the coolant.
When the key is turned to “ ”, the dis-
play segments of the digital coolant
temperature meter will sweep once
across the temperature range and then
return to “C” in order to test the electri-
cal circuit.
If the last segment on the right flashes,
stop the vehicle, then stop the engine,
and let the engine cool. (See page
6-38.)
NOTICE
ECA10022
Do not continue to operate the en-
g
ine if it is overheatin g.
TIP
The coolant temperature varies with
changes in the weather and engine
load.
Transmission gear display
This display shows the selected gear.
The neutral position is indicated by “ ”
and by the neutral indicator light.
Multi-function display
The multi-function display is equipped
with the following: �z an odometer
1. Coolant temperature meter
1
1. Neutral indicator light “ ”
2. Transmission gear display
1. Multi-function display
12
MPH
km/h
km
1
UB9AE0E0.book Page 6 Thursday, March 23, 2017 2:48 PM
Page 39 of 96

For your safety – pre-operation checks
4-1
4
EAU63440
Inspect your vehicle each time you use it to make sure the vehicle is in safe oper-
ating condition. Always follow the inspection and maintenance procedures and
schedules described in the Owner’s Manual.
WARNING
EWA11152
Failure to inspect or maintain the vehicle properly increases the possibility
of an acci dent or equipment d amage. Do not operate the vehicle if you fin d
any prob lem. If a pro blem cannot be corrected b y the proce dures provi ded
in this manual, have the vehicle inspecte d b y a Yamaha d ealer.
Before using this vehicle, check the following points:
ITEM CHECKSPAGE
Fuel • Check fuel level in fuel tank.
• Refuel if necessary.
• Check fuel line for leakage.
• Check fuel tank breather hose and overflow hose for
obstructions, cracks or damage, and check hose con-
nections. 3-16,
3-17
En gine oil • Check oil level in engine.
• If necessary, add recommended oil to specified level.
• Check vehicle for oil leakage. 6-8
Coolant • Check coolant level in reservoir.
• If necessary, add recommended coolant to specified
level.
• Check cooling system for leakage. 6-11
Front brake • Check operation.
• If soft or spongy, have Yamaha dealer bleed hydraulic
system.
• Check brake pads for wear.
• Replace if necessary.
• Check fluid level in reservoir.
• If necessary, add specified brake fluid to specified level.
• Check hydraulic system for leakage. 6-20,
6-21
Rear brake • Check operation.
• If soft or spongy, have Yamaha dealer bleed hydraulic
system.
• Check brake pads for wear.
• Replace if necessary.
• Check fluid level in reservoir.
• If necessary, add specified brake fluid to specified level.
• Check hydraulic system for leakage. 6-20,
6-21
Clutch • Check operation.
• Lubricate cable if necessary.
• Check lever free play.
• Adjust if necessary. 6-18
UB9AE0E0.book Page 1 Thursday, March 23, 2017 2:48 PM
Page 49 of 96

Periodic maintenance an d a djustment
6-5
6
14 *Steerin g b earin gs • Check bearing assemblies for
looseness. √√ √
• Moderately repack with lithium- soap-based grease. √√
15 *Chassis fasteners • Make sure that all nuts, bolts
and screws are properly tight-
ened. √√√√√
16 Brake lever pivot
shaft • Lubricate with silicone grease.
√√√√√
17 Brake ped
al pivot
shaft • Lubricate with lithium-soap-
based grease. √√√√√
18 Clutch lever pivot
shaft • Lubricate with lithium-soap-
based grease. √√√√√
19 Shift pe
dal pivot
shaft • Lubricate with lithium-soap-
based grease. √√√√√
20 Si destan d • Check operation.
• Lubricate with lithium-soap-
based grease. √√√√√
21 *Sidestan d switch • Check operation and replace if
necessary. √√√√√√
22 *Front fork • Check operation and for oil
leakage.
• Replace if necessary. √√√√
23 *Shock a
bsor ber
assem bly • Check operation and for oil
leakage.
• Replace if necessary. √√√√
24 En gine oil • Change (warm engine before
draining).
• Check oil level and vehicle for oil leakage. At the initial interval and
when the oil change indi-
cator flashes or comes on [every 5000km (3000 mi)]. √
25 En
gin
e oil filter
cartri dge • Replace.
√√√
26 *Coolin g system • Check coolant level and vehicle
for coolant leakage. √√√√√
• Change. Every 3 years
27 *Front an
d rear
b rake switches • Check operation.
√√√√√√
NO. ITEM
X 1000 km
CHECK OR
MAINTENANCE JOB
X 1000 mi
ODOMETER READINGS
ANNUAL CHECK
110203040
0.66121824
UB9AE0E0.book Page 5 Thursday, March 23, 2017 2:48 PM
Page 55 of 96

Periodic maintenance an d a djustment
6-11
6
a
ddition, do not use oils la bele d
“ENERGY CONSERVING II” or
hi gher.
�z Make sure that no forei gn mate-
rial enters the crankcase.
11. Install the cowling by installing the bolts.
12. Start the engine, and then let it idle for several minutes while checking
it for oil leakage. If oil is leaking,
immediately turn the engine off
and check for the cause.
TIP
After the engine is started, the engine
oil pressure warning light should go off.
NOTICE
ECA20860
If the oil pressure warnin g li ght flick-
ers or remains on even if the oil level
is correct, imme diately turn the en-
g ine off an d have a Yamaha dealer
check the vehicle.
13. Turn the engine off, wait a few minutes until the oil settles, and
then check the oil level and cor-
rect it if necessary.
EAU20071
Coolant
The coolant level should be checked
before each ride. In addition, the cool-
ant must be changed at the intervals
specified in the periodic maintenance
and lubrication chart.
EAU38176To check the coolant level1. Place the vehicle on a level sur- face and hold it in an upright posi-
tion.
TIP
�zThe coolant level must be
checked on a cold engine since
the level varies with engine tem-
perature.
�z Make sure that the vehicle is posi-
tioned straight up when checking
the coolant level. A slight tilt to the
side can result in a false reading.
2. Check the coolant level in the
coolant reservoir.
TIP
The coolant should be between the
minimum and maximum level marks.
1. Maximum level mark
2. Minimum level mark
3. Coolant reservoir
1
2
3
UB9AE0E0.book Page 11 Thursday, March 23, 2017 2:48 PM
Page 56 of 96

Periodic maintenance an d a djustment
6-12
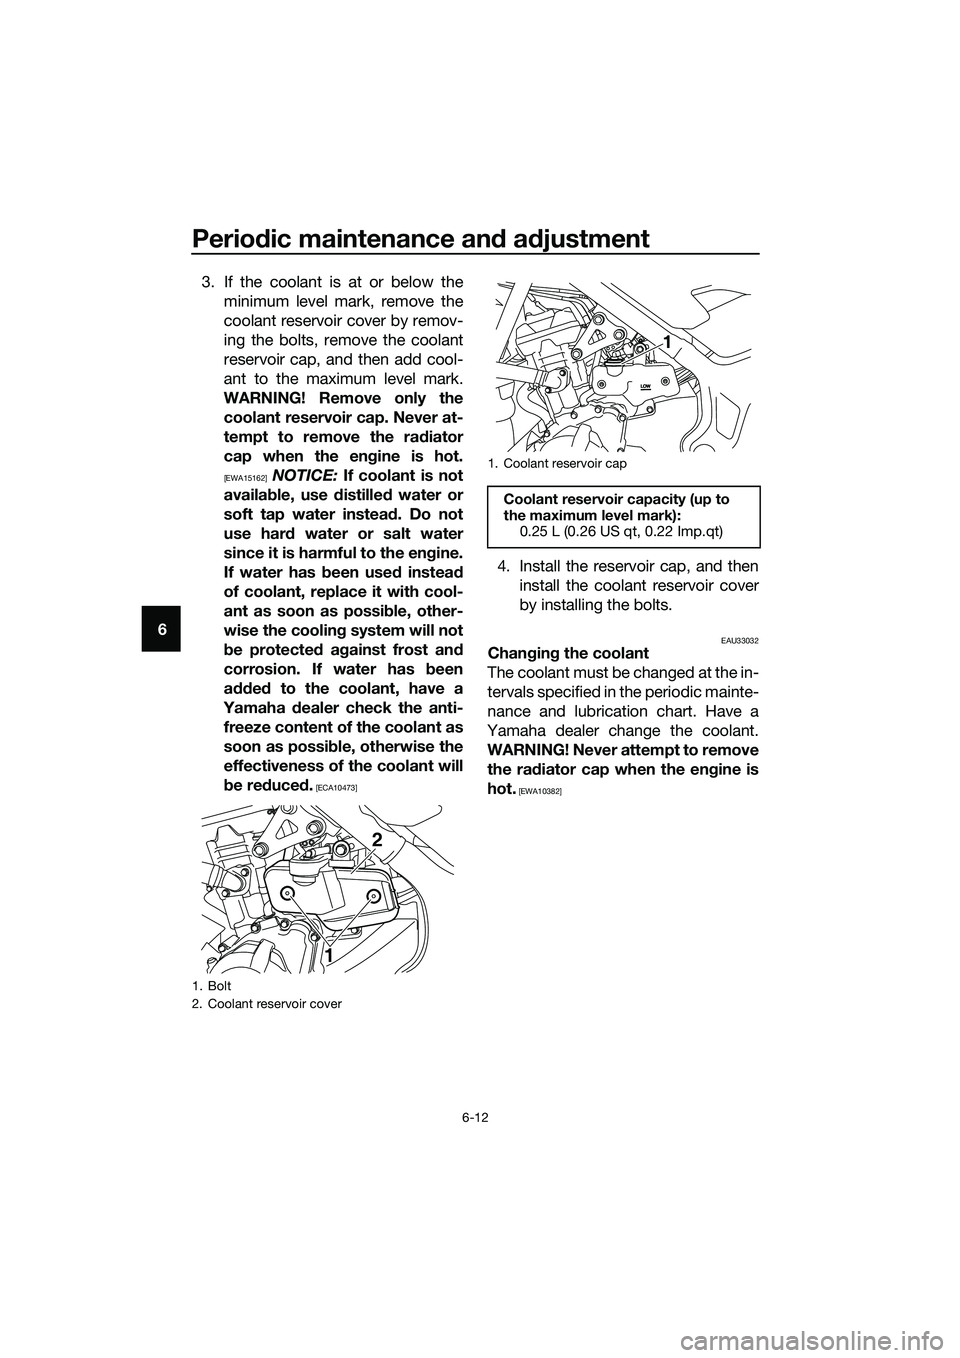
6 3. If the coolant is at or below the
minimum level mark, remove the
coolant reservoir cover by remov-
ing the bolts, remove the coolant
reservoir cap, and then add cool-
ant to the maximum level mark.
WARNING! Remove only the coolant reservoir cap. Never at-
tempt to remove the ra diator
cap when the en gine is hot.
[EWA15162] NOTICE: If coolant is not
availa ble, use d istilled water or
soft tap water instea d. Do not
use har d water or salt water
since it is harmful to the en gine.
If water has been used instead
of coolant, replace it with cool-
ant as soon as possi ble, other-
wise the coolin g system will not
b e protecte d a gainst frost an d
corrosion. If water has been
a dde d to the coolant, have a
Yamaha dealer check the anti-
freeze content of the coolant as
soon as possi ble, otherwise the
effectiveness of the coolant will
b e re duce d.
[ECA10473]
4. Install the reservoir cap, and then
install the coolant reservoir cover
by installing the bolts.
EAU33032Chan gin g the coolant
The coolant must be changed at the in-
tervals specified in the periodic mainte-
nance and lubrication chart. Have a
Yamaha dealer change the coolant.
WARNING! Never attempt to remove the ra diator cap when the en gine is
hot.
[EWA10382]
1. Bolt
2. Coolant reservoir cover
2
1
1. Coolant reservoir cap
Coolant reservoir capacity (up to
the maximum level mark): 0.25 L (0.26 US qt, 0.22 Imp.qt)
1
UB9AE0E0.book Page 12 Thursday, March 23, 2017 2:48 PM
Page 82 of 96

Periodic maintenance an d a djustment
6-38
6 En
gine overheatin g
WARNING
EWAT1041
�zDo not remove the ra diator cap when the en gine an d ra diator are hot.
Scal din g hot flui d an d steam may b e blown out un der pressure, which
coul d cause serious injury. Be sure to wait until the eng ine has cooled.
�z Place a thick ra g, like a towel, over the ra diator cap, an d then slowly ro-
tate the cap counterclockwise to the detent to allow any resi dual pres-
sure to escape. When the hissin g soun d has stopped , press down on the
cap while turnin g it counterclockwise, an d then remove the cap.
TIP
If coolant is not available, tap water can be temporarily used instead, provided
that it is changed to the recommended coolant as soon as possible.
Wait until the engine
has cooled.
Check the coolant
level in the reservoir
and radiator.Add coolant.
(See TIP.)
The coolant level is
OK.
There is no leakage.
There is leakage.
The coolant level is
low.
Check the cooling
system for leakage.
Have a Yamaha
dealer check and
repair the cooling
system.
Start the engine. If the engine overheats again,
have a Yamaha dealer check and repair the cooling
system.
UB9AE0E0.book Page 38 Thursday, March 23, 2017 2:48 PM
Page 88 of 96

Specifications
8-1
8
Dimensions:
Overall length:2090 mm (82.3 in)
Overall width:
745 mm (29.3 in)
Overall height: 1135 mm (44.7 in)
Seat height: 780 mm (30.7 in)
Wheelbase:
1380 mm (54.3 in)
Ground clearance: 160 mm (6.30 in)
Minimum turning radius: 2.7 m (8.86 ft)
Wei ght:
Curb weight:
169 kg (373 lb)
Engine:
Combustion cycle:
4-stroke
Cooling system:
Liquid cooled
Valve train: DOHC
Cylinder arrangement: Inline
Number of cylinders:
2-cylinder
Displacement: 321 cm³
Bore × stroke:
68.0 × 44.1 mm (2.68 × 1.74 in)
Compression ratio:
11.2 : 1
Starting system: Electric starter
Lubrication system: Wet sump
Engine oil:
Recommended brand:
YAMALUBE
SAE viscosity grades: 10W-40
Recommended engine oil grade: API service SG type or higher, JASO
standard MA Engine oil quantity:
Oil change:
1.80 L (1.90 US qt, 1.58 Imp.qt)
With oil filter removal: 2.10 L (2.22 US qt, 1.85 Imp.qt)
Coolant quantity:
Coolant reservoir (up to the maximum level
mark):0.25 L (0.26 US qt, 0.22 Imp.qt)
Radiator (including all routes):
0.81 L (0.86 US qt, 0.72 Imp.qt)
Air filter:
Air filter element:Oil-coated paper element
Fuel:
Recommended fuel:
Regular unleaded gasoline (Gasohol [E10]
acceptable)
Fuel tank capacity:
14 L (3.7 US gal, 3.1 Imp.gal)
Fuel reserve amount: 3.0 L (0.79 US gal, 0.66 Imp.gal)
Fuel injection:
Throttle body:
ID mark: BR51 00
Spark plu g(s):
Manufacturer/model:
NGK/LMAR8A-9
Spark plug gap: 0.8–0.9 mm (0.031–0.035 in)
Clutch:
Clutch type:Wet, multiple-disc
Drivetrain:
Primary reduction ratio:
3.043 (70/23)
Final drive: Chain
Secondary reduction ratio: 3.071 (43/14)
Transmission type:
Constant mesh 6-speed
Gear ratio: 1st:
2.500 (35/14)
2nd: 1.824 (31/17)
3rd: 1.348 (31/23)
UB9AE0E0.book Page 1 Thursday, March 23, 2017 2:48 PM