lock YAMAHA MT-10 2020 Owner's Manual
[x] Cancel search | Manufacturer: YAMAHA, Model Year: 2020, Model line: MT-10, Model: YAMAHA MT-10 2020Pages: 108, PDF Size: 9.22 MB
Page 79 of 108

Periodic maintenance and adjustment7-21
1
2
3
4
5
678
9
10
11
12
EAU36505
Brake light switchesThe brake light should come on just be-
fore braking takes effect. The brake
light is activated by switches connected
to the brake lever and brake pedal.
Since the brake light switches are com-
ponents of the anti-lock brake system,
they should only be serviced by a
Yamaha dealer.
EAU22393
Checking the front and rear
brake padsThe front and rear brake pads must be
checked for wear at the intervals spec-
ified in the periodic maintenance and
lubrication chart.
EAU36891
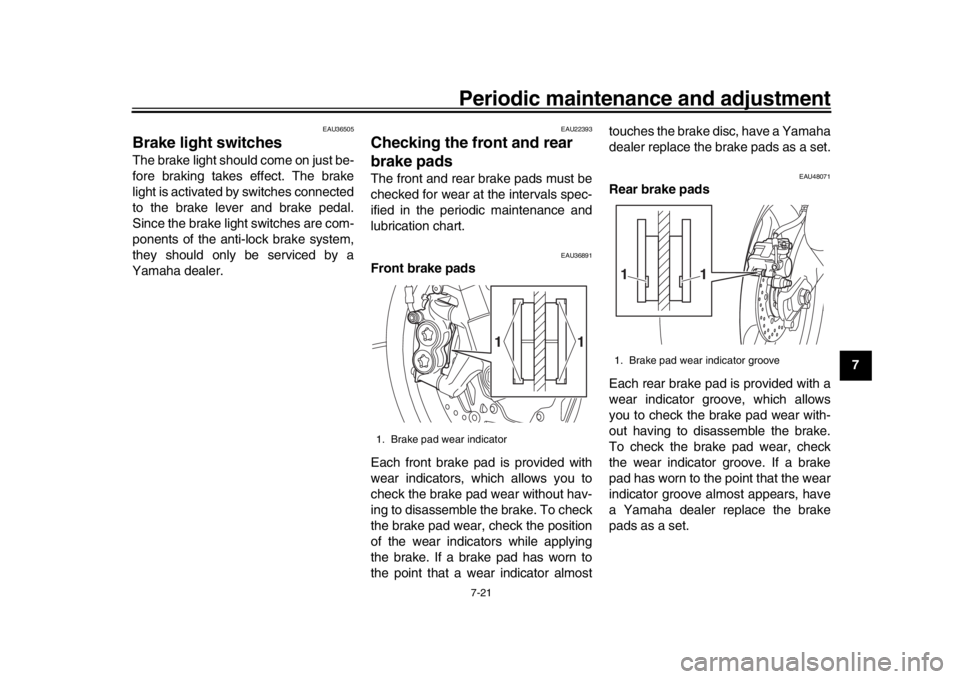
Front brake pads
Each front brake pad is provided with
wear indicators, which allows you to
check the brake pad wear without hav-
ing to disassemble the brake. To check
the brake pad wear, check the position
of the wear indicators while applying
the brake. If a brake pad has worn to
the point that a wear indicator almost touches the brake disc, have a Yamaha
dealer replace the brake pads as a set.
EAU48071
Rear brake pads
Each rear brake pad is provided with a
wear indicator groove, which allows
you to check the brake pad wear with-
out having to disassemble the brake.
To check the brake pad wear, check
the wear indicator groove. If a brake
pad has worn to the point that the wear
indicator groove almost appears, have
a Yamaha dealer replace the brake
pads as a set.
1. Brake pad wear indicator
1
1
1. Brake pad wear indicator groove
1
1
B67-9-E4.book 21 ページ 2019年7月19日 金曜日 午後4時23分
Page 80 of 108

Periodic maintenance and adjustment
7-22
1
2
3
4
5
67
8
9
10
11
12
EAU22583
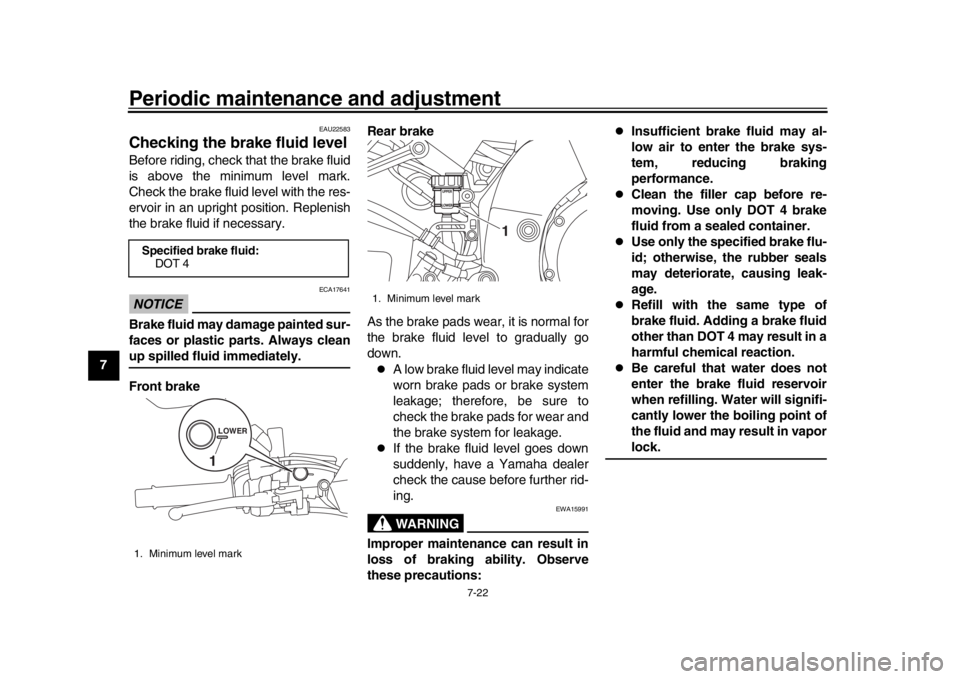
Checking the brake fluid levelBefore riding, check that the brake fluid
is above the minimum level mark.
Check the brake fluid level with the res-
ervoir in an upright position. Replenish
the brake fluid if necessary.NOTICE
ECA17641
Brake fluid may damage painted sur-
faces or plastic parts. Always cleanup spilled fluid immediately.
Front brake Rear brake
As the brake pads wear, it is normal for
the brake fluid level to gradually go
down.
A low brake fluid level may indicate
worn brake pads or brake system
leakage; therefore, be sure to
check the brake pads for wear and
the brake system for leakage.
If the brake fluid level goes down
suddenly, have a Yamaha dealer
check the cause before further rid-
ing.WARNING
EWA15991
Improper maintenance can result in
loss of braking ability. Observe
these precautions:
Insufficient brake fluid may al-
low air to enter the brake sys-
tem, reducing braking
performance.
Clean the filler cap before re-
moving. Use only DOT 4 brake
fluid from a sealed container.
Use only the specified brake flu-
id; otherwise, the rubber seals
may deteriorate, causing leak-
age.
Refill with the same type of
brake fluid. Adding a brake fluid
other than DOT 4 may result in a
harmful chemical reaction.
Be careful that water does not
enter the brake fluid reservoir
when refilling. Water will signifi-
cantly lower the boiling point of
the fluid and may result in vaporlock.
Specified brake fluid:
DOT 41. Minimum level mark
LOWER1
1. Minimum level mark
1
B67-9-E4.book 22 ページ 2019年7月19日 金曜日 午後4時23分
Page 82 of 108

Periodic maintenance and adjustment
7-24
1
2
3
4
5
67
8
9
10
11
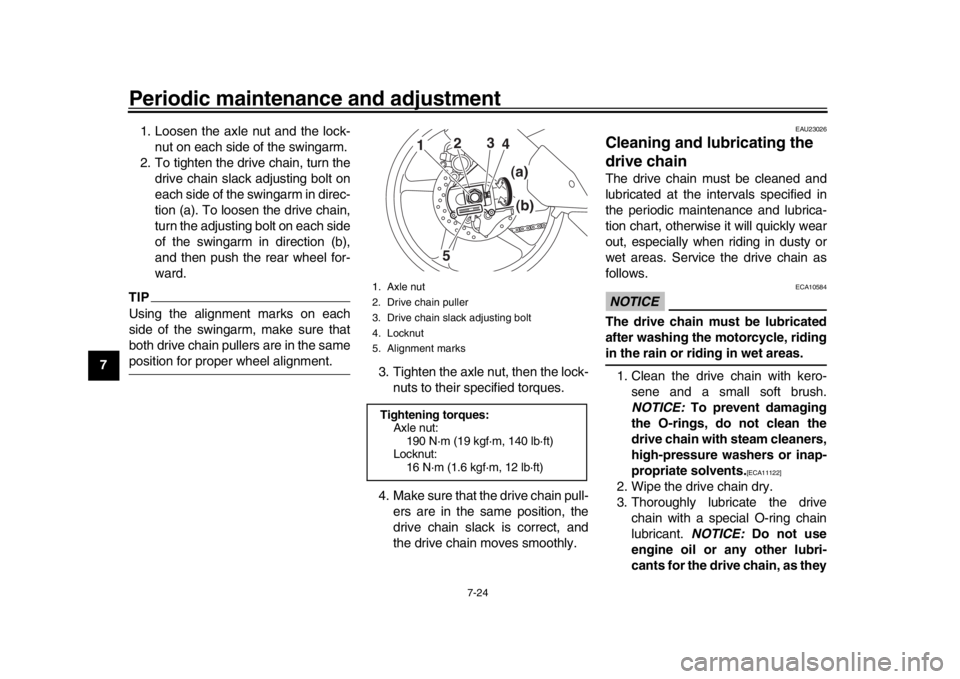
12 1. Loosen the axle nut and the lock-
nut on each side of the swingarm.
2. To tighten the drive chain, turn the drive chain slack adjusting bolt on
each side of the swingarm in direc-
tion (a). To loosen the drive chain,
turn the adjusting bolt on each side
of the swingarm in direction (b),
and then push the rear wheel for-
ward.
TIPUsing the alignment marks on each
side of the swingarm, make sure that
both drive chain pullers are in the sameposition for proper wheel alignment. 3. Tighten the axle nut, then the lock-
nuts to their specified torques.
4. Make sure that the drive chain pull- ers are in the same position, the
drive chain slack is correct, and
the drive chain moves smoothly.
EAU23026
Cleaning and lubricating the
drive chainThe drive chain must be cleaned and
lubricated at the intervals specified in
the periodic maintenance and lubrica-
tion chart, otherwise it will quickly wear
out, especially when riding in dusty or
wet areas. Service the drive chain as
follows.NOTICE
ECA10584
The drive chain must be lubricated
after washing the motorcycle, ridingin the rain or riding in wet areas.
1. Clean the drive chain with kero- sene and a small soft brush.
NOTICE: To prevent damaging
the O-rings, do not clean the
drive chain with steam cleaners,
high-pressure washers or inap-
propriate solvents.
[ECA11122]
2. Wipe the drive chain dry.
3. Thoroughly lubricate the drive chain with a special O-ring chain
lubricant. NOTICE: Do not use
engine oil or any other lubri-
cants for the drive chain, as they
1. Axle nut
2. Drive chain puller
3. Drive chain slack adjusting bolt
4. Locknut
5. Alignment marksTightening torques: Axle nut:190 N·m (19 kgf·m, 140 lb·ft)
Locknut: 16 N·m (1.6 kgf·m, 12 lb·ft)
1
2 3
45
(a)
(b)
B67-9-E4.book 24 ページ 2019年7月19日 金曜日 午後4時23分
Page 94 of 108

Periodic maintenance and adjustment
7-36
1
2
3
4
5
67
8
9
10
11
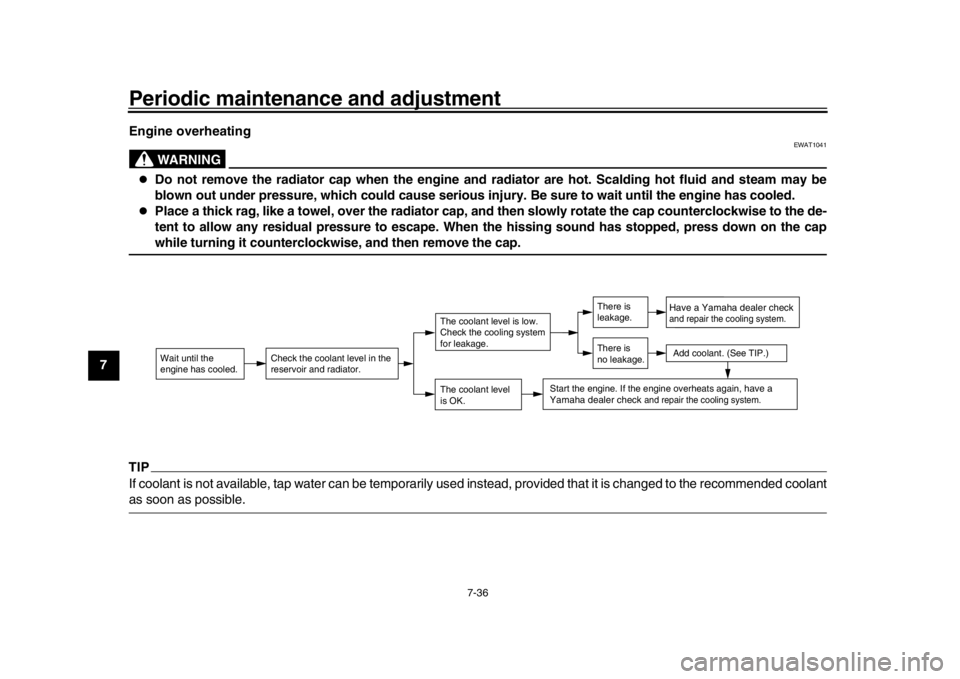
12 Engine overheating
WARNING
EWAT1041
Do not remove the radiator cap when the engine and radiator are hot. Scalding hot fluid and steam may be
blown out under pressure, which could cause serious injury. Be sure to wait until the engine has cooled.
Place a thick rag, like a towel, over the radiator cap, and then slowly rotate the cap counterclockwise to the de-
tent to allow any residual pressure to escape. When the hissing sound has stopped, press down on the capwhile turning it counterclockwise, and then remove the cap.
TIPIf coolant is not available, tap water can be temporarily us
ed instead, provided that it is changed to the recommended coolantas soon as possible.
Wait until the
engine has cooled.
Check the coolant level in the
reservoir and radiator.
The coolant level
is OK.The coolant level is low.
Check the cooling system
for leakage.
Have a Yamaha dealer checkand repair the cooling system.Add coolant. (See TIP.)
Start the engine. If the engine overheats again,
have a
Yamaha dealer check
and repair the cooling system.
There is
leakage.
There is
no leakage.
B67-9-E4.book 36 ページ 2019年7月19日 金曜日 午後4時23分
Page 105 of 108

11-1
1
2
3
4
5
6
7
8
9
101112
Index
AABS ...................................................... 4-17
ABS warning light ................................... 4-6
Air filter element.................................... 7-15
Auxiliary DC jack .................................. 4-27BBattery .................................................. 7-29
Brake and clutch levers, checking and lubricating .................................... 7-26
Brake and shift pedals, checking
and lubricating .................................... 7-26
Brake fluid, changing ............................ 7-23
Brake fluid level, checking .................... 7-22
Brake lever ........................................... 4-16
Brake lever free play, checking ............ 7-20
Brake light switches .............................. 7-21
Brake pedal .......................................... 4-17CCables, checking and lubricating .......... 7-25
Canister ................................................ 7-10
Care ........................................................ 8-1
Catalytic converter ................................ 4-21
Clutch lever........................................... 4-16
Clutch lever free play, adjusting ........... 7-19
Coolant ................................................. 7-14
Coolant temperature warning light.......... 4-6
Cruise control indicator lights ................. 4-5
Cruise control switches........................... 4-4
Cruise control system ............................. 3-1DData recording, vehicle ......................... 10-2
Diagnostic connecto r ............................ 10-2
Dimmer/Pass switch ............................... 4-3
D-mode (drive mode).............................. 3-3 Drive chain, cleaning
and lubricating .... 7-24
Drive chain slack ................................... 7-23
Drive mode switch ................................... 4-4
EEngine break-in ....................................... 6-3
Engine idling speed, checking............... 7-16
Engine oil .............................................. 7-10
Engine serial number ............................ 10-1
Engine trouble warning light .................... 4-6
EXUP system ........................................ 4-27FFront and rear brake pads, checking .... 7-21
Front fork, adjusting .............................. 4-22
Front fork, checking............................... 7-28
Fuel ....................................................... 4-19
Fuel consumption, tips for reducing ........6-3
Fuel tank cap......................................... 4-18
Fuel tank overflow hose ........................ 4-21
Fuses, replacing .................................... 7-30HHandlebar switches ................................. 4-3
Hazard switch.......................................... 4-4
High beam indicator light .........................4-5
Horn switch .............................................4-4IIdentification numbers ........................... 10-1
Ignition circuit cut-off system ................. 4-29
Immobilizer system ................................. 4-1
Immobilizer system indicator light ........... 4-7
Indicator lights and warning lights ........... 4-5LLuggage strap holders .......................... 4-27MMain switch/steering lock ........................4-2 Maintenance and lubrication, periodic .... 7-5
Maintenance, emission control
system .................................................. 7-3
Matte color, caution ................................ 8-1
Model label ........................................... 10-2
Multi-function meter unit ......................... 4-8
NNeutral indicator light .............................. 4-5OOil pressure warning light ....................... 4-5PParking.................................................... 6-4
Part locations .......................................... 2-1QQuick shift system................................... 3-6SSafety information ................................... 1-1
Seat ...................................................... 4-22
SELECT switch ....................................... 4-4
Shift indicator light .................................. 4-7
Shifting .................................................... 6-2
Shift pedal ............................................. 4-16
Shock absorber assembly, adjusting .... 4-24
Sidestand .............................................. 4-28
Sidestand, checking and lubricating ..... 7-27
Spark plugs, checking ............................. 7-9
Special features ...................................... 3-1
Specifications.......................................... 9-1
Starting the engine.................................. 6-1
Steering, checking ................................ 7-28
Steering damper warning light ................ 4-7
Stop/Run/Start switch ............................. 4-4
Storage ................................................... 8-4
Supporting the motorcycle .................... 7-34
B67-9-E4.book 1 ページ 2019年7月19日 金曜日 午後4時23分