warning YAMAHA NMAX 125 2020 User Guide
[x] Cancel search | Manufacturer: YAMAHA, Model Year: 2020, Model line: NMAX 125, Model: YAMAHA NMAX 125 2020Pages: 114, PDF Size: 10.63 MB
Page 32 of 114
Stop and Start System
4-4
4
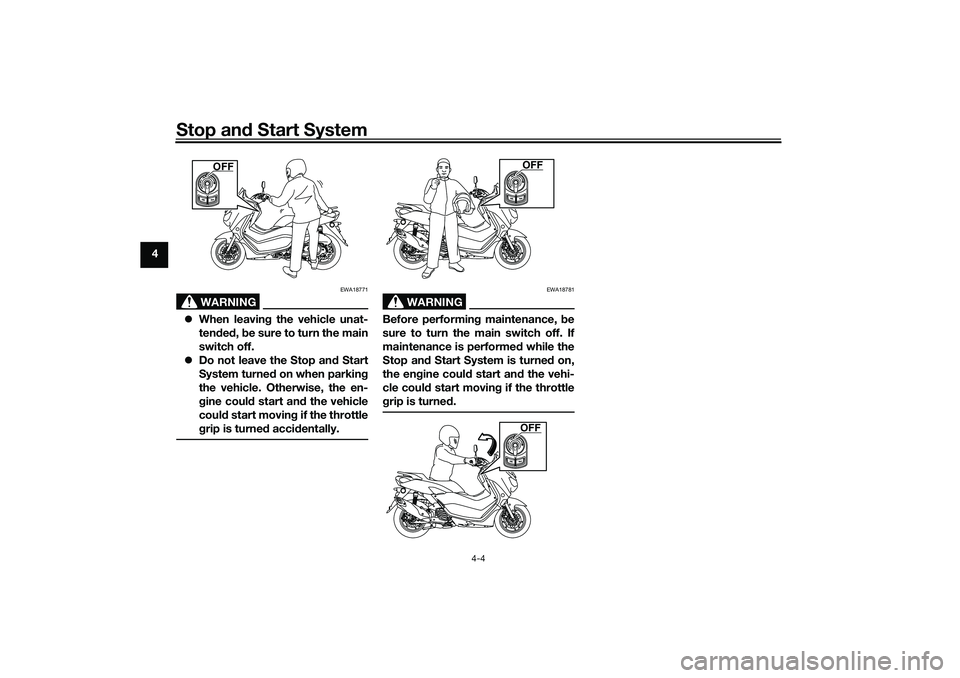
WARNING
EWA18771
When leaving the vehicle unat-
tended, be sure to turn the main
switch off.
Do not leave the Stop and Start
System turned on when parking
the vehicle. Otherwise, the en-
gine could start and the vehicle
could start moving if the throttle
grip is turned accidentally.
WARNING
EWA18781
Before performing maintenance, be
sure to turn the main switch off. If
maintenance is performed while the
Stop and Start System is turned on,
the engine could start and the vehi-
cle could start moving if the throttle
grip is turned.
OFF
OFFOFF
UBALE0E0.book Page 4 Wednesday, September 30, 2020 1:37 PM
Page 33 of 114
Special features
5-1
5
EAUN3012
CCU (Communication Control
Unit)This model is equipped with a CCU
that allows your vehicle and smart-
phone to connect using Bluetooth
wireless technology and the MyRide
App.
With this connection, notifications from
apps, incoming phone calls and
missed calls are signaled to you, and
the battery level of your smartphone is
displayed.
WARNING
EWAN0070
Always stop the vehicle before
operating your smartphone.
Never take your hands off the
handlebars while riding.
Always concentrate on riding by
keeping your eyes and mind on
the road.NOTICE
ECAN0150
The Bluetooth connection may not
work in the following situations.In a location exposed to strong
radio waves or other electro-
magnetic noise.
At facilities nearby that are
emitting strong radio waves (TV
or radio towers, power plants,
broadcasting stations, airports,
etc.).
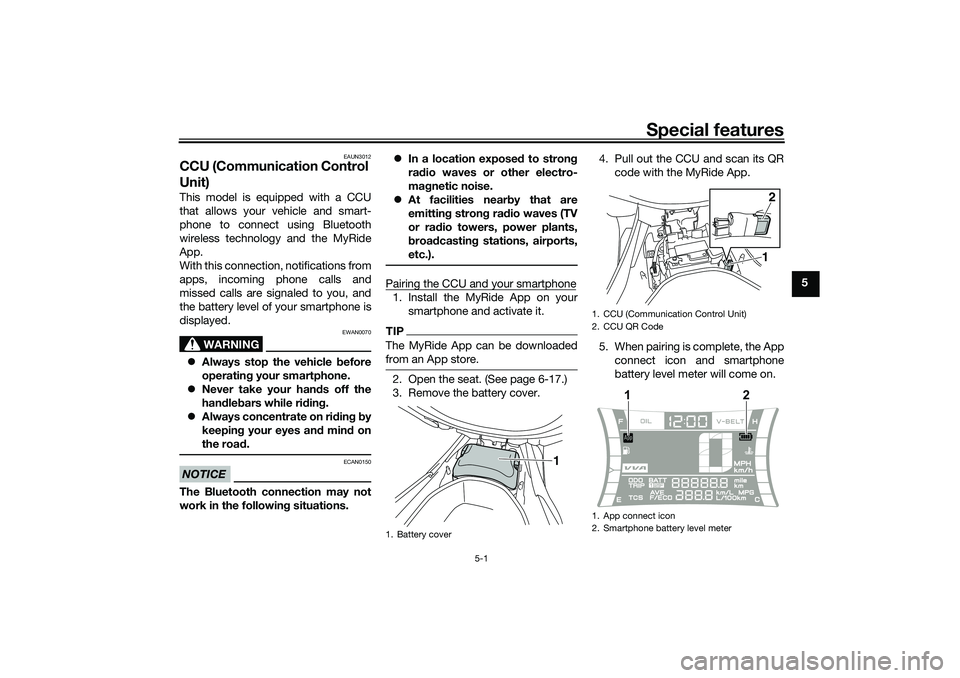
Pairing the CCU and your smartphone1. Install the MyRide App on your
smartphone and activate it.TIPThe MyRide App can be downloaded
from an App store.2. Open the seat. (See page 6-17.)
3. Remove the battery cover.4. Pull out the CCU and scan its QR
code with the MyRide App.
5. When pairing is complete, the App
connect icon and smartphone
battery level meter will come on.1. Battery cover
1
1. CCU (Communication Control Unit)
2. CCU QR Code
1. App connect icon
2. Smartphone battery level meter
12
1
2
UBALE0E0.book Page 1 Wednesday, September 30, 2020 1:37 PM
Page 35 of 114
Instrument and control functions
6-1
6
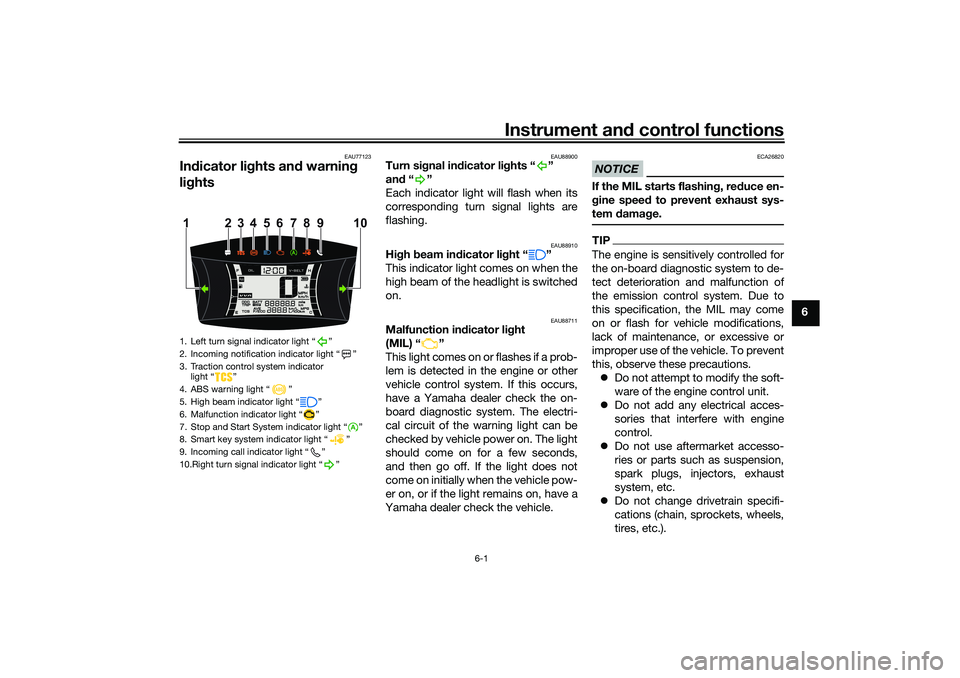
EAU77123
Indicator lights and warning
lights
EAU88900
Turn signal indicator lights “ ”
and“”
Each indicator light will flash when its
corresponding turn signal lights are
flashing.
EAU88910
High beam indicator light “ ”
This indicator light comes on when the
high beam of the headlight is switched
on.
EAU88711
Malfunction indicator light
(MIL) “ ”
This light comes on or flashes if a prob-
lem is detected in the engine or other
vehicle control system. If this occurs,
have a Yamaha dealer check the on-
board diagnostic system. The electri-
cal circuit of the warning light can be
checked by vehicle power on. The light
should come on for a few seconds,
and then go off. If the light does not
come on initially when the vehicle pow-
er on, or if the light remains on, have a
Yamaha dealer check the vehicle.
NOTICE
ECA26820
If the MIL starts flashing, reduce en-
gine speed to prevent exhaust sys-
tem damage.TIPThe engine is sensitively controlled for
the on-board diagnostic system to de-
tect deterioration and malfunction of
the emission control system. Due to
this specification, the MIL may come
on or flash for vehicle modifications,
lack of maintenance, or excessive or
improper use of the vehicle. To prevent
this, observe these precautions.
Do not attempt to modify the soft-
ware of the engine control unit.
Do not add any electrical acces-
sories that interfere with engine
control.
Do not use aftermarket accesso-
ries or parts such as suspension,
spark plugs, injectors, exhaust
system, etc.
Do not change drivetrain specifi-
cations (chain, sprockets, wheels,
tires, etc.).
1. Left turn signal indicator light “ ”
2. Incoming notification indicator light “ ”
3. Traction control system indicator
light “ ”
4. ABS warning light “ ”
5. High beam indicator light “ ”
6. Malfunction indicator light “ ”
7. Stop and Start System indicator light “ ”
8. Smart key system indicator light “ ”
9. Incoming call indicator light “ ”
10.Right turn signal indicator light “ ”
4 110
5
6
7
8
23 9
UBALE0E0.book Page 1 Wednesday, September 30, 2020 1:37 PM
Page 36 of 114
Instrument and control functions
6-2
6Do not remove or alter the O2 sen-
sor, air induction system, or ex-
haust parts (catalysts or EXUP,
etc.).
Maintain proper V-belt and drive
belt (if equipped).
Maintain correct tire pressure.
Do not operate the vehicle in an
extreme manner. For example, re-
peated or excessive opening and
closing of the throttle, racing,
burnouts, wheelies, etc.
EAU88890
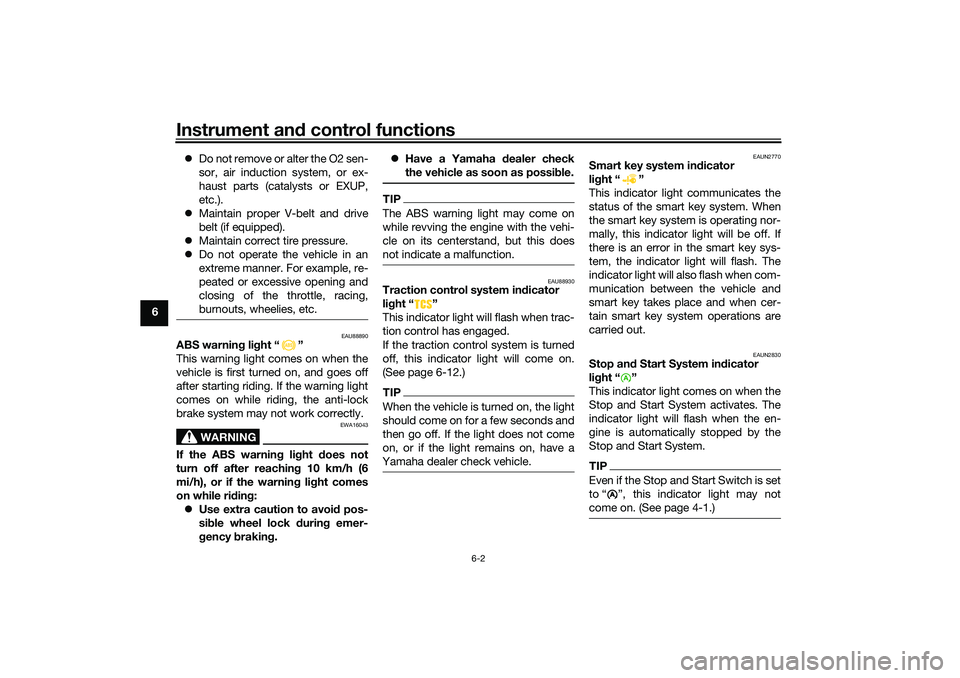
ABS warning light “ ”
This warning light comes on when the
vehicle is first turned on, and goes off
after starting riding. If the warning light
comes on while riding, the anti-lock
brake system may not work correctly.
WARNING
EWA16043
If the ABS warning light does not
turn off after reaching 10 km/h (6
mi/h), or if the warning light comes
on while riding:
Use extra caution to avoid pos-
sible wheel lock during emer-
gency braking. Have a Yamaha dealer check
the vehicle as soon as possible.
TIPThe ABS warning light may come on
while revving the engine with the vehi-
cle on its centerstand, but this does
not indicate a malfunction.
EAU88930
Traction control system indicator
light “ ”
This indicator light will flash when trac-
tion control has engaged.
If the traction control system is turned
off, this indicator light will come on.
(See page 6-12.)TIPWhen the vehicle is turned on, the light
should come on for a few seconds and
then go off. If the light does not come
on, or if the light remains on, have a
Yamaha dealer check vehicle.
EAUN2770
Smart key system indicator
light “ ”
This indicator light communicates the
status of the smart key system. When
the smart key system is operating nor-
mally, this indicator light will be off. If
there is an error in the smart key sys-
tem, the indicator light will flash. The
indicator light will also flash when com-
munication between the vehicle and
smart key takes place and when cer-
tain smart key system operations are
carried out.
EAUN2830
Stop and Start System indicator
light “ ”
This indicator light comes on when the
Stop and Start System activates. The
indicator light will flash when the en-
gine is automatically stopped by the
Stop and Start System.TIPEven if the Stop and Start Switch is set
to Ž, this indicator light may not
come on. (See page 4-1.)
A
UBALE0E0.book Page 2 Wednesday, September 30, 2020 1:37 PM
Page 37 of 114
Instrument and control functions
6-3
6
EAUN2781
Incoming call indicator light “ ”
This indicator light flashes when there
is an incoming call to the connected
smartphone. If you do not answer the
call, the indicator light stays on until
you turn the vehicle off.TIPThis function works only when the
smartphone is connected to the vehi-
cle.
EAUN2792
Incoming notification indicator
light “ ”
This indicator light flashes for 10 sec-
onds when the connected smartphone
receives an SNS, E-mail or other notifi-
cation. After that, the indicator light
stays on until you turn the vehicle off.TIPThis function works only when the
smartphone is connected to the
vehicle.
Notification setting is needed for
each application at the connected
smartphone in advance.
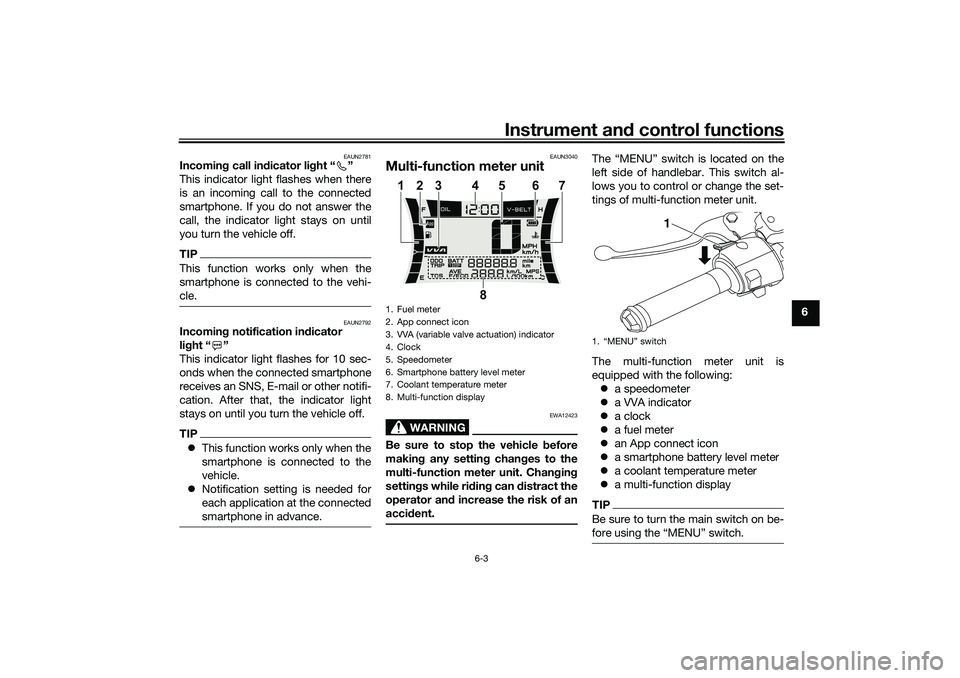
EAUN3040
Multi-function meter unit
WARNING
EWA12423
Be sure to stop the vehicle before
making any setting changes to the
multi-function meter unit. Changing
settings while riding can distract the
operator and increase the risk of an
accident.
The “MENU” switch is located on the
left side of handlebar. This switch al-
lows you to control or change the set-
tings of multi-function meter unit.
The multi-function meter unit is
equipped with the following:
a speedometer
a VVA indicator
a clock
a fuel meter
an App connect icon
a smartphone battery level meter
a coolant temperature meter
a multi-function displayTIPBe sure to turn the main switch on be-
1. Fuel meter
2. App connect icon
3. VVA (variable valve actuation) indicator
4. Clock
5. Speedometer
6. Smartphone battery level meter
7. Coolant temperature meter
8. Multi-function display
8 1345 7
6 2
1.
1
UBALE0E0.book Page 3 Wednesday, September 30, 2020 1:37 PM
Page 45 of 114
Instrument and control functions
6-11
6
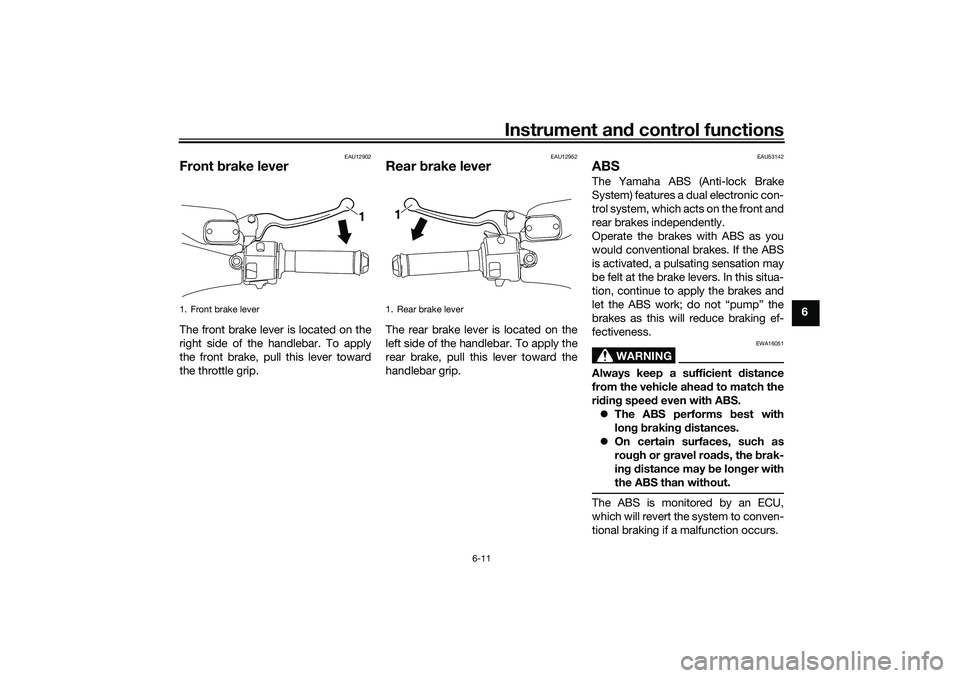
EAU12902
Front brake leverThe front brake lever is located on the
right side of the handlebar. To apply
the front brake, pull this lever toward
the throttle grip.
EAU12952
Rear brake leverThe rear brake lever is located on the
left side of the handlebar. To apply the
rear brake, pull this lever toward the
handlebar grip.
EAU53142
ABSThe Yamaha ABS (Anti-lock Brake
System) features a dual electronic con-
trol system, which acts on the front and
rear brakes independently.
Operate the brakes with ABS as you
would conventional brakes. If the ABS
is activated, a pulsating sensation may
be felt at the brake levers. In this situa-
tion, continue to apply the brakes and
let the ABS work; do not “pump” the
brakes as this will reduce braking ef-
fectiveness.
WARNING
EWA16051
Always keep a sufficient distance
from the vehicle ahead to match the
riding speed even with ABS.
The ABS performs best with
long braking distances.
On certain surfaces, such as
rough or gravel roads, the brak-
ing distance may be longer with
the ABS than without.The ABS is monitored by an ECU,
which will revert the system to conven-
tional braking if a malfunction occurs.
1. Front brake lever
1
1. Rear brake lever1
UBALE0E0.book Page 11 Wednesday, September 30, 2020 1:37 PM
Page 46 of 114
Instrument and control functions
6-12
6
TIPThe ABS performs a self-diagno-
sis test each time the vehicle first
starts off after the key is turned to
“ON” and the vehicle has traveled
at a speed of 10 km/h (6 mi/h) or
higher. During this test, a “click-
ing” noise can be heard from the
front of the vehicle, and if either
brake lever is even slightly ap-
plied, a vibration can be felt at the
lever, but these do not indicate a
malfunction.
This ABS has a test mode which
allows the owner to experience
the pulsation at the brake levers
when the ABS is operating. How-
ever, special tools are required, so
please consult your Yamaha deal-
er.NOTICE
ECA20100
Be careful not to damage the wheel
sensor or wheel sensor rotor; other-
wise, improper performance of the
ABS will result.
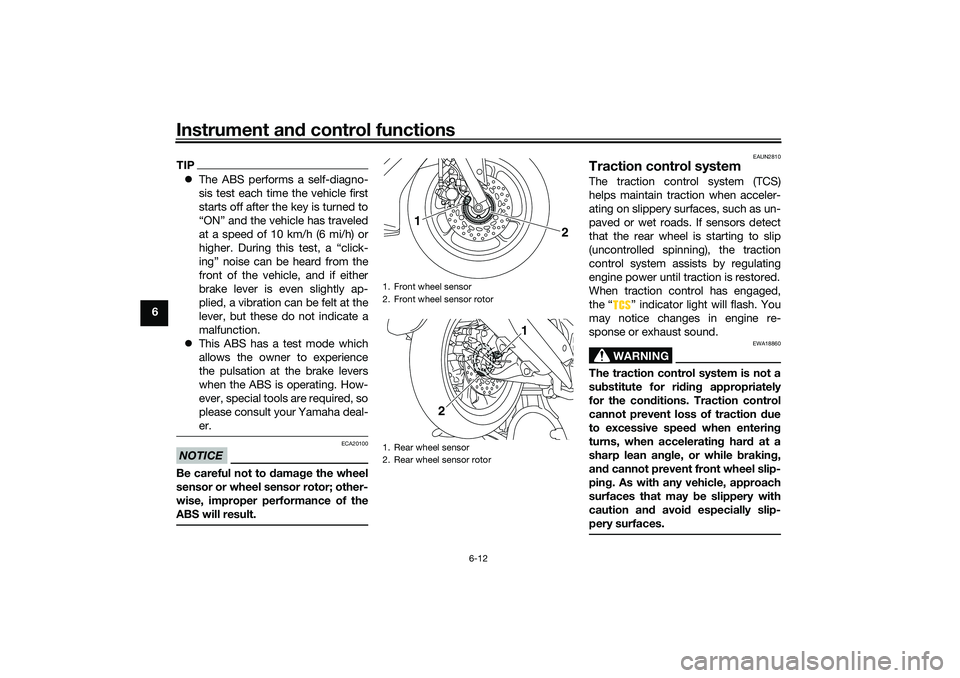
EAUN2810
Traction control systemThe traction control system (TCS)
helps maintain traction when acceler-
ating on slippery surfaces, such as un-
paved or wet roads. If sensors detect
that the rear wheel is starting to slip
(uncontrolled spinning), the traction
control system assists by regulating
engine power until traction is restored.
When traction control has engaged,
the “ ” indicator light will flash. You
may notice changes in engine re-
sponse or exhaust sound.
WARNING
EWA18860
The traction control system is not a
substitute for riding appropriately
for the conditions. Traction control
cannot prevent loss of traction due
to excessive speed when entering
turns, when accelerating hard at a
sharp lean angle, or while braking,
and cannot prevent front wheel slip-
ping. As with any vehicle, approach
surfaces that may be slippery with
caution and avoid especially slip-
pery surfaces.
1. Front wheel sensor
2. Front wheel sensor rotor
1. Rear wheel sensor
2. Rear wheel sensor rotor
2
1
1
2
UBALE0E0.book Page 12 Wednesday, September 30, 2020 1:37 PM
Page 47 of 114
Instrument and control functions
6-13
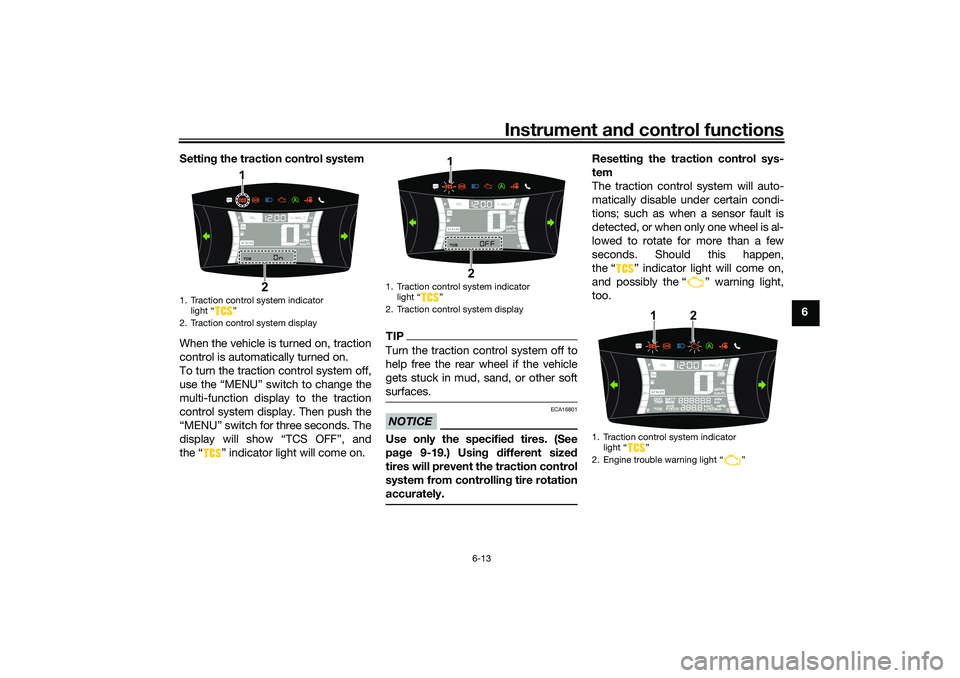
6 Setting the traction control system
When the vehicle is turned on, traction
control is automatically turned on.
To turn the traction control system off,
use the “MENU” switch to change the
multi-function display to the traction
control system display. Then push the
“MENU” switch for three seconds. The
display will show “TCS OFF”, and
the “ ” indicator light will come on.
TIPTurn the traction control system off to
help free the rear wheel if the vehicle
gets stuck in mud, sand, or other soft
surfaces.NOTICE
ECA16801
Use only the specified tires. (See
page 9-19.) Using different sized
tires will prevent the traction control
system from controlling tire rotation
accurately.
Resetting the traction control sys-
tem
The traction control system will auto-
matically disable under certain condi-
tions; such as when a sensor fault is
detected, or when only one wheel is al-
lowed to rotate for more than a few
seconds. Should this happen,
the “ ” indicator light will come on,
and possibly the “ ” warning light,
too.
1. Traction control system indicator
light “ ”
2. Traction control system display
1
2
1. Traction control system indicator
light Ž
2. Traction control system display
1
2
1. Traction control system indicator
light Ž
2. Engine trouble warning light Ž
1
2
UBALE0E0.book Page 13 Wednesday, September 30, 2020 1:37 PM
Page 48 of 114
Instrument and control functions
6-14
6
TIPWhen the vehicle is on the centerstand,
do not rev the engine for an extended
period of time. Otherwise, the traction
control system will automatically dis-
able and need to be reset.If the traction control system automat-
ically disables, try resetting it as fol-
lows.
1. Stop the vehicle and turn it off
completely.
2. Wait a few seconds and then turn
the vehicle power on.
3. The “ ” indicator light should
turn off and the system be en-
abled.TIPIf the Ž indicator light remains on
after resetting, the vehicle may still be
ridden; however, have a Yamaha deal-
er check the vehicle as soon as possi-
ble.4. Have a Yamaha dealer check the
vehicle and turn off the Ž
warning light.
EAUN2571
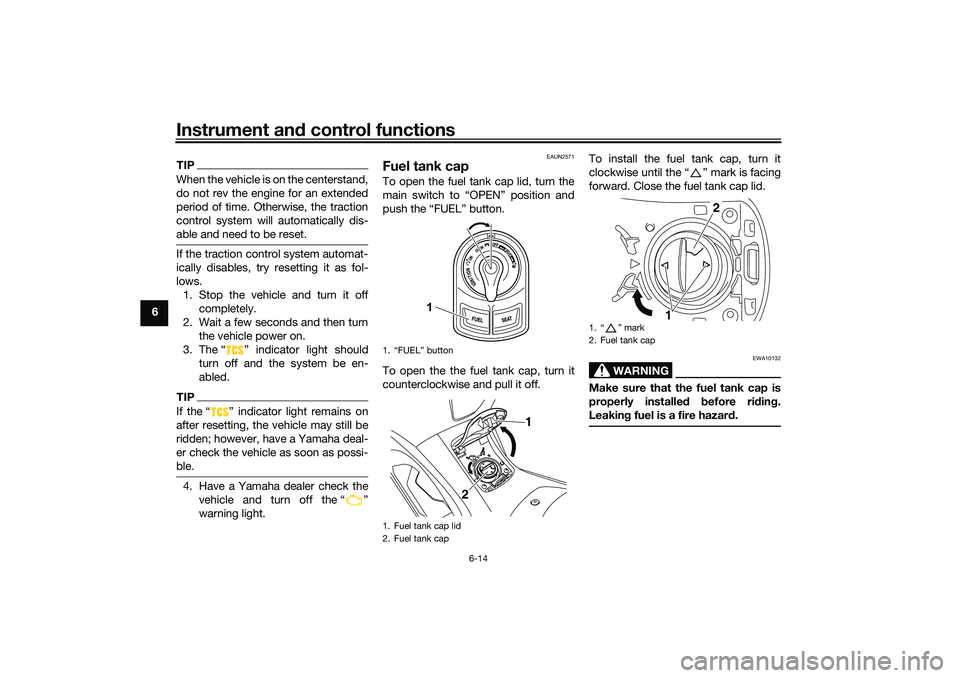
Fuel tank capTo open the fuel tank cap lid, turn the
main switch to “OPEN” position and
push the “FUEL” button.
To open the the fuel tank cap, turn it
counterclockwise and pull it off.To install the fuel tank cap, turn it
clockwise until the “ ” mark is facing
forward. Close the fuel tank cap lid.
WARNING
EWA10132
Make sure that the fuel tank cap is
properly installed before riding.
Leaking fuel is a fire hazard.
1. “FUEL” button
1. Fuel tank cap lid
2. Fuel tank cap
1
1
2
1. “ ” mark
2. Fuel tank cap
12
UBALE0E0.book Page 14 Wednesday, September 30, 2020 1:37 PM
Page 49 of 114
Instrument and control functions
6-15
6
EAU13213
FuelMake sure there is sufficient gasoline in
the tank.
WARNING
EWA10882
Gasoline and gasoline vapors are
extremely flammable. To avoid fires
and explosions and to reduce the
risk of injury when refueling, follow
these instructions.1. Before refueling, turn off the en-
gine and be sure that no one is sit-
ting on the vehicle. Never refuel
while smoking, or while in the vi-
cinity of sparks, open flames, or
other sources of ignition such as
the pilot lights of water heaters
and clothes dryers.
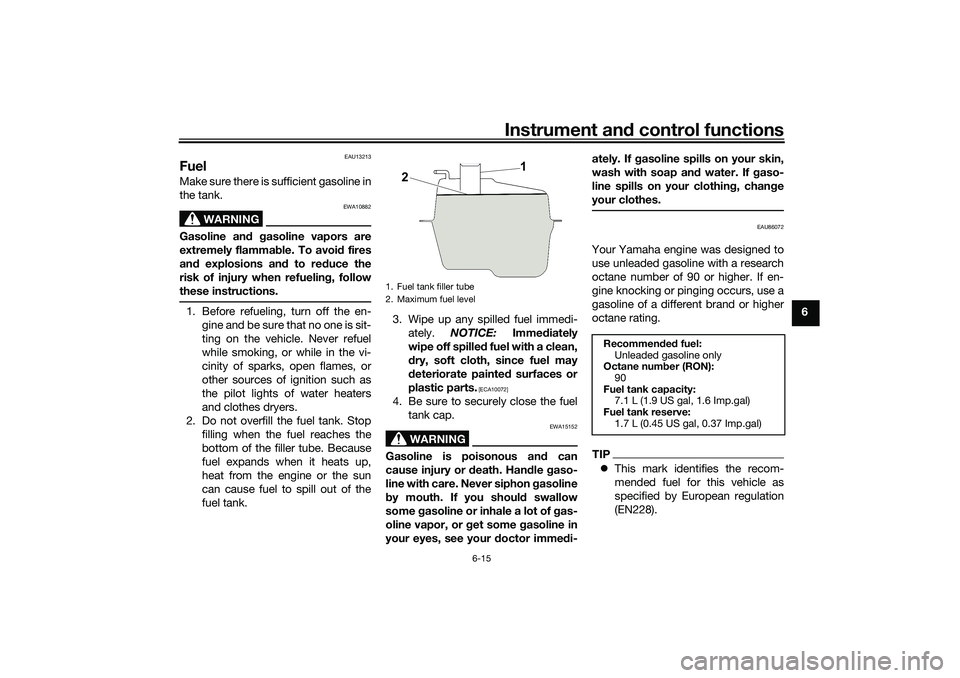
2. Do not overfill the fuel tank. Stop
filling when the fuel reaches the
bottom of the filler tube. Because
fuel expands when it heats up,
heat from the engine or the sun
can cause fuel to spill out of the
fuel tank.3. Wipe up any spilled fuel immedi-
ately. NOTICE: Immediately
wipe off spilled fuel with a clean,
dry, soft cloth, since fuel may
deteriorate painted surfaces or
plastic parts.
[ECA10072]
4. Be sure to securely close the fuel
tank cap.
WARNING
EWA15152
Gasoline is poisonous and can
cause injury or death. Handle gaso-
line with care. Never siphon gasoline
by mouth. If you should swallow
some gasoline or inhale a lot of gas-
oline vapor, or get some gasoline in
your eyes, see your doctor immedi-ately. If gasoline spills on your skin,
wash with soap and water. If gaso-
line spills on your clothing, change
your clothes.
EAU86072
Your Yamaha engine was designed to
use unleaded gasoline with a research
octane number of 90 or higher. If en-
gine knocking or pinging occurs, use a
gasoline of a different brand or higher
octane rating.TIPThis mark identifies the recom-
mended fuel for this vehicle as
specified by European regulation
(EN228).
1. Fuel tank filler tube
2. Maximum fuel level
1
2
Recommended fuel:
Unleaded gasoline only
Octane number (RON):
90
Fuel tank capacity:
7.1 L (1.9 US gal, 1.6 Imp.gal)
Fuel tank reserve:
1.7 L (0.45 US gal, 0.37 Imp.gal)
UBALE0E0.book Page 15 Wednesday, September 30, 2020 1:37 PM