display YAMAHA NMAX 155 2021 Owners Manual
[x] Cancel search | Manufacturer: YAMAHA, Model Year: 2021, Model line: NMAX 155, Model: YAMAHA NMAX 155 2021Pages: 114, PDF Size: 10.93 MB
Page 33 of 114
Special features
5-1
5
EAUN3012
CCU (Communication Control
Unit)This model is equipped with a CCU
that allows your vehicle and smart-
phone to connect using Bluetooth
wireless technology and the MyRide
App.
With this connection, notifications from
apps, incoming phone calls and
missed calls are signaled to you, and
the battery level of your smartphone is
displayed.
WARNING
EWAN0070
Always stop the vehicle before
operatin g your smartphone.
Never take your han ds off the
han dle bars while ri din g.
Always concentrate on ri din g b y
keepin g your eyes an d min d on
the roa d.NOTICE
ECAN0150
The Bluetooth connection may not
work in the followin g situations.
In a location exposed to strong
ra dio waves or other electro-
ma gnetic noise.
At facilities near by that are
emittin g stron g ra dio waves (TV
or ra dio towers, power plants,
b roa dcastin g stations, airports,
etc.).
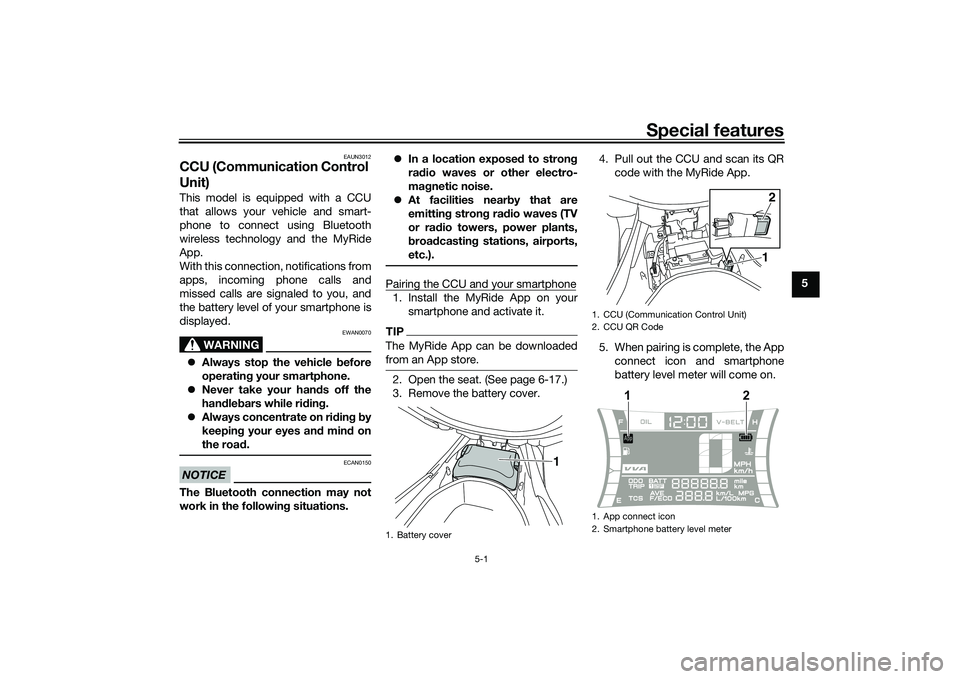
Pairing the CCU and your smartphone1. Install the MyRide App on your smartphone and activate it.TIPThe MyRide App can be downloaded
from an App store.2. Open the seat. (See page 6-17.)
3. Remove the battery cover. 4. Pull out the CCU and scan its QR
code with the MyRide App.
5. When pairing is complete, the App connect icon and smartphone
battery level meter will come on.1. Battery cover
1
1. CCU (Communication Control Unit)
2. CCU QR Code
1. App connect icon
2. Smartphone battery level meter
12
1
2
UBBDE0E0.book Page 1 Wednesday, June 2, 2021 2:57 PM
Page 37 of 114

Instrument and control functions
6-3
6
EAUN2781
Incomin g call in dicator li ght “ ”
This indicator light flashes when there
is an incoming call to the connected
smartphone. If you do not answer the
call, the indicator light stays on until
you turn the vehicle off.TIPThis function works only when the
smartphone is connected to the vehi-
cle.
EAUN2792
Incomin g notification in dicator
lig ht “ ”
This indicator light flashes for 10 sec-
onds when the connected smartphone
receives an SNS, E-mail or other notifi-
cation. After that, the indicator light
stays on until you turn the vehicle off.TIP This function works only when the
smartphone is connected to the
vehicle.
Notification setting is needed for
each application at the connected
smartphone in advance.
EAUN3040
Multi-function meter unit
WARNING
EWA12423
Be sure to stop the vehicle before
makin g any settin g chan ges to the
multi-function meter unit. Chan gin g
settin gs while ri din g can distract the
operator an d increase the risk of an
acci dent.
The “MENU” switch is located on the
left side of handlebar. This switch al-
lows you to control or change the set-
tings of multi-function meter unit.
The multi-function meter unit is
equipped with the following:
a speedometer
a VVA indicator
a clock
a fuel meter
an App connect icon
a smartphone battery level meter
a coolant temperature meter
a multi-function displayTIPBe sure to turn the main switch on be-
1. Fuel meter
2. App connect icon
3. VVA (variable valve actuation) indicator
4. Clock
5. Speedometer
6. Smartphone battery level meter
7. Coolant temperature meter
8. Multi-function display
8
1345 7
6
2
1.
1
UBBDE0E0.book Page 3 Wednesday, June 2, 2021 2:57 PM
Page 38 of 114

Instrument and control functions
6-4
6
EAUN3051
App Connect icon
This icon comes on when CCU and
smartphone is connected via MyRide
App.TIPEven if the smartphone is not connect-
ed, when the vehicle is turned on, this
icon should come on for a few sec-
onds. Otherwise have a Yamaha dealer
check the CCU and the electrical cir-
cuit.
EAUN2873
Smartphone battery level meter
This meter indicates the current battery
level of the connected smartphone.
The display segments of the meter dis-
appear from full to blank as the battery
level decreases. When approximately
10% or less of the battery remains, the
last segment starts flashing.TIPEven if the smartphone is not connect-
ed, when the vehicle is turned on, this
icon should come on for a few sec- onds. Otherwise have a Yamaha dealer
check the CCU and the electrical cir-
cuit.
EAU86820
Switchin
g the display units
The display units can be switched be-
tween kilometers and miles.
To switch the display units1. Turn the vehicle off.
2. While pushing the “MENU” switch, turn the vehicle on.
3. Continue to push the “MENU” switch until the display unit setting
screen comes on (approximately 5
seconds).
4. Push the “MENU” switch once to switch the display units.
5. Push the “MENU” switch for 1 second to confirm the setting.
EAU86831
Speed ometer
The speedometer shows the vehicle’s
traveling speed.
EAU86841
Fuel meter
The fuel meter indicates the amount of
fuel in the fuel tank. The display seg-
ments of the fuel meter disappear from
“F” (full) towards “E” (empty) as the fuel
level decreases. When approximately
1.7 L (0.45 US gal, 0.37 Imp.gal) of fuel
remains, the last segment starts flash-
ing. Refuel as soon as possible.TIPIf a problem is detected in the electrical
circuit, the fuel level segments will flash
repeatedly. If this occurs, have a
Yamaha dealer check the vehicle.1. Fuel meter1
UBBDE0E0.book Page 4 Wednesday, June 2, 2021 2:57 PM
Page 40 of 114
Instrument and control functions
6-6
6 2. While pushing the “MENU”
switch, turn the vehicle on.
3. Continue pushing the “MENU” switch. The display unit setting
screen will come on (after 5 sec-
onds), and after that (an additional
10 seconds) all segments other
than the VVA indicator will start
flashing. Now release the “MENU”
switch.
4. Push the “MENU” switch once to change the on or off setting.
5. Push the “MENU” switch for 1 second to confirm the setting.
TIPTurning the VVA indicator off does not
turn off the variable valve actuation
system.
EAUN2800
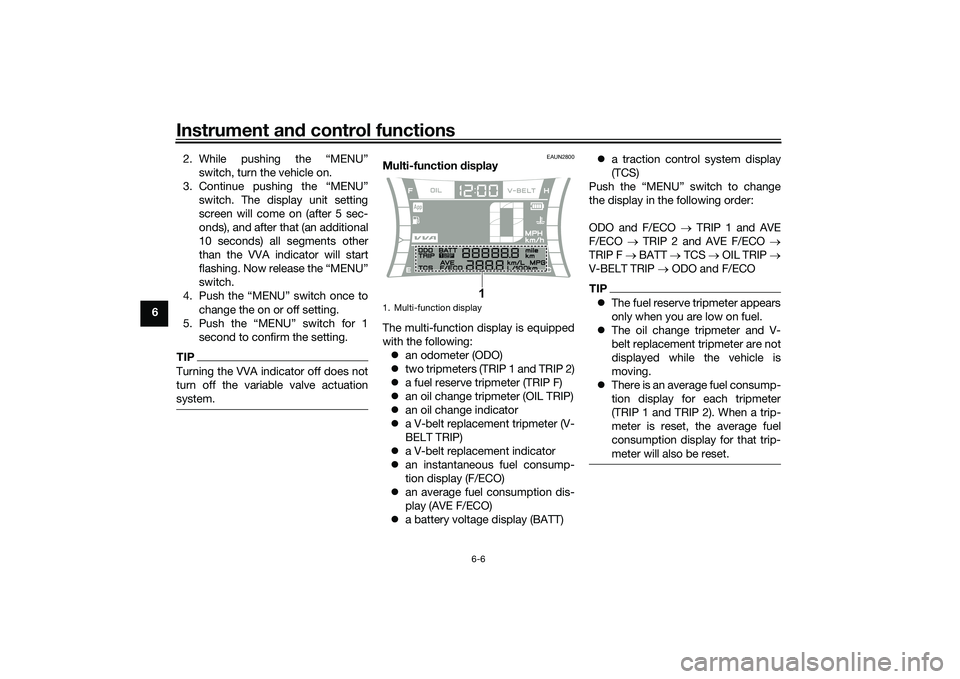
Multi-function display
The multi-function display is equipped
with the following: an odometer (ODO)
two tripmeters (TRIP 1 and TRIP 2)
a fuel reserve tripmeter (TRIP F)
an oil change tripmeter (OIL TRIP)
an oil change indicator
a V-belt replacement tripmeter (V-
BELT TRIP)
a V-belt replacement indicator
an instantaneous fuel consump-
tion display (F/ECO)
an average fuel consumption dis-
play (AVE F/ECO)
a battery voltage display (BATT)
a traction control system display
(TCS)
Push the “MENU” switch to change
the display in the following order:
ODO and F/ECO TRIP 1 and AVE
F/ECO TRIP 2 and AVE F/ECO
TRIP F BATT TCS OIL TRIP
V-BELT TRIP ODO and F/ECO
TIP The fuel reserve tripmeter appears
only when you are low on fuel.
The oil change tripmeter and V-
belt replacement tripmeter are not
displayed while the vehicle is
moving.
There is an average fuel consump-
tion display for each tripmeter
(TRIP 1 and TRIP 2). When a trip-
meter is reset, the average fuel
consumption display for that trip-
meter will also be reset.
1. Multi-function display
1
UBBDE0E0.book Page 6 Wednesday, June 2, 2021 2:57 PM
Page 41 of 114

Instrument and control functions
6-7
6
EAU86890
O dometer
The odometer shows the total distance
traveled by the vehicle.TIPThe odometer will lock at 999999 and
cannot be reset.
EAU86900
Tripmeters
The tripmeters show the distance trav-
eled since they were last reset.
To reset a tripmeter, set the display to
the tripmeter you want to reset, and
then push the “MENU” switch until it is
reset.TIPThe tripmeters will reset and continue
counting after 9999.9 is reached.
EAU86910
Fuel reserve tripmeter
If the last segment of the fuel meter
starts flashing, the display automati-
cally changes to the fuel reserve trip-
meter “TRIP F” and starts counting the
distance traveled from that point.
To reset the fuel reserve tripmeter,
push the “MENU” switch until it is re-
set.TIPIf you do not reset the fuel reserve trip-
meter manually, it will reset automati-
cally and disappear from the display
after refueling and traveling 5 km (3 mi).
1. Odometer
1
1. Tripmeter
1
1. Fuel reserve tripmeter
1
UBBDE0E0.book Page 7 Wednesday, June 2, 2021 2:57 PM
Page 42 of 114
Instrument and control functions
6-8
6
EAUN3060
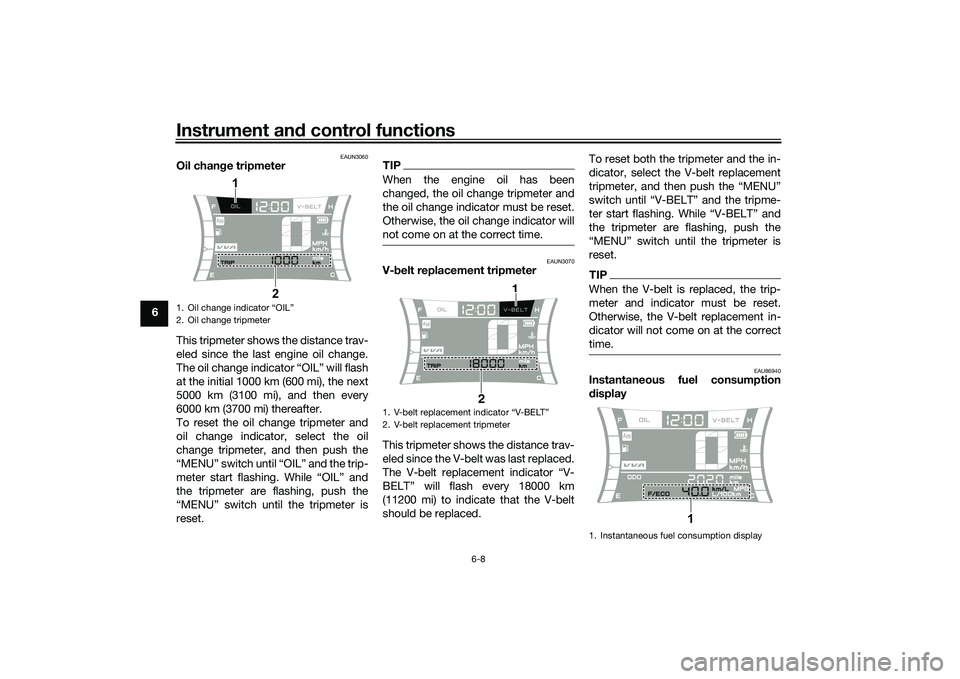
Oil chan ge tripmeter
This tripmeter shows the distance trav-
eled since the last engine oil change.
The oil change indicator “OIL” will flash
at the initial 1000 km (600 mi), the next
5000 km (3100 mi), and then every
6000 km (3700 mi) thereafter.
To reset the oil change tripmeter and
oil change indicator, select the oil
change tripmeter, and then push the
“MENU” switch until “OIL” and the trip-
meter start flashing. While “OIL” and
the tripmeter are flashing, push the
“MENU” switch until the tripmeter is
reset.
TIPWhen the engine oil has been
changed, the oil change tripmeter and
the oil change indicator must be reset.
Otherwise, the oil change indicator will
not come on at the correct time.
EAUN3070
V- belt replacement tripmeter
This tripmeter shows the distance trav-
eled since the V-belt was last replaced.
The V-belt replacement indicator “V-
BELT” will flash every 18000 km
(11200 mi) to indicate that the V-belt
should be replaced. To reset both the tripmeter and the in-
dicator, select the V-belt replacement
tripmeter, and then push the “MENU”
switch until “V-BELT” and the tripme-
ter start flashing. While “V-BELT” and
the tripmeter are flashing, push the
“MENU” switch until the tripmeter is
reset.
TIPWhen the V-belt is replaced, the trip-
meter and indicator must be reset.
Otherwise, the V-belt replacement in-
dicator will not come on at the correct
time.
EAU86940
Instantaneous fuel consumption
d
isplay
1. Oil change indicator “OIL”
2. Oil change tripmeter
2
1
1.
2. V-belt replacement tripmeter
2 1
1. Instantaneous fuel consumption display
1
UBBDE0E0.book Page 8 Wednesday, June 2, 2021 2:57 PM
Page 43 of 114

Instrument and control functions
6-9
6
This display shows fuel consumption
under current riding conditions. It can
be set to either “km/L” or “L/100 km”,
or “MPG” when using miles.
“km/L”: the distance that can be
traveled on 1.0 L of fuel.
“L/100 km”: the amount of fuel
necessary to travel 100 km.
“MPG”: the distance that can be
traveled on 1.0 Imp.gal of fuel.
TIPWhen traveling under 10 km/h (6 mi/h),
EAU86950
Avera ge fuel consumption display This display shows the average fuel
consumption since it was last reset.
The average fuel consumption display
can be set to either “km/L” or “L/100
km”, or “MPG” when using miles.
“km/L”: the average distance that
can be traveled on 1.0 L of fuel.
“L/100 km”: the average amount
of fuel necessary to travel 100 km.
“MPG”: the average distance that
can be traveled on 1.0 Imp.gal of
fuel.
TIPTo reset the display, push the
“MENU” switch until it resets.
After resetting, “_ _._” is shown
until the vehicle has traveled some
distance.
EAU86960
Battery volta ge display
This display shows the current charge
state of the battery. Over 12.8 V = Full charge.
Under 12.7 V = Charging is re-
quired.TIPIf the battery voltage is less than 9.0 V,
1. Average fuel consumption display
1
1. Battery voltage meter
1
UBBDE0E0.book Page 9 Wednesday, June 2, 2021 2:57 PM
Page 45 of 114

Instrument and control functions
6-11
6
NOTICE
ECA10062
Do not use the hazar d lig hts for an
exten ded len gth of time with the en-
g ine not running , otherwise the bat-
tery may d ischarge.
EAU59011
Menu switch “MENU”
This switch is used to perform selec-
tions in the setting mode display of the
multi-function meter unit.
See Multi-function meter unit on page
6-3 for detailed information.
EAU76391
Stop an d Start System
switch “ / ”
To turn on the Stop and Start System,
set the switch to “ ”. To turn off the
Stop and Start System, set this switch
to “ ”.
EAU12902
Front brake leverThe front brake lever is located on the
right side of the handlebar. To apply
the front brake, pull this lever toward
the throttle grip.
EAU12952
Rear brake leverThe rear brake lever is located on the
left side of the handlebar. To apply the
rear brake, pull this lever toward the
handlebar grip.
A
A
A
A
1. Front brake lever
1
1. Rear brake lever1
UBBDE0E0.book Page 11 Wednesday, June 2, 2021 2:57 PM
Page 47 of 114
Instrument and control functions
6-13
6
EAUN2810
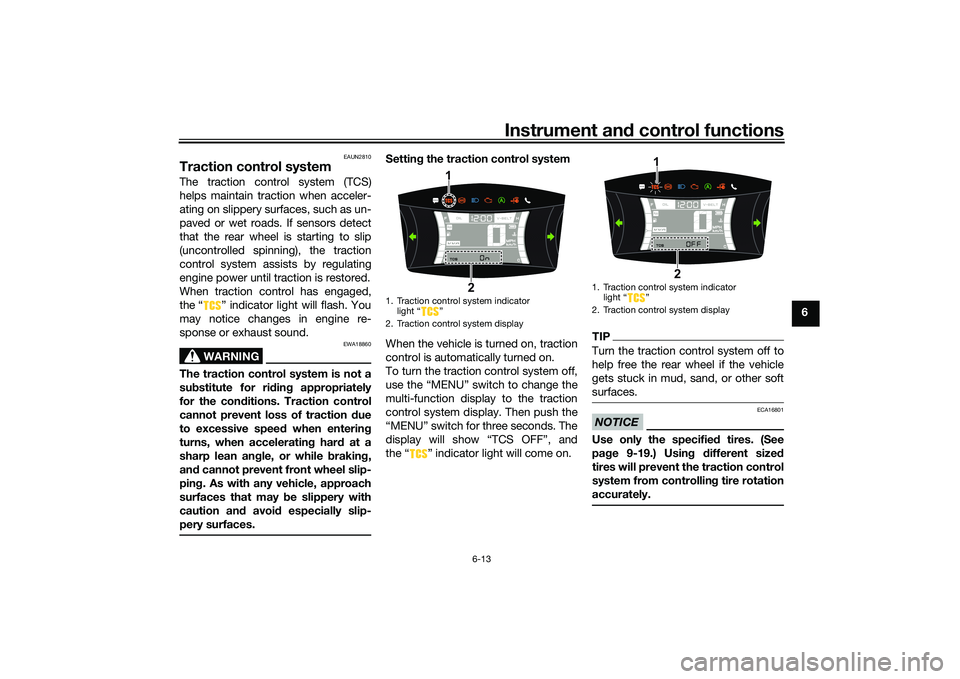
Traction control systemThe traction control system (TCS)
helps maintain traction when acceler-
ating on slippery surfaces, such as un-
paved or wet roads. If sensors detect
that the rear wheel is starting to slip
(uncontrolled spinning), the traction
control system assists by regulating
engine power until traction is restored.
When traction control has engaged,
the “ ” indicator light will flash. You
may notice changes in engine re-
sponse or exhaust sound.
WARNING
EWA18860
The traction control system is not a
su bstitute for ri din g appropriately
for the con ditions. Traction control
cannot prevent loss of traction d ue
to excessive spee d when enterin g
turns, when acceleratin g har d at a
sharp lean an gle, or while b raking,
an d cannot prevent front wheel slip-
pin g. As with any vehicle, approach
surfaces that may be slippery with
caution an d avoi d especially slip-
pery surfaces.
Settin g the traction control system
When the vehicle is turned on, traction
control is automatically turned on.
To turn the traction control system off,
use the “MENU” switch to change the
multi-function display to the traction
control system display. Then push the
“MENU” switch for three seconds. The
display will show “TCS OFF”, and
the “ ” indicator light will come on.
TIPTurn the traction control system off to
help free the rear wheel if the vehicle
gets stuck in mud, sand, or other soft
surfaces.NOTICE
ECA16801
Use only the specifie d tires. (See
pa ge 9-19.) Usin g different size d
tires will prevent the traction control
system from controllin g tire rotation
accurately.
1. Traction control system indicator light “ ”
2. Traction control system display
1
2
1. Traction control system indicator light Ž
2. Traction control system display
1
2
UBBDE0E0.book Page 13 Wednesday, June 2, 2021 2:57 PM
Page 112 of 114
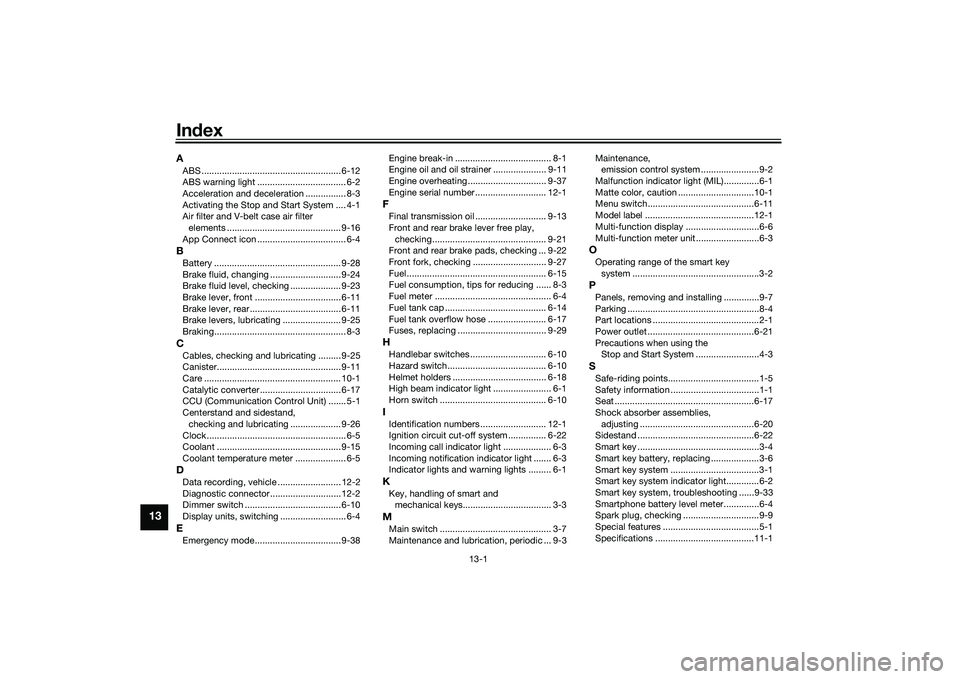
13-1
13
IndexAABS ....................................................... 6-12
ABS warning light ................................... 6-2
Acceleration and deceleration ................ 8-3
Activating the Stop and Start System .... 4-1
Air filter and V-belt case air filter
elements ............................................. 9-16
App Connect icon ................................... 6-4BBattery .................................................. 9-28
Brake fluid, changing ............................ 9-24
Brake fluid level, checking .................... 9-23
Brake lever, front .................................. 6-11
Brake lever, rear.................................... 6-11
Brake levers, lubricating ....................... 9-25
Braking.................................................... 8-3CCables, checking and lubricating ......... 9-25
Canister................................................. 9-11
Care ...................................................... 10-1
Catalytic converter ................................ 6-17
CCU (Communication Control Unit) ....... 5-1
Centerstand and sidestand, checking and lubricating .................... 9-26
Clock....................................................... 6-5
Coolant ................................................. 9-15
Coolant temperature meter .................... 6-5DData recording, vehicle ......................... 12-2
Diagnostic connector............................ 12-2
Dimmer switch ...................................... 6-10
Display units, switching .......................... 6-4EEmergency mode.................................. 9-38 Engine break-in ...................................... 8-1
Engine oil and oil strainer ..................... 9-11
Engine overheating ............................... 9-37
Engine serial number ............................ 12-1
FFinal transmission oil ............................ 9-13
Front and rear brake lever free play,
checking............................................. 9-21
Front and rear brake pads, checking ... 9-22
Front fork, checking ............................. 9-27
Fuel ....................................................... 6-15
Fuel consumption, tips for reducing ...... 8-3
Fuel meter .............................................. 6-4
Fuel tank cap ........................................ 6-14
Fuel tank overflow hose ....................... 6-17
Fuses, replacing ................................... 9-29HHandlebar switches .............................. 6-10
Hazard switch....................................... 6-10
Helmet holders ..................................... 6-18
High beam indicator light ....................... 6-1
Horn switch .......................................... 6-10IIdentification numbers .......................... 12-1
Ignition circuit cut-off system ............... 6-22
Incoming call indicator light ................... 6-3
Incoming notification indicator light ....... 6-3
Indicator lights and warning lights ......... 6-1KKey, handling of smart and mechanical keys................................... 3-3MMain switch ............................................ 3-7
Maintenance and lubrication, periodic ... 9-3 Maintenance,
emission control system .......................9-2
Malfunction indicator light (MIL)..............6-1
Matte color, caution ..............................10-1
Menu switch..........................................6-11
Model label ...........................................12-1
Multi-function display .............................6-6
Multi-function meter unit .........................6-3
OOperating range of the smart key system ..................................................3-2PPanels, removing and installing ..............9-7
Parking ....................................................8-4
Part locations ..........................................2-1
Power outlet ..........................................6-21
Precautions when using the Stop and Start System .........................4-3SSafe-riding points....................................1-5
Safety information ...................................1-1
Seat .......................................................6-17
Shock absorber assemblies,
adjusting .............................................6-20
Sidestand ..............................................6-22
Smart key ................................................3-4
Smart key battery, replacing ...................3-6
Smart key system ...................................3-1
Smart key system indicator light.............6-2
Smart key system, troubleshooting ......9-33
Smartphone battery level meter..............6-4
Spark plug, checking ..............................9-9
Special features ......................................5-1
Specifications .......................................11-1
UBBDE0E0.book Page 1 Wednesday, June 2, 2021 2:57 PM