engine YAMAHA PW50 2013 Owner's Manual
[x] Cancel search | Manufacturer: YAMAHA, Model Year: 2013, Model line: PW50, Model: YAMAHA PW50 2013Pages: 76, PDF Size: 1.67 MB
Page 46 of 76
PERIODIC MAINTENANCE AND ADJUSTMENT
7-5
7
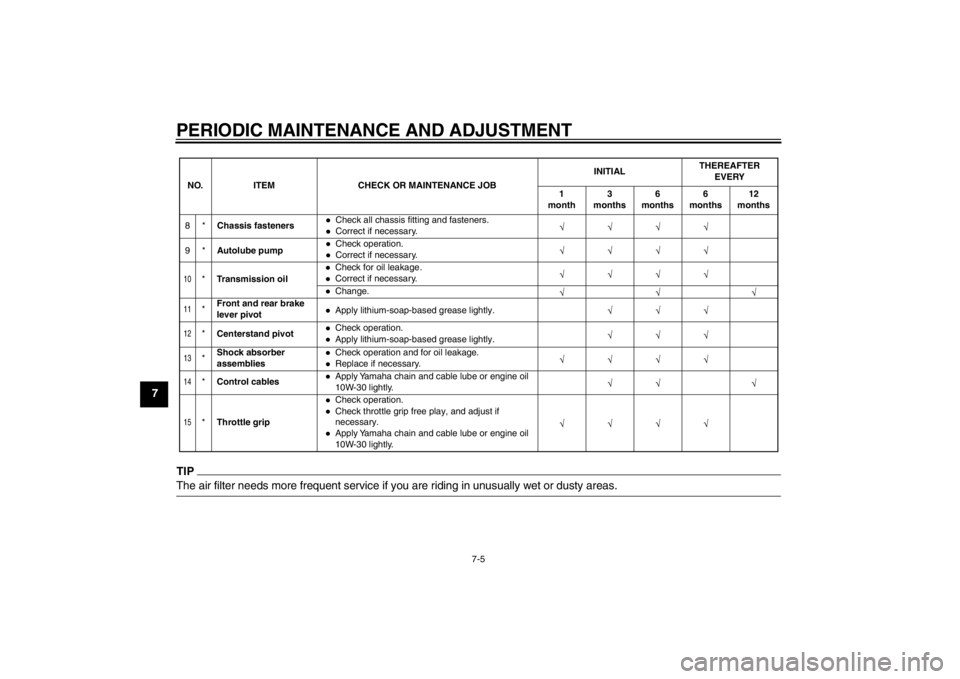
TIPThe air filter needs more frequent service if you are riding in unusually wet or dusty areas.10
*Transmission oil
Check for oil leakage .Correct if necessary.Change.
11
*Front and rear brake
lever pivot
Apply lithium-soap-based grease lightly.
12
*
Centerstand pivot
Check operation.Apply lithium-soap-based grease lightly.
13
*Shock absorber
assemblies
Check operation and for oil leakage.Replace if necessary.
14
*
Control cables
Apply Yamaha chain and cable lube or engine oil
10W-30 lightly.
15
*Throttle grip
Check operation.Check throttle grip free play, and adjust if
necessary.Apply Yamaha chain and cable lube or engine oil
10W-30 lightly.
NO. ITEM CHECK OR MAINTENANCE JOB
INITIAL
THEREAFTER
EVERY
1
month 3
months 6
months 6
months 12
months
8* Chassis fastenersCorrect if necessary.
A
9* utolube pumpCheck operation.Correct if necessary. Check all chassis fitting and fasteners.
U5PG8BE0.book Page 5 Wednesday, June 27, 2012 2:53 PM
Page 47 of 76
PERIODIC MAINTENANCE AND ADJUSTMENT
7-6
7
EAU19604
Checking the spark plug The spark plug is an important engine
component, which is easy to check.
Since heat and deposits will cause any
spark plug to slowly erode, the spark
plug should be removed and checked
in accordance with the periodic mainte-
nance and lubrication chart. In addition,
the condition of the spark plug can re-
veal the condition of the engine.
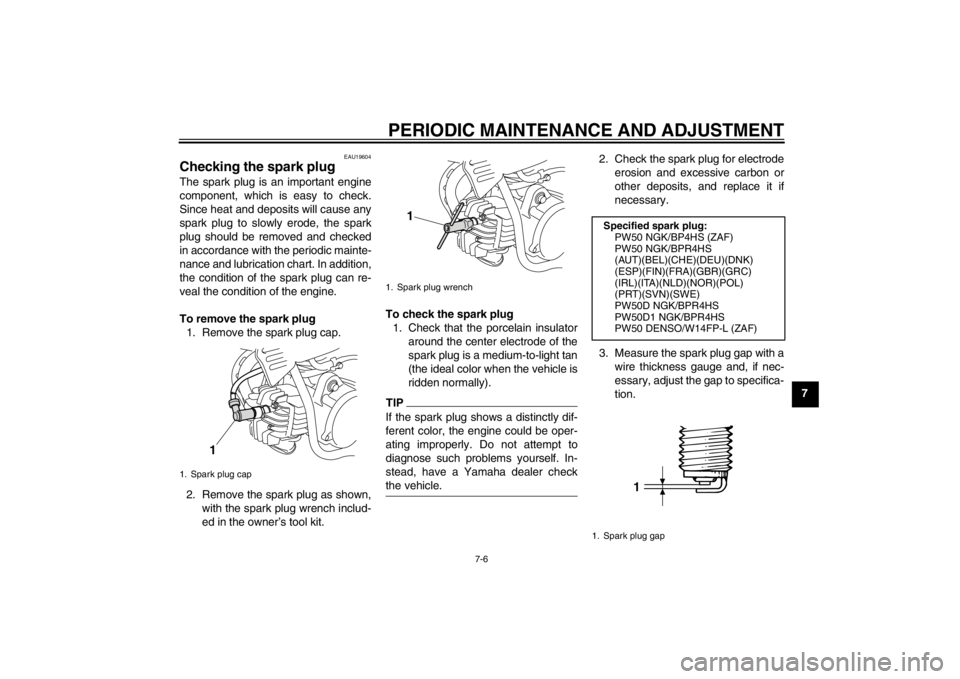
To remove the spark plug1. Remove the spark plug cap.
2. Remove the spark plug as shown, with the spark plug wrench includ-
ed in the owner’s tool kit. To check the spark plug
1. Check that the porcelain insulator around the center electrode of the
spark plug is a medium-to-light tan
(the ideal color when the vehicle is
ridden normally).
TIPIf the spark plug shows a distinctly dif-
ferent color, the engine could be oper-
ating improperly. Do not attempt to
diagnose such problems yourself. In-
stead, have a Yamaha dealer check
the vehicle.
2. Check the spark plug for electrodeerosion and excessive carbon or
other deposits, and replace it if
necessary.
3. Measure the spark plug gap with a wire thickness gauge and, if nec-
essary, adjust the gap to specifica-
tion.
1. Spark plug cap
1
1. Spark plug wrench
1
Specified spark plug:PW50 NGK/BP4HS (ZAF)
PW50 NGK/BPR4HS
(AUT)(BEL)(CHE)(DEU)(DNK)
(ESP)(FIN)(FRA)(GBR)(GRC)
(IRL)(ITA)(NLD)(NOR)(POL)
(PRT)(SVN)(SWE)
PW50D NGK/BPR4HS
PW50D1 NGK/BPR4HS
PW50 DENSO/W14FP-L (ZAF)
1. Spark plug gap
1
U5PG8BE0.book Page 6 Wednesday, June 27, 2012 2:53 PM
Page 48 of 76
PERIODIC MAINTENANCE AND ADJUSTMENT
7-7
7To install the spark plug
1. Clean the surface of the spark plug gasket and its mating surface, and
then wipe off any grime from the
spark plug threads.
2. Install the spark plug with the spark plug wrench, and then tight-
en it to the specified torque.
TIPIf a torque wrench is not available when
installing a spark plug, a good estimate
of the correct torque is 1/4–1/2 turn
past finger tight. However, the spark
plug should be tightened to the speci-
fied torque as soon as possible.3. Install the spark plug cap.
EAU41103
Removing the power reduc-
tion plate To obtain full engine performance ca-
pability, removing the power reduction
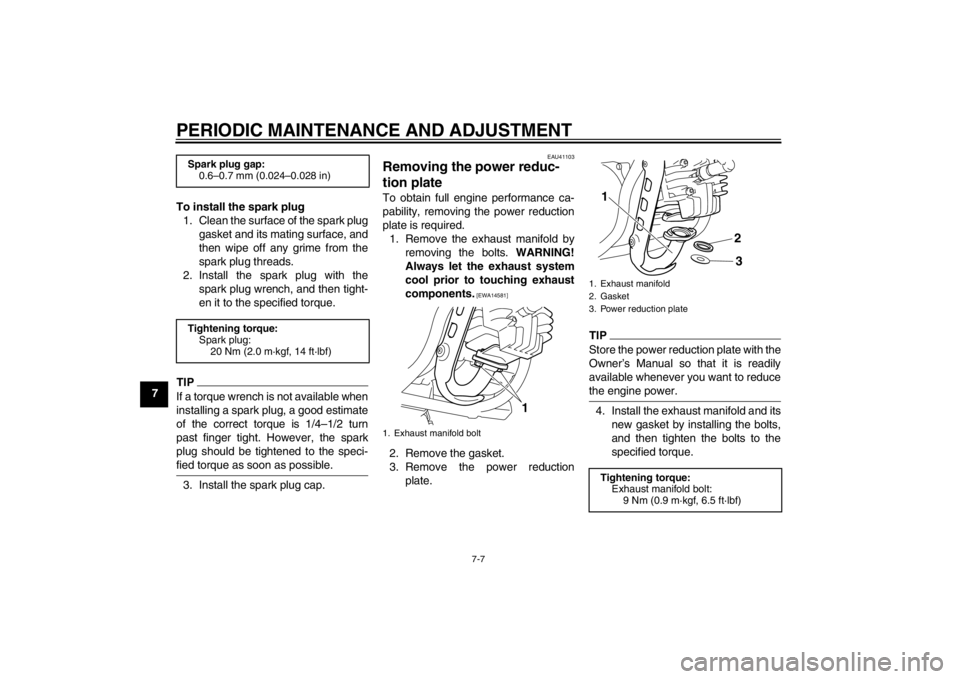
plate is required.1. Remove the exhaust manifold by removing the bolts. WARNING!
Always let the exhaust system
cool prior to touching exhaust
components.
[EWA14581]
2. Remove the gasket.
3. Remove the power reduction plate.
TIPStore the power reduction plate with the
Owner’s Manual so that it is readily
available whenever you want to reduce
the engine power.4. Install the exhaust manifold and itsnew gasket by installing the bolts,
and then tighten the bolts to the
specified torque.
Spark plug gap:0.6–0.7 mm (0.024–0.028 in)
Tightening torque: Spark plug:20 Nm (2.0 m·kgf, 14 ft·lbf)
1. Exhaust manifold bolt
1
1. Exhaust manifold
2. Gasket
3. Power reduction plateTightening torque:Exhaust manifold bolt:
9 Nm (0.9 m·kgf, 6.5 ft·lbf)1
23
U5PG8BE0.book Page 7 Wednesday, June 27, 2012 2:53 PM
Page 49 of 76
PERIODIC MAINTENANCE AND ADJUSTMENT
7-8
7
EAU40893
Transmission oil The transmission oil must be checked
for oil leakage before each ride. If any
leakage is found, have a Yamaha deal-
er check and repair the motorcycle. In
addition, the transmission oil must be
changed at the intervals specified in the
periodic maintenance and lubrication
chart.1. Place the motorcycle on the cen- terstand.
2. Place an oil pan under the trans- mission to collect the used oil.
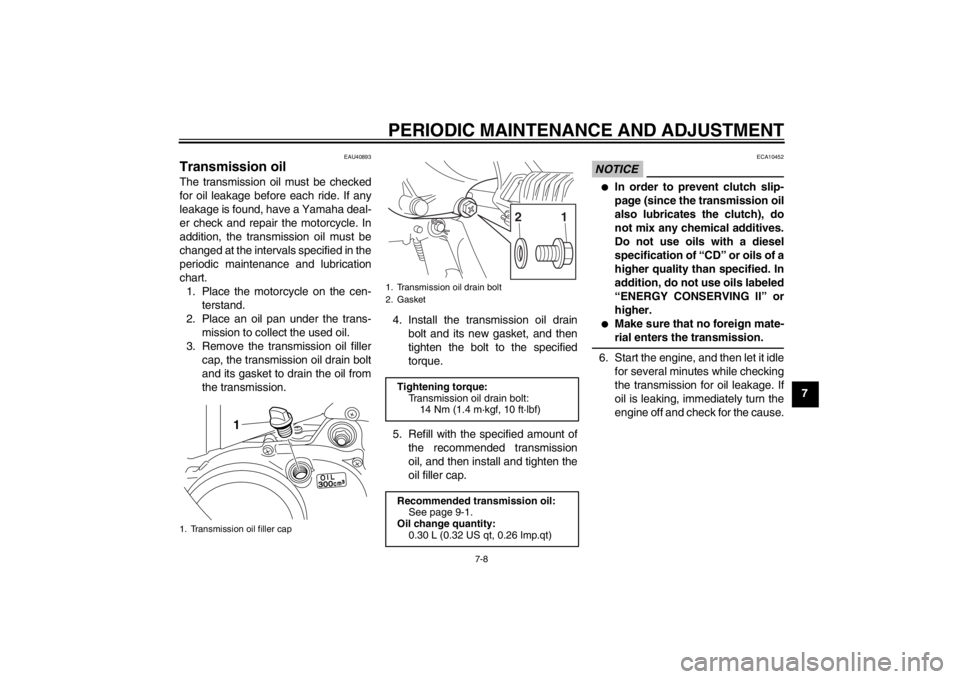
3. Remove the transmission oil filler cap, the transmission oil drain bolt
and its gasket to drain the oil from
the transmission. 4. Install the transmission oil drain
bolt and its new gasket, and then
tighten the bolt to the specified
torque.
5. Refill with the specified amount of the recommended transmission
oil, and then install and tighten the
oil filler cap.
NOTICE
ECA10452
●
In order to prevent clutch slip-
page (since the transmission oil
also lubricates the clutch), do
not mix any chemical additives.
Do not use oils with a diesel
specification of “CD” or oils of a
higher quality than specified. In
addition, do not use oils labeled
“ENERGY CONSERVING II” or
higher.
●
Make sure that no foreign mate-
rial enters the transmission.
6. Start the engine, and then let it idlefor several minutes while checking
the transmission for oil leakage. If
oil is leaking, immediately turn the
engine off and check for the cause.
1. Transmission oil filler cap
1
1. Transmission oil drain bolt
2. Gasket
Tightening torque:Transmission oil drain bolt:14 Nm (1.4 m·kgf, 10 ft·lbf)
Recommended transmission oil: See page 9-1.
Oil change quantity:
0.30 L (0.32 US qt, 0.26 Imp.qt)
1
2
U5PG8BE0.book Page 8 Wednesday, June 27, 2012 2:53 PM
Page 51 of 76
PERIODIC MAINTENANCE AND ADJUSTMENT
7-10
7
5. Insert the sponge material into the
air filter case. NOTICE: Make sure
that the sponge material is prop-
erly seated in the air filter case.
The engine should never be op-
erated without the sponge mate-
rial installed, otherwise the
piston(s) and/or cylinder(s) may
become excessively worn.
[ECA15621]
6. Install the air filter case cover by in- stalling the screw.
7. Install the seat.
EAU41221
Cleaning the spark arrester The spark arrester should be cleaned
at the intervals specified in the periodic
maintenance and lubrication chart.
WARNING
EWA10980
●
Always let the exhaust system
cool prior to touching exhaust
components.
●
Do not start the engine when
cleaning the exhaust system.
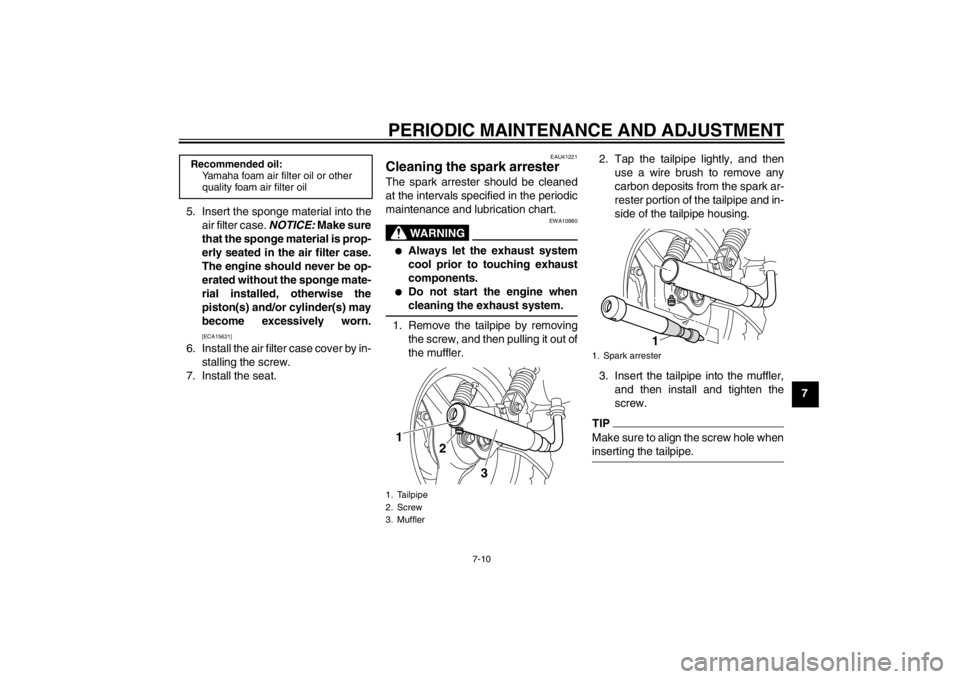
1. Remove the tailpipe by removing the screw, and then pulling it out of
the muffler. 2. Tap the tailpipe lightly, and then
use a wire brush to remove any
carbon deposits from the spark ar-
rester portion of the tailpipe and in-
side of the tailpipe housing.
3. Insert the tailpipe into the muffler, and then install and tighten the
screw.
TIPMake sure to align the screw hole when
inserting the tailpipe.
Recommended oil:Yamaha foam air filter oil or other
quality foam air filter oil
1. Tailpipe
2. Screw
3. Muffler1
2
3
1. Spark arrester
1
U5PG8BE0.book Page 10 Wednesday, June 27, 2012 2:53 PM
Page 52 of 76
PERIODIC MAINTENANCE AND ADJUSTMENT
7-11
7
EAU39930
Adjusting the carburetor The carburetor is an important part of
the engine and requires very sophisti-
cated adjustment. Therefore, most car-
buretor adjustments should be left to a
Yamaha dealer, who has the neces- sary professional knowledge and expe-
rience. The adjustment described in the
following section, however, may be ser-
viced by the owner as part of routine
maintenance.NOTICE
ECA10550
The carburetor has been set and ex-
tensively tested at the Yamaha fac-
tory. Changing these settings
without sufficient technical knowl-
edge may result in poor perfor-
mance of or damage to the engine.
EAU21362
Adjusting the engine idling
speed The engine idling speed must be
checked and, if necessary, adjusted as
follows at the intervals specified in the
periodic maintenance and lubrication
chart.TIPA diagnostic tachometer is needed to
make this adjustment.1. Attach the tachometer to the spark plug lead.
2. Start the engine and warm it up for several minutes at 1000–2000
r/min while occasionally revving it
to 4000–5000 r/min.TIPThe engine is warm when it quickly re-
sponds to the throttle.3. Check the engine idling speedand, if necessary, adjust it to spec-
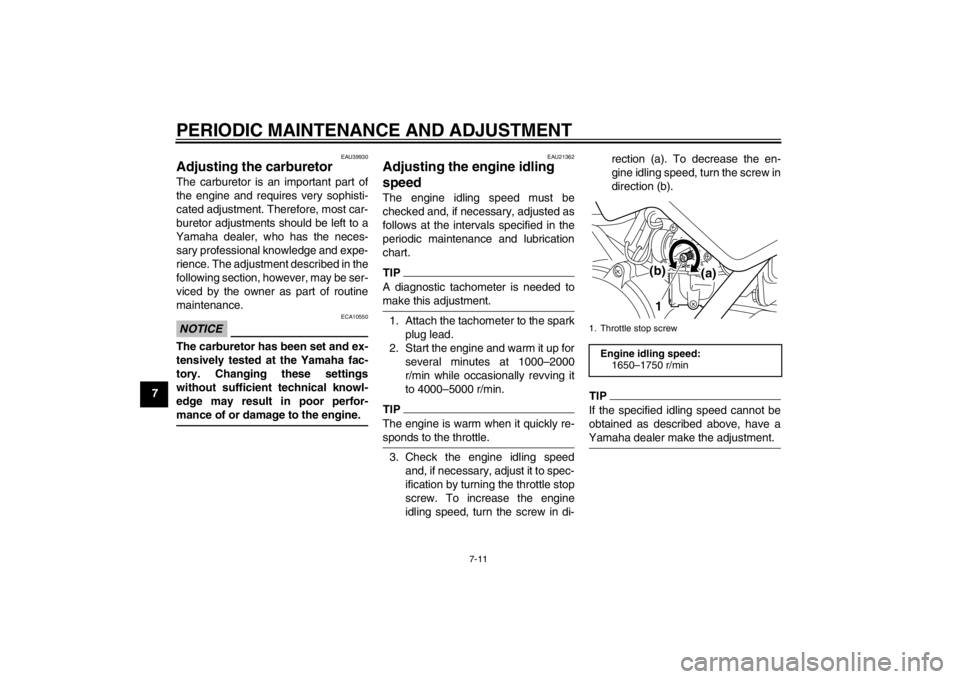
ification by turning the throttle stop
screw. To increase the engine
idling speed, turn the screw in di- rection (a). To decrease the en-
gine idling speed, turn the screw in
direction (b).
TIPIf the specified idling speed cannot be
obtained as described above, have a
Yamaha dealer make the adjustment.1. Throttle stop screwEngine idling speed: 1650–1750 r/min
1 (a)
(b)
U5PG8BE0.book Page 11 Wednesday, June 27, 2012 2:53 PM
Page 57 of 76

PERIODIC MAINTENANCE AND ADJUSTMENT
7-16
7
EAU50800
Checking and lubricating the
cables The operation of all control cables and
the condition of the cables should be
checked before each ride, and the ca-
bles and cable ends should be lubricat-
ed if necessary. If a cable is damaged
or does not move smoothly, have a
Yamaha dealer check or replace it.
WARNING! Damage to the outer housing of cables may result in in-
ternal rusting and cause interfer-
ence with cable movement. Replace
damaged cables as soon as possi-
ble to prevent unsafe conditions.[EWA10711] EAU23114
Checking and lubricating the
throttle grip and cable The operation of the throttle grip should
be checked before each ride. In addi-
tion, the cable should be lubricated by a
Yamaha dealer at the intervals speci-
fied in the periodic maintenance chart.
The throttle cable is equipped with a
rubber cover. Make sure that the cover
is securely installed. Even though the
cover is installed correctly, it does not
completely protect the cable from water
entry. Therefore, use care not to pour
water directly onto the cover or cable
when washing the vehicle. If the cable
or cover becomes dirty, wipe clean with
a moist cloth.
EAU23120
Adjusting the Autolube pump The Autolube pump is a vital and so-
phisticated component of the engine,
which must be adjusted by a Yamaha
dealer at the intervals specified in the
periodic maintenance and lubrication
chart.
Recommended lubricant:
Yamaha Chain and Cable Lube or 4-
stroke engine oil
U5PG8BE0.book Page 16 Wednesday, June 27, 2012 2:53 PM
Page 65 of 76
PERIODIC MAINTENANCE AND ADJUSTMENT
7-24
7
EAU25972
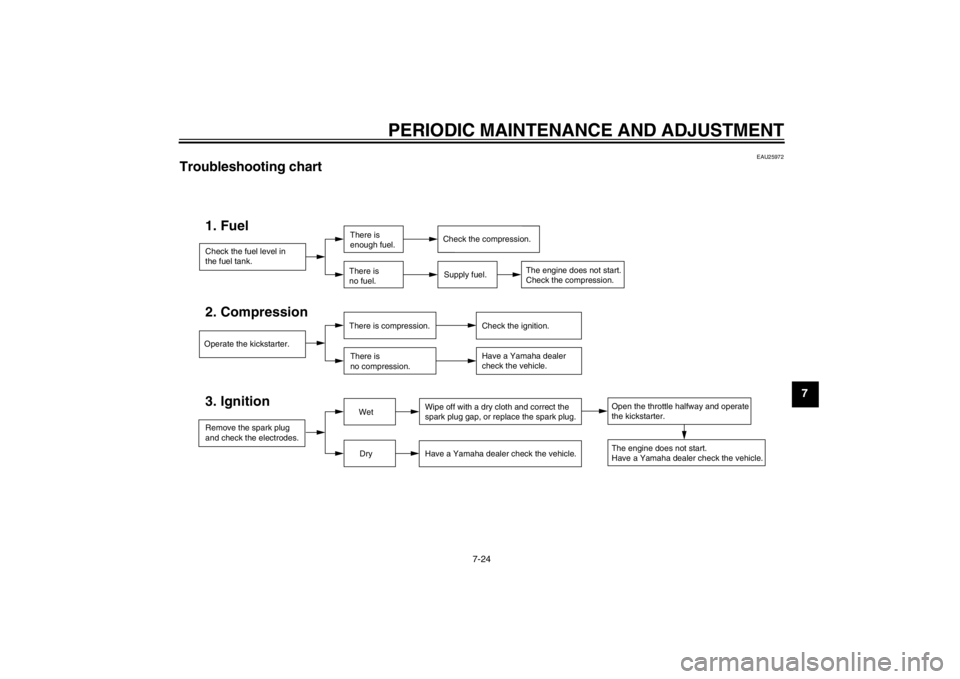
Troubleshooting chart
Check the fuel level in
the fuel tank.1. Fuel
There is
enough fuel.
There is
no fuel.
Supply fuel.
Operate the kickstarter.2. Compression
There is compression.
There is
no compression. Check the ignition.
Have a Yamaha dealer
check the vehicle.
Remove the spark plug
and check the electrodes.3. Ignition
Wet
Dry Wipe off with a dry cloth and correct the
spark plug gap, or replace the spark plug.
Have a Yamaha dealer check the vehicle.
The engine does not start.
Have a Yamaha dealer check the vehicle.
Open the throttle halfway and operate
the kickstarter.
Check the compression.
The engine does not start.
Check the compression.
U5PG8BE0.book Page 24 Wednesday, June 27, 2012 2:53 PM
Page 66 of 76
MOTORCYCLE CARE AND STORAGE
8-1
8
EAU37833
Matte color caution NOTICE
ECA15192
Some models are equipped with
matte colored finished parts. Be
sure to consult a Yamaha dealer for
advice on what products to use be-
fore cleaning the vehicle. Using a
brush, harsh chemical products or
cleaning compounds when cleaning
these parts will scratch or damage
their surface. Wax also should not
be applied to any matte colored fin-
ished parts.
EAU40635
Care While the open design of a motorcycle
reveals the attractiveness of the tech-
nology, it also makes it more vulnera-
ble. Rust and corrosion can develop
even if high-quality components are
used. A rusty exhaust pipe may go un-
noticed on a car, however, it detracts
from the overall appearance of a motor-
cycle. Frequent and proper care does
not only comply with the terms of the
warranty, but it will also keep your mo-
torcycle looking good, extend its life
and optimize its performance.
Before cleaning1. Cover the muffler outlet with a plastic bag after the engine has
cooled down.
2. Make sure that all caps and covers as well as all electrical couplers
and connectors, including the
spark plug cap, are tightly in-
stalled.
3. Remove extremely stubborn dirt, like oil burnt onto the crankcase,
with a degreasing agent and a
brush, but never apply such prod- ucts onto seals, gaskets and wheel
axles. Always rinse the dirt and de-
greaser off with water.
Cleaning
NOTICE
ECA17110
●
Avoid using strong acidic wheel
cleaners, especially on spoked
wheels. If such products are
used on hard-to-remove dirt, do
not leave the cleaner on the af-
fected area any longer than in-
structed. Also, thoroughly rinse
the area off with water, immedi-
ately dry it, and then apply a cor-
rosion protection spray.
●
Improper cleaning can damage
plastic parts (such as cowlings,
panels, etc.) and the mufflers.
Use only a soft, clean cloth or
sponge with water to clean plas-
tic. However, if the plastic parts
cannot be thoroughly cleaned
with water, diluted mild deter-
gent with water may be used. Be
sure to rinse off any detergent
residue using plenty of water, as
it is harmful to plastic parts.
U5PG8BE0.book Page 1 Wednesday, June 27, 2012 2:53 PM
Page 67 of 76
MOTORCYCLE CARE AND STORAGE
8-2
8
●
Do not use any harsh chemical
products on plastic parts. Be
sure to avoid using cloths or
sponges which have been in
contact with strong or abrasive
cleaning products, solvent or
thinner, fuel (gasoline), rust re-
movers or inhibitors, brake flu-
id, antifreeze or electrolyte.
●
Do not use high-pressure wash-
ers or steam-jet cleaners since
they cause water seepage and
deterioration in the following ar-
eas: seals (of wheel and swing-
arm bearings, fork and brakes),
electric components (couplers,
connectors, and switches),
breather hoses and vents.
After normal useRemove dirt with warm water, a mild
detergent, and a soft, clean sponge,
and then rinse thoroughly with clean
water. Use a toothbrush or bottlebrush
for hard-to-reach areas. Stubborn dirt
and insects will come off more easily if
the area is covered with a wet cloth for
a few minutes before cleaning.After riding in the rain or near the sea
Since sea salt is extremely corrosive,
carry out the following steps after each
ride in the rain or near the sea.
1. Clean the motorcycle with cold wa- ter and a mild detergent, after the
engine has cooled down.
NOTICE: Do not use warm water
since it increases the corrosive
action of the salt.
[ECA10791]
2. Apply a corrosion protection spray on all metal, including chrome- and
nickel-plated, surfaces to prevent
corrosion.
After cleaning 1. Dry the motorcycle with a chamois or an absorbing cloth.
2. Use a chrome polish to shine chrome, aluminum and stainless-
steel parts.
3. To prevent corrosion, it is recom- mended to apply a corrosion pro-
tection spray on all metal,
including chrome- and nickel-plat-
ed, surfaces.
4. Use spray oil as a universal clean- er to remove any remaining dirt. 5. Touch up minor paint damage
caused by stones, etc.
6. Wax all painted surfaces.
7. Let the motorcycle dry completely before storing or covering it.
WARNING
EWA14501
Contaminants on the brakes or tires
can cause loss of control.●
Make sure that there is no oil or
wax on the tires.
●
If necessary, wash the tires with
warm water and a mild deter-
gent. Before riding at higher
speeds, test the motorcycle’s
braking performance and cor-
nering behavior.
NOTICE
ECA10800
●
Apply spray oil and wax spar-
ingly and make sure to wipe off
any excess.
●
Never apply oil or wax to any
rubber and plastic parts, but
treat them with a suitable care
product.
U5PG8BE0.book Page 2 Wednesday, June 27, 2012 2:53 PM