oil level YAMAHA TDM 900 2003 Owners Manual
[x] Cancel search | Manufacturer: YAMAHA, Model Year: 2003, Model line: TDM 900, Model: YAMAHA TDM 900 2003Pages: 110, PDF Size: 7.38 MB
Page 16 of 110
3-2
INSTRUMENT AND CONTROL FUNCTIONS
3
EW000016
w
Never turn the key to “OFF” or
“LOCK” while the motorcycle is
moving, otherwise the electrical
systems will be switched off,
which may result in loss of control
or an accident. Make sure that the
motorcycle is stopped before turn-
ing the key to “OFF” or “LOCK”.
ab
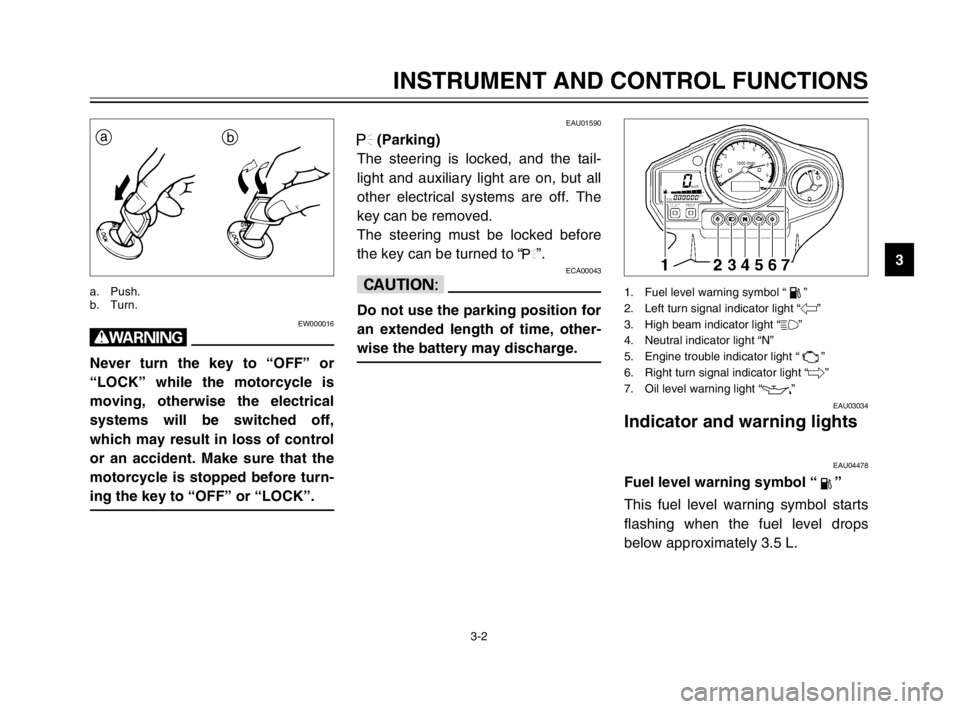
a. Push.
b. Turn.
EAU03034
Indicator and warning lights
Indicator and warning lightsEAU04478
Fuel level warning symbol “”Fuel level warning symbolThis fuel level warning symbol starts
flashing when the fuel level drops
below approximately 3.5 L.
1. Fuel level warning symbol “ ”
2. Left turn signal indicator light “
4”
3. High beam indicator light “&”
4. Neutral indicator light “N”
5. Engine trouble indicator light “ ”
6. Right turn signal indicator light “6”
7. Oil level warning light “
7”
EAU01590
.(Parking)
The steering is locked, and the tail-
light and auxiliary light are on, but all
other electrical systems are off. The
key can be removed.
The steering must be locked before
the key can be turned to “
.”.ECA00043
cC
Do not use the parking position for
an extended length of time, other-
wise the battery may discharge.
5PS-28199-E1 8/29/02 9:16 AM Page 15
Page 17 of 110
3-3
INSTRUMENT AND CONTROL FUNCTIONS
3
EAU04877
Oil level warning light “7”Oil level warning lightThis warning light comes on when
the engine oil level is low.
The electrical circuit of the warning
light can be checked by turning the
key to “ON”.
If the warning light does not come on
for a few seconds, then go off, have a
Yamaha dealer check the electrical
circuit.
NOTE:
Even if the oil level is sufficient, the
warning light may flicker when riding
on a slope or during sudden acceler-
ation or deceleration, but this is not a
malfunction.
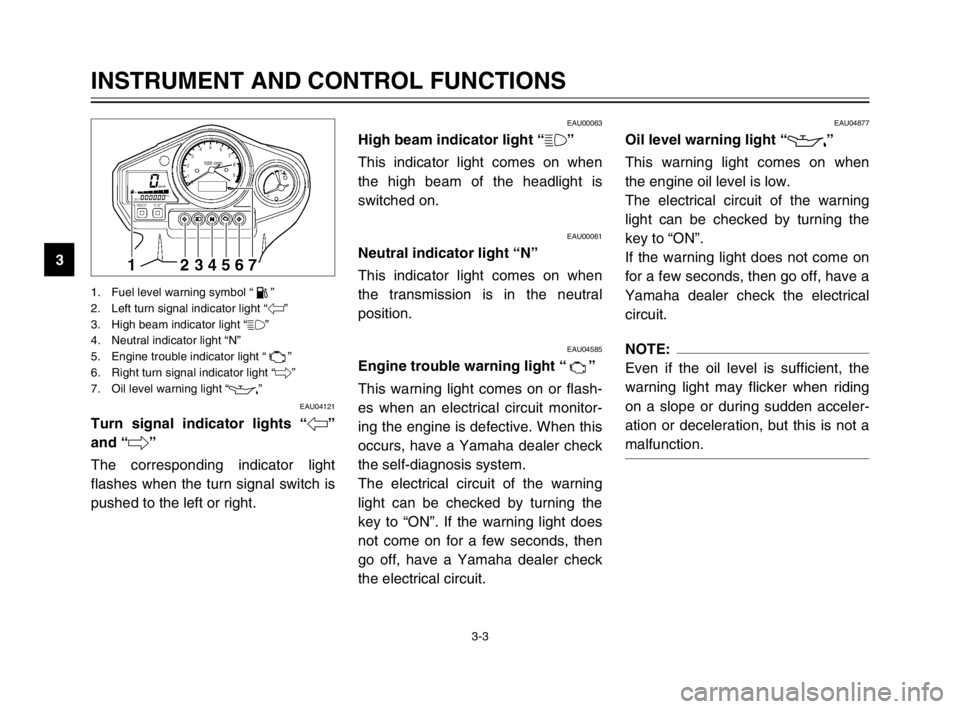
1. Fuel level warning symbol “ ”
2. Left turn signal indicator light “4”
3. High beam indicator light “&”
4. Neutral indicator light “N”
5. Engine trouble indicator light “ ”
6. Right turn signal indicator light “6”
7. Oil level warning light “
7”
EAU04121
Turn signal indicator lights “4”
and “6”
Turn signal indicator lightsThe corresponding indicator light
flashes when the turn signal switch is
pushed to the left or right.
EAU00063
High beam indicator light “&”High beam indicator lightThis indicator light comes on when
the high beam of the headlight is
switched on.
EAU00061
Neutral indicator light “N”Neutral indicator lightThis indicator light comes on when
the transmission is in the neutral
position.
EAU04585
Engine trouble warning light “”Engine trouble warning lightThis warning light comes on or flash-
es when an electrical circuit monitor-
ing the engine is defective. When this
occurs, have a Yamaha dealer check
the self-diagnosis system.
The electrical circuit of the warning
light can be checked by turning the
key to “ON”. If the warning light does
not come on for a few seconds, then
go off, have a Yamaha dealer check
the electrical circuit.
5PS-28199-E1 8/29/02 9:16 AM Page 16
Page 37 of 110

4-1
EAU01114
PRE-OPERATION CHECKS
4The condition of a vehicle is the owner’s responsibility. Vital components can start to deteriorate quickly and unexpect-
edly, even if the vehicle remains unused (for example, as a result of exposure to the elements). Any damage, fluid leak-
age or loss of tire air pressure could have serious consequences. Therefore, it is very important, in addition to a thor-
ough visual inspection, to check the following points before each ride.
EAU03439
Pre-operation check listPre-operation check list
ITEM CHECKS PAGE
Fuel•Check fuel level in fuel tank.
•Refuel if necessary.
•Check fuel line for leakage.3-10–3-12
Engine oil•Check oil level in engine.
•If necessary, add recommended oil to specified level.
•Check vehicle for oil leakage.6-8–6-11
Coolant•Check coolant level in reservoir.
•If necessary, add recommended coolant to specified level.
•Check cooling system for leakage.6-11–6-15
Front brake•Check operation.
•If soft or spongy, have Yamaha dealer bleed hydraulic system.
•Check fluid level in reservoir.
•If necessary, add recommended brake fluid to specified level.
•Check hydraulic system for leakage.3-9–3-10, 6-24–6-26
Rear brake•Check operation.
•If soft or spongy, have Yamaha dealer bleed hydraulic system.
•Check fluid level in reservoir.
•If necessary, add recommended brake fluid to specified level.
•Check hydraulic system for leakage.3-10, 6-23–6-26
Clutch•Check operation.
•Lubricate cable if necessary.
•Check lever free play.
•Adjust if necessary.3-9, 6-22–6-23
5PS-28199-E1 8/29/02 9:16 AM Page 36
Page 41 of 110
5-1
EAU00372
OPERATION AND IMPORTANT RIDING POINTS
5
EAU00373
w
8Become thoroughly familiar
with all operating controls and
their functions before riding.
Consult a Yamaha dealer
regarding any control or func-
tion that you do not thorough-
ly understand.
8Never start the engine or oper-
ate it in a closed area for any
length of time. Exhaust fumes
are poisonous, and inhaling
them can cause loss of con-
sciousness and death within a
short time. Always make sure
that there is adequate ventila-
tion.
8Before starting out, make sure
that the sidestand is up. If the
sidestand is not raised com-
pletely, it could contact the
ground and distract the opera-
tor, resulting in a possible loss
of control.
EAU03951
Starting the engineStarting the engineIn order for the ignition circuit cut-off
system to enable starting, one of the
following conditions must be met:
8The transmission is in the neutral
position.
8The transmission is in gear with
the clutch lever pulled and the
sidestand up.
EW000054
w
8Before starting the engine,
check the function of the igni-
tion circuit cut-off system
according to the procedure
described on page 3-20.
8Never ride with the sidestand
down.
1. Turn the key to “ON” and make
sure that the engine stop switch
is set to “#”.
ECA00083
cC
The oil level warning light and
engine trouble warning light
should come on for a few seconds,
then go off. If a warning light does
not go off, see pages 3-2 and 3-3
for the corresponding warning
light circuit check.
2. Shift the transmission into the
neutral position.
NOTE:
When the transmission is in the neu-
tral position, the neutral indicator light
should be on, otherwise have a
Yamaha dealer check the electrical
circuit.
3. Start the engine by pushing the
start switch.
5PS-28199-E1 8/29/02 9:16 AM Page 40
Page 46 of 110
PERIODIC MAINTENANCE AND MINOR REPAIR
Owner’s tool kit .....................................................6-1
Periodic maintenance and lubrication chart .........6-2
Removing and installing cowlings and panels ......6-5
Checking the spark plugs .....................................6-7
Engine oil and oil filter element ............................6-8
Coolant ...............................................................6-11
Replacing the air filter element ...........................6-16
Adjusting the engine idling speed .......................6-17
Adjusting the throttle cable free play ..................6-18
Adjusting the valve clearance .............................6-18
Tires ...................................................................6-18
Cast wheels ........................................................6-22
Adjusting the clutch lever free play .....................6-22
Adjusting the brake pedal position .....................6-23
Adjusting the rear brake light switch ...................6-24
Checking the front and rear brake pads .............6-24
Checking the brake fluid level ............................6-25
Changing the brake fluid ....................................6-26
Drive chain slack ................................................6-27
Lubricating the drive chain .................................6-28
Checking and lubricating the cables ...................6-29
Checking and lubricating the throttle grip
and cable .........................................................6-29Checking and lubricating the brake and
shift pedals ......................................................6-30
Checking and lubricating the brake and
clutch levers ....................................................6-30
Checking and lubricating the sidestand ..............6-30
Lubricating the rear suspension .........................6-31
Checking the front fork .......................................6-31
Checking the steering .........................................6-32
Checking the wheel bearings .............................6-32
Battery ................................................................6-33
Replacing the fuses ............................................6-34
Replacing a headlight bulb .................................6-35
Replacing a tail/brake light bulb .........................6-37
Replacing a turn signal light bulb .......................6-37
Supporting the motorcycle ..................................6-38
Front wheel .........................................................6-39
Rear wheel .........................................................6-40
Troubleshooting ..................................................6-43
Troubleshooting charts .......................................6-44
6
5PS-28199-E1 8/29/02 9:16 AM Page 45
Page 50 of 110

6-4
PERIODIC MAINTENANCE AND MINOR REPAIR
6
EAU03884
NOTE:
8The air filter needs more frequent service if you are riding in unusually wet or dusty areas.
8Hydraulic brake service
9Regularly check and, if necessary, correct the brake fluid level.
9Every two years replace the internal components of the brake master cylinders and calipers, and change the
brake fluid.
9Replace the brake hoses every four years and if cracked or damaged.
22 Engine oil•Change.
•Check oil level and vehicle for oil leakage.√√√√√ √
23 Engine oil filter element•Replace.√√√
24
*Cooling system•Check coolant level and vehicle for coolant leakage.√√√√ √
•Change.Every 3 years
25
*Front and rear brake
switches•Check operation.√√√√√ √
26 Moving parts and cables•Lubricate.√√√√ √
27
*Throttle grip housing
and cable•Check operation and free play.
•Adjust the throttle cable free play if necessary.
•Lubricate the throttle grip housing and cable.√√√√ √
28
*Air induction system•Check the air cut-off valve, reed valve, and hose for
damage.
•Replace the entire air induction system if necessary.√√√√ √
29
*Muffler and exhaust pipe•Check the screw clamp for looseness.√√√√√
30
*Lights, signals and
switches•Check operation.
•Adjust headlight beam.√√√√√ √ NO. ITEM CHECK OR MAINTENANCE JOBODOMETER READING (× 1,000 km)
ANNUAL
CHECK
1 10203040
5PS-28199-E1 8/29/02 9:16 AM Page 49
Page 54 of 110
6-8
PERIODIC MAINTENANCE AND MINOR REPAIR
6
NOTE:
If a torque wrench is not available
when installing a spark plug, a good
estimate of the correct torque is
1/4–1/2 turn past finger tight.
However, the spark plug should be
tightened to the specified torque as
soon as possible.
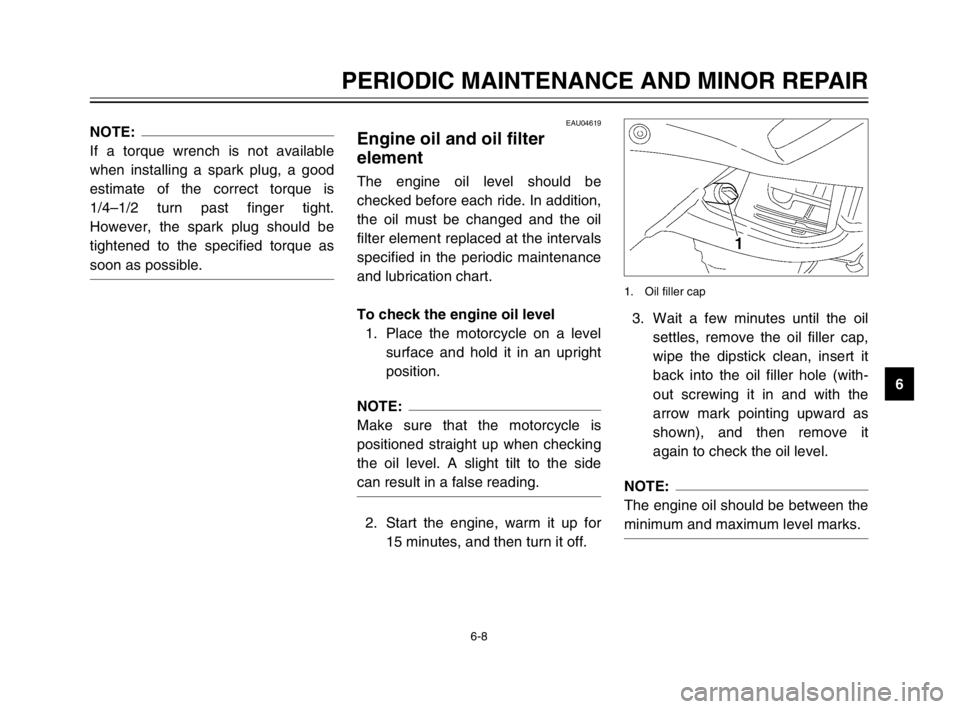
3. Wait a few minutes until the oil
settles, remove the oil filler cap,
wipe the dipstick clean, insert it
back into the oil filler hole (with-
out screwing it in and with the
arrow mark pointing upward as
shown), and then remove it
again to check the oil level.
NOTE:
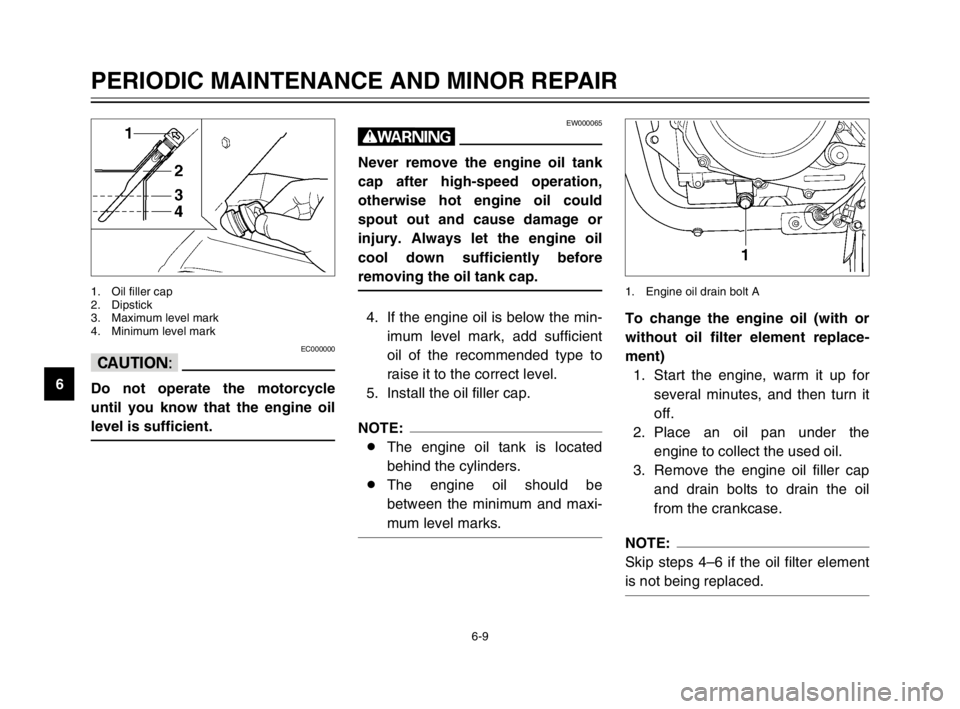
The engine oil should be between the
minimum and maximum level marks.
1. Oil filler cap
EAU04619
Engine oil and oil filter
element
Engine oil and oil filter elementThe engine oil level should be
checked before each ride. In addition,
the oil must be changed and the oil
filter element replaced at the intervals
specified in the periodic maintenance
and lubrication chart.
To check the engine oil level
1. Place the motorcycle on a level
surface and hold it in an upright
position.
NOTE:
Make sure that the motorcycle is
positioned straight up when checking
the oil level. A slight tilt to the side
can result in a false reading.
2. Start the engine, warm it up for
15 minutes, and then turn it off.
5PS-28199-E1 8/29/02 9:16 AM Page 53
Page 55 of 110
6-9
PERIODIC MAINTENANCE AND MINOR REPAIR
6
EC000000
cC
Do not operate the motorcycle
until you know that the engine oil
level is sufficient.
1. Oil filler cap
2. Dipstick
3. Maximum level mark
4. Minimum level mark
To change the engine oil (with or
without oil filter element replace-
ment)
1. Start the engine, warm it up for
several minutes, and then turn it
off.
2. Place an oil pan under the
engine to collect the used oil.
3. Remove the engine oil filler cap
and drain bolts to drain the oil
from the crankcase.
NOTE:
Skip steps 4–6 if the oil filter element
is not being replaced.
1. Engine oil drain bolt A
EW000065
w
Never remove the engine oil tank
cap after high-speed operation,
otherwise hot engine oil could
spout out and cause damage or
injury. Always let the engine oil
cool down sufficiently before
removing the oil tank cap.
4. If the engine oil is below the min-
imum level mark, add sufficient
oil of the recommended type to
raise it to the correct level.
5. Install the oil filler cap.
NOTE:
8The engine oil tank is located
behind the cylinders.
8The engine oil should be
between the minimum and maxi-
mum level marks.
5PS-28199-E1 8/29/02 9:16 AM Page 54
Page 57 of 110
6-11
PERIODIC MAINTENANCE AND MINOR REPAIR
6
ECA00133
cC
8In order to prevent clutch slip-
page (since the engine oil also
lubricates the clutch), do not
mix any chemical additives.
Do not use oils with a diesel
specification of “CD” or oils of
a higher quality than specified.
In addition, do not use oils
labeled “ENERGY CONSERV-
ING II” or higher.
8Make sure that no foreign
material enters the crankcase.
9. Start the engine, and then let it
idle for several minutes while
checking it for oil leakage. If oil is
leaking, immediately turn the
engine off and check for the
cause.
10. Turn the engine off, and then
check the oil level and correct it if
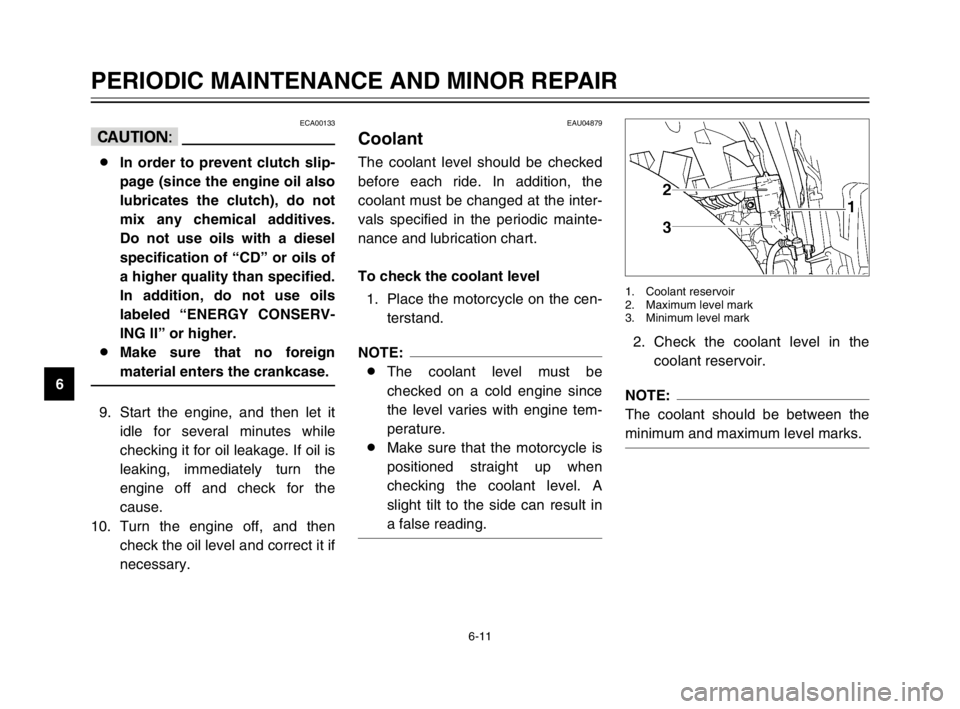
necessary.2. Check the coolant level in the
coolant reservoir.
NOTE:
The coolant should be between the
minimum and maximum level marks.
1. Coolant reservoir
2. Maximum level mark
3. Minimum level mark
EAU04879
CoolantCoolantThe coolant level should be checked
before each ride. In addition, the
coolant must be changed at the inter-
vals specified in the periodic mainte-
nance and lubrication chart.
To check the coolant level
Checking1. Place the motorcycle on the cen-
terstand.
NOTE:
8The coolant level must be
checked on a cold engine since
the level varies with engine tem-
perature.
8Make sure that the motorcycle is
positioned straight up when
checking the coolant level. A
slight tilt to the side can result in
a false reading.
5PS-28199-E1 8/29/02 9:16 AM Page 56
Page 72 of 110
6-26
PERIODIC MAINTENANCE AND MINOR REPAIR
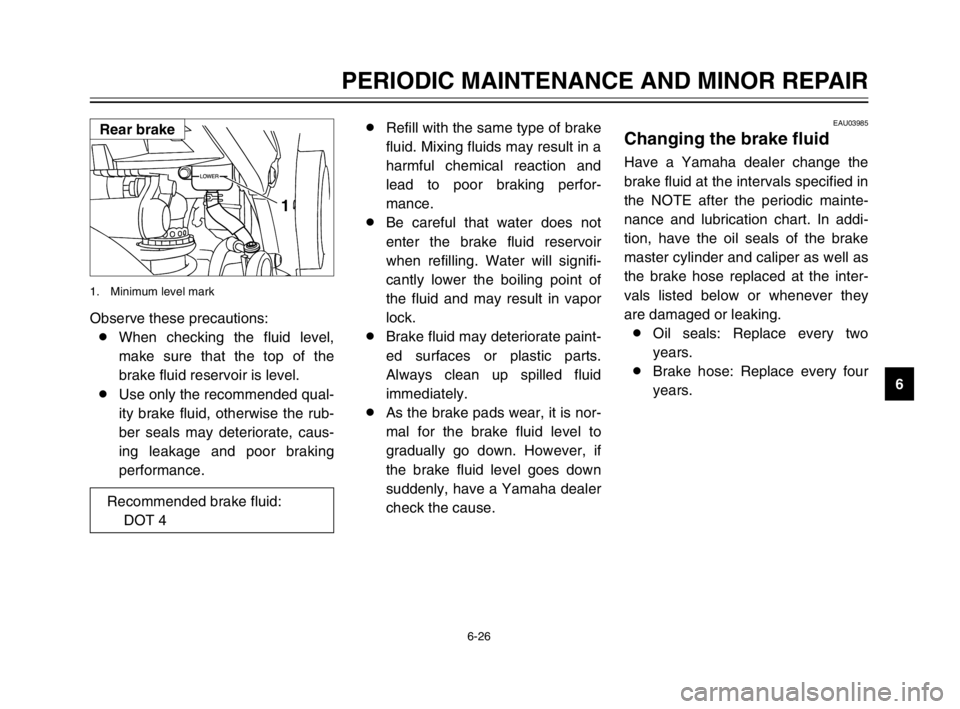
6 Observe these precautions:
8When checking the fluid level,
make sure that the top of the
brake fluid reservoir is level.
8Use only the recommended qual-
ity brake fluid, otherwise the rub-
ber seals may deteriorate, caus-
ing leakage and poor braking
performance.
1
1. Minimum level mark
EAU03985
Changing the brake fluidBrake fluid, changingHave a Yamaha dealer change the
brake fluid at the intervals specified in
the NOTE after the periodic mainte-
nance and lubrication chart. In addi-
tion, have the oil seals of the brake
master cylinder and caliper as well as
the brake hose replaced at the inter-
vals listed below or whenever they
are damaged or leaking.
8Oil seals: Replace every two
years.
8Brake hose: Replace every four
years. 8Refill with the same type of brake
fluid. Mixing fluids may result in a
harmful chemical reaction and
lead to poor braking perfor-
mance.
8Be careful that water does not
enter the brake fluid reservoir
when refilling. Water will signifi-
cantly lower the boiling point of
the fluid and may result in vapor
lock.
8Brake fluid may deteriorate paint-
ed surfaces or plastic parts.
Always clean up spilled fluid
immediately.
8As the brake pads wear, it is nor-
mal for the brake fluid level to
gradually go down. However, if
the brake fluid level goes down
suddenly, have a Yamaha dealer
check the cause.
Rear brake
Recommended brake fluid:
DOT 4
5PS-28199-E1 8/29/02 9:16 AM Page 71