power steering YAMAHA TMAX 2015 Owners Manual
[x] Cancel search | Manufacturer: YAMAHA, Model Year: 2015, Model line: TMAX, Model: YAMAHA TMAX 2015Pages: 112, PDF Size: 6.38 MB
Page 8 of 112
TABLE OF CONTENTSSAFETY INFORMATION................... 1-1
Further safe-riding points................. 1-5
DESCRIPTION ................................... 2-1
Left view .......................................... 2-1
Right view ........................................ 2-2
Controls and instrument s................. 2-3
SMART KEY SYSTEM ....................... 3-1
Smart key system ......... ................... 3-1
Operating range of the smart key
system ....................... ................... 3-2
Handling of the smart key and mechanical key ............................ 3-3
Smart key ........................................ 3-5
Replacing the smart key battery ...... 3-6
Vehicle power on and steering lock release .................................. 3-7
Powering off th e vehicle .................. 3-8
How to lock the steering .................. 3-9
Seat opening and closin g ................ 3-9
Parking mode ................................ 3-10
INSTRUMENT AND CONTROL
FUNCTIONS ....................................... 4-1
Indicator lights and warning lights ... 4-1
Speedometer ................................... 4-2
Tachometer ..................................... 4-3
Multi-function display ....................... 4-3
Handlebar switches ......................... 4-9
Front brake lever ........................... 4-11 Rear brake lever............................ 4-11
Rear brake lock lever .................... 4-12
ABS (for ABS models)...
................ 4-13
Fuel tank cap................................. 4-14
Fuel ............................................... 4-15
Catalytic converter ........................ 4-16
Adjusting the rider backrest........... 4-17
Helmet holder ................................ 4-17
Storage compartments .................. 4-18
Windshield..................................... 4-20
Rear view mirrors .......................... 4-21
Shock absorber assembly ............. 4-22
Sidestand ...................................... 4-22
Ignition circuit cut- off system ......... 4-23
Auxiliary DC connector.................. 4-25
FOR YOUR SAFETY –
PRE-OPERATION CHECKS ............. 5-1
OPERATION AND IMPORTANT
RIDING POINTS ................................. 6-1
Starting the engine .......................... 6-1
Starting off ....................................... 6-2
Acceleration and deceleration ......... 6-3
Braking ............................................ 6-3
Tips for reducing fuel consumption ................................ 6-4
Engine break-in ............................... 6-4
Parking ............................................ 6-5 PERIODIC MAINTENANCE AND
ADJUSTMENT
.................................... 7-1
Owner’s tool kit ................................ 7-2
Periodic maintenance chart for the emission control syst em ............... 7-3
General maintenance and lubrication chart ............................ 7-4
Removing and installing panels ....... 7-8
Checking the spark plugs .............. 7-10
Engine oil and oil filt er cartridge..... 7-11
Coolant .......................................... 7-14
Replacing the air filter element ...... 7-16
Adjusting the engine idling speed............ ............................ .. 7-16
Checking the throttle grip free play ............................................. 7-17
Valve clearance ............................. 7-17
Tires ............................................... 7-18
Cast wheels ................................... 7-20
Checking the front and rear brake
lever free play ............................. 7-20
Adjusting the rear brake lock cable ........................................... 7-21
Checking the rear brake lock ......... 7-22
Checking the front and rear brake pads............................................ 7-22
Checking the brake fluid level ........ 7-23
Changing the brake fluid ................ 7-24
Drive belt slack .............................. 7-24
Checking and lubricating the
cables
......................................... 7-25
2PW-9-E0_1.book 1 ページ 2015年2月19日 木曜日 午後3時30分
Page 13 of 112
SAFETY INFORMATION
1-4
12
3
4
5
6
7
8
9
10
11
12
Aftermarket Parts, Accessories,
and Modifications
While you may find aftermarket prod-
ucts similar in design and quality to
genuine Yamaha accessories, recog-
nize that some aftermarket accessories
or modifications are not suitable be-
cause of potential safety hazards to you
or others. Installing aftermarket prod-
ucts or having other modifications per-
formed to your vehicle that change any
of the vehicle’s design or operation
characteristics can put you and others
at greater risk of serious injury or death.
You are responsible for injuries related
to changes in the vehicle.
Keep the following guidelines in mind,
as well as those provided under “Load-
ing” when mounting accessories.
Never install accessories or carry
cargo that would impair the perfor-
mance of your scooter. Carefully
inspect the accessory before using
it to make sure that it does not in
any way reduce ground clearance
or cornering clearance, limit sus-
pension travel, steering travel or
control operation, or obscure lights
or reflectors. Accessories fitted to the handle-
bar or the front fork area can
create instability due to improper
weight distribution or aerody-
namic changes. If accessories
are added to the handlebar or
front fork area, they must be as
lightweight as possible and
should be kept to a minimum.
Bulky or large accessories may seriously affect the stability of
the scooter due to aerodynamic
effects. Wind may attempt to lift
the scooter, or the scooter may
become unstable in cross
winds. These accessories may
also cause instability when
passing or being passed by
large vehicles.
Certain accessories can dis- place the operator from his or
her normal riding position. This
improper position limits the free-
dom of movement of the opera-
tor and may limit control ability,
therefore, such accessories are
not recommended.
Use caution when adding electri-
cal accessories. If electrical acces- sories exceed the capacity of the
scooter’s electrical system, an
electric failure could result, which
could cause a dangerous loss of
lights or engine power.
Aftermarket Tires and Rims
The tires and rims that came with your
scooter were designed to match the
performance capabilities and to provide
the best combination of handling, brak-
ing, and comfort. Other tires, rims, siz-
es, and combinations may not be
appropriate. Refer to page 7-18 for tire
specifications and more information on
replacing your tires.
Transporting the Scooter
Be sure to observe following instruc-
tions before transporting the scooter in
another vehicle.
Remove all loose items from the
scooter.
Point the front wheel straight
ahead on the trailer or in the truck
bed, and choke it in a rail to pre-
vent movement.
Secure the scooter with tie-downs
or suitable straps that are attached
2PW-9-E0_1.book 4 ページ 2015年2月19日 木曜日 午後3時30分
Page 24 of 112
SMART KEY SYSTEM
3-7
1
23
4
5
6
7
8
9
10
11
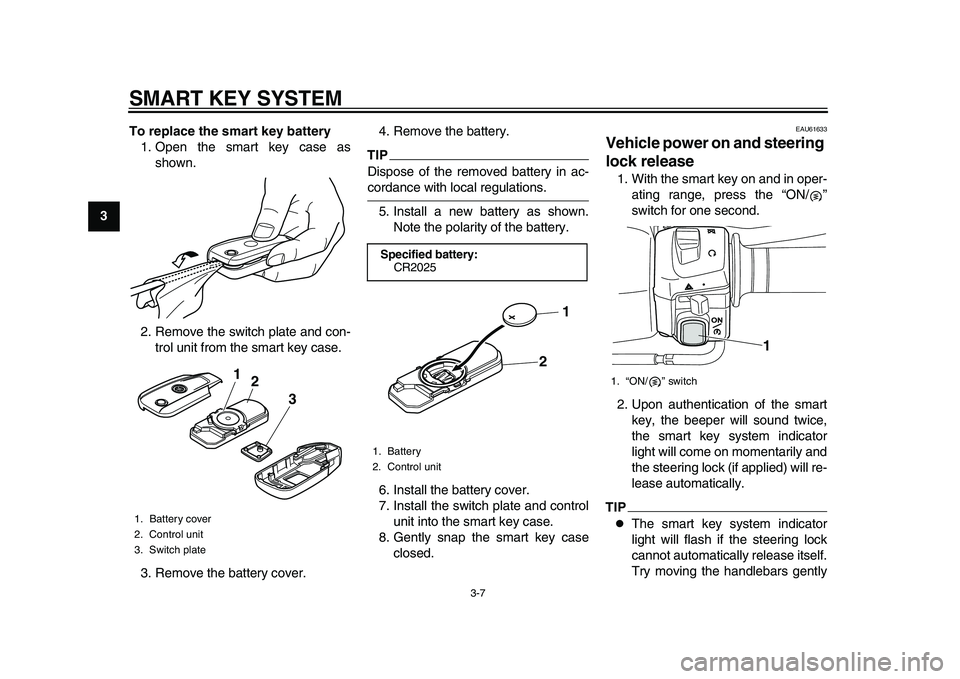
12 To replace the smart key battery
1. Open the smart key case as shown.
2. Remove the switch plate and con- trol unit from the smart key case.
3. Remove the battery cover. 4. Remove the battery.
TIPDispose of the removed battery in ac-cordance with local regulations.
5. Install a new battery as shown. Note the polarity of the battery.
6. Install the battery cover.
7. Install the switch plate and control unit into the smart key case.
8. Gently snap the smart key case closed.
EAU61633
Vehicle power on and steering
lock release1. With the smart key on and in oper-ating range, press the “ON/ ”
switch for one second.
2. Upon authentication of the smart key, the beeper will sound twice,
the smart key system indicator
light will come on momentarily and
the steering lock (if applied) will re-
lease automatically.TIP
The smart key system indicator
light will flash if the steering lock
cannot automatically release itself.
Try moving the handlebars gently
1. Battery cover
2. Control unit
3. Switch plate
3
1
2
Specified battery:
CR20251. Battery
2. Control unit
2 1
1. “ON/ ” switch
1
2PW-9-E0_1.book 7 ページ 2015年2月19日 木曜日 午後3時30分
Page 25 of 112
SMART KEY SYSTEM
3-8
1
234
5
6
7
8
9
10
11
12
to the left or right and then press
the “ON/ ” switch.
If the steering continues to be
locked and will not release, the
smart key system indicator light
will flash 16 times and the steering
lock release operation will stop
midway. Move the handlebar gen-
tly to the left and right to help re-
lease the steering lock and thenpress the “ON/ ” switch again.
NOTICE
ECA15825
If the steering lock will not release
and the smart key system indicator
light is flashing, have a Yamahadealer check the smart key system.
3. The power of the vehicle is turned on once the steering lock is com-
pletely released. The smart key
system indicator light will go off
and the multi-function meter dis-
play will come on.
4. The engine can now be started. (See page 6-1.)
EAU61693
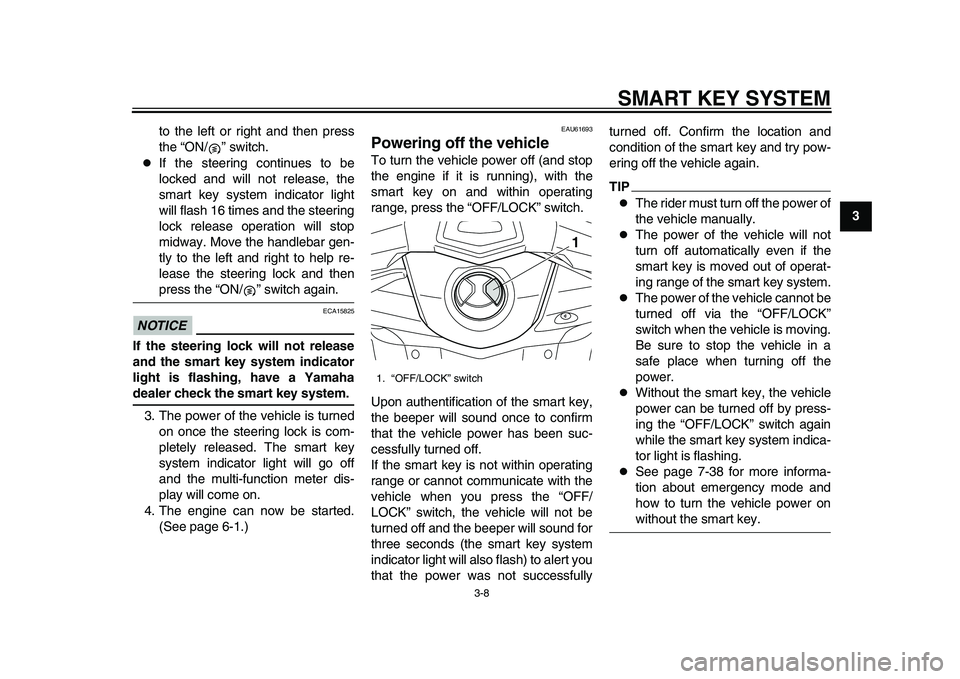
Powering off the vehicleTo turn the vehicle power off (and stop
the engine if it is running), with the
smart key on and within operating
range, press the “OFF/LOCK” switch.
Upon authentification of the smart key,
the beeper will sound once to confirm
that the vehicle power has been suc-
cessfully turned off.
If the smart key is not within operating
range or cannot communicate with the
vehicle when you press the “OFF/
LOCK” switch, the vehicle will not be
turned off and the beeper will sound for
three seconds (the smart key system
indicator light will also flash) to alert you
that the power was not successfully turned off. Confirm the location and
condition of the smart key and try pow-
ering off the vehicle again.
TIP
The rider must turn off the power of
the vehicle manually.
The power of the vehicle will not
turn off automatically even if the
smart key is moved out of operat-
ing range of the smart key system.
The power of the vehicle cannot be
turned off via the “OFF/LOCK”
switch when the vehicle is moving.
Be sure to stop the vehicle in a
safe place when turning off the
power.
Without the smart key, the vehicle
power can be turned off by press-
ing the “OFF/LOCK” switch again
while the smart key system indica-
tor light is flashing.
See page 7-38 for more informa-
tion about emergency mode and
how to turn the vehicle power onwithout the smart key.
1. “OFF/LOCK” switch
1
2PW-9-E0_1.book 8 ページ 2015年2月19日 木曜日 午後3時30分
Page 26 of 112
SMART KEY SYSTEM
3-9
1
23
4
5
6
7
8
9
10
11
12
EAU61612
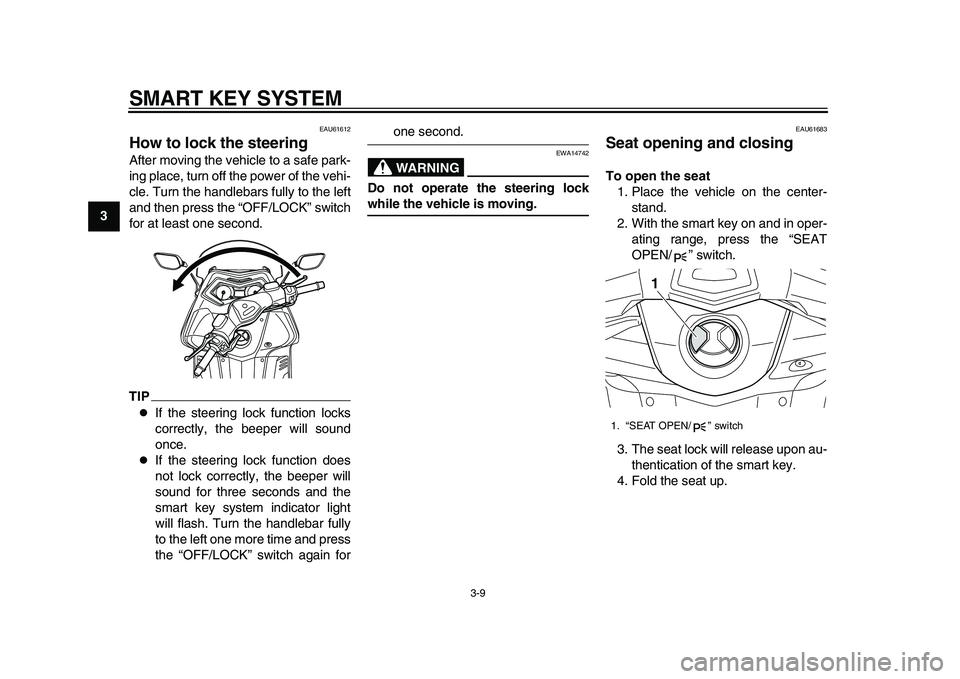
How to lock the steeringAfter moving the vehicle to a safe park-
ing place, turn off the power of the vehi-
cle. Turn the handlebars fully to the left
and then press the “OFF/LOCK” switch
for at least one second.TIP
If the steering lock function locks
correctly, the beeper will sound
once.
If the steering lock function does
not lock correctly, the beeper will
sound for three seconds and the
smart key system indicator light
will flash. Turn the handlebar fully
to the left one more time and press
the “OFF/LOCK” switch again for
one second.WARNING
EWA14742
Do not operate the steering lockwhile the vehicle is moving.
EAU61683
Seat opening and closingTo open the seat 1. Place the vehicle on the center- stand.
2. With the smart key on and in oper- ating range, press the “SEAT
OPEN/ ” switch.
3. The seat lock will release upon au- thentication of the smart key.
4. Fold the seat up.1. “SEAT OPEN/ ” switch
1
2PW-9-E0_1.book 9 ページ 2015年2月19日 木曜日 午後3時30分
Page 56 of 112
OPERATION AND IMPORTANT RIDING POINTS
6-2
1
2
3
4
56
7
8
9
10
11
12 the steering lock (if applied) will be
released. The engine trouble
warning light should come on for a
few seconds and then go off.
For ABS models:
The ABS warning light should
come on when the power of the ve-
hicle is turned on, and go off once
the vehicle reaches a traveling
speed of 10 km/h (6 mi/h) or high-
er.
NOTICE
ECA21980
If the engine warning light or the
ABS warning light (for
ABS-equipped models) does not
come on and then go off as ex-
plained above, see page 4-1 for thewarning light circuit check.
3. Close the throttle completely.
4. Start the engine by pushing the “ON/ ” switch while applying the
front or rear brake.
If the engine does not start within 5
seconds of pressing the “ON/ ”
switch, wait 10 seconds before
pressing the switch again to allow the battery voltage to restore.
NOTICE
ECA11043
For maximum engine life, never ac-
celerate hard when the engine iscold!
EAU45093
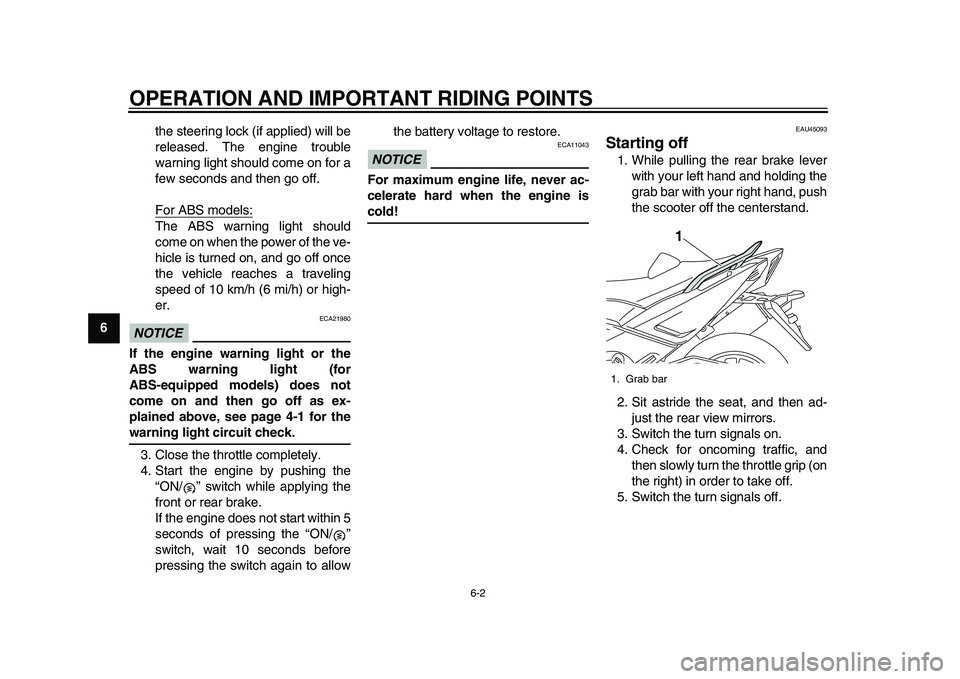
Starting off1. While pulling the rear brake lever
with your left hand and holding the
grab bar with your right hand, push
the scooter off the centerstand.
2. Sit astride the seat, and then ad- just the rear view mirrors.
3. Switch the turn signals on.
4. Check for oncoming traffic, and then slowly turn the throttle grip (on
the right) in order to take off.
5. Switch the turn signals off.1. Grab bar
1
2PW-9-E0_1.book 2 ページ 2015年2月19日 木曜日 午後3時30分
Page 108 of 112
11-1
1
2
3
4
5
6
7
8
9
1011
12
INDEXAABS (for ABS models) .............................4-13
ABS warning light (for ABS models) ..........4-1
Acceleration and deceleration....................6-3
Air filter element, replacing ......................7-16
Auxiliary DC connector ............................4-25
Auxiliary light ............................................7-32BBattery......................................................7-28
Brake fluid, changing ...............................7-24
Brake fluid level, checking .......................7-23
Brake lever, front......................................4-11
Brake lever, rear ......................................4-11
Brake levers, lubricating...........................7-25
Braking .......................................................6-3CCables, checking and lubricating .............7-25
Care ...........................................................8-1
Catalytic converter ...................................4-16
Centerstand and sidestand, checking and lubricating .......................................7-26
Coolant.....................................................7-14DDimmer switch .........................................4-10
Drive belt slack.........................................7-24EEmergency mode .....................................7-38
Engine break-in ..........................................6-4
Engine idling speed..................................7-16
Engine oil and oil filter cartridge ...............7-11
Engine serial number ...............................10-1
Engine stop switch ...................................4-10
Engine trouble warning light.......................4-1
FFront and rear brak e lever free play,
checking ................................................ 7-20
Front and rear brake pads, checking ....... 7-22
Front fork, checking ................................. 7-27
Fuel.......................................................... 4-15
Fuel consumption, tips for reducing........... 6-4
Fuel tank cap ........................................... 4-14
Fuses, replacing ...................................... 7-29HHandlebar switches ................................... 4-9
Hazard switch .......................................... 4-10
Headlights................................................ 7-31
Helmet holder .......................................... 4-17
High beam indicator light ........................... 4-1
Horn switch .............................................. 4-10
How to lock the steering ............................ 3-9IIdentification numbers ............................. 10-1
Ignition circuit cut-off system ................... 4-23
Indicator lights and warning lights ............. 4-1KKey, handling of smart and mechanical
key........................................................... 3-3LLicense plate light bulb, replacing ........... 7-33MMaintenance and lubrication, periodic ....... 7-4
Maintenance, emission control system...... 7-3
Matte color, caution ................................... 8-1
Model label .............................................. 10-2
Multi-function display ................................. 4-3OON/Start switch........................................ 4-10 Operating range of the smart key
system .................................................... 3-2
PPanels, removing and installing ................ 7-8
Parking ...................................................... 6-5
Parking mode .......................................... 3-10
Part locations ............................................ 2-1
Pass switch ............................................. 4-10
Powering off the vehicle ............................ 3-8RRear brake lock cable, adjusting ............. 7-21
Rear brake lock, checking ....................... 7-22
Rear brake lock lever .............................. 4-12
Rear view mirrors .................................... 4-21
Rider backrest, adjusting......................... 4-17SSafe-riding points ...................................... 1-5
Safety information ..................................... 1-1
Seat opening and closing .......................... 3-9
Shock absorber assembly ....................... 4-22
Sidestand ................................................ 4-22
Smart key .................................................. 3-5
Smart key battery, replacing ..................... 3-6
Smart key system...................................... 3-1
Smart key system indicator light ............... 4-2
Spark plugs, checking ............................. 7-10
Specifications ............................................ 9-1
Speedometer............................................. 4-2
Starting off ................................................. 6-2
Starting the engine .................................... 6-1
Steering, checking................................... 7-27
Storage...................................................... 8-4
Storage compartments ............................ 4-18
2PW-9-E0_1.book 1 ページ 2015年2月19日 木曜日 午後3時30分
Page 109 of 112
INDEX
11-2
1
2
3
4
5
6
7
8
9
101112
TTachometer ............................................... 4-3
Tail/brake light ......................................... 7-32
Throttle grip and cable, checking and lubricating .............................................. 7-25
Throttle grip free play, checking .............. 7-17
Tires......................................................... 7-18
Tool kit ....................................................... 7-2
Troubleshooting ....................................... 7-34
Troubleshooting charts ............................ 7-36
Turn signal indicator lights ......................... 4-1
Turn signal light bulb (front), replacing .... 7-32
Turn signal switch .................................... 4-10VValve clearance ....................................... 7-17
Vehicle identification number................... 10-1
Vehicle power on and steering lock release..................................................... 3-7WWheel bearings, c hecking ....................... 7-28
Wheels..................................................... 7-20
Windshield ............................................... 4-20
2PW-9-E0_1.book 2 ページ 2015年2月19日 木曜日 午後3時30分