engine YAMAHA TTR50 2006 User Guide
[x] Cancel search | Manufacturer: YAMAHA, Model Year: 2006, Model line: TTR50, Model: YAMAHA TTR50 2006Pages: 390, PDF Size: 9.69 MB
Page 28 of 390
1 - 2
GEN
INFO
MACHINE IDENTIFICATION
EC120001
MACHINE IDENTIFICATION
There are two significant reasons for knowing
the serial number of your machine:
1. When ordering parts, you can give the
number to your Yamaha dealer for positive
identification of the model you own.
2. If your machine is stolen, the authorities will need the number to search for and identify
your machine.
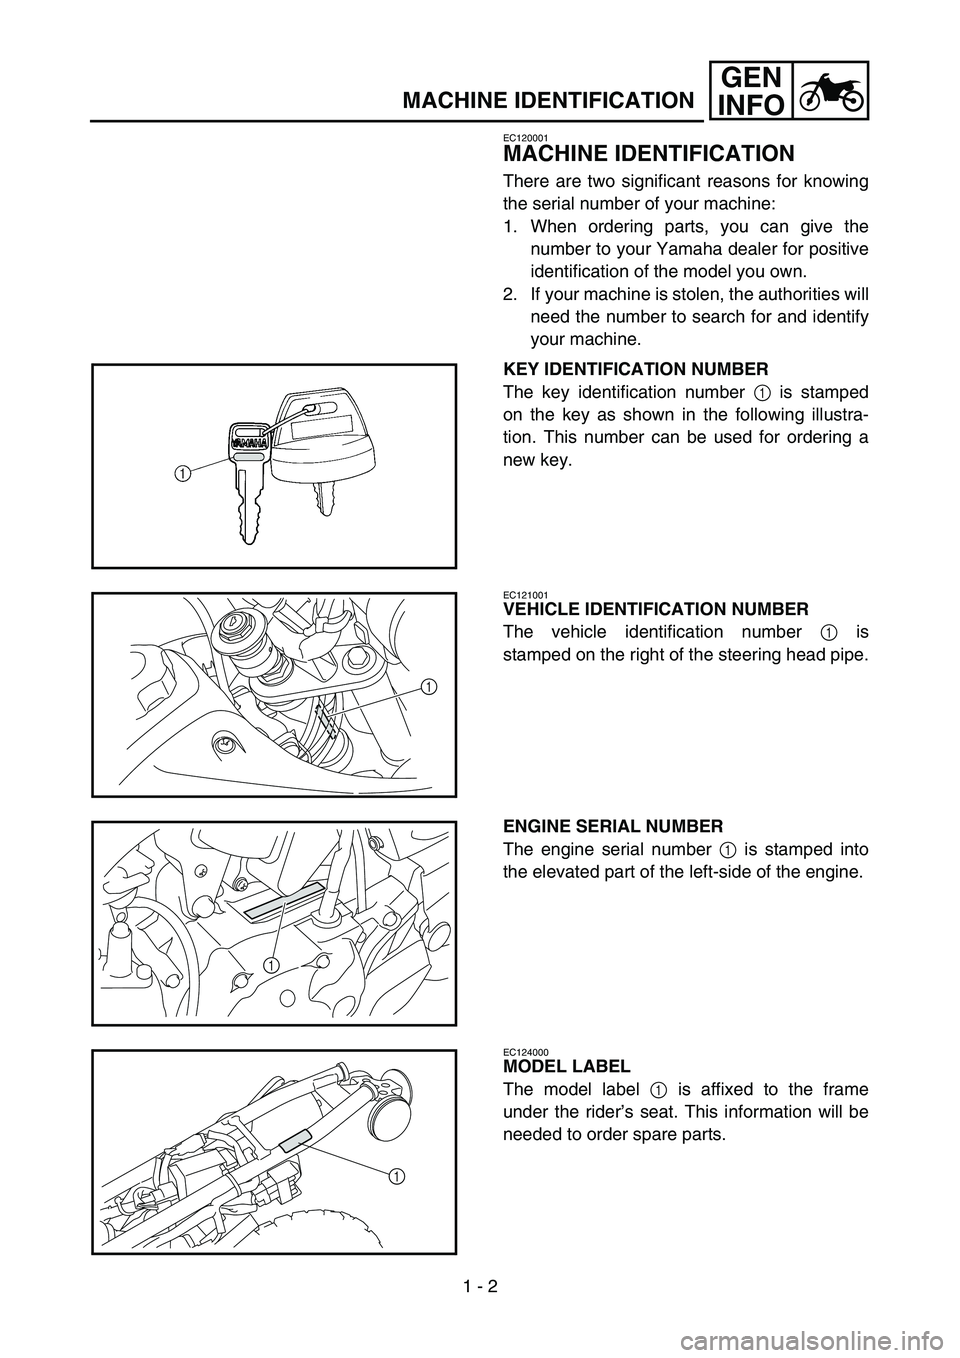
KEY IDENTIFICATION NUMBER
The key identification number 1 is stamped
on the key as shown in the following illustra-
tion. This number can be used for ordering a
new key.
EC121001
VEHICLE IDENTIFICATION NUMBER
The vehicle identification number 1 is
stamped on the right of the steering head pipe.
1
ENGINE SERIAL NUMBER
The engine serial number 1 is stamped into
the elevated part of the left-side of the engine.
1
EC124000
MODEL LABEL
The model label 1 is affixed to the frame
under the rider ’s seat. This information will be
needed to order spare parts.
1
Page 32 of 390
1 - 4
GEN
INFO
IMPORTANT INFORMATION
EC132000
ALL REPLACEMENT PARTS
1. We recommend to use Yamaha genuine
parts for all replacements. Use oil and/or
grease recommended by Yamaha for
assembly and adjustment.
EC133000
GASKETS, OIL SEALS AND O-RINGS
1. All gaskets, oil seals, and O-rings shouldbe replaced when an engine is overhauled.
All gasket surfaces, oil seal lips, and O-
rings must be cleaned.
2. Properly oil all mating parts and bearings
during reassembly. Apply grease to the oil
seal lips.
EC134000
LOCK WASHERS/PLATES AND COTTER
PINS
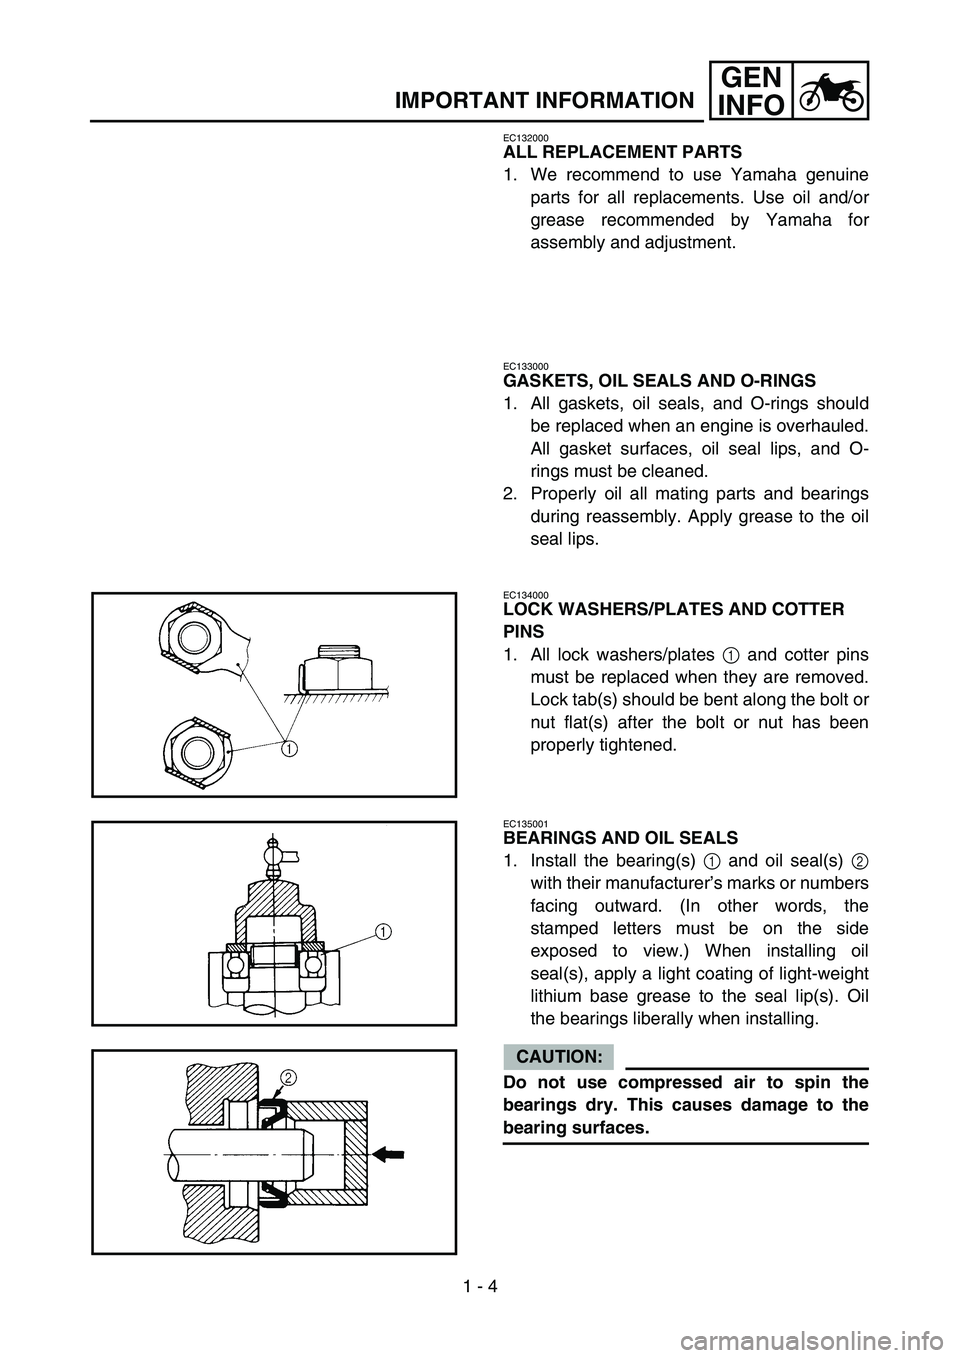
1. All lock washers/plates 1 and cotter pins
must be replaced when they are removed.
Lock tab(s) should be bent along the bolt or
nut flat(s) after the bolt or nut has been
properly tightened.
EC135001
BEARINGS AND OIL SEALS
1. Install the bearing(s) 1 and oil seal(s) 2
with their manufacturer ’s marks or numbers
facing outward. (In other words, the
stamped letters must be on the side
exposed to view.) When installing oil
seal(s), apply a light coating of light-weight
lithium base grease to the seal lip(s). Oil
the bearings liberally when installing.
CAUTION:
Do not use compressed air to spin the
bearings dry. This causes damage to the
bearing surfaces.
Page 42 of 390
1 - 8
GEN
INFO
CONTROL FUNCTIONS
EC150000
CONTROL FUNCTIONS
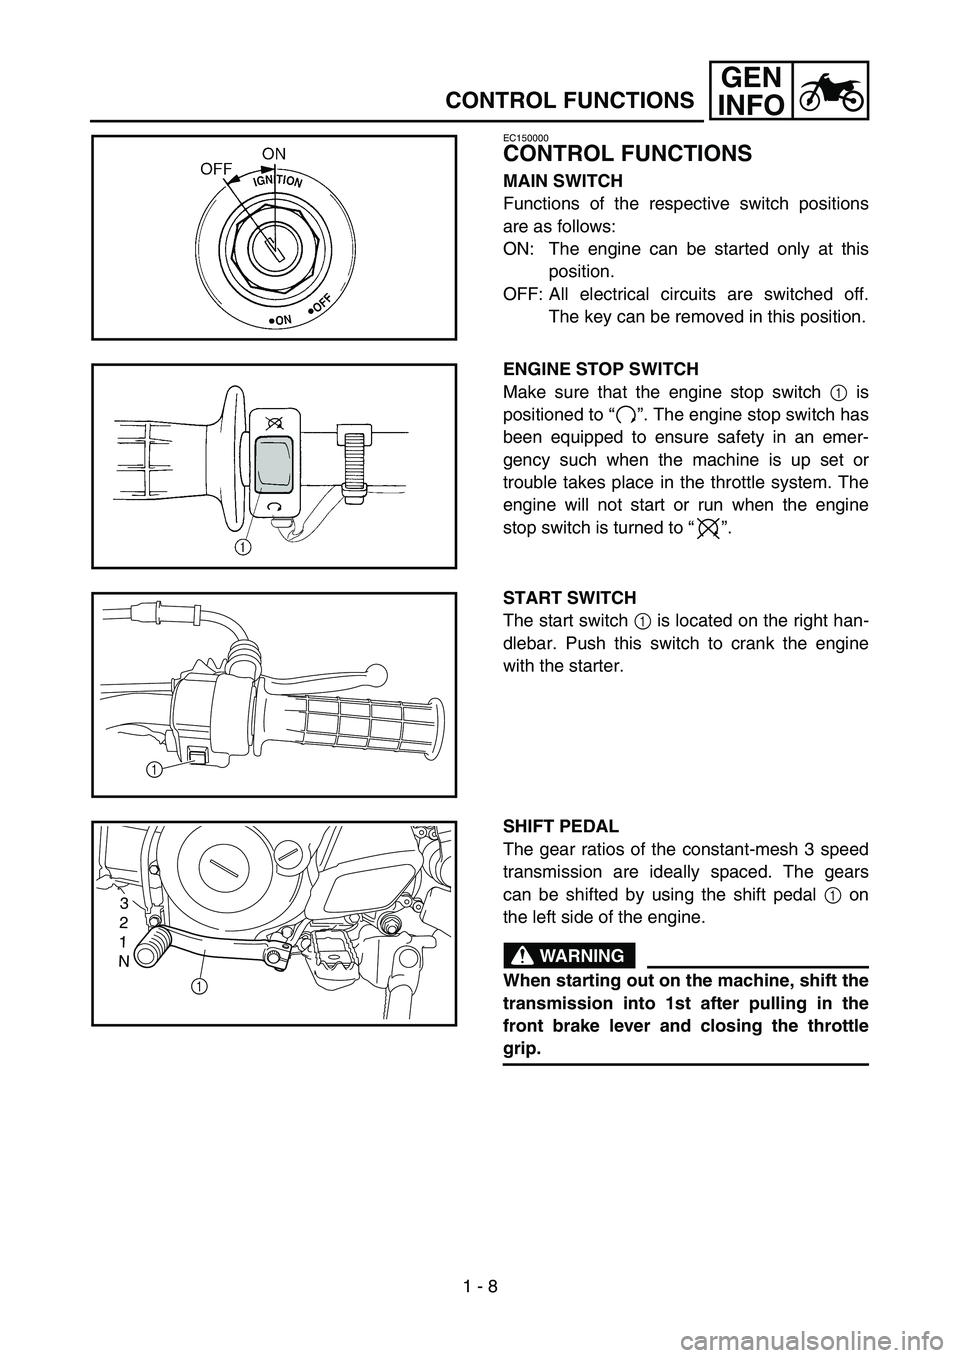
MAIN SWITCH
Functions of the respective switch positions
are as follows:
ON: The engine can be started only at this
position.
OFF: All electrical circuits are switched off. The key can be removed in this position.
ENGINE STOP SWITCH
Make sure that the engine stop switch 1 is
positioned to “”. The engine stop switch has
been equipped to ensure safety in an emer-
gency such when the machine is up set or
trouble takes place in the throttle system. The
engine will not start or run when the engine
stop switch is turned to “”.
START SWITCH
The start switch 1 is located on the right han-
dlebar. Push this switch to crank the engine
with the starter.
1
SHIFT PEDAL
The gear ratios of the constant-mesh 3 speed
transmission are ideally spaced. The gears
can be shifted by using the shift pedal 1 on
the left side of the engine.
WARNING
When starting out on the machine, shift the
transmission into 1st after pulling in the
front brake lever and closing the throttle
grip.
3
2
1
N
1
Page 44 of 390
1 - 9
GEN
INFO
CONTROL FUNCTIONS
EC155001
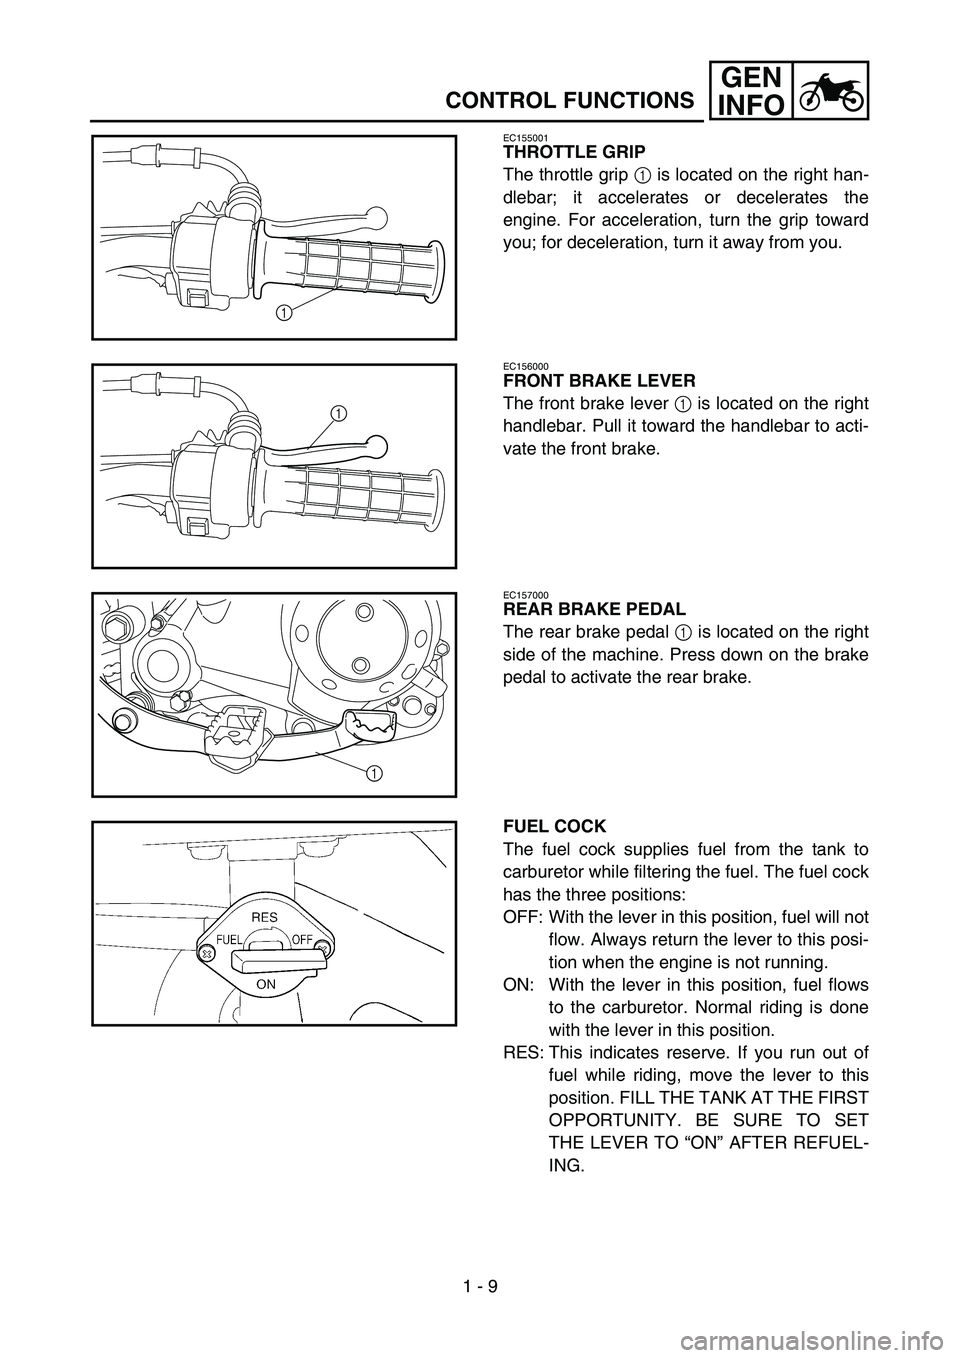
THROTTLE GRIP
The throttle grip 1 is located on the right han-
dlebar; it accelerates or decelerates the
engine. For acceleration, turn the grip toward
you; for deceleration, turn it away from you.
1
EC156000
FRONT BRAKE LEVER
The front brake lever 1 is located on the right
handlebar. Pull it toward the handlebar to acti-
vate the front brake.
1
EC157000
REAR BRAKE PEDAL
The rear brake pedal 1 is located on the right
side of the machine. Press down on the brake
pedal to activate the rear brake.
1
FUEL COCK
The fuel cock supplies fuel from the tank to
carburetor while filtering the fuel. The fuel cock
has the three positions:
OFF: With the lever in this position, fuel will not flow. Always return the lever to this posi-
tion when the engine is not running.
ON: With the lever in this position, fuel flows to the carburetor. Normal riding is done
with the lever in this position.
RES: This indicates reserve. If you run out of fuel while riding, move the lever to this
position. FILL THE TANK AT THE FIRST
OPPORTUNITY. BE SURE TO SET
THE LEVER TO “ON ” AFTER REFUEL-
ING.
Page 46 of 390
1 - 10
GEN
INFO
CONTROL FUNCTIONS
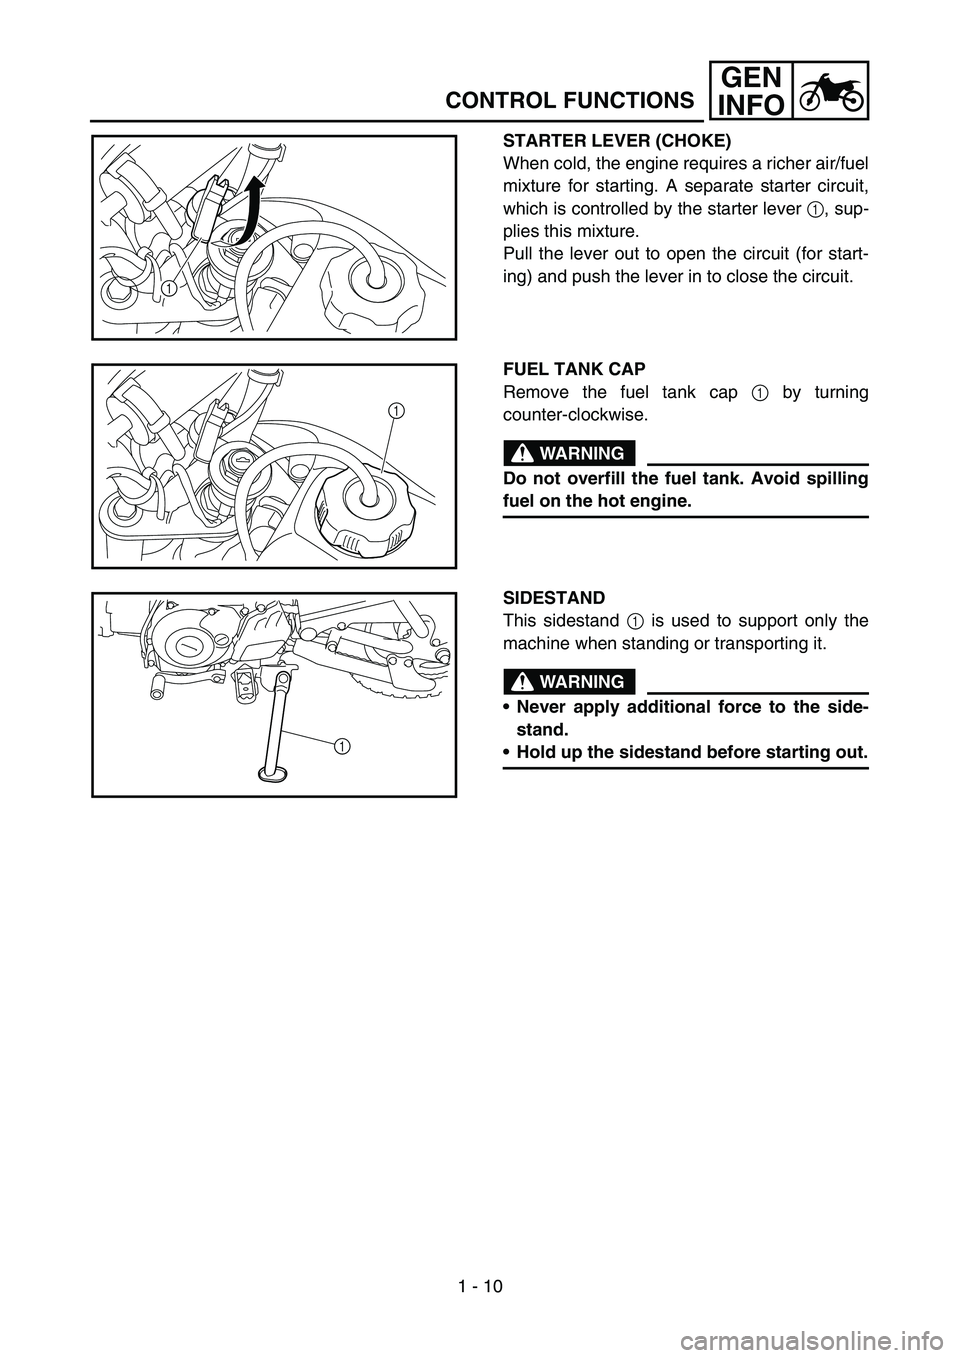
STARTER LEVER (CHOKE)
When cold, the engine requires a richer air/fuel
mixture for starting. A separate starter circuit,
which is controlled by the starter lever 1, sup-
plies this mixture.
Pull the lever out to open the circuit (for start-
ing) and push the lever in to close the circuit.
1
FUEL TANK CAP
Remove the fuel tank cap 1 by turning
counter-clockwise.
WARNING
Do not overfill the fuel tank. Avoid spilling
fuel on the hot engine.
1
SIDESTAND
This sidestand 1 is used to support only the
machine when standing or transporting it.
WARNING
Never apply additional force to the side-
stand.
Hold up the sidestand before starting out.1
Page 48 of 390
1 - 11
GEN
INFO
FUEL
Use regular gasoline. Always use fresh, name
brand gasoline.
WARNING
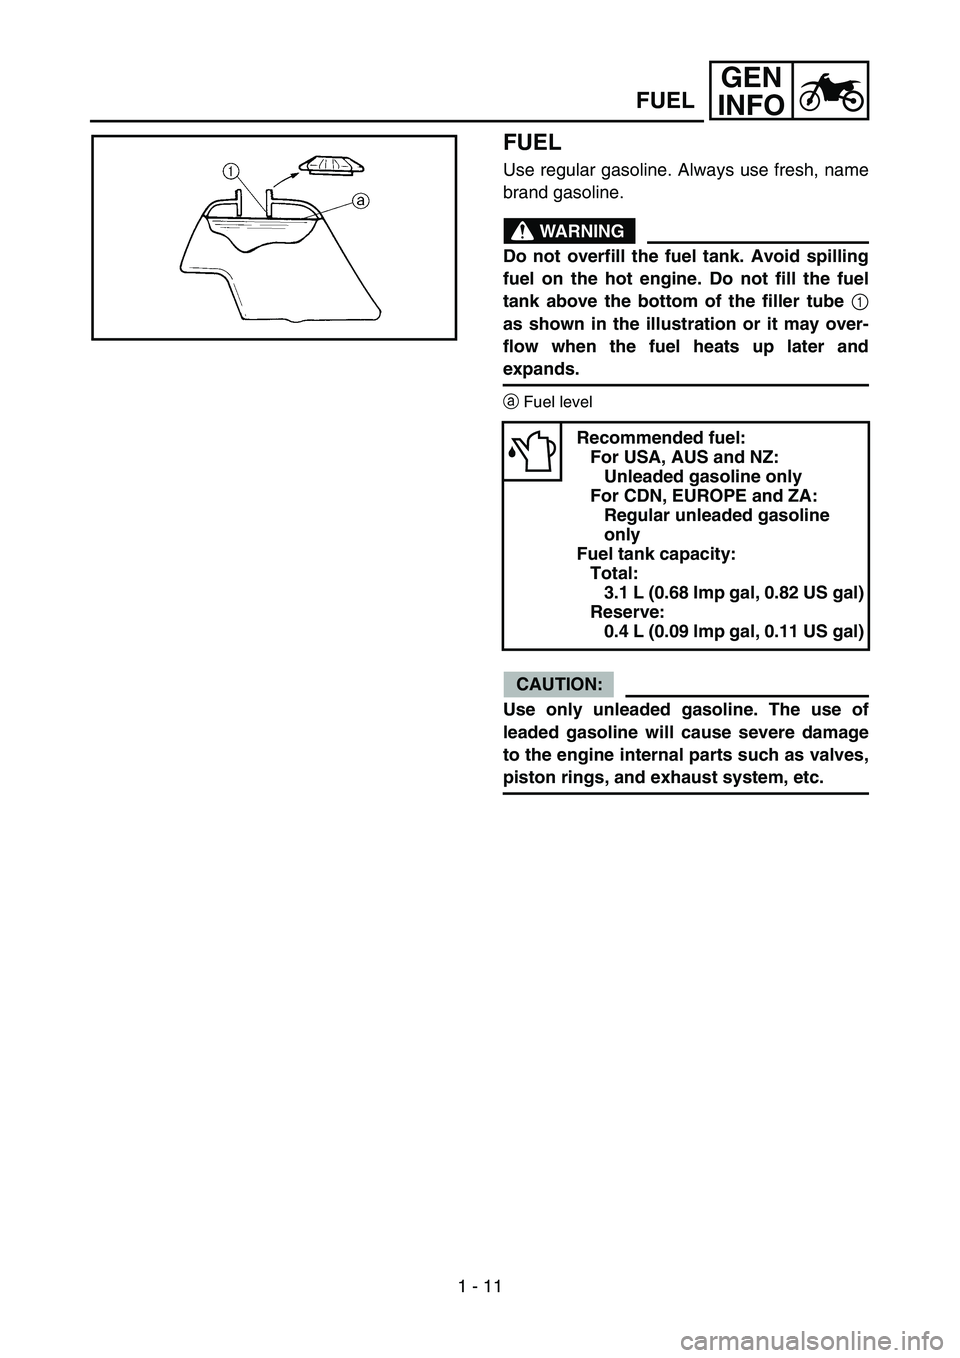
Do not overfill the fuel tank. Avoid spilling
fuel on the hot engine. Do not fill the fuel
tank above the bottom of the filler tube 1
as shown in the illustration or it may over-
flow when the fuel heats up later and
expands.
a Fuel level
CAUTION:
Use only unleaded gasoline. The use of
leaded gasoline will cause severe damage
to the engine internal parts such as valves,
piston rings, and exhaust system, etc.
Recommended fuel: For USA, AUS and NZ: Unleaded gasoline only
For CDN, EUROPE and ZA: Regular unleaded gasoline
only
Fuel tank capacity: Total: 3.1 L (0.68 Imp gal, 0.82 US gal)
Reserve: 0.4 L (0.09 lmp gal, 0.11 US gal)
FUEL
Page 50 of 390
GEN
INFO
1 - 12
STARTING AND OPERATION
STARTING AND OPERATION
CAUTION:
Prior to operating the machine, perform
steps listed in pre-operation check list.
WARNING
Never start your engine or let it run for any
length of time in a closed area. The exhaust
fumes are poisonous and can cause loss of
consciousness and death within a short
time. Always operate your machine in an
area with adequate ventilation.
STARTING A COLD ENGINE
WARNING
Before starting the engine, be sure to shift
the transmission into neutral.
NOTE:
This model is equipped with an ignition cir-
cuit cut-off system. In case of electric start-
ing, the engine can be started only when the
transmission is in neutral.
If the engine fails to start by pushing the start
switch, release the switch, wait a few sec-
onds, and then try again. Each starting
attempt should be as short as possible to
preserve the battery. Do not crank the
engine more than 10 seconds on any one
attempt.
1. Turn the fuel cock to “ON ”.
2. Turn the main switch to “ON ”.
3. Shift the transmission into neutral.
4. Operate the starter (choke) and completely close the throttle grip.
5. Slide the “engine stop ” switch to the “”.
6. Start the engine by pushing the start switch.
7. After the engine starts, warm up for one or
two minutes. Make sure the stater (choke) is
returned to the original position before riding. STARTING A WARM ENGINE
To start a warm engine, refer to the
“START-
ING A COLD ENGINE ” section. The starter
(choke) should not be used. The throttle
should be opened slightly.
CAUTION:
See “Engine break-in Section ” prior to
operating engine for the first time.
WARMING UP
To get maximum engine life, always “warm-up ”
the engine before starting off. Never accelerate
hard with a cold engine! To see whether or not
the engine is warm, see if it responds to throttle
normally with the stater (choke) turned off.
WARNING
Before starting off, be sure to turn up or
remove the side stand.
Failure to retract the side stand completely
can result in a serious accident when you
try to turn a corner.
ENGINE BREAK-IN
Break-in is important to better fit the moving
and sliding parts as well as the installed parts.
It is also important to accustom the rider to the
machine better.
Avoid full-throttle run on a new machine for the
first 5 hours.
After the trial run, check for loose parts, oil
leakage and other problems.
Make full inspection and adjustment especially of
slack cables and drive chain and loose spokes.
CAUTION:
After the break-in period, check every fit-
ting and fastener for looseness.
If any loose is found, retighten it securely.
Page 53 of 390
GEN
INFO
1 - 13
CLEANING AND STORAGE
EC1B0000
CLEANING AND STORAGE
EC1B1000
CLEANING
Frequent cleaning of your machine will
enhance its appearance, maintain good overall
performance, and extend the life of many com-
ponents.
1. Before washing the machine, block off the
end of the exhaust pipe to prevent water
from entering.
2. If the engine is excessively greasy, apply some degreaser to it with a paint brush. Do
not apply degreaser to the chain, sprock-
ets, or wheel axles.
3. Rinse the dirt and degreaser off with a gar- den hose; use only enough pressure to do
the job.
CAUTION:
Excessive hose pressure may cause water
seepage and contamination of wheel bear-
ings, front forks, brakes and transmission
seals. Many expensive repair bills have
resulted from improper high pressure
detergent applications such as those avail-
able in coin-operated car washers.
4. After the majority of the dirt has been hosed off, wash all surfaces with warm
water and a mild detergent. Use an old
toothbrush to clean hard-to-reach places.
5. Rinse the machine off immediately with clean water, and dry all surfaces with a soft
towel or cloth.
6. Immediately after washing, remove excess water from the chain with a paper towel
and lubricate the chain to prevent rust.
7. Clean the seat with a vinyl upholstery cleaner to keep the cover pliable and
glossy.
8. Automotive wax may be applied to all
painted or chromed surfaces. Avoid combi-
nation cleaner-waxes, as they may contain
abrasives.
9. After completing the above, start the engine and allow it to idle for several min-
utes.
EC182001
STORAGE
If your machine is to be stored for 60 days or
more, some preventive measures must be
taken to avoid deterioration. After cleaning the
machine thoroughly, prepare it for storage as
follows:
1. Drain the fuel tank, fuel lines, and the car-
buretor float bowl.
2. Remove the spark plug, pour a tablespoon of SAE 10W-30 motor oil in the spark plug
hole, and reinstall the plug. Set the engine
stop switch to “”, turn the engine over
several times with starter. (This will coat
the cylinder walls with oil.)
3. Remove the drive chain, clean it thoroughly with solvent, and lubricate it. Reinstall the
chain or store it in a plastic bag tied to the
frame.
4. Lubricate all control cables.
5. Block the frame up to raise the wheels off the ground.
6. Tie a plastic bag over the exhaust pipe out-
let to prevent moisture from entering.
7. If the machine is to be stored in a humid or salt-air environment, coat all exposed
metal surfaces with a film of light oil. Do not
apply oil to rubber parts or the seat cover.
NOTE:
Make any necessary repairs before the
machine is stored.
Page 56 of 390
SPEC
2 - 1
EC200000
SPECIFICATIONS
EC211000
GENERAL SPECIFICATIONS
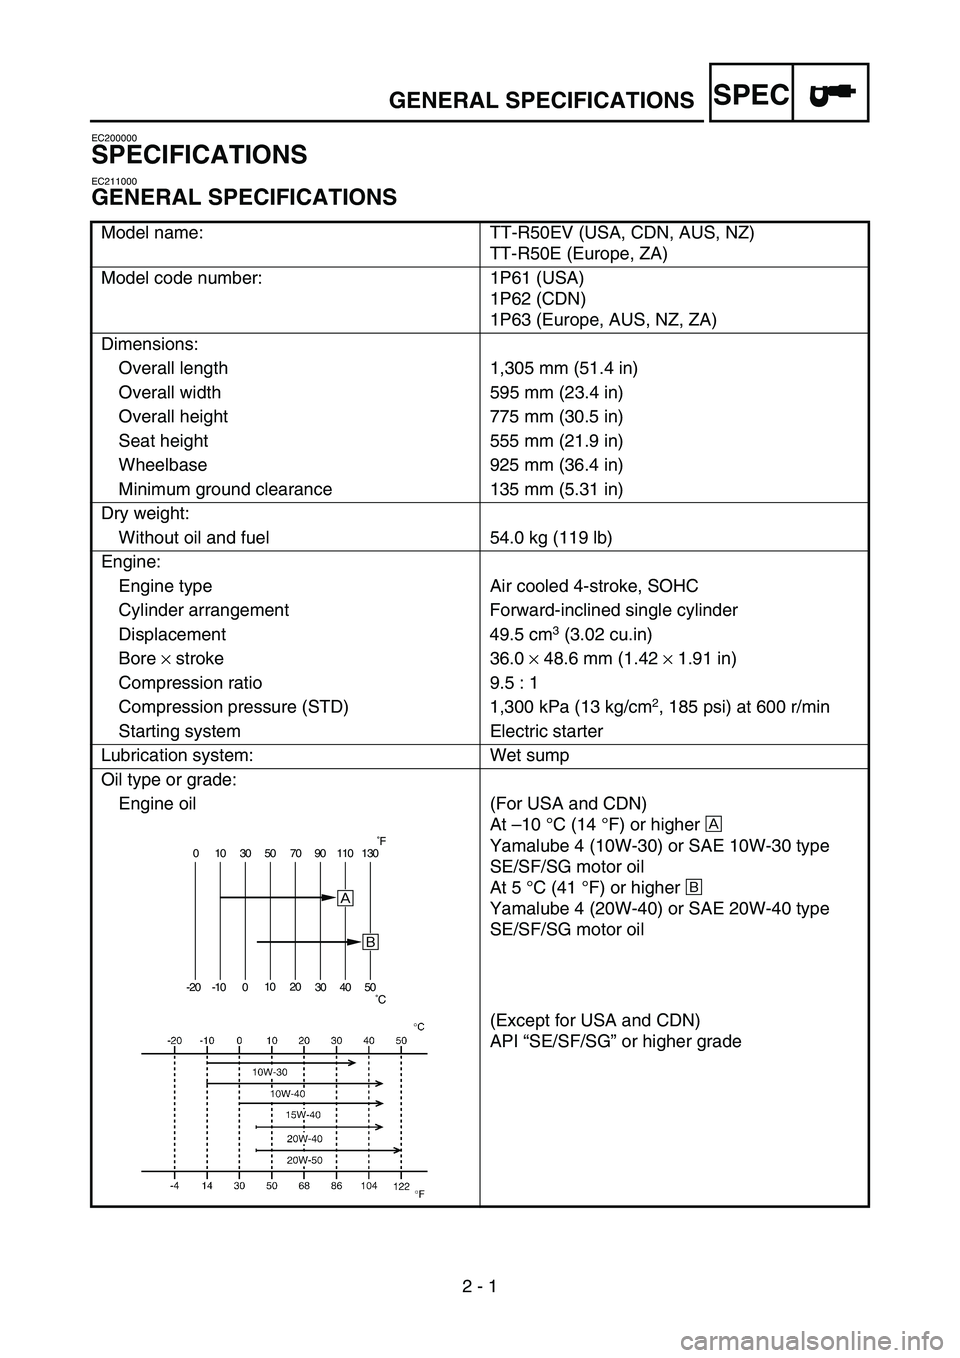
Model name: TT-R50EV (USA, CDN, AUS, NZ)TT-R50E (Europe, ZA)
Model code number: 1P61 (USA) 1P62 (CDN)
1P63 (Europe, AUS, NZ, ZA)
Dimensions: Overall length 1,305 mm (51.4 in)
Overall width 595 mm (23.4 in)
Overall height 775 mm (30.5 in)
Seat height 555 mm (21.9 in)
Wheelbase 925 mm (36.4 in)
Minimum ground clearance 135 mm (5.31 in)
Dry weight: Without oil and fuel 54.0 kg (119 lb)
Engine: Engine type Air cooled 4-stroke, SOHC
Cylinder arrangement Forward-inclined single cylinder
Displacement 49.5 cm
3 (3.02 cu.in)
Bore × stroke 36.0 × 48.6 mm (1.42 × 1.91 in)
Compression ratio 9.5 : 1
Compression pressure (STD) 1,300 kPa (13 kg/cm
2, 185 psi) at 600 r/min
Starting system Electric starter
Lubrication system: Wet sump
Oil type or grade: Engine oil
(For USA and CDN)
At –10 °C (14 °F) or higher È
Yamalube 4 (10W-30) or SAE 10W-30 type
SE/SF/SG motor oil
At 5 °C (41 °F) or higher É
Yamalube 4 (20W-40) or SAE 20W-40 type
SE/SF/SG motor oil
(Except for USA and CDN)
API “SE/SF/SG ” or higher grade
0 10 30 50 70 90 110 130
-20 -10 0 10
20
30 40 50
È
É
˚F
˚C
GENERAL SPECIFICATIONS
Page 57 of 390
SPEC
2 - 2
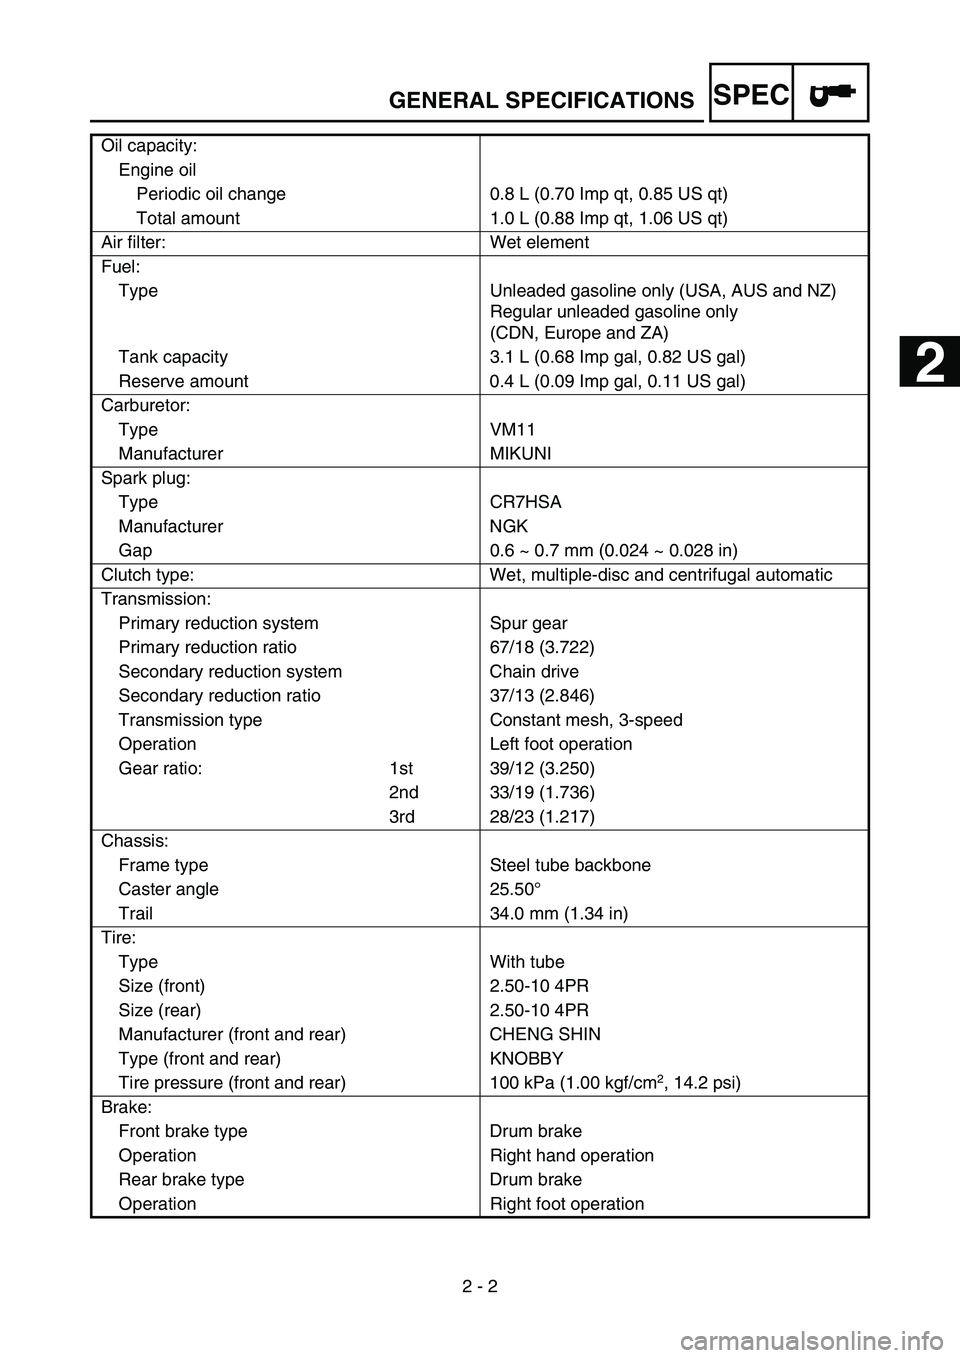
Oil capacity:
Engine oil Periodic oil change 0.8 L (0.70 Imp qt, 0.85 US qt)
Total amount 1.0 L (0.88 Imp qt, 1.06 US qt)
Air filter: Wet element
Fuel: Type Unleaded gasoline only (USA, AUS and NZ) Regular unleaded gasoline only
(CDN, Europe and ZA)
Tank capacity 3.1 L (0.68 Imp gal, 0.82 US gal)
Reserve amount 0.4 L (0.09 Imp gal, 0.11 US gal)
Carburetor: Type VM11
Manufacturer MIKUNI
Spark plug: Type CR7HSA
Manufacturer NGK
Gap 0.6 ~ 0.7 mm (0.024 ~ 0.028 in)
Clutch type: Wet, multiple-disc and centrifugal automatic
Transmission: Primary reduction system Spur gear
Primary reduction ratio 67/18 (3.722)
Secondary reduction system Chain drive
Secondary reduction ratio 37/13 (2.846)
Transmission type Constant mesh, 3-speed
Operation Left foot operation
Gear ratio: 1st 39/12 (3.250) 2nd 33/19 (1.736)
3rd 28/23 (1.217)
Chassis: Frame type Steel tube backbone
Caster angle 25.50 °
Trail 34.0 mm (1.34 in)
Tire: Type With tube
Size (front) 2.50-10 4PR
Size (rear) 2.50-10 4PR
Manufacturer (front and rear) CHENG SHIN
Type (front and rear) KNOBBY
Tire pressure (front and rear) 100 kPa (1.00 kgf/cm
2, 14.2 psi)
Brake: Front brake type Drum brake
Operation Right hand operation
Rear brake type Drum brake
Operation Right foot operation
GENERAL SPECIFICATIONS
1
2
3
4
5
6