turn signal YAMAHA TZR50 2012 Owners Manual
[x] Cancel search | Manufacturer: YAMAHA, Model Year: 2012, Model line: TZR50, Model: YAMAHA TZR50 2012Pages: 92, PDF Size: 5.1 MB
Page 6 of 92
SAFETY INFORMATION .....................1-1
DESCRIPTION.....................................2-1Left view ...........................................3-1
Right view .........................................3-1
Controls and instruments .................3-1
INSTRUMENT AND CONTROL
FUNCTIONS ........................................3-1 Main switch/steering lock .................3-1
Indicator and warning lights .............3-2
Turn signal indicator light ................3-2
Neutral indicator light ......................3-2
Oil level warning light ......................3-2
Coolant temperature warning light ...............................................3-3
Engine trouble warning light ............3-3
Speedometer unit .............................3-3
Tachometer .......................................3-4
Handlebar switches ..........................3-4
Pass switch ......................................3-5
Dimmer switch .................................3-5
Turn signal switch ............................3-5
Horn switch .....................................3-5
Engine stop switch ..........................3-5
Start switch ......................................3-5
Clutch lever .......................................3-5
Shift pedal.........................................3-6
Brake lever ........................................3-6
Brake pedal.......................................3-6
Fuel tank cap ....................................3-7 Fuel ...................................................3-8
Fuel tank breather/overflow hose .....3-9
Catalytic converter............................3-9
2-stroke engine oil ..........................3-10
Fuel cock ........................................3-11
Starter (choke) lever ......................3-12
Seat.................................................3-12
Anti-theft device housing................3-13
Rear view mirrors ............................3-13
Sidestand ........................................3-14
Ignition circuit cut-off system .........3-14
FOR YOUR SAFETY –
PRE-OPERATION CHECKS ...............4-1
OPERATION AND IMPORTANT
RIDING POINTS ..................................5-1 Starting a cold engine ......................5-1
Starting a warm engine ....................5-2
Shifting ..............................................5-2
Tips for reducing fuel consumption..................................5-3
Engine break-in.................................5-3
Parking ..............................................5-4
PERIODIC MAINTENANCE AND
ADJUSTMENT ....................................6-1 Owner’s tool kit .................................6-1
Periodic maintenance chart for the emission control system .........6-3 General maintenance and
lubrication chart ............................6-4
Removing and installing cowlings and panels .....................................6-8
Checking the spark plug ................6-11
Transmission oil ..............................6-13
Coolant ...........................................6-14
Air filter element ..............................6-17
Adjusting the carburetor .................6-17
Adjusting the engine idling speed..........................................6-18
Adjusting the throttle grip free play .......................................6-18
Tires ................................................6-19
Cast wheels ....................................6-21
Adjusting the clutch lever free play .......................................6-21
Checking the front brake lever free play .......................................6-22
Adjusting the brake pedal free play .......................................6-22
Adjusting the shift pedal position ...6-22
Brake light switches .......................6-23
Checking the front and rear brake pads ..................................6-23
Checking the brake fluid level ........6-24
Changing the brake fluid ................6-25
Drive chain slack.............................6-25
Cleaning and lubricating the drive chain ............................................6-27
TABLE OF CONTENTS
1HD-F819D-E0 7/3/11 20:27 Página 6
2AS-F819D-E0.indd 631/07/12 10:09
Page 7 of 92
Checking and lubricating the cables ..........................................6-28
Checking and lubricating the throttle grip and cable .................6-28
Adjusting the Autolube pump .........6-28
Checking and lubricating the brake and shift pedals.................6-29
Checking and lubricating the brake and clutch levers ...............6-29
Checking and lubricating the sidestand .....................................6-30
Checking the front fork ...................6-31
Checking the steering.....................6-31
Checking the wheel bearings .........6-32
Battery ............................................6-32
Replacing the fuse ..........................6-33
Replacing the headlight bulb..........6-34
Replacing the tail/brake light bulb .............................................6-35
Replacing a front turn signal light bulb......................................6-35
Replacing a rear turn signal light bulb......................................6-36
Replacing the license plate light bulb......................................6-36
Troubleshooting ..............................6-37
Troubleshooting charts ...................6-38
MOTORCYCLE CARE AND
STORAGE ............................................7-1 Matte color caution...........................7-1 Care ..................................................7-1
Storage .............................................7-3
SPECIFICATIONS ...............................8-1
CONSUMER INFORMATION .............9-1 Identification numbers ......................9-1
Vehicle identification number............9-1
Model label .......................................9-1
TABLE OF CONTENTS
1HD-F819D-E0 7/3/11 20:27 Página 7
2AS-F819D-E0.indd 731/07/12 10:09
Page 9 of 92
• Always obey the speed limitand never travel faster than
warranted by road and traffic
conditions.
• Always signal before turning or changing lanes. Make sure that
other motorists can see you.
�The posture of the operator and
passenger is important for proper
control.
• The operator should keep both hands on the handlebar and
both feet on the operator foo-
trests during operation to
maintain control of the
motorcycle.
• The passenger should always hold onto the operator, the seat
strap or grab bar, if equipped,
with both hands and keep both
feet on the passenger foo-
trests. Never carry a passenger
unless he or she can firmly pla-
ce both feet on the passenger
footrests.
�Never ride under the influence of
alcohol or other drugs.
�This motorcycle is designed for
on-road use only. It is not suitable for off-road use.
Protective Apparel
The majority of fatalities from
motorcycle accidents are the result of
head injuries. The use of a safety hel-
met is the single most critical factor in
the prevention or reduction of head
injuries.
�Always wear an approved hel-
met.
�Wear a face shield or goggles.
Wind in your unprotected eyes
could contribute to an impair-
ment of vision that could delay
seeing a hazard.
�The use of a jacket, heavy boots,
trousers, gloves, etc., is effective
in preventing or reducing abra-
sions or lacerations.
�Never wear loose-fitting clothes,
otherwise they could catch on
the control levers, footrests, or
wheels and cause injury or an
accident.
�Always wear protective clothing
that covers your legs, ankles, and
feet. The engine or exhaust sys-
tem become very hot during or after operation and can cause
burns.
�A passenger should also observe
the above precautions.
Avoid Carbon Monoxide Poisoning
All engine exhaust contains carbon
monoxide, a deadly gas. Breathing
carbon monoxide can cause heada-
ches, dizziness, drowsiness, nausea,
confusion, and eventually death.
Carbon Monoxide is a colorless,
odorless, tasteless gas which may be
present even if you do not see or
smell any engine exhaust. Deadly
levels of carbon monoxide can collect
rapidly and you can quickly be over-
come and unable to save yourself.
Also, deadly levels of carbon monoxi-
de can linger for hours or days in
enclosed or poorly ventilated areas. If
you experience any symptoms of car-
bon monoxide poisoning, leave the
area immediately, get fresh air, and
SEEK MEDICAL TREATMENT.
�Do not run engine indoors. Even
if you try to ventilate engine
exhaust with fans or open win-
dows and doors, carbon monoxi-
1
SAFETY INFORMATION
1-2
1HD-F819D-E0 7/3/11 20:27 Página 9
2AS-F819D-E0.indd 931/07/12 10:09
Page 17 of 92
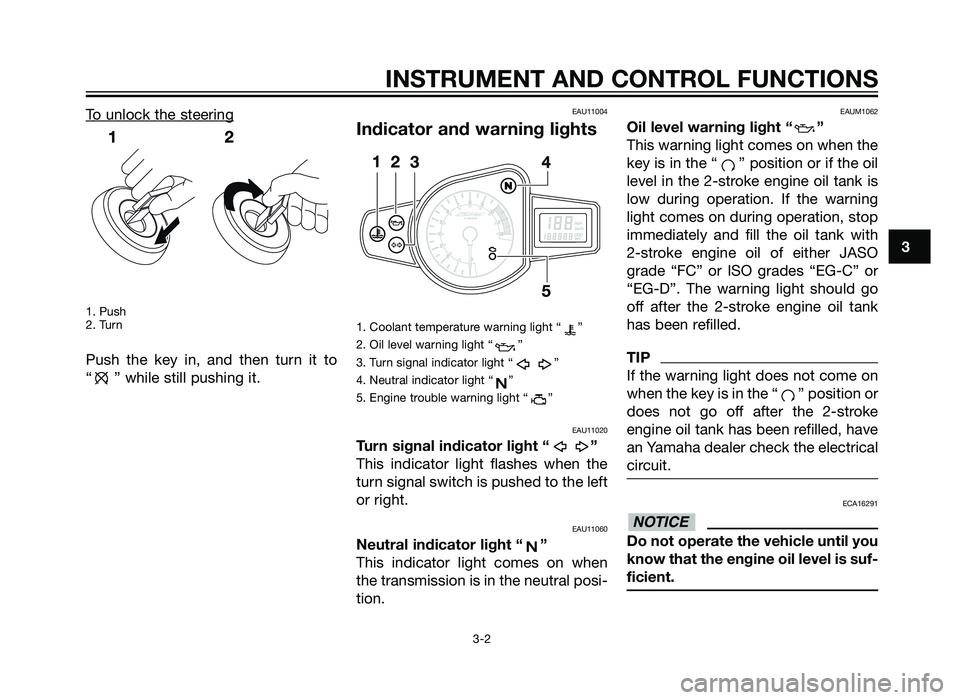
To unlock the steering
1. Push
2. Turn
Push the key in, and then turn it to
“ ” while still pushing it.
EAU11004
Indicator and warning lights
1. Coolant temperature warning light “ ”
2. Oil level warning light “ ”
3. Turn signal indicator light “ ”
4. Neutral indicator light “ ”
5. Engine trouble warning light “ ”
EAU11020
Turn signal indicator light “ ”
This indicator light flashes when the
turn signal switch is pushed to the left
or right.
EAU11060
Neutral indicator light “ ”
This indicator light comes on when
the transmission is in the neutral posi-
tion.
EAUM1062
Oil level warning light “ ”
This warning light comes on when the
key is in the “ ” position or if the oil
level in the 2-stroke engine oil tank is
low during operation. If the warning
light comes on during operation, stop
immediately and fill the oil tank with
2-stroke engine oil of either JASO
grade “FC” or ISO grades “EG-C” or
“EG-D”. The warning light should go
off after the 2-stroke engine oil tank
has been refilled.
TIP
If the warning light does not come on
when the key is in the “ ” position or
does not go off after the 2-stroke
engine oil tank has been refilled, have
an Yamaha dealer check the electrical
circuit.
ECA16291
Do not operate the vehicle until you
know that the engine oil level is suf-
ficient.
NOTICE
INSTRUMENT AND CONTROL FUNCTIONS
3-2
3
1HD-F819D-E0 7/3/11 20:27 Página 17
2AS-F819D-E0.indd 1731/07/12 10:09
Page 19 of 92
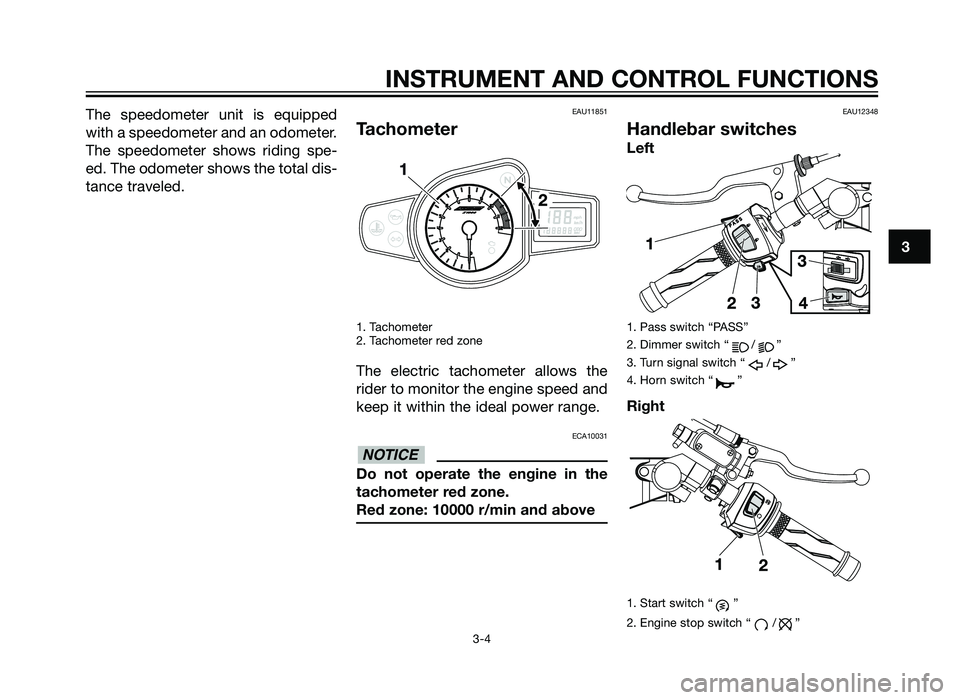
The speedometer unit is equipped
with a speedometer and an odometer.
The speedometer shows riding spe-
ed. The odometer shows the total dis-
tance traveled.EAU11851
Tachometer
1. Tachometer
2. Tachometer red zone
The electric tachometer allows the
rider to monitor the engine speed and
keep it within the ideal power range.
ECA10031
Do not operate the engine in the
tachometer red zone.
Red zone: 10000 r/min and above
EAU12348
Handlebar switches
Left
1. Pass switch “PASS”
2. Dimmer switch “ / ”
3. Turn signal switch “ / ”
4. Horn switch “ ”
Right
1. Start switch “ ”
2. Engine stop switch “ / ”
NOTICE
INSTRUMENT AND CONTROL FUNCTIONS
3-4
3
1HD-F8199-E0 13/5/11 07:11 Página 19
2AS-F819D-E0.indd 1931/07/12 10:09
Page 20 of 92
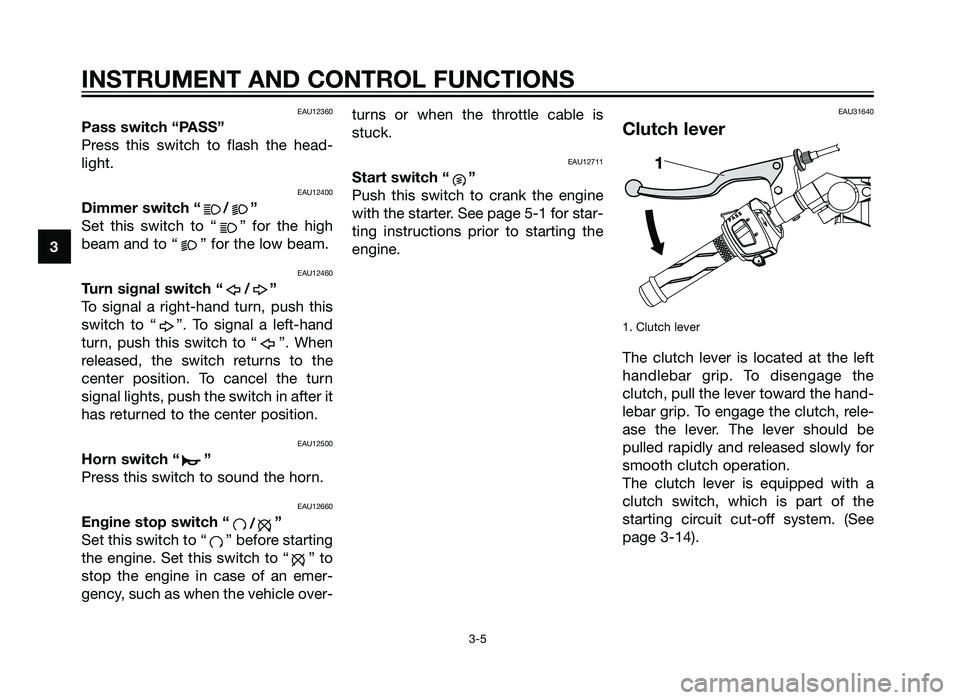
EAU12360
Pass switch “PASS”
Press this switch to flash the head-
light.
EAU12400
Dimmer switch “ / ”
Set this switch to “ ” for the high
beam and to “ ” for the low beam.
EAU12460
Turn signal switch “ / ”
To signal a right-hand turn, push this
switch to “ ”. To signal a left-hand
turn, push this switch to “ ”. When
released, the switch returns to the
center position. To cancel the turn
signal lights, push the switch in after it
has returned to the center position.
EAU12500
Horn switch “ ”
Press this switch to sound the horn.
EAU12660
Engine stop switch “/”
Set this switch to “ ” before starting
the engine. Set this switch to “ ” to
stop the engine in case of an emer-
gency, such as when the vehicle over- turns or when the throttle cable is
stuck.
EAU12711
Start switch “ ”
Push this switch to crank the engine
with the starter. See page 5-1 for star-
ting instructions prior to starting the
engine.
EAU31640
Clutch lever
1. Clutch lever
The clutch lever is located at the left
handlebar grip. To disengage the
clutch, pull the lever toward the hand-
lebar grip. To engage the clutch, rele-
ase the lever. The lever should be
pulled rapidly and released slowly for
smooth clutch operation.
The clutch lever is equipped with a
clutch switch, which is part of the
starting circuit cut-off system. (See
page 3-14).
INSTRUMENT AND CONTROL FUNCTIONS
3-5
3
1HD-F819D-E0 7/3/11 20:27 Página 20
2AS-F819D-E0.indd 2031/07/12 10:09
Page 72 of 92
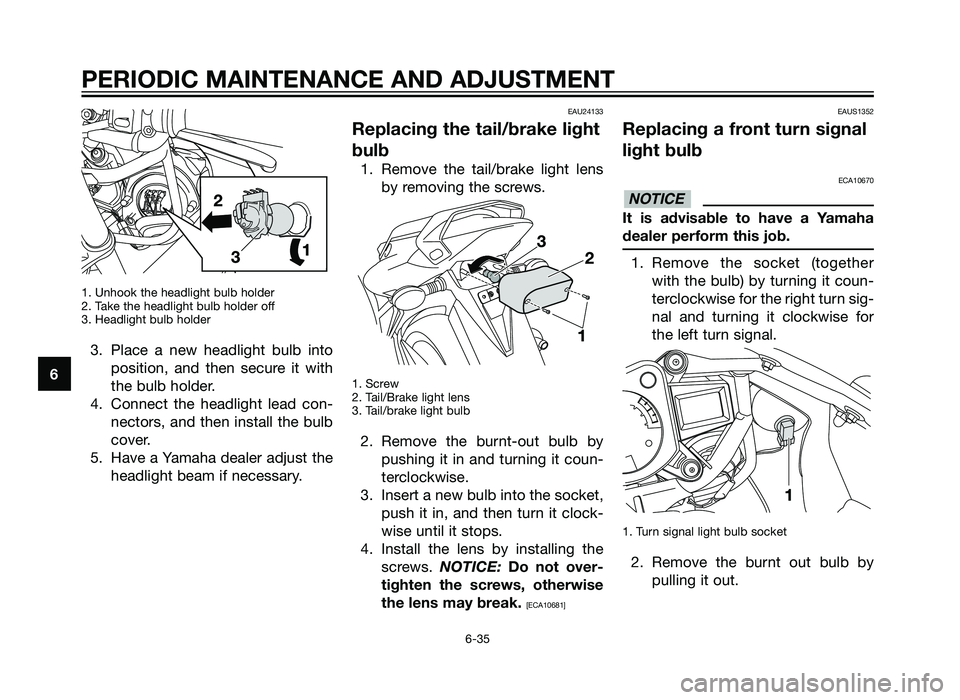
1. Unhook the headlight bulb holder
2. Take the headlight bulb holder off
3. Headlight bulb holder
3. Place a new headlight bulb intoposition, and then secure it with
the bulb holder.
4. Connect the headlight lead con- nectors, and then install the bulb
cover.
5. Have a Yamaha dealer adjust the headlight beam if necessary.
EAU24133
Replacing the tail/brake light
bulb
1. Remove the tail/brake light lensby removing the screws.
1. Screw
2. Tail/Brake light lens
3. Tail/brake light bulb
2. Remove the burnt-out bulb bypushing it in and turning it coun-
terclockwise.
3. Insert a new bulb into the socket, push it in, and then turn it clock-
wise until it stops.
4. Install the lens by installing the screws. NOTICE: Do not over-
tighten the screws, otherwise
the lens may break.
[ECA10681] EAUS1352
Replacing a front turn signal
light bulb
ECA10670
It is advisable to have a Yamaha
dealer perform this job.
1. Remove the socket (together
with the bulb) by turning it coun-
terclockwise for the right turn sig-
nal and turning it clockwise for
the left turn signal.
1. Turn signal light bulb socket
2. Remove the burnt out bulb bypulling it out.
NOTICE
PERIODIC MAINTENANCE AND ADJUSTMENT
6-35
6
1HD-F819D-E0 7/3/11 20:27 Página 72
2AS-F819D-E0.indd 7231/07/12 10:09
Page 73 of 92
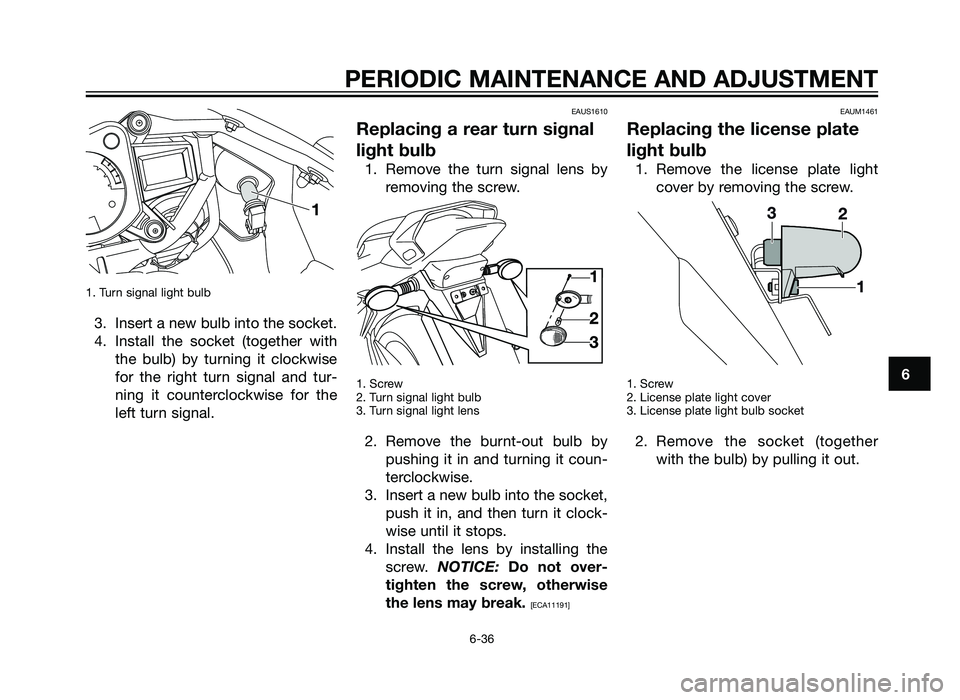
1. Turn signal light bulb
3. Insert a new bulb into the socket.
4. Install the socket (together withthe bulb) by turning it clockwise
for the right turn signal and tur-
ning it counterclockwise for the
left turn signal.
EAUS1610
Replacing a rear turn signal
light bulb
1. Remove the turn signal lens byremoving the screw.
1. Screw
2. Turn signal light bulb
3. Turn signal light lens
2. Remove the burnt-out bulb bypushing it in and turning it coun-
terclockwise.
3. Insert a new bulb into the socket, push it in, and then turn it clock-
wise until it stops.
4. Install the lens by installing the screw. NOTICE: Do not over-
tighten the screw, otherwise
the lens may break.
[ECA11191] EAUM1461
Replacing the license plate
light bulb
1. Remove the license plate light
cover by removing the screw.
1. Screw
2. License plate light cover
3. License plate light bulb socket
2. Remove the socket (togetherwith the bulb) by pulling it out.
PERIODIC MAINTENANCE AND ADJUSTMENT
6-36
6
1HD-F819D-E0 7/3/11 20:27 Página 73
2AS-F819D-E0.indd 7331/07/12 10:09
Page 83 of 92
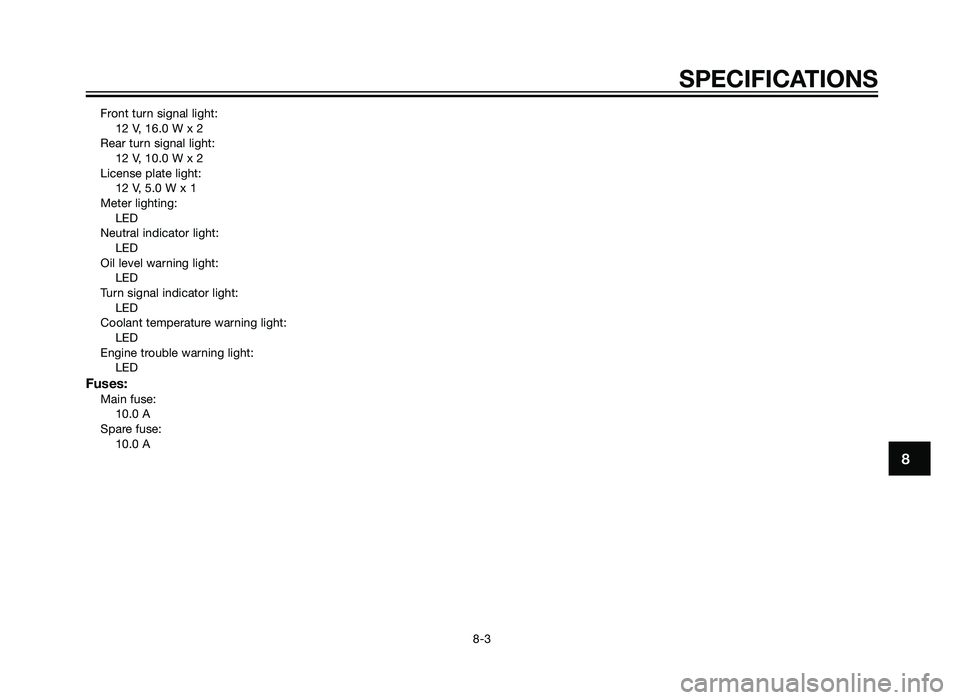
Front turn signal light:12 V, 16.0 W x 2
Rear turn signal light: 12 V, 10.0 W x 2
License plate light: 12 V, 5.0 W x 1
Meter lighting: LED
Neutral indicator light: LED
Oil level warning light: LED
Turn signal indicator light: LED
Coolant temperature warning light: LED
Engine trouble warning light: LED
Fuses:Main fuse:10.0 A
Spare fuse: 10.0 A
SPECIFICATIONS
8-3
8
1HD-F819D-E0 7/3/11 20:27 Página 83
2AS-F819D-E0.indd 8331/07/12 10:09
Page 85 of 92
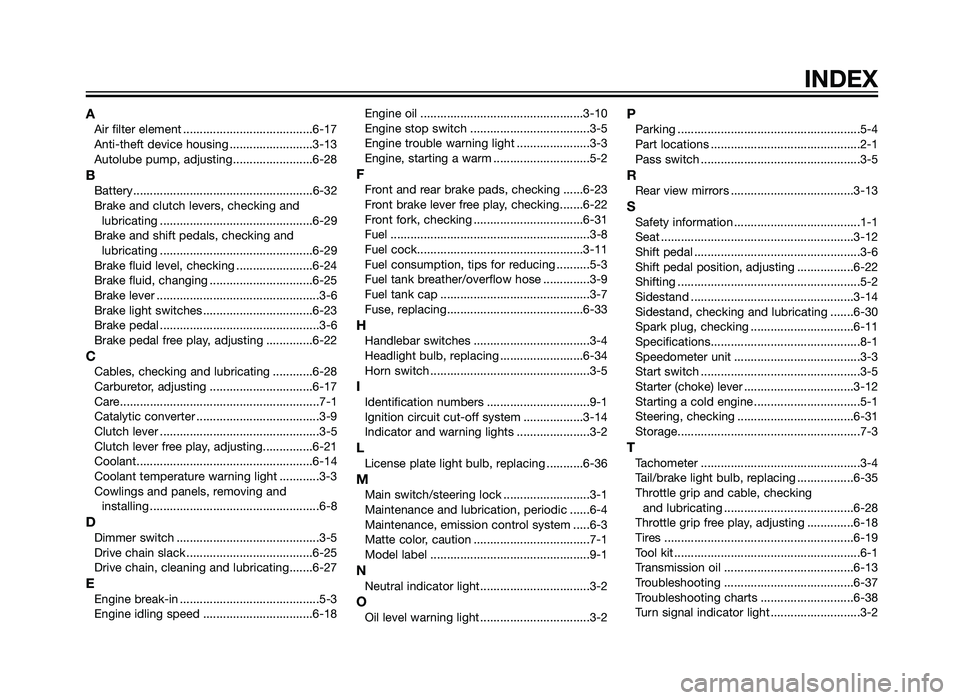
AAir filter element .......................................6-17
Anti-theft device housing .........................3-13
Autolube pump, adjusting........................6-28
BBattery......................................................6-32
Brake and clutch levers, checking andlubricating ..............................................6-29
Brake and shift pedals, checking and lubricating ..............................................6-29
Brake fluid level, checking .......................6-24
Brake fluid, changing ...............................6-25
Brake lever .................................................3-6
Brake light switches .................................6-23
Brake pedal ................................................3-6
Brake pedal free play, adjusting ..............6-22
CCables, checking and lubricating ............6-28
Carburetor, adjusting ...............................6-17
Care............................................................7-1
Catalytic converter .....................................3-9
Clutch lever ................................................3-5
Clutch lever free play, adjusting...............6-21
Coolant.....................................................6-14
Coolant temperature warning light ............3-3
Cowlings and panels, removing and installing ...................................................6-8
DDimmer switch ...........................................3-5
Drive chain slack ......................................6-25
Drive chain, cleaning and lubricating.......6-27
EEngine break-in ..........................................5-3
Engine idling speed .................................6-18 Engine oil .................................................3-10
Engine stop switch ....................................3-5
Engine trouble warning light ......................3-3
Engine, starting a warm .............................5-2
FFront and rear brake pads, checking ......6-23
Front brake lever free play, checking.......6-22
Front fork, checking .................................6-31
Fuel ............................................................3-8
Fuel cock..................................................3-11
Fuel consumption, tips for reducing ..........5-3
Fuel tank breather/overflow hose ..............3-9
Fuel tank cap .............................................3-7
Fuse, replacing.........................................6-33
HHandlebar switches ...................................3-4
Headlight bulb, replacing .........................6-34
Horn switch ................................................3-5
IIdentification numbers ...............................9-1
Ignition circuit cut-off system ..................3-14
Indicator and warning lights ......................3-2
LLicense plate light bulb, replacing ...........6-36
MMain switch/steering lock ..........................3-1
Maintenance and lubrication, periodic ......6-4
Maintenance, emission control system .....6-3
Matte color, caution ...................................7-1
Model label ................................................9-1
NNeutral indicator light.................................3-2
OOil level warning light .................................3-2
PParking .......................................................5-4
Part locations .............................................2-1
Pass switch ................................................3-5
RRear view mirrors .....................................3-13
SSafety information ......................................1-1
Seat ..........................................................3-12
Shift pedal ..................................................3-6
Shift pedal position, adjusting .................6-22
Shifting .......................................................5-2
Sidestand .................................................3-14
Sidestand, checking and lubricating .......6-30
Spark plug, checking ...............................6-11
Specifications.............................................8-1
Speedometer unit ......................................3-3
Start switch ................................................3-5
Starter (choke) lever .................................3-12
Starting a cold engine ................................5-1
Steering, checking ...................................6-31
Storage.......................................................7-3
TTachometer ................................................3-4
Tail/brake light bulb, replacing .................6-35
Throttle grip and cable, checking
and lubricating .......................................6-28
Throttle grip free play, adjusting ..............6-18
Tires .........................................................6-19
Tool kit ........................................................6-1
Transmission oil .......................................6-13
Troubleshooting .......................................6-37
Troubleshooting charts ............................6-38
Turn signal indicator light ...........................3-2
INDEX
1HD-F819D-E0 7/3/11 20:27 Página 85
2AS-F819D-E0.indd 8531/07/12 10:09