YAMAHA WHY 50 2004 Owner's Manual
Manufacturer: YAMAHA, Model Year: 2004, Model line: WHY 50, Model: YAMAHA WHY 50 2004Pages: 80, PDF Size: 1.18 MB
Page 21 of 80

INSTRUMENT AND CONTROL FUNCTIONS
3
1
2
3
4
ZAUM0359
1
ZAUM0360
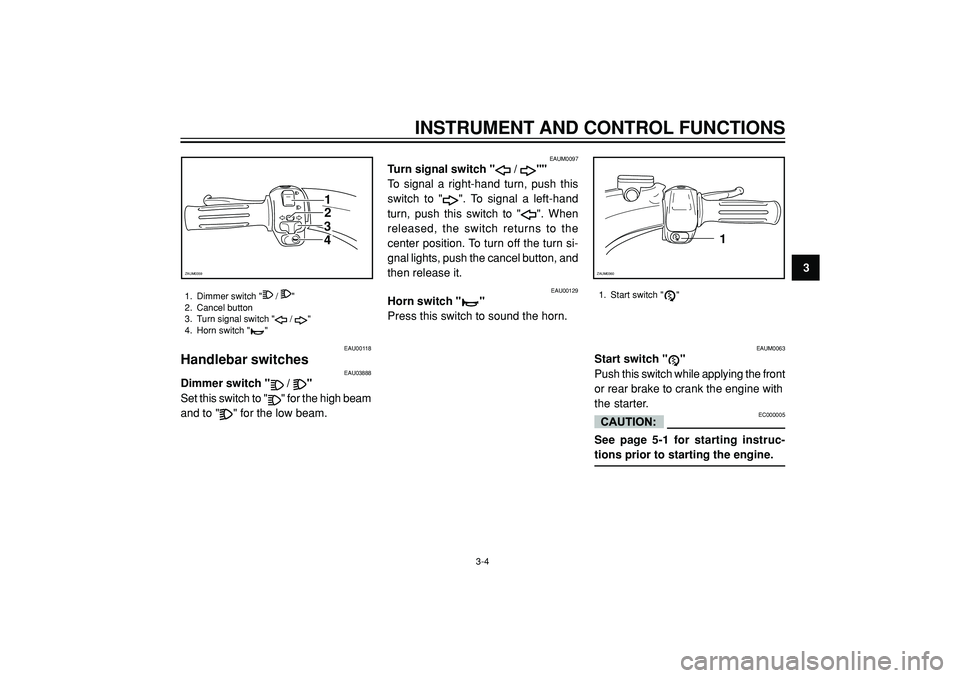
1. Dimmer switch " / "
2. Cancel button
3. Turn signal switch "
/ "
4. Horn switch "
"
EAU00118
Handlebar switchesEAU03888
Dimmer switch " / "
Set this switch to "
" for the high beam
and to "
" for the low beam.
EAU00129
Horn switch ""
Press this switch to sound the horn.
EAUM0063
Start switch ""
Push this switch while applying the front
or rear brake to crank the engine with
the starter.
EC000005
See page 5-1 for starting instruc-
tions prior to starting the engine.
1. Start switch ""
3-4
EAUM0097
Turn signal switch " / ""
To signal a right-hand turn, push this
switch to "
". To signal a left-hand
turn, push this switch to "
". When
released, the switch returns to the
center position. To turn off the turn si-
gnal lights, push the cancel button, and
then release it.
Page 22 of 80

3
INSTRUMENT AND CONTROL FUNCTIONS
1
ZAUM0084
1
ZAUM0085
EAU03882
Front brake lever
The front brake lever is located on the
right handlebar grip. To apply the front
brake, pull this lever toward the
handlebar grip.
EAU00163
Rear brake lever
The rear brake lever is located on the
left handlebar grip. To apply the rear
brake, pull this lever toward the
handlebar grip.
1. Front brake lever
1. Rear brake lever
12
ZAUM0361
1. Oil tank cap
2. Fuel tank cap
EAU03463
Fuel and 2-stroke engine oil
tank caps
The fuel tank cap and the 2-stroke
engine oil tank cap are located under
the seat. (See page 3-8 for seat opening
and closing procedures.)
Fuel tank cap
To remove the fuel tank cap, turn it
counterclockwise, and then pull it off.
To install the fuel tank cap, turn it
clockwise.
3-5
Page 23 of 80

INSTRUMENT AND CONTROL FUNCTIONS
3
2-stroke engine oil tank cap
To remove the 2-stroke engine oil tank
cap, pull it off.
To install the 2-stroke engine oil tank
cap, push it into the oil tank opening.
EW000025
Make sure that the fuel and 2-stroke
engine oil tank caps are properly
installed before riding the scooter.
ZAUM0204
1
2
ZAUM0020
1. Filler tube
2. Fuel level
EAU03753
Fuel
Make sure that there is sufficient fuel
in the tank. Fill the fuel tank to the
bottom of the filler tube as shown.
EW000130
•Do not overfill the fuel tank,
otherwise it may overflow when
the fuel warms up and expands.
•Avoid spilling fuel on the hot
engine.
EAU00185
EC000008
Immediately wipe off spilled fuel with
a clean, dry, soft cloth, since fuel may
deteriorate painted surfaces or plas-
tic parts.
EAU04206
Recommended fuel:
REGULAR UNLEADED
GASOLINE ONLY
Fuel tank capacity:
Total amount:
7.2 L
Your Yamaha engine has been
designed to use regular unleaded
gasoline with a research octane
number of 91 or higher. If knocking (or
pinging) occurs, use a gasoline of a
different brand or premium unleaded
fuel. Use of unleaded fuel will extend
spark plug life and reduce maintenance
costs.
3-6
Page 24 of 80

3
INSTRUMENT AND CONTROL FUNCTIONS
EAU03098
Catalytic converter
This scooter is equipped with a catalytic
converter in the muffler.
EW000128
The exhaust system is hot after
operation. Make sure that the
exhaust system has cooled down
before doing any maintenance work.
EC000114
The following precautions must be
observed to prevent a fire hazard or
other damages.
•Use only unleaded gasoline.
The use of leaded gasoline will
cause unrepairable damage to
the catalytic converter.
•Never park the scooter near
possible fire hazards such as
grass or other materials that
easily burn.
•Do not allow the engine to idle
too long.
EAU03750
2-stroke engine oil
Make sure that there is sufficient oil in
the 2-stroke engine oil tank. Add the
recommended 2-stroke engine oil if
necessary.
NOTE :
Make sure that the 2-stroke engine oil
tank cap is properly installed.
Recommended oil:
Yamalube 2 or equivalent
2-stroke engine oil
(JASO grade "FC",
or ISO grades "EG-C" or "EG-D")
Oil quantity:
1.3 L
EAUS0015
Kickstarter
To start the engine, push the kickstarter
down lightly with your foot until the
gears engage, and then push it down
smoothly but forcefully.
1
ZAUM0362
1. Kickstarter
3-7
Page 25 of 80

INSTRUMENT AND CONTROL FUNCTIONS
3
EAU03091
Rider seat
To open the rider seat
1. Place the scooter on the
centerstand.
2. Insert the key into the main switch,
and then turn it counterclockwise.
NOTE :
Do not push inward when turning the
key.
3. Fold the rider seat up.To close the rider seat
1. Fold the rider seat down, and then
push it down to lock it in place.
2. Remove the key from the main
switch if the scooter will be left
unattended.
NOTE :
Make sure that the seat is properly
secured before riding.
PUSH
OPEN
ZAUM0253ZAUM0363
OPEN
OPEN
UNLOCKLOCK
OPEN
OPEN
UNLOCKLOCK
OPENOPEN
UNLOCKLOCK
ZAUM0364
3-8
EAUM0096
Storage compartment
To unlock the storage compartment
Insert the key in the lock and turn it 1/4
turn clockwise.
To open the storage compartment
when it is unlocked
Turn the knob 1/4 turn clockwise. The
knob will return to its original position
after released.
To close the storage compartment
Push the lid into the original position
To lock the storage compartment
Insert the key in the lock and turn it 1/4
turn counterclockwise, and then
remove the key.
Page 26 of 80

3
INSTRUMENT AND CONTROL FUNCTIONS
1
ZAUM0365
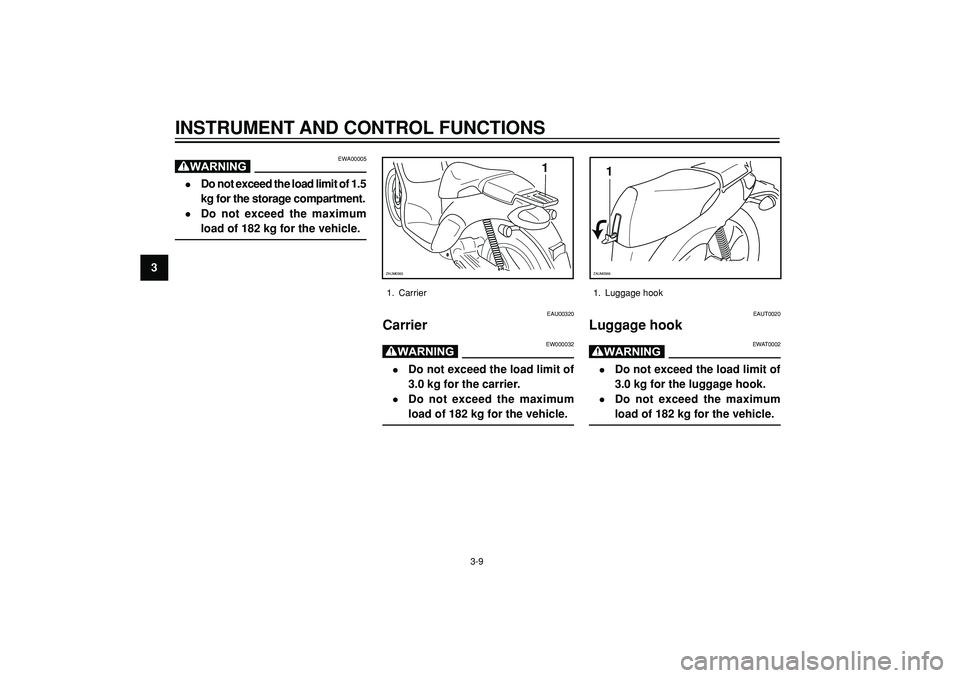
1. Carrier
EAU00320
Carrier
EW000032
•Do not exceed the load limit of
3.0 kg for the carrier.
•Do not exceed the maximum
load of 182 kg for the vehicle.
1
ZAUM0366
1. Luggage hook
EAUT0020
Luggage hook
EWAT0002
•Do not exceed the load limit of
3.0 kg for the luggage hook.
•Do not exceed the maximum
load of 182 kg for the vehicle.
3-9
EWA00005
•Do not exceed the load limit of 1.5
kg for the storage compartment.
•Do not exceed the maximum
load of 182 kg for the vehicle.
Page 27 of 80

EAU01114
PRE-OPERATION CHECKS
Pre-operation check list ....................................................................... 4-1
4
Page 28 of 80

PRE-OPERATION CHECKS
4
•Check fuel level in fuel tank.
Fuel•Refuel if necessary. 3-5 — 3-6
•Check fuel line for leakage.
•Check oil level in oil tank.
2-stroke engine oil•If necessary, add recommended oil to specified level. 3-5 — 3-7
•Check vehicle for oil leakage.
Final transmission oil•Check vehicle for oil leakage. 6-6
•Check operation.
•If soft or spongy, have Yamaha dealer bleed hydraulic system.
Front brake•Check fluid level in reservoir. 3-5, 6-13 — 6-15
•If necessary, add recommended brake fluid to specified level.
•Check hydraulic system for leakage.
•Check operation.
Rear brake•Check pedal free play. 3-5, 6-13 — 6-15
•Adjust if necessary.
•Make sure that operation is smooth.
Throttle grip•Check cable free play.
6-9, 6-15
•If necessary, have Yamaha dealer adjust cable free play
and lubricate cable and grip housing.
The condition of a vehicle is the owner’s responsibility. Vital components can start to deteriorate quickly and unexpectedly,
even if the vehicle remains unused (for example, as a result of exposure to the elements). Any damage, fluid leakage or
loss of tire air pressure could have serious consequences. Therefore, it is very important, in addition to a thorough visual
inspection, to check the following points before each ride.
EAU03439
Pre-operation check list
ITEM CHECKS PAGE
4-1
Page 29 of 80

4
PRE-OPERATION CHECKS
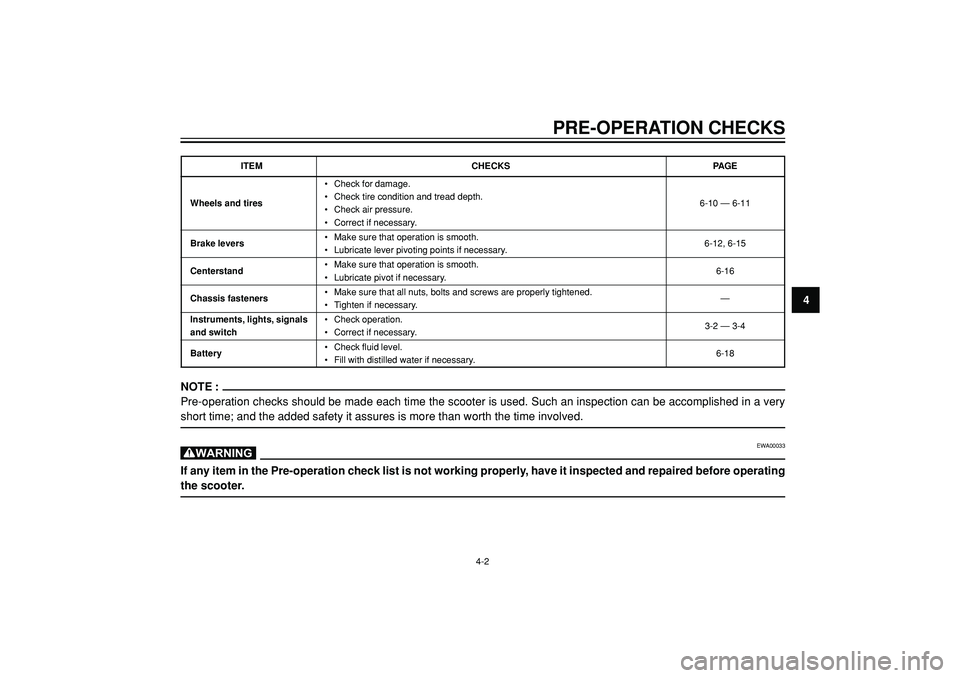
NOTE :
Pre-operation checks should be made each time the scooter is used. Such an inspection can be accomplished in a very
short time; and the added safety it assures is more than worth the time involved.
EWA00033
If any item in the Pre-operation check list is not working properly, have it inspected and repaired before operating
the scooter.
ITEM CHECKS PAGE
•Check for damage.
Wheels and tires•Check tire condition and tread depth.
6-10 — 6-11
•Check air pressure.
•Correct if necessary.
Brake levers•Make sure that operation is smooth.
6-12, 6-15
•Lubricate lever pivoting points if necessary.
Centerstand•Make sure that operation is smooth.
6-16
•Lubricate pivot if necessary.
Chassis fasteners•Make sure that all nuts, bolts and screws are properly tightened.
—
•Tighten if necessary.
Instruments, lights, signals•Check operation.
3-2 — 3-4
and switch•Correct if necessary.
Battery•Check fluid level.
6-18
•Fill with distilled water if necessary.
4-2
Page 30 of 80
