light YAMAHA WR 250F 2007 Service Manual
[x] Cancel search | Manufacturer: YAMAHA, Model Year: 2007, Model line: WR 250F, Model: YAMAHA WR 250F 2007Pages: 912, PDF Size: 23.95 MB
Page 718 of 912
6 - 55
CHASFRONT BRAKE AND REAR BRAKE
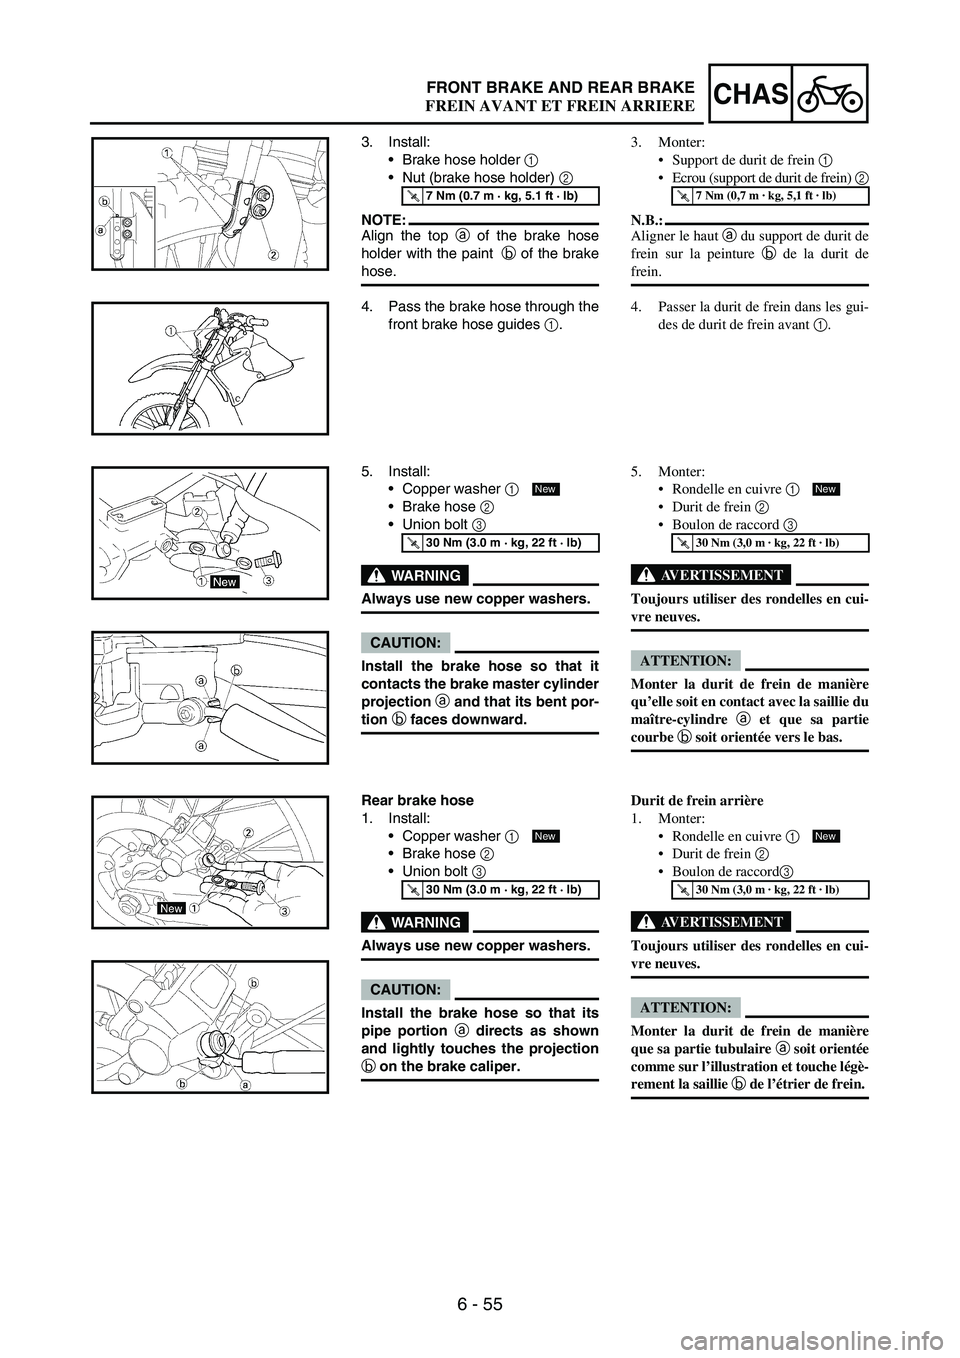
3. Install:
Brake hose holder
1
Nut (brake hose holder)
2
NOTE:Align the top
a of the brake hose
holder with the paint
b of the brake
hose.
T R..7 Nm (0.7 m · kg, 5.1 ft · lb)
4. Pass the brake hose through the
front brake hose guides
1.
5. Install:
Copper washer
1
Brake hose
2
Union bolt
3
WARNING
Always use new copper washers.
CAUTION:
Install the brake hose so that it
contacts the brake master cylinder
projection a
and that its bent por-
tion b
faces downward.
T R..30 Nm (3.0 m · kg, 22 ft · lb)
New
Rear brake hose
1. Install:
Copper washer
1
Brake hose
2
Union bolt
3
WARNING
Always use new copper washers.
CAUTION:
Install the brake hose so that its
pipe portion a
directs as shown
and lightly touches the projection
b
on the brake caliper.
T R..30 Nm (3.0 m · kg, 22 ft · lb)
New
3. Monter:
Support de durit de frein 1
Ecrou (support de durit de frein) 2
N.B.:
Aligner le haut a du support de durit de
frein sur la peinture b de la durit de
frein.
T R..7 Nm (0,7 m · kg, 5,1 ft · lb)
4. Passer la durit de frein dans les gui-
des de durit de frein avant 1.
5. Monter:
Rondelle en cuivre 1
Durit de frein 2
Boulon de raccord 3
AVERTISSEMENT
Toujours utiliser des rondelles en cui-
vre neuves.
ATTENTION:
Monter la durit de frein de manière
qu’elle soit en contact avec la saillie du
maître-cylindre a et que sa partie
courbe b soit orientée vers le bas.
T R..30 Nm (3,0 m · kg, 22 ft · lb)
New
Durit de frein arrière
1. Monter:
Rondelle en cuivre 1
Durit de frein 2
Boulon de raccord3
AVERTISSEMENT
Toujours utiliser des rondelles en cui-
vre neuves.
ATTENTION:
Monter la durit de frein de manière
que sa partie tubulaire a soit orientée
comme sur l’illustration et touche légè-
rement la saillie b de l’étrier de frein.
T R..30 Nm (3,0 m · kg, 22 ft · lb)
New
FREIN AVANT ET FREIN ARRIERE
Page 724 of 912
6 - 61
CHASFRONT FORK
EC550000
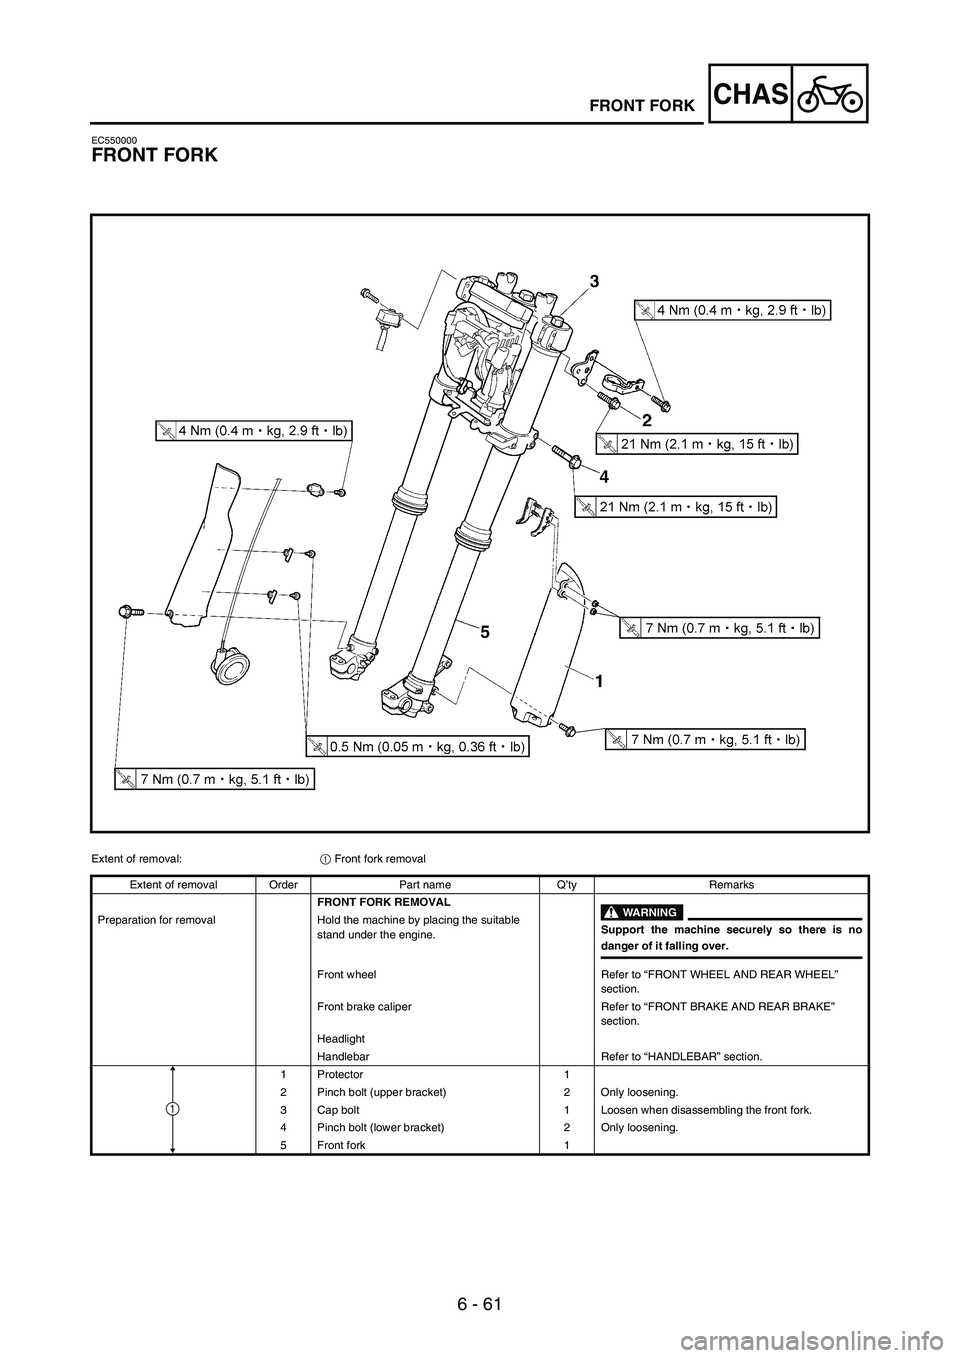
FRONT FORK
Extent of removal:
1 Front fork removal
Extent of removal Order Part name Q’ty Remarks
FRONT FORK REMOVAL
WARNING
Support the machine securely so there is nodanger of it falling over. Preparation for removal Hold the machine by placing the suitable
stand under the engine.
Front wheel Refer to “FRONT WHEEL AND REAR WHEEL”
section.
Front brake caliper Refer to “FRONT BRAKE AND REAR BRAKE”
section.
Headlight
Handlebar Refer to “HANDLEBAR” section.
1 Protector 1
2 Pinch bolt (upper bracket) 2 Only loosening.
3 Cap bolt 1 Loosen when disassembling the front fork.
4 Pinch bolt (lower bracket) 2 Only loosening.
5 Front fork 1
1
Page 754 of 912
6 - 91
CHASHANDLEBAR
EC5B0000
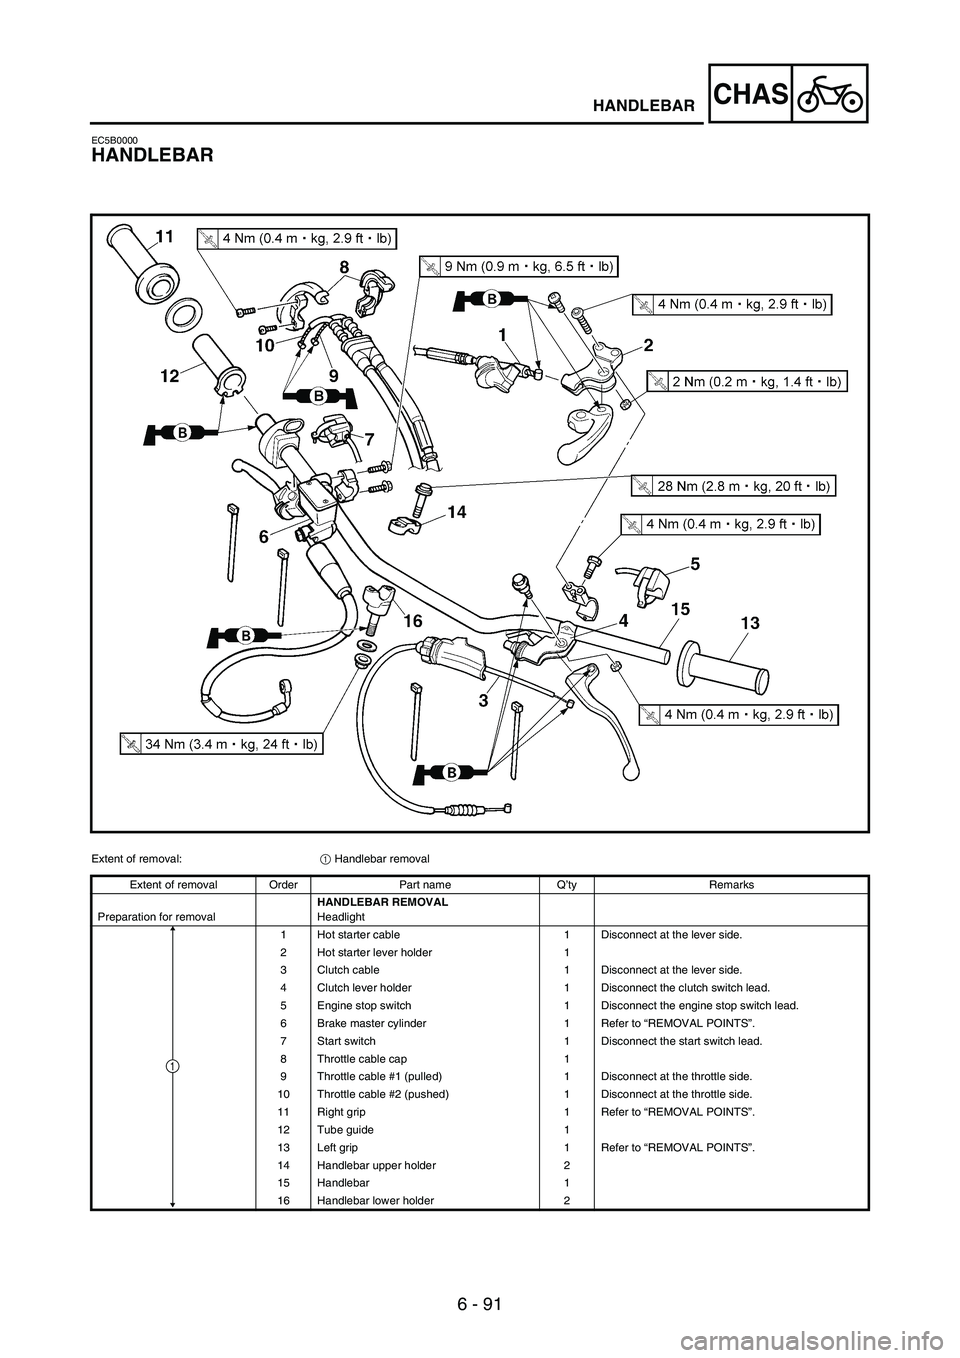
HANDLEBAR
Extent of removal:
1 Handlebar removal
Extent of removal Order Part name Q’ty Remarks
Preparation for removalHANDLEBAR REMOVAL
Headlight
1 Hot starter cable 1 Disconnect at the lever side.
2 Hot starter lever holder 1
3 Clutch cable 1 Disconnect at the lever side.
4 Clutch lever holder 1 Disconnect the clutch switch lead.
5 Engine stop switch 1 Disconnect the engine stop switch lead.
6 Brake master cylinder 1 Refer to “REMOVAL POINTS”.
7 Start switch 1 Disconnect the start switch lead.
8 Throttle cable cap 1
9 Throttle cable #1 (pulled) 1 Disconnect at the throttle side.
10 Throttle cable #2 (pushed) 1 Disconnect at the throttle side.
11 Right grip 1 Refer to “REMOVAL POINTS”.
12 Tube guide 1
13 Left grip 1 Refer to “REMOVAL POINTS”.
14 Handlebar upper holder 2
15 Handlebar 1
16 Handlebar lower holder 2
1
Page 768 of 912
6 - 105
CHASSTEERING
EC560000
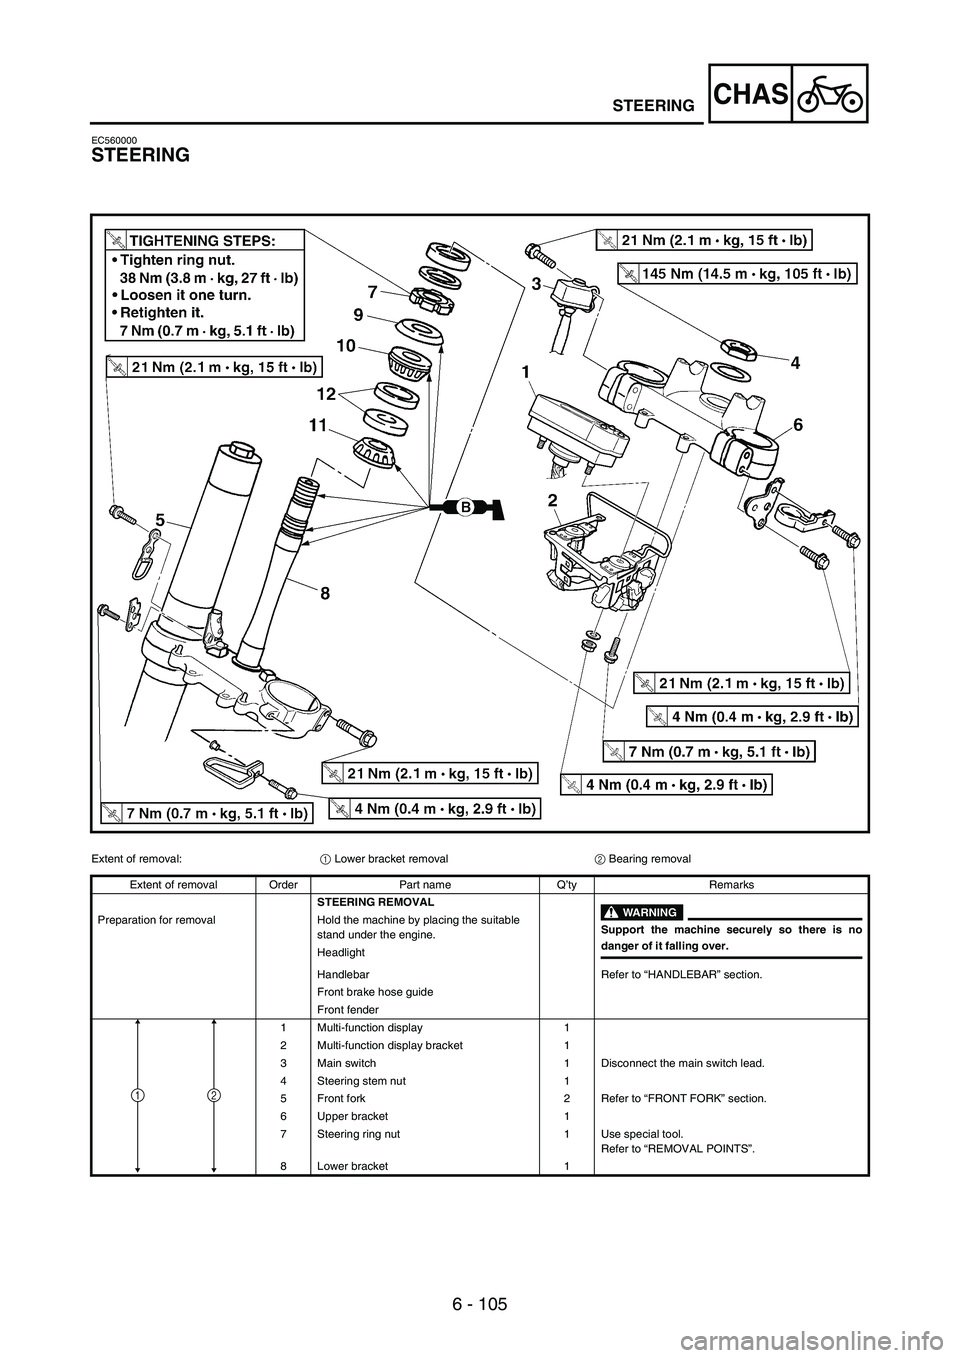
STEERING
Extent of removal:
1 Lower bracket removal
2 Bearing removal
Extent of removal Order Part name Q’ty Remarks
STEERING REMOVAL
WARNING
Support the machine securely so there is nodanger of it falling over. Preparation for removal Hold the machine by placing the suitable
stand under the engine.
Headlight
Handlebar Refer to “HANDLEBAR” section.
Front brake hose guide
Front fender
1 Multi-function display 1
2 Multi-function display bracket 1
3 Main switch 1 Disconnect the main switch lead.
4 Steering stem nut 1
5 Front fork 2 Refer to “FRONT FORK” section.
6 Upper bracket 1
7 Steering ring nut 1 Use special tool.
Refer to “REMOVAL POINTS”.
8 Lower bracket 1
12
Page 808 of 912
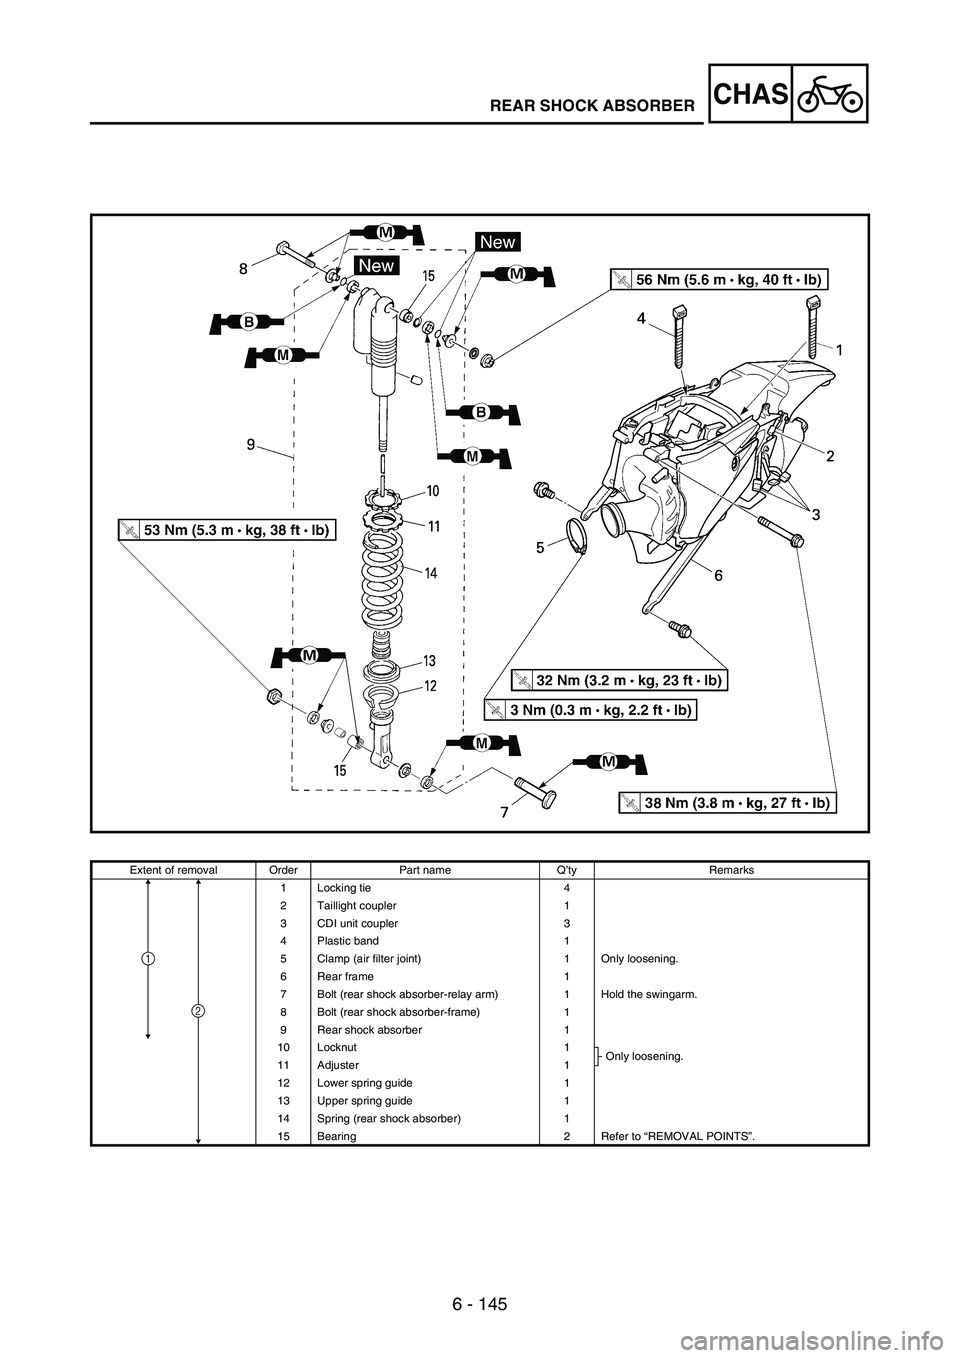
6 - 145
CHASREAR SHOCK ABSORBER
Extent of removal Order Part name Q’ty Remarks
1 Locking tie 4
2 Taillight coupler 1
3 CDI unit coupler 3
4 Plastic band 1
5 Clamp (air filter joint) 1 Only loosening.
6 Rear frame 1
7 Bolt (rear shock absorber-relay arm) 1 Hold the swingarm.
8 Bolt (rear shock absorber-frame) 1
9 Rear shock absorber 1
10 Locknut 1
Only loosening.
11 Adjuster 1
12 Lower spring guide 1
13 Upper spring guide 1
14 Spring (rear shock absorber) 1
15 Bearing 2 Refer to “REMOVAL POINTS”.
1
2
Page 820 of 912
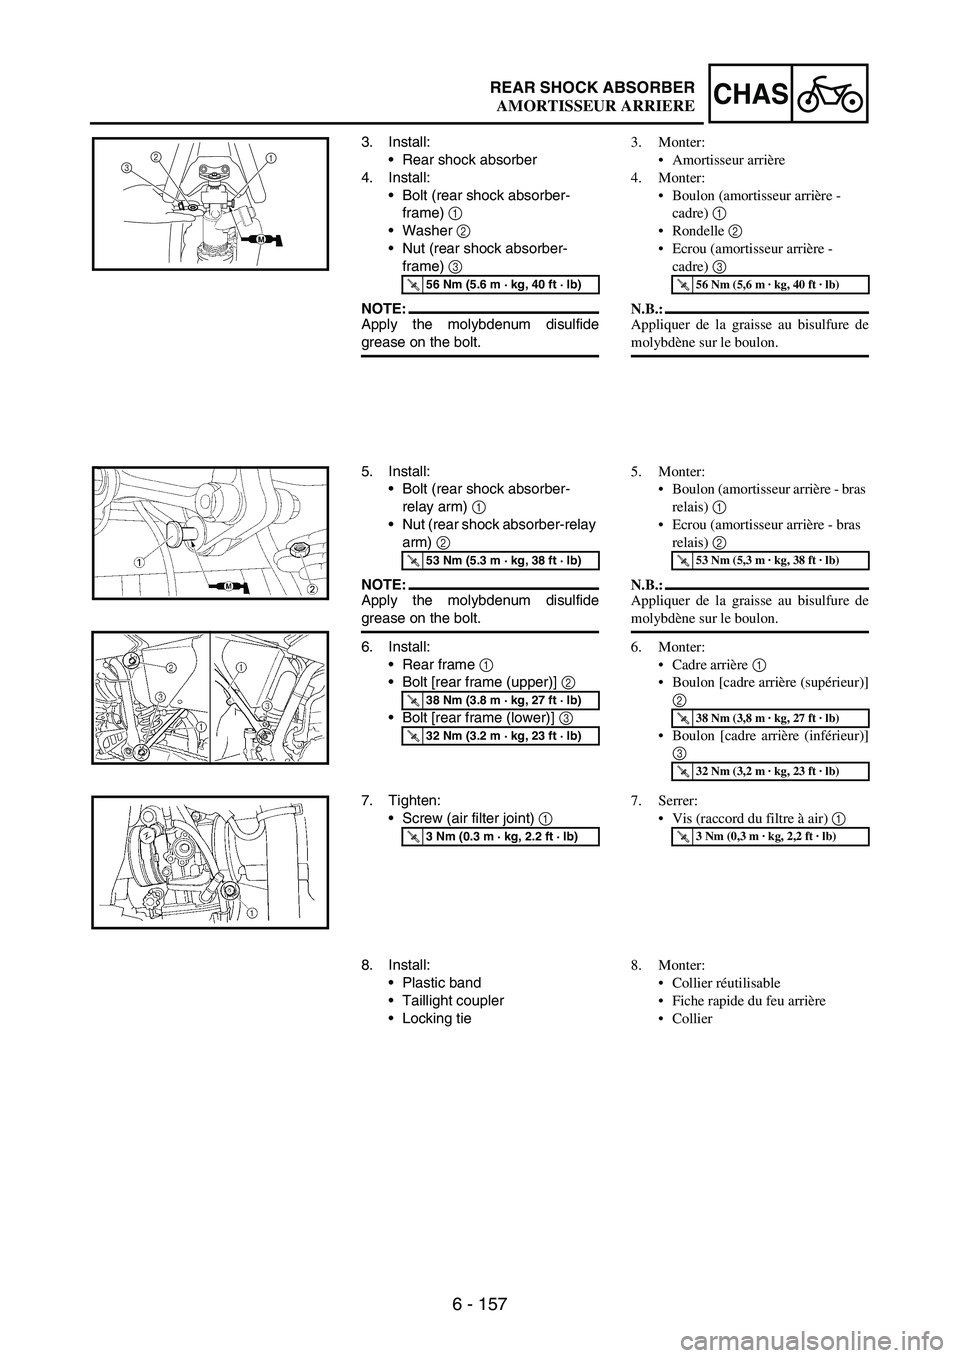
6 - 157
CHASREAR SHOCK ABSORBER
3. Install:
•Rear shock absorber
4. Install:
•Bolt (rear shock absorber-
frame)
1
•Washer
2
•Nut (rear shock absorber-
frame)
3
NOTE:Apply the molybdenum disulfide
grease on the bolt.
T R..56 Nm (5.6 m · kg, 40 ft · lb)
1 2
3
M
5. Install:
•Bolt (rear shock absorber-
relay arm)
1
•Nut (rear shock absorber-relay
arm)
2
NOTE:Apply the molybdenum disulfide
grease on the bolt.
6. Install:
•Rear frame
1
•Bolt [rear frame (upper)]
2
•Bolt [rear frame (lower)]
3
T R..53 Nm (5.3 m · kg, 38 ft · lb)
T R..38 Nm (3.8 m · kg, 27 ft · lb)
T R..32 Nm (3.2 m · kg, 23 ft · lb)
7. Tighten:
•Screw (air filter joint)
1
T R..3 Nm (0.3 m · kg, 2.2 ft · lb)
8. Install:
•Plastic band
•Taillight coupler
•Locking tie3. Monter:
Amortisseur arrière
4. Monter:
Boulon (amortisseur arrière -
cadre) 1
Rondelle 2
Ecrou (amortisseur arrière -
cadre) 3
N.B.:
Appliquer de la graisse au bisulfure de
molybdène sur le boulon.
T R..56 Nm (5,6 m · kg, 40 ft · lb)
5. Monter:
Boulon (amortisseur arrière - bras
relais) 1
Ecrou (amortisseur arrière - bras
relais) 2
N.B.:
Appliquer de la graisse au bisulfure de
molybdène sur le boulon.
6. Monter:
Cadre arrière 1
Boulon [cadre arrière (supérieur)]
2
Boulon [cadre arrière (inférieur)]
3
T R..53 Nm (5,3 m · kg, 38 ft · lb)
T R..38 Nm (3,8 m · kg, 27 ft · lb)
T R..32 Nm (3,2 m · kg, 23 ft · lb)
7. Serrer:
Vis (raccord du filtre à air) 1
T R..3 Nm (0,3 m · kg, 2,2 ft · lb)
8. Monter:
Collier réutilisable
Fiche rapide du feu arrière
Collier
AMORTISSEUR ARRIERE
Page 822 of 912
7 - 1
–+ELECELECTRICAL COMPONENTS AND WIRING DIAGRAM
EC600000
ELECTRICAL
NOTE:This section is intended for those who have basic knowledge and skill concerning the servicing of Yamaha motorcycles
(e.g., Yamaha dealers, service engineers, etc.) Those who have little knowledge and skill concerning servicing are
requested not to undertake inspection, adjustment, disassembly, or reassembly only by reference to this manual. It may
lead to servicing trouble and mechanical damage.
EC610000
ELECTRICAL COMPONENTS AND WIRING DIAGRAM
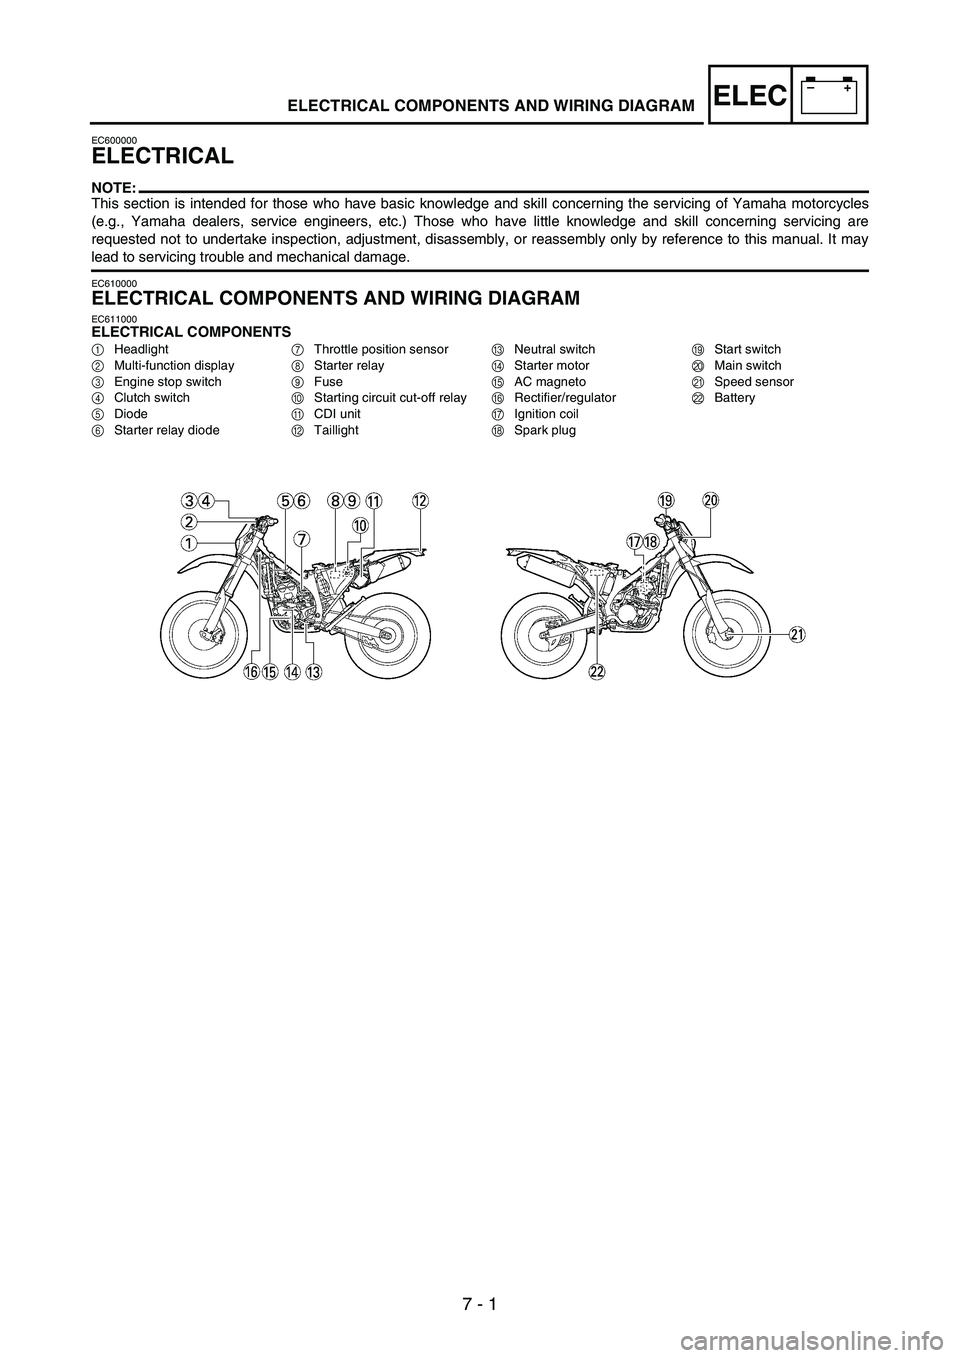
EC611000ELECTRICAL COMPONENTS
1Headlight
2Multi-function display
3Engine stop switch
4Clutch switch
5Diode
6Starter relay diode7Throttle position sensor
8Starter relay
9Fuse
0Starting circuit cut-off relay
ACDI unit
BTaillightCNeutral switch
DStarter motor
EAC magneto
FRectifier/regulator
GIgnition coil
HSpark plugIStart switch
JMain switch
KSpeed sensor
LBattery
Page 824 of 912
7 - 3
–+ELECELECTRICAL COMPONENTS AND WIRING DIAGRAM
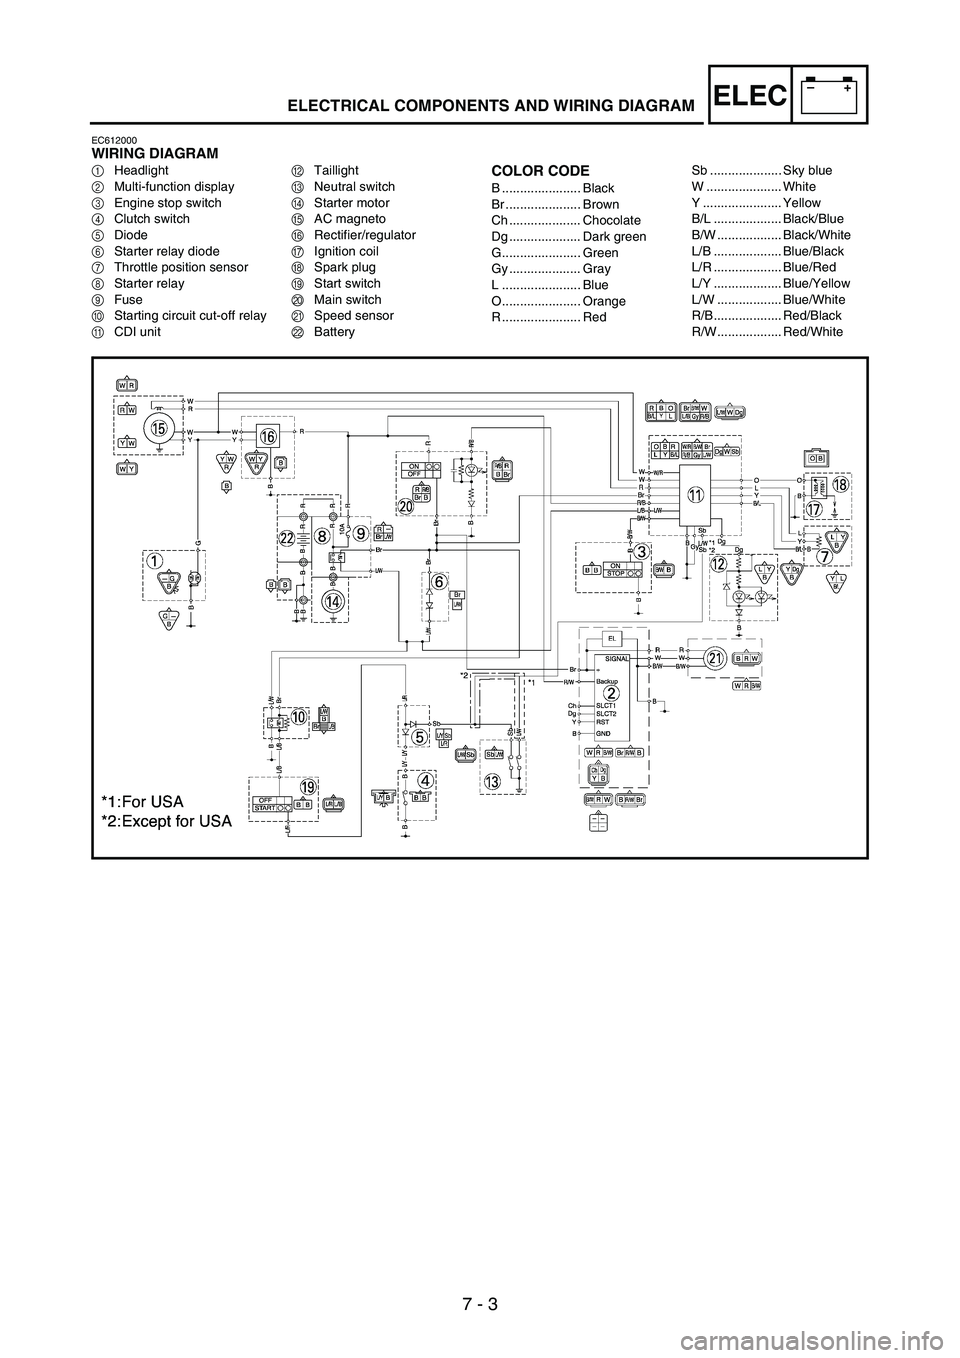
EC612000WIRING DIAGRAM
1Headlight
2Multi-function display
3Engine stop switch
4Clutch switch
5Diode
6Starter relay diode
7Throttle position sensor
8Starter relay
9Fuse
0Starting circuit cut-off relay
ACDI unitBTaillight
CNeutral switch
DStarter motor
EAC magneto
FRectifier/regulator
GIgnition coil
HSpark plug
IStart switch
JMain switch
KSpeed sensor
LBatteryCOLOR CODE
B ...................... Black
Br ..................... Brown
Ch .................... Chocolate
Dg .................... Dark green
G...................... Green
Gy .................... Gray
L ...................... Blue
O...................... Orange
R ...................... RedSb .................... Sky blue
W ..................... White
Y ...................... Yellow
B/L ................... Black/Blue
B/W .................. Black/White
L/B ................... Blue/Black
L/R ................... Blue/Red
L/Y ................... Blue/Yellow
L/W .................. Blue/White
R/B................... Red/Black
R/W.................. Red/White
Page 834 of 912
7 - 13
–+ELECIGNITION SYSTEM
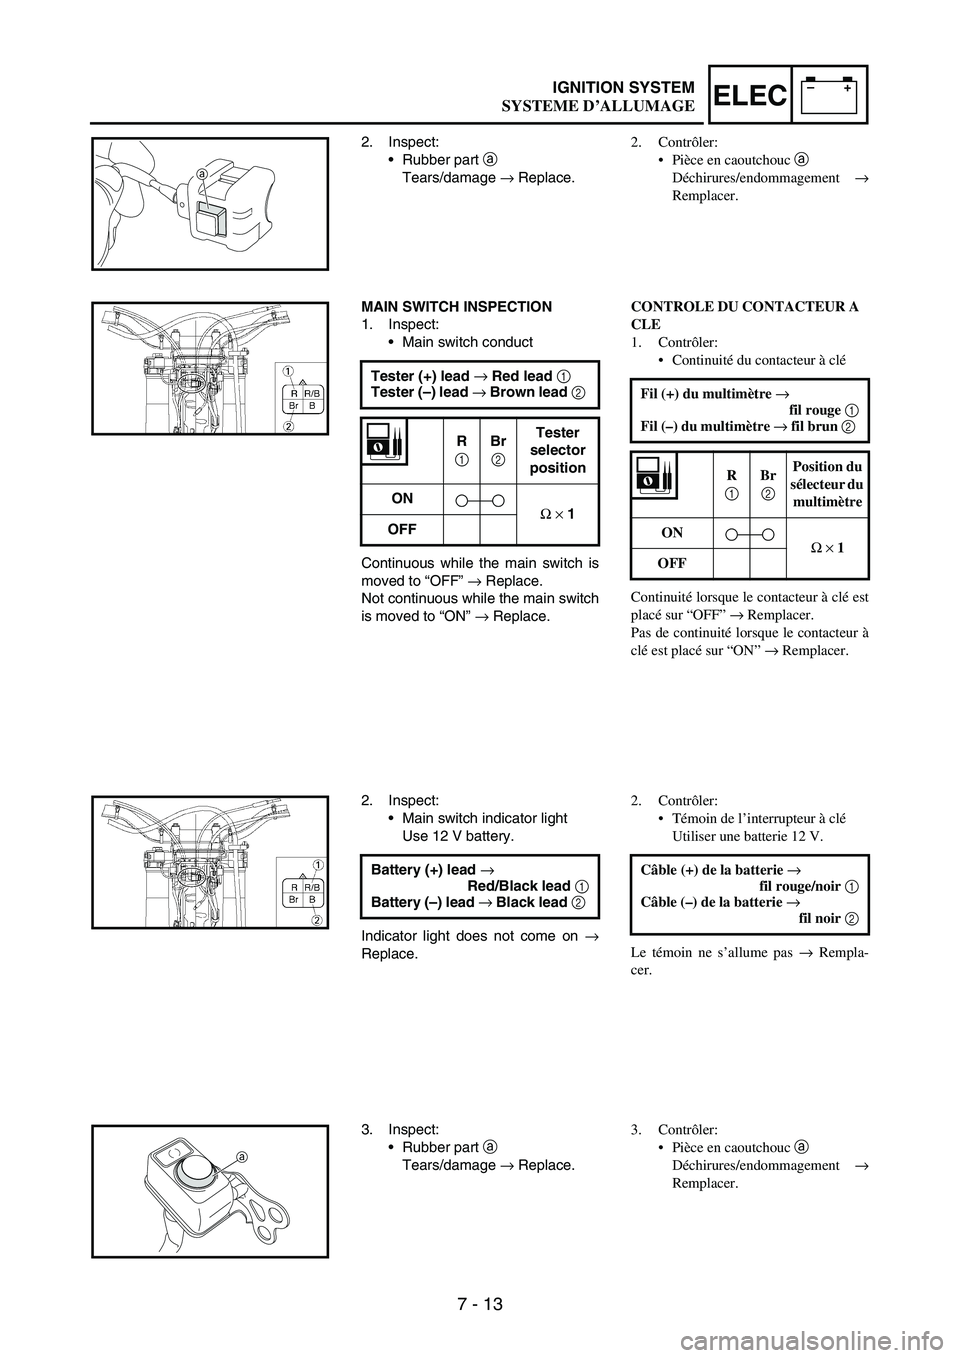
2. Inspect:
•Rubber part
a
Tears/damage
→ Replace.
a
MAIN SWITCH INSPECTION
1. Inspect:
•Main switch conduct
Continuous while the main switch is
moved to “OFF”
→ Replace.
Not continuous while the main switch
is moved to “ON”
→ Replace. Tester (+) lead →
Red lead 1
Tester (–) lead →
Brown lead 2
R
1
Br
2
Tester
selector
position
ON
Ω
×
1
OFF
2. Inspect:
•Main switch indicator light
Use 12 V battery.
Indicator light does not come on
→
Replace.Battery (+) lead →
Red/Black lead 1
Battery (–) lead →
Black lead 2
3. Inspect:
•Rubber part
a
Tears/damage
→ Replace.
a
2. Contrôler:
Pièce en caoutchouc a
Déchirures/endommagement →
Remplacer.
CONTROLE DU CONTACTEUR A
CLE
1. Contrôler:
Continuité du contacteur à clé
Continuité lorsque le contacteur à clé est
placé sur “OFF” → Remplacer.
Pas de continuité lorsque le contacteur à
clé est placé sur “ON” → Remplacer. Fil (+) du multimètre →
fil rouge 1
Fil (–) du multimètre → fil brun 2
R
1 Br
2 Position du
sélecteur du
multimètre
ON
Ω × 1
OFF
2. Contrôler:
Témoin de l’interrupteur à clé
Utiliser une batterie 12 V.
Le témoin ne s’allume pas → Rempla-
cer.Câble (+) de la batterie →
fil rouge/noir 1
Câble (–) de la batterie →
fil noir 2
3. Contrôler:
Pièce en caoutchouc a
Déchirures/endommagement →
Remplacer.
SYSTEME D’ALLUMAGE
Page 888 of 912
7 - 67
–+ELECLIGHTING SYSTEM
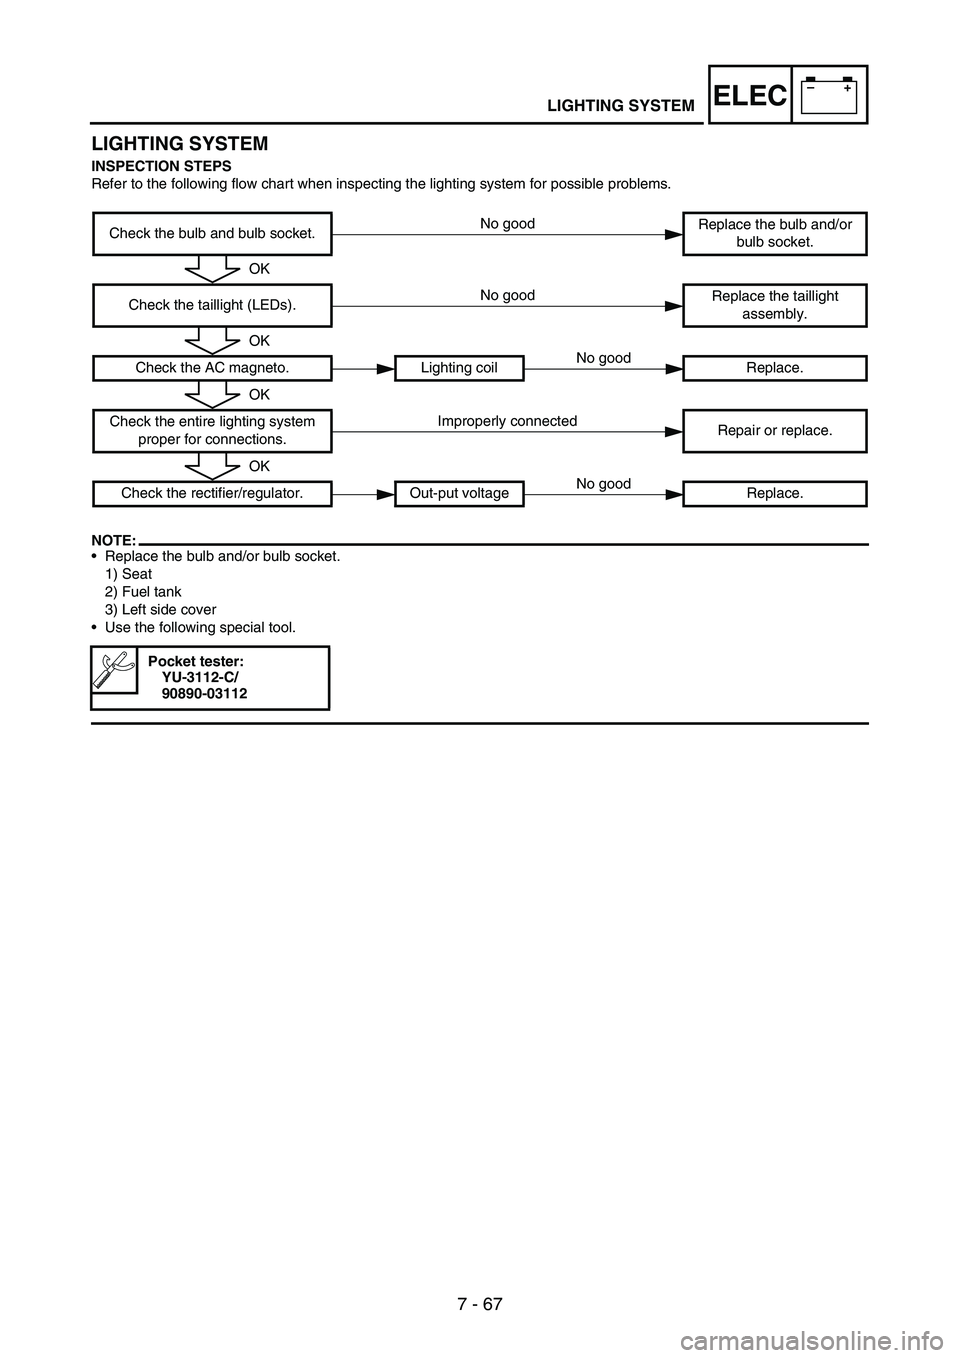
LIGHTING SYSTEM
INSPECTION STEPS
Refer to the following flow chart when inspecting the lighting system for possible problems.
NOTE:•Replace the bulb and/or bulb socket.
1) Seat
2) Fuel tank
3) Left side cover
•Use the following special tool.
Check the bulb and bulb socket.Replace the bulb and/or
bulb socket.
Check the taillight (LEDs).Replace the taillight
assembly.
Check the AC magneto. Lighting coil Replace.
Check the entire lighting system
proper for connections.Repair or replace.
Check the rectifier/regulator. Out-put voltage Replace.
Pocket tester:
YU-3112-C/
90890-03112
No good
OK
No good
OK
No good
OK
Improperly connected
OK
No good