height YAMAHA WR 250F 2009 Owners Manual
[x] Cancel search | Manufacturer: YAMAHA, Model Year: 2009, Model line: WR 250F, Model: YAMAHA WR 250F 2009Pages: 224, PDF Size: 13.93 MB
Page 26 of 224
2-1
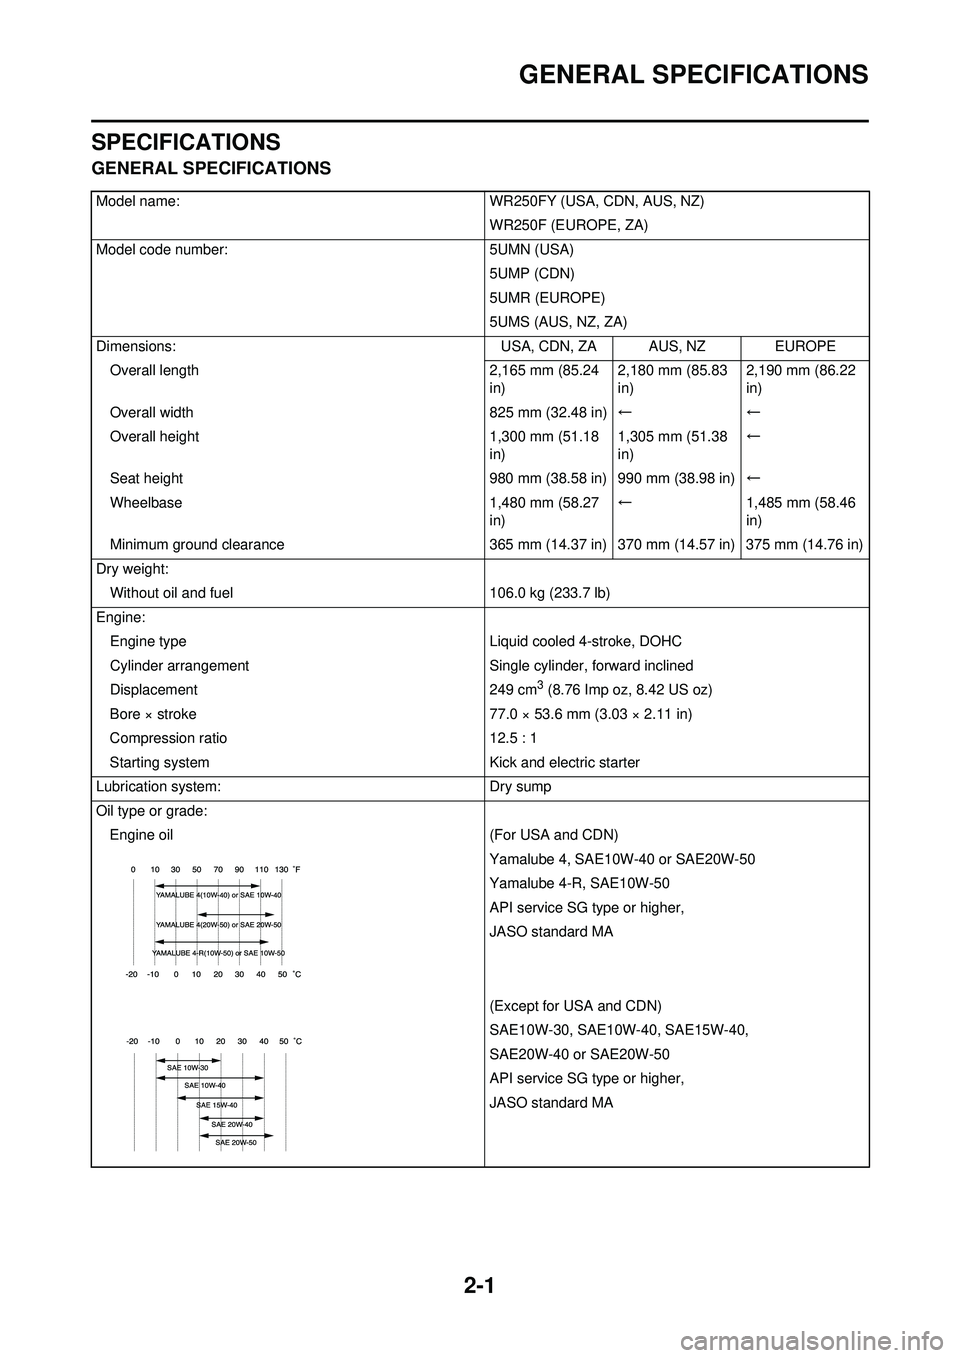
GENERAL SPECIFICATIONS
SPECIFICATIONS
GENERAL SPECIFICATIONS
Model name:WR250FY (USA, CDN, AUS, NZ)
WR250F (EUROPE, ZA)
Model code number: 5UMN (USA)
5UMP (CDN)
5UMR (EUROPE)
5UMS (AUS, NZ, ZA)
Dimensions: USA, CDN, ZA AUS, NZ EUROPE
Overall length 2,165 mm (85.24
in) 2,180 mm (85.83
in) 2,190 mm (86.22
in)
Overall width 825 mm (32.48 in)←←
Overall height 1,300 mm (51.18
in) 1,305 mm (51.38
in) ←
Seat height 980 mm (38.58 in) 990 mm (38.98 in)←
Wheelbase 1,480 mm (58.27
in) ←
1,485 mm (58.46
in)
Minimum ground clearance 365 mm (14.37 in) 370 mm (14.57 in) 375 mm (14.76 in)
Dry weight: Without oil and fuel 106.0 kg (233.7 lb)
Engine: Engine type Liquid cooled 4-stroke, DOHC
Cylinder arrangement Single cylinder, forward inclined
Displacement 249 cm
3 (8.76 Imp oz, 8.42 US oz)
Bore × stroke 77.0 × 53.6 mm (3.03 × 2.11 in)
Compression ratio 12.5 : 1
Starting system Kick and electric starter
Lubrication system: Dry sump
Oil type or grade: Engine oil (For USA and CDN)
Yamalube 4, SAE10W-40 or SAE20W-50
Yamalube 4-R, SAE10W-50
API service SG type or higher,
JASO standard MA
(Except for USA and CDN)
SAE10W-30, SAE10W-40, SAE15W-40,
SAE20W-40 or SAE20W-50
API service SG type or higher,
JASO standard MA
Page 33 of 224
2-8
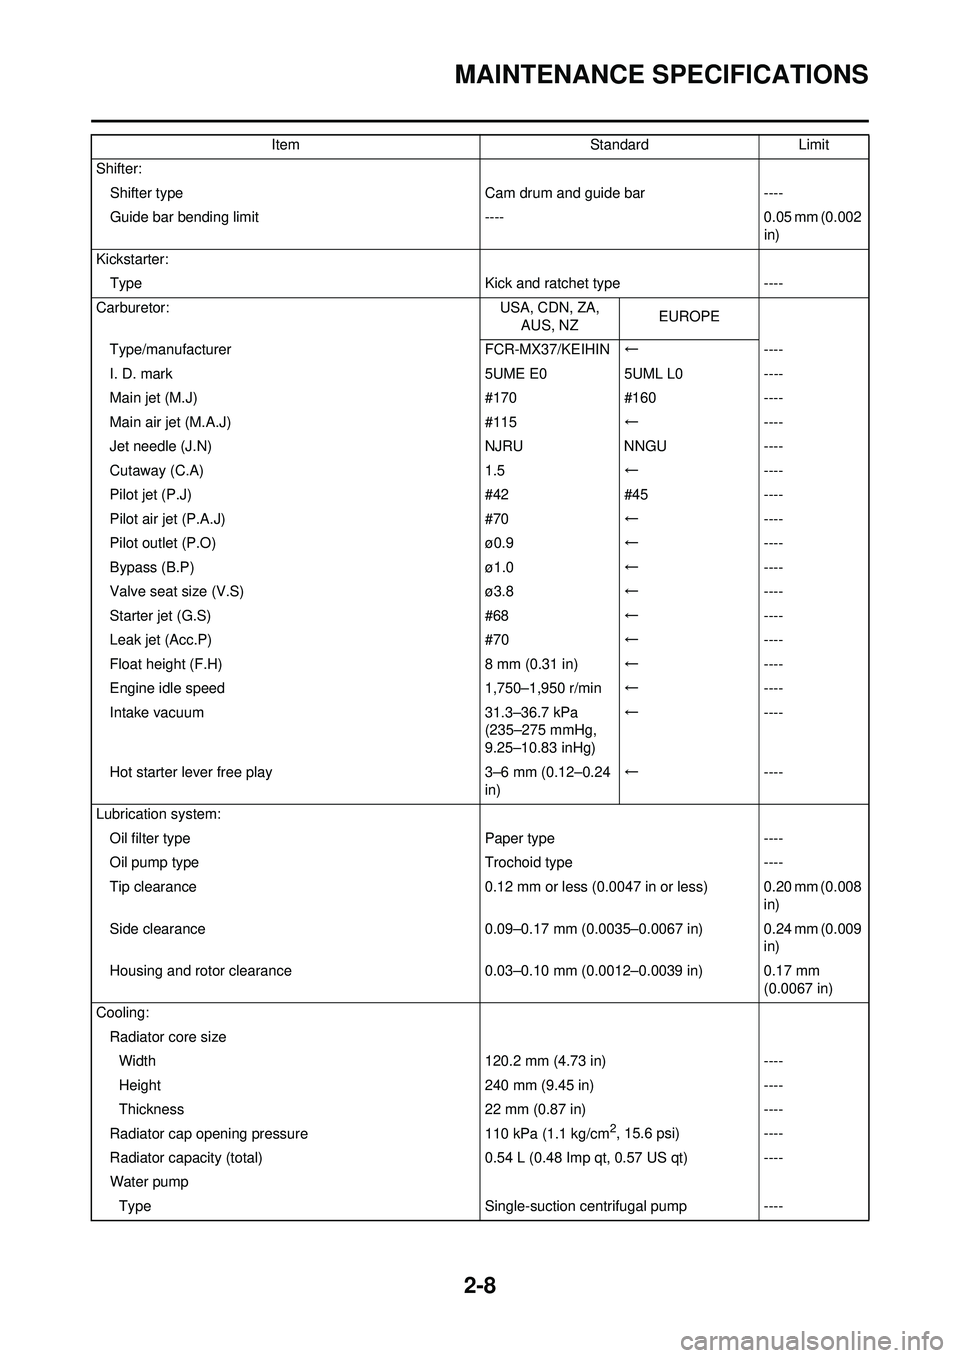
MAINTENANCE SPECIFICATIONS
Shifter:Shifter type Cam drum and guide bar----
Guide bar bending limit ----0.05 mm (0.002
in)
Kickstarter: Type Kick and ratchet type----
Carburetor: USA, CDN, ZA,
AUS, NZ EUROPE
Type/manufacturer FCR-MX37/KEIHIN← ----
I. D. mark 5UME E05UML L0 ----
Main jet (M.J) #170#160 ----
Main air jet (M.A.J) #115← ----
Jet needle (J.N) NJRUNNGU ----
Cutaway (C.A) 1.5← ----
Pilot jet (P.J) #42#45 ----
Pilot air jet (P.A.J) #70← ----
Pilot outlet (P.O) ø0.9← ----
Bypass (B.P) ø1.0← ----
Valve seat size (V.S) ø3.8← ----
Starter jet (G.S) #68← ----
Leak jet (Acc.P) #70← ----
Float height (F.H) 8 mm (0.31 in)← ----
Engine idle speed 1,750–1,950 r/min← ----
Intake vacuum 31.3–36.7 kPa
(235–275 mmHg,
9.25–10.83 inHg)←
----
Hot starter lever free play 3–6 mm (0.12–0.24
in) ←
----
Lubrication system: Oil filter type Paper type----
Oil pump type Trochoid type----
Tip clearance 0.12 mm or less (0.0047 in or less) 0.20 mm (0.008
in)
Side clearance 0.09–0.17 mm (0.0035–0.0067 in) 0.24 mm (0.009
in)
Housing and rotor clearance 0.03–0.10 mm (0.0012–0.0039 in) 0.17 mm
(0.0067 in)
Cooling: Radiator core sizeWidth 120.2 mm (4.73 in)----
Height 240 mm (9.45 in)----
Thickness 22 mm (0.87 in)----
Radiator cap opening pressure 110 kPa (1.1 kg/cm
2, 15.6 psi)----
Radiator capacity (total) 0.54 L (0.48 Imp qt, 0.57 US qt)----
Water pump Type Single-suction centrifugal pump----
Item
StandardLimit
Page 35 of 224
2-10
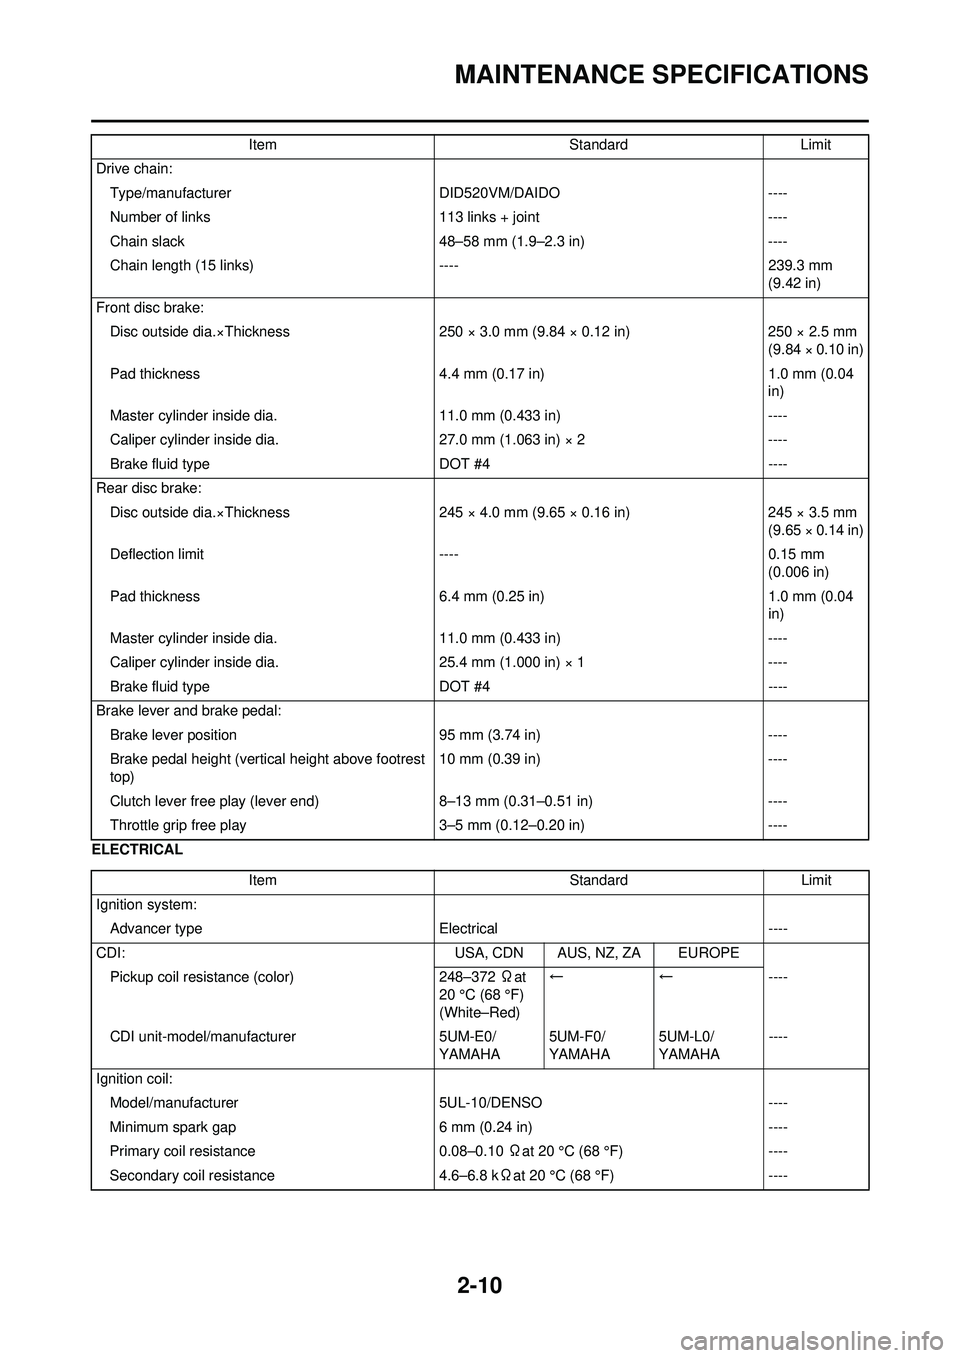
MAINTENANCE SPECIFICATIONS
ELECTRICALDrive chain:
Type/manufacturer DID520VM/DAIDO----
Number of links 113 links + joint----
Chain slack 48–58 mm (1.9–2.3 in)----
Chain length (15 links) ----239.3 mm
(9.42 in)
Front disc brake: Disc outside dia.×Thickness 250 × 3.0 mm (9.84 × 0.12 in)250 × 2.5 mm
(9.84 × 0.10 in)
Pad thickness 4.4 mm (0.17 in)1.0 mm (0.04
in)
Master cylinder inside dia. 11.0 mm (0.433 in)----
Caliper cylinder inside dia. 27.0 mm (1.063 in) × 2----
Brake fluid type DOT #4----
Rear disc brake: Disc outside dia.×Thickness 245 × 4.0 mm (9.65 × 0.16 in)245 × 3.5 mm
(9.65 × 0.14 in)
Deflection limit ----0.15 mm
(0.006 in)
Pad thickness 6.4 mm (0.25 in)1.0 mm (0.04
in)
Master cylinder inside dia. 11.0 mm (0.433 in)----
Caliper cylinder inside dia. 25.4 mm (1.000 in) × 1----
Brake fluid type DOT #4----
Brake lever and brake pedal: Brake lever position 95 mm (3.74 in)----
Brake pedal height (vertical height above footrest
top) 10 mm (0.39 in)
----
Clutch lever free play (lever end) 8–13 mm (0.31–0.51 in)----
Throttle grip free play 3–5 mm (0.12–0.20 in)----
Item
StandardLimit
Item StandardLimit
Ignition system: Advancer type Electrical ----
CDI: USA, CDN AUS, NZ, ZA EUROPE
Pickup coil resistance (color) 248–372 Ωat
20 °C (68 °F)
(White–Red) ←←----
CDI unit-model/manufacturer 5UM-E0/
YAMAHA 5UM-F0/
YAMAHA5UM-L0/
YAMAHA----
Ignition coil: Model/manufacturer 5UL-10/DENSO ----
Minimum spark gap 6 mm (0.24 in) ----
Primary coil resistance 0.08–0.10 Ωat 20 °C (68 °F) ----
Secondary coil resistance 4.6–6.8 kΩat 20 °C (68 °F) ----
Page 58 of 224
3-5
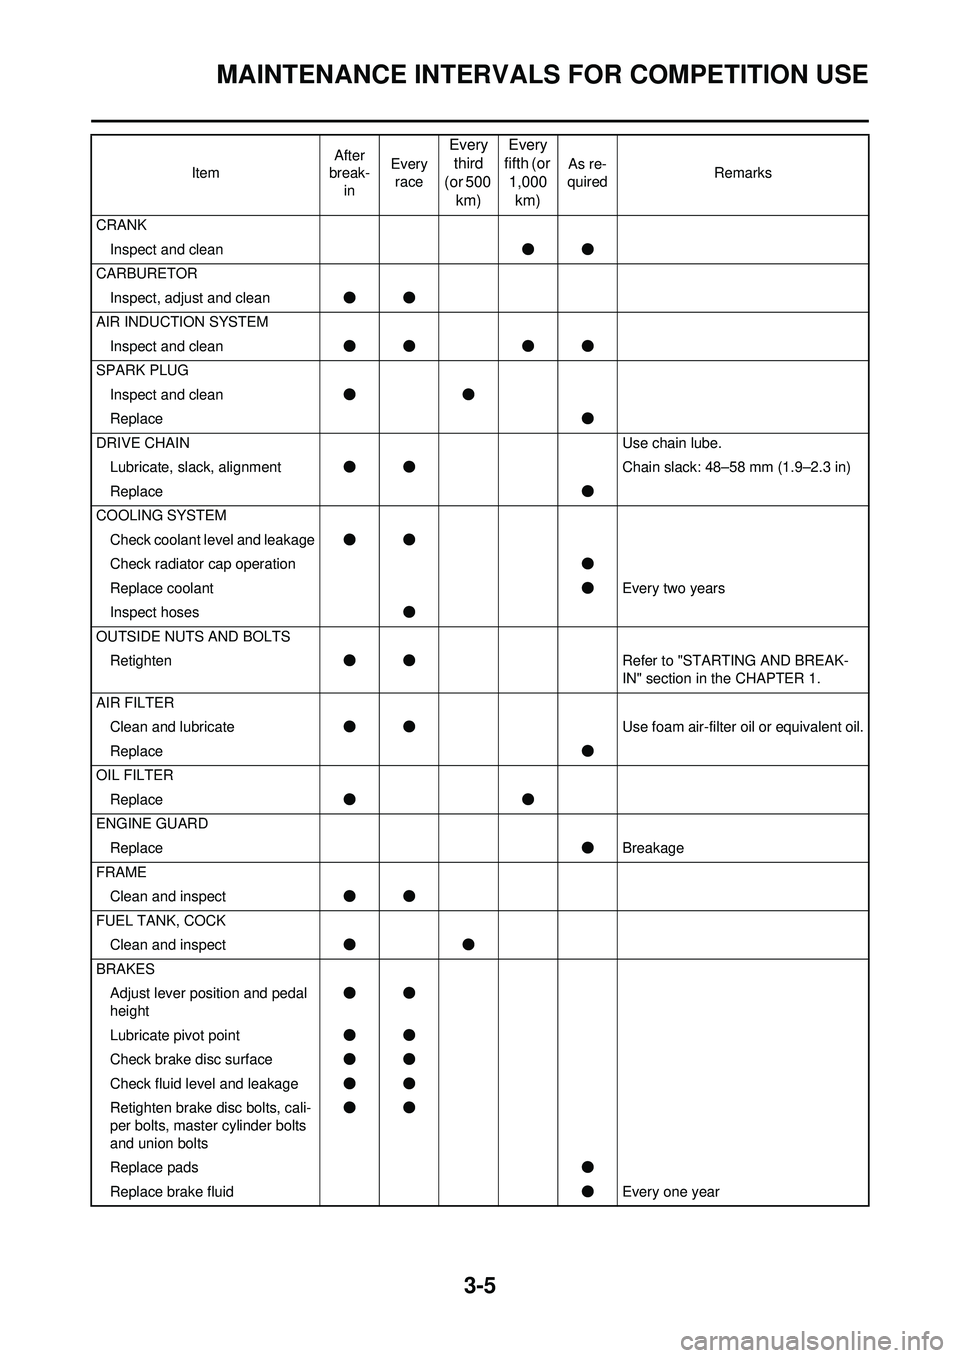
MAINTENANCE INTERVALS FOR COMPETITION USE
CRANKInspect and clean ●●
CARBURETOR Inspect, adjust and clean ●●
AIR INDUCTION SYSTEM Inspect and clean ●● ●●
SPARK PLUG Inspect and clean ●●
Replace ●
DRIVE CHAIN Use chain lube.
Lubricate, slack, alignment ●● Chain slack: 48–58 mm (1.9–2.3 in)
Replace ●
COOLING SYSTEM Check coolant level and leakage ●●
Check radiator cap operation ●
Replace coolant ●Every two years
Inspect hoses ●
OUTSIDE NUTS AND BOLTS Retighten ●● Refer to "STARTING AND BREAK-
IN" section in the CHAPTER 1.
AIR FILTER Clean and lubricate ●● Use foam air-filter oil or equivalent oil.
Replace ●
OIL FILTER Replace ●●
ENGINE GUARD Replace ●Breakage
FRAME Clean and inspect ●●
FUEL TANK, COCK Clean and inspect ●●
BRAKES Adjust lever position and pedal
height ●●
Lubricate pivot point ●●
Check brake disc surface ●●
Check fluid level and leakage ●●
Retighten brake disc bolts, cali-
per bolts, master cylinder bolts
and union bolts ●●
Replace pads ●
Replace brake fluid ●Every one year
Item
After
break-
in Every
race
Every third
(or 500 km) Every
fifth (or 1,000 km)
As re-
quired Remarks
Page 73 of 224
3-20
CHASSIS
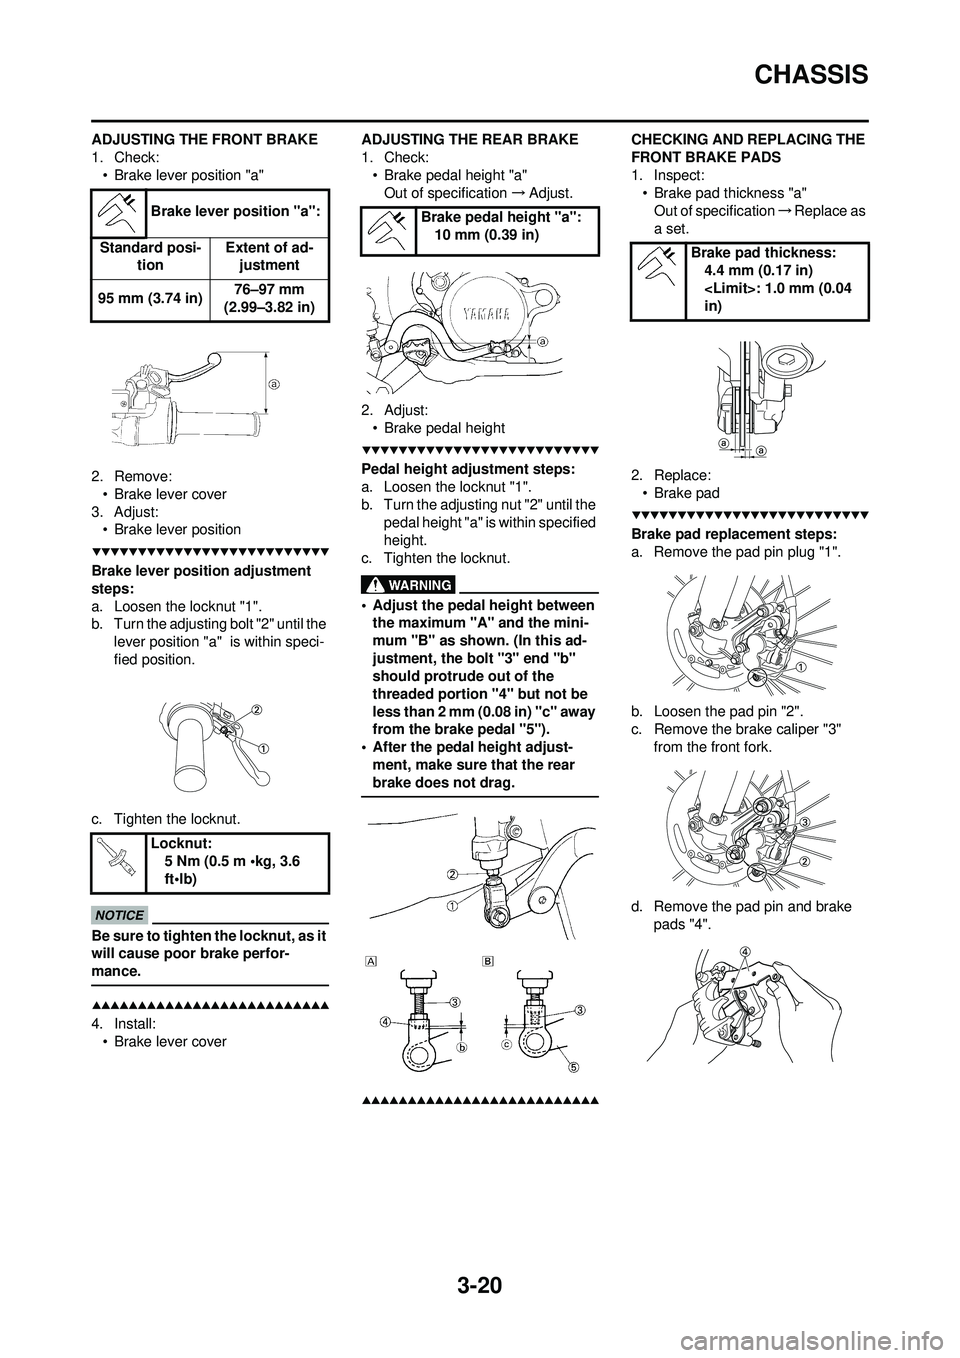
ADJUSTING THE FRONT BRAKE
1. Check:• Brake lever position "a"
2. Remove: • Brake lever cover
3. Adjust: • Brake lever position
Brake lever position adjustment
steps:
a. Loosen the locknut "1".
b. Turn the adjusting bolt "2" until the
lever position "a" is within speci-
fied position.
c. Tighten the locknut.
Be sure to tighten the locknut, as it
will cause poor brake perfor-
mance.
4. Install: • Brake lever cover ADJUSTING THE REAR BRAKE
1. Check:
• Brake pedal height "a"Out of specification →Adjust.
2. Adjust: • Brake pedal height
Pedal height adjustment steps:
a. Loosen the locknut "1".
b. Turn the adjusting nut "2" until the pedal height "a" is within specified
height.
c. Tighten the locknut.
• Adjust the pedal height between the maximum "A" and the mini-
mum "B" as shown. (In this ad-
justment, the bolt "3" end "b"
should protrude out of the
threaded portion "4" but not be
less than 2 mm (0.08 in) "c" away
from the brake pedal "5").
• After the pedal height adjust- ment, make sure that the rear
brake does not drag.
CHECKING AND REPLACING THE
FRONT BRAKE PADS
1. Inspect:• Brake pad thickness "a"
Out of specification →Replace as
a set.
2. Replace: • Brake pad
Brake pad replacement steps:
a. Remove the pad pin plug "1".
b. Loosen the pad pin "2".
c. Remove the brake caliper "3" from the front fork.
d. Remove the pad pin and brake pads "4".
Brake lever position "a":
Standard posi- tion Extent of ad-
justment
95 mm (3.74 in) 76–97 mm
(2.99–3.82 in)
Locknut: 5 Nm (0.5 m •kg, 3.6
ft•lb)
Brake pedal height "a":10 mm (0.39 in)
Brake pad thickness:4.4 mm (0.17 in)
in)
Page 103 of 224
5-7
CARBURETOR
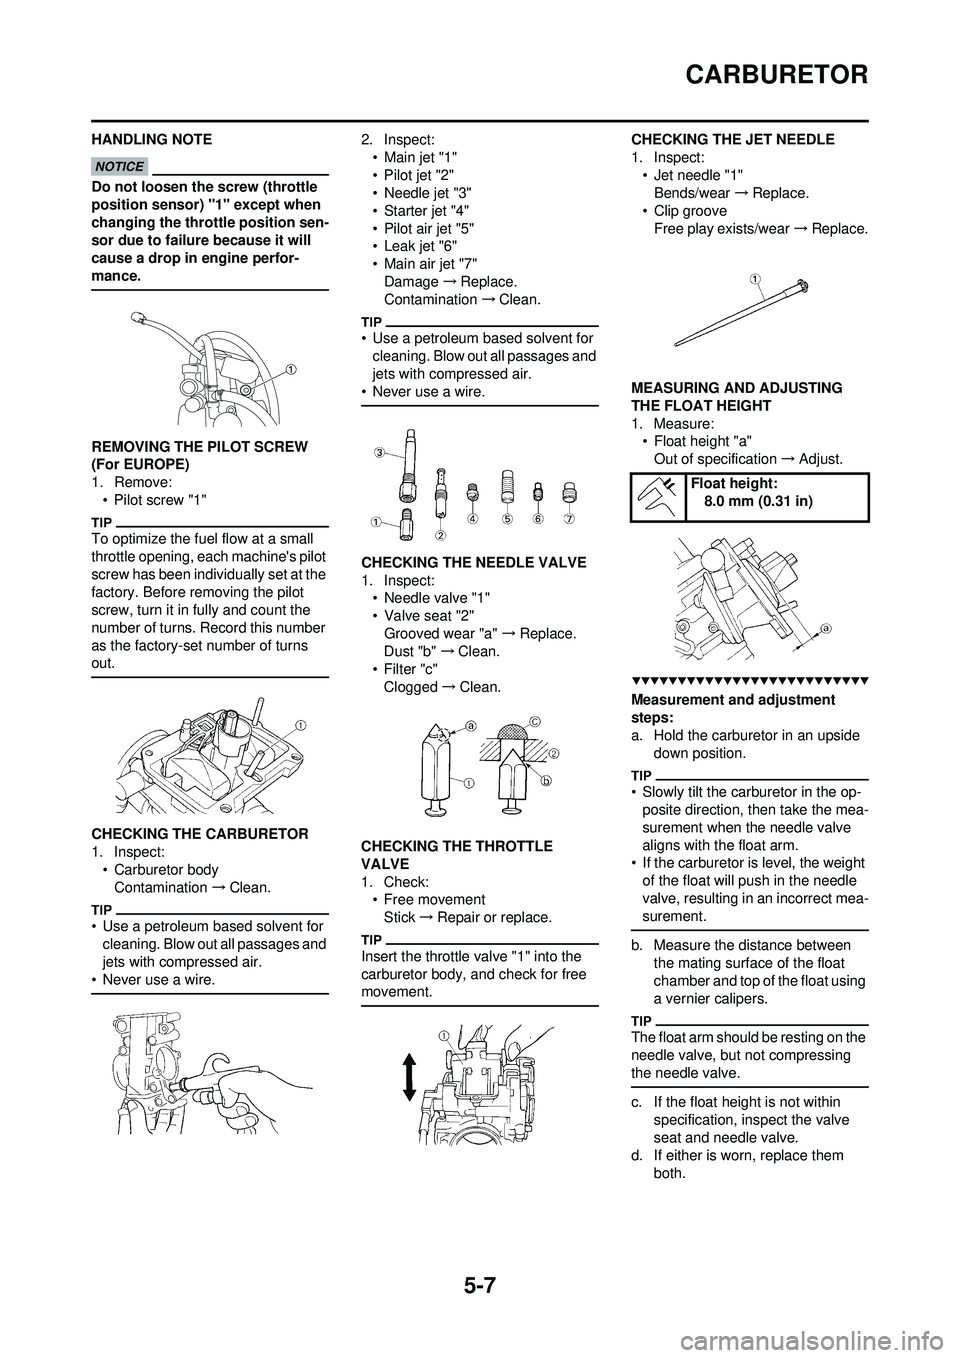
HANDLING NOTE
Do not loosen the screw (throttle
position sensor) "1" except when
changing the throttle position sen-
sor due to failure because it will
cause a drop in engine perfor-
mance.
REMOVING THE PILOT SCREW
(For EUROPE)
1. Remove:• Pilot screw "1"
To optimize the fuel flow at a small
throttle opening, each machine's pilot
screw has been individually set at the
factory. Before removing the pilot
screw, turn it in fully and count the
number of turns. Record this number
as the factory-set number of turns
out.
CHECKING THE CARBURETOR
1. Inspect:• Carburetor body
Contamination →Clean.
• Use a petroleum based solvent for
cleaning. Blow out all passages and
jets with compressed air.
• Never use a wire.
2. Inspect: •Main jet "1"
• Pilot jet "2"
• Needle jet "3"
• Starter jet "4"
• Pilot air jet "5"
•Leak jet "6"
• Main air jet "7"Damage →Replace.
Contamination →Clean.
• Use a petroleum based solvent for
cleaning. Blow out all passages and
jets with compressed air.
• Never use a wire.
CHECKING THE NEEDLE VALVE
1. Inspect: • Needle valve "1"
• Valve seat "2"
Grooved wear "a" →Replace.
Dust "b" →Clean.
•Filter "c" Clogged →Clean.
CHECKING THE THROTTLE
VALVE
1. Check: • Free movement
Stick →Repair or replace.
Insert the throttle valve "1" into the
carburetor body, and check for free
movement.
CHECKING THE JET NEEDLE
1. Inspect:
•Jet needle "1"Bends/wear →Replace.
• Clip groove Free play exists/wear →Replace.
MEASURING AND ADJUSTING
THE FLOAT HEIGHT
1. Measure: • Float height "a"
Out of specification →Adjust.
Measurement and adjustment
steps:
a. Hold the carburetor in an upside
down position.
• Slowly tilt the carburetor in the op-posite direction, then take the mea-
surement when the needle valve
aligns with the float arm.
• If the carburetor is level, the weight
of the float will push in the needle
valve, resulting in an incorrect mea-
surement.
b. Measure the distance between the mating surface of the float
chamber and top of the float using
a vernier calipers.
The float arm should be resting on the
needle valve, but not compressing
the needle valve.
c. If the float height is not within specification, inspect the valve
seat and needle valve.
d. If either is worn, replace them
both.
Float height:8.0 mm (0.31 in)
Page 104 of 224
5-8
CARBURETOR
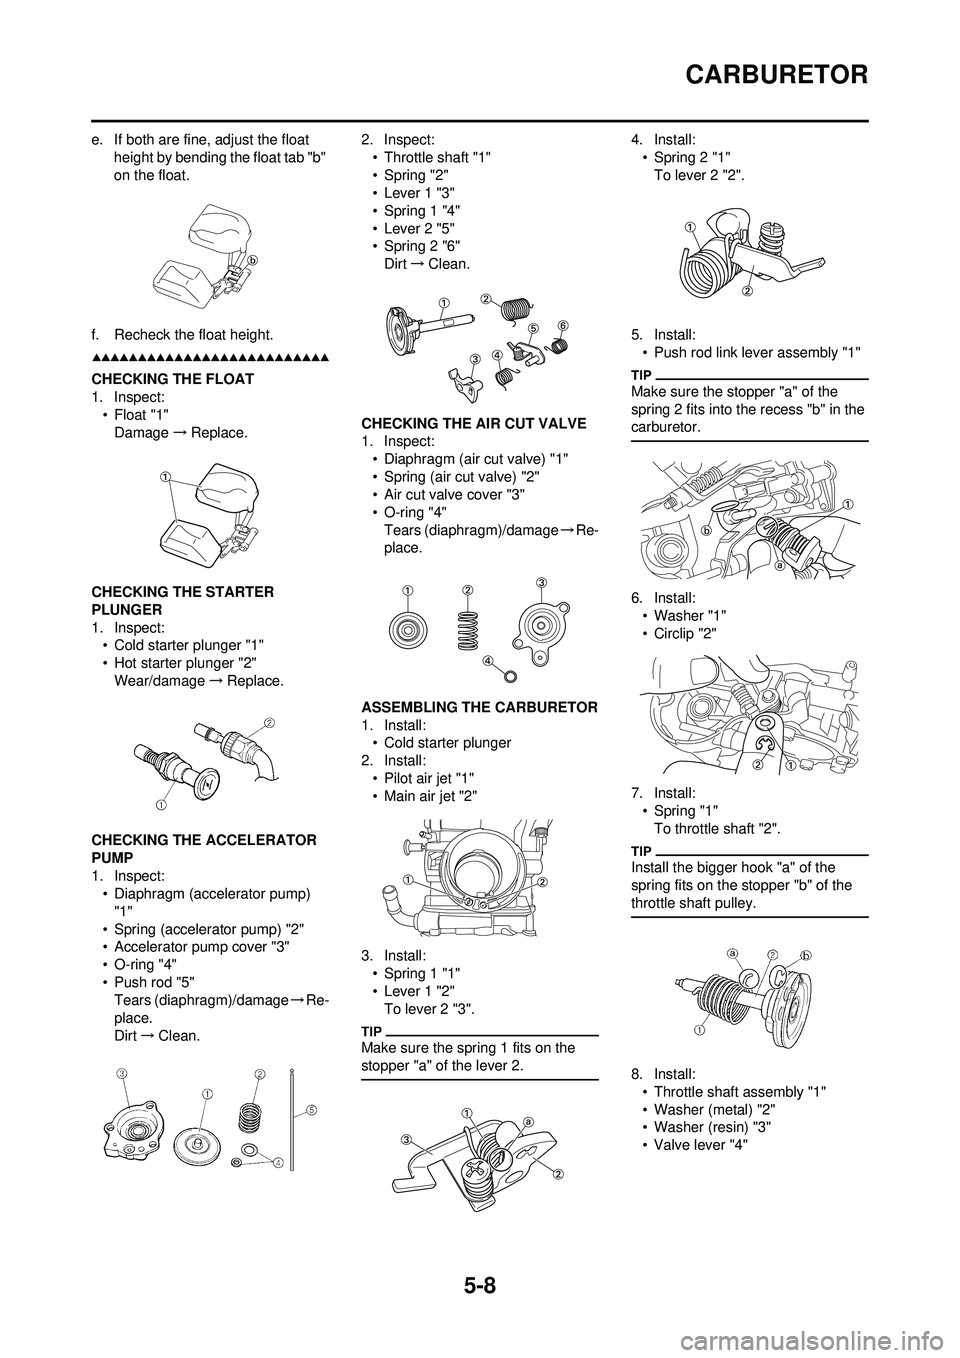
e. If both are fine, adjust the float height by bending the float tab "b"
on the float.
f. Recheck the float height.
CHECKING THE FLOAT
1. Inspect: •Float "1"Damage →Replace.
CHECKING THE STARTER
PLUNGER
1. Inspect: • Cold starter plunger "1"
• Hot starter plunger "2"
Wear/damage →Replace.
CHECKING THE ACCELERATOR
PUMP
1. Inspect: • Diaphragm (accelerator pump)
"1"
• Spring (accelerator pump) "2"
• Accelerator pump cover "3"
• O-ring "4"
• Push rod "5" Tears (diaphragm)/damage →Re-
place.
Dirt →Clean. 2. Inspect:
• Throttle shaft "1"
• Spring "2"
• Lever 1 "3"
• Spring 1 "4"
• Lever 2 "5"
• Spring 2 "6"Dirt →Clean.
CHECKING THE AIR CUT VALVE
1. Inspect: • Diaphragm (air cut valve) "1"
• Spring (air cut valve) "2"
• Air cut valve cover "3"
• O-ring "4"Tears (diaphragm)/damage →Re-
place.
ASSEMBLING THE CARBURETOR
1. Install: • Cold starter plunger
2. Install: • Pilot air jet "1"
• Main air jet "2"
3. Install: • Spring 1 "1"
• Lever 1 "2"
To lever 2 "3".
Make sure the spring 1 fits on the
stopper "a" of the lever 2.
4. Install:• Spring 2 "1"To lever 2 "2".
5. Install: • Push rod link lever assembly "1"
Make sure the stopper "a" of the
spring 2 fits into the recess "b" in the
carburetor.
6. Install:• Washer "1"
•Circlip "2"
7. Install: • Spring "1"To throttle shaft "2".
Install the bigger hook "a" of the
spring fits on the stopper "b" of the
throttle shaft pulley.
8. Install:
• Throttle shaft assembly "1"
• Washer (metal) "2"
• Washer (resin) "3"
• Valve lever "4"
Page 106 of 224
5-10
CARBURETOR
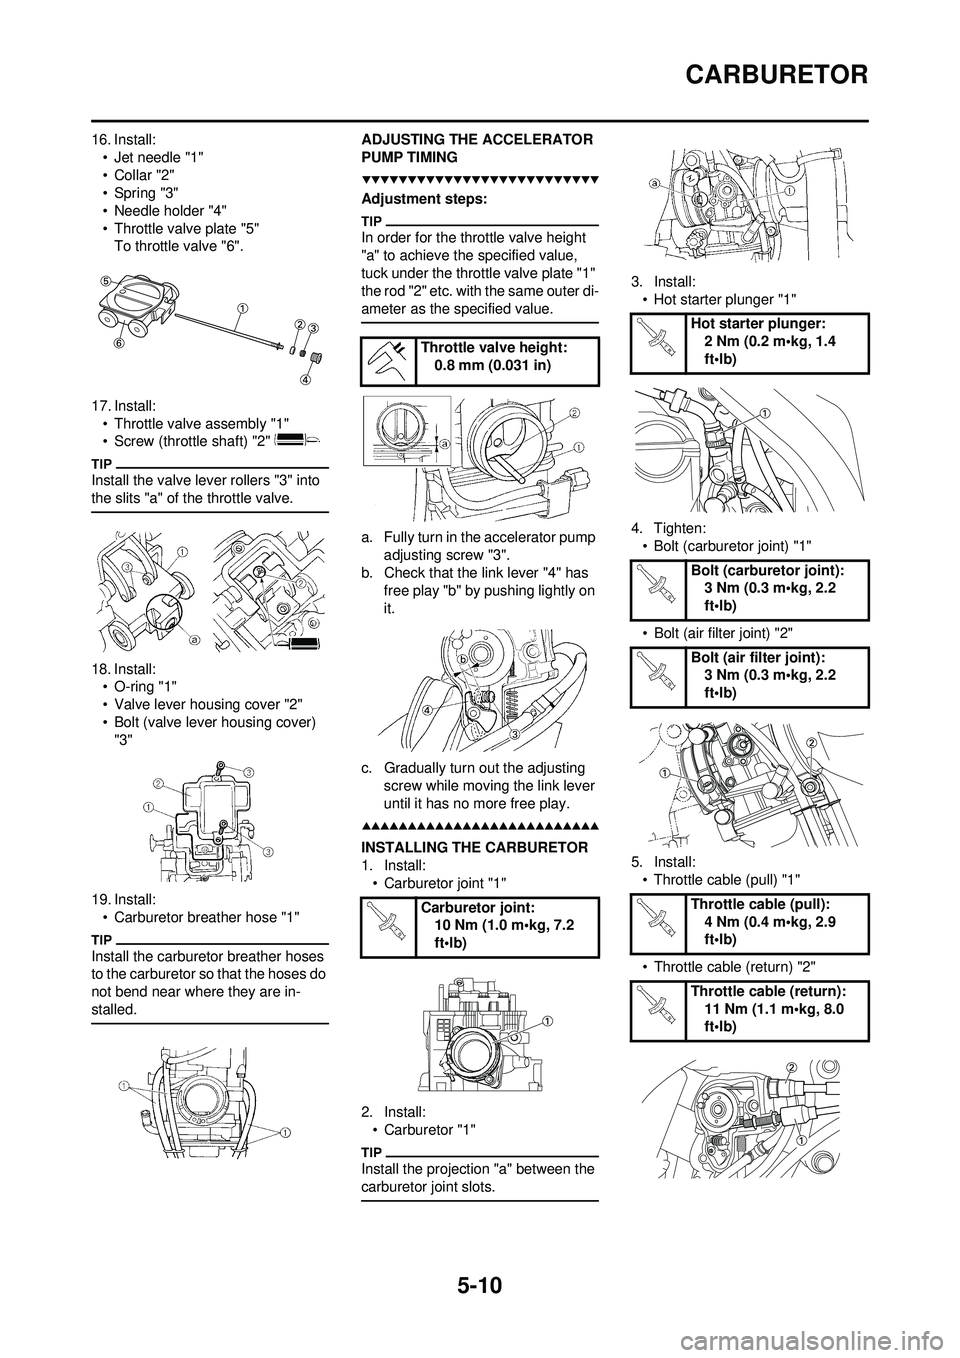
16. Install:• Jet needle "1"
•Collar "2"
• Spring "3"
• Needle holder "4"
• Throttle valve plate "5"To throttle valve "6".
17. Install: • Throttle valve assembly "1"
• Screw (throttle shaft) "2"
Install the valve lever rollers "3" into
the slits "a" of the throttle valve.
18. Install:• O-ring "1"
• Valve lever housing cover "2"
• Bolt (valve lever housing cover) "3"
19. Install: • Carburetor breather hose "1"
Install the carburetor breather hoses
to the carburetor so that the hoses do
not bend near where they are in-
stalled.
ADJUSTING THE ACCELERATOR
PUMP TIMING
Adjustment steps:
In order for the throttle valve height
"a" to achieve the specified value,
tuck under the throttle valve plate "1"
the rod "2" etc. with the same outer di-
ameter as the specified value.
a. Fully turn in the accelerator pump adjusting screw "3".
b. Check that the link lever "4" has
free play "b" by pushing lightly on
it.
c. Gradually turn out the adjusting screw while moving the link lever
until it has no more free play.
INSTALLING THE CARBURETOR
1. Install:• Carburetor joint "1"
2. Install: • Carburetor "1"
Install the projection "a" between the
carburetor joint slots.
3. Install:• Hot starter plunger "1"
4. Tighten: • Bolt (carburetor joint) "1"
• Bolt (air filter joint) "2"
5. Install: • Throttle cable (pull) "1"
• Throttle cable (return) "2"
Throttle valve height: 0.8 mm (0.031 in)
Carburetor joint: 10 Nm (1.0 m•kg, 7.2
ft•lb)
Hot starter plunger:
2 Nm (0.2 m•kg, 1.4
ft•lb)
Bolt (carburetor joint): 3 Nm (0.3 m•kg, 2.2
ft•lb)
Bolt (air filter joint): 3 Nm (0.3 m•kg, 2.2
ft•lb)
Throttle cable (pull): 4 Nm (0.4 m•kg, 2.9
ft•lb)
Throttle cable (return): 11 Nm (1.1 m•kg, 8.0
ft•lb)
Page 174 of 224
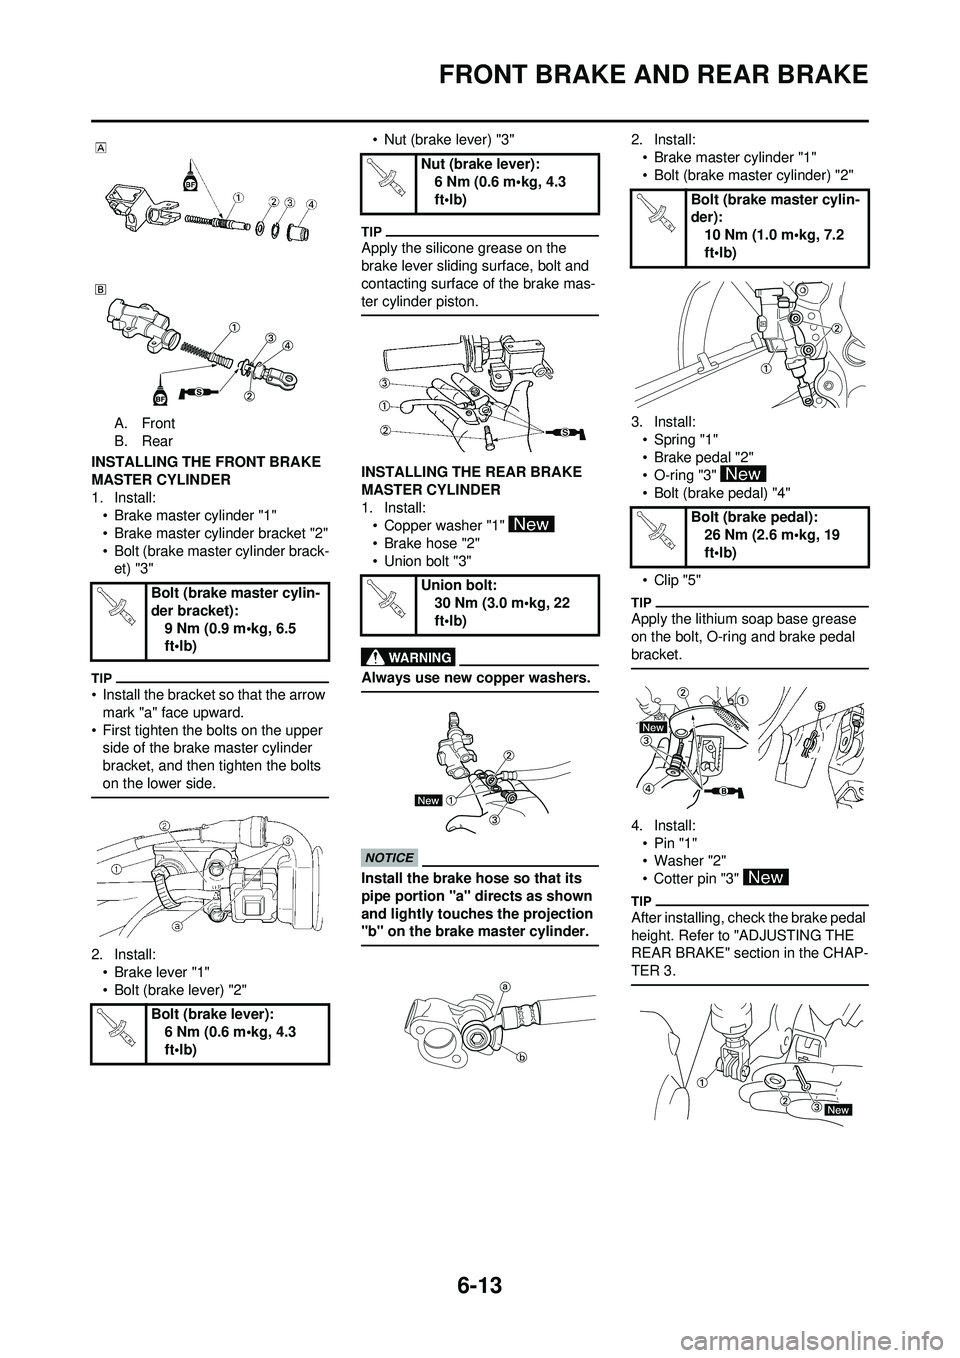
6-13
FRONT BRAKE AND REAR BRAKE
A. Front
B. Rear
INSTALLING THE FRONT BRAKE
MASTER CYLINDER
1. Install: • Brake master cylinder "1"
• Brake master cylinder bracket "2"
• Bolt (brake master cylinder brack-et) "3"
• Install the bracket so that the arrow
mark "a" face upward.
• First tighten the bolts on the upper side of the brake master cylinder
bracket, and then tighten the bolts
on the lower side.
2. Install:
• Brake lever "1"
• Bolt (brake lever) "2" • Nut (brake lever) "3"
Apply the silicone grease on the
brake lever sliding surface, bolt and
contacting surface of the brake mas-
ter cylinder piston.
INSTALLING THE REAR BRAKE
MASTER CYLINDER
1. Install:
• Copper washer "1"
• Brake hose "2"
• Union bolt "3"
Always use new copper washers.
Install the brake hose so that its
pipe portion "a" directs as shown
and lightly touches the projection
"b" on the brake master cylinder.
2. Install:
• Brake master cylinder "1"
• Bolt (brake master cylinder) "2"
3. Install: • Spring "1"
• Brake pedal "2"
• O-ring "3"
• Bolt (brake pedal) "4"
•Clip "5"
Apply the lithium soap base grease
on the bolt, O-ring and brake pedal
bracket.
4. Install:•Pin "1"
• Washer "2"
• Cotter pin "3"
After installing, check the brake pedal
height. Refer to "ADJUSTING THE
REAR BRAKE" section in the CHAP-
TER 3.
Bolt (brake master cylin-
der bracket): 9 Nm (0.9 m•kg, 6.5
ft•lb)
Bolt (brake lever): 6 Nm (0.6 m•kg, 4.3
ft•lb)
Nut (brake lever):
6 Nm (0.6 m•kg, 4.3
ft•lb)
Union bolt: 30 Nm (3.0 m•kg, 22
ft•lb)
Bolt (brake master cylin-
der):
10 Nm (1.0 m•kg, 7.2
ft•lb)
Bolt (brake pedal): 26 Nm (2.6 m•kg, 19
ft•lb)