start stop button YAMAHA WR 250F 2017 Owners Manual
[x] Cancel search | Manufacturer: YAMAHA, Model Year: 2017, Model line: WR 250F, Model: YAMAHA WR 250F 2017Pages: 432, PDF Size: 14.14 MB
Page 36 of 432

MULTI-FUNCTION DISPLAY
1-22
EAS2GBB042
MULTI-FUNCTION DISPLAYEWA
WARNING
Be sure to stop the machine before making
any setting changes to the multi-function
display.
The multi-function display is equipped with the
following:
BASIC MODE:
• Speedometer
•Clock
• Two tripmeters (which shows the distance
that has been traveled since it was last set to
zero)
RACE MODE:
• Timer (which shows the time that has been
accumulated since the start of timer measure-
ment)
• Tripmeter (which shows the accumulated
travel distance in timer measurement)
• Change tripmeter digits (capable of change to
any given ones)
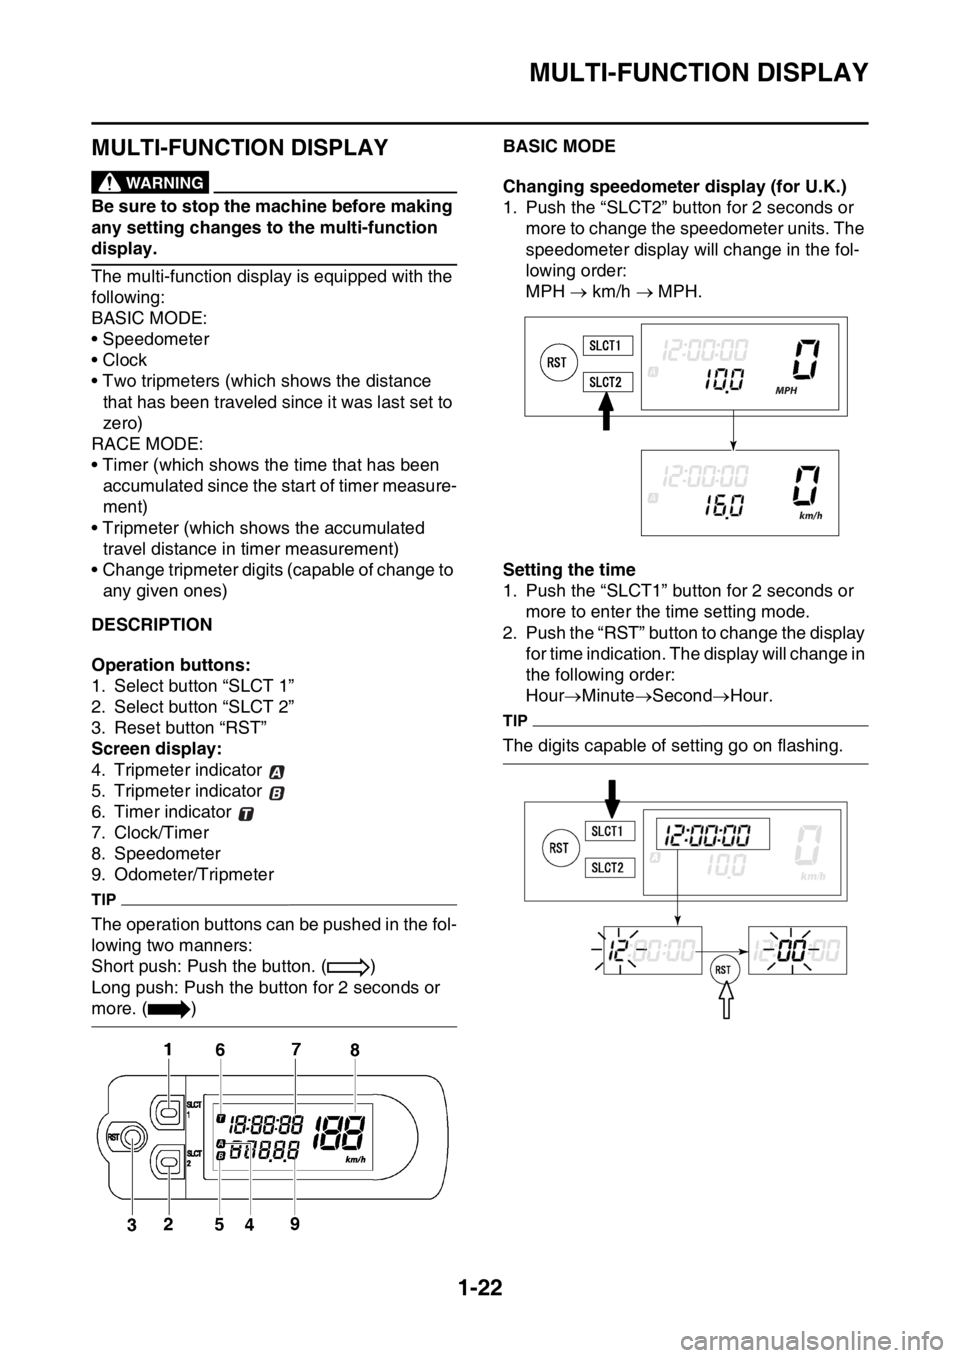
EAS2GBB043DESCRIPTION
Operation buttons:
1. Select button “SLCT 1”
2. Select button “SLCT 2”
3. Reset button “RST”
Screen display:
4. Tripmeter indicator
5. Tripmeter indicator
6. Timer indicator
7. Clock/Timer
8. Speedometer
9. Odometer/Tripmeter
TIP
The operation buttons can be pushed in the fol-
lowing two manners:
Short push: Push the button. ( )
Long push: Push the button for 2 seconds or
more. ( )
EAS2GBB044BASIC MODE
Changing speedometer display (for U.K.)
1. Push the “SLCT2” button for 2 seconds or
more to change the speedometer units. The
speedometer display will change in the fol-
lowing order:
MPH km/h MPH.
Setting the time
1. Push the “SLCT1” button for 2 seconds or
more to enter the time setting mode.
2. Push the “RST” button to change the display
for time indication. The display will change in
the following order:
HourMinuteSecondHour.
TIP
The digits capable of setting go on flashing.
Page 38 of 432

MULTI-FUNCTION DISPLAY
1-24
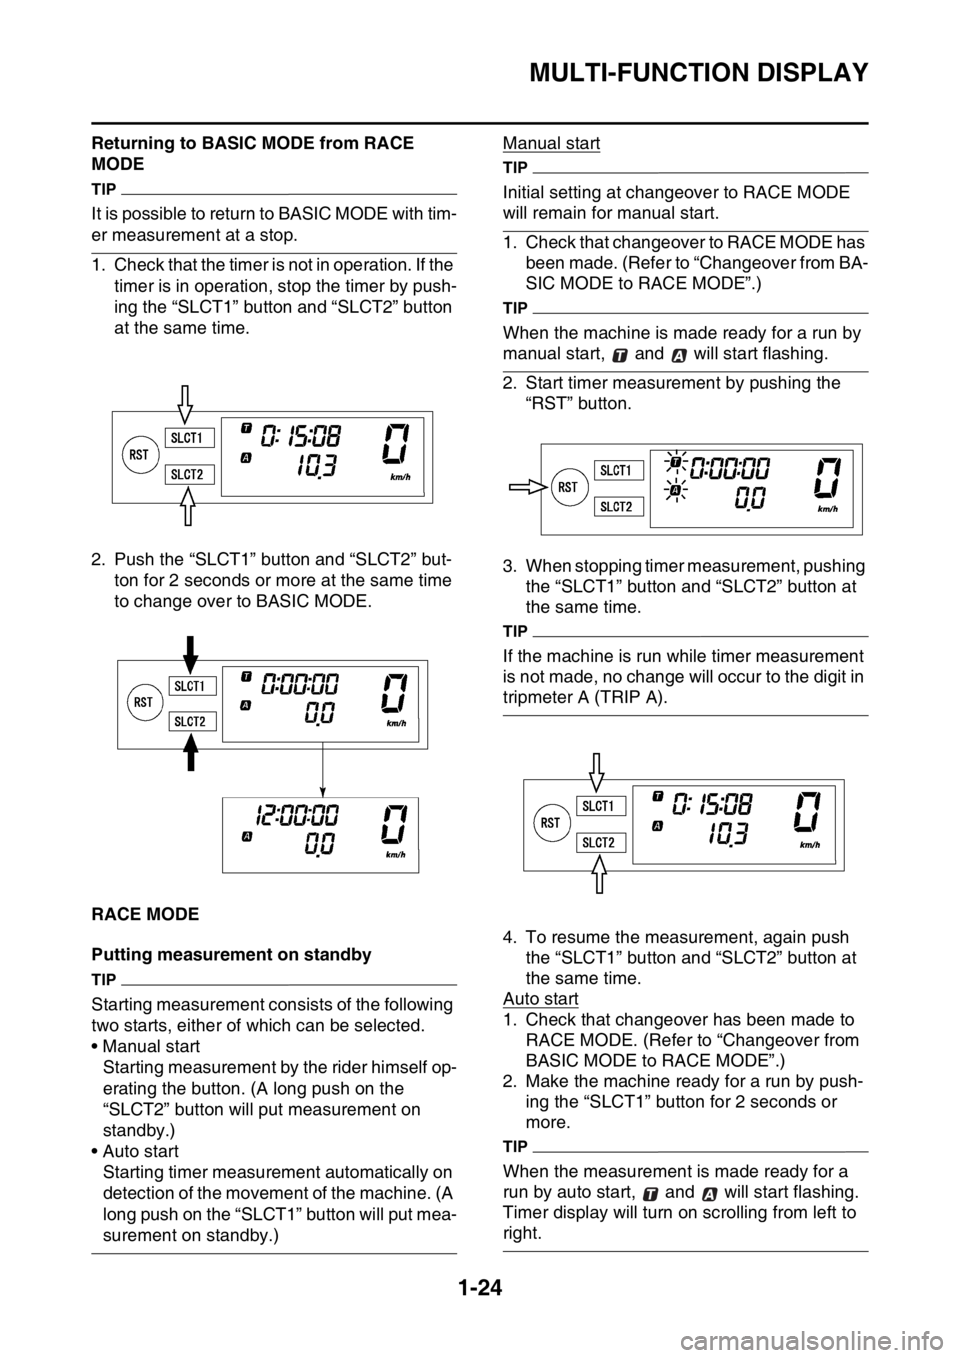
Returning to BASIC MODE from RACE
MODE
TIP
It is possible to return to BASIC MODE with tim-
er measurement at a stop.
1. Check that the timer is not in operation. If the
timer is in operation, stop the timer by push-
ing the “SLCT1” button and “SLCT2” button
at the same time.
2. Push the “SLCT1” button and “SLCT2” but-
ton for 2 seconds or more at the same time
to change over to BASIC MODE.
EAS2GBB046RACE MODE
Putting measurement on standby
TIP
Starting measurement consists of the following
two starts, either of which can be selected.
• Manual start
Starting measurement by the rider himself op-
erating the button. (A long push on the
“SLCT2” button will put measurement on
standby.)
• Auto start
Starting timer measurement automatically on
detection of the movement of the machine. (A
long push on the “SLCT1” button will put mea-
surement on standby.)Manual start
TIP
Initial setting at changeover to RACE MODE
will remain for manual start.
1. Check that changeover to RACE MODE has
been made. (Refer to “Changeover from BA-
SIC MODE to RACE MODE”.)
TIP
When the machine is made ready for a run by
manual start, and will start flashing.
2. Start timer measurement by pushing the
“RST” button.
3. When stopping timer measurement, pushing
the “SLCT1” button and “SLCT2” button at
the same time.
TIP
If the machine is run while timer measurement
is not made, no change will occur to the digit in
tripmeter A (TRIP A).
4. To resume the measurement, again push
the “SLCT1” button and “SLCT2” button at
the same time.
Auto start
1. Check that changeover has been made to
RACE MODE. (Refer to “Changeover from
BASIC MODE to RACE MODE”.)
2. Make the machine ready for a run by push-
ing the “SLCT1” button for 2 seconds or
more.
TIP
When the measurement is made ready for a
run by auto start, and will start flashing.
Timer display will turn on scrolling from left to
right.
Page 39 of 432

MULTI-FUNCTION DISPLAY
1-25
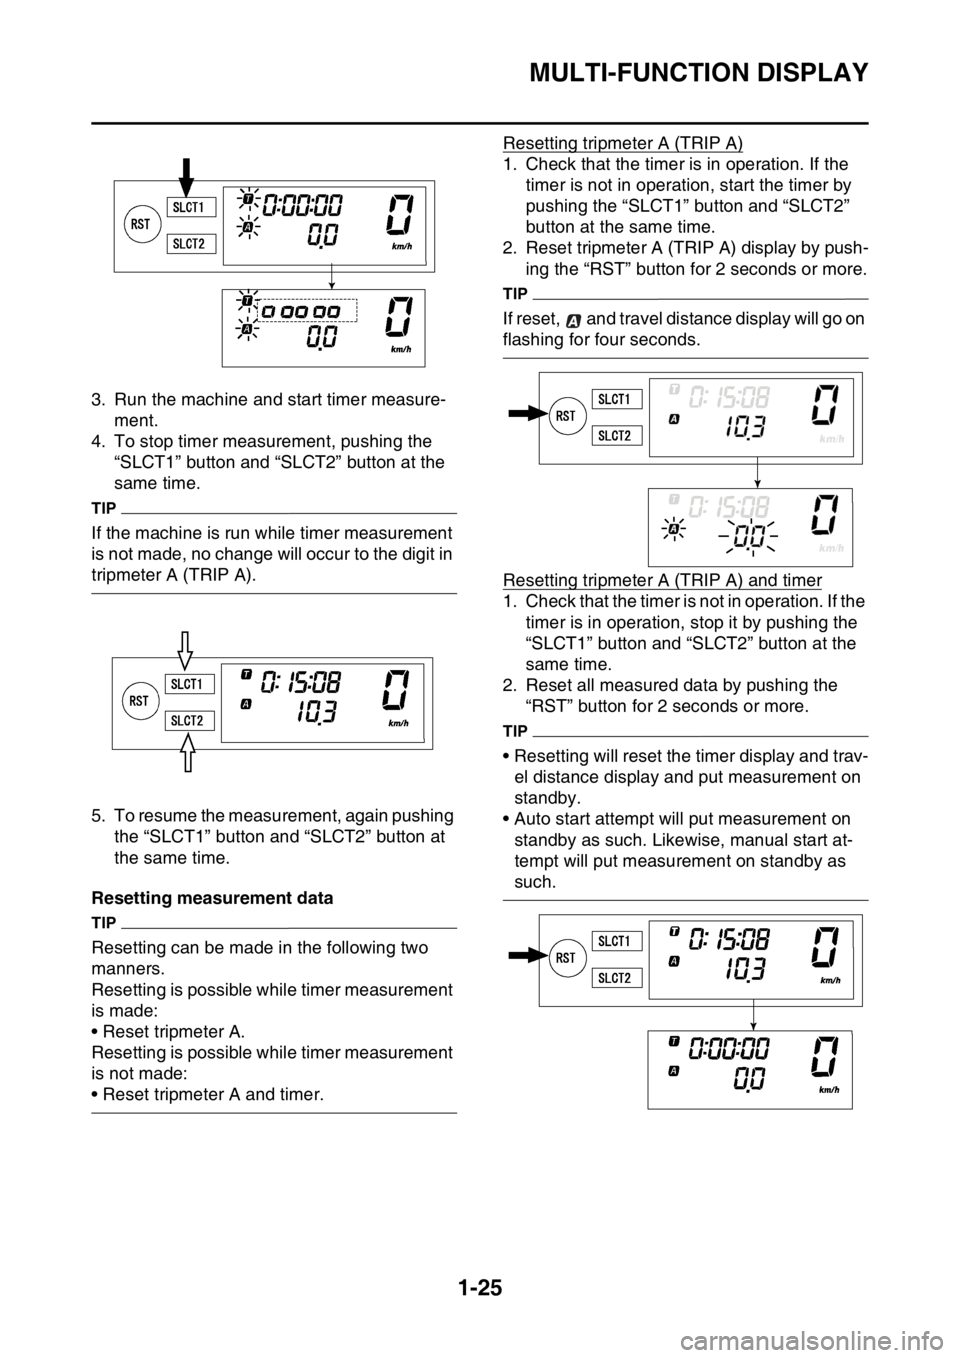
3. Run the machine and start timer measure-
ment.
4. To stop timer measurement, pushing the
“SLCT1” button and “SLCT2” button at the
same time.
TIP
If the machine is run while timer measurement
is not made, no change will occur to the digit in
tripmeter A (TRIP A).
5. To resume the measurement, again pushing
the “SLCT1” button and “SLCT2” button at
the same time.
Resetting measurement data
TIP
Resetting can be made in the following two
manners.
Resetting is possible while timer measurement
is made:
• Reset tripmeter A.
Resetting is possible while timer measurement
is not made:
• Reset tripmeter A and timer.Resetting tripmeter A (TRIP A)
1. Check that the timer is in operation. If the
timer is not in operation, start the timer by
pushing the “SLCT1” button and “SLCT2”
button at the same time.
2. Reset tripmeter A (TRIP A) display by push-
ing the “RST” button for 2 seconds or more.
TIP
If reset, and travel distance display will go on
flashing for four seconds.
Resetting tripmeter A (TRIP A) and timer
1. Check that the timer is not in operation. If the
timer is in operation, stop it by pushing the
“SLCT1” button and “SLCT2” button at the
same time.
2. Reset all measured data by pushing the
“RST” button for 2 seconds or more.
TIP
• Resetting will reset the timer display and trav-
el distance display and put measurement on
standby.
• Auto start attempt will put measurement on
standby as such. Likewise, manual start at-
tempt will put measurement on standby as
such.