engine YAMAHA WR 400F 2000 Notices Demploi (in French)
[x] Cancel search | Manufacturer: YAMAHA, Model Year: 2000, Model line: WR 400F, Model: YAMAHA WR 400F 2000Pages: 654, PDF Size: 60.12 MB
Page 87 of 654
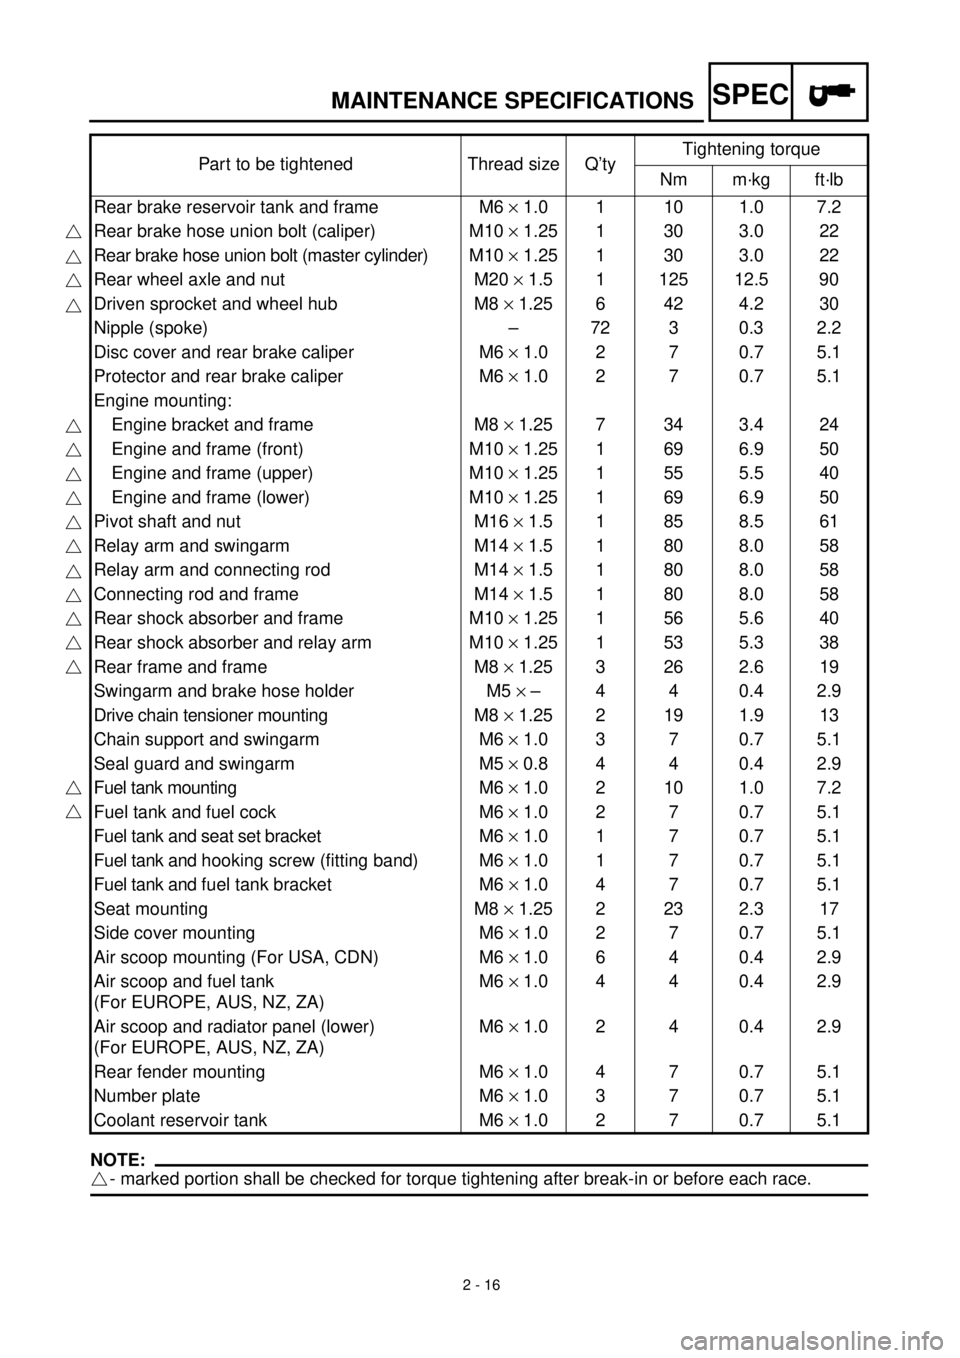
2 - 16
SPECMAINTENANCE SPECIFICATIONS
HINWEIS:NOTE:
- marked portion shall be checked for torque tightening after break-in or before each race.Part to be tightened Thread size Q’tyTightening torque
Nm m·kg ft·lb
Rear brake reservoir tank and frame M6 ´ 1.0 1 10 1.0 7.2
Rear brake hose union bolt (caliper) M10 ´ 1.25 1 30 3.0 22
Rear brake hose union bolt (master cylinder)M10 ´ 1.25 1 30 3.0 22
Rear wheel axle and nut M20 ´ 1.5 1 125 12.5 90
Driven sprocket and wheel hub M8 ´ 1.25 6 42 4.2 30
Nipple (spoke) – 72 3 0.3 2.2
Disc cover and rear brake caliper M6 ´ 1.0 2 7 0.7 5.1
Protector and rear brake caliper M6 ´ 1.0 2 7 0.7 5.1
Engine mounting:
Engine bracket and frame M8 ´ 1.25 7 34 3.4 24
Engine and frame (front) M10 ´ 1.25 1 69 6.9 50
Engine and frame (upper) M10 ´ 1.25 1 55 5.5 40
Engine and frame (lower) M10 ´ 1.25 1 69 6.9 50
Pivot shaft and nut M16 ´ 1.5 1 85 8.5 61
Relay arm and swingarm M14 ´ 1.5 1 80 8.0 58
Relay arm and connecting rod M14 ´ 1.5 1 80 8.0 58
Connecting rod and frame M14 ´ 1.5 1 80 8.0 58
Rear shock absorber and frame M10 ´ 1.25 1 56 5.6 40
Rear shock absorber and relay arm M10 ´ 1.25 1 53 5.3 38
Rear frame and frame M8 ´ 1.25 3 26 2.6 19
Swingarm and brake hose holder M5 ´ – 4 4 0.4 2.9
Drive chain tensioner mounting M8 ´ 1.25 2 19 1.9 13
Chain support and swingarm M6 ´ 1.0 3 7 0.7 5.1
Seal guard and swingarm M5 ´ 0.8 4 4 0.4 2.9
Fuel tank mounting M6 ´ 1.0 2 10 1.0 7.2
Fuel tank and fuel cock M6 ´ 1.0 2 7 0.7 5.1
Fuel tank and seat set bracket M6 ´ 1.0 1 7 0.7 5.1
Fuel tank and hooking screw (fitting band) M6 ´ 1.0 1 7 0.7 5.1
Fuel tank and fuel tank bracket M6 ´ 1.0 4 7 0.7 5.1
Seat mounting M8 ´ 1.25 2 23 2.3 17
Side cover mounting M6 ´ 1.0 2 7 0.7 5.1
Air scoop mounting (For USA, CDN) M6 ´ 1.0 6 4 0.4 2.9
Air scoop and fuel tank
(For EUROPE, AUS, NZ, ZA)M6 ´ 1.0 4 4 0.4 2.9
Air scoop and radiator panel (lower)
(For EUROPE, AUS, NZ, ZA)M6 ´ 1.0 2 4 0.4 2.9
Rear fender mounting M6 ´ 1.0 4 7 0.7 5.1
Number plate M6 ´ 1.0 3 7 0.7 5.1
Coolant reservoir tank M6 ´ 1.0 2 7 0.7 5.1
Page 89 of 654
2 - 18
SPEC
GENERAL TORQUE SPECIFICATIONS/
DEFINITION OF UNITS
EC220001
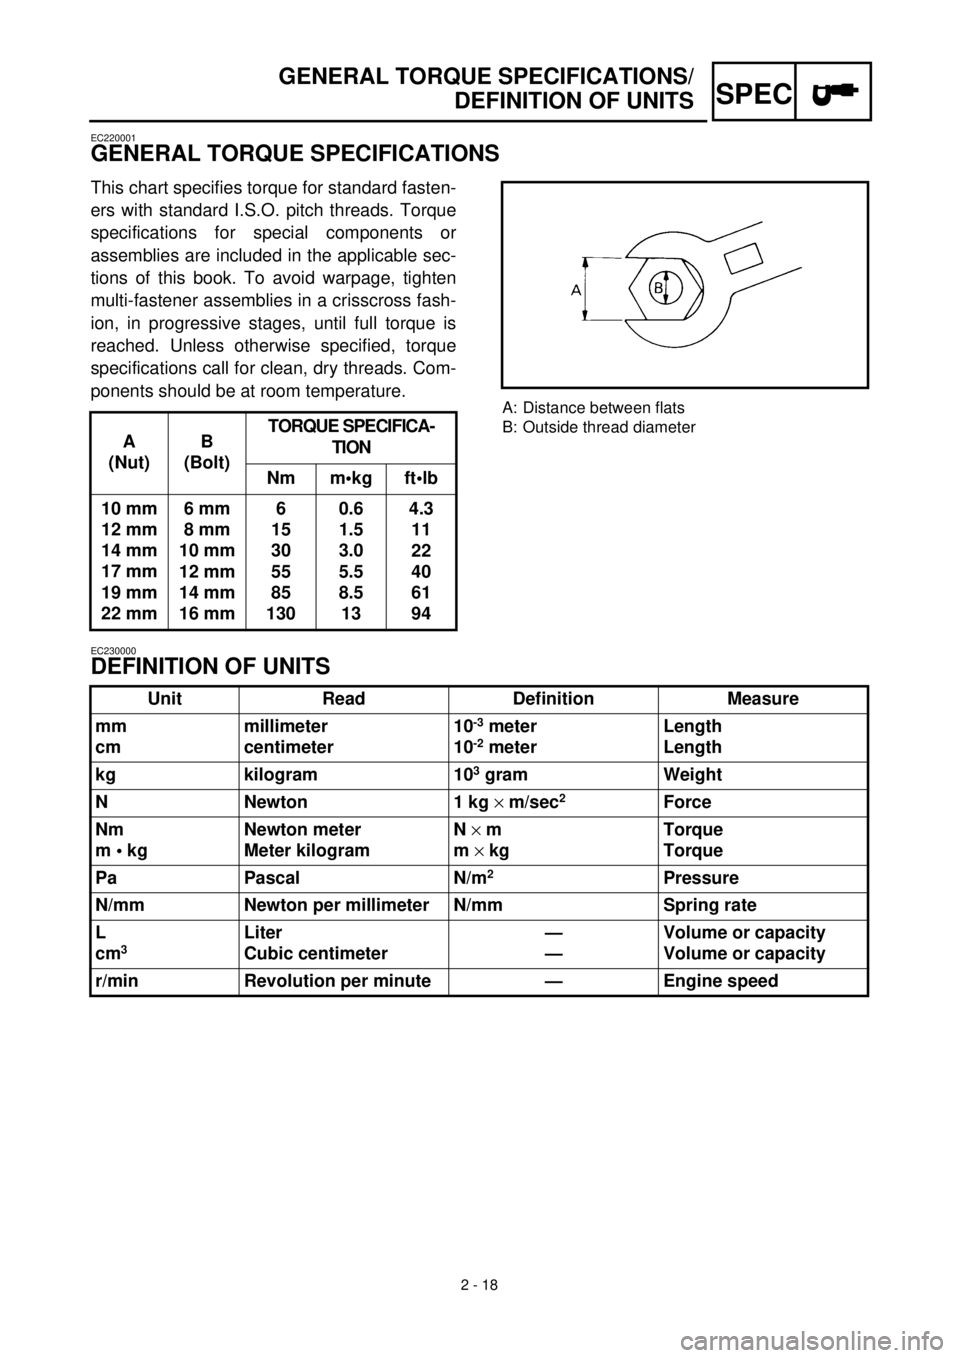
GENERAL TORQUE SPECIFICATIONS
This chart specifies torque for standard fasten-
ers with standard I.S.O. pitch threads. Torque
specifications for special components or
assemblies are included in the applicable sec-
tions of this book. To avoid warpage, tighten
multi-fastener assemblies in a crisscross fash-
ion, in progressive stages, until full torque is
reached. Unless otherwise specified, torque
specifications call for clean, dry threads. Com-
ponents should be at room temperature.
A
(Nut)B
(Bolt)TORQUE SPECIFICA-
TION
Nm m•kg ft•lb
10 mm
12 mm
14 mm
17 mm
19 mm
22 mm6 mm
8 mm
10 mm
12 mm
14 mm
16 mm6
15
30
55
85
1300.6
1.5
3.0
5.5
8.5
134.3
11
22
40
61
94
A: Distance between flats
B: Outside thread diameter
EC230000
DEFINITION OF UNITS
Unit Read Definition Measure
mm
cmmillimeter
centimeter10
-3
meter
10
-2
meterLength
Length
kg kilogram 10
3
gram Weight
N Newton 1 kg
´
m/sec
2
Force
Nm
m • kgNewton meter
Meter kilogramN
´
m
m
´
kgTorque
Torque
Pa Pascal N/m
2
Pressure
N/mm Newton per millimeter N/mm Spring rate
L
cm
3
Liter
Cubic centimeter—
—Volume or capacity
Volume or capacity
r/min Revolution per minute — Engine speed
Page 148 of 654

2 - 21
SPEC
CABLE ROUTING DIAGRAM
EC240000
CABLE ROUTING DIAGRAM
1
Hose guide
2
Brake hose
3
Regulator
4
Fuel tank breather hose
5
Oil tank breather hose
6
Clamp
7
“ENGINE STOP” button lead
8
Sub wire harness
9
Tail light lead
0
TPS (throttle position sensor) lead
A
Neutral switch lead
B
Oil hose
C
Cylinder head breather hose
D
CDI magneto lead
E
Hose holder
F
Clutch cable
G
Decompression cable
H
Lights switch lead
I
Carburetor breather hose
J
Overflow hose
K
Coolant reservoir tank breather hose
Pass the fuel tank breather
hose behind handlebar, then
insert it into the steering shaft
hole.
õ
Pass the decompression
cable, “ENGINE STOP” but-
ton lead and lights switch lead
under where the oil hose is
attached.
‚
Pass the “ENGINE STOP” but-
ton lead, regulator lead and
lights switch lead along the
inner and side of the decom-
pression cable.
ë
Fasten the CDI magneto lead,
neutral switch lead “ENGINE
STOP” button lead and lights
switch lead to the frame with a
plastic locking tie.äPass the “ENGINE STOP”
button lead and lights switch
lead along the inner side of
the oil tank breather hose.
ìFasten the sub wire harness,
“ENGINE STOP” button lead
and lights switch lead to the
frame with a plastic locking
tie.
íPass the cylinder head
breather hose along the right
side of the oil tank breather
hose.
îFasten the sub wire harness
to the frame with a plastic
locking tie and cut off the tie
end.
éFasten the TPS lead (in the
sub wire harness) under the
frame.
Page 149 of 654

SPEC
CHEMINEMENT DES CABLES
KABELFÜHRUNG
DIAGRAMA DE RUTA DE CABLES
KABELFÜHRUNG
1Kabelführung
2Bremsschlauch
3Regler
4Kraftstofftank-Belüftungsschlauch
5Öltank-Belüftungsschlauch
6Kabelbinder
7Motorstoppschalter-Kabel
8Nebenkabelsatz
9Rücklicht
0Drosselklappensensor-Kabel
ALeerlaufschalter-Kabel
BÖlschlauch
CZylinderkopf-Entlüftungsschlauch
DCDI-Schwungradmagnetzünder-Ka-
bel
ESchlauchhalterung
FKupplungszug
GDekompressionszug
HLichtschalterleitung
IVergaser-Entlüftungsschlauch
JAuslaufschutzschlauch
KKühlmittelausgleichstank-Lüftungs-
schlauch
Den Kraftstofftank-Belüftungs-
schlauch zwischen Lenker und Zugs-
trebe führen und das Ende durch die
Bohrung im Nummerschild führen.
õDen Dekompressionszug hinter dem
Öltank-Belüftungsschlauch und über
das Öltankrohr führen.
‚Das Motorstoppschalter-Kabel hinter
dem Dekompressionszug führen.
ëDas CDI-Schwungradmagnetzünder-
Kabel, Leerlaufschalter-Kabel und
Motorstoppschalter-Kabel mit wieder-
verwenden. Kabelbinder am Rahmen
befestigen.
äDas Motorstoppschalter-Kabel hinter
dem Öltank-Belüftungsschlauch füh-
ren.
ìDen Nebenkabelbaum und das Mo-
torstoppschalter-Kabel mit mehrf. ver-
wendb. Kabelbinder am Rahmen be-
festigen.
íDen Zylinderkopf-Entlüftungs-
schlauch rechts vom Öltank-Belüf-
tungsschlauch führen.
îDen Nebenkabelbaum mit einem Ka-
belbinder am Rahmen befestigen,
und das Schlauchbandende ab-
schneiden.
éDie TPS-Leitung (im Nebenkabel-
baum) unter dem Rahmen verlegen.
CHEMINEMENT DES
CABLES
1Guide de flexible
2Tuyau de frein
3Régulateur
4Reniflard de réservoir d’essence
5Reniflard de réservoir d’huile
6Bride
7Fil de bouton d’arrêt du moteur
“ENGINE STOP”
8Faisceau de fils secondaires
9Fil de feux arrière
0Fil de TPS (copteur du papillon d’accélé-
ration)
AFil de contacteur de point mort
BFlexible d’huile
CReniflard de culasse
DFil de magnéto CDI
ESupport de flexible
FCâble d’embrayage
GCâble du décompresseur
HFil de commutateur de feux
IReniflard de carburateur
JFlexible de trop-plein
KFlexible de reniflard du réservoir de
liquide de refroidissement
Faire passer le flexible de reniflard du
réservoir d’essence derrière le guidon,
puis l’insérer dans le trou de l’axe de la
colonne de direction.
õFaire passer le câble de décompression, le
fil de bouton d’arrêt du moteur “ENGINE
STOP” et le fil de commutateur de feux
sous l’endroit où le flexible d’huile est
attaché.
‚Faire passer le fil de bouton d’arrêt du
moteur “ENGINE STOP”, le fil de régu-
lateur et le fil de commutateur de feux le
long du côté intérieur du câble de décom-
pression.
ëAttacher le fil de magnéto CDI, le fil de
commutateur de point mort, le fil du bou-
ton d’arrêt du moteur “ENGINE STOP”
et le fil de commutateur de feux au cadre
à l’aide d’une attache en plastique.
äFaire passer le fil de bouton d’arrêt du
moteur “ENGINE STOP” et le fil de com-
mutateur de feux le long du côté intérieur
du flexible de reniflard du réservoir
d’huile.
ìAttacher le faisceau de fils secondaires, le
fil de bouton d’arrêt du moteur “ENGINE
STOP” et le fil de commutateur de feux
au cadre à l'aide d’une attache en plasti-
que.
íFaire passer le reniflard de culasse le long
du côté droit du reniflard du réservoir
d’huile.
îAttacher le faisceau de fils secondaires au
cadre à l’aide d’une attache en plastique
et couper l’extrémité de l’attache.
éAttacher le fil de TPS (dans le faisceau de
fils secondaires) sous le cadre.
2 - 21
DIAGRAMA DE RUTA DE
CABLES
1Guía del tubo
2Tubo del freno
3Regulador
4Tubo respiradero del depósito de combus-
tible
5Tubo respiradero del depósito de aceite
6Abrazadera
7Cable del botón de parada del motor
“ENGINE STOP”
8Sub-cableado
9Cable de la luz trasera
0Cable TPS (sensor de posición del acele-
rador)
ACable del interruptor de punto muerto
BTubo de aceite
CTubo respiradero de la culata
DCable del magneto CDI
ESoporte del tubo
FCable del embrague
GCable de descompresión
HCable del interruptor de las luces
ITubo respiradero del carburador
JTubo de desbordamiento
KTubo respiradero del depósito de reserva
del refrigerante
Pasar el tubo respiradero del depósito de
combustible por detrás del manillar y des-
pués insertarlo en del orificio del eje de la
dirección.
õPasar el cable de descompresión, el cable
del botón de parada del motor “ENGINE
STOP” y el cable del interruptor de las
luces por debajo de la zona de colocación
del tubo de aceite.
‚Pasar el cable del botón de parada del
motor “ENGINE STOP”, el cable del
regulador y el cable del interruptor de las
luces por la parte interna y lateral del
cable de descompresión.
ëSujetar el cable del magneto CDI, el cable
del interruptor de punto muerto, el cable
del botón de parada del motor “ENGINE
STOP” y el cable del interruptor de las
luces al bastidor mediante una conexión
plástica de cierre.
äPasar el cable del botón de parada del
motor “ENGINE STOP” y el cable del
interruptor de las luces por la parte interna
lateral del tubo respiradero del depósito
de aceite.
ìSujetar el sub-cableado, el cable del botón
de parada del motor “ENGINE STOP” y
el cable del interruptor de las luces al bas-
tidor mediante una conexión plástica de
cierre.
íPasar el tubo respiradero de la culata por
el lado derecho del tubo respiradero del
depósito de aceite.
îSujetar el sub-cableado al bastidor
mediante una conexión plástica de cierre
y cortar el extremo de la conexión.
éSujetar el cable TPS (del sub-cableado)
por debajo del bastidor.
Page 154 of 654
2 - 24
SPECCABLE ROUTING DIAGRAM
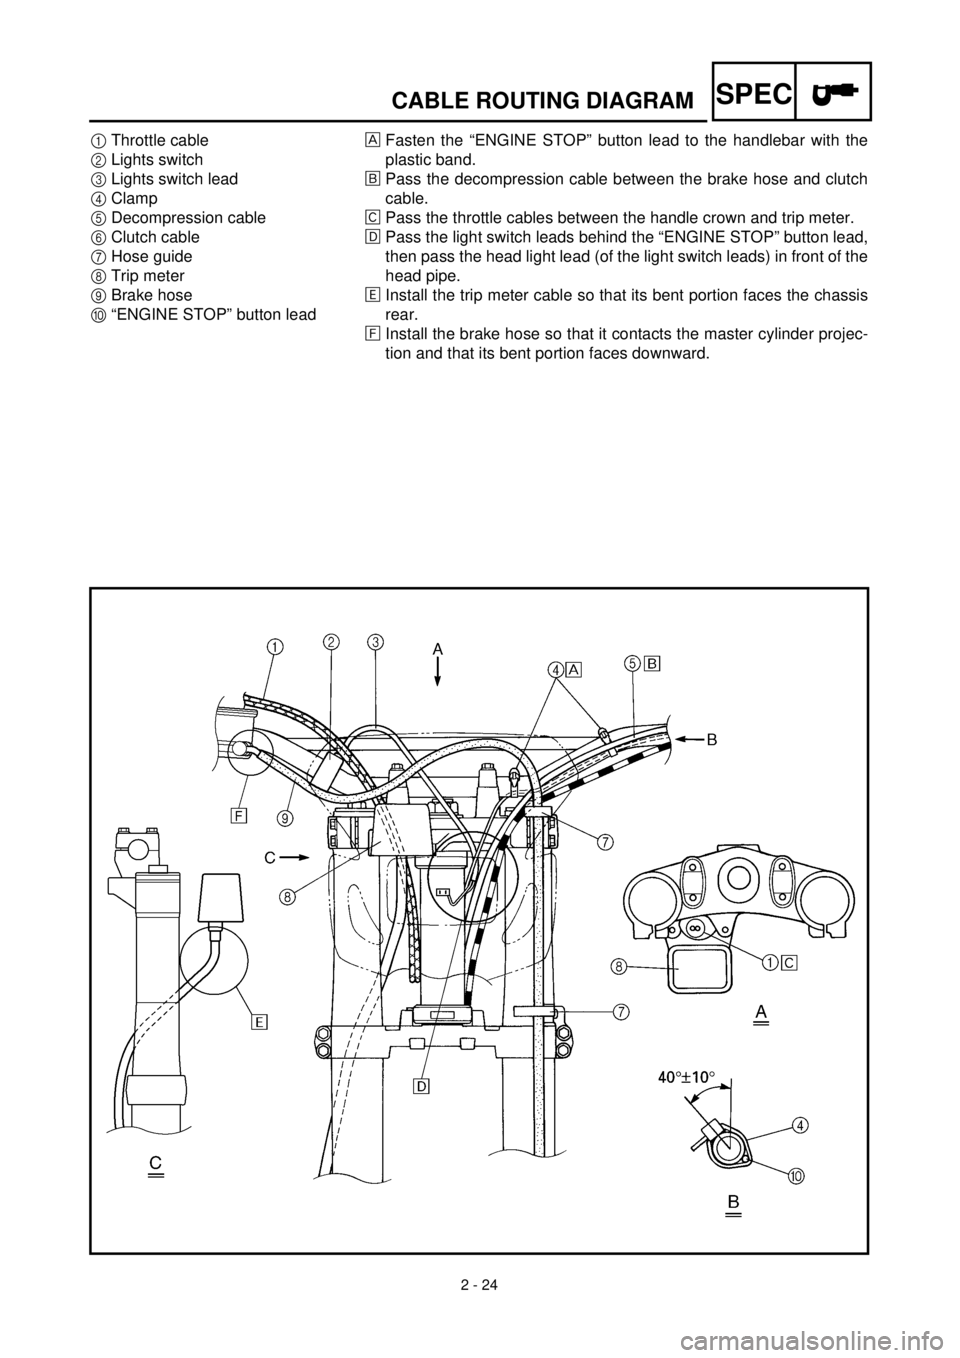
1Throttle cable
2Lights switch
3Lights switch lead
4Clamp
5Decompression cable
6Clutch cable
7Hose guide
8Trip meter
9Brake hose
0“ENGINE STOP” button leadFasten the “ENGINE STOP” button lead to the handlebar with the
plastic band.
õPass the decompression cable between the brake hose and clutch
cable.
‚Pass the throttle cables between the handle crown and trip meter.
ëPass the light switch leads behind the “ENGINE STOP” button lead,
then pass the head light lead (of the light switch leads) in front of the
head pipe.
äInstall the trip meter cable so that its bent portion faces the chassis
rear.
ìInstall the brake hose so that it contacts the master cylinder projec-
tion and that its bent portion faces downward.
Page 155 of 654
SPEC
CHEMINEMENT DES CABLES
KABELFÜHRUNG
DIAGRAMA DE RUTA DE CABLES
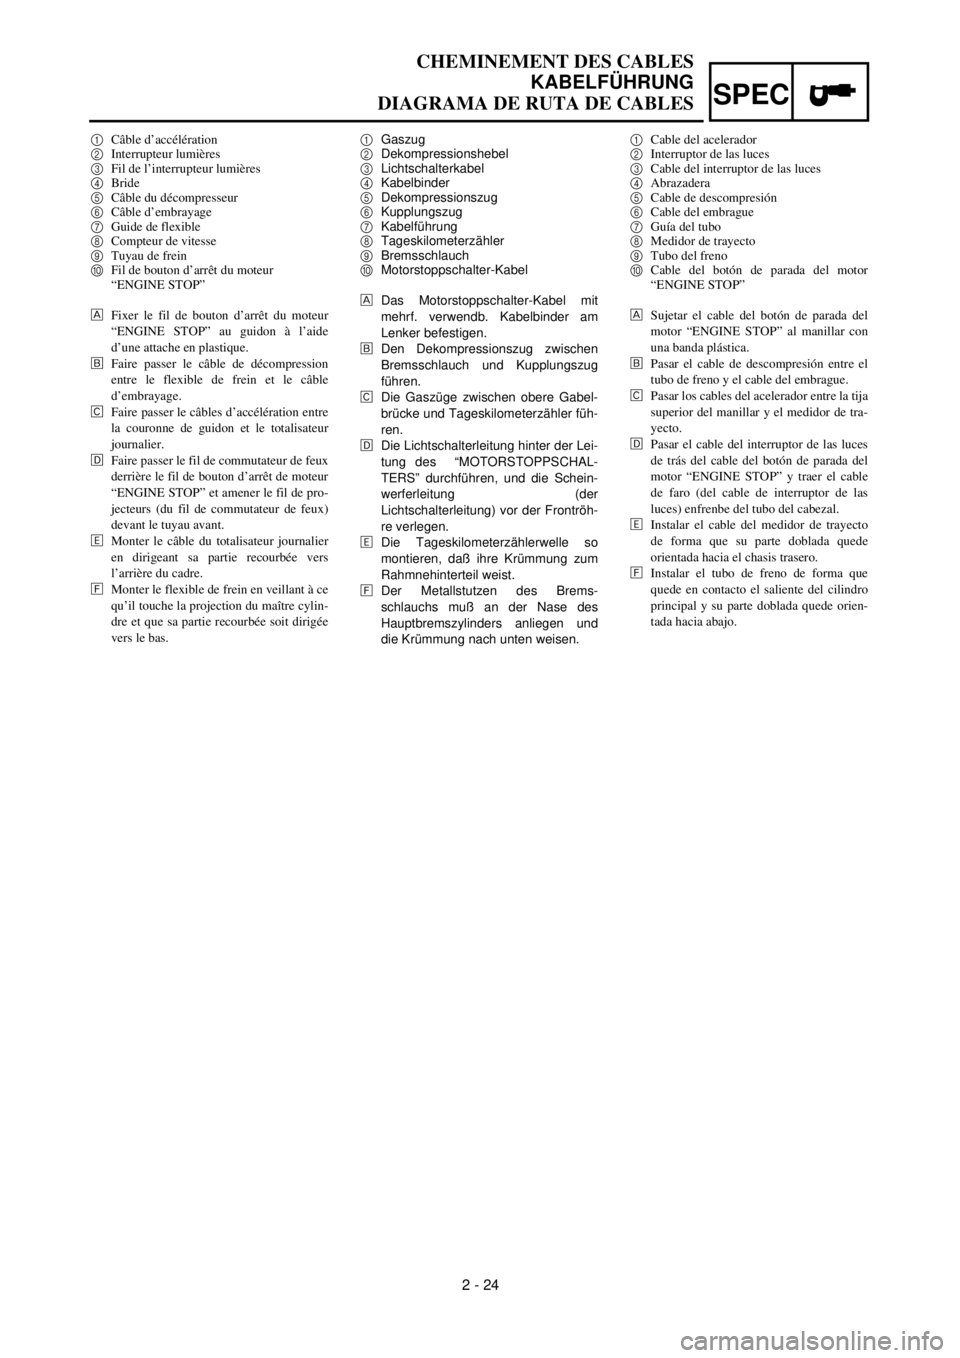
1Gaszug
2Dekompressionshebel
3Lichtschalterkabel
4Kabelbinder
5Dekompressionszug
6Kupplungszug
7Kabelführung
8Tageskilometerzähler
9Bremsschlauch
0Motorstoppschalter-Kabel
Das Motorstoppschalter-Kabel mit
mehrf. verwendb. Kabelbinder am
Lenker befestigen.
õDen Dekompressionszug zwischen
Bremsschlauch und Kupplungszug
führen.
‚Die Gaszüge zwischen obere Gabel-
brücke und Tageskilometerzähler füh-
ren.
ëDie Lichtschalterleitung hinter der Lei-
tung des “MOTORSTOPPSCHAL-
TERS” durchführen, und die Schein-
werferleitung (der
Lichtschalterleitung) vor der Frontröh-
re verlegen.
äDie Tageskilometerzählerwelle so
montieren, daß ihre Krümmung zum
Rahmnehinterteil weist.
ìDer Metallstutzen des Brems-
schlauchs muß an der Nase des
Hauptbremszylinders anliegen und
die Krümmung nach unten weisen. 1Câble d’accélération
2Interrupteur lumières
3Fil de l’interrupteur lumières
4Bride
5Câble du décompresseur
6Câble d’embrayage
7Guide de flexible
8Compteur de vitesse
9Tuyau de frein
0Fil de bouton d’arrêt du moteur
“ENGINE STOP”
Fixer le fil de bouton d’arrêt du moteur
“ENGINE STOP” au guidon à l’aide
d’une attache en plastique.
õFaire passer le câble de décompression
entre le flexible de frein et le câble
d’embrayage.
‚Faire passer le câbles d’accélération entre
la couronne de guidon et le totalisateur
journalier.
ëFaire passer le fil de commutateur de feux
derrière le fil de bouton d’arrêt de moteur
“ENGINE STOP” et amener le fil de pro-
jecteurs (du fil de commutateur de feux)
devant le tuyau avant.
äMonter le câble du totalisateur journalier
en dirigeant sa partie recourbée vers
l’arrière du cadre.
ìMonter le flexible de frein en veillant à ce
qu’il touche la projection du maître cylin-
dre et que sa partie recourbée soit dirigée
vers le bas.
2 - 24
1Cable del acelerador
2Interruptor de las luces
3Cable del interruptor de las luces
4Abrazadera
5Cable de descompresión
6Cable del embrague
7Guía del tubo
8Medidor de trayecto
9Tubo del freno
0Cable del botón de parada del motor
“ENGINE STOP”
Sujetar el cable del botón de parada del
motor “ENGINE STOP” al manillar con
una banda plástica.
õPasar el cable de descompresión entre el
tubo de freno y el cable del embrague.
‚Pasar los cables del acelerador entre la tija
superior del manillar y el medidor de tra-
yecto.
ëPasar el cable del interruptor de las luces
de trás del cable del botón de parada del
motor “ENGINE STOP” y traer el cable
de faro (del cable de interruptor de las
luces) enfrenbe del tubo del cabezal.
äInstalar el cable del medidor de trayecto
de forma que su parte doblada quede
orientada hacia el chasis trasero.
ìInstalar el tubo de freno de forma que
quede en contacto el saliente del cilindro
principal y su parte doblada quede orien-
tada hacia abajo.
Page 156 of 654
3 - 1
INSP
ADJ
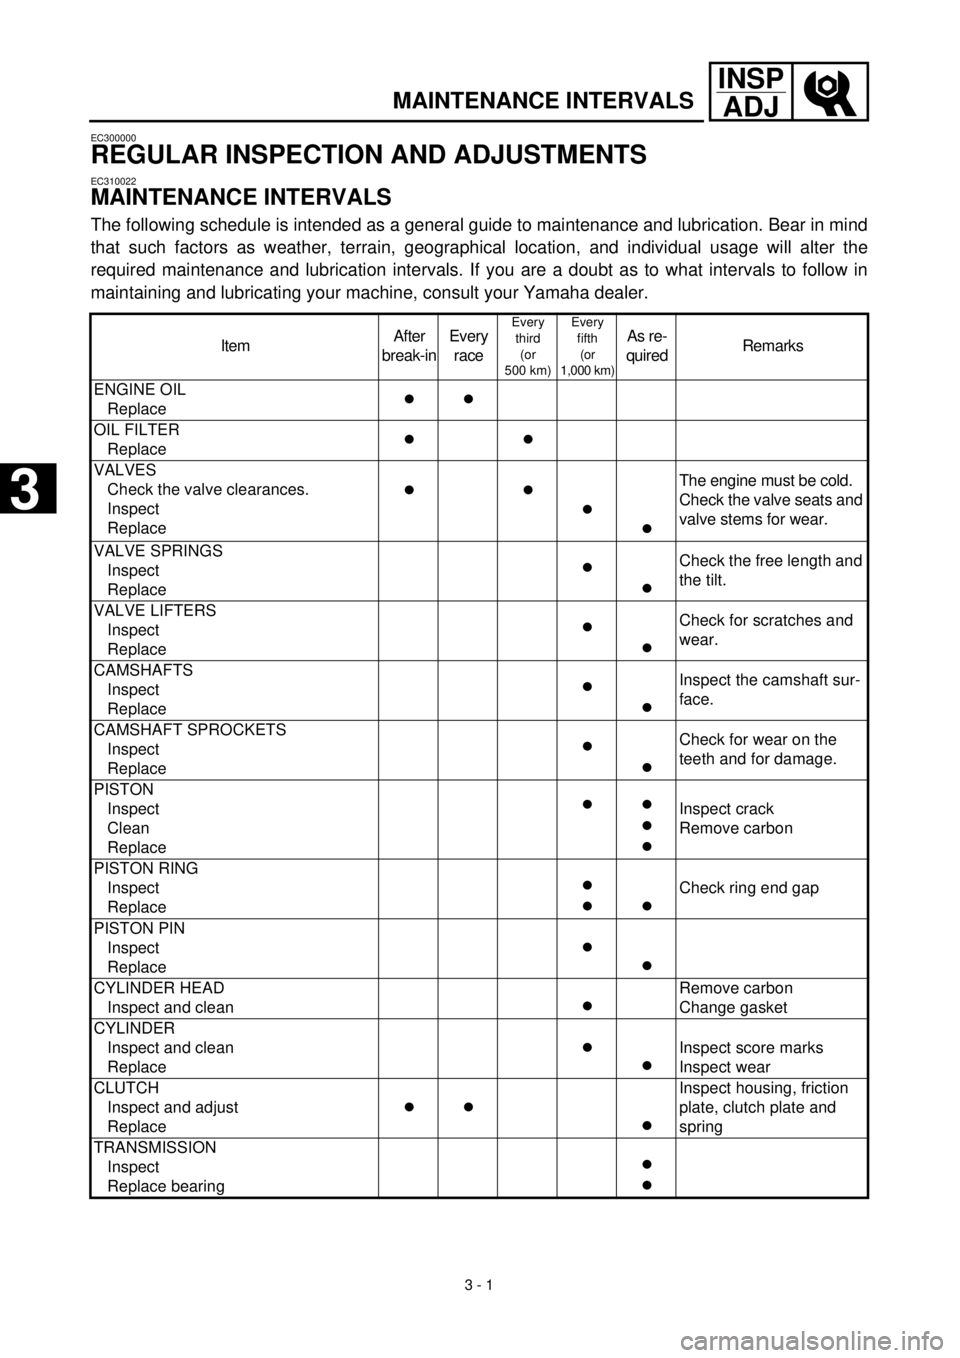
MAINTENANCE INTERVALS
EC300000
REGULAR INSPECTION AND ADJUSTMENTS
EC310022
MAINTENANCE INTERVALS
The following schedule is intended as a general guide to maintenance and lubrication. Bear in mind
that such factors as weather, terrain, geographical location, and individual usage will alter the
required maintenance and lubrication intervals. If you are a doubt as to what intervals to follow in
maintaining and lubricating your machine, consult your Yamaha dealer.
ItemAfter
break-inEvery
race
Every
third
(or
500 km)Every
fifth
(or
1,000 km)
As re-
quiredRemarks
ENGINE OIL
Replace
cc
OIL FILTER
Replace
cc
VALVES
Check the valve clearances.
Inspect
Replace
cc
c
c
The engine must be cold.
Check the valve seats and
valve stems for wear.
VALVE SPRINGS
Inspect
Replace
c
c
Check the free length and
the tilt.
VALVE LIFTERS
Inspect
Replace
c
c
Check for scratches and
wear.
CAMSHAFTS
Inspect
Replace
c
c
Inspect the camshaft sur-
face.
CAMSHAFT SPROCKETS
Inspect
Replace
c
c
Check for wear on the
teeth and for damage.
PISTON
Inspect
Clean
Replace
cc
c
c
Inspect crack
Remove carbon
PISTON RING
Inspect
Replace
c
cc
Check ring end gap
PISTON PIN
Inspect
Replace
c
c
CYLINDER HEAD
Inspect and clean
c
Remove carbon
Change gasket
CYLINDER
Inspect and clean
Replace
c
c
Inspect score marks
Inspect wear
CLUTCH
Inspect and adjust
Replace
cc
c
Inspect housing, friction
plate, clutch plate and
spring
TRANSMISSION
Inspect
Replace bearing
c
c
3
Page 168 of 654
3 - 4
INSP
ADJ
PRE-OPERATION INSPECTION AND MAINTENANCE
EC320000
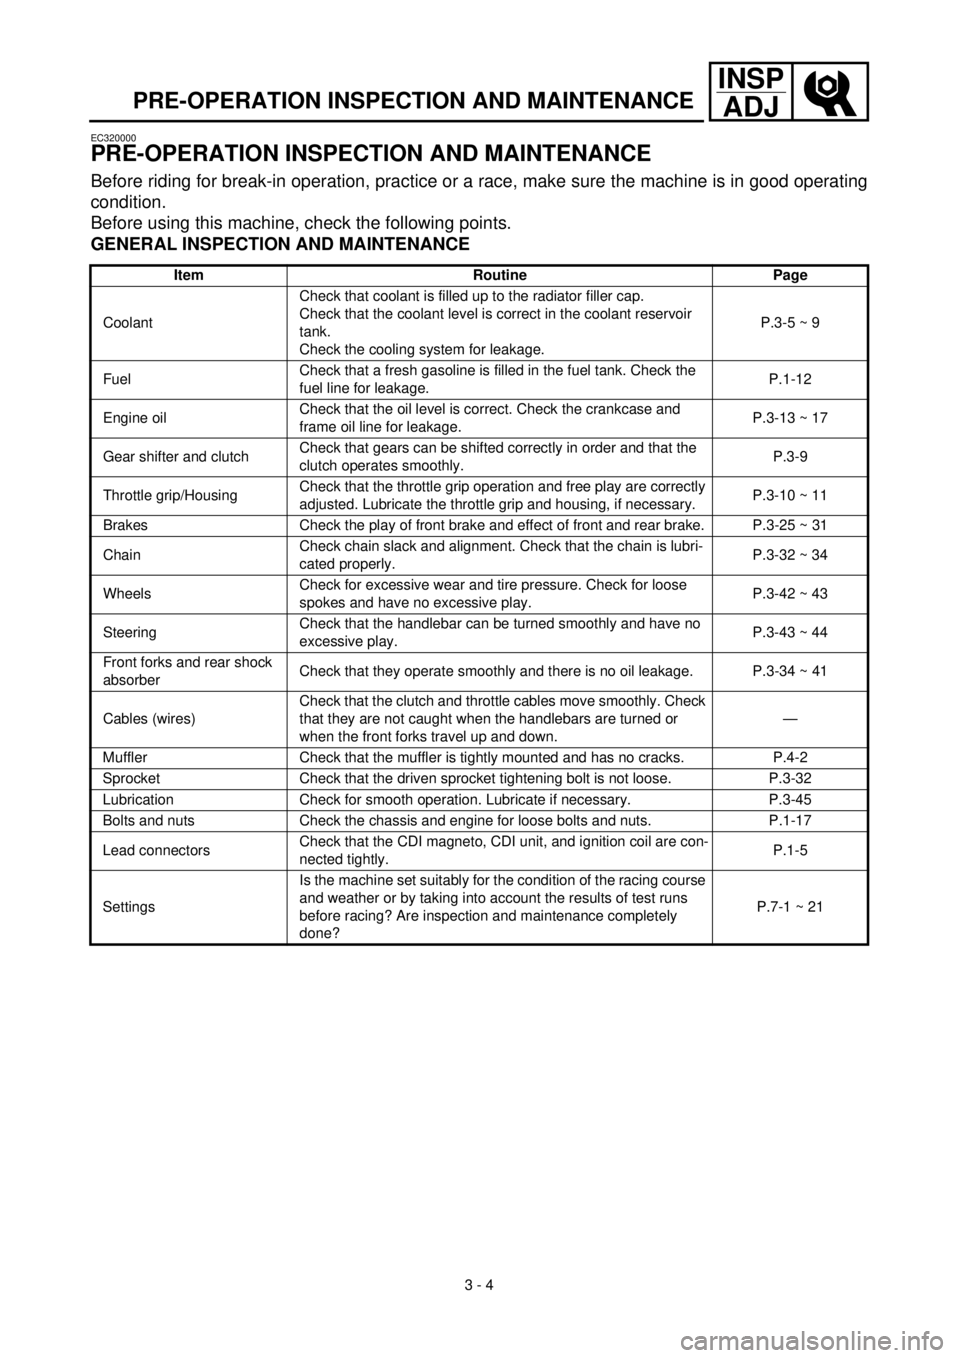
PRE-OPERATION INSPECTION AND MAINTENANCE
Before riding for break-in operation, practice or a race, make sure the machine is in good operating
condition.
Before using this machine, check the following points.
GENERAL INSPECTION AND MAINTENANCE
Item Routine Page
CoolantCheck that coolant is filled up to the radiator filler cap.
Check that the coolant level is correct in the coolant reservoir
tank.
Check the cooling system for leakage.P.3-5 ~ 9
FuelCheck that a fresh gasoline is filled in the fuel tank. Check the
fuel line for leakage.P.1-12
Engine oilCheck that the oil level is correct. Check the crankcase and
frame oil line for leakage.P.3-13 ~ 17
Gear shifter and clutchCheck that gears can be shifted correctly in order and that the
clutch operates smoothly.P.3-9
Throttle grip/HousingCheck that the throttle grip operation and free play are correctly
adjusted. Lubricate the throttle grip and housing, if necessary.P.3-10 ~ 11
Brakes Check the play of front brake and effect of front and rear brake. P.3-25 ~ 31
ChainCheck chain slack and alignment. Check that the chain is lubri-
cated properly.P.3-32 ~ 34
WheelsCheck for excessive wear and tire pressure. Check for loose
spokes and have no excessive play.P.3-42 ~ 43
SteeringCheck that the handlebar can be turned smoothly and have no
excessive play.P.3-43 ~ 44
Front forks and rear shock
absorberCheck that they operate smoothly and there is no oil leakage. P.3-34 ~ 41
Cables (wires)Check that the clutch and throttle cables move smoothly. Check
that they are not caught when the handlebars are turned or
when the front forks travel up and down.—
Muffler Check that the muffler is tightly mounted and has no cracks. P.4-2
Sprocket Check that the driven sprocket tightening bolt is not loose. P.3-32
Lubrication Check for smooth operation. Lubricate if necessary. P.3-45
Bolts and nuts Check the chassis and engine for loose bolts and nuts. P.1-17
Lead connectorsCheck that the CDI magneto, CDI unit, and ignition coil are con-
nected tightly.P.1-5
SettingsIs the machine set suitably for the condition of the racing course
and weather or by taking into account the results of test runs
before racing? Are inspection and maintenance completely
done?P.7-1 ~ 21
Page 172 of 654
3 - 5
INSP
ADJ
EC350000
ENGINE
EC351011
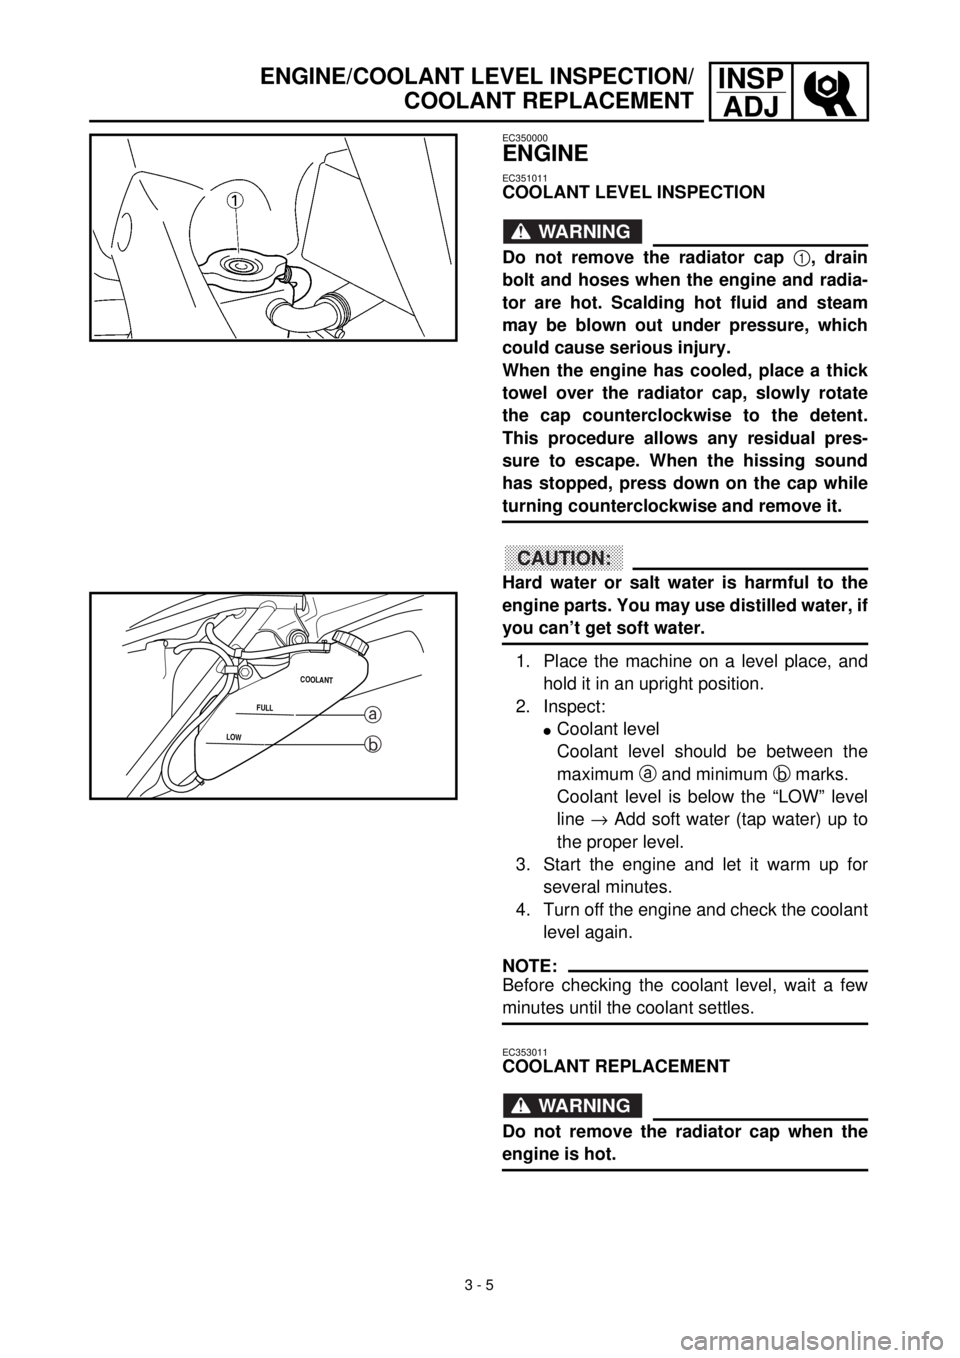
COOLANT LEVEL INSPECTION
WARNING
Do not remove the radiator cap
1
, drain
bolt and hoses when the engine and radia-
tor are hot. Scalding hot fluid and steam
may be blown out under pressure, which
could cause serious injury.
When the engine has cooled, place a thick
towel over the radiator cap, slowly rotate
the cap counterclockwise to the detent.
This procedure allows any residual pres-
sure to escape. When the hissing sound
has stopped, press down on the cap while
turning counterclockwise and remove it.
CAUTION:
Hard water or salt water is harmful to the
engine parts. You may use distilled water, if
you can’t get soft water.
1. Place the machine on a level place, and
hold it in an upright position.
2. Inspect:
l
Coolant level
Coolant level should be between the
maximum
a
and minimum
b
marks.
Coolant level is below the “LOW” level
line
®
Add soft water (tap water) up to
the proper level.
3. Start the engine and let it warm up for
several minutes.
4. Turn off the engine and check the coolant
level again.
NOTE:
Before checking the coolant level, wait a few
minutes until the coolant settles.
LOWFULLCOOLANT
a
b
EC353011
COOLANT REPLACEMENT
WARNING
Do not remove the radiator cap when the
engine is hot.
ENGINE/COOLANT LEVEL INSPECTION/
COOLANT REPLACEMENT
Page 174 of 654
3 - 6
INSP
ADJ
COOLANT REPLACEMENT
CAUTION:
Take care so that coolant does not splash
on painted surfaces. If it splashes, wash it
away with water.
1. Place a container under the engine.
2. Remove:
l
Seat
Refer to ”SEAT FUEL TANK AND SIDE
COVERS” section in the CHAPTER 4.
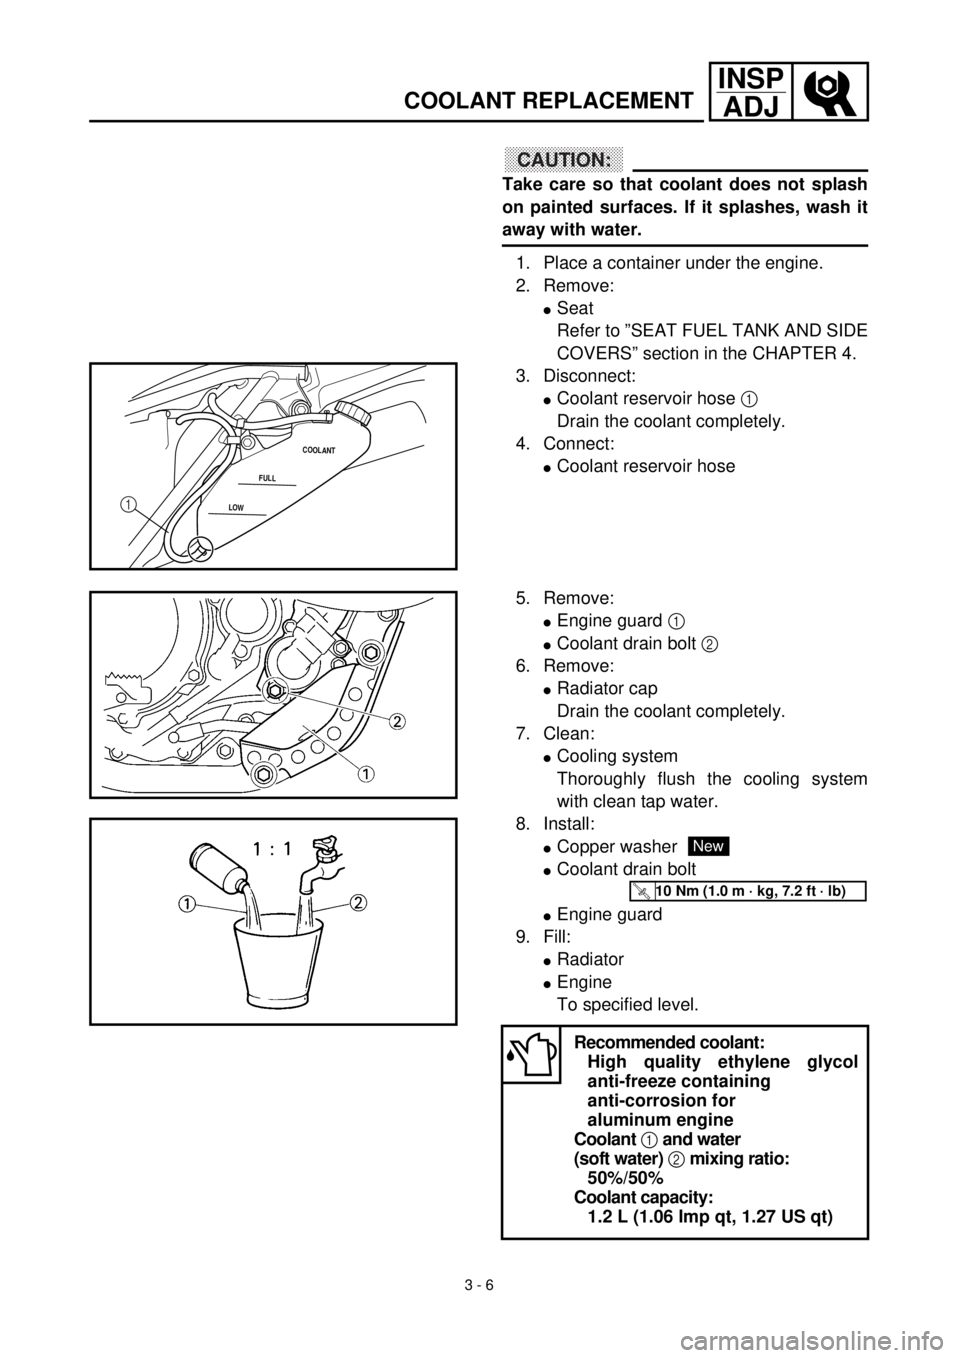
3. Disconnect:
l
Coolant reservoir hose
1
Drain the coolant completely.
4. Connect:
l
Coolant reservoir hose
LOWFULLCOOLANT1
5. Remove:
l
Engine guard
1
l
Coolant drain bolt
2
6. Remove:
l
Radiator cap
Drain the coolant completely.
7. Clean:
l
Cooling system
Thoroughly flush the cooling system
with clean tap water.
8. Install:
l
Copper washer
l
Coolant drain bolt
l
Engine guard
9. Fill:
l
Radiator
l
Engine
To specified level.
Recommended coolant:
High quality ethylene glycol
anti-freeze containing
anti-corrosion for
aluminum engine
Coolant
1 and water
(soft water) 2 mixing ratio:
50%/50%
Coolant capacity:
1.2 L (1.06 Imp qt, 1.27 US qt)
New
T R..10 Nm (1.0 m · kg, 7.2 ft · lb)