sensor YAMAHA WR 450F 2007 Owners Manual
[x] Cancel search | Manufacturer: YAMAHA, Model Year: 2007, Model line: WR 450F, Model: YAMAHA WR 450F 2007Pages: 794, PDF Size: 21.82 MB
Page 24 of 794
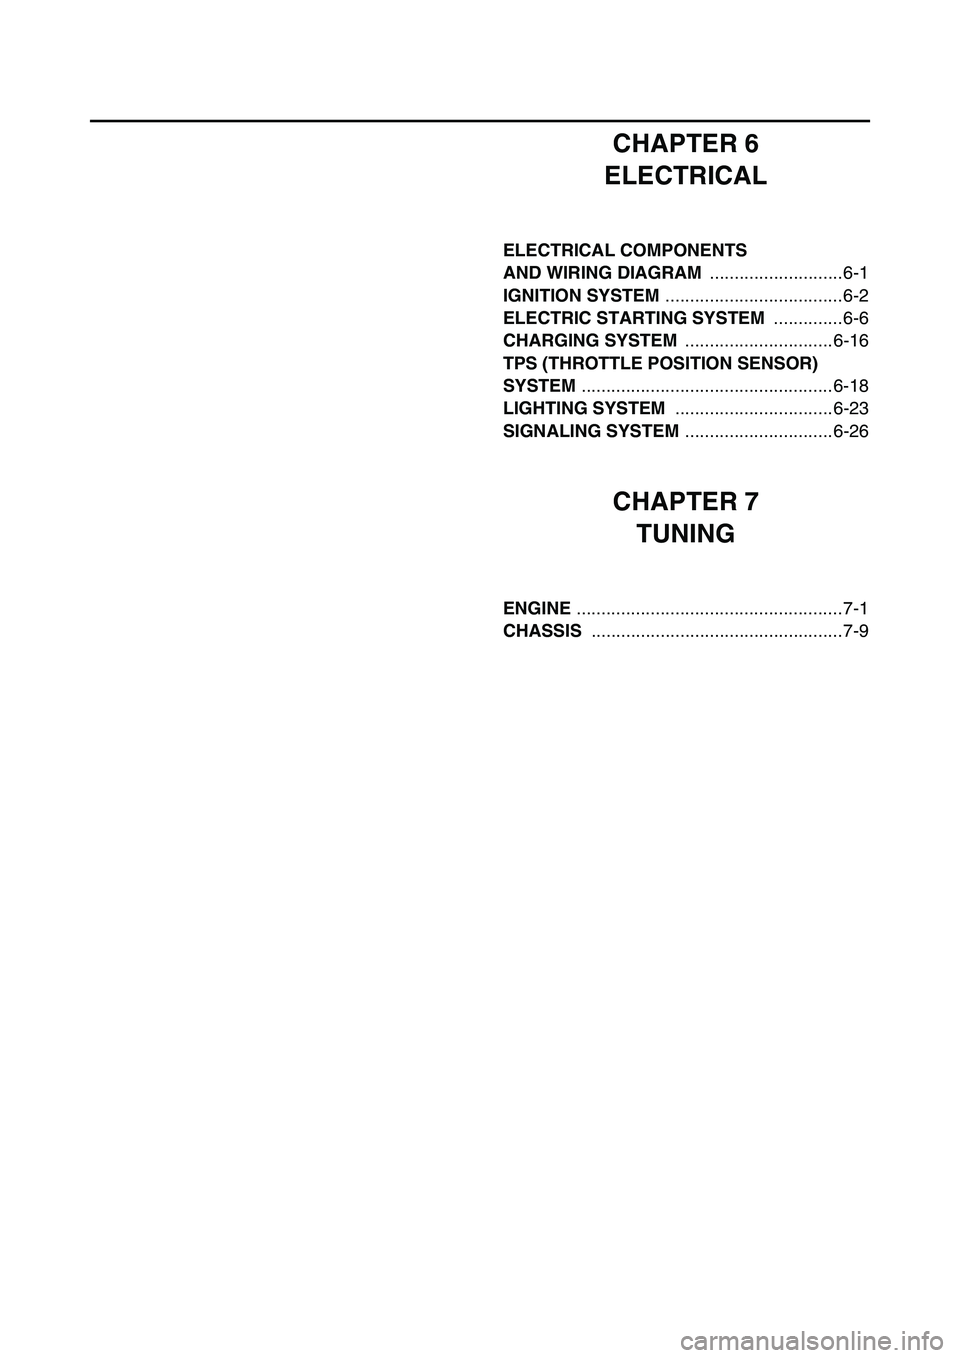
CHAPTER 6
ELECTRICAL
ELECTRICAL COMPONENTS
AND WIRING DIAGRAM ...........................6-1
IGNITION SYSTEM ....................................6-2
ELECTRIC STARTING SYSTEM ..............6-6
CHARGING SYSTEM ..............................6-16
TPS (THROTTLE POSITION SENSOR)
SYSTEM ...................................................6-18
LIGHTING SYSTEM ................................6-23
SIGNALING SYSTEM ..............................6-26
CHAPTER 7
TUNING
ENGINE ......................................................7-1
CHASSIS ...................................................7-9
Page 25 of 794
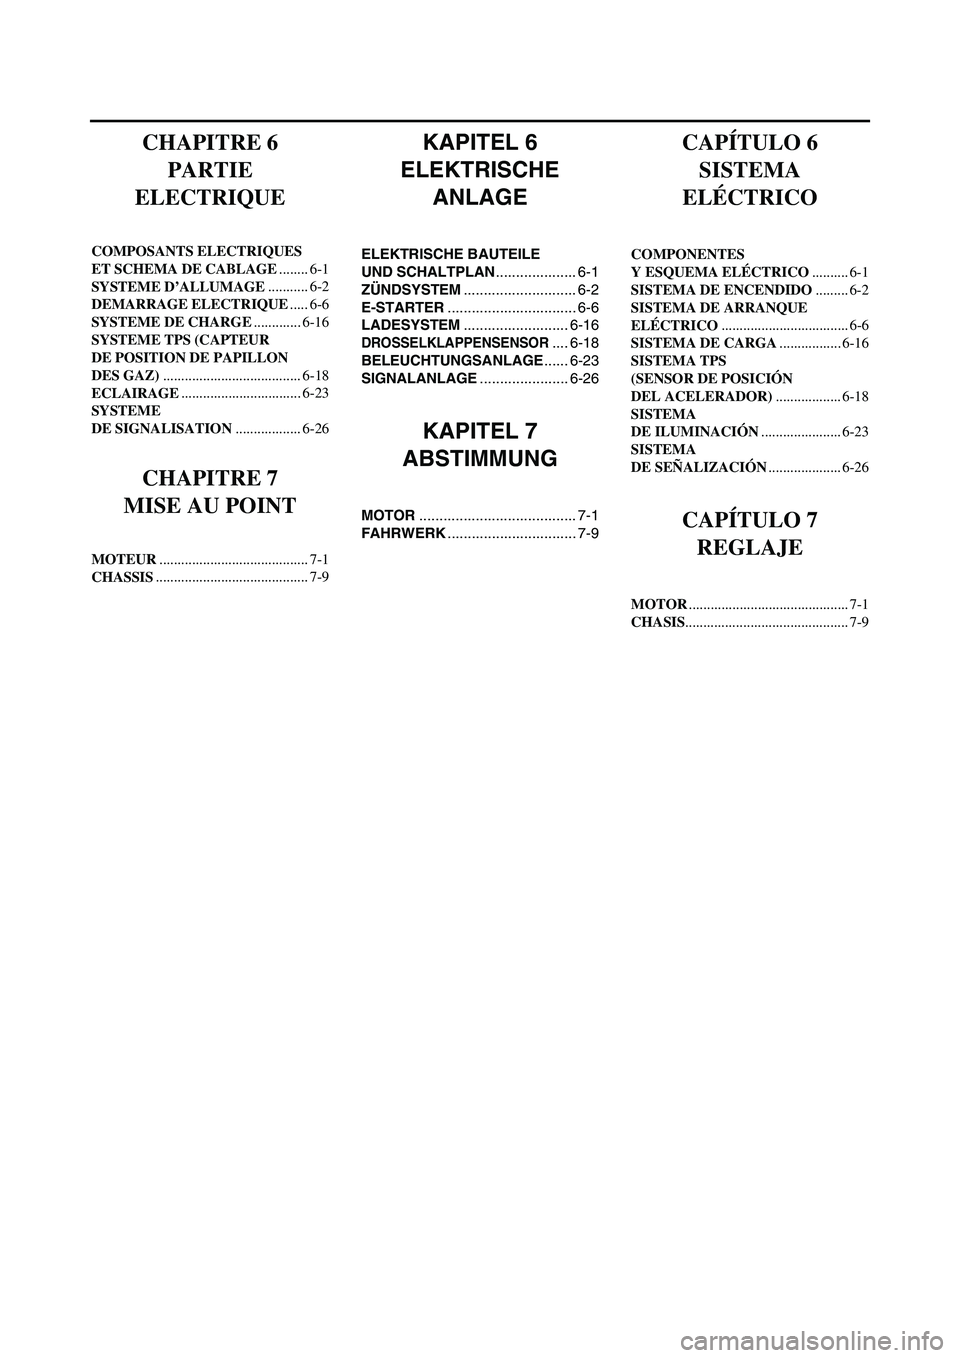
KAPITEL 6
ELEKTRISCHE
ANLAGE
ELEKTRISCHE BAUTEILE
UND SCHALTPLAN.................... 6-1
ZÜNDSYSTEM............................ 6-2
E-STARTER................................ 6-6
LADESYSTEM.......................... 6-16
DROSSELKLAPPENSENSOR.... 6-18
BELEUCHTUNGSANLAGE...... 6-23
SIGNALANLAGE...................... 6-26
KAPITEL 7
ABSTIMMUNG
MOTOR....................................... 7-1
FAHRWERK................................ 7-9
CHAPITRE 6
PARTIE
ELECTRIQUE
COMPOSANTS ELECTRIQUES
ET SCHEMA DE CABLAGE........ 6-1
SYSTEME D’ALLUMAGE........... 6-2
DEMARRAGE ELECTRIQUE..... 6-6
SYSTEME DE CHARGE............. 6-16
SYSTEME TPS (CAPTEUR
DE POSITION DE PAPILLON
DES GAZ)...................................... 6-18
ECLAIRAGE................................. 6-23
SYSTEME
DE SIGNALISATION.................. 6-26
CHAPITRE 7
MISE AU POINT
MOTEUR......................................... 7-1
CHASSIS.......................................... 7-9
CAPÍTULO 6
SISTEMA
ELÉCTRICO
COMPONENTES
Y ESQUEMA ELÉCTRICO.......... 6-1
SISTEMA DE ENCENDIDO......... 6-2
SISTEMA DE ARRANQUE
ELÉCTRICO................................... 6-6
SISTEMA DE CARGA................. 6-16
SISTEMA TPS
(SENSOR DE POSICIÓN
DEL ACELERADOR).................. 6-18
SISTEMA
DE ILUMINACIÓN...................... 6-23
SISTEMA
DE SEÑALIZACIÓN.................... 6-26
CAPÍTULO 7
REGLAJE
MOTOR............................................ 7-1
CHASIS............................................. 7-9
Page 106 of 794
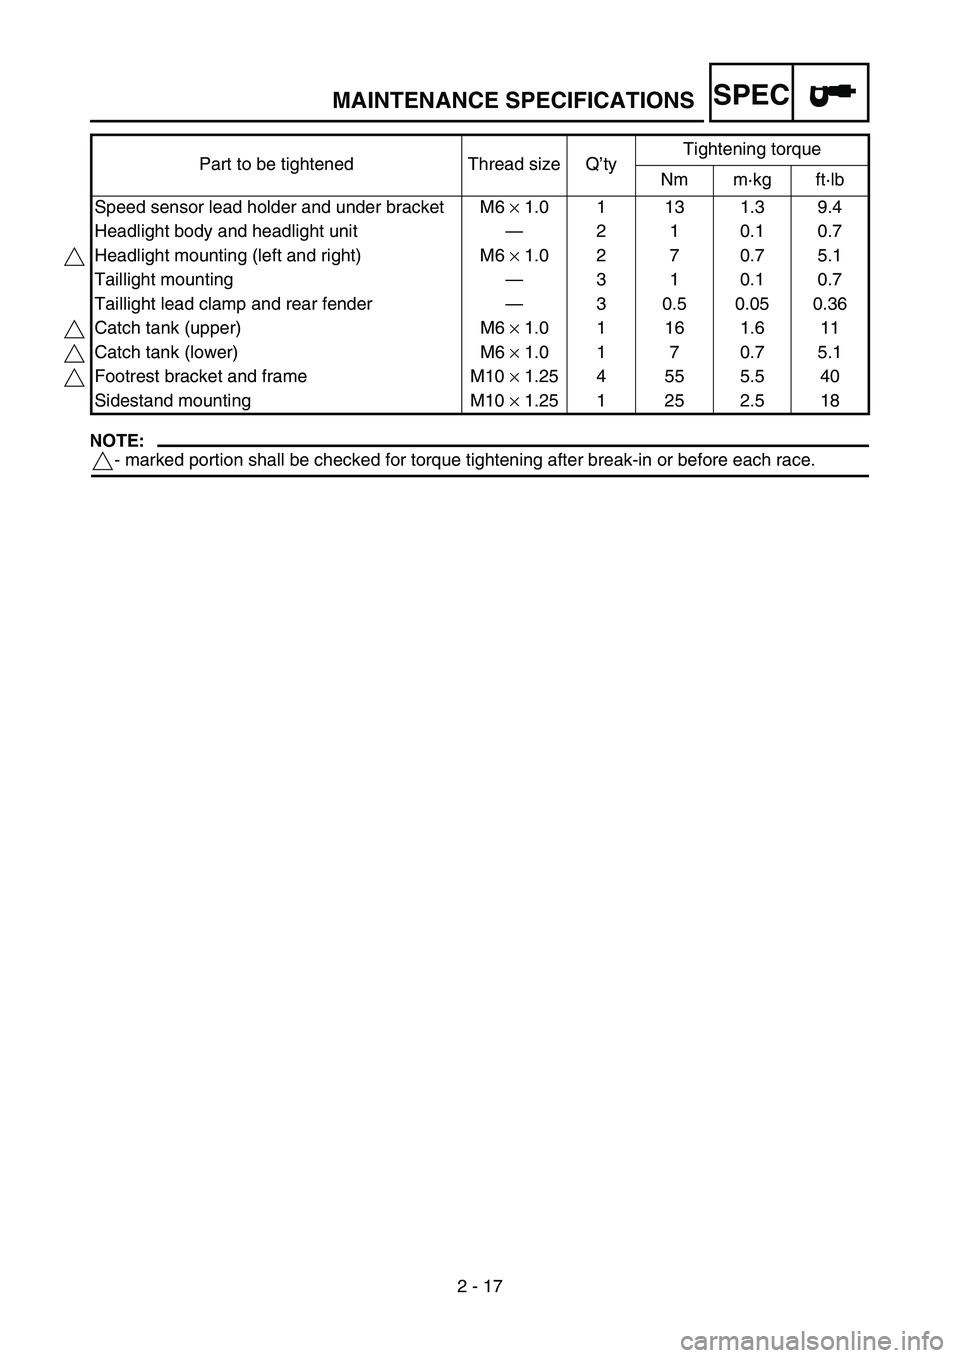
SPEC
2 - 17
NOTE:
- marked portion shall be checked for torque tightening after break-in or before each race. Speed sensor lead holder and under bracket M6 × 1.0 1 13 1.3 9.4
Headlight body and headlight unit—210.10.7
Headlight mounting (left and right) M6 × 1.0 2 7 0.7 5.1
Taillight mounting—310.10.7
Taillight lead clamp and rear fender—3 0.5 0.05 0.36
Catch tank (upper) M6 × 1.0 1 16 1.6 11
Catch tank (lower) M6 × 1.0 1 7 0.7 5.1
Footrest bracket and frame M10 × 1.25 4 55 5.5 40
Sidestand mounting M10 × 1.25 1 25 2.5 18 Part to be tightened Thread size Q’tyTightening torque
Nm m·kg ft·lb
MAINTENANCE SPECIFICATIONS
Page 146 of 794
SPEC
2 - 17
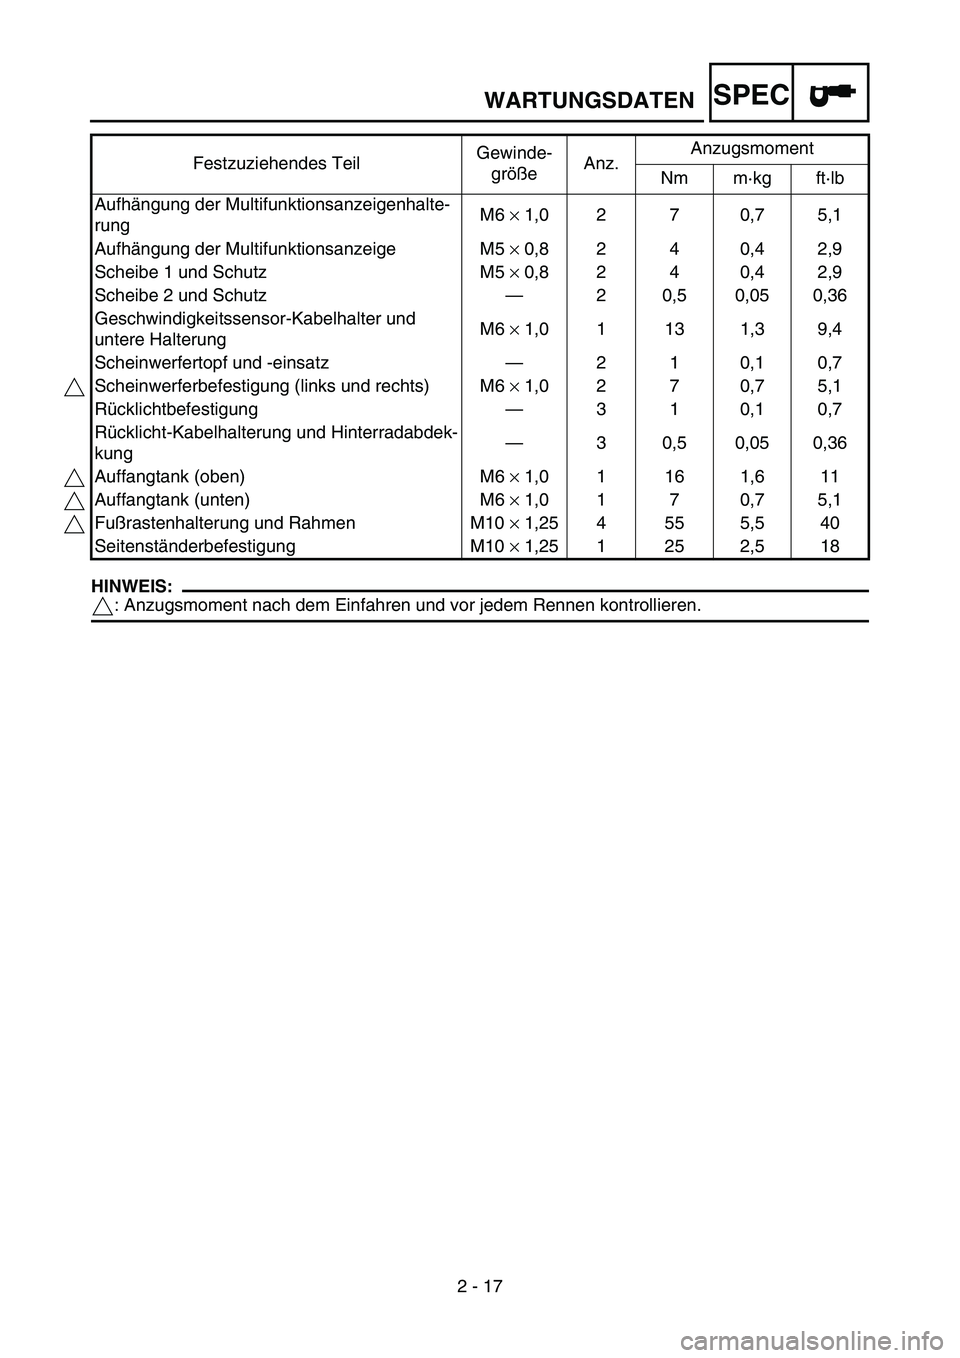
HINWEIS:
: Anzugsmoment nach dem Einfahren und vor jedem Rennen kontrollieren. Aufhängung der Multifunktionsanzeigenhalte-
rungM6 × 1,0 2 7 0,7 5,1
Aufhängung der Multifunktionsanzeige M5 × 0,8 2 4 0,4 2,9
Scheibe 1 und Schutz M5 × 0,8 2 4 0,4 2,9
Scheibe 2 und Schutz—2 0,5 0,05 0,36
Geschwindigkeitssensor-Kabelhalter und
untere HalterungM6 × 1,0 1 13 1,3 9,4
Scheinwerfertopf und -einsatz—210,10,7
Scheinwerferbefestigung (links und rechts) M6 × 1,0 2 7 0,7 5,1
Rücklichtbefestigung—310,10,7
Rücklicht-Kabelhalterung und Hinterradabdek-
kung—3 0,5 0,05 0,36
Auffangtank (oben) M6 × 1,0 1 16 1,6 11
Auffangtank (unten) M6 × 1,0 1 7 0,7 5,1
Fußrastenhalterung und Rahmen M10 × 1,25 4 55 5,5 40
Seitenständerbefestigung M10 × 1,25 1 25 2,5 18 Festzuziehendes TeilGewinde-
größeAnz.Anzugsmoment
Nm m·kg ft·lb
WARTUNGSDATEN
Page 166 of 794
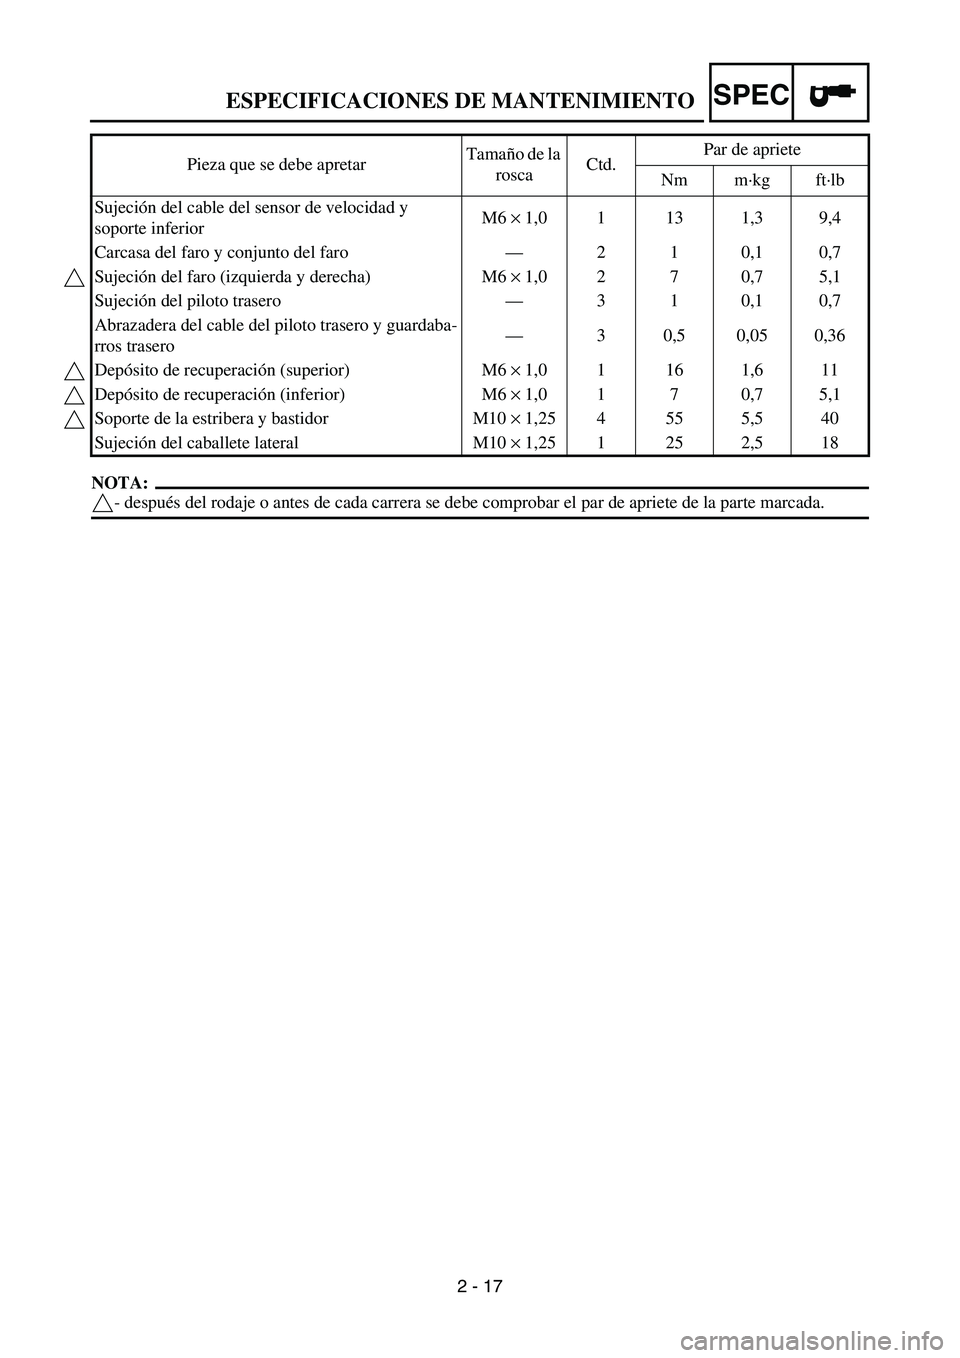
SPEC
2 - 17
NOTA:
- después del rodaje o antes de cada carrera se debe comprobar el par de apriete de la parte marcada. Sujeción del cable del sensor de velocidad y
soporte inferiorM6 × 1,0 1 13 1,3 9,4
Carcasa del faro y conjunto del faro—210,10,7
Sujeción del faro (izquierda y derecha) M6 × 1,0 2 7 0,7 5,1
Sujeción del piloto trasero—310,10,7
Abrazadera del cable del piloto trasero y guardaba-
rros trasero—3 0,5 0,05 0,36
Depósito de recuperación (superior) M6 × 1,0 1 16 1,6 11
Depósito de recuperación (inferior) M6 × 1,0 1 7 0,7 5,1
Soporte de la estribera y bastidor M10 × 1,25 4 55 5,5 40
Sujeción del caballete lateral M10 × 1,25 1 25 2,5 18 Pieza que se debe apretarTamaño de la
roscaCtd.Par de apriete
Nm m·kg ft·lb
ESPECIFICACIONES DE MANTENIMIENTO
Page 174 of 794
2 - 23
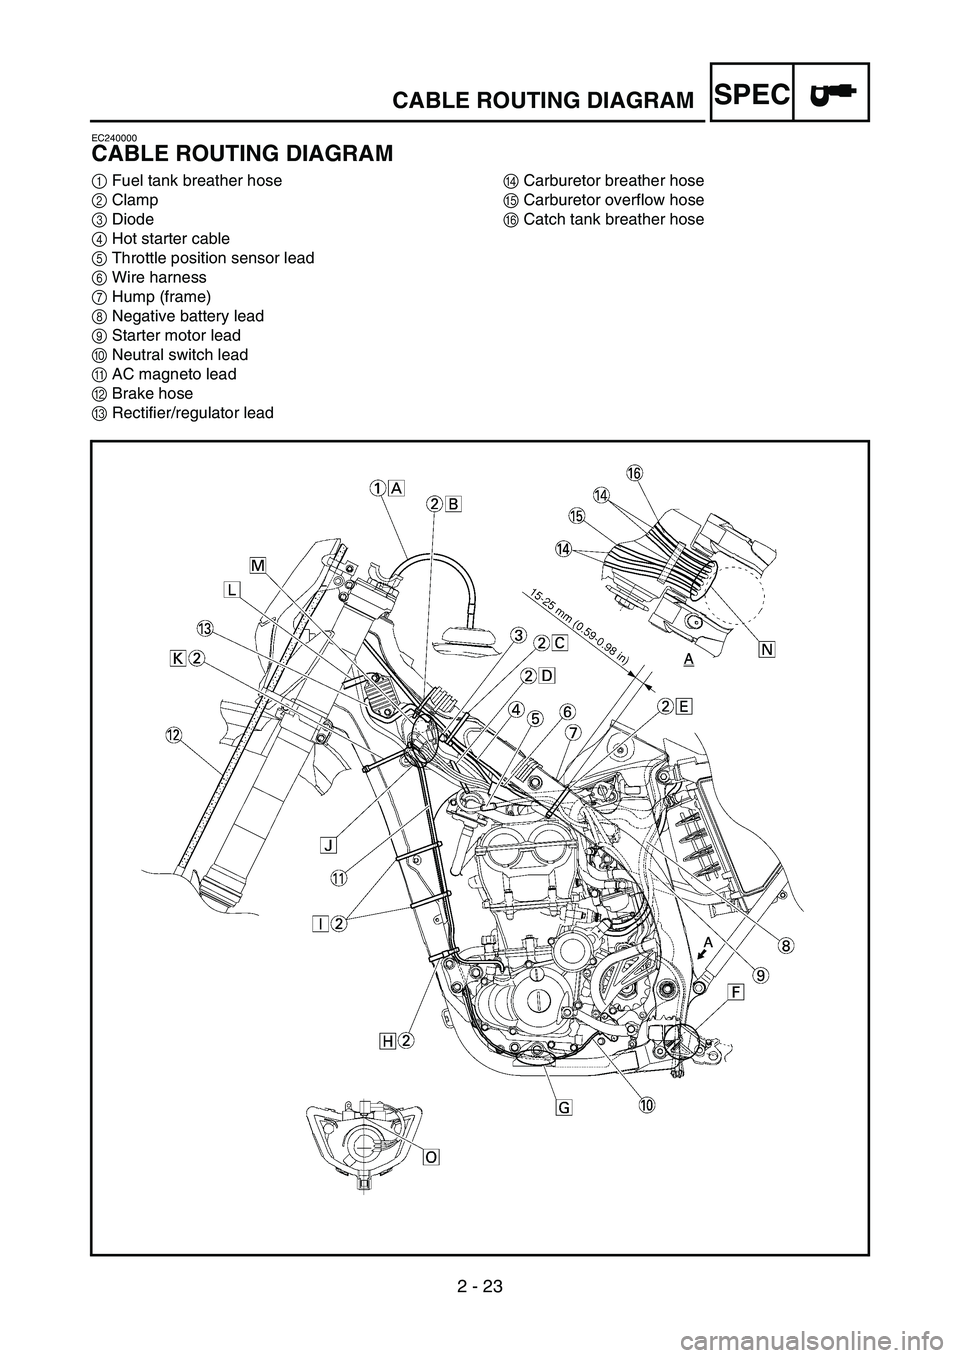
SPECCABLE ROUTING DIAGRAM
EC240000
CABLE ROUTING DIAGRAM
1Fuel tank breather hose
2Clamp
3Diode
4Hot starter cable
5Throttle position sensor lead
6Wire harness
7Hump (frame)
8Negative battery lead
9Starter motor lead
0Neutral switch lead
AAC magneto lead
BBrake hose
CRectifier/regulator leadDCarburetor breather hose
ECarburetor overflow hose
FCatch tank breather hose
Page 175 of 794
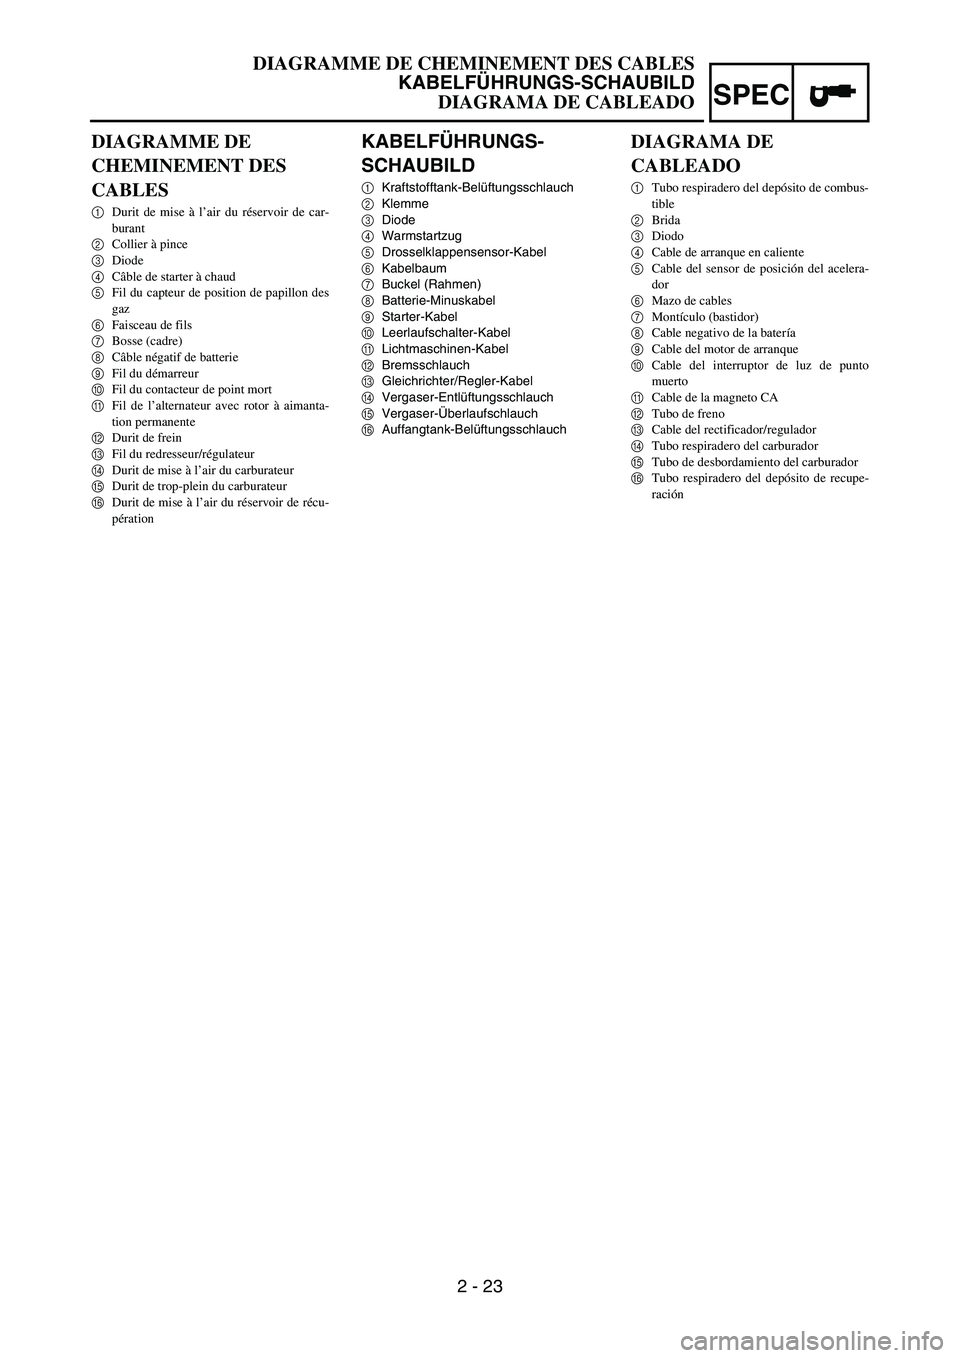
2 - 23
SPEC
KABELFÜHRUNGS-
SCHAUBILD
1Kraftstofftank-Belüftungsschlauch
2Klemme
3Diode
4Warmstartzug
5Drosselklappensensor-Kabel
6Kabelbaum
7Buckel (Rahmen)
8Batterie-Minuskabel
9Starter-Kabel
0Leerlaufschalter-Kabel
ALichtmaschinen-Kabel
BBremsschlauch
CGleichrichter/Regler-Kabel
DVergaser-Entlüftungsschlauch
EVergaser-Überlaufschlauch
FAuffangtank-Belüftungsschlauch
DIAGRAMME DE
CHEMINEMENT DES
CABLES
1Durit de mise à l’air du réservoir de car-
burant
2Collier à pince
3Diode
4Câble de starter à chaud
5Fil du capteur de position de papillon des
gaz
6Faisceau de fils
7Bosse (cadre)
8Câble négatif de batterie
9Fil du démarreur
0Fil du contacteur de point mort
AFil de l’alternateur avec rotor à aimanta-
tion permanente
BDurit de frein
CFil du redresseur/régulateur
DDurit de mise à l’air du carburateur
EDurit de trop-plein du carburateur
FDurit de mise à l’air du réservoir de récu-
pération
DIAGRAMA DE
CABLEADO
1Tubo respiradero del depósito de combus-
tible
2Brida
3Diodo
4Cable de arranque en caliente
5Cable del sensor de posición del acelera-
dor
6Mazo de cables
7Montículo (bastidor)
8Cable negativo de la batería
9Cable del motor de arranque
0Cable del interruptor de luz de punto
muerto
ACable de la magneto CA
BTubo de freno
CCable del rectificador/regulador
DTubo respiradero del carburador
ETubo de desbordamiento del carburador
FTubo respiradero del depósito de recupe-
ración
DIAGRAMME DE CHEMINEMENT DES CABLES
KABELFÜHRUNGS-SCHAUBILD
DIAGRAMA DE CABLEADO
Page 176 of 794
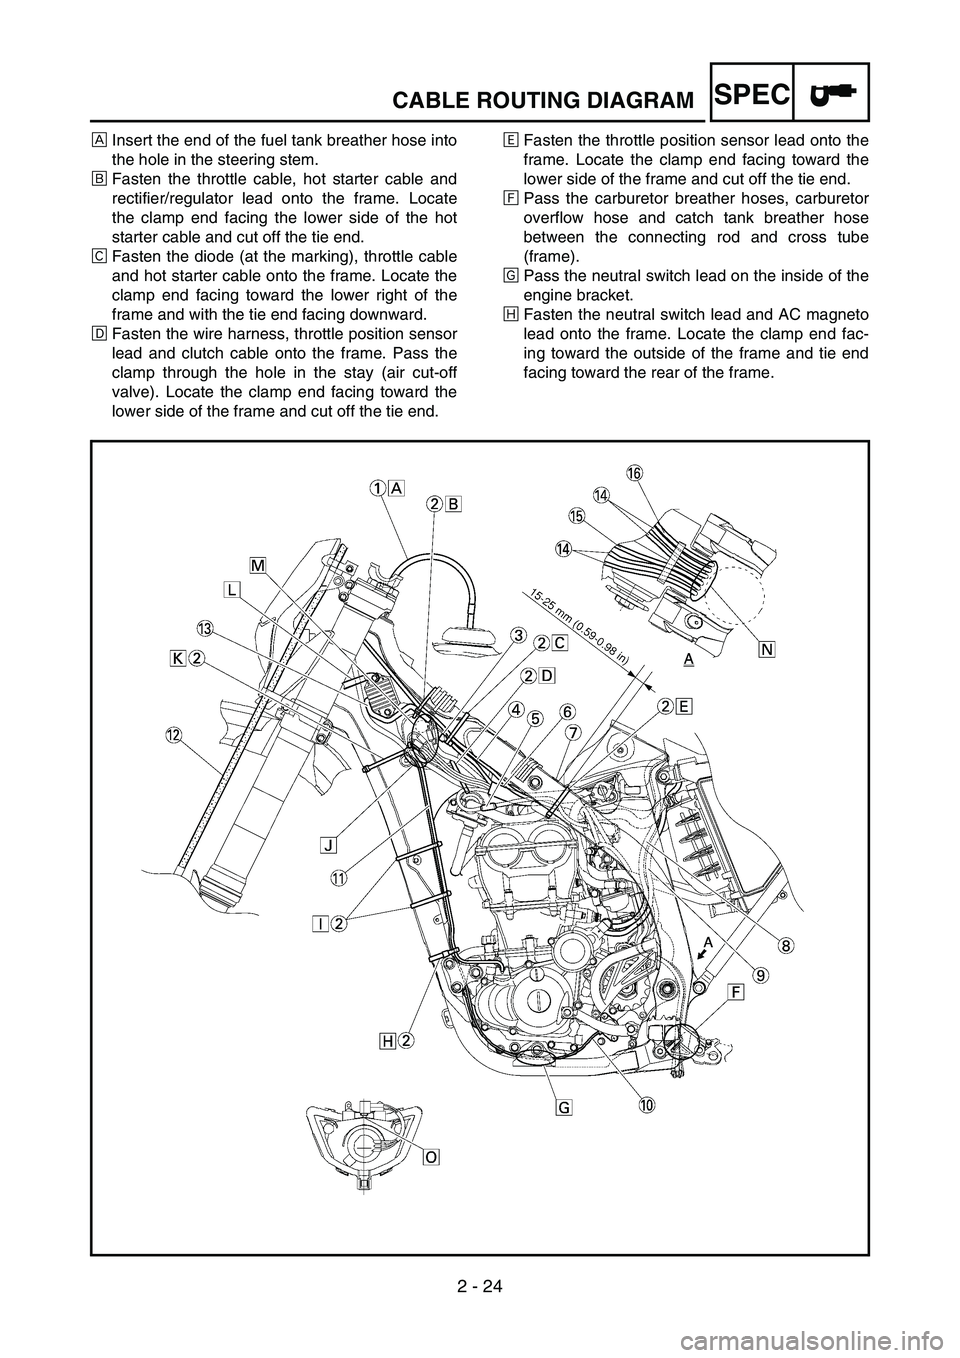
2 - 24
SPECCABLE ROUTING DIAGRAM
ÈInsert the end of the fuel tank breather hose into
the hole in the steering stem.
ÉFasten the throttle cable, hot starter cable and
rectifier/regulator lead onto the frame. Locate
the clamp end facing the lower side of the hot
starter cable and cut off the tie end.
ÊFasten the diode (at the marking), throttle cable
and hot starter cable onto the frame. Locate the
clamp end facing toward the lower right of the
frame and with the tie end facing downward.
ËFasten the wire harness, throttle position sensor
lead and clutch cable onto the frame. Pass the
clamp through the hole in the stay (air cut-off
valve). Locate the clamp end facing toward the
lower side of the frame and cut off the tie end.ÌFasten the throttle position sensor lead onto the
frame. Locate the clamp end facing toward the
lower side of the frame and cut off the tie end.
ÍPass the carburetor breather hoses, carburetor
overflow hose and catch tank breather hose
between the connecting rod and cross tube
(frame).
ÎPass the neutral switch lead on the inside of the
engine bracket.
ÏFasten the neutral switch lead and AC magneto
lead onto the frame. Locate the clamp end fac-
ing toward the outside of the frame and tie end
facing toward the rear of the frame.
Page 177 of 794
2 - 24
SPEC
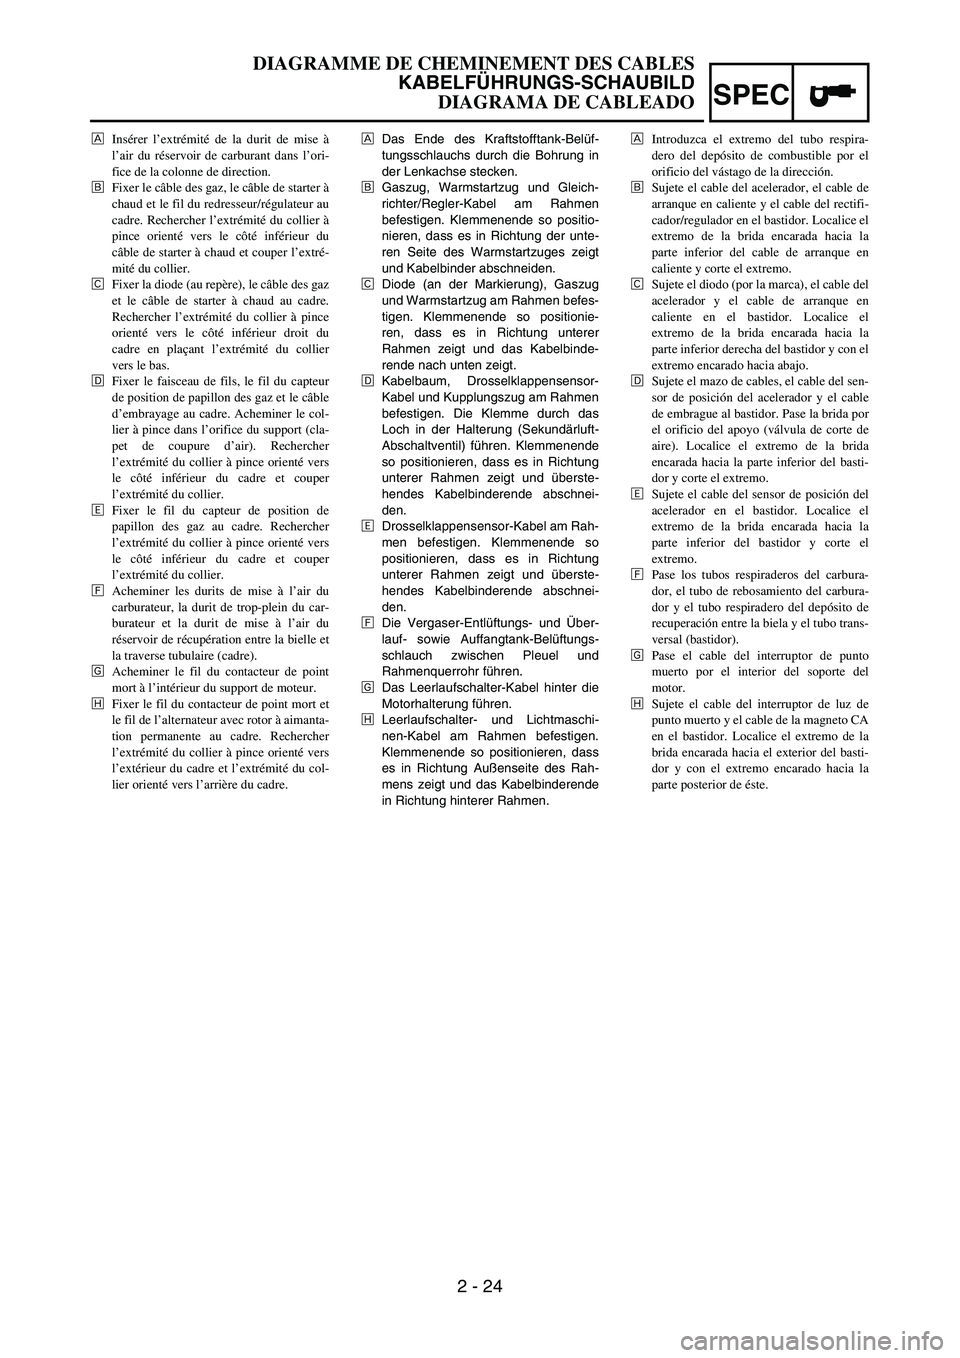
ÈDas Ende des Kraftstofftank-Belüf-
tungsschlauchs durch die Bohrung in
der Lenkachse stecken.
ÉGaszug, Warmstartzug und Gleich-
richter/Regler-Kabel am Rahmen
befestigen. Klemmenende so positio-
nieren, dass es in Richtung der unte-
ren Seite des Warmstartzuges zeigt
und Kabelbinder abschneiden.
ÊDiode (an der Markierung), Gaszug
und Warmstartzug am Rahmen befes-
tigen. Klemmenende so positionie-
ren, dass es in Richtung unterer
Rahmen zeigt und das Kabelbinde-
rende nach unten zeigt.
ËKabelbaum, Drosselklappensensor-
Kabel und Kupplungszug am Rahmen
befestigen. Die Klemme durch das
Loch in der Halterung (Sekundärluft-
Abschaltventil) führen. Klemmenende
so positionieren, dass es in Richtung
unterer Rahmen zeigt und überste-
hendes Kabelbinderende abschnei-
den.
ÌDrosselklappensensor-Kabel am Rah-
men befestigen. Klemmenende so
positionieren, dass es in Richtung
unterer Rahmen zeigt und überste-
hendes Kabelbinderende abschnei-
den.
ÍDie Vergaser-Entlüftungs- und Über-
lauf- sowie Auffangtank-Belüftungs-
schlauch zwischen Pleuel und
Rahmenquerrohr führen.
ÎDas Leerlaufschalter-Kabel hinter die
Motorhalterung führen.
ÏLeerlaufschalter- und Lichtmaschi-
nen-Kabel am Rahmen befestigen.
Klemmenende so positionieren, dass
es in Richtung Außenseite des Rah-
mens zeigt und das Kabelbinderende
in Richtung hinterer Rahmen. ÈInsérer l’extrémité de la durit de mise à
l’air du réservoir de carburant dans l’ori-
fice de la colonne de direction.
ÉFixer le câble des gaz, le câble de starter à
chaud et le fil du redresseur/régulateur au
cadre. Rechercher l’extrémité du collier à
pince orienté vers le côté inférieur du
câble de starter à chaud et couper l’extré-
mité du collier.
ÊFixer la diode (au repère), le câble des gaz
et le câble de starter à chaud au cadre.
Rechercher l’extrémité du collier à pince
orienté vers le côté inférieur droit du
cadre en plaçant l’extrémité du collier
vers le bas.
ËFixer le faisceau de fils, le fil du capteur
de position de papillon des gaz et le câble
d’embrayage au cadre. Acheminer le col-
lier à pince dans l’orifice du support (cla-
pet de coupure d’air). Rechercher
l’extrémité du collier à pince orienté vers
le côté inférieur du cadre et couper
l’extrémité du collier.
ÌFixer le fil du capteur de position de
papillon des gaz au cadre. Rechercher
l’extrémité du collier à pince orienté vers
le côté inférieur du cadre et couper
l’extrémité du collier.
ÍAcheminer les durits de mise à l’air du
carburateur, la durit de trop-plein du car-
burateur et la durit de mise à l’air du
réservoir de récupération entre la bielle et
la traverse tubulaire (cadre).
ÎAcheminer le fil du contacteur de point
mort à l’intérieur du support de moteur.
ÏFixer le fil du contacteur de point mort et
le fil de l’alternateur avec rotor à aimanta-
tion permanente au cadre. Rechercher
l’extrémité du collier à pince orienté vers
l’extérieur du cadre et l’extrémité du col-
lier orienté vers l’arrière du cadre.ÈIntroduzca el extremo del tubo respira-
dero del depósito de combustible por el
orificio del vástago de la dirección.
ÉSujete el cable del acelerador, el cable de
arranque en caliente y el cable del rectifi-
cador/regulador en el bastidor. Localice el
extremo de la brida encarada hacia la
parte inferior del cable de arranque en
caliente y corte el extremo.
ÊSujete el diodo (por la marca), el cable del
acelerador y el cable de arranque en
caliente en el bastidor. Localice el
extremo de la brida encarada hacia la
parte inferior derecha del bastidor y con el
extremo encarado hacia abajo.
ËSujete el mazo de cables, el cable del sen-
sor de posición del acelerador y el cable
de embrague al bastidor. Pase la brida por
el orificio del apoyo (válvula de corte de
aire). Localice el extremo de la brida
encarada hacia la parte inferior del basti-
dor y corte el extremo.
ÌSujete el cable del sensor de posición del
acelerador en el bastidor. Localice el
extremo de la brida encarada hacia la
parte inferior del bastidor y corte el
extremo.
ÍPase los tubos respiraderos del carbura-
dor, el tubo de rebosamiento del carbura-
dor y el tubo respiradero del depósito de
recuperación entre la biela y el tubo trans-
versal (bastidor).
ÎPase el cable del interruptor de punto
muerto por el interior del soporte del
motor.
ÏSujete el cable del interruptor de luz de
punto muerto y el cable de la magneto CA
en el bastidor. Localice el extremo de la
brida encarada hacia el exterior del basti-
dor y con el extremo encarado hacia la
parte posterior de éste.
DIAGRAMME DE CHEMINEMENT DES CABLES
KABELFÜHRUNGS-SCHAUBILD
DIAGRAMA DE CABLEADO
Page 188 of 794
2 - 30
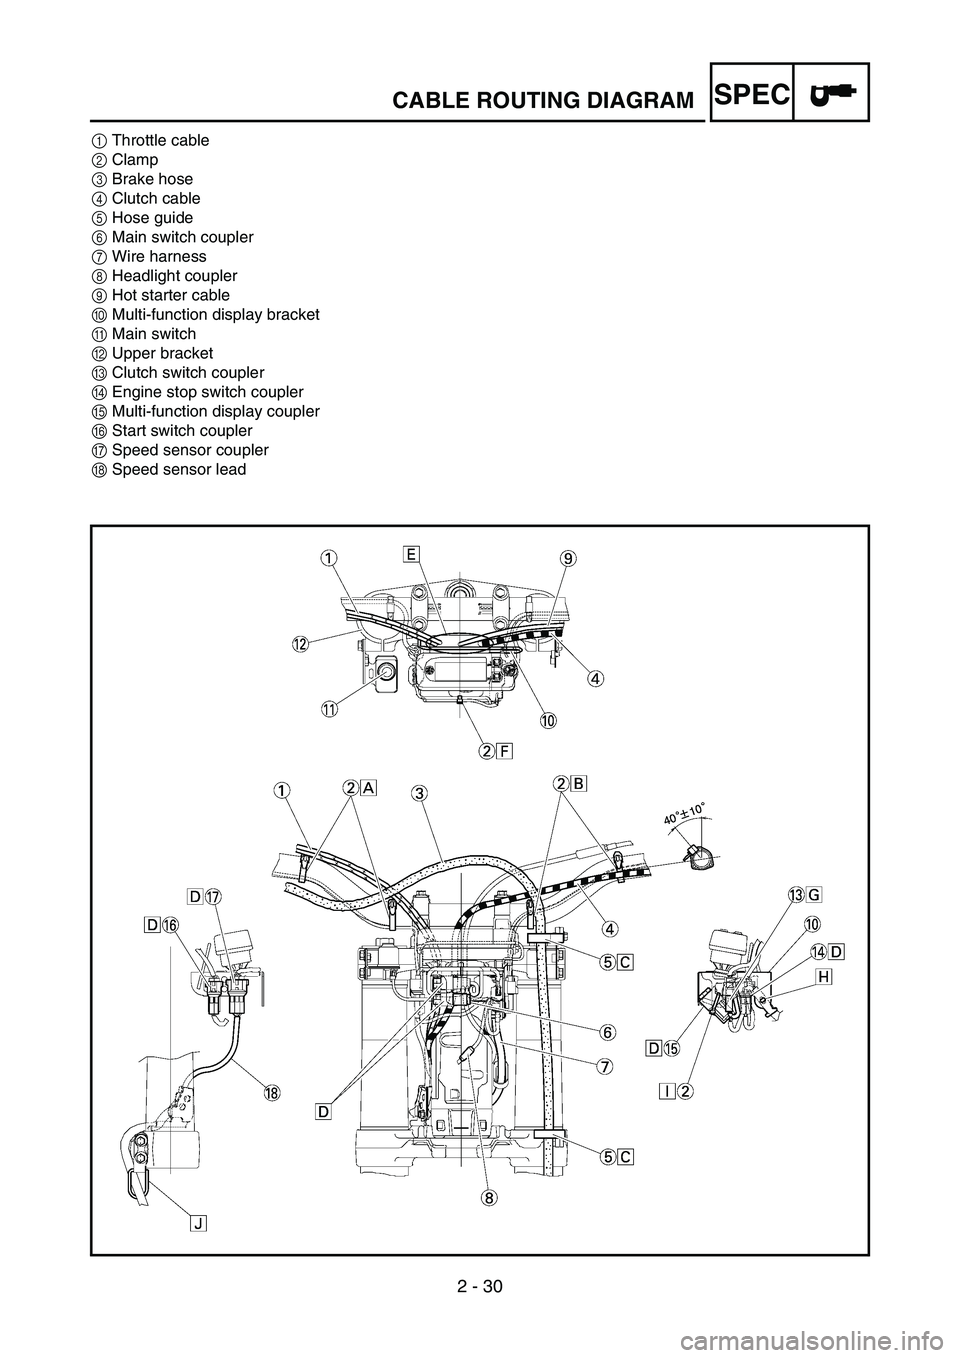
SPECCABLE ROUTING DIAGRAM
1Throttle cable
2Clamp
3Brake hose
4Clutch cable
5Hose guide
6Main switch coupler
7Wire harness
8Headlight coupler
9Hot starter cable
0Multi-function display bracket
AMain switch
BUpper bracket
CClutch switch coupler
DEngine stop switch coupler
EMulti-function display coupler
FStart switch coupler
GSpeed sensor coupler
HSpeed sensor lead