check engine YAMAHA WR 450F 2010 Owner's Manual
[x] Cancel search | Manufacturer: YAMAHA, Model Year: 2010, Model line: WR 450F, Model: YAMAHA WR 450F 2010Pages: 230, PDF Size: 13.87 MB
Page 83 of 230
3-24
CHASSIS
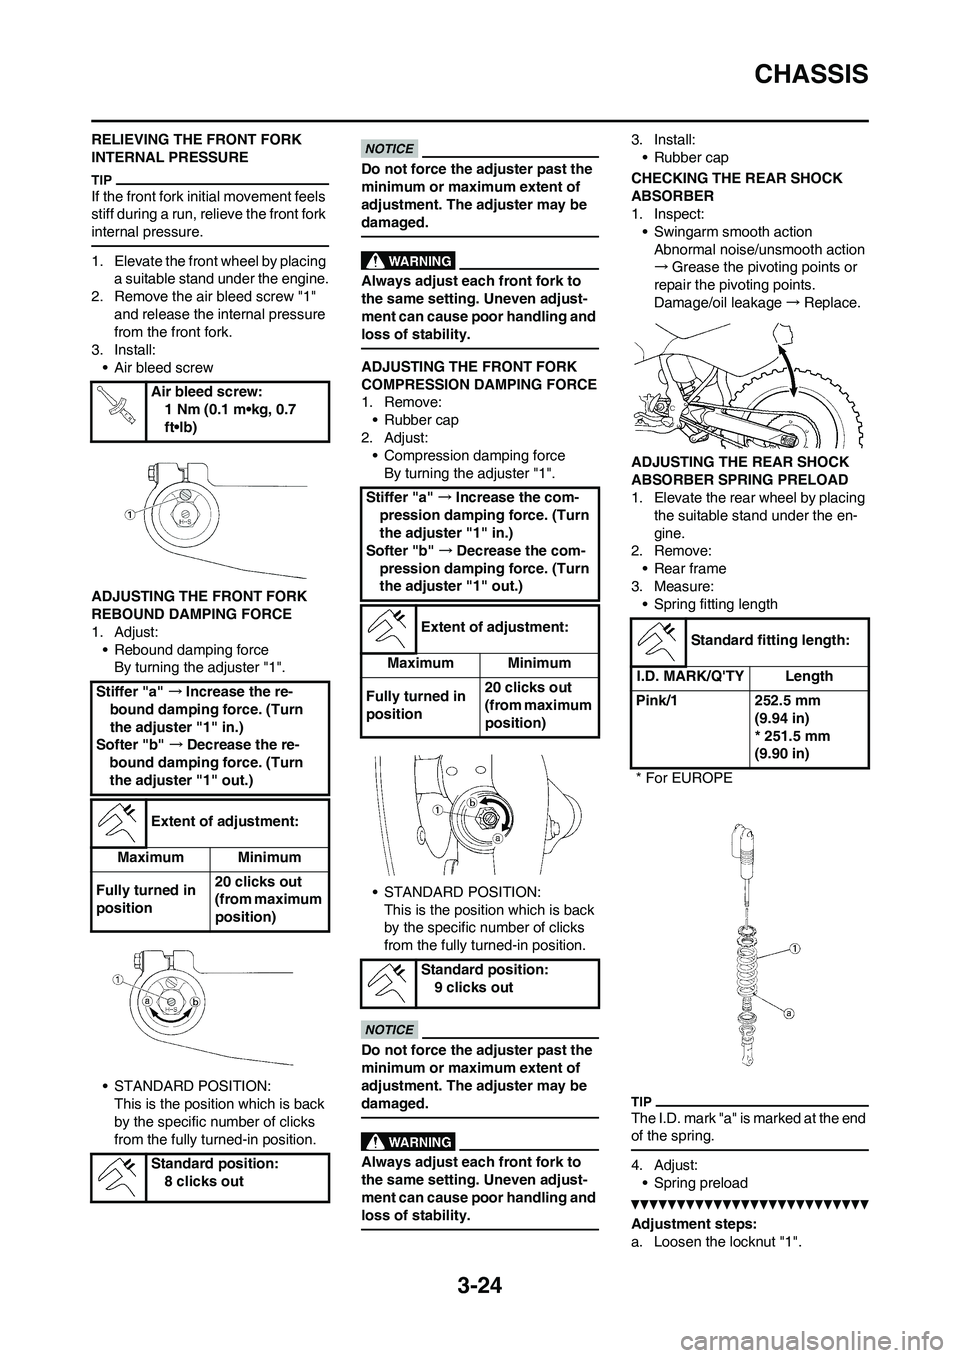
RELIEVING THE FRONT FORK
INTERNAL PRESSURE
If the front fork initial movement feels
stiff during a run, relieve the front fork
internal pressure.
1. Elevate the front wheel by placing
a suitable stand under the engine.
2. Remove the air bleed screw "1"
and release the internal pressure
from the front fork.
3. Install:
• Air bleed screw
ADJUSTING THE FRONT FORK
REBOUND DAMPING FORCE
1. Adjust:
• Rebound damping force
By turning the adjuster "1".
• STANDARD POSITION:
This is the position which is back
by the specific number of clicks
from the fully turned-in position.
Do not force the adjuster past the
minimum or maximum extent of
adjustment. The adjuster may be
damaged.
Always adjust each front fork to
the same setting. Uneven adjust-
ment can cause poor handling and
loss of stability.
ADJUSTING THE FRONT FORK
COMPRESSION DAMPING FORCE
1. Remove:
• Rubber cap
2. Adjust:
• Compression damping force
By turning the adjuster "1".
• STANDARD POSITION:
This is the position which is back
by the specific number of clicks
from the fully turned-in position.
Do not force the adjuster past the
minimum or maximum extent of
adjustment. The adjuster may be
damaged.
Always adjust each front fork to
the same setting. Uneven adjust-
ment can cause poor handling and
loss of stability.
3. Install:
• Rubber cap
CHECKING THE REAR SHOCK
ABSORBER
1. Inspect:
• Swingarm smooth action
Abnormal noise/unsmooth action
→Grease the pivoting points or
repair the pivoting points.
Damage/oil leakage→Replace.
ADJUSTING THE REAR SHOCK
ABSORBER SPRING PRELOAD
1. Elevate the rear wheel by placing
the suitable stand under the en-
gine.
2. Remove:
• Rear frame
3. Measure:
• Spring fitting length
The I.D. mark "a" is marked at the end
of the spring.
4. Adjust:
• Spring preload
Adjustment steps:
a. Loosen the locknut "1". Air bleed screw:
1 Nm (0.1 m•kg, 0.7
ft•lb)
Stiffer "a" →Increase the re-
bound damping force. (Turn
the adjuster "1" in.)
Softer "b" →Decrease the re-
bound damping force. (Turn
the adjuster "1" out.)
Extent of adjustment:
Maximum Minimum
Fully turned in
position20 clicks out
(from maximum
position)
Standard position:
8 clicks out
Stiffer "a" →Increase the com-
pression damping force. (Turn
the adjuster "1" in.)
Softer "b" →Decrease the com-
pression damping force. (Turn
the adjuster "1" out.)
Extent of adjustment:
Maximum Minimum
Fully turned in
position20 clicks out
(from maximum
position)
Standard position:
9 clicks out
Standard fitting length:
I.D. MARK/Q'TY Length
Pink/1 252.5 mm
(9.94 in)
* 251.5 mm
(9.90 in)
* For EUROPE
Page 85 of 230
3-26
CHASSIS
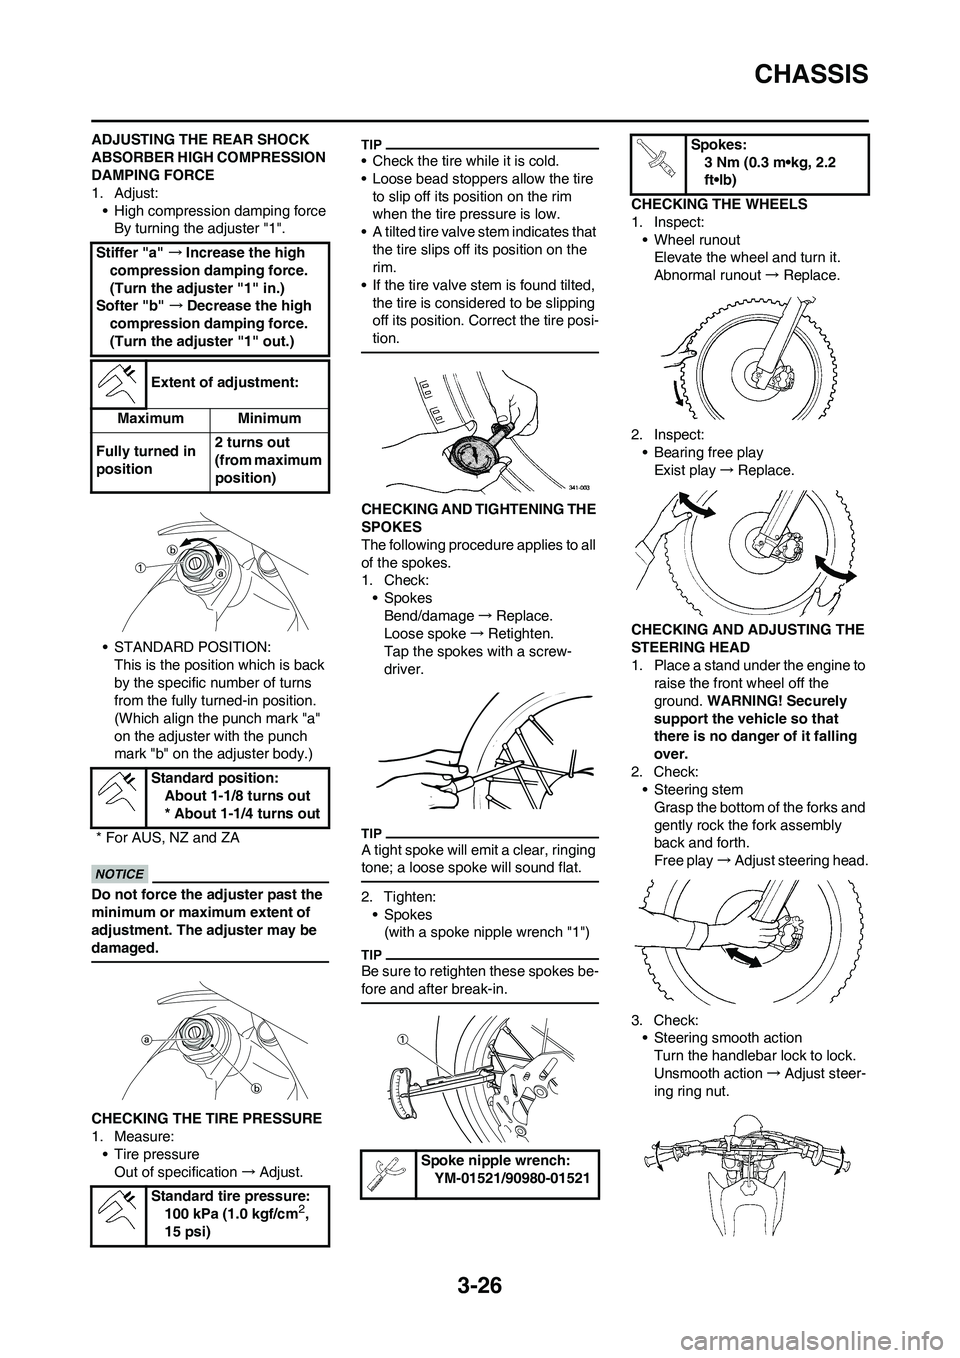
ADJUSTING THE REAR SHOCK
ABSORBER HIGH COMPRESSION
DAMPING FORCE
1. Adjust:
• High compression damping force
By turning the adjuster "1".
• STANDARD POSITION:
This is the position which is back
by the specific number of turns
from the fully turned-in position.
(Which align the punch mark "a"
on the adjuster with the punch
mark "b" on the adjuster body.)
Do not force the adjuster past the
minimum or maximum extent of
adjustment. The adjuster may be
damaged.
CHECKING THE TIRE PRESSURE
1. Measure:
• Tire pressure
Out of specification→Adjust.
• Check the tire while it is cold.
• Loose bead stoppers allow the tire
to slip off its position on the rim
when the tire pressure is low.
• A tilted tire valve stem indicates that
the tire slips off its position on the
rim.
• If the tire valve stem is found tilted,
the tire is considered to be slipping
off its position. Correct the tire posi-
tion.
CHECKING AND TIGHTENING THE
SPOKES
The following procedure applies to all
of the spokes.
1. Check:
• Spokes
Bend/damage→Replace.
Loose spoke→Retighten.
Tap the spokes with a screw-
driver.
A tight spoke will emit a clear, ringing
tone; a loose spoke will sound flat.
2. Tighten:
• Spokes
(with a spoke nipple wrench "1")
Be sure to retighten these spokes be-
fore and after break-in.
CHECKING THE WHEELS
1. Inspect:
• Wheel runout
Elevate the wheel and turn it.
Abnormal runout→ Replace.
2. Inspect:
• Bearing free play
Exist play→Replace.
CHECKING AND ADJUSTING THE
STEERING HEAD
1. Place a stand under the engine to
raise the front wheel off the
ground. WARNING! Securely
support the vehicle so that
there is no danger of it falling
over.
2. Check:
• Steering stem
Grasp the bottom of the forks and
gently rock the fork assembly
back and forth.
Free play→Adjust steering head.
3. Check:
• Steering smooth action
Turn the handlebar lock to lock.
Unsmooth action→Adjust steer-
ing ring nut. Stiffer "a" →Increase the high
compression damping force.
(Turn the adjuster "1" in.)
Softer "b" →Decrease the high
compression damping force.
(Turn the adjuster "1" out.)
Extent of adjustment:
Maximum Minimum
Fully turned in
position2 turns out
(from maximum
position)
Standard position:
About 1-1/8 turns out
* About 1-1/4 turns out
* For AUS, NZ and ZA
Standard tire pressure:
100 kPa (1.0 kgf/cm
2,
15 psi)
Spoke nipple wrench:
YM-01521/90980-01521
Spokes:
3 Nm (0.3 m•kg, 2.2
ft•lb)
Page 88 of 230
3-29
ELECTRICAL
ELECTRICAL
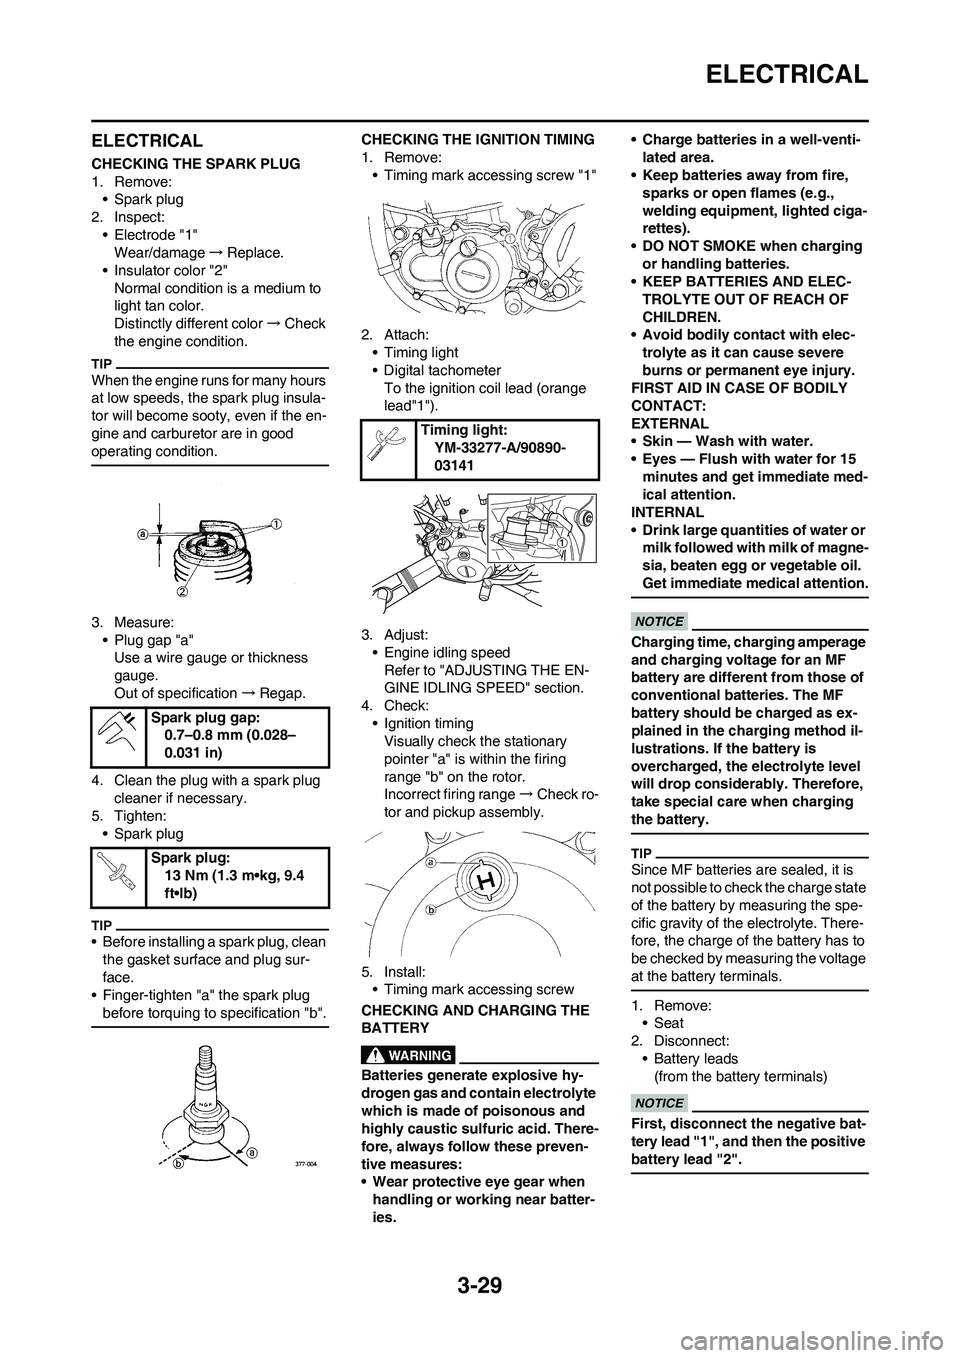
CHECKING THE SPARK PLUG
1. Remove:
• Spark plug
2. Inspect:
• Electrode "1"
Wear/damage→Replace.
• Insulator color "2"
Normal condition is a medium to
light tan color.
Distinctly different color→Check
the engine condition.
When the engine runs for many hours
at low speeds, the spark plug insula-
tor will become sooty, even if the en-
gine and carburetor are in good
operating condition.
3. Measure:
• Plug gap "a"
Use a wire gauge or thickness
gauge.
Out of specification→Regap.
4. Clean the plug with a spark plug
cleaner if necessary.
5. Tighten:
• Spark plug
• Before installing a spark plug, clean
the gasket surface and plug sur-
face.
• Finger-tighten "a" the spark plug
before torquing to specification "b".
CHECKING THE IGNITION TIMING
1. Remove:
• Timing mark accessing screw "1"
2. Attach:
• Timing light
• Digital tachometer
To the ignition coil lead (orange
lead"1").
3. Adjust:
• Engine idling speed
Refer to "ADJUSTING THE EN-
GINE IDLING SPEED" section.
4. Check:
• Ignition timing
Visually check the stationary
pointer "a" is within the firing
range "b" on the rotor.
Incorrect firing range→Check ro-
tor and pickup assembly.
5. Install:
• Timing mark accessing screw
CHECKING AND CHARGING THE
BATTERY
Batteries generate explosive hy-
drogen gas and contain electrolyte
which is made of poisonous and
highly caustic sulfuric acid. There-
fore, always follow these preven-
tive measures:
• Wear protective eye gear when
handling or working near batter-
ies.• Charge batteries in a well-venti-
lated area.
• Keep batteries away from fire,
sparks or open flames (e.g.,
welding equipment, lighted ciga-
rettes).
• DO NOT SMOKE when charging
or handling batteries.
• KEEP BATTERIES AND ELEC-
TROLYTE OUT OF REACH OF
CHILDREN.
• Avoid bodily contact with elec-
trolyte as it can cause severe
burns or permanent eye injury.
FIRST AID IN CASE OF BODILY
CONTACT:
EXTERNAL
• Skin — Wash with water.
• Eyes — Flush with water for 15
minutes and get immediate med-
ical attention.
INTERNAL
• Drink large quantities of water or
milk followed with milk of magne-
sia, beaten egg or vegetable oil.
Get immediate medical attention.
Charging time, charging amperage
and charging voltage for an MF
battery are different from those of
conventional batteries. The MF
battery should be charged as ex-
plained in the charging method il-
lustrations. If the battery is
overcharged, the electrolyte level
will drop considerably. Therefore,
take special care when charging
the battery.
Since MF batteries are sealed, it is
not possible to check the charge state
of the battery by measuring the spe-
cific gravity of the electrolyte. There-
fore, the charge of the battery has to
be checked by measuring the voltage
at the battery terminals.
1. Remove:
• Seat
2. Disconnect:
• Battery leads
(from the battery terminals)
First, disconnect the negative bat-
tery lead "1", and then the positive
battery lead "2".
Spark plug gap:
0.7–0.8 mm (0.028–
0.031 in)
Spark plug:
13 Nm (1.3 m•kg, 9.4
ft•lb)
Timing light:
YM-33277-A/90890-
03141
Page 94 of 230
4-1
ENGINE (Except for Canada)
TUNING
ENGINE (Except for Canada)
CARBURETOR SETTING
• The air/fuel mixture will vary de-pending on atmospheric conditions.
Therefore, it is necessary to take
into consideration the air pressure,
ambient temperature, humidity,
etc., when adjusting the carburetor.
• Perform a test run to check for prop- er engine performance (e.g., throt-
tle response) and spark plug(-s)
discoloration or fouling. Use these
readings to determine the best pos-
sible carburetor setting.
It is recommended to keep a record of
all carburetor settings and external
conditions (e.g., atmospheric condi-
tions, track/surface conditions, lap
times) to make future carburetor set-
ting easier.
• The carburetor is a part of the fuel line. Therefore, be sure to in-
stall it in a wellventilated area,
away from flammable objects
and any sources of fire.
• Never look into the carburetor in- take. Flames may shoot out from
the pipe if the engine backfires
while it is being started. Gasoline
may be discharged from the ac-
celerator pump nozzle when the
carburetor has been removed.
• The carburetor is extremely sen-sitive to foreign matter (dirt,
sand, water, etc.). During instal-
lation, do not al low foreign mat-
ter to get into the carburetor.
• Always handle the carburetor and its components carefully.
Even slight scratches, bends or
damage to carburetor parts may
prevent the carburetor from
functioning correctly. Carefully
perform all servicing with the ap-
propriate tools and without ap-
plying excessive force.
• When the engine is stopped or when riding at no load, do not
open and close the throttle un-
necessarily. Otherwise, too
much fuel may be discharged,
starting may become difficult or
the engine may not run well. • After installing the carburetor,
check that the throttle operates
correctly and opens and closes
smoothly.
ATMOSPHERIC CONDITIONS AND
CARBURETOR SETTINGS
The air density (i.e., concentration of
oxygen in the air) determines the rich-
ness or leanness of the air/fuel mix-
ture.
• Higher temperature expands the air with its resultant reduced density.
• Higher humidity reduces the amount of oxygen in the air by so
much of the water vapor in the
same air.
• Lower atmospheric pressure (at a
high altitude) reduces the density of
the air.
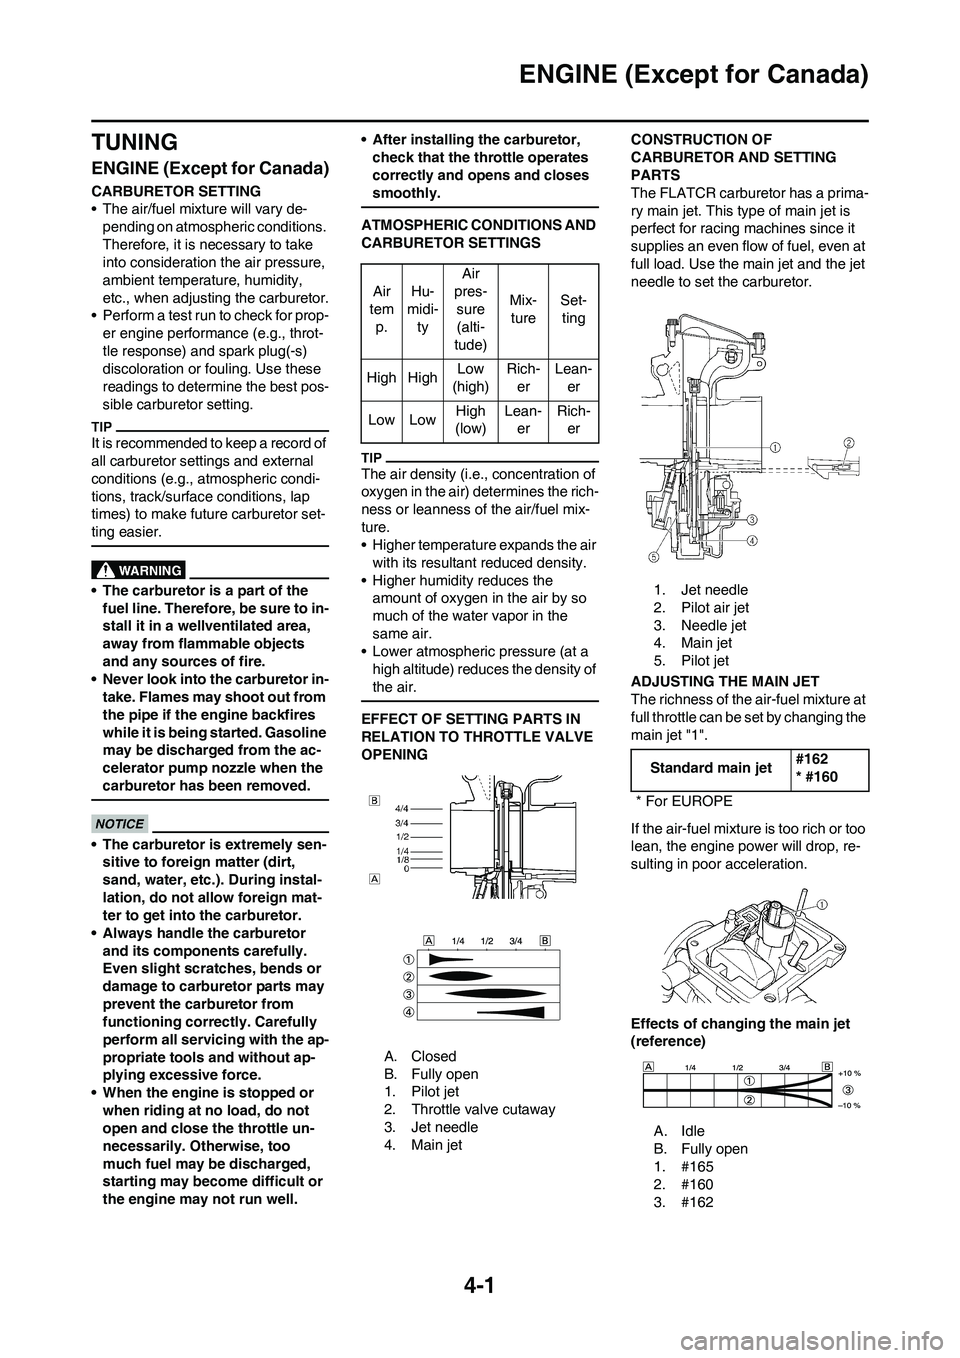
EFFECT OF SETTING PARTS IN
RELATION TO THROTTLE VALVE
OPENING
A. Closed
B. Fully open
1. Pilot jet
2. Throttle valve cutaway
3. Jet needle
4. Main jet CONSTRUCTION OF
CARBURETOR AND SETTING
PARTS
The FLATCR carburetor has a prima-
ry main jet. This type of main jet is
perfect for racing machines since it
supplies an even flow of fuel, even at
full load. Use the main jet and the jet
needle to set the carburetor.
1. Jet needle
2. Pilot air jet
3. Needle jet
4. Main jet
5. Pilot jet
ADJUSTING THE MAIN JET
The richness of the air-fuel mixture at
full throttle can be set by changing the
main jet "1".
If the air-fuel mixture is too rich or too
lean, the engine power will drop, re-
sulting in poor acceleration.
Effects of changing the main jet
(reference)
A. Idle
B. Fully open
1. #165
2. #160
3. #162
Air
tem p. Hu-
midi- ty Air
pres- sure
(alti-
tude) Mix-
ture Set-
ting
High High Low
(high) Rich-
er Lean-
er
Low Low High
(low) Lean-
er Rich-
er
Standard main jet #162
* #160
* For EUROPE
Page 97 of 230

4-4
ENGINE (Except for Canada)
EXAMPLES OF CARBURETOR SETTING DEPENDING ON SYMPTOM
This should be taken simply for an example. It is necessary to set the carburetor while checking the operating conditions
of the engine.
Symptom Setting Checking
At full throttle
Hard breathing
Shearing noise
Whitish spark plug
↓
Lean mixtureIncrease main jet calibration no. (Gradual-
ly)Discoloration of spark plug→If tan color, it
is in good condition.
If cannot be corrected:
Clogged float valve seat
Clogged fuel hose
Clogged fuel cock
Check that the accelerator pump operates
smoothly.
At full throttle
Speed pick-up stops
Slow speed pick-up
Slow response
Sooty spark plug
↓
Rich mixtureDecrease main jet calibration no. (Gradual-
ly)Discoloration of spark plug→If tan color, it
is in good condition.
If cannot be corrected:
Clogged air filter
Fuel overflow from carburetor
Lean mixture Lower jet needle clip position. (1 groove
down)
The clip position is the jet needle groove on
which the clip is installed.
The positions are numbered from the top.
Check that the accelerator pump operates
smoothly. (except for rich mixture symp-
tom). Rich mixture Raise jet needle clip position. (1 groove up)
1/4–3/4 throttle
Hard breathing
Lack of speedLower jet needle clip position. (1 groove
down)
1/4–1/2 throttle
Slow speed pick-up
Poor accelerationRaise jet needle clip position. (1 groove up)
Closed to 1/4 throttle
Hard breathing
Speed downUse jet needle with a smaller diameter. Slow-speed-circuit passage
Clogged→Clean.
Overflow from carburetor
Closed to 1/4 throttle
Poor accelerationUse jet needle with a larger diameter.
Raise jet needle clip position. (1 groove up)
Poor response in the low to in-
termediate speedsRaise jet needle clip position.
If this has no effect, lower the jet needle clip
position.
Poor response when throttle is
opened quicklyCheck overall settings.
Use main jet with a lower calibration no.
Raise jet needle clip position. (1 groove up)
If these have no effect, use a main jet with
a higher calibration no. and lower the jet
needle clip position.Check air filter for fouling.
Check that the accelerator pump operates
smoothly.
Jet needleClip
Groove 7 Groove 6
Groove 5
Groove 4
Groove 3
Groove 2
Groove 1
Leaner
(Standard)
Richer
Page 106 of 230
5-3
RADIATOR
HANDLING NOTE
Do not remove the radiator cap
when the engine and radiator are
hot. Scalding hot fluid and steam
may be blown out under pressure,
which could cause serious injury.
When the engine has cooled, open
the radiator cap by the following
procedure:
Place a thick rag, like a towel, over
the radiator cap, slowly rotate the
cap counterclockwise to the de-
tent. This procedure allows any re-
sidual pressure to escape. When
the hissing sound has stopped,
press down on the cap while turn-
ing counterclockwise and remove
it.
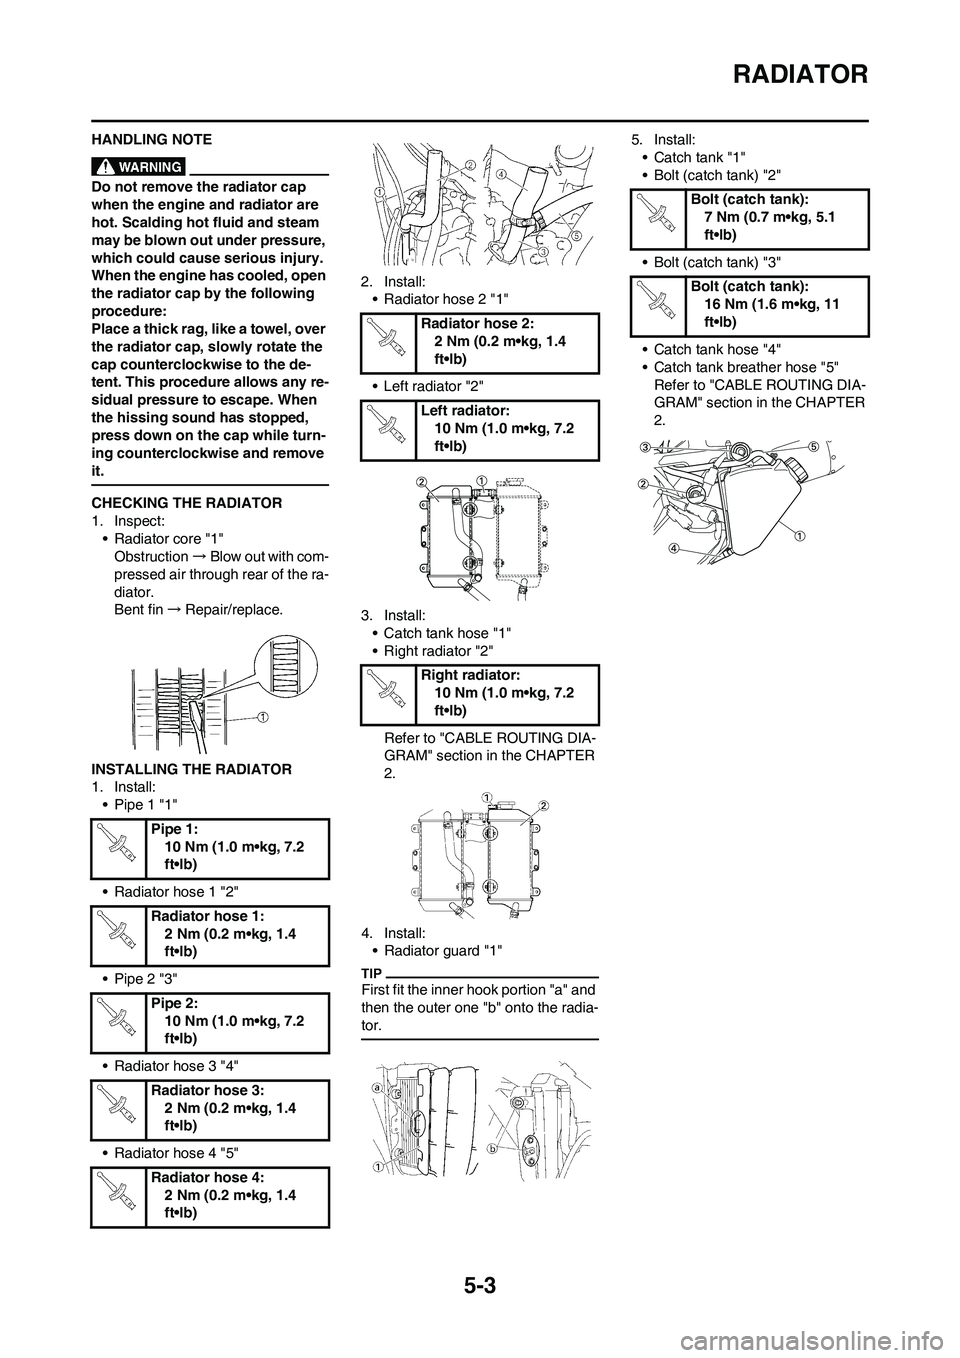
CHECKING THE RADIATOR
1. Inspect:
• Radiator core "1"
Obstruction→Blow out with com-
pressed air through rear of the ra-
diator.
Bent fin→Repair/replace.
INSTALLING THE RADIATOR
1. Install:
• Pipe 1 "1"
• Radiator hose 1 "2"
• Pipe 2 "3"
• Radiator hose 3 "4"
• Radiator hose 4 "5"2. Install:
• Radiator hose 2 "1"
• Left radiator "2"
3. Install:
• Catch tank hose "1"
• Right radiator "2"
Refer to "CABLE ROUTING DIA-
GRAM" section in the CHAPTER
2.
4. Install:
• Radiator guard "1"
First fit the inner hook portion "a" and
then the outer one "b" onto the radia-
tor.
5. Install:
• Catch tank "1"
• Bolt (catch tank) "2"
• Bolt (catch tank) "3"
• Catch tank hose "4"
• Catch tank breather hose "5"
Refer to "CABLE ROUTING DIA-
GRAM" section in the CHAPTER
2.
Pipe 1:
10 Nm (1.0 m•kg, 7.2
ft•lb)
Radiator hose 1:
2 Nm (0.2 m•kg, 1.4
ft•lb)
Pipe 2:
10 Nm (1.0 m•kg, 7.2
ft•lb)
Radiator hose 3:
2 Nm (0.2 m•kg, 1.4
ft•lb)
Radiator hose 4:
2 Nm (0.2 m•kg, 1.4
ft•lb)
Radiator hose 2:
2 Nm (0.2 m•kg, 1.4
ft•lb)
Left radiator:
10 Nm (1.0 m•kg, 7.2
ft•lb)
Right radiator:
10 Nm (1.0 m•kg, 7.2
ft•lb)
Bolt (catch tank):
7 Nm (0.7 m•kg, 5.1
ft•lb)
Bolt (catch tank):
16 Nm (1.6 m•kg, 11
ft•lb)
Page 111 of 230

5-8
CARBURETOR
HANDLING NOTE
Do not loosen the screw (throttle
position sensor) "1" except when
changing the throttle position sen-
sor due to failure because it will
cause a drop in engine perfor-
mance.
REMOVING THE PILOT SCREW
(For EUROPE)
1. Remove:
• Pilot screw "1"
To optimize the fuel flow at a small
throttle opening, each machine's pilot
screw has been individually set at the
factory. Before removing the pilot
screw, turn it in fully and count the
number of turns. Record this number
as the factory-set number of turns
out.
CHECKING THE CARBURETOR
1. Inspect:
• Carburetor body
Contamination→Clean.
• Use a petroleum based solvent for
cleaning. Blow out all passages and
jets with compressed air.
• Never use a wire.
2. Inspect:
•Main jet "1"
• Pilot jet "2"
• Needle jet "3"
• Starter jet "4"
•Pilot air jet "5"
• Leak jet "6"
Damage→Replace.
Contamination→Clean.
• Use a petroleum based solvent for
cleaning. Blow out all passages and
jets with compressed air.
• Never use a wire.
CHECKING THE NEEDLE VALVE
1. Inspect:
• Needle valve "1"
• Valve seat "2"
Grooved wear "a" →Replace.
Dust "b" →Clean.
• Filter "c"
Clogged→Clean.
CHECKING THE THROTTLE
VALVE
1. Check:
• Free movement
Stick→Repair or replace.
Insert the throttle valve "1" into the
carburetor body, and check for free
movement.
CHECKING THE JET NEEDLE
1. Inspect:
• Jet needle "1"
Bends/wear→Replace.
• Clip groove
Free play exists/wear→Replace.
MEASURING AND ADJUSTING
THE FLOAT HEIGHT
1. Measure:
• Float height "a"
Out of specification→Adjust.
Measurement and adjustment
steps:
a. Hold the carburetor in an upside
down position.
• Slowly tilt the carburetor in the op-
posite direction, then take the mea-
surement when the needle valve
aligns with the float arm.
• If the carburetor is level, the weight
of the float will push in the needle
valve, resulting in an incorrect mea-
surement.
b. Measure the distance between
the mating surface of the float
chamber and top of the float using
a vernier calipers.
The float arm should be resting on the
needle valve, but not compressing
the needle valve.
c. If the float height is not within
specification, inspect the valve
seat and needle valve.
d. If either is worn, replace them
both.
Float height:
8.0 mm (0.31 in)
Page 122 of 230
5-19
CAMSHAFTS
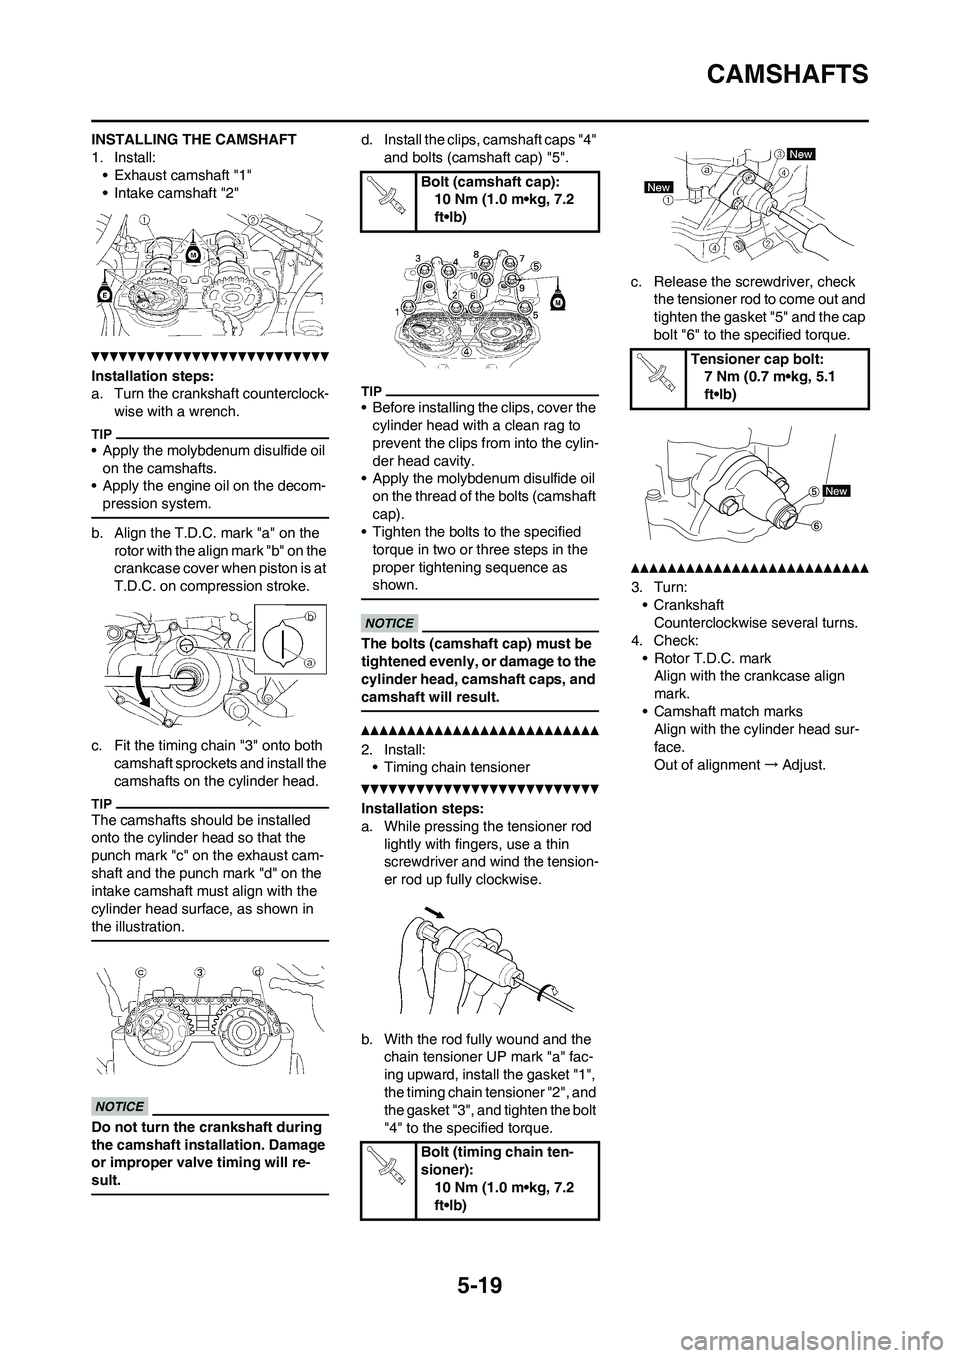
INSTALLING THE CAMSHAFT
1. Install:
• Exhaust camshaft "1"
• Intake camshaft "2"
Installation steps:
a. Turn the crankshaft counterclock-
wise with a wrench.
• Apply the molybdenum disulfide oil
on the camshafts.
• Apply the engine oil on the decom-
pression system.
b. Align the T.D.C. mark "a" on the
rotor with the align mark "b" on the
crankcase cover when piston is at
T.D.C. on compression stroke.
c. Fit the timing chain "3" onto both
camshaft sprockets and install the
camshafts on the cylinder head.
The camshafts should be installed
onto the cylinder head so that the
punch mark "c" on the exhaust cam-
shaft and the punch mark "d" on the
intake camshaft must align with the
cylinder head surface, as shown in
the illustration.
Do not turn the crankshaft during
the camshaft installation. Damage
or improper valve timing will re-
sult.
d. Install the clips, camshaft caps "4"
and bolts (camshaft cap) "5".
• Before installing the clips, cover the
cylinder head with a clean rag to
prevent the clips from into the cylin-
der head cavity.
• Apply the molybdenum disulfide oil
on the thread of the bolts (camshaft
cap).
• Tighten the bolts to the specified
torque in two or three steps in the
proper tightening sequence as
shown.
The bolts (camshaft cap) must be
tightened evenly, or damage to the
cylinder head, camshaft caps, and
camshaft will result.
2. Install:
• Timing chain tensioner
Installation steps:
a. While pressing the tensioner rod
lightly with fingers, use a thin
screwdriver and wind the tension-
er rod up fully clockwise.
b. With the rod fully wound and the
chain tensioner UP mark "a" fac-
ing upward, install the gasket "1",
the timing chain tensioner "2", and
the gasket "3", and tighten the bolt
"4" to the specified torque.c. Release the screwdriver, check
the tensioner rod to come out and
tighten the gasket "5" and the cap
bolt "6" to the specified torque.
3. Turn:
• Crankshaft
Counterclockwise several turns.
4. Check:
• Rotor T.D.C. mark
Align with the crankcase align
mark.
• Camshaft match marks
Align with the cylinder head sur-
face.
Out of alignment→Adjust.
Bolt (camshaft cap):
10 Nm (1.0 m•kg, 7.2
ft•lb)
Bolt (timing chain ten-
sioner):
10 Nm (1.0 m•kg, 7.2
ft•lb)
Tensioner cap bolt:
7 Nm (0.7 m•kg, 5.1
ft•lb)
Page 129 of 230
5-26
VALVES AND VALVE SPRINGS
h. Press the valve through the valve
guide and onto the valve seat to
make a clear pattern.
i. Measure the valve seat width
again. If the valve seat width is out
of specification, reface and relap
the valve seat.
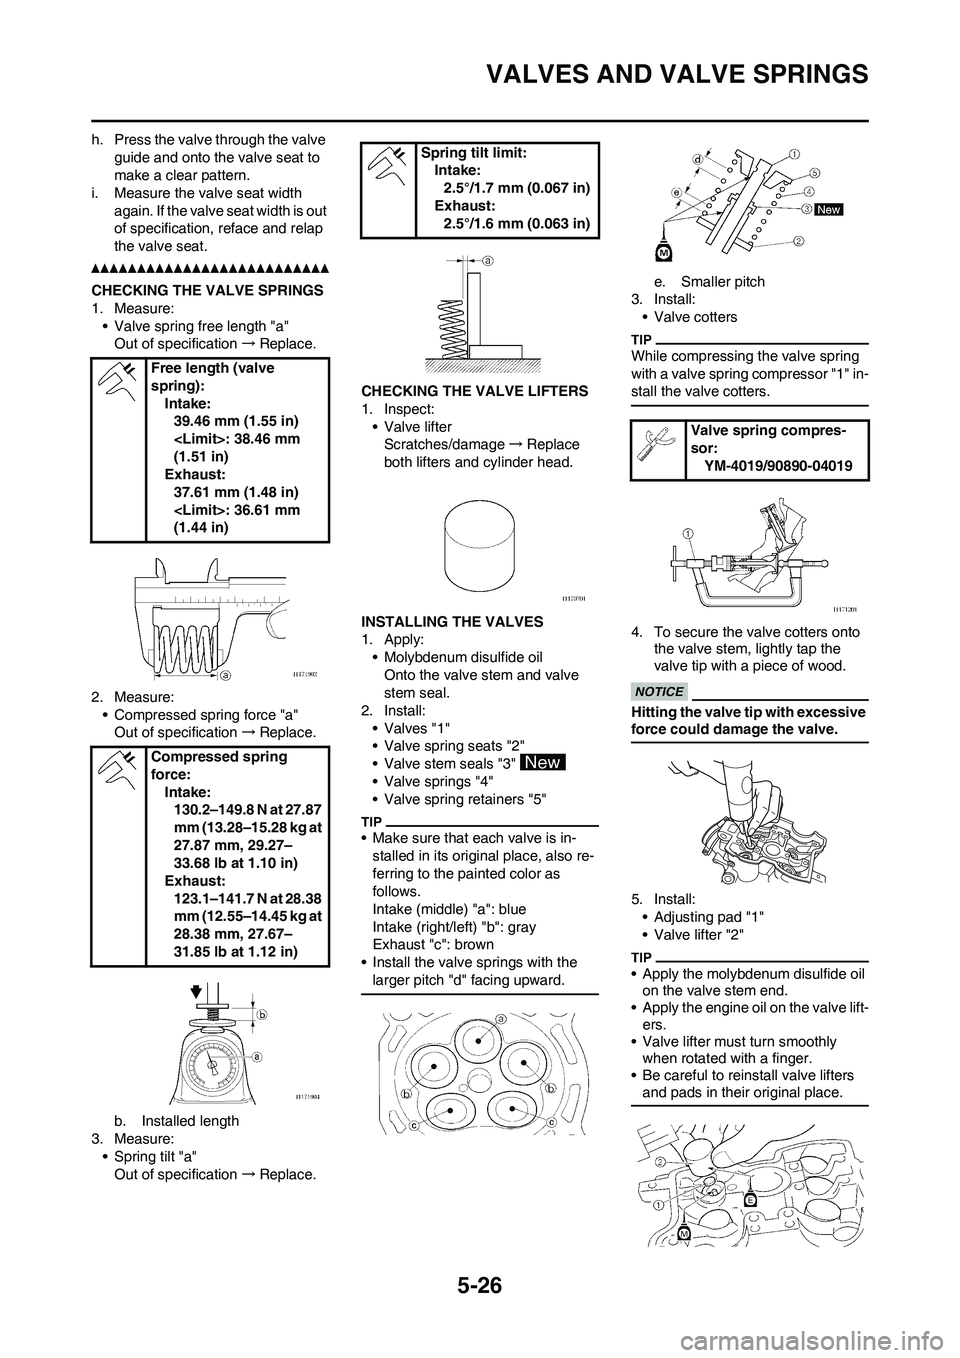
CHECKING THE VALVE SPRINGS
1. Measure:
• Valve spring free length "a"
Out of specification→Replace.
2. Measure:
• Compressed spring force "a"
Out of specification→Replace.
b. Installed length
3. Measure:
• Spring tilt "a"
Out of specification→Replace.CHECKING THE VALVE LIFTERS
1. Inspect:
• Valve lifter
Scratches/damage→Replace
both lifters and cylinder head.
INSTALLING THE VALVES
1. Apply:
• Molybdenum disulfide oil
Onto the valve stem and valve
stem seal.
2. Install:
• Valves "1"
• Valve spring seats "2"
• Valve stem seals "3"
• Valve springs "4"
• Valve spring retainers "5"
• Make sure that each valve is in-
stalled in its original place, also re-
ferring to the painted color as
follows.
Intake (middle) "a": blue
Intake (right/left) "b": gray
Exhaust "c": brown
• Install the valve springs with the
larger pitch "d" facing upward.
e. Smaller pitch
3. Install:
• Valve cotters
While compressing the valve spring
with a valve spring compressor "1" in-
stall the valve cotters.
4. To secure the valve cotters onto
the valve stem, lightly tap the
valve tip with a piece of wood.
Hitting the valve tip with excessive
force could damage the valve.
5. Install:
• Adjusting pad "1"
• Valve lifter "2"
• Apply the molybdenum disulfide oil
on the valve stem end.
• Apply the engine oil on the valve lift-
ers.
• Valve lifter must turn smoothly
when rotated with a finger.
• Be careful to reinstall valve lifters
and pads in their original place.
Free length (valve
spring):
Intake:
39.46 mm (1.55 in)
(1.51 in)
Exhaust:
37.61 mm (1.48 in)
(1.44 in)
Compressed spring
force:
Intake:
130.2–149.8 N at 27.87
mm (13.28–15.28 kg at
27.87 mm, 29.27–
33.68 lb at 1.10 in)
Exhaust:
123.1–141.7 N at 28.38
mm (12.55–14.45 kg at
28.38 mm, 27.67–
31.85 lb at 1.12 in)
Spring tilt limit:
Intake:
2.5°/1.7 mm (0.067 in)
Exhaust:
2.5°/1.6 mm (0.063 in)
Valve spring compres-
sor:
YM-4019/90890-04019
Page 132 of 230
5-29
CYLINDER AND PISTON
3. Measure:
• Ring end gap
Out of specification→Replace.
You cannot measure the end gap on
the expander spacer of the oil control
ring. If the oil control ring rails show
excessive gap, replace all three rings.
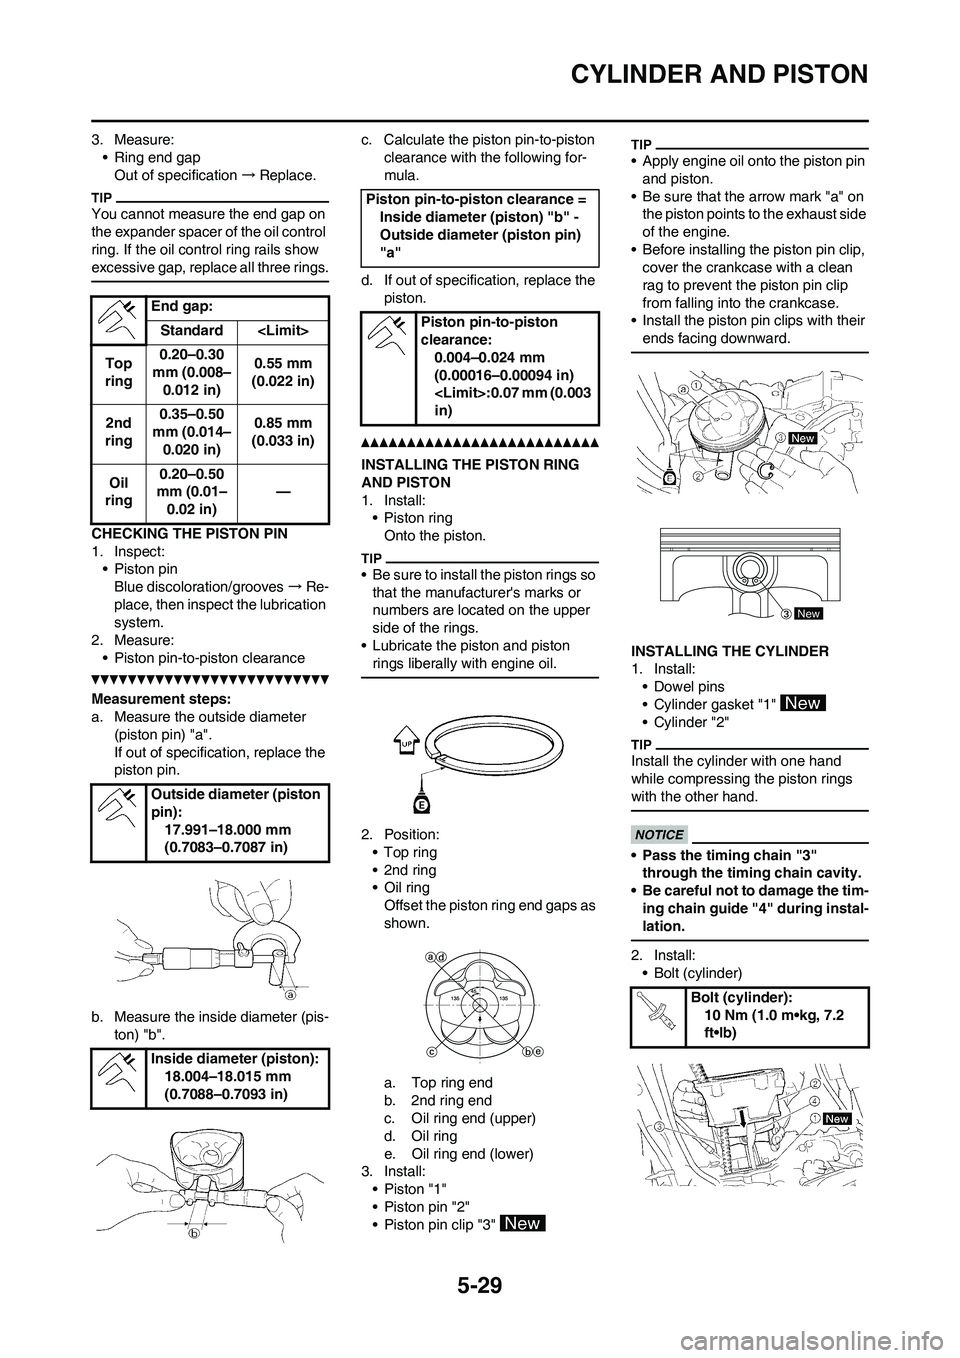
CHECKING THE PISTON PIN
1. Inspect:
• Piston pin
Blue discoloration/grooves→Re-
place, then inspect the lubrication
system.
2. Measure:
• Piston pin-to-piston clearance
Measurement steps:
a. Measure the outside diameter
(piston pin) "a".
If out of specification, replace the
piston pin.
b. Measure the inside diameter (pis-
ton) "b".c. Calculate the piston pin-to-piston
clearance with the following for-
mula.
d. If out of specification, replace the
piston.
INSTALLING THE PISTON RING
AND PISTON
1. Install:
•Piston ring
Onto the piston.
• Be sure to install the piston rings so
that the manufacturer's marks or
numbers are located on the upper
side of the rings.
• Lubricate the piston and piston
rings liberally with engine oil.
2. Position:
•Top ring
• 2nd ring
• Oil ring
Offset the piston ring end gaps as
shown.
a. Top ring end
b. 2nd ring end
c. Oil ring end (upper)
d. Oil ring
e. Oil ring end (lower)
3. Install:
•Piston "1"
• Piston pin "2"
• Piston pin clip "3"
• Apply engine oil onto the piston pin
and piston.
• Be sure that the arrow mark "a" on
the piston points to the exhaust side
of the engine.
• Before installing the piston pin clip,
cover the crankcase with a clean
rag to prevent the piston pin clip
from falling into the crankcase.
• Install the piston pin clips with their
ends facing downward.
INSTALLING THE CYLINDER
1. Install:
• Dowel pins
• Cylinder gasket "1"
• Cylinder "2"
Install the cylinder with one hand
while compressing the piston rings
with the other hand.
• Pass the timing chain "3"
through the timing chain cavity.
• Be careful not to damage the tim-
ing chain guide "4" during instal-
lation.
2. Install:
• Bolt (cylinder) End gap:
Standard
Top
ring0.20–0.30
mm (0.008–
0.012 in)0.55 mm
(0.022 in)
2nd
ring0.35–0.50
mm (0.014–
0.020 in)0.85 mm
(0.033 in)
Oil
ring0.20–0.50
mm (0.01–
0.02 in)—
Outside diameter (piston
pin):
17.991–18.000 mm
(0.7083–0.7087 in)
Inside diameter (piston):
18.004–18.015 mm
(0.7088–0.7093 in)
Piston pin-to-piston clearance =
Inside diameter (piston) "b" -
Outside diameter (piston pin)
"a"
Piston pin-to-piston
clearance:
0.004–0.024 mm
(0.00016–0.00094 in)
in)
Bolt (cylinder):
10 Nm (1.0 m•kg, 7.2
ft•lb)
New