engine YAMAHA WR 450F 2016 Owners Manual
[x] Cancel search | Manufacturer: YAMAHA, Model Year: 2016, Model line: WR 450F, Model: YAMAHA WR 450F 2016Pages: 426, PDF Size: 10.86 MB
Page 304 of 426
TRANSMISSION
6-77
EAS2GC1322
TRANSMISSION
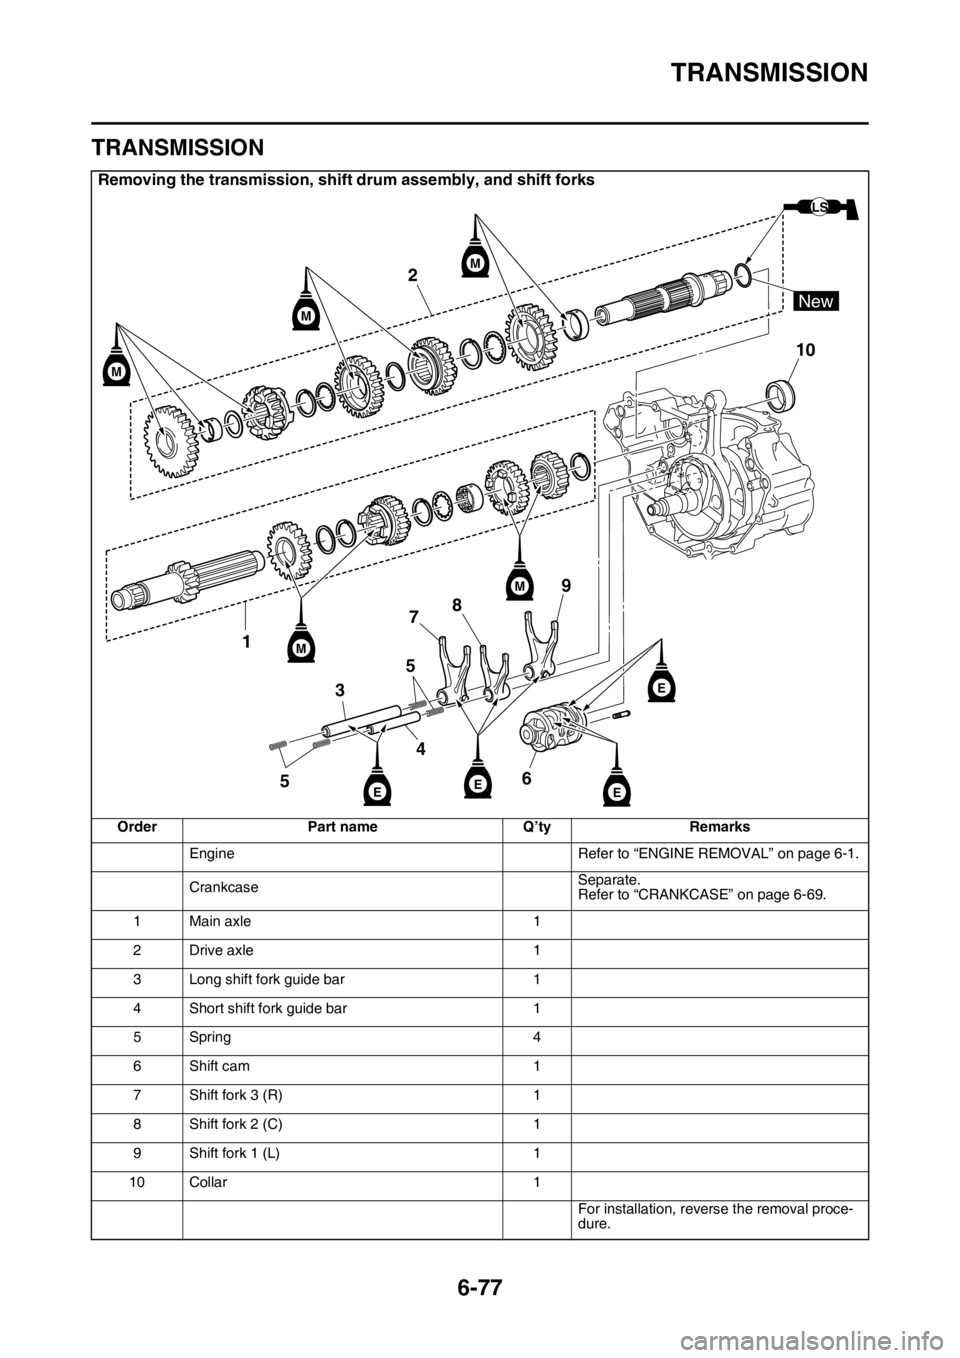
Removing the transmission, shift drum assembly, and shift forks
OrderPart name Q’tyRemarks
Engine Refer to “ENGINE REMOVAL” on page 6-1.
Crankcase Separate.
Refer to “CRANKCASE” on page 6-69.
1 Main axle 1
2 Drive axle 1
3 Long shift fork guide bar 1
4 Short shift fork guide bar 1
5Spring 4
6 Shift cam 1
7 Shift fork 3 (R) 1
8 Shift fork 2 (C) 1
9 Shift fork 1 (L) 1
10 Collar 1
For installation, reverse the removal proce-
dure.
2
10
1 5 3
4
5
7
8
69
M
M
M
M
M
EE
E
E
LS
New
Page 307 of 426
TRANSMISSION
6-80
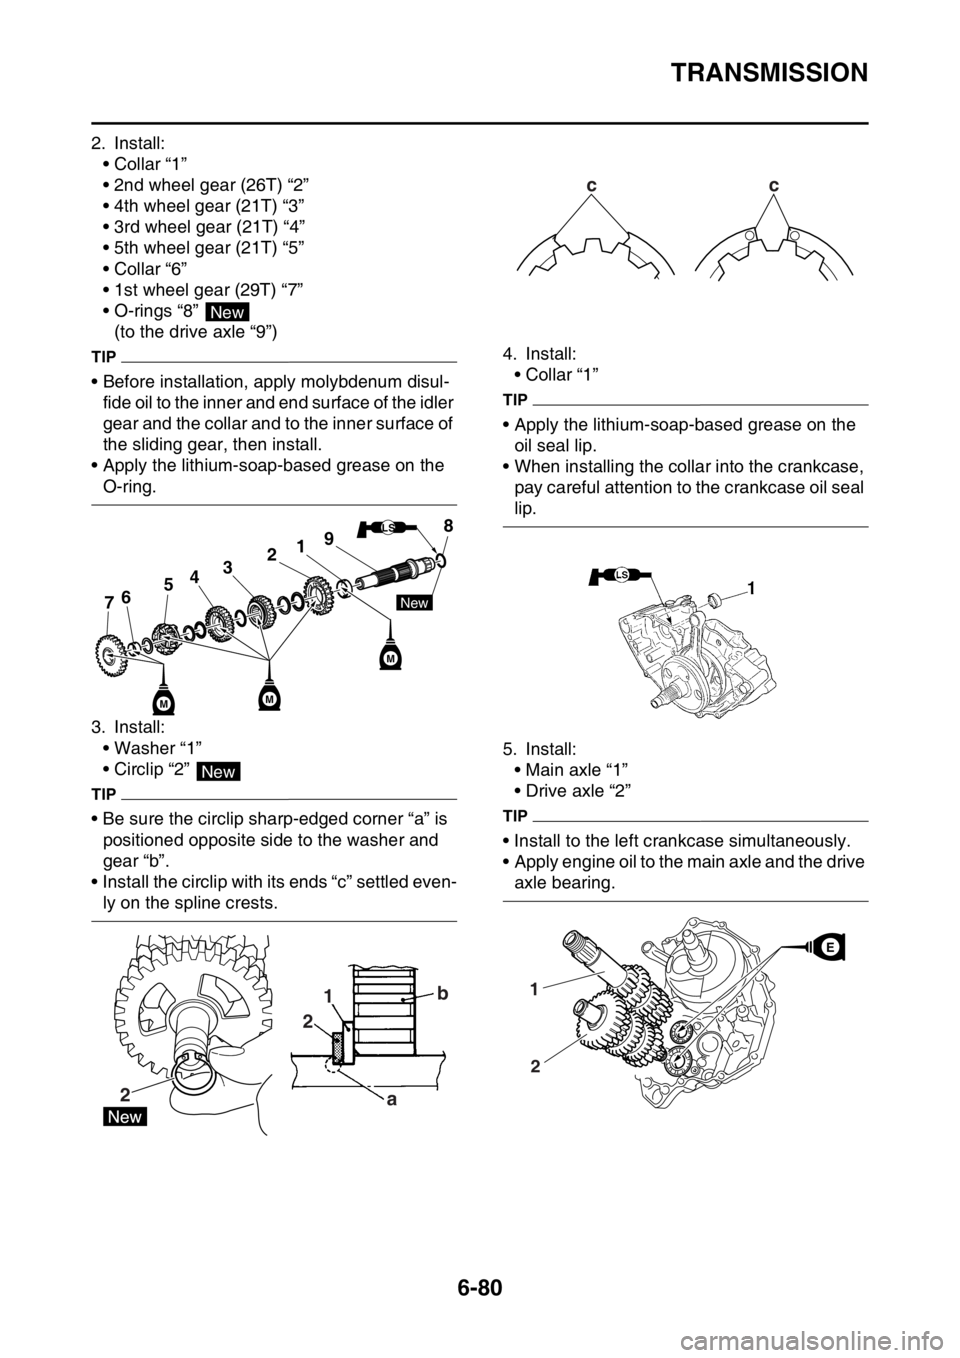
2. Install:• Collar “1”
• 2nd wheel gear (26T) “2”
• 4th wheel gear (21T) “3”
• 3rd wheel gear (21T) “4”
• 5th wheel gear (21T) “5”
• Collar “6”
• 1st wheel gear (29T) “7”
• O-rings “8” (to the drive axle “9”)
TIP
• Before installation, apply molybdenum disul-fide oil to the inner and end surface of the idler
gear and the collar and to the inner surface of
the sliding gear, then install.
• Apply the lithium-soap-based grease on the
O-ring.
3. Install: • Washer “1”
• Circlip “2”
TIP
• Be sure the circlip sharp-edged corner “a” is positioned opposite side to the washer and
gear “b”.
• Install the circlip with its ends “c” settled even-
ly on the spline crests. 4. Install:
• Collar “1”
TIP
• Apply the lithium-soap-based grease on the oil seal lip.
• When installing the collar into the crankcase, pay careful attention to the crankcase oil seal
lip.
5. Install: • Main axle “1”
• Drive axle “2”
TIP
• Install to the left crankcase simultaneously.
• Apply engine oil to the main axle and the drive
axle bearing.
New
2 9
8
3
4
5
6
7
New
MM
LS
M
1
New
2 1
2
ab
cc
1
2
EE
Page 308 of 426

TRANSMISSION
6-81
6. Install:• Shift fork 1 (L) “1”
• Shift fork 2 (C) “2”
• Shift fork 3 (R) “3”
• Shift cam “4”(to the main axle and the drive axle)
TIP
• Apply engine oil to the shift fork grooves.
• Apply engine oil to the shift cam groove and
the bearing contact surface.
• Mesh the shift fork 1 (L) with the 4th wheel gear “5” and shift fork 3 (R) with the 5th wheel
gear “7” on the drive axle.
• Mesh the shift fork 2 (C) with the 3rd pinion
gear “6” on the main axle. 7. Install:
• Long shift fork guide bar “1”
• Short shift fork guide bar “2”
• Spring “3”
TIP
• Screw the spring into the shift fork guide bar lightly beforehand.
• Apply the engine oil on the shift fork guide
bars.
8. Check: • Operation of shift cam and shift fork
• Transmission operationUnsmooth operation Repair.
3
12
EE
E
2
1 3
E
Page 310 of 426
RADIATOR
7-1
EAS2GC1328
TIP
This section is intended for those who have basic knowledge and skill concerning the servicing of
Yamaha motorcycles (e.g., Yamaha dealers, serv ice engineers, etc.). Those who have little knowl-
edge and skill concerning servicing are requested not to undertake inspection, adjustment, disas-
sembly, or reassembly only by reference to this manual. It may lead to servicing trouble and
mechanical damage.
EAS2GC1329
RADIATOR
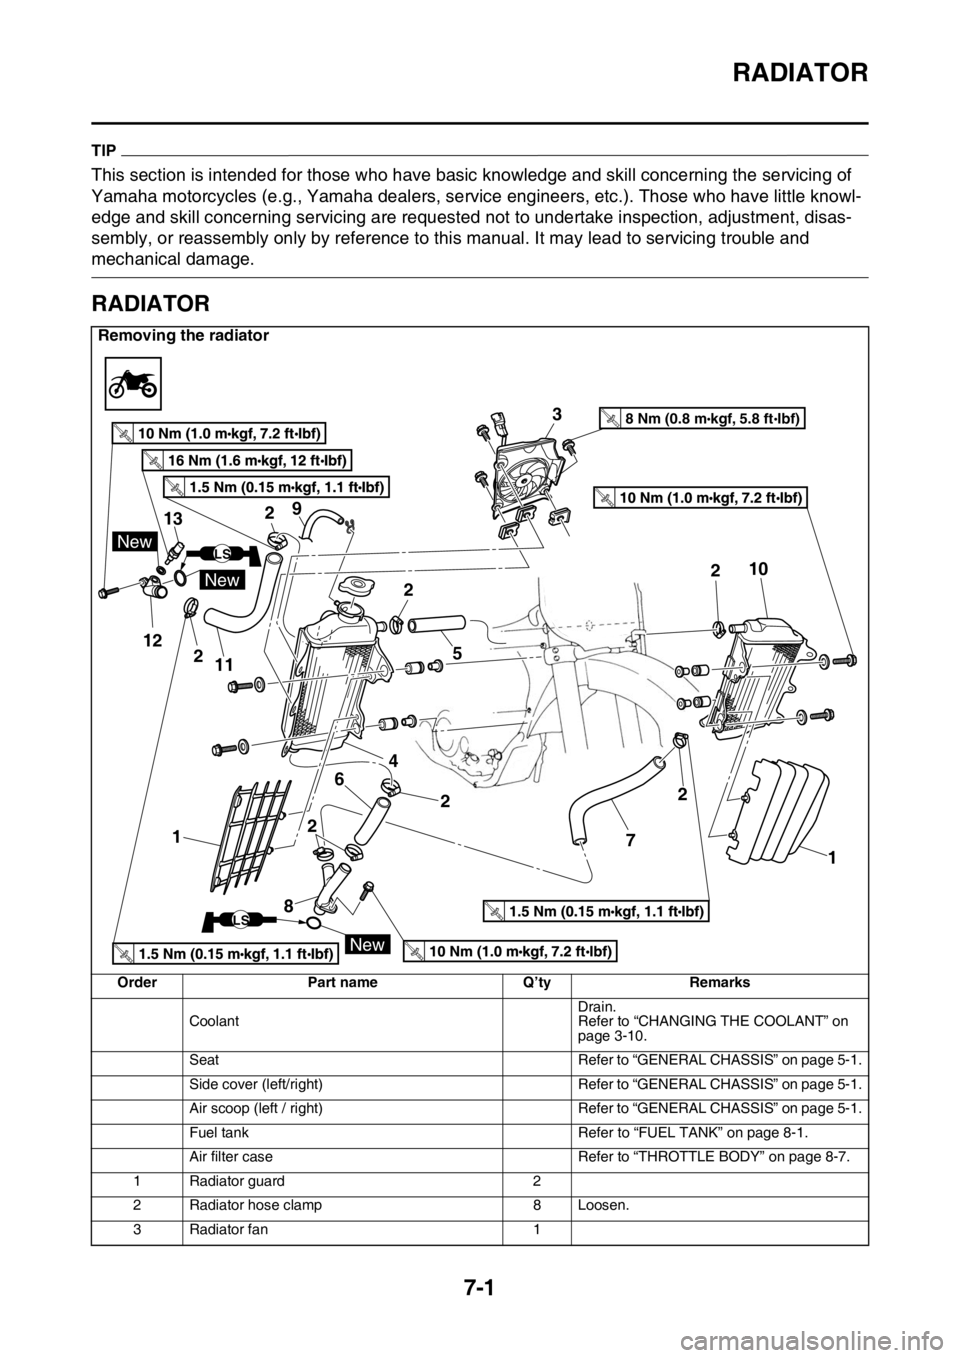
Removing the radiator
OrderPart name Q’tyRemarks
Coolant Drain.
Refer to “CHANGING THE COOLANT” on
page 3-10.
Seat Refer to “GENERAL CHASSIS” on page 5-1.
Side cover (left/right) Refer to “GENERAL CHASSIS” on page 5-1.
Air scoop (left / right) Refer to “GENERAL CHASSIS” on page 5-1.
Fuel tank Refer to “FUEL TANK” on page 8-1.
Air filter case Refer to “THROTTLE BODY” on page 8-7.
1 Radiator guard 2
2 Radiator hose clamp 8 Loosen.
3 Radiator fan 1
12
13
New
New
New
LS
LS
3
4 58 Nm (0.8 m kgf, 5.8 ft Ibf)T.R.
6
7
8 9
10
11 2
2
2
2
2
2
2
1
1
Page 313 of 426
WATER PUMP
7-4
EAS2GC1332
WATER PUMP
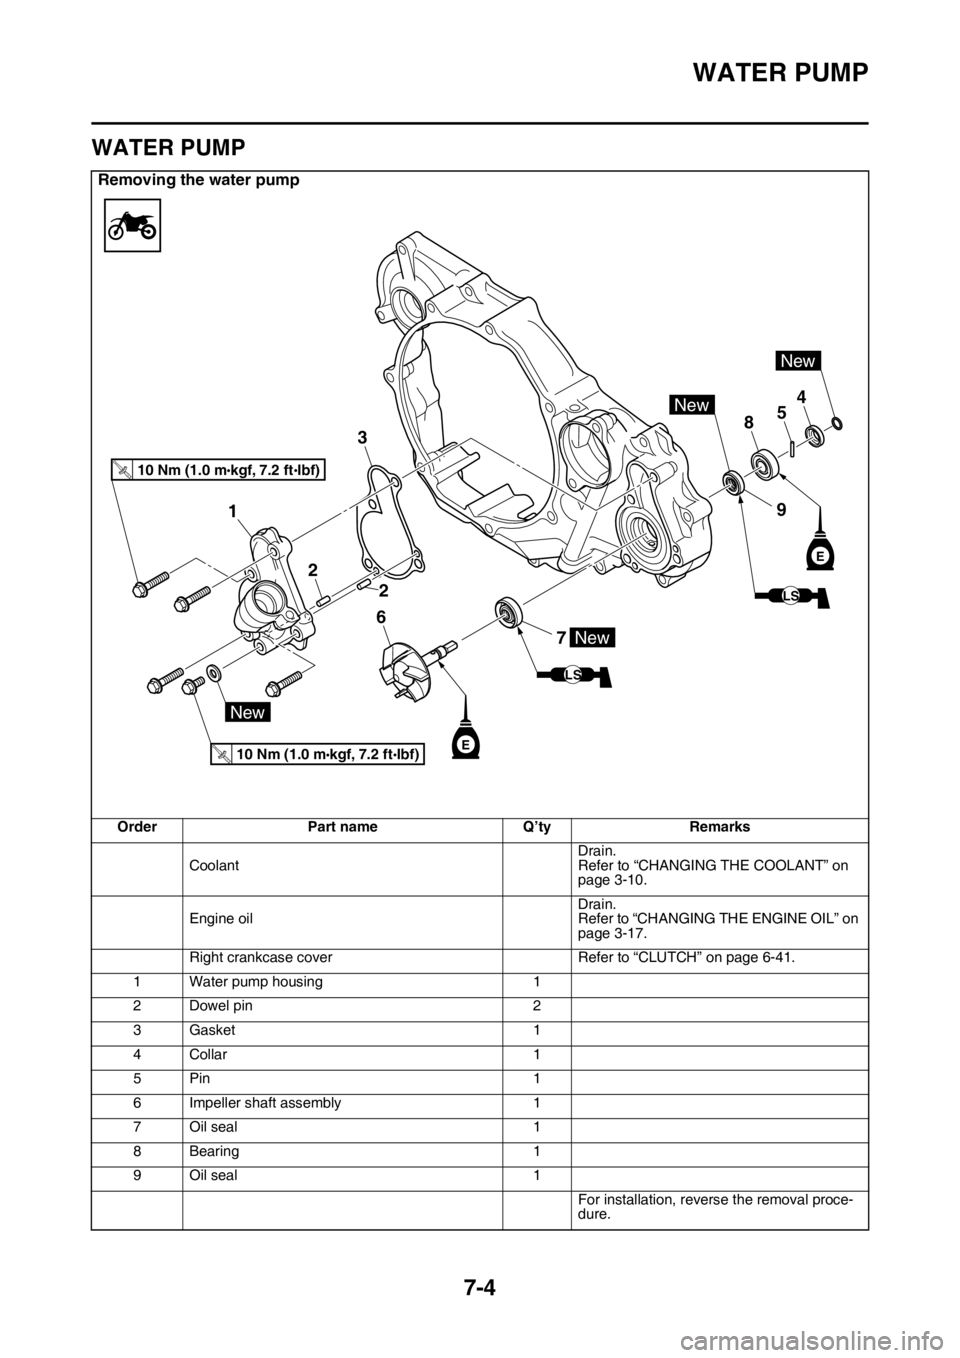
Removing the water pump
OrderPart name Q’tyRemarks
Coolant Drain.
Refer to “CHANGING THE COOLANT” on
page 3-10.
Engine oil Drain.
Refer to “CHANGING THE ENGINE OIL” on
page 3-17.
Right crankcase cover Refer to “CLUTCH” on page 6-41.
1 Water pump housing 1
2 Dowel pin 2
3Gasket 1
4Collar 1
5Pin 1
6 Impeller shaft assembly 1
7 Oil seal 1
8 Bearing 1
9 Oil seal 1
For installation, reverse the removal proce-
dure.
LS
LS
7
6
2 2
3
1
854
New
New
New
E
9
New
E
10 Nm (1.0 m kgf, 7.2 ft Ibf)T.R.
10 Nm (1.0 m kgf, 7.2 ft Ibf)T.R.
Page 314 of 426
WATER PUMP
7-5
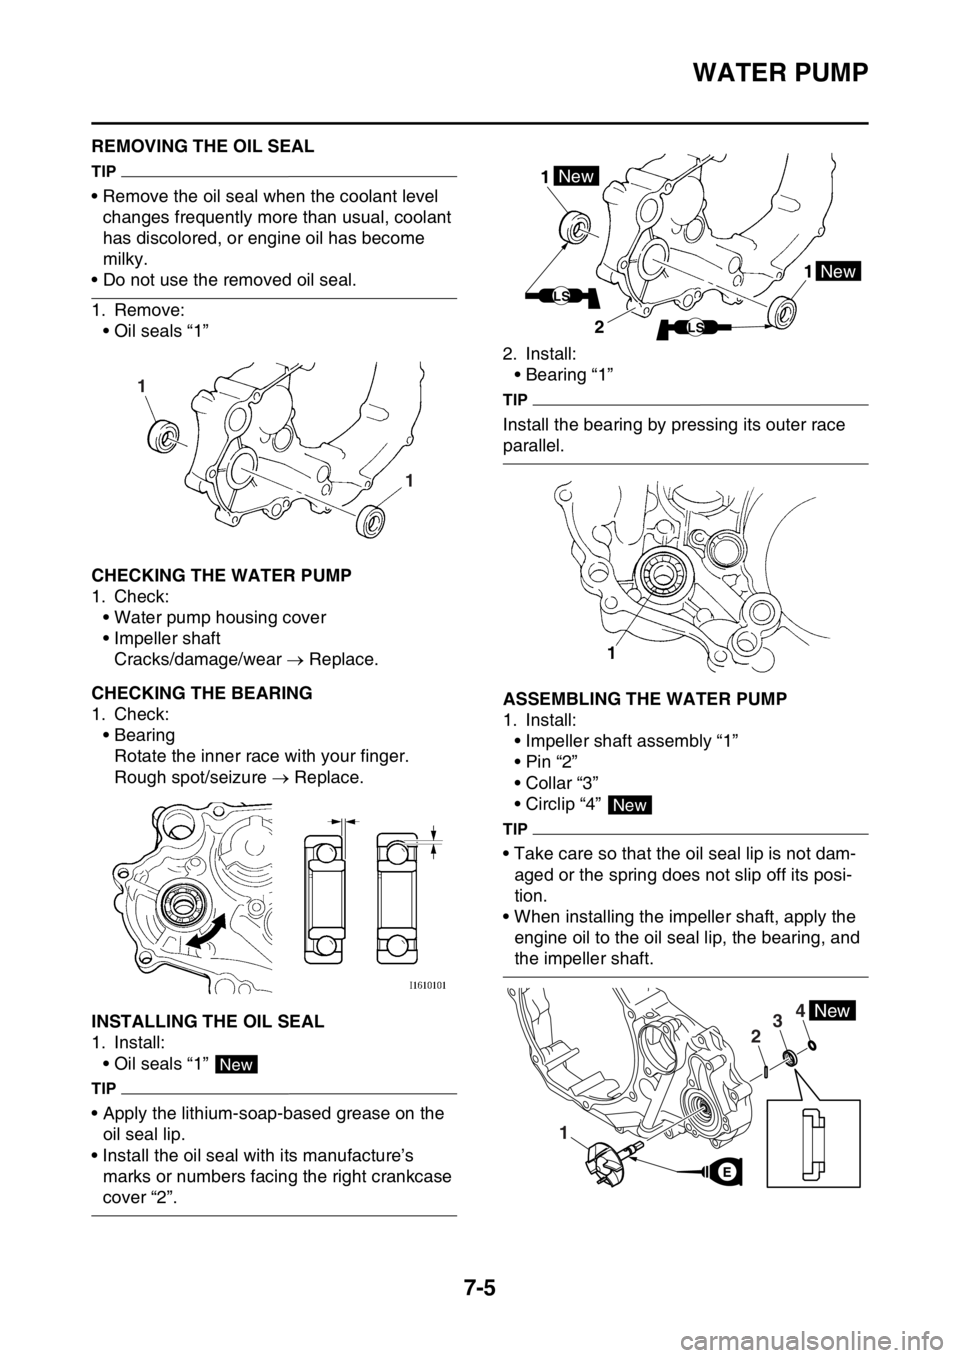
EAS2GC1333REMOVING THE OIL SEAL
TIP
• Remove the oil seal when the coolant level changes frequently more than usual, coolant
has discolored, or engine oil has become
milky.
• Do not use the removed oil seal.
1. Remove:• Oil seals “1”
EAS2GC1334CHECKING THE WATER PUMP
1. Check:
• Water pump housing cover
• Impeller shaftCracks/damage/wear Replace.
EAS2GC1335CHECKING THE BEARING
1. Check:
• BearingRotate the inner race with your finger.
Rough spot/seizure Replace.
EAS2GC1336INSTALLING THE OIL SEAL
1. Install:
• Oil seals “1”
TIP
• Apply the lithium-soap-based grease on the oil seal lip.
• Install the oil seal with its manufacture’s marks or numbers facing the right crankcase
cover “2”. 2. Install:
• Bearing “1”
TIP
Install the bearing by pressing its outer race
parallel.
EAS2GC1337ASSEMBLING THE WATER PUMP
1. Install:
• Impeller shaft assembly “1”
•Pin “2”
• Collar “3”
• Circlip “4”
TIP
• Take care so that the oil seal lip is not dam-aged or the spring does not slip off its posi-
tion.
• When installing the impeller shaft, apply the engine oil to the oil seal lip, the bearing, and
the impeller shaft.
1
1
New
1
1New
New
LS
LS2
New
4
1
23New
E
Page 318 of 426
FUEL TANK
8-1
EAS2GC1338
TIP
This section is intended for those who have basic knowledge and skill concerning the servicing of
Yamaha motorcycles (e.g., Yamaha dealers, serv ice engineers, etc.). Those who have little knowl-
edge and skill concerning servicing are requested not to undertake inspection, adjustment, disas-
sembly, or reassembly only by reference to this manual. It may lead to servicing trouble and
mechanical damage.
EAS2GC1339
FUEL TANK
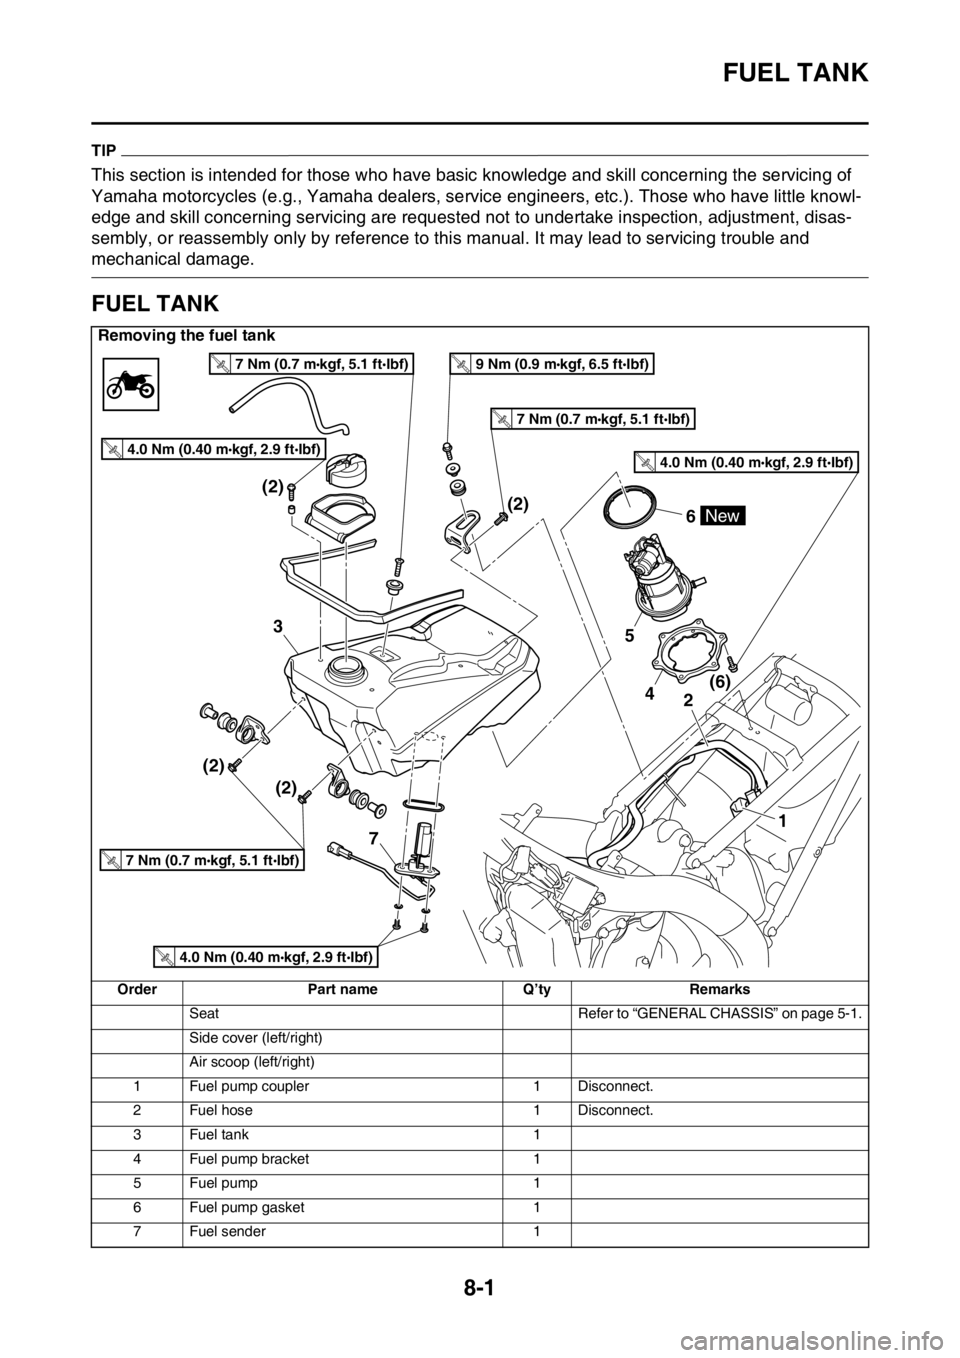
Removing the fuel tank
OrderPart name Q’tyRemarks
Seat Refer to “GENERAL CHASSIS” on page 5-1.
Side cover (left/right)
Air scoop (left/right)
1 Fuel pump coupler 1 Disconnect.
2 Fuel hose 1 Disconnect.
3Fuel tank 1
4 Fuel pump bracket 1
5 Fuel pump 1
6 Fuel pump gasket 1
7 Fuel sender 1
4(6)
(2)
(2)
(2) (2)2
5
6
3
1
New
4.0 Nm (0.40 m kgf, 2.9 ft Ibf)T.R.
7 Nm (0.7 m kgf, 5.1 ft Ibf)T.R.
7 Nm (0.7 m kgf, 5.1 ft Ibf)T.R.
7 Nm (0.7 m kgf, 5.1 ft Ibf)T.R.
9 Nm (0.9 m kgf, 6.5 ft Ibf)T.R.
4.0 Nm (0.40 m kgf, 2.9 ft Ibf)T.R.
4.0 Nm (0.40 m kgf, 2.9 ft Ibf)T.R.
7
Page 322 of 426
FUEL TANK
8-5
TIP
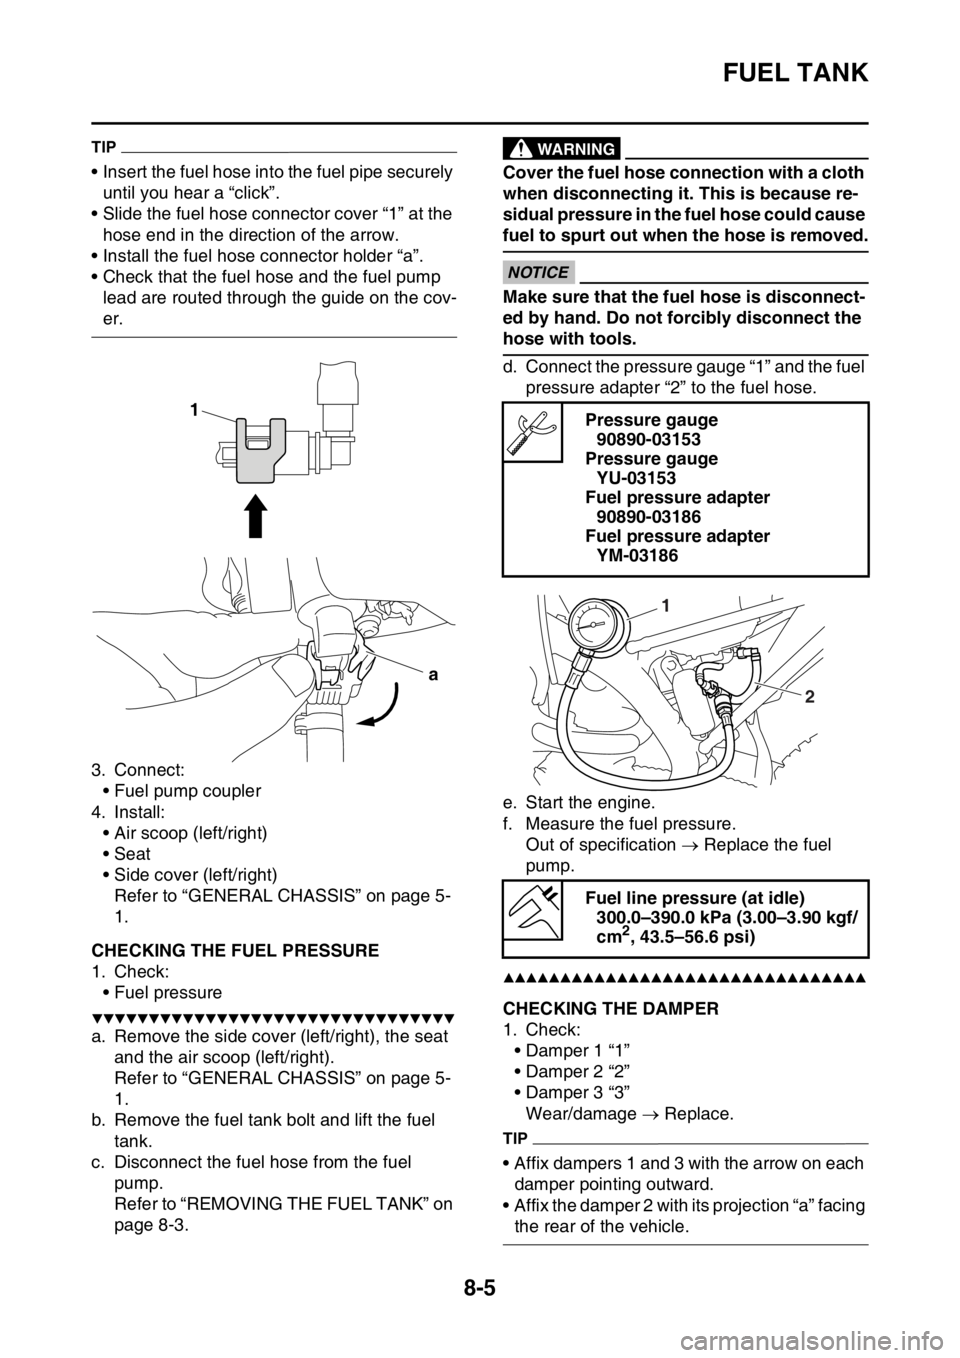
• Insert the fuel hose into the fuel pipe securely until you hear a “click”.
• Slide the fuel hose connector cover “1” at the hose end in the direction of the arrow.
• Install the fuel hose connector holder “a”.
• Check that the fuel hose and the fuel pump
lead are routed through the guide on the cov-
er.
3. Connect: • Fuel pump coupler
4. Install: • Air scoop (left/right)
• Seat
• Side cover (left/right)Refer to “GENERAL CHASSIS” on page 5-
1.
EAS2GC1348CHECKING THE FUEL PRESSURE
1. Check:• Fuel pressure
▼▼▼▼▼▼▼▼▼▼▼▼▼▼▼▼▼▼▼▼▼▼▼▼▼▼▼▼▼▼▼▼
a. Remove the side cover (left/right), the seat and the air scoop (left/right).
Refer to “GENERAL CHASSIS” on page 5-
1.
b. Remove the fuel tank bolt and lift the fuel
tank.
c. Disconnect the fuel hose from the fuel pump.
Refer to “REMOVING THE FUEL TANK” on
page 8-3.
EWA
WARNING
Cover the fuel hose connection with a cloth
when disconnecting it. This is because re-
sidual pressure in the fuel hose could cause
fuel to spurt out when the hose is removed.
ECA
NOTICE
Make sure that the fuel hose is disconnect-
ed by hand. Do not forcibly disconnect the
hose with tools.
d. Connect the pressure gauge “1” and the fuel pressure adapter “2” to the fuel hose.
e. Start the engine.
f. Measure the fuel pressure. Out of specification Replace the fuel
pump.
▲▲▲▲▲▲▲▲▲▲▲▲▲▲▲▲▲▲▲▲▲▲▲▲▲▲▲▲▲▲▲▲
EAS2GC1349CHECKING THE DAMPER
1. Check:
• Damper 1 “1”
• Damper 2 “2”
• Damper 3 “3”Wear/damage Replace.
TIP
• Affix dampers 1 and 3 with the arrow on each
damper pointing outward.
• Affix the damper 2 with its projection “a” facing
the rear of the vehicle.
1
a
Pressure gauge 90890-03153
Pressure gauge YU-03153
Fuel pressure adapter 90890-03186
Fuel pressure adapter YM-03186
Fuel line pressure (at idle) 300.0–390.0 kPa (3.00–3.90 kgf/
cm
2, 43.5–56.6 psi)
1
2
Page 324 of 426
THROTTLE BODY
8-7
EAS2GC1351
THROTTLE BODY
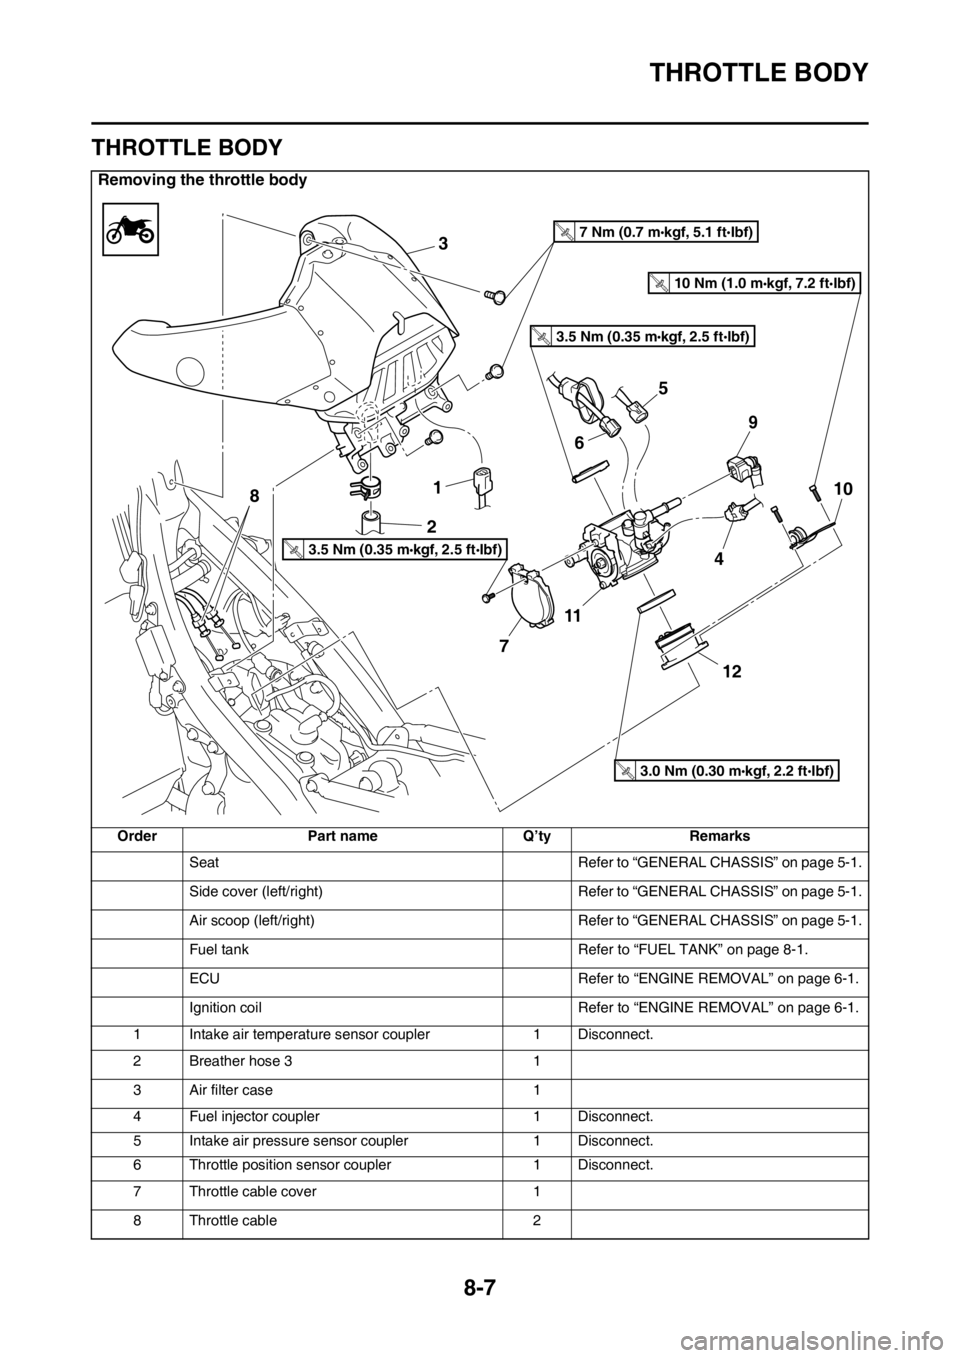
Removing the throttle body
OrderPart name Q’tyRemarks
Seat Refer to “GENERAL CHASSIS” on page 5-1.
Side cover (left/right) Refer to “GENERAL CHASSIS” on page 5-1.
Air scoop (left/right) Refer to “GENERAL CHASSIS” on page 5-1.
Fuel tank Refer to “FUEL TANK” on page 8-1.
ECU Refer to “ENGINE REMOVAL” on page 6-1.
Ignition coil Refer to “ENGINE REMOVAL” on page 6-1.
1 Intake air temperature sensor coupler 1 Disconnect.
2 Breather hose 3 1
3 Air filter case 1
4 Fuel injector coupler 1 Disconnect.
5 Intake air pressure sensor coupler 1 Disconnect.
6 Throttle position sensor coupler 1 Disconnect.
7 Throttle cable cover 1
8 Throttle cable 2
3
1
2
7
11
12
10
9
4
8
6
5
3.5 Nm (0.35 m kgf, 2.5 ft Ibf)T.R.
3.5 Nm (0.35 m kgf, 2.5 ft Ibf)T.R.
7 Nm (0.7 m kgf, 5.1 ft Ibf)T.R.
3.0 Nm (0.30 m kgf, 2.2 ft Ibf)T.R.
10 Nm (1.0 m kgf, 7.2 ft Ibf)T.R.
Page 327 of 426
THROTTLE BODY
8-10
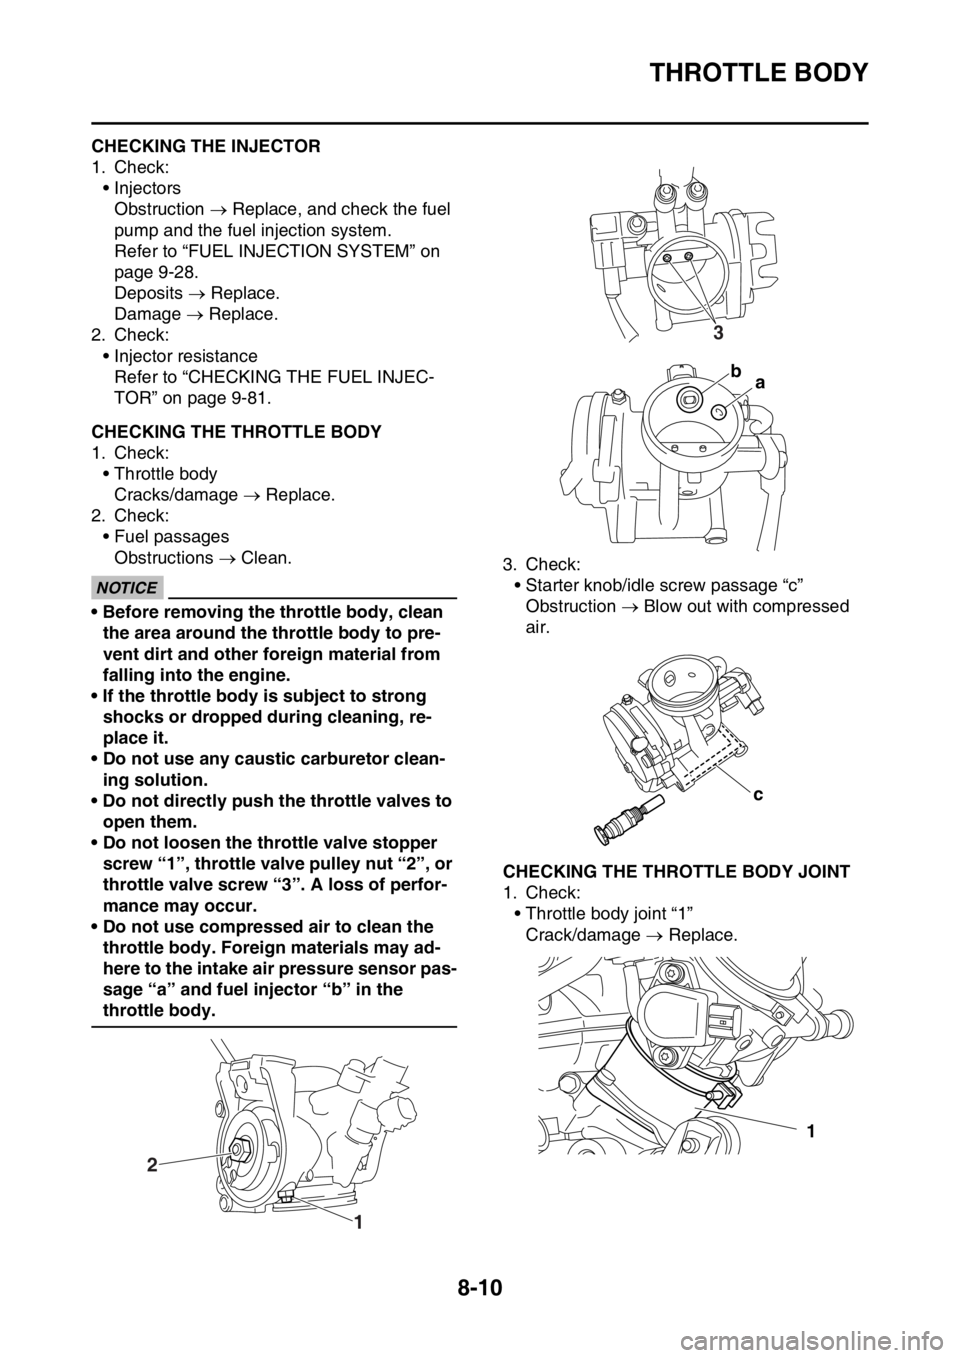
EAS2GC1352CHECKING THE INJECTOR
1. Check:• InjectorsObstruction Replace, and check the fuel
pump and the fuel injection system.
Refer to “FUEL INJECTION SYSTEM” on
page 9-28.
Deposits Replace.
Damage Replace.
2. Check:
• Injector resistanceRefer to “CHECKING THE FUEL INJEC-
TOR” on page 9-81.
EAS2GC1353CHECKING THE THROTTLE BODY
1. Check:• Throttle bodyCracks/damage Replace.
2. Check:
• Fuel passagesObstructions Clean.
ECA
NOTICE
• Before removing the throttle body, clean
the area around the throttle body to pre-
vent dirt and other foreign material from
falling into the engine.
• If the throttle body is subject to strong shocks or dropped during cleaning, re-
place it.
• Do not use any caustic carburetor clean- ing solution.
• Do not directly push the throttle valves to open them.
• Do not loosen the throttle valve stopper screw “1”, throttle valve pulley nut “2”, or
throttle valve screw “3”. A loss of perfor-
mance may occur.
• Do not use compressed air to clean the throttle body. Foreign materials may ad-
here to the intake air pressure sensor pas-
sage “a” and fuel injector “b” in the
throttle body. 3. Check:
• Starter knob/idle screw passage “c”Obstruction Blow out with compressed
air.
EAS2GC1354CHECKING THE THROTTLE BODY JOINT
1. Check: • Throttle body joint “1”Crack/damage Replace.
1
2
3
ba
c
1