YAMAHA XJ600S 2000 Owner's Guide
Manufacturer: YAMAHA, Model Year: 2000, Model line: XJ600S, Model: YAMAHA XJ600S 2000Pages: 101, PDF Size: 19.23 MB
Page 31 of 101
L
3-13
INSTRUMENT AND CONTROL FUNCTIONS
/Net/layout8/layout_G2/work/Imai_work/OM-PS/AA9156_XJ600SN-E6/English/E-3.frame
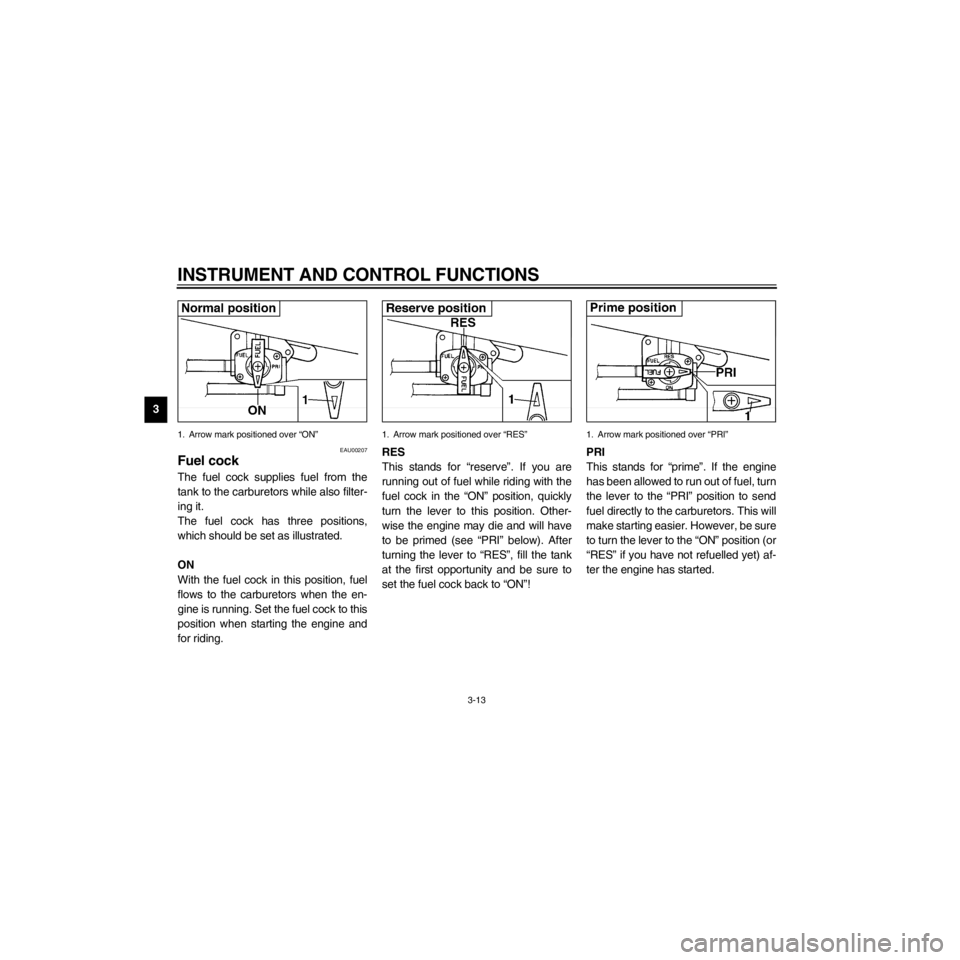
1. Arrow mark positioned over ÒONÓ
EAU00207
Fuel cock
The fuel cock supplies fuel from the
tank to the carburetors while also filter-
ing it.
The fuel cock has three positions,
which should be set as illustrated.
ON
With the fuel cock in this position, fuel
flows to the carburetors when the en-
gine is running. Set the fuel cock to this
position when starting the engine and
for riding.
1. Arrow mark positioned over ÒRESÓ
RES
This stands for ÒreserveÓ. If you are
running out of fuel while riding with the
fuel cock in the ÒONÓ position, quickly
turn the lever to this position. Other-
wise the engine may die and will have
to be primed (see ÒPRIÓ below). After
turning the lever to ÒRESÓ, fill the tank
at the first opportunity and be sure to
set the fuel cock back to ÒONÓ!
1. Arrow mark positioned over ÒPRIÓ
PRI
This stands for ÒprimeÓ. If the engine
has been allowed to run out of fuel, turn
the lever to the ÒPRIÓ position to send
fuel directly to the carburetors. This will
make starting easier. However, be sure
to turn the lever to the ÒONÓ position (or
ÒRESÓ if you have not refuelled yet) af-
ter the engine has started.
Page 32 of 101
R
3-14
INSTRUMENT AND CONTROL FUNCTIONS
/Net/layout8/layout_G2/work/Imai_work/OM-PS/AA9156_XJ600SN-E6/English/E-3.frame
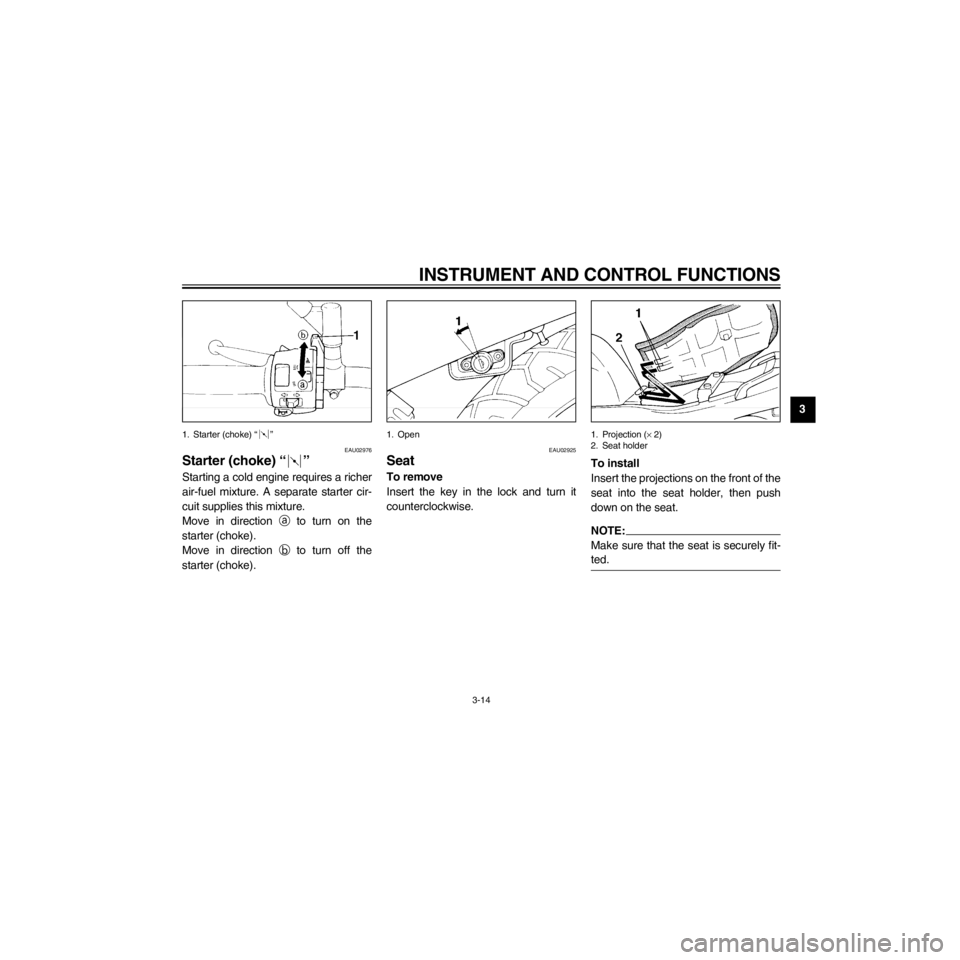
1. Starter (choke) Ò Ó
EAU02976
Starter (choke) Ò Ó
Starting a cold engine requires a richer
air-fuel mixture. A separate starter cir-
cuit supplies this mixture.
Move in direction a
to turn on the
starter (choke).
Move in direction b
to turn off the
starter (choke).
1. Open
EAU02925
Seat
To remove
Insert the key in the lock and turn it
counterclockwise.
1. Projection (´ 2)
2. Seat holder
To install
Insert the projections on the front of the
seat into the seat holder, then push
down on the seat.
NOTE:
Make sure that the seat is securely fit-
ted.
Page 33 of 101
L
3-15
INSTRUMENT AND CONTROL FUNCTIONS
/Net/layout8/layout_G2/work/Imai_work/OM-PS/AA9156_XJ600SN-E6/English/E-3.frame
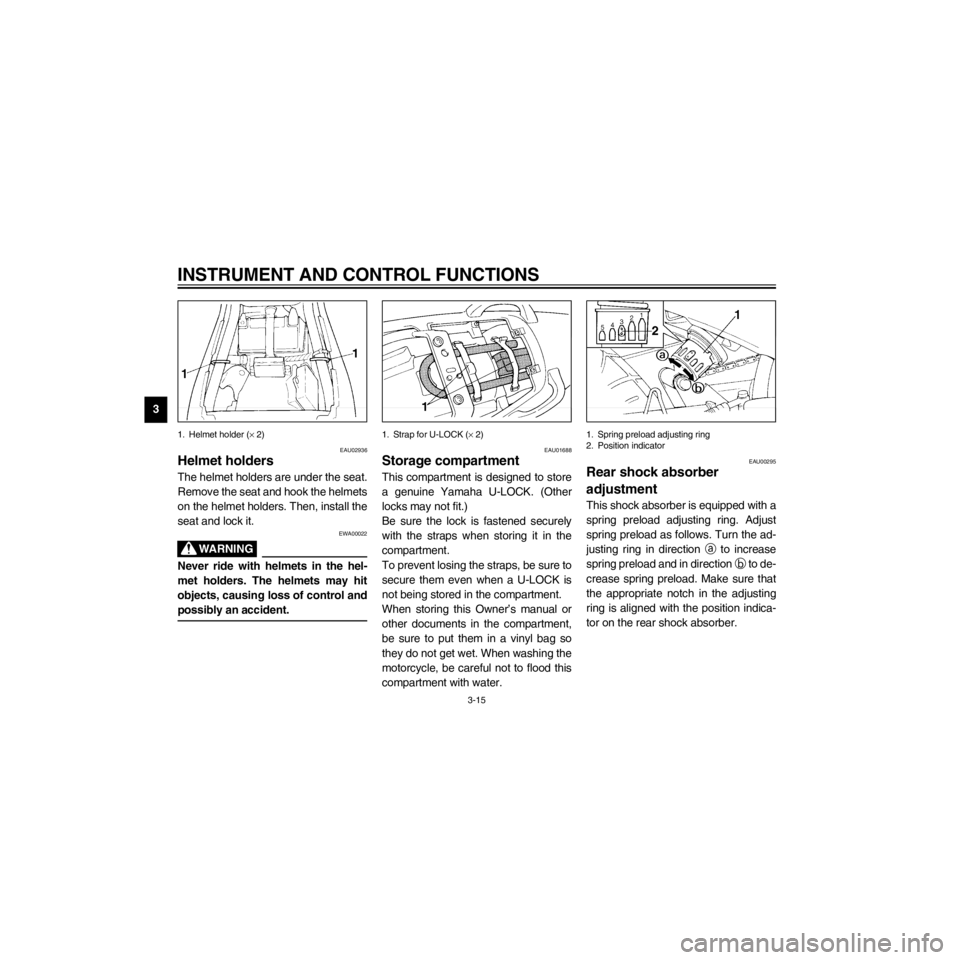
1. Helmet holder (´ 2)
EAU02936
Helmet holders
The helmet holders are under the seat.
Remove the seat and hook the helmets
on the helmet holders. Then, install the
seat and lock it.
EWA00022
Never ride with helmets in the hel-
met holders. The helmets may hit
objects, causing loss of control and
possibly an accident.
1. Strap for U-LOCK (´ 2)
EAU01688
Storage compartment
This compartment is designed to store
a genuine Yamaha U-LOCK. (Other
locks may not fit.)
Be sure the lock is fastened securely
with the straps when storing it in the
compartment.
To prevent losing the straps, be sure to
secure them even when a U-LOCK is
not being stored in the compartment.
When storing this OwnerÕs manual or
other documents in the compartment,
be sure to put them in a vinyl bag so
they do not get wet. When washing the
motorcycle, be careful not to flood this
compartment with water.
1. Spring preload adjusting ring
2. Position indicator
EAU00295
Rear shock absorber
adjustment
This shock absorber is equipped with a
spring preload adjusting ring. Adjust
spring preload as follows. Turn the ad-
justing ring in direction a
to increase
spring preload and in direction b
to de-
crease spring preload. Make sure that
the appropriate notch in the adjusting
ring is aligned with the position indica-
tor on the rear shock absorber.
Page 34 of 101
R
3-16
INSTRUMENT AND CONTROL FUNCTIONS
/Net/layout8/layout_G2/work/Imai_work/OM-PS/AA9156_XJ600SN-E6/English/E-3.frame
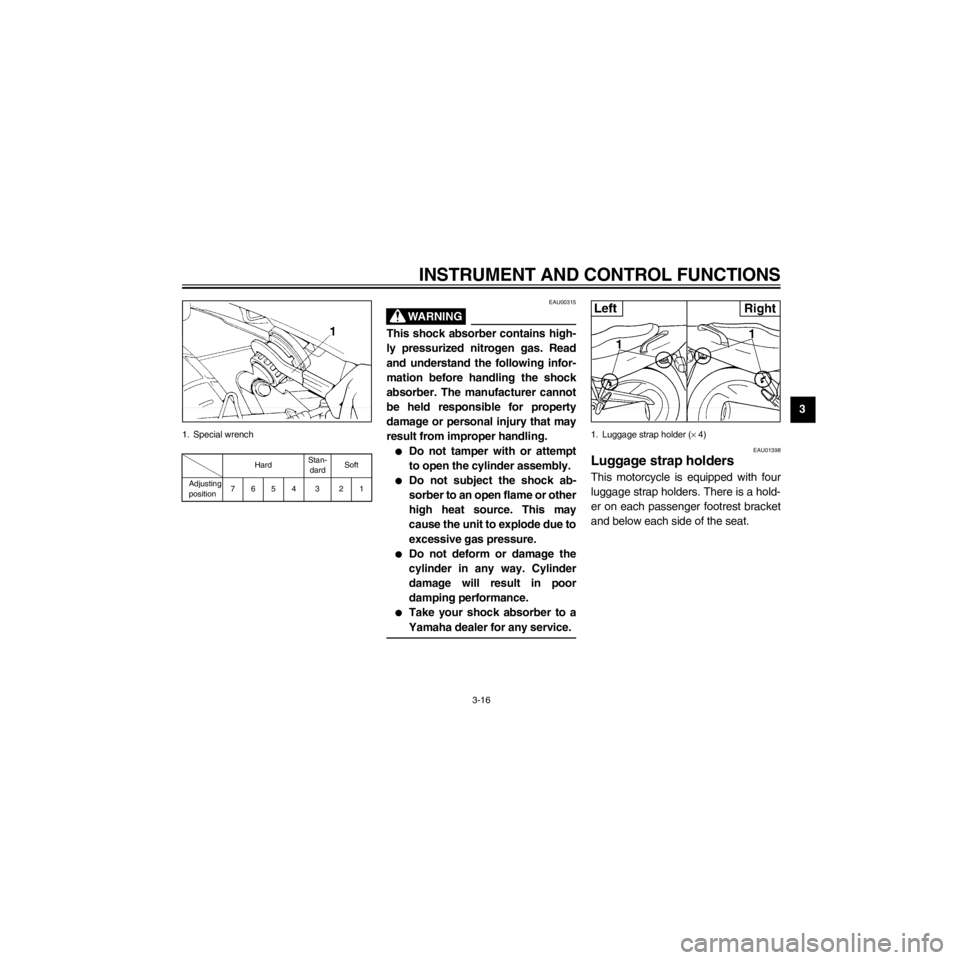
1. Special wrench
HardStan-
dardSoft
Adjusting
position7654 3 21
EAU00315
This shock absorber contains high-
ly pressurized nitrogen gas. Read
and understand the following infor-
mation before handling the shock
absorber. The manufacturer cannot
be held responsible for property
damage or personal injury that may
result from improper handling.
lDo not tamper with or attempt
to open the cylinder assembly.
lDo not subject the shock ab-
sorber to an open flame or other
high heat source. This may
cause the unit to explode due to
excessive gas pressure.
lDo not deform or damage the
cylinder in any way. Cylinder
damage will result in poor
damping performance.
lTake your shock absorber to a
Yamaha dealer for any service.
1. Luggage strap holder (´4)
EAU01398
Luggage strap holders
This motorcycle is equipped with four
luggage strap holders. There is a hold-
er on each passenger footrest bracket
and below each side of the seat.
Page 35 of 101
L
3-17
INSTRUMENT AND CONTROL FUNCTIONS
/Net/layout8/layout_G2/work/Imai_work/OM-PS/AA9156_XJ600SN-E6/English/E-3.frame
EAU00330
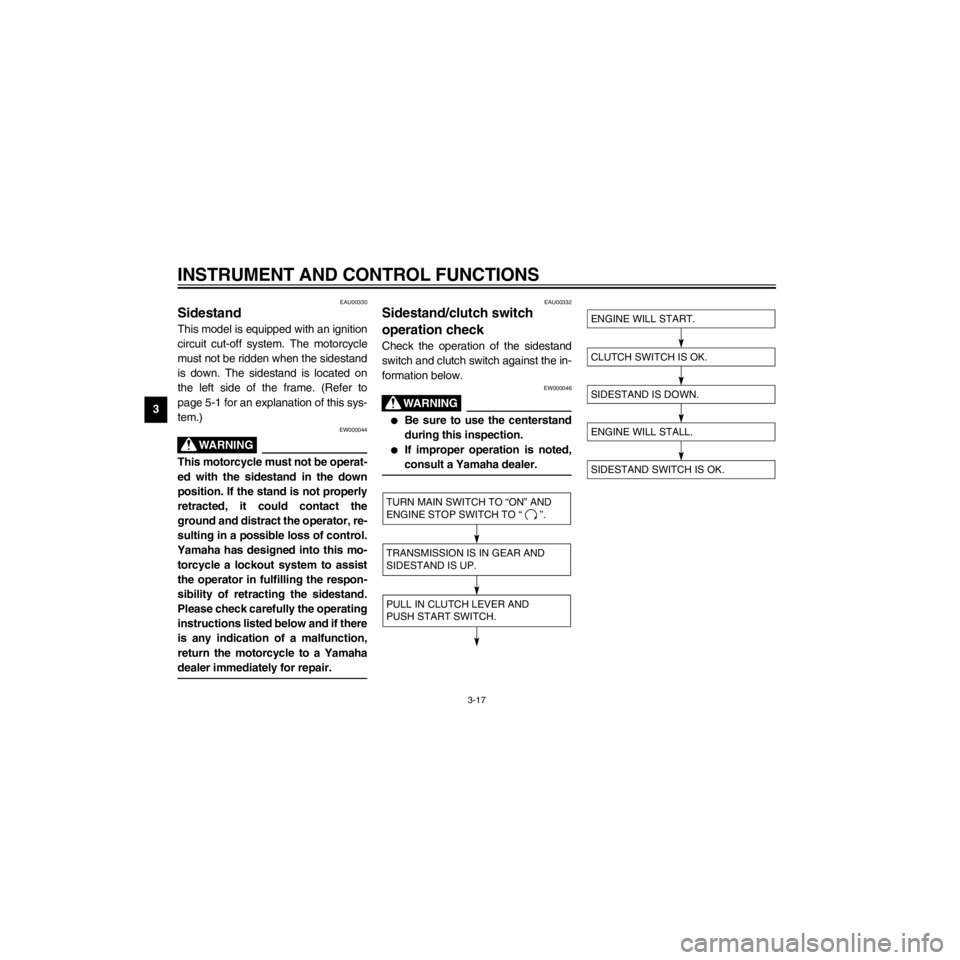
Sidestand
This model is equipped with an ignition
circuit cut-off system. The motorcycle
must not be ridden when the sidestand
is down. The sidestand is located on
the left side of the frame. (Refer to
page 5-1 for an explanation of this sys-
tem.)
EW000044
This motorcycle must not be operat-
ed with the sidestand in the down
position. If the stand is not properly
retracted, it could contact the
ground and distract the operator, re-
sulting in a possible loss of control.
Yamaha has designed into this mo-
torcycle a lockout system to assist
the operator in fulfilling the respon-
sibility of retracting the sidestand.
Please check carefully the operating
instructions listed below and if there
is any indication of a malfunction,
return the motorcycle to a Yamaha
dealer immediately for repair.
EAU00332
Sidestand/clutch switch
operation check
Check the operation of the sidestand
switch and clutch switch against the in-
formation below.
EW000046
lBe sure to use the centerstand
during this inspection.
lIf improper operation is noted,
consult a Yamaha dealer.
TURN MAIN SWITCH TO ÒONÓ AND
ENGINE STOP SWITCH TO Ò Ó.
TRANSMISSION IS IN GEAR AND
SIDESTAND IS UP.
PULL IN CLUTCH LEVER AND
PUSH START SWITCH.
ENGINE WILL START.
SIDESTAND IS DOWN.
ENGINE WILL STALL.
SIDESTAND SWITCH IS OK.
CLUTCH SWITCH IS OK.
Page 36 of 101
R
PRE-OPERATION CHECKS
/Net/layout8/layout_G2/work/Imai_work/OM-PS/AA9156_XJ600SN-E6/English/E-4TOC.-
Pre-operation check list...................................................................... 4-1
Page 37 of 101
L
4-1
PRE-OPERATION CHECKS
/Net/layout8/layout_G2/work/Imai_work/OM-PS/AA9156_XJ600SN-E6/English/E-4.frame
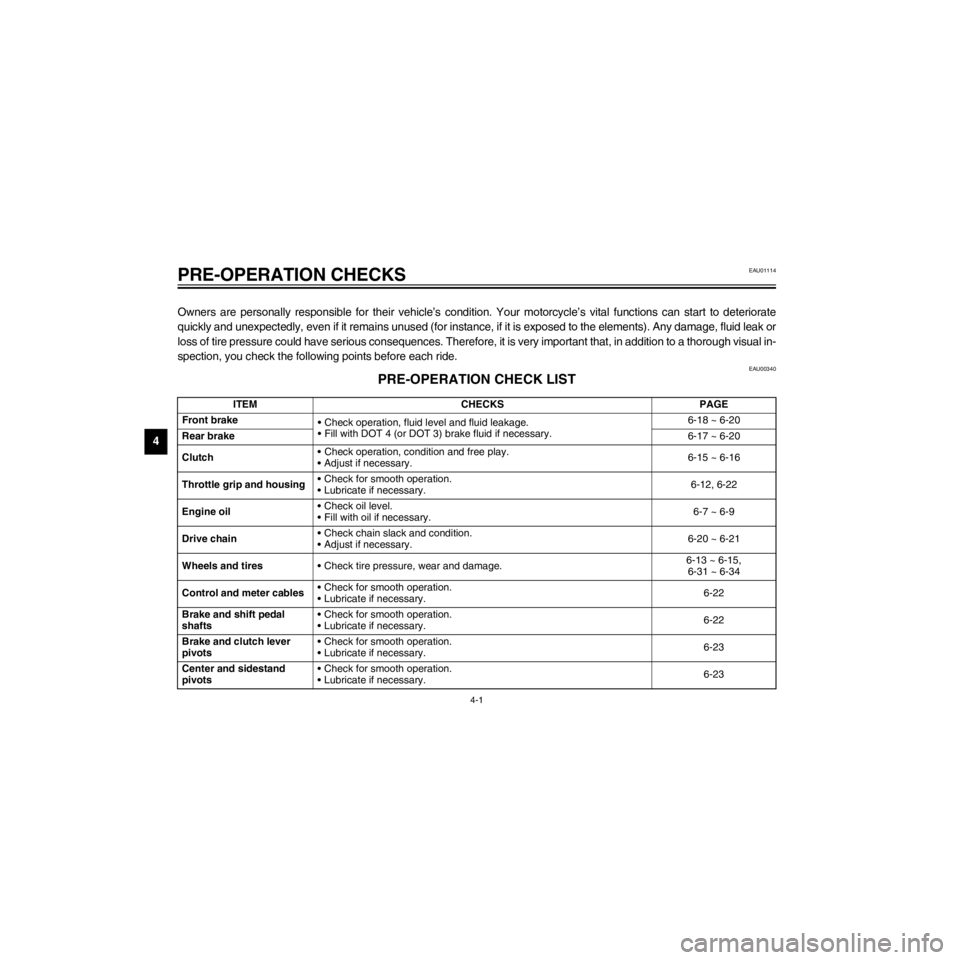
Owners are personally responsible for their vehicleÕs condition. Your motorcycleÕs vital functions can start to deteriorate
quickly and unexpectedly, even if it remains unused (for instance, if it is exposed to the elements). Any damage, fluid leak or
loss of tire pressure could have serious consequences. Therefore, it is very important that, in addition to a thorough visual in-
spection, you check the following points before each ride.
EAU00340
PRE-OPERATION CHECK LIST
ITEM CHECKS PAGE
Front brake
¥ Check operation, fluid level and fluid leakage.
¥ Fill with DOT 4 (or DOT 3) brake fluid if necessary.6-18 ~ 6-20
Rear brake6-17 ~ 6-20
Clutch¥ Check operation, condition and free play.
¥ Adjust if necessary.6-15 ~ 6-16
Throttle grip and housing¥ Check for smooth operation.
¥ Lubricate if necessary.6-12, 6-22
Engine oil¥ Check oil level.
¥ Fill with oil if necessary.6-7 ~ 6-9
Drive chain¥ Check chain slack and condition.
¥ Adjust if necessary.6-20 ~ 6-21
Wheels and tires¥ Check tire pressure, wear and damage.6-13 ~ 6-15,
6-31 ~ 6-34
Control and meter cables¥ Check for smooth operation.
¥ Lubricate if necessary.6-22
Brake and shift pedal
shafts¥ Check for smooth operation.
¥ Lubricate if necessary.6-22
Brake and clutch lever
pivots¥ Check for smooth operation.
¥ Lubricate if necessary.6-23
Center and sidestand
pivots¥ Check for smooth operation.
¥ Lubricate if necessary.6-23
EAU01114
Page 38 of 101
R
4-2
PRE-OPERATION CHECKS
/Net/layout8/layout_G2/work/Imai_work/OM-PS/AA9156_XJ600SN-E6/English/E-4.frame
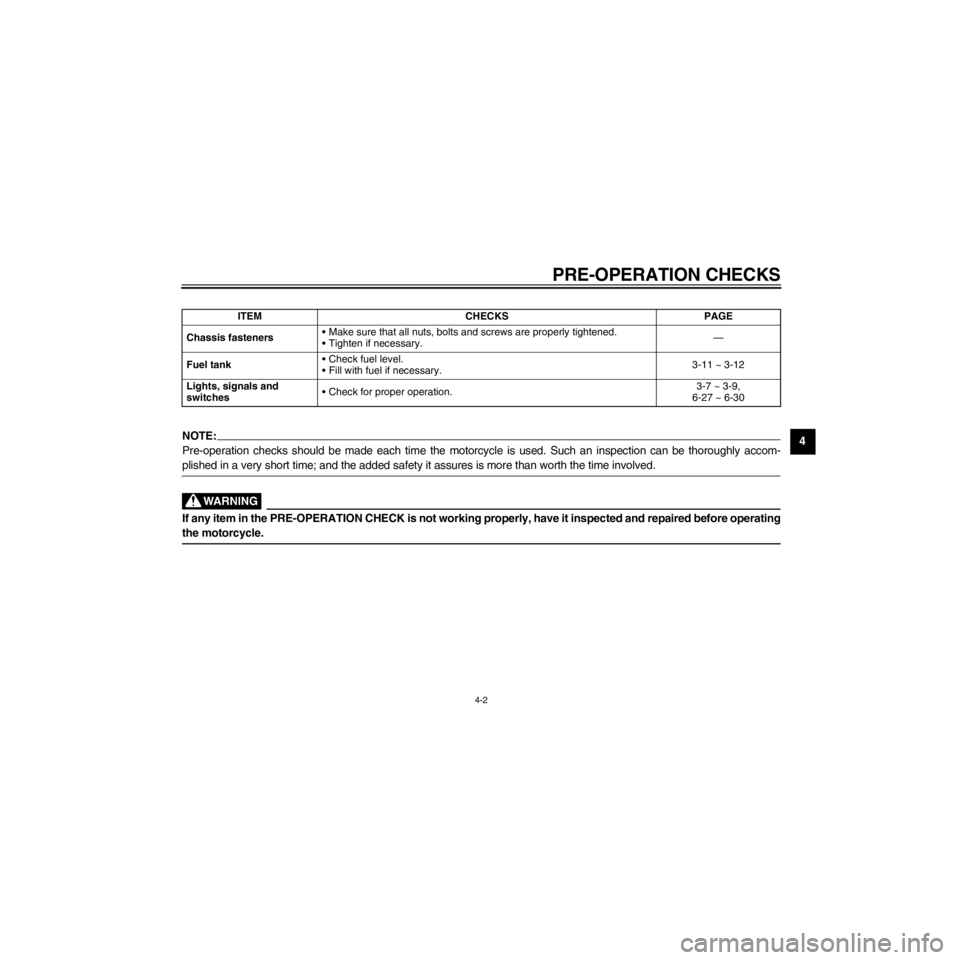
NOTE:
Pre-operation checks should be made each time the motorcycle is used. Such an inspection can be thoroughly accom-
plished in a very short time; and the added safety it assures is more than worth the time involved.
If any item in the PRE-OPERATION CHECK is not working properly, have it inspected and repaired before operating
the motorcycle.
Chassis fasteners¥ Make sure that all nuts, bolts and screws are properly tightened.
¥ Tighten if necessary.Ñ
Fuel tank¥ Check fuel level.
¥ Fill with fuel if necessary.3-11 ~ 3-12
Lights, signals and
switches¥ Check for proper operation.3-7 ~ 3-9,
6-27 ~ 6-30 ITEM CHECKS PAGE
Page 39 of 101

/Net/layout8/layout_G2/work/Imai_work/OM-PS/AA9156_XJ600SN-E6/English/E-4.frame
Page 40 of 101
R
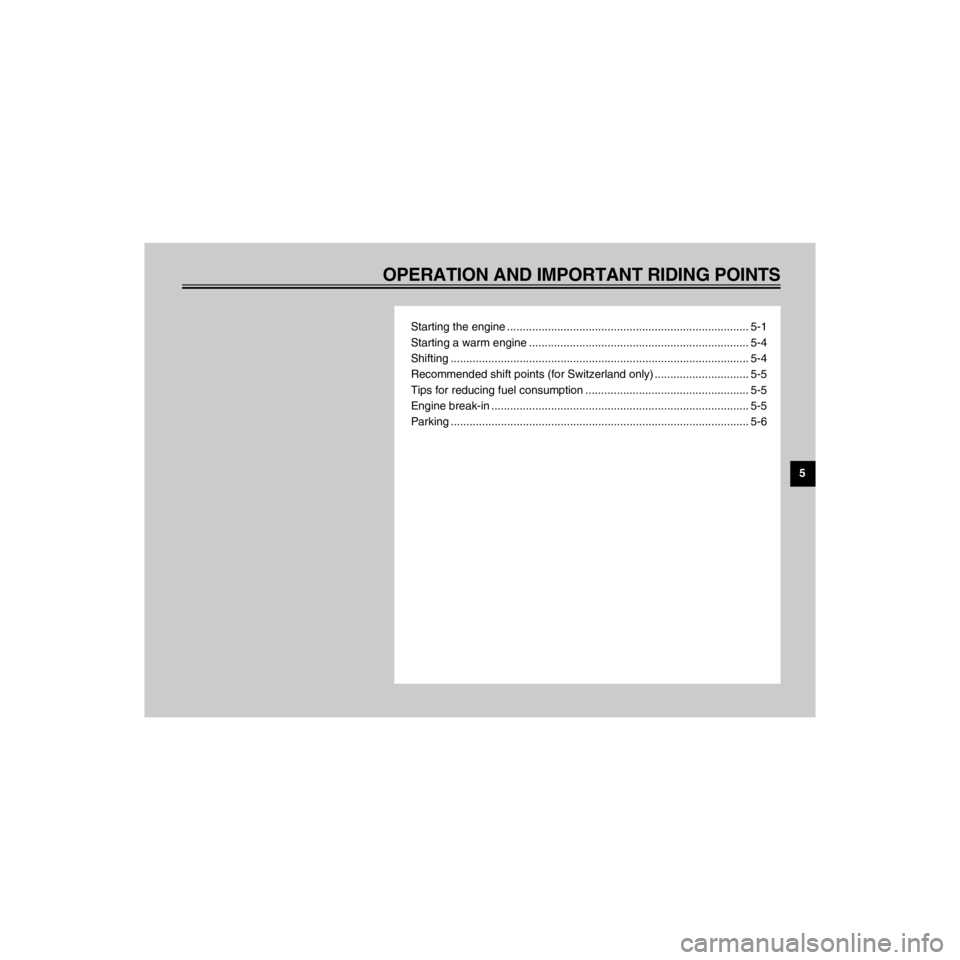
OPERATION AND IMPORTANT RIDING POINTS
/Net/layout8/layout_G2/work/Imai_work/OM-PS/AA9156_XJ600SN-E6/English/E-5TOC.-
Starting the engine ............................................................................. 5-1
Starting a warm engine ...................................................................... 5-4
Shifting ............................................................................................... 5-4
Recommended shift points (for Switzerland only) .............................. 5-5
Tips for reducing fuel consumption .................................................... 5-5
Engine break-in .................................................................................. 5-5
Parking ............................................................................................... 5-6