YAMAHA XJ600S 2000 Manual Online
Manufacturer: YAMAHA, Model Year: 2000, Model line: XJ600S, Model: YAMAHA XJ600S 2000Pages: 101, PDF Size: 19.23 MB
Page 81 of 101
L
6-33
PERIODIC MAINTENANCE AND MINOR REPAIR
/Net/layout8/layout_G2/work/Imai_work/OM-PS/AA9156_XJ600SN-E6/English/E-6.frame
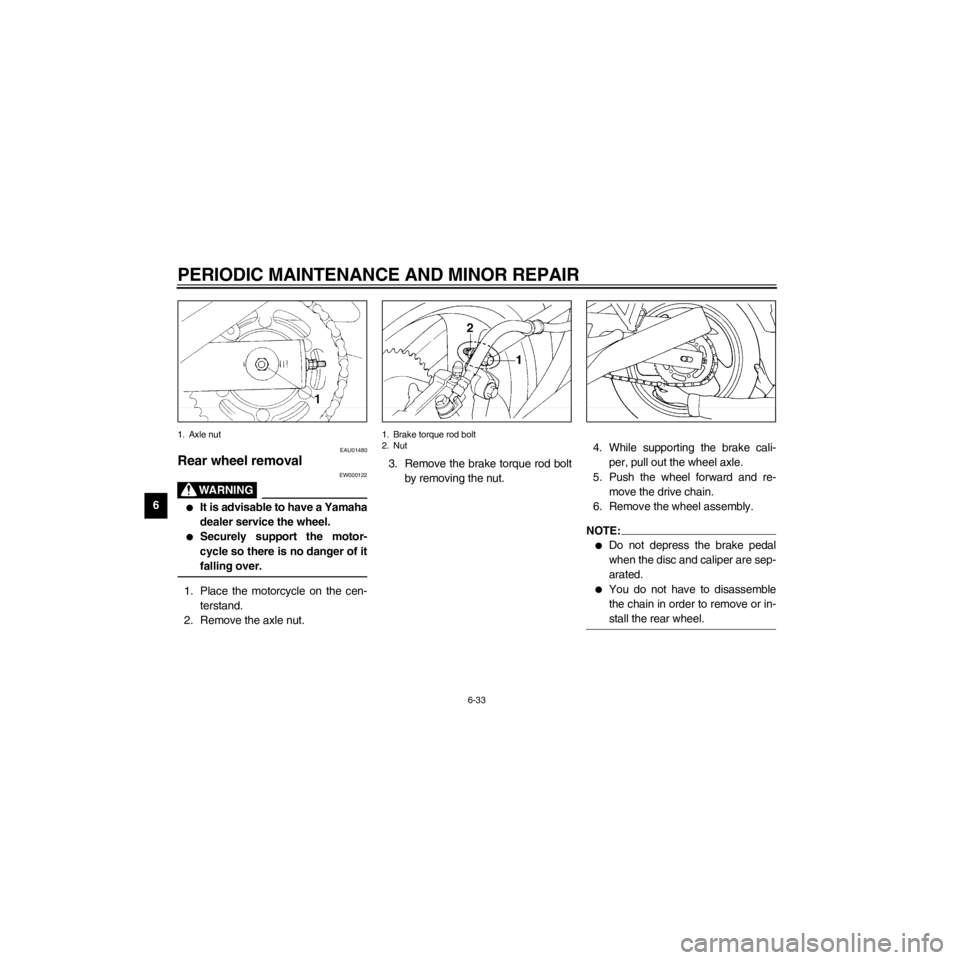
1. Axle nut
EAU01480
Rear wheel removal
EW000122
lIt is advisable to have a Yamaha
dealer service the wheel.
lSecurely support the motor-
cycle so there is no danger of it
falling over.
1. Place the motorcycle on the cen-
terstand.
2. Remove the axle nut.
1. Brake torque rod bolt
2. Nut
3. Remove the brake torque rod bolt
by removing the nut.
4. While supporting the brake cali-
per, pull out the wheel axle.
5. Push the wheel forward and re-
move the drive chain.
6. Remove the wheel assembly.
NOTE:
lDo not depress the brake pedal
when the disc and caliper are sep-
arated.
lYou do not have to disassemble
the chain in order to remove or in-
stall the rear wheel.
Page 82 of 101

R
6-34
PERIODIC MAINTENANCE AND MINOR REPAIR
/Net/layout8/layout_G2/work/Imai_work/OM-PS/AA9156_XJ600SN-E6/English/E-6.frame
EAU01468
Rear wheel installation
1. Install the wheel assembly and in-
sert the axle.
2. Install and adjust the drive chain.
(See page 6-20 for details about
adjusting the drive chain slack.)
3. Install the axle nut.
4. Install the caliper and caliper bolts.
Make sure there is enough gap
between the brake pads before in-
stalling the caliper onto the brake
disc.
5. Take the motorcycle off the cen-
terstand.
6. Tighten the axle nut and brake
torque rod bolt to the specified
torques.
Tightening torque:
Axle nut:
105 Nm (10.5 mákg)
Brake torque rod bolt:
23 Nm (2.3 mákg)
EAU01008
Troubleshooting
Although Yamaha motorcycles receive
a rigid inspection before shipment from
the factory, trouble may occur during
operation.
Any problem in the fuel, compression,
or ignition systems can cause poor
starting and loss of power. The trouble-
shooting chart describes a quick, easy
procedure for making checks.
If your motorcycle requires any repair,
bring it to a Yamaha dealer. The skilled
technicians at a Yamaha dealership
have the tools, experience, and know-
how to properly service your motor-
cycle. Use only genuine Yamaha parts
on your motorcycle. Imitation parts may
look like Yamaha parts, but they are of-
ten inferior. Consequently, they have a
shorter service life and can lead to ex-
pensive repair bills.
Page 83 of 101

L
6-35
PERIODIC MAINTENANCE AND MINOR REPAIR
/Net/layout8/layout_G2/work/Imai_work/OM-PS/AA9156_XJ600SN-E6/English/E-6.frame
EAU01297
Troubleshooting chart
EW000125
Never check the fuel system while smoking or in the vicinity of an open flame.
Check if there is fuel
in the fuel tank.
1. FuelEnough fuel.
No fuel.Go to compression check.
Supply fuel.
Use the electric starter.
2. CompressionThere is compression.
No compression.Go to ignition check.
Ask a Yamaha dealer to
inspect.
Remove spark
plugs and
check electrodes.
3. IgnitionWet.
Dry.Wipe clean with dry cloth and correct
spark gap or replace spark plugs.
Ask a Yamaha dealer to inspect.
Engine doesnÕt start, go to battery
check.
Open throttle half-way and start
the engine.
Use the electric starter.
4. BatteryEngine turns over
quickly.
Engine turns over
slowly.Battery good.
Check connections or
recharge.
Engine doesnÕt start, ask a Yamaha
dealer to inspect.
Engine doesnÕt start, go to compression check.
Page 84 of 101
R
MOTORCYCLE CARE AND STORAGE
/Net/layout8/layout_G2/work/Imai_work/OM-PS/AA9156_XJ600SN-E6/English/E-7TOC.-
Care ................................................................................................... 7-1
Storage............................................................................................... 7-4
Page 85 of 101
L
7-1
MOTORCYCLE CARE AND STORAGE
/Net/layout8/layout_G2/work/Imai_work/OM-PS/AA9156_XJ600SN-E6/English/E-7.frame
Care
The exposure of its technology makes
a motorcycle charming but also vul-
nerable. Although high-quality compo-
nents are used, they are not all rust-
resistant. While a rusty exhaust pipe
may remain unnoticed on a car, it
does look unattractive on a motor-
cycle. Frequent and proper care, how-
ever, will keep your motorcycle
looking good, extend its life and main-
tain its performance. Moreover, the
warranty states that the vehicle must
be properly taken care of. For all these
reasons, it is recommended that you
observe the following cleaning and
storing precautions.Before cleaning
1. Cover up the muffler outlets with
plastic bags.
2. Make sure that all caps and covers
as well as all electrical couplers
and connectors, including the
spark plug caps, are tightly in-
stalled.
3. Remove extremely stubborn dirt,
like oil burnt onto the crankcase,
with a degreasing agent and a
brush, but never apply such prod-
ucts onto seals, gaskets, sprock-
ets, the drive chain and wheel
axles. Always rinse the dirt and
degreaser off with water.CleaningAfter normal use
Remove dirt with warm water, a neutral
detergent and a soft clean sponge,
then rinse with plenty of clean water.
Use a tooth or bottle brush for hard-to-
reach parts. Tougher dirt and insects
will come off more easily if the area is
covered with a wet cloth for a few min-
utes before cleaning.
EAU01517
Page 86 of 101
R
7-2
MOTORCYCLE CARE AND STORAGE
/Net/layout8/layout_G2/work/Imai_work/OM-PS/AA9156_XJ600SN-E6/English/E-7.frame
ECA00010
CAUTION:
lAvoid using strong acidic wheel
cleaners, especially on spoked
wheels. If you do use such
products for hard-to-remove
dirt, do not leave it on any long-
er than instructed, then thor-
oughly rinse it off with water,
immediately dry the area and
apply a corrosion protection
spray.
lImproper cleaning can damage
windshields, cowlings, panels
and other plastic parts. Use
only a soft, clean cloth or
sponge with mild detergent and
water to clean plastic.
lDo not use any harsh chemical
products on plastic parts. Be
sure to avoid using cloths or
sponges which have been in
contact with strong or abrasive
cleaning products, solvent or
thinner, fuel (gasoline), rust re-
movers or inhibitors, brake flu-
id, antifreeze or electrolyte.
lDo not use high-pressure wash-
ers or steam-jet cleaners since
they cause water seepage and
deterioration in the following ar-
eas: seals (of wheel bearings,
swingarm bearings, forks and
brakes), electric components
(couplers, connectors, instru-
ments, switches and lights),
breather hoses and vents.
lFor motorcycles equipped with
a windshield: Do not use strong
cleaners or hard sponges as
they will cause dulling or
scratching. Some cleaning
compounds for plastic may
leave scratches on the wind-
shield. Test the product on a
small hidden part of the wind-
shield to make sure they do not
leave any marks. If the wind-
shield is scratched, use a quali-
ty plastic polishing compound
after washing.
After riding in the rain, near the sea or
on salt-sprayed roads
Since sea salt or salt sprayed on the
roads in the winter are extremely corro-
sive in combination with water, carry
out the following steps after each ride
in the rain, near the sea or on salt-
sprayed roads. (Salt sprayed in the
winter may remain on the roads well
into spring.)
Page 87 of 101
L
7-3
MOTORCYCLE CARE AND STORAGE
/Net/layout8/layout_G2/work/Imai_work/OM-PS/AA9156_XJ600SN-E6/English/E-7.frame
1. Clean your motorcycle with cold
water and soap after the engine
has cooled down.
ECA00012
CAUTION:
Do not use warm water since it in-
creases the corrosive action of the
salt.
2. Be sure to apply a corrosion pro-
tection spray on all (even chrome-
and nickel-plated) metal surfaces
to prevent corrosion.After cleaning
1. Dry the motorcycle with a chamois
or an absorbing cloth.
2. Immediately dry the drive chain
and lubricate it to prevent it from
rusting.
3. Use a chrome polish to shine
chrome, aluminum and stainless-
steel parts, including the exhaust
system. (Even the thermally in-
duced discoloring of stainless-
steel exhaust systems can be re-
moved through polishing.)
4. To prevent corrosion, it is recom-
mended to apply a corrosion pro-
tection spray on all (even chrome-
and nickel-plated) metal surfaces.
5. Use spray oil as a universal clean-
er to remove any remaining dirt.
6. Touch up minor paint damage
caused by stones, etc.
7. Wax all painted surfaces.
8. Let the motorcycle dry completely
before storing it or covering it.
EWA00001
Make sure that there is no oil or wax
on the brakes and tires. If neces-
sary, clean the brake discs and lin-
ings with a regular brake disc
cleaner or acetone, and wash the
tires with warm water and mild soap.
Then, carefully test the motorcycle
for its braking performance and cor-
nering behavior.
Page 88 of 101
R
7-4
MOTORCYCLE CARE AND STORAGE
/Net/layout8/layout_G2/work/Imai_work/OM-PS/AA9156_XJ600SN-E6/English/E-7.frame
ECA00013
CAUTION:
lApply spray oil and wax spar-
ingly and wipe off any excess.
lNever apply oil or wax on rub-
ber and plastic parts, but treat
them with a suitable care prod-
uct.
lAvoid using abrasive polishing
compounds as they wear away
the paint.
NOTE:
Consult a Yamaha dealer for advice on
what products to use.
Storage
Short-term
Always store your motorcycle in a cool,
dry place and, if necessary, protect it
against dust with a porous cover.
ECA00014
CAUTION:
lStoring the motorcycle in a
poorly ventilated room or cov-
ering it with a tarp while it is still
wet will allow water and humidi-
ty to seep in and cause rust.
lTo prevent corrosion, avoid
damp cellars, stables (because
of the presence of ammonia)
and areas where strong chemi-
cals are stored.Long-term
Before storing your motorcycle for sev-
eral months:
1. Follow all the instructions in the
ÒCareÓ section of this chapter.
2. Drain the carburetor float cham-
bers by loosening the drain bolts;
this will prevent fuel deposits from
building up. Pour the drained fuel
into the fuel tank.
3. Only for motorcycles equipped
with a fuel cock which has an
ÒOFFÓ position: Turn the fuel cock
to ÒOFFÓ.
4. Fill up the fuel tank and add fuel
stabilizer (if available) to prevent
the fuel tank from rusting and the
fuel from deteriorating.
5. Perform the following steps to pro-
tect the cylinders, piston rings, etc.
from corrosion.
a. Remove the spark plug caps and
spark plugs.
b. Pour a teaspoonful of engine oil
into each spark plug bore.
Page 89 of 101
L
7-5
MOTORCYCLE CARE AND STORAGE
/Net/layout8/layout_G2/work/Imai_work/OM-PS/AA9156_XJ600SN-E6/English/E-7.frame
c. Install the spark plug caps onto the
spark plugs and place the spark
plugs on the cylinder head so that
the electrodes are grounded. (This
will limit sparking during the next
step.)
d. Turn the engine over several times
with the starter. (This will coat the
cylinder walls with oil.)
e. Remove the spark plug caps from
the spark plugs, install the spark
plugs and then the spark plug
caps.
EWA00003
When turning the engine over, be
sure to ground the spark plug elec-
trodes to prevent damage or injury
from sparking.
6. Lubricate all control cables and
the pivoting points of all levers and
pedals as well as of the side-
stand/centerstand.7. Check and, if necessary, correct
the tire air pressure, then raise the
motorcycle so that both of its
wheels are off the ground. Alterna-
tively, turn the wheels a little every
month in order to prevent the tires
from becoming degraded in one
spot.
8. Cover up the muffler outlets with
plastic bags to prevent moisture
from entering.
9. Remove the battery and fully
charge it. Store it in a cool, dry
place and recharge it once a
month. Do not store the battery in
an excessively cold or warm place
(less than 0ûC or more than 30ûC).
For more information, see ÒBattery
storageÓ in the chapter ÒPERIOD-
IC MAINTENANCE AND MINOR
REPAIRSÓ.
NOTE:
Make any necessary repairs before
storing the motorcycle.
Page 90 of 101
R
SPECIFICATIONS
/Net/layout8/layout_G2/work/Imai_work/OM-PS/AA9156_XJ600SN-E6/English/E-8TOC.-
Specifications ..................................................................................... 8-1
HOW TO USE THE CONVERSION TABLE ...................................... 8-5