fuse YAMAHA XJR 1300 2016 Owners Manual
[x] Cancel search | Manufacturer: YAMAHA, Model Year: 2016, Model line: XJR 1300, Model: YAMAHA XJR 1300 2016Pages: 98, PDF Size: 2.59 MB
Page 6 of 98

Table of contentsSafety information ............................ 1-1
Description ....................................... 2-1
Left view ......................................... 2-1
Right view ....................................... 2-2
Controls and instruments ............... 2-3
Instrument an d control functions ... 3-1
Immobilizer system......................... 3-1
Main switch/steering lock............... 3-2
Indicator lights and warning lights............................................ 3-4
Speedometer .................................. 3-5
Tachometer .................................... 3-5
Multi-function display ..................... 3-6
Handlebar switches ........................ 3-9
Clutch lever .................................. 3-10
Shift pedal .................................... 3-11
Brake lever.................................... 3-11
Brake pedal .................................. 3-12
Fuel tank cap ................................ 3-12
Fuel ............................................... 3-13
Fuel tank breather hose and overflow hose ............................ 3-14
Catalytic converters ..................... 3-14
Seat .............................................. 3-15
Adjusting the front fork ................. 3-16
Adjusting the shock absorber assembly ................................... 3-18
Luggage strap holders ................. 3-20
EXUP system ................................ 3-21 Sidestand ...................................... 3-21
Ignition circuit cut-off system ....... 3-22
For your safety – pre-operation
checks ............................................... 4-1
Operation an d important ri din g
points ................................................. 5-1
Starting the engine .......................... 5-1
Shifting ............................................ 5-2
Tips for reducing fuel consumption ................................ 5-3
Engine break-in ............................... 5-3
Parking ............................................ 5-4
Perio dic maintenance an d
a d justment ........................................ 6-1
Owner’s tool kit ............................... 6-2
Periodic maintenance chart for the emission control system .............. 6-3
General maintenance and lubrication chart ........................... 6-4
Removing and installing panels ...... 6-8
Checking the spark plugs ............... 6-9
Engine oil and oil filter element ..... 6-10
Replacing the air filter element
and cleaning the check hose..... 6-13
Checking the throttle grip free play ............................................ 6-15
Valve clearance ............................. 6-15
Tires .............................................. 6-15 Cast wheels .................................. 6-18
Clutch lever................................... 6-18
Checking the brake lever free
play ............................................ 6-18
Brake light switches ..................... 6-19
Checking the front and rear brake
pads .......................................... 6-19
Checking the brake and clutch
fluid levels.................................. 6-20
Changing the brake and clutch fluids .......................................... 6-21
Drive chain slack........................... 6-22
Cleaning and lubricating the drive chain ................................. 6-23
Checking and lubricating the cables ........................................ 6-24
Checking and lubricating the
throttle grip and cable ............... 6-24
Checking and lubricating the brake and shift pedals............... 6-24
Checking and lubricating the brake and clutch levers ............. 6-25
Checking and lubricating the
sidestand................................... 6-26
Lubricating the swingarm pivots......................................... 6-26
Checking the front fork ................. 6-26
Checking the steering................... 6-27
Checking the wheel bearings ....... 6-27
Battery .......................................... 6-28
Replacing the fuses ...................... 6-29U2PNE1E0.book Page 1 Monday, December 28, 2015 11:03 AM
Page 13 of 98

Description
2-1
2
EAU10411
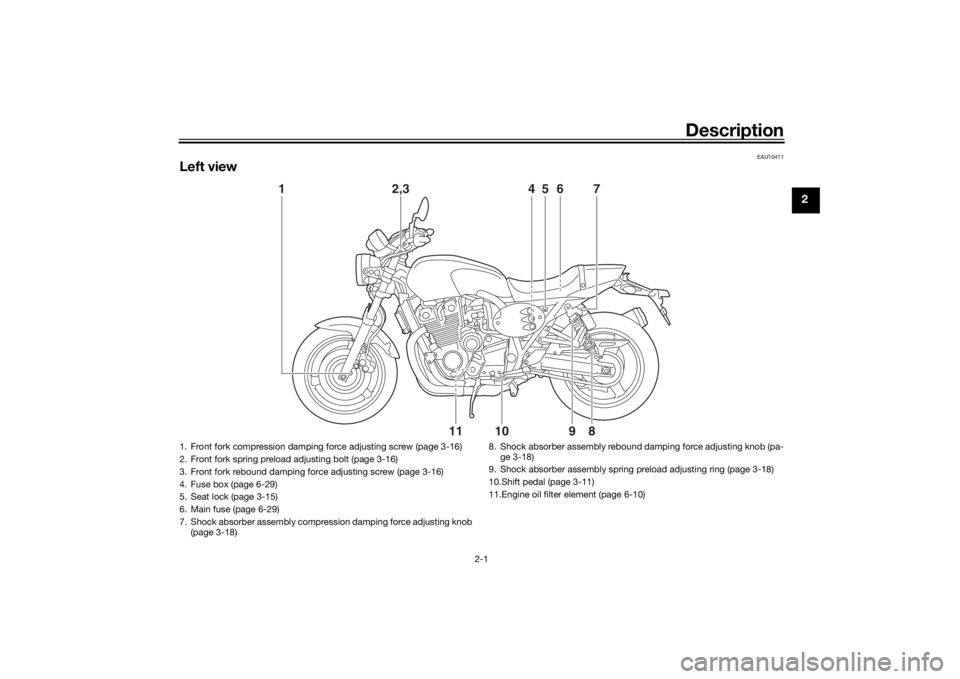
Left view
1
2,3
4
5
6
7
11
10
9
8
1. Front fork compression damping force adjusting screw (page 3-16)
2. Front fork spring preload adjusting bolt (page 3-16)
3. Front fork rebound damping force adjusting screw (page 3-16)
4. Fuse box (page 6-29)
5. Seat lock (page 3-15)
6. Main fuse (page 6-29)
7. Shock absorber assembly compression damping force adjusting knob (page 3-18) 8. Shock absorber assembly rebound damping force adjusting knob (pa-
ge 3-18)
9. Shock absorber assembly spring preload adjusting ring (page 3-18)
10.Shift pedal (page 3-11)
11.Engine oil filter element (page 6-10)
U2PNE1E0.book Page 1 Monday, December 28, 2015 11:03 AM
Page 74 of 98
![YAMAHA XJR 1300 2016 Owners Manual Periodic maintenance an d a djustment
6-29
6 key is turned
to “OFF”, then
connect the positive lead b efore
connectin g the ne gative lead .
[ECA16841]
4. After installation, make sure that
the YAMAHA XJR 1300 2016 Owners Manual Periodic maintenance an d a djustment
6-29
6 key is turned
to “OFF”, then
connect the positive lead b efore
connectin g the ne gative lead .
[ECA16841]
4. After installation, make sure that
the](/img/51/52678/w960_52678-73.png)
Periodic maintenance an d a djustment
6-29
6 key is turned
to “OFF”, then
connect the positive lead b efore
connectin g the ne gative lead .
[ECA16841]
4. After installation, make sure that
the battery leads are properly con-
nected to the battery terminals.NOTICE
ECA16531
Always keep the b attery charged .
Storin g a d ischar ged battery can
cause permanent battery dama ge.
EAU43274
Replacin g the fusesThe main fuse is located under the
seat. (See page 3-15.)
The fuse box, which contains the fuses
for the individual circuits, is located be-
hind panel B. (See page 6-8.)
If a fuse is blown, replace it as follows.
1. Turn the key to “OFF” and turn off the electrical circuit in question.
2. Remove the blown fuse, and then install a new fuse of the specified
amperage. WARNING! Do not
use a fuse of a hi gher ampera ge
ratin g than recommen ded to
avoi d causin g extensive d am-
a g e to the electrical system an d
possi bly a fire.
[EWA15132]
1. Main fuse
1
1. Headlight fuse
2. Signaling system fuse
3. Ignition fuse
4. Taillight fuse
5. Fuel injection system fuse
6. Backup fuse (for clock and immobilizer sys-
tem)
7. Spare fuse
123
4
5
6
7
U2PNE1E0.book Page 29 Monday, December 28, 2015 11:03 AM
Page 75 of 98

Periodic maintenance an d a djustment
6-30
6
3. Turn the key to “ON” and turn on the electrical circuit in question to
check if the device operates.
4. If the fuse immediately blows again, have a Yamaha dealer
check the electrical system.
EAU63180
Replacin g the hea dlig ht bul bThis model is equipped with a halogen
bulb headlight. If the headlight bulb
burns out, replace it as follows.NOTICE
ECA10661
Do not touch the glass part of the
hea dlig ht bul b to keep it free from
oil, otherwise the transparency of
the glass, the luminosity of the bul b,
an d the bul b life will be ad versely af-
fected . Thorou ghly clean off any d irt
an d fin gerprints on the head light
b ul b using a cloth moistene d with al-
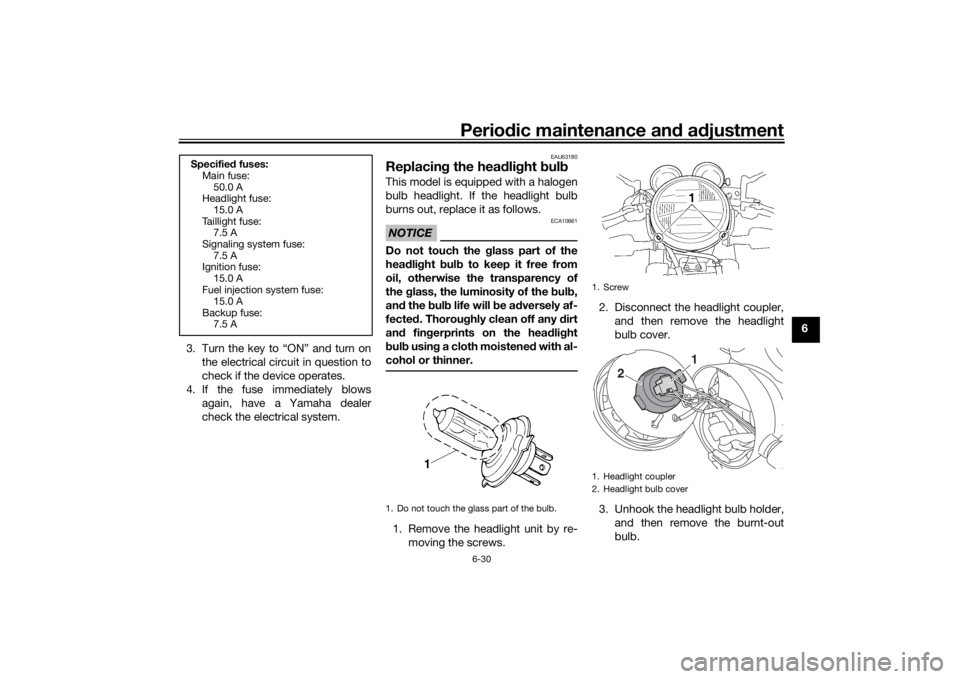
cohol or thinner.1. Remove the headlight unit by re- moving the screws. 2. Disconnect the headlight coupler,
and then remove the headlight
bulb cover.
3. Unhook the headlight bulb holder, and then remove the burnt-out
bulb.
Specifie d fuses:
Main fuse:
50.0 A
Headlight fuse:
15.0 A
Taillight fuse: 7.5 A
Signaling system fuse: 7.5 A
Ignition fuse:
15.0 A
Fuel injection system fuse: 15.0 A
Backup fuse: 7.5 A
1. Do not touch the glass part of the bulb.
1. Screw
1. Headlight coupler
2. Headlight bulb cover
2
1
U2PNE1E0.book Page 30 Monday, December 28, 2015 11:03 AM
Page 92 of 98

Specifications
8-3
8
Neutral indicator light:12 V, 1.7 W × 1
High beam indicator light: 12 V, 1.7 W × 1
Oil level warning light:
12 V, 1.7 W × 1
Turn signal indicator light: 12 V, 1.7 W × 2
Engine trouble warning light: 12 V, 1.7 W × 1
Immobilizer system indicator light:
LEDFuse:Main fuse:50.0 A
Headlight fuse:
15.0 A
Taillight fuse: 7.5 A
Signaling system fuse: 7.5 A
Ignition fuse:
15.0 A
Fuel injection system fuse: 15.0 A
Backup fuse: 7.5 A
U2PNE1E0.book Page 3 Monday, December 28, 2015 11:03 AM
Page 95 of 98

10-1
10
Index
AAir filter element and check hose,
replacing and cleaning ....................... 6-13
Auxiliary light bulb, replacing ............... 6-31BBattery .................................................. 6-28
Brake and clutch fluid levels, checking ............................................. 6-20
Brake and clutch fluids , changing ........ 6-21
Brake and clutch levers, checking and lubricating........................................... 6-25
Brake and shift pedals, checking and
lubricating........................................... 6-24
Brake lever............................................ 3-11
Brake lever free play, checking ............ 6-18
Brake light switches ............................. 6-19
Brake pedal .......................................... 3-12
Brake/tail light....................................... 6-32CCables, checking and lubricating ......... 6-24
Care ........................................................ 7-1
Catalytic converters.............................. 3-14
Clutch lever.................................. 3-10, 6-18DDimmer switch........................................ 3-9
Drive chain, cleaning and lubricating ... 6-23
Drive chain slack .................................. 6-22EEngine break-in ...................................... 5-3
Engine oil and oil filter element............. 6-10
Engine serial number .............................. 9-1
Engine stop switch ................................. 3-9
Engine trouble warning light ................... 3-4
EXUP system ........................................ 3-21
FFront and rear brake pads, checking ... 6-19
Front fork, adjusting ............................. 3-16
Front fork, checking ............................. 6-26
Fuel ...................................................... 3-13
Fuel consumption, tips for reducing ...... 5-3
Fuel tank breather hose and overflow
hose ................................................... 3-14
Fuel tank cap........................................ 3-12
Fuses, replacing ................................... 6-29HHandlebar switches ............................... 3-9
Hazard switch ...................................... 3-10
Headlight bulb, replacing ..................... 6-30
High beam indicator light ....................... 3-4
Horn switch ............................................ 3-9IIdentification numbers ........................... 9-1
Ignition circuit cut-off system .............. 3-22
Immobilizer system ................................ 3-1
Immobilizer system indicator light ......... 3-5
Indicator lights and warning lights ......... 3-4LLicense plate light bulb, replacing ....... 6-33
Luggage strap holders ......................... 3-20MMain switch/steering lock ...................... 3-2
Maintenance and lubrication, periodic... 6-4
Maintenance, emission control system ................................................. 6-3
Matte color, caution ............................... 7-1
Model label............................................. 9-1
Multi-function display............................. 3-6
NNeutral indicator light ............................. 3-4OOil level warning light .............................. 3-4PPanels, removing and installing .............. 6-8
Parking.................................................... 5-4
Part locations.......................................... 2-1
Pass switch............................................. 3-9SSafety information................................... 1-1
Seat....................................................... 3-15
Shifting.................................................... 5-2
Shift pedal............................................. 3-11
Shock absorber assemblies, adjusting ............................................. 3-18
Sidestand.............................................. 3-21
Sidestand, checking and lubricating .... 6-26
Spark plugs, checking ............................ 6-9
Specifications ......................................... 8-1
Speedometer .......................................... 3-5
Starting the engine ................................. 5-1
Start switch ............................................. 3-9
Steering, checking ................................ 6-27
Storage ................................................... 7-3
Supporting the motorcycle ................... 6-35
Swingarm pivots, lubricating ................ 6-26TTachometer............................................. 3-5
Throttle grip and cable, checking and lubricating ........................................... 6-24
Throttle grip free play, checking ........... 6-15
Tires ...................................................... 6-15
Tool kit .................................................... 6-2
U2PNE1E0.book Page 1 Monday, December 28, 2015 11:03 AM