ignition YAMAHA XJR 1300 2016 Owners Manual
[x] Cancel search | Manufacturer: YAMAHA, Model Year: 2016, Model line: XJR 1300, Model: YAMAHA XJR 1300 2016Pages: 98, PDF Size: 2.59 MB
Page 6 of 98

Table of contentsSafety information ............................ 1-1
Description ....................................... 2-1
Left view ......................................... 2-1
Right view ....................................... 2-2
Controls and instruments ............... 2-3
Instrument an d control functions ... 3-1
Immobilizer system......................... 3-1
Main switch/steering lock............... 3-2
Indicator lights and warning lights............................................ 3-4
Speedometer .................................. 3-5
Tachometer .................................... 3-5
Multi-function display ..................... 3-6
Handlebar switches ........................ 3-9
Clutch lever .................................. 3-10
Shift pedal .................................... 3-11
Brake lever.................................... 3-11
Brake pedal .................................. 3-12
Fuel tank cap ................................ 3-12
Fuel ............................................... 3-13
Fuel tank breather hose and overflow hose ............................ 3-14
Catalytic converters ..................... 3-14
Seat .............................................. 3-15
Adjusting the front fork ................. 3-16
Adjusting the shock absorber assembly ................................... 3-18
Luggage strap holders ................. 3-20
EXUP system ................................ 3-21 Sidestand ...................................... 3-21
Ignition circuit cut-off system ....... 3-22
For your safety – pre-operation
checks ............................................... 4-1
Operation an d important ri din g
points ................................................. 5-1
Starting the engine .......................... 5-1
Shifting ............................................ 5-2
Tips for reducing fuel consumption ................................ 5-3
Engine break-in ............................... 5-3
Parking ............................................ 5-4
Perio dic maintenance an d
a d justment ........................................ 6-1
Owner’s tool kit ............................... 6-2
Periodic maintenance chart for the emission control system .............. 6-3
General maintenance and lubrication chart ........................... 6-4
Removing and installing panels ...... 6-8
Checking the spark plugs ............... 6-9
Engine oil and oil filter element ..... 6-10
Replacing the air filter element
and cleaning the check hose..... 6-13
Checking the throttle grip free play ............................................ 6-15
Valve clearance ............................. 6-15
Tires .............................................. 6-15 Cast wheels .................................. 6-18
Clutch lever................................... 6-18
Checking the brake lever free
play ............................................ 6-18
Brake light switches ..................... 6-19
Checking the front and rear brake
pads .......................................... 6-19
Checking the brake and clutch
fluid levels.................................. 6-20
Changing the brake and clutch fluids .......................................... 6-21
Drive chain slack........................... 6-22
Cleaning and lubricating the drive chain ................................. 6-23
Checking and lubricating the cables ........................................ 6-24
Checking and lubricating the
throttle grip and cable ............... 6-24
Checking and lubricating the brake and shift pedals............... 6-24
Checking and lubricating the brake and clutch levers ............. 6-25
Checking and lubricating the
sidestand................................... 6-26
Lubricating the swingarm pivots......................................... 6-26
Checking the front fork ................. 6-26
Checking the steering................... 6-27
Checking the wheel bearings ....... 6-27
Battery .......................................... 6-28
Replacing the fuses ...................... 6-29U2PNE1E0.book Page 1 Monday, December 28, 2015 11:03 AM
Page 17 of 98
Instrument and control functions
3-2
3
Keep other immo bilizer system
keys away from the main switch
as they may cause si gnal inter-
ference.
EAU10474
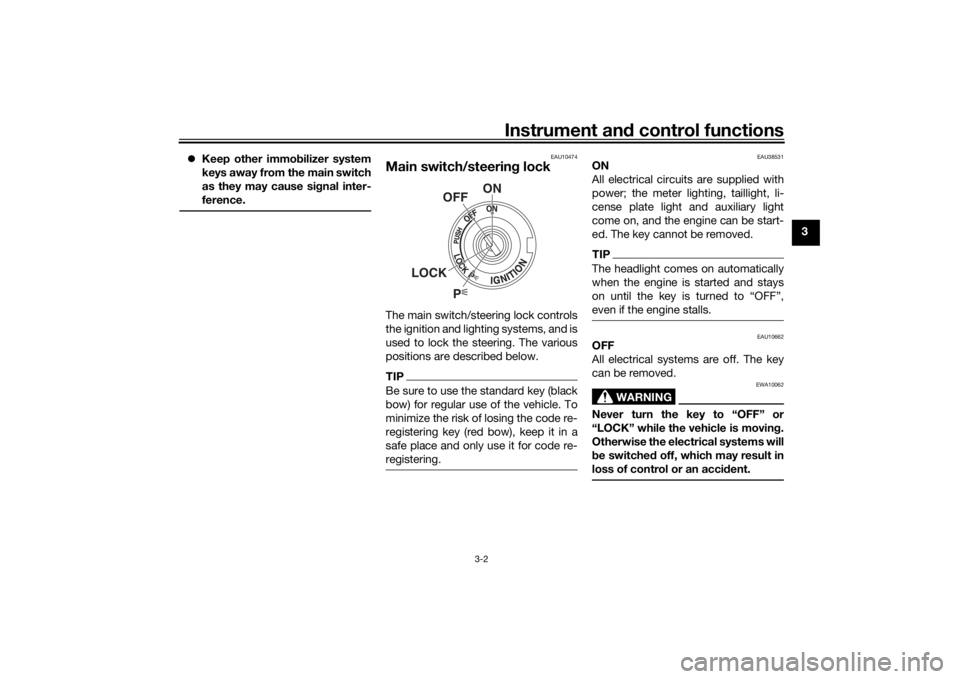
Main switch/steerin g lockThe main switch/steering lock controls
the ignition and lighting systems, and is
used to lock the steering. The various
positions are described below.TIPBe sure to use the standard key (black
bow) for regular use of the vehicle. To
minimize the risk of losing the code re-
registering key (red bow), keep it in a
safe place and only use it for code re-
registering.
EAU38531
ON
All electrical circuits are supplied with
power; the meter lighting, taillight, li-
cense plate light and auxiliary light
come on, and the engine can be start-
ed. The key cannot be removed.TIPThe headlight comes on automatically
when the engine is started and stays
on until the key is turned to “OFF”,
even if the engine stalls.
EAU10662
OFF
All electrical systems are off. The key
can be removed.
WARNING
EWA10062
Never turn the key to “OFF” or
“LOCK” while the vehicle is movin g.
Otherwise the electrical systems will
b e switche d off, which may result in
loss of control or an acci dent.
P
ON
OFF
LOCK
U2PNE1E0.book Page 2 Monday, December 28, 2015 11:03 AM
Page 28 of 98
Instrument and control functions
3-13
3
EAU13213
FuelMake sure there is sufficient gasoline in
the tank.
WARNING
EWA10882
Gasoline an d g asoline vapors are
extremely flammab le. To avoid fires
an d explosions an d to re duce the
risk of injury when refuelin g, follow
these instructions.1. Before refueling, turn off the en- gine and be sure that no one is sit-
ting on the vehicle. Never refuel
while smoking, or while in the vi-
cinity of sparks, open flames, or
other sources of ignition such as
the pilot lights of water heaters
and clothes dryers.
2. Do not overfill the fuel tank. Stop filling when the fuel reaches the
bottom of the filler tube. Because
fuel expands when it heats up,
heat from the engine or the sun
can cause fuel to spill out of the
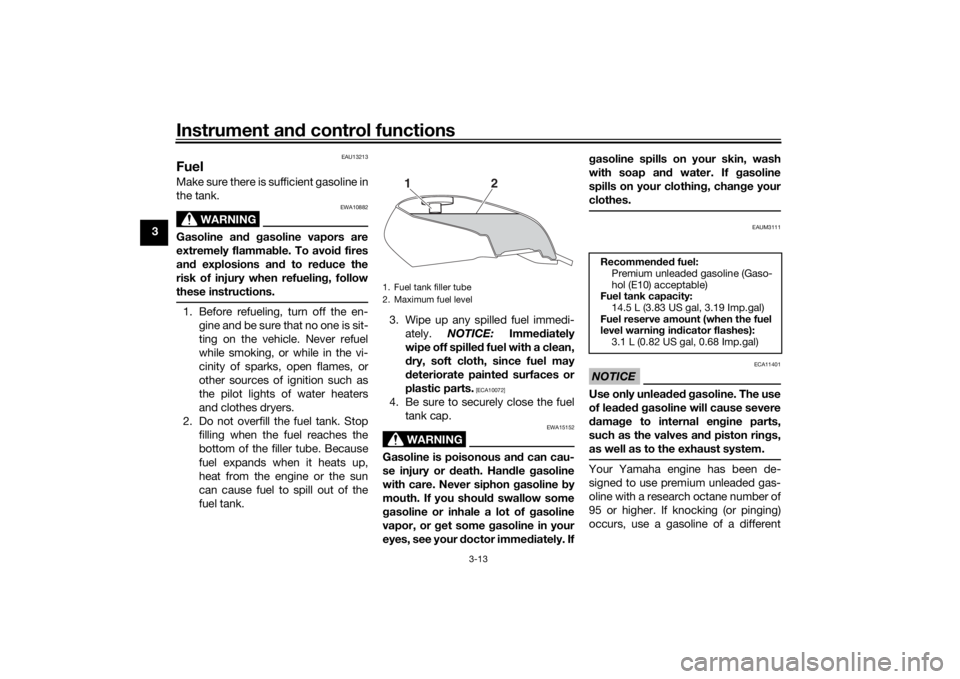
fuel tank. 3. Wipe up any spilled fuel immedi-
ately. NOTICE: Immediately
wipe off spille d fuel with a clean,
d ry, soft cloth, since fuel may
d eteriorate painted surfaces or
plastic parts.
[ECA10072]
4. Be sure to securely close the fuel tank cap.
WARNING
EWA15152
Gasoline is poisonous an d can cau-
se injury or death. Han dle gasoline
with care. Never siphon gasoline by
mouth. If you shoul d swallow some
g asoline or inhale a lot of g asoline
vapor, or g et some gasoline in your
eyes, see your d octor immediately. If g
asoline spills on your skin, wash
with soap an d water. If gasoline
spills on your clothin g, chan ge your
clothes.
EAUM3111
NOTICE
ECA11401
Use only unlea ded g asoline. The use
of lea ded g asoline will cause severe
d amag e to internal en gine parts,
such as the valves an d piston rin gs,
as well as to the exhaust system.Your Yamaha engine has been de-
signed to use premium unleaded gas-
oline with a research octane number of
95 or higher. If knocking (or pinging)
occurs, use a gasoline of a different
1. Fuel tank filler tube
2. Maximum fuel level
12
Recommen ded fuel:
Premium unleaded gasoline (Gaso-
hol (E10) acceptable)
Fuel tank capacity:
14.5 L (3.83 US gal, 3.19 Imp.gal)
Fuel reserve amount (when the fuel
level warnin g in dicator flashes):
3.1 L (0.82 US gal, 0.68 Imp.gal)
U2PNE1E0.book Page 13 Monday, December 28, 2015 11:03 AM
Page 36 of 98
Instrument and control functions
3-21
3
EAU15283
EXUP systemThis model is equipped with Yamaha’s
EXUP (EXhaust Ultimate Power valve)
system. This system boosts engine
power by means of a valve that regu-
lates the inner diameter of the exhaust
pipe. The EXUP system valve is con-
stantly adjusted in accordance with the
engine speed by a computer-con-
trolled servomotor.NOTICE
ECA10192
The EXUP system has been set
an d extensively teste d at the
Yamaha factory. Chan gin g
these settin gs without sufficient
technical knowle dge may result
in poor performance of or dam-
a g e to the en gine.
If the EXUP system cannot b e
hear d when the main switch is
turne d on, have a Yamaha d eal-
er check it.
EAU15306
Si destan dThe sidestand is located on the left
side of the frame. Raise the sidestand
or lower it with your foot while holding
the vehicle upright.TIPThe built-in sidestand switch is part of
the ignition circuit cut-off system,
which cuts the ignition in certain situa-
tions. (See the following section for an
explanation of the ignition circuit cut-
off system.)
WARNING
EWA10242
The vehicle must not be ri dden with
the si destan d d own, or if the si de-
stan d cannot b e properly moved up
(or does not stay up), otherwise the
si destan d coul d contact the g round
an d d istract the operator, resultin g
in a possi ble loss of control.
Yamaha’s ig nition circuit cut-off
system has been desi gne d to assist
the operator in fulfillin g the respon-
si bility of raisin g the si destan d b e-
fore startin g off. Therefore, check this system reg
ularly and have a
Yamaha dealer repair it if it does not
function properly.
U2PNE1E0.book Page 21 Monday, December 28, 2015 11:03 AM
Page 37 of 98

Instrument and control functions
3-22
3
EAU44893
Ig nition circuit cut-off systemThe ignition circuit cut-off system
(comprising the sidestand switch,
clutch switch and neutral switch) has
the following functions.
It prevents starting when the
transmission is in gear and the
sidestand is up, but the clutch le-
ver is not pulled.
It prevents starting when the
transmission is in gear and the
clutch lever is pulled, but the side-
stand is still down.
It cuts the running engine when
the transmission is in gear and the
sidestand is moved down.
Periodically check the operation of the
ignition circuit cut-off system accord-
ing to the following procedure.
U2PNE1E0.book Page 22 Monday, December 28, 2015 11:03 AM
Page 41 of 98

For your safety – pre-operation checks
4-3
4
Chassis fasteners• Make sure that all nuts, bolts and screws are properly tightened.
• Tighten if necessary. —
Instruments, li ghts, si gnals
an d switches • Check operation.
• Correct if necessary.
—
Si destan d switch • Check operation of ignition circuit cut-off system.
• If system is not working correctly, have Yamaha dealer check vehicle. 3-21
ITEM CHECKS PAGE
U2PNE1E0.book Page 3 Monday, December 28, 2015 11:03 AM
Page 42 of 98
Operation and important rid ing points
5-1
5
EAU15952
Read the Owner’s Manual carefully to
become familiar with all controls. If
there is a control or function you do not
understand, ask your Yamaha dealer.
WARNING
EWA10272
Failure to familiarize yourself with
the controls can lead to loss of con-
trol, which coul d cause an acci dent
or injury.
EAU48712
TIPThis model is equipped with: a lean angle sensor to stop the en-
gine in case of a turnover. In this
case, the display will indicate error
code 30, but this is not a malfunc-
tion. Turn the key to “OFF” and
then to “ON” to clear the error co-
d e . F ai l in g to do s o wi ll pr e v e nt the
engine from starting even though
the engine will crank when push-
ing the start switch.
an engine auto-stop system. The
engine stops automatically if left
idling for 20 minutes. If the engine
stops, simply push the start
switch to restart the engine.
EAU3372A
Startin g the en gineIn order for the ignition circuit cut-off
system to enable starting, one of the
following conditions must be met:
The transmission is in the neutral
position.
The transmission is in gear with
the clutch lever pulled and the
sidestand up.
See page 3-22 for more informa-
tion.
1. Turn the key to “ON” and make sure that the engine stop switch is
set to “ ”.
The following warning lights and
indicator light should come on for
a few seconds, then go off. Oil level warning light
Engine trouble warning light
Immobilizer system indicator
lightNOTICE
ECA11834
If a warnin g or in dicator li ght does
not come on initially when the key is
turne d to “ON”, or if a warning or in-
U2PNE1E0.book Page 1 Monday, December 28, 2015 11:03 AM
Page 74 of 98
![YAMAHA XJR 1300 2016 Owners Manual Periodic maintenance an d a djustment
6-29
6 key is turned
to “OFF”, then
connect the positive lead b efore
connectin g the ne gative lead .
[ECA16841]
4. After installation, make sure that
the YAMAHA XJR 1300 2016 Owners Manual Periodic maintenance an d a djustment
6-29
6 key is turned
to “OFF”, then
connect the positive lead b efore
connectin g the ne gative lead .
[ECA16841]
4. After installation, make sure that
the](/img/51/52678/w960_52678-73.png)
Periodic maintenance an d a djustment
6-29
6 key is turned
to “OFF”, then
connect the positive lead b efore
connectin g the ne gative lead .
[ECA16841]
4. After installation, make sure that
the battery leads are properly con-
nected to the battery terminals.NOTICE
ECA16531
Always keep the b attery charged .
Storin g a d ischar ged battery can
cause permanent battery dama ge.
EAU43274
Replacin g the fusesThe main fuse is located under the
seat. (See page 3-15.)
The fuse box, which contains the fuses
for the individual circuits, is located be-
hind panel B. (See page 6-8.)
If a fuse is blown, replace it as follows.
1. Turn the key to “OFF” and turn off the electrical circuit in question.
2. Remove the blown fuse, and then install a new fuse of the specified
amperage. WARNING! Do not
use a fuse of a hi gher ampera ge
ratin g than recommen ded to
avoi d causin g extensive d am-
a g e to the electrical system an d
possi bly a fire.
[EWA15132]
1. Main fuse
1
1. Headlight fuse
2. Signaling system fuse
3. Ignition fuse
4. Taillight fuse
5. Fuel injection system fuse
6. Backup fuse (for clock and immobilizer sys-
tem)
7. Spare fuse
123
4
5
6
7
U2PNE1E0.book Page 29 Monday, December 28, 2015 11:03 AM
Page 75 of 98
Periodic maintenance an d a djustment
6-30
6
3. Turn the key to “ON” and turn on the electrical circuit in question to
check if the device operates.
4. If the fuse immediately blows again, have a Yamaha dealer
check the electrical system.
EAU63180
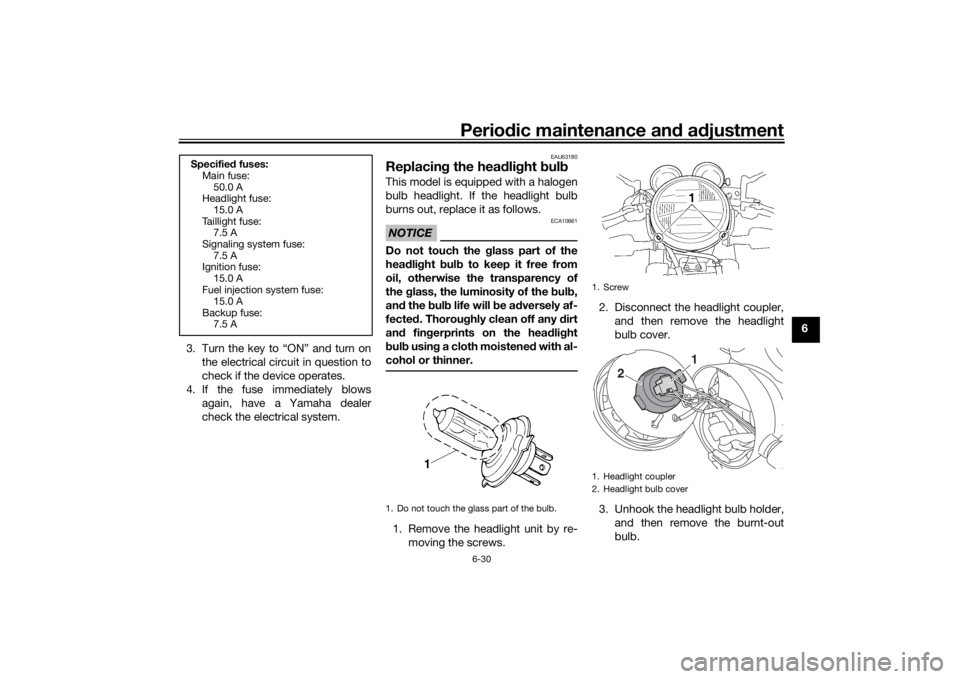
Replacin g the hea dlig ht bul bThis model is equipped with a halogen
bulb headlight. If the headlight bulb
burns out, replace it as follows.NOTICE
ECA10661
Do not touch the glass part of the
hea dlig ht bul b to keep it free from
oil, otherwise the transparency of
the glass, the luminosity of the bul b,
an d the bul b life will be ad versely af-
fected . Thorou ghly clean off any d irt
an d fin gerprints on the head light
b ul b using a cloth moistene d with al-
cohol or thinner.1. Remove the headlight unit by re- moving the screws. 2. Disconnect the headlight coupler,
and then remove the headlight
bulb cover.
3. Unhook the headlight bulb holder, and then remove the burnt-out
bulb.
Specifie d fuses:
Main fuse:
50.0 A
Headlight fuse:
15.0 A
Taillight fuse: 7.5 A
Signaling system fuse: 7.5 A
Ignition fuse:
15.0 A
Fuel injection system fuse: 15.0 A
Backup fuse: 7.5 A
1. Do not touch the glass part of the bulb.
1. Screw
1. Headlight coupler
2. Headlight bulb cover
2
1
U2PNE1E0.book Page 30 Monday, December 28, 2015 11:03 AM
Page 83 of 98
Periodic maintenance an d a djustment
6-38
6
8. Remove the brake caliper bracket
and the wheel.
To install the rear wheel 1. Place the wheel and the brake cal- iper bracket in the original posi-
tion.
2. Insert the wheel axle through the brake caliper bracket and wheel
from the right-hand side, and then
install the axle nut.
3. Install the drive chain onto the rear sprocket.
4. Connect the brake torque rod to the brake caliper bracket by in-
stalling the bolt and the nut.
5. Install the brake caliper by install- ing the bolts.
TIPMake sure that there is enough space
between the brake pads before install-
ing the brake caliper onto the brake
disc.6. Lower the rear wheel so that it ison the ground, and then put the
sidestand down.
7. Adjust the drive chain slack. (See page 6-22.) 8. Tighten the axle nut, brake caliper
bolts and brake torque rod nut to
the specified torques.
EAU25852
Trou bleshootin gAlthough Yamaha motorcycles receive
a thorough inspection before shipment
from the factory, trouble may occur
during operation. Any problem in the
fuel, compression, or ignition systems,
for example, can cause poor starting
and loss of power.
The following troubleshooting chart
represents a quick and easy procedure
for checking these vital systems your-
self. However, should your motorcycle
require any repair, take it to a Yamaha
dealer, whose skilled technicians have
the necessary tools, experience, and
know-how to service the motorcycle
properly.
Use only genuine Yamaha replace-
ment parts. Imitation parts may look
like Yamaha parts, but they are often
inferior, have a shorter service life and
can lead to expensive repair bills.
WARNING
EWA15142
When checkin g the fuel system, d o
not smoke, an d make sure there are
no open flames or sparks in the ar-
ea, inclu din g pilot li ghts from water
Ti ghtenin g torques:
Axle nut: 150 Nm (15 m·kgf, 108 ft·lbf)
Brake caliper bolt:
40 Nm (4.0 m·kgf, 29 ft·lbf)
Brake torque rod nut: 23 Nm (2.3 m·kgf, 17 ft·lbf)
U2PNE1E0.book Page 38 Monday, December 28, 2015 11:03 AM