crank case YAMAHA XMAX 300 2022 Owners Manual
[x] Cancel search | Manufacturer: YAMAHA, Model Year: 2022, Model line: XMAX 300, Model: YAMAHA XMAX 300 2022Pages: 116, PDF Size: 4.64 MB
Page 43 of 116
Instrument and control functions
4-13
4
EAU54213
Stop/Run/Start switch “ / / ”
To crank the engine with the starter,
set this switch to “ ”, and then push
the switch down towards “ ”. See
page 6-2 for starting instructions prior
to starting the engine.
Set this switch to “ ” to stop the en-
gine in case of an emergency, such as
when the vehicle overturns or when the
throttle cable is stuck.
EAU78190
Hazar d switch “ ”
With the main switch in the “ON”
or “ ” position, use this switch to turn
on the hazard lights (simultaneous
flashing of all turn signal lights).
The hazard lights are used in case of an
emergency or to warn other drivers
when your vehicle is stopped where it
might be a traffic hazard.NOTICE
ECA10062
Do not use the hazar d lig hts for an
exten ded len gth of time with the en-
g ine not running , otherwise the bat-
tery may d ischarge.
EAU78491
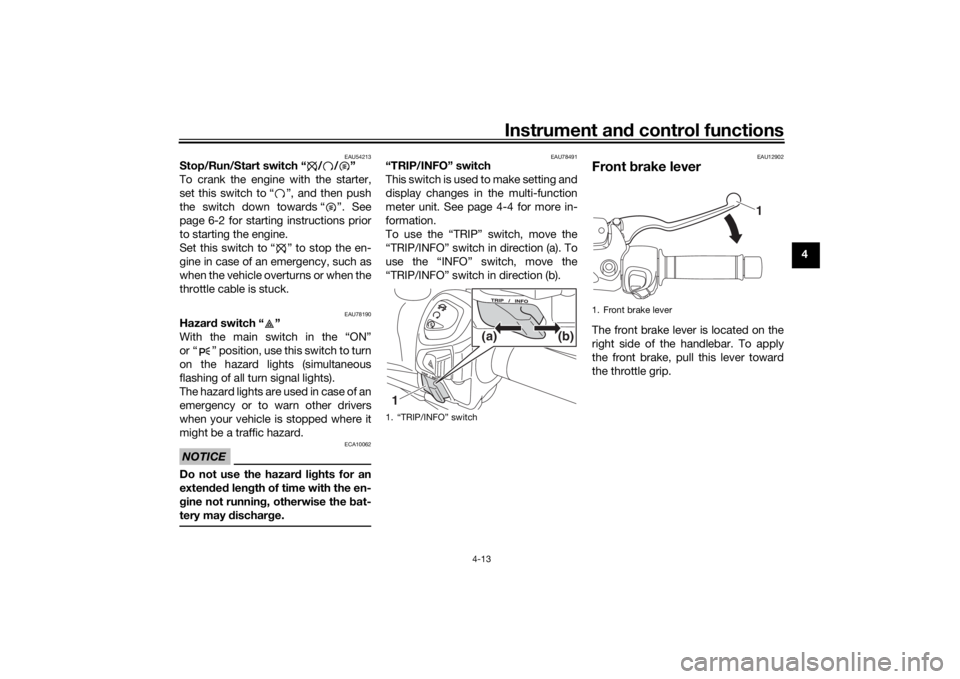
“TRIP/INFO” switch
T h i s s w i t c h i s u s e d t o m a k e s e t t i n g a n d
display changes in the multi-function
meter unit. See page 4-4 for more in-
formation.
To use the “TRIP” switch, move the
“TRIP/INFO” switch in direction (a). To
use the “INFO” switch, move the
“TRIP/INFO” switch in direction (b).
EAU12902
Front brake leverThe front brake lever is located on the
right side of the handlebar. To apply
the front brake, pull this lever toward
the throttle grip.
1. “TRIP/INFO” switch1 (b)
(a)
1. Front brake lever
1
UBBAE1E0.book Page 13 Monday, October 4, 2021 4:51 PM
Page 62 of 116
Operation and important rid ing points
6-2
6
EAUM4460
Startin g the eng ineThe ignition circuit cut-off system will
enable starting when the sidestand is
be up.
To start the engine1. Turn the main switch on.
2. Confirm the indicator and warning
light(s) come on for a few sec-
onds, and the go off. (See page
4-1.)TIPDo not start the engine if the mal-
function indicator light remains on.
The ABS warning light should
come on and stay on until the ve-
hicle reaches a speed of 10 km/h
(6 mi/h).NOTICE
ECA24110
If a warnin g or in dicator li ght does
not work as d escribed a bove, have a
Yamaha dealer check the vehicle.3. Close the throttle completely.
4. While applying the front or rear
brake, push the start switch. 5. Release the start switch when the
engine starts, or after 5 seconds.
Wait 10 seconds before pressing
the switch again to allow battery
voltage to restore.
NOTICE
ECA11043
For maximum en gine life, never ac-
celerate har d when the en gine is
col d!
EAUM4280
TIPThis model is equipped with a lean an-
gle sensor to stop the engine in case of
a turnover. In this case, the malfunction
Indicator light will come on but this is
not a malfunction. Turn the vehicle
power off and then back on again to
cancel the Indicator light. Failing to do
so will prevent the engine from starting
even though the engine will crank
when pushing the start switch.
UBBAE1E0.book Page 2 Monday, October 4, 2021 4:51 PM
Page 75 of 116
Periodic maintenance an d a djustment
7-10
7
EAU36113
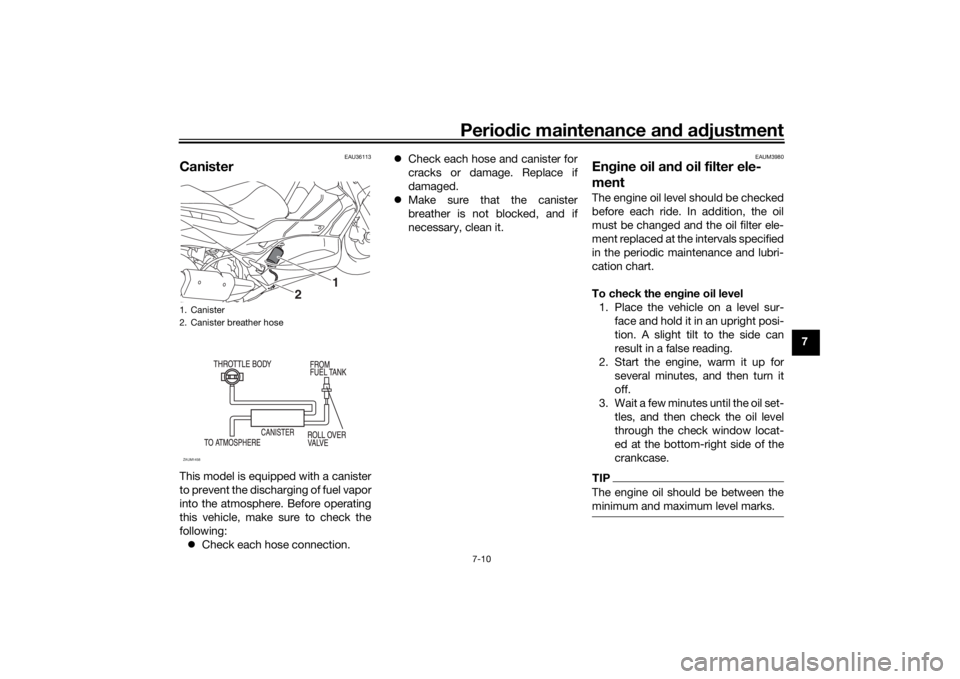
CanisterThis model is equipped with a canister
to prevent the discharging of fuel vapor
into the atmosphere. Before operating
this vehicle, make sure to check the
following:
Check each hose connection.
Check each hose and canister for
cracks or damage. Replace if
damaged.
Make sure that the canister
breather is not blocked, and if
necessary, clean it.
EAUM3980
Engine oil an d oil filter ele-
mentThe engine oil level should be checked
before each ride. In addition, the oil
must be changed and the oil filter ele-
ment replaced at the intervals specified
in the periodic maintenance and lubri-
cation chart.
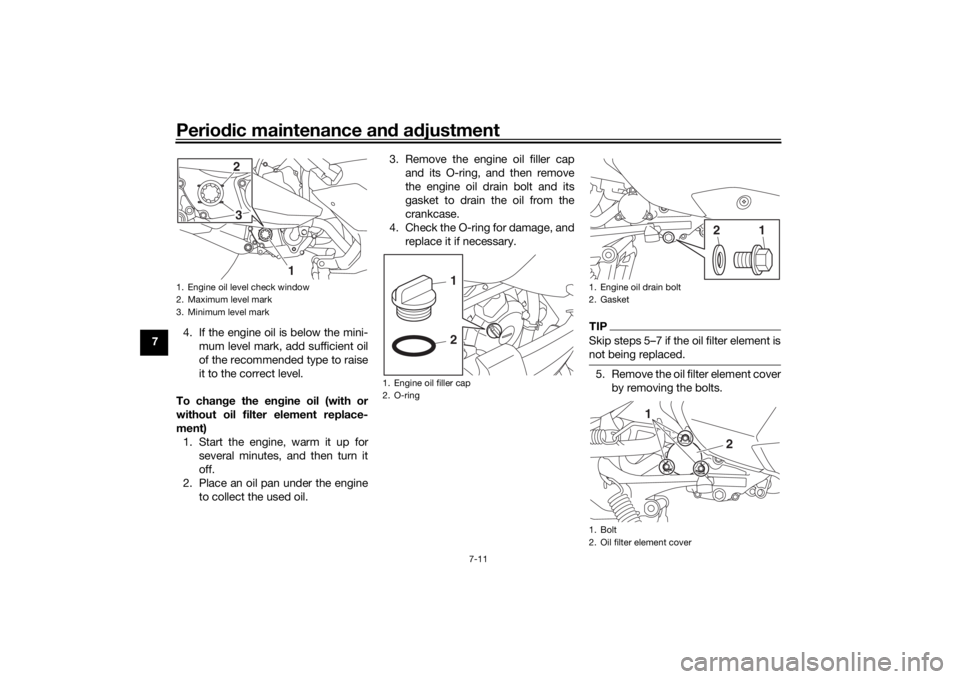
To check the en gine oil level
1. Place the vehicle on a level sur- face and hold it in an upright posi-
tion. A slight tilt to the side can
result in a false reading.
2. Start the engine, warm it up for several minutes, and then turn it
off.
3. Wait a few minutes until the oil set- tles, and then check the oil level
through the check window locat-
ed at the bottom-right side of the
crankcase.TIPThe engine oil should be between the
minimum and maximum level marks.
1. Canister
2. Canister breather hose
2
1
ZAUM1458
UBBAE1E0.book Page 10 Monday, October 4, 2021 4:51 PM
Page 76 of 116
Periodic maintenance an d a djustment
7-11
7 4. If the engine oil is below the mini-
mum level mark, add sufficient oil
of the recommended type to raise
it to the correct level.
To chan ge the en gine oil (with or
without oil filter element replace-
ment) 1. Start the engine, warm it up for several minutes, and then turn it
off.
2. Place an oil pan under the engine to collect the used oil. 3. Remove the engine oil filler cap
and its O-ring, and then remove
the engine oil drain bolt and its
gasket to drain the oil from the
crankcase.
4. Check the O-ring for damage, and replace it if necessary.
TIPSkip steps 5–7 if the oil filter element is
not being replaced.5. Remove the oil filter element coverby removing the bolts.
1. Engine oil level check window
2. Maximum level mark
3. Minimum level mark
3
1
2
1. Engine oil filler cap
2. O-ring
1
2
1. Engine oil drain bolt
2. Gasket
1. Bolt
2. Oil filter element cover
1
2
2
1
UBBAE1E0.book Page 11 Monday, October 4, 2021 4:51 PM
Page 77 of 116
Periodic maintenance an d a djustment
7-12
7
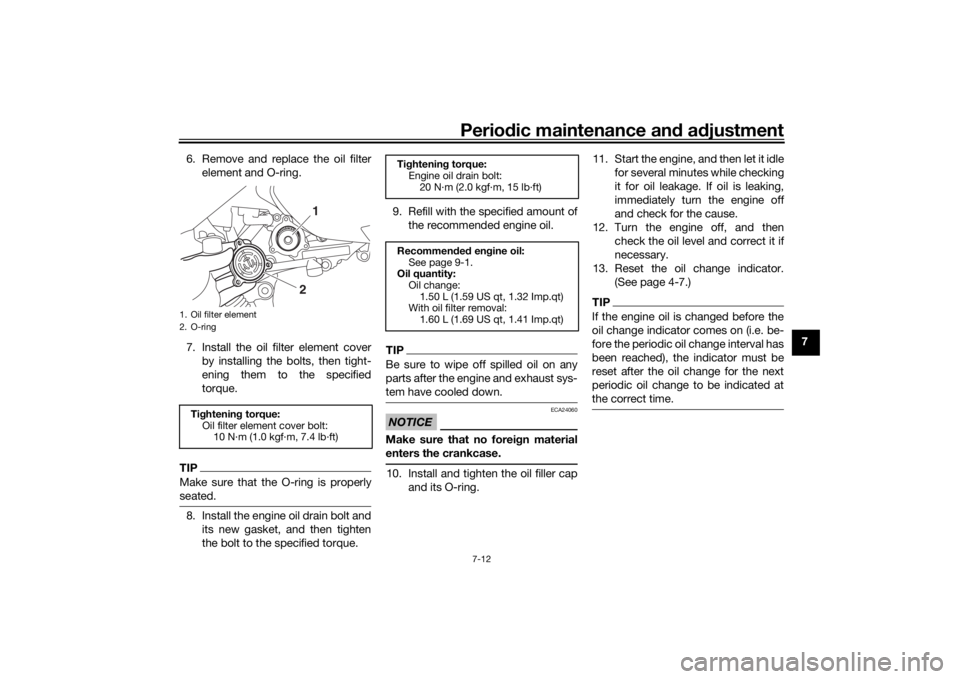
6. Remove and replace the oil filter
element and O-ring.
7. Install the oil filter element cover by installing the bolts, then tight-
ening them to the specified
torque.
TIPMake sure that the O-ring is properly
seated.8. Install the engine oil drain bolt andits new gasket, and then tighten
the bolt to the specified torque. 9. Refill with the specified amount of
the recommended engine oil.
TIPBe sure to wipe off spilled oil on any
parts after the engine and exhaust sys-
tem have cooled down.NOTICE
ECA24060
Make sure that no forei gn material
enters the crankcase.10. Install and tighten the oil filler cap and its O-ring. 11. Start the engine, and then let it idle
for several minutes while checking
it for oil leakage. If oil is leaking,
immediately turn the engine off
and check for the cause.
12. Turn the engine off, and then check the oil level and correct it if
necessary.
13. Reset the oil change indicator. (See page 4-7.)
TIPIf the engine oil is changed before the
oil change indicator comes on (i.e. be-
fore the periodic oil change interval has
been reached), the indicator must be
reset after the oil change for the next
periodic oil change to be indicated at
the correct time.
1. Oil filter element
2. O-ringTightenin g torque:
Oil filter element cover bolt: 10 N·m (1.0 kgf·m, 7.4 lb·ft)
1
2
Tightenin g torque:
Engine oil drain bolt:
20 N·m (2.0 kgf·m, 15 lb·ft)
Recommen ded en gine oil:
See page 9-1.
Oil quantity:
Oil change:1.50 L (1.59 US qt, 1.32 Imp.qt)
With oil filter removal:
1.60 L (1.69 US qt, 1.41 Imp.qt)
UBBAE1E0.book Page 12 Monday, October 4, 2021 4:51 PM
Page 110 of 116
Consumer information
10-1
10
EAU53562
Id entification num bersRecord the vehicle identification num-
ber, engine serial number, and the
model label information in the spaces
provided below. These identification
numbers are needed when registering
the vehicle with the authorities in your
area and when ordering spare parts
from a Yamaha dealer.
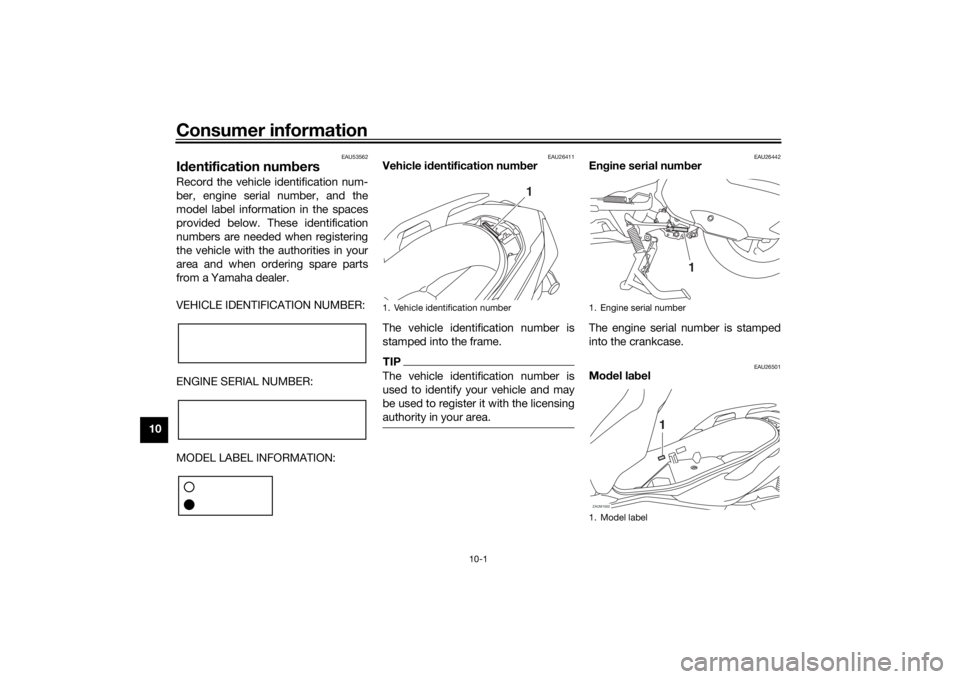
VEHICLE IDENTIFICATION NUMBER:
ENGINE SERIAL NUMBER:
MODEL LABEL INFORMATION:
EAU26411
Vehicle i dentification num ber
The vehicle identification number is
stamped into the frame.TIPThe vehicle identification number is
used to identify your vehicle and may
be used to register it with the licensing
authority in your area.
EAU26442
En gine serial num ber
The engine serial number is stamped
into the crankcase.
EAU26501
Mo del la bel
1. Vehicle identification number
1
1. Engine serial number
1. Model label
1
ZAUM1502
1
UBBAE1E0.book Page 1 Monday, October 4, 2021 4:51 PM