YAMAHA YFM250R 2013 Owners Manual
Manufacturer: YAMAHA, Model Year: 2013, Model line: YFM250R, Model: YAMAHA YFM250R 2013Pages: 136, PDF Size: 3.44 MB
Page 111 of 136
8-32
8
essary. If a cable is damaged or does not move
smoothly, have a Yamaha dealer check or replace
it.
WARNING
EWB02581●Inspect cables frequently and replace if dam-
aged. Corrosion can result when the cable
sheaths become damaged, and cables can
also become frayed or kinked, which could
restrict the operation of controls and lead to
an accident or injury.●Always make sure all control cables work
smoothly before you begin riding in cold
weather. If the control cables are frozen or do
not work smoothly, you could be unable to
control the ATV, which could lead to an acci-
dent or collision.
EBU24922Checking and lubric
ating the brake and
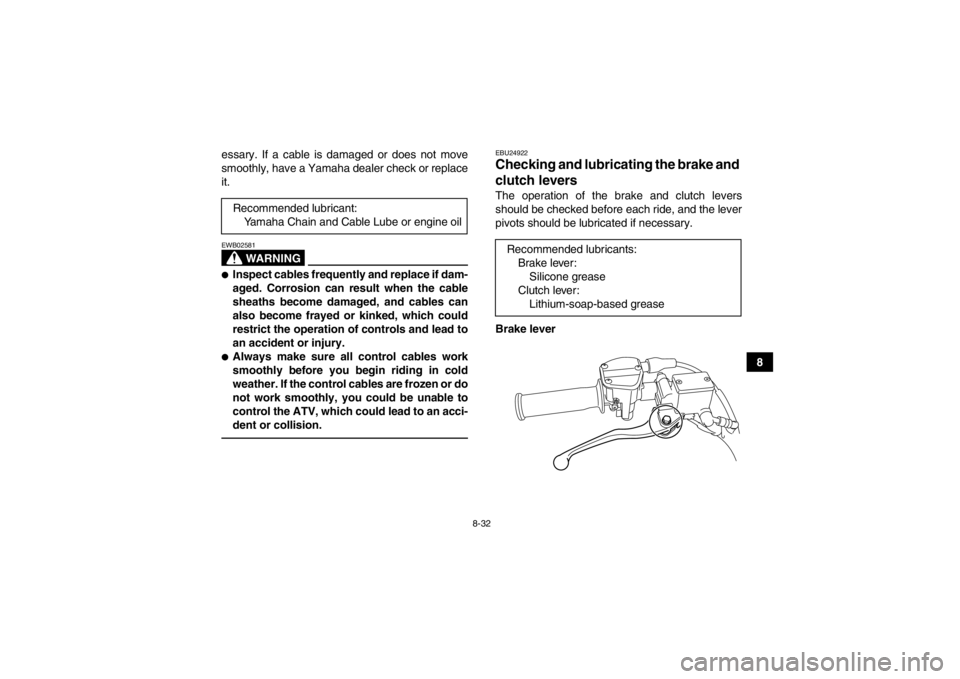
clutch levers The operation of the brake and clutch levers
should be checked before each ride, and the lever
pivots should be lubricated if necessary.
Brake lever
Recommended lubricant:
Yamaha Chain and Cable Lube or engine oilRecommended lubricants: Brake lever:Silicone grease
Clutch lever: Lithium-soap-based grease
U1BT63E0.book Page 32 Friday, March 9, 2012 11:22 AM
Page 112 of 136
8-33
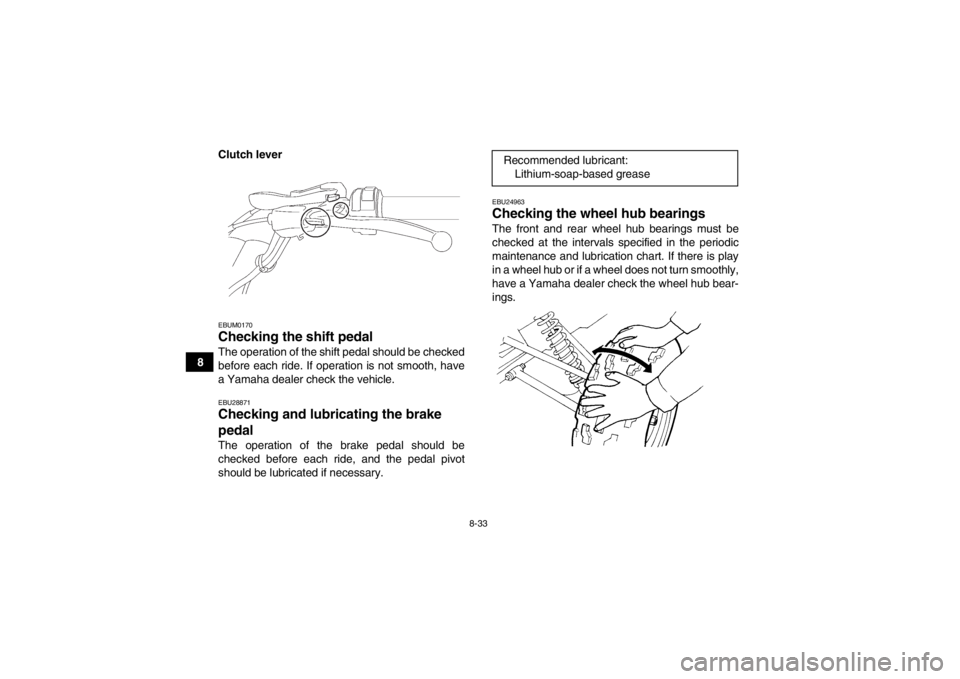
8Clutch lever
EBUM0170Checking the shift pedal The operation of the shift pedal should be checked
before each ride. If operation is not smooth, have
a Yamaha dealer check the vehicle.EBU28871Checking and lubricating the brake
pedal The operation of the brake pedal should be
checked before each ride, and the pedal pivot
should be lubricated if necessary.
EBU24963Checking the wheel hub bearings The front and rear wheel hub bearings must be
checked at the intervals specified in the periodic
maintenance and lubrication chart. If there is play
in a wheel hub or if a wheel does not turn smoothly,
have a Yamaha dealer check the wheel hub bear-
ings.Recommended lubricant:
Lithium-soap-based grease
U1BT63E0.book Page 33 Friday, March 9, 2012 11:22 AM
Page 113 of 136
8-34
8
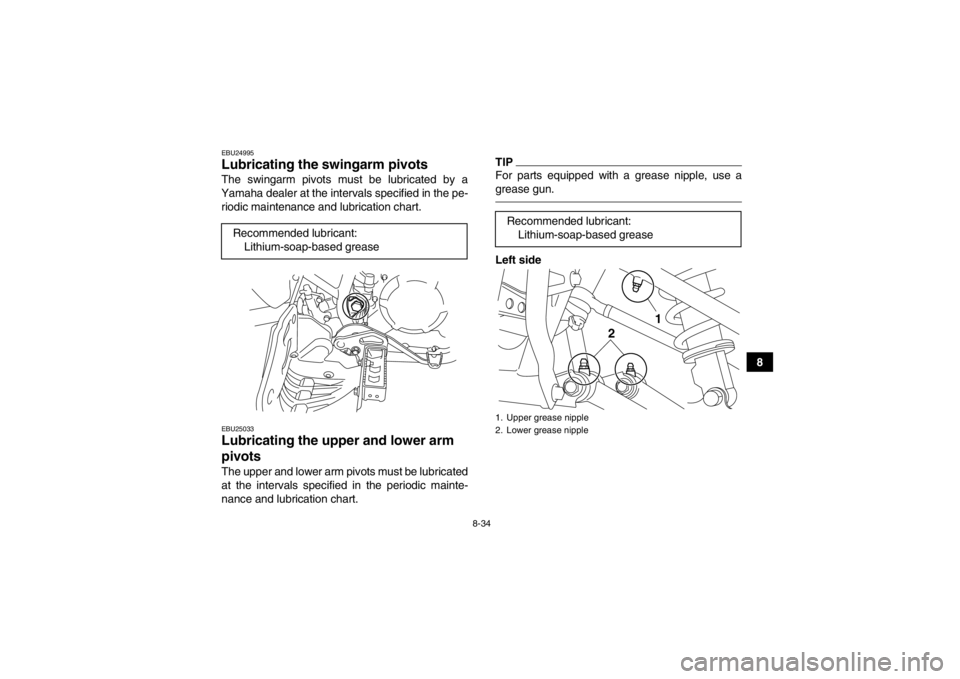
EBU24995Lubricating the swingarm pivots The swingarm pivots must be lubricated by a
Yamaha dealer at the intervals specified in the pe- riodic maintenance and lubrication chart.EBU25033Lubricating the upper and lower arm
pivots The upper and lower arm pivots must be lubricated
at the intervals specified in the periodic mainte-
nance and lubrication chart.
TIPFor parts equipped with a grease nipple, use a
grease gun.Left side
Recommended lubricant:
Lithium-soap-based greaseRecommended lubricant:Lithium-soap-based grease1. Upper grease nipple
2. Lower grease nipple
2
1
U1BT63E0.book Page 34 Friday, March 9, 2012 11:22 AM
Page 114 of 136
8-35
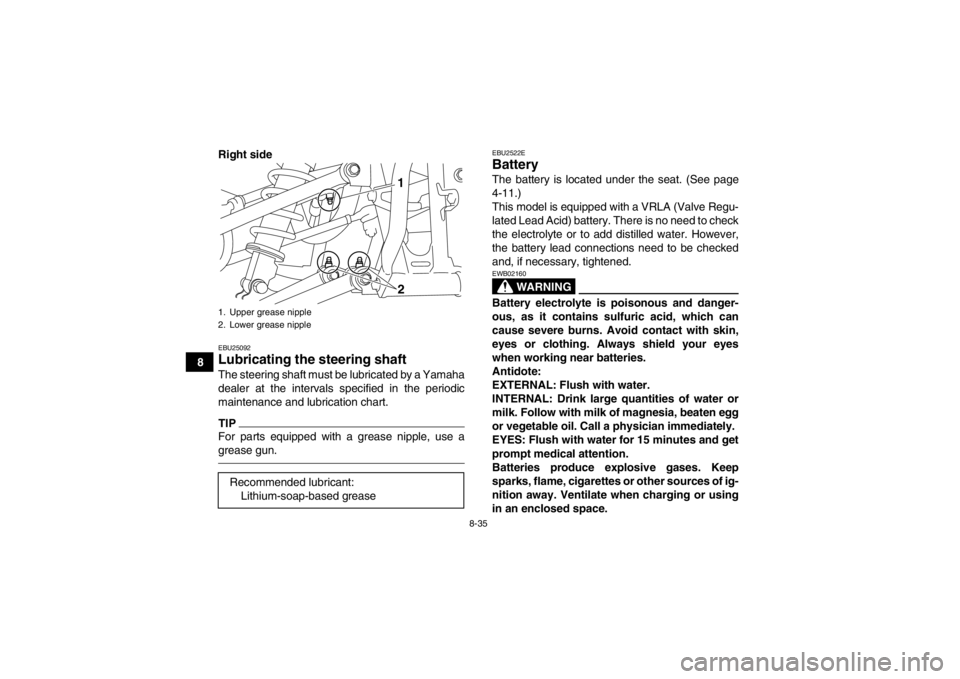
8Right side
EBU25092Lubricating the steering shaft The steering shaft must be lubricated by a Yamaha
dealer at the intervals specified in the periodic
maintenance and lubrication chart.TIPFor parts equipped with a grease nipple, use a
grease gun.
EBU2522EBattery The battery is located under the seat. (See page
4-11.)
This model is equipped with a VRLA (Valve Regu-
lated Lead Acid) battery. There is no need to check
the electrolyte or to add distilled water. However,
the battery lead connections need to be checked
and, if necessary, tightened.
WARNING
EWB02160Battery electrolyte is poisonous and danger-
ous, as it contains sulfuric acid, which can
cause severe burns. Avoid contact with skin,
eyes or clothing. Always shield your eyes
when working near batteries.
Antidote:
EXTERNAL: Flush with water.
INTERNAL: Drink large quantities of water or
milk. Follow with milk of magnesia, beaten egg
or vegetable oil. Call a physician immediately.
EYES: Flush with water for 15 minutes and get
prompt medical attention.
Batteries produce explosive gases. Keep
sparks, flame, cigarettes or other sources of ig-
nition away. Ventilate when charging or using
in an enclosed space.
1. Upper grease nipple
2. Lower grease nippleRecommended lubricant:
Lithium-soap-based grease
1
2
U1BT63E0.book Page 35 Friday, March 9, 2012 11:22 AM
Page 115 of 136
8-36
8
KEEP OUT OF REACH OF CHILDREN.
NOTICEECB00620Never attempt to remove the battery cell seals,
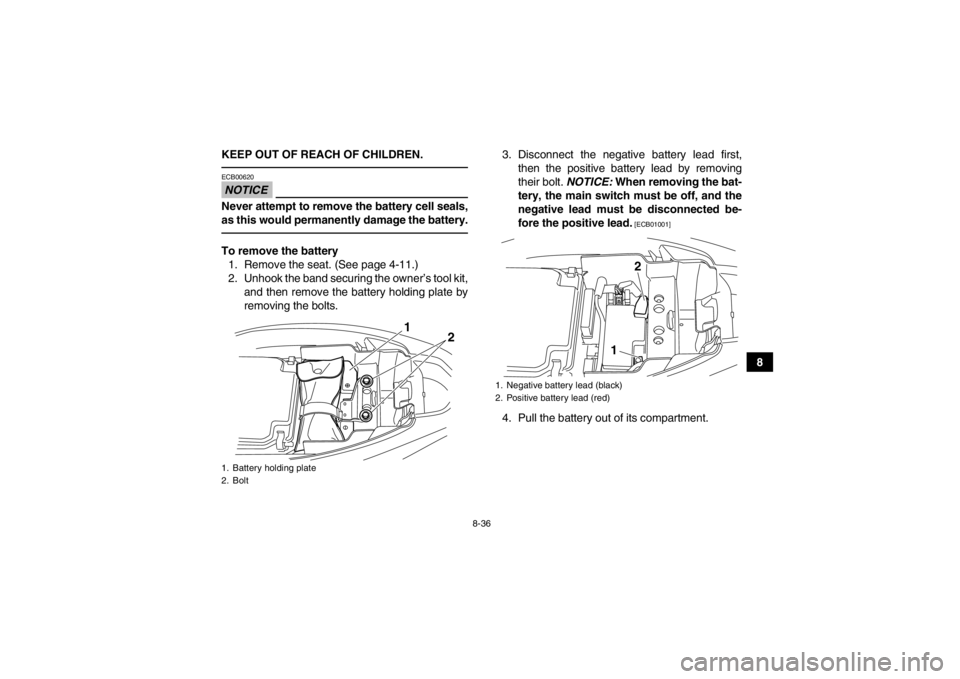
as this would permanently damage the battery.To remove the battery
1. Remove the seat. (See page 4-11.)
2. Unhook the band securing the owner’s tool kit, and then remove the battery holding plate by
removing the bolts. 3. Disconnect the negative battery lead first,
then the positive battery lead by removing
their bolt. NOTICE: When removing the bat-
tery, the main switch must be off, and the
negative lead must be disconnected be-
fore the positive lead.
[ECB01001]
4. Pull the battery out of its compartment.
1. Battery holding plate
2. Bolt
2
1
1. Negative battery lead (black)
2. Positive battery lead (red)
1 2
U1BT63E0.book Page 36 Friday, March 9, 2012 11:22 AM
Page 116 of 136
8-37
8To charge the battery
Have a Yamaha dealer charge the battery as soon
as possible if it seems to have discharged. Keep in
mind that the battery tends to discharge more
quickly if the ATV is equipped with optional electri-
cal accessories.
NOTICEECB00931To charge a VRLA (Valve Regulated Lead Acid)
battery, a special (constant-voltage) battery
charger is required. Using a conventional bat-
tery charger will damage the battery.To store the battery●If the ATV will not be used for more than one
month, remove the battery, fully charge it, and
then place it in a cool, dry place.●If the battery will be stored for more than two
months, check it at least once a month and fully
charge it if necessary.NOTICEECB00940Always keep the battery charged. Storing a dis-
charged battery can cause permanent battery
damage.
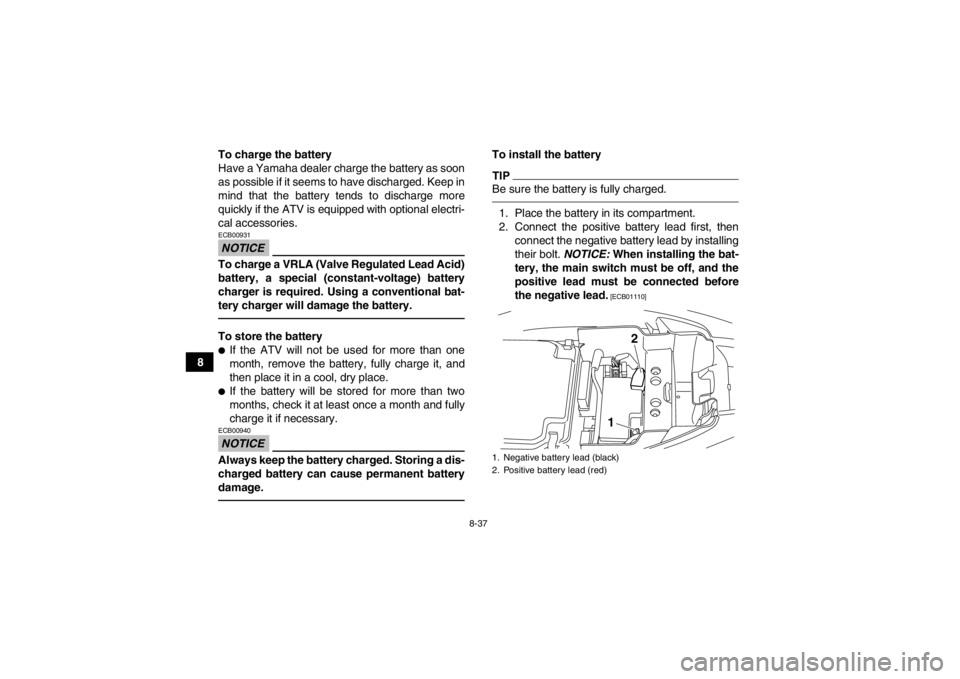
To install the batteryTIPBe sure the battery is fully charged.1. Place the battery in its compartment.
2. Connect the positive battery lead first, then
connect the negative battery lead by installing
their bolt. NOTICE: When installing the bat-
tery, the main switch must be off, and the
positive lead must be connected before
the negative lead.
[ECB01110]
1. Negative battery lead (black)
2. Positive battery lead (red)
1 2
U1BT63E0.book Page 37 Friday, March 9, 2012 11:22 AM
Page 117 of 136
8-38
8
3. Install the battery holding plate by installing
the bolts, and then hook the band to secure
the owner’s tool kit.
4. Install the seat. (See page 4-11.)
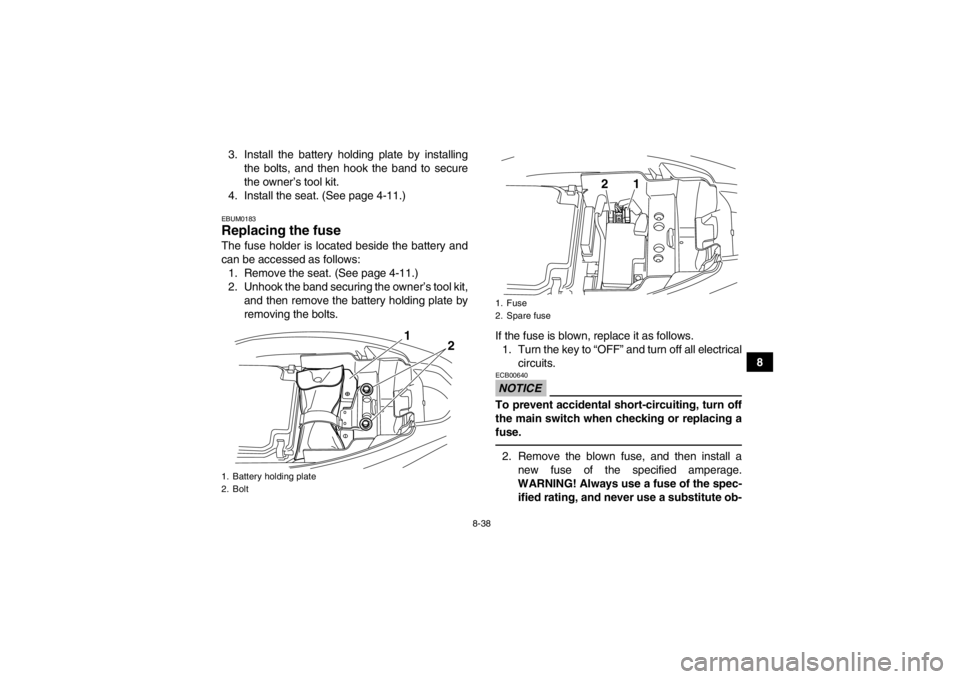
EBUM0183Replacing the fuse The fuse holder is located beside the battery and
can be accessed as follows: 1. Remove the seat. (See page 4-11.)
2. Unhook the band securing the owner’s tool kit, and then remove the battery holding plate by
removing the bolts.
If the fuse is blown, replace it as follows.1. Turn the key to “OFF” and turn off all electrical circuits.
NOTICEECB00640To prevent accidental short-circuiting, turn off
the main switch when checking or replacing a
fuse.2. Remove the blown fuse, and then install anew fuse of the specified amperage.
WARNING! Always use a fuse of the spec- ified rating, and never use a substitute ob-
1. Battery holding plate
2. Bolt
2
1
1. Fuse
2. Spare fuse
1
2
U1BT63E0.book Page 38 Friday, March 9, 2012 11:22 AM
Page 118 of 136
![YAMAHA YFM250R 2013 Owners Manual 8-39
8ject in place of the proper fuse. An
improper fuse or a substitute object can
cause damage to the electrical system,
which could lead to a fire.
[EWB02172]
3. Turn the key to “ON” and turn YAMAHA YFM250R 2013 Owners Manual 8-39
8ject in place of the proper fuse. An
improper fuse or a substitute object can
cause damage to the electrical system,
which could lead to a fire.
[EWB02172]
3. Turn the key to “ON” and turn](/img/51/53676/w960_53676-117.png)
8-39
8ject in place of the proper fuse. An
improper fuse or a substitute object can
cause damage to the electrical system,
which could lead to a fire.
[EWB02172]
3. Turn the key to “ON” and turn on the electrical
circuits to check if the devices operate.
4. If the fuse immediately blows again, have a Yamaha dealer check the electrical system.
5. Install the battery holding plate by installing the bolts, and then hook the band to secure
the owner’s tool kit.
6. Install the seat.EBU25444Replacing a headlight bulb If a headlight bulb burns out, replace it as follows. 1. Remove the headlight unit by removing the bolt and pulling the headlight unit outward as
shown. 2. Disconnect the headlight coupler.
3. Remove the headlight bulb holder cover.
Specified fuse:
Fuse:15.0 A
1. Headlight unit
2. Bolt
1
2
U1BT63E0.book Page 39 Friday, March 9, 2012 11:22 AM
Page 119 of 136
8-40
8
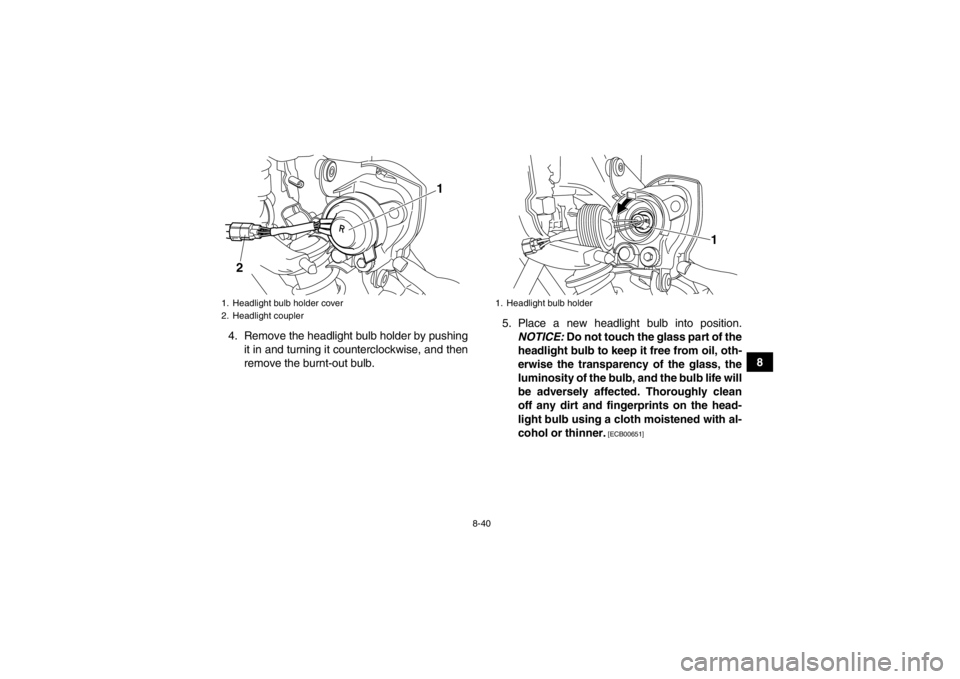
4. Remove the headlight bulb holder by pushing
it in and turning it counterclockwise, and then
remove the burnt-out bulb. 5. Place a new headlight bulb into position.
NOTICE: Do not touch the glass part of the
headlight bulb to keep it free from oil, oth-
erwise the transparency of the glass, the
luminosity of the bulb, and the bulb life will
be adversely affected. Thoroughly clean
off any dirt and fingerprints on the head-
light bulb using a cloth moistened with al-
cohol or thinner.
[ECB00651]
1. Headlight bulb holder cover
2. Headlight coupler
1
2
1. Headlight bulb holder
1
U1BT63E0.book Page 40 Friday, March 9, 2012 11:22 AM
Page 120 of 136
8-41
86. Install the headlight bulb holder by pushing it
in and turning it clockwise.
7. Install the headlight bulb holder cover.
8. Connect the headlight coupler.
9. Place the headlight unit in the original posi- tion, and then install the bolt.
10. Adjust the headlight beam if necessary.
EBU25561Adjusting a headlight beam NOTICEECB00690It is advisable to have a Yamaha dealer make
this adjustment.
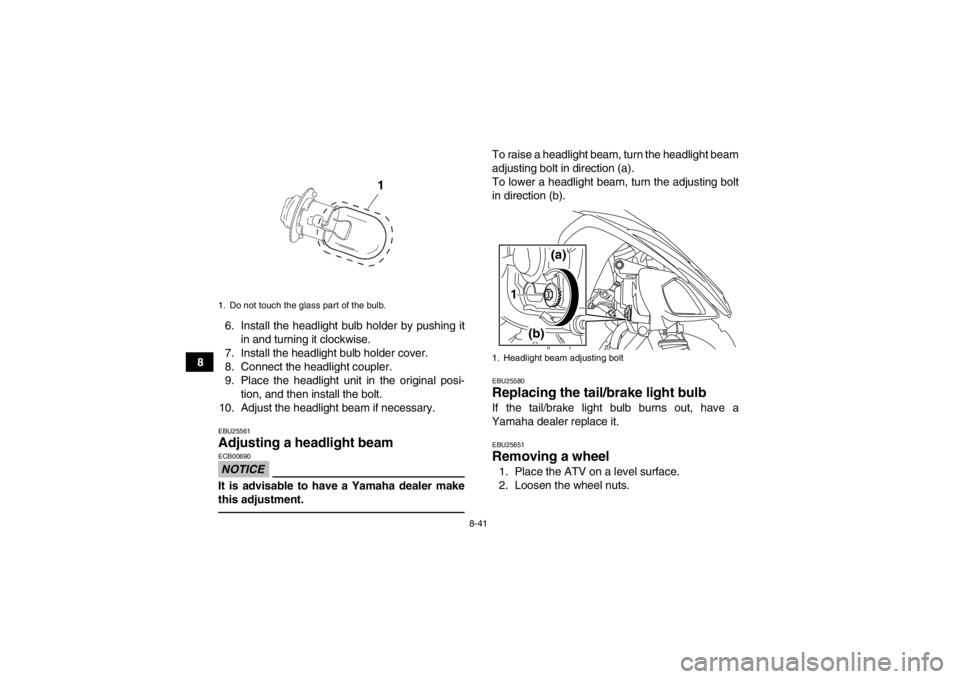
To raise a headlight beam, turn the headlight beam
adjusting bolt in direction (a).
To lower a headlight beam, turn the adjusting bolt
in direction (b).EBU25580Replacing the tail/brake light bulb If the tail/brake light bulb burns out, have a
Yamaha dealer replace it.EBU25651Removing a wheel 1. Place the ATV on a level surface.
2. Loosen the wheel nuts.
1. Do not touch the glass part of the bulb.
1
1. Headlight beam adjusting bolt
1 (a)
(b)
U1BT63E0.book Page 41 Friday, March 9, 2012 11:22 AM