engine YAMAHA YFM700R 2006 User Guide
[x] Cancel search | Manufacturer: YAMAHA, Model Year: 2006, Model line: YFM700R, Model: YAMAHA YFM700R 2006Pages: 424, PDF Size: 3.86 MB
Page 66 of 424

4-9
1
2
3
1. Light switch “LIGHTS”
2. Engine stop switch “ENG. STOP”
3. Start switch “START”
1. Contacteur d’éclairage “LIGHTS”
2. Coupe-circuit du moteur “ENG. STOP”
3. Contacteur du démarreur “START”
1. Interruptor de luces “LIGHTS”
2. Interruptor de paro del motor “ENG. STOP”
3. Interruptor de arranque “START”
EBU00530
Handlebar switches
EBU11560
Light switch “LIGHTS”
Set the switch to the “LO” position to turn on the
low beam and the taillight.
Set the switch to the “HI” position to turn on the
high beam and the taillight.
Set the switch to the “OFF” position to turn off all
of the lights.
cC
Do not use the headlights with the engine
turned off for more than thirty minutes. The
battery may discharge to the point that the
starter motor will not operate properly. If this
should happen, remove the battery and
recharge it.
1S3-9-60 4 6/7/05 9:37 AM Page 4-9
Page 68 of 424

4-11
EBU11580
Engine stop switch “ENG. STOP”
Make sure that the engine stop switch is in the
“RUN” position before starting the engine. The
engine stop switch controls ignition and can be
used at all times to stop the engine, especially in
an emergency. The engine will not start or run
when the engine stop switch is turned to “OFF”.
EBU06470
Start switch “START”
The starter motor cranks the engine when this
switch is pushed.
cC
See the starting instructions on page 6-3
prior to starting the engine.
1
2
3
1. Light switch “LIGHTS”
2. Engine stop switch “ENG. STOP”
3. Start switch “START”
1. Contacteur d’éclairage “LIGHTS”
2. Coupe-circuit du moteur “ENG. STOP”
3. Contacteur du démarreur “START”
1. Interruptor de luces “LIGHTS”
2. Interruptor de paro del motor “ENG. STOP”
3. Interruptor de arranque “START”
1S3-9-60 4 6/7/05 9:37 AM Page 4-11
Page 70 of 424

4-13
1. Throttle lever1. Levier d’accélération1. Palanca del aceleración
EBU00630
Throttle lever
Once the engine is running, movement of the
throttle lever will increase the engine speed.
Regulate the speed of the machine by varying
the throttle position. Because the throttle is
spring-loaded, the machine will decelerate, and
the engine will return to an idle any time the
hand is removed from the throttle lever.
Before starting the engine, check the throttle to
be sure it is operating smoothly. Make sure it
returns to the idle position as soon as the lever
is released.
w
Malfunction of the throttle could make it diffi-
cult to speed up or slow down when you
need to. This could cause an accident.
Check the operation of the throttle lever
before you start the engine. If the throttle
does not work smoothly, check for the
cause. Correct the problem before riding the
ATV or consult a Yamaha dealer.
1S3-9-60 4 6/7/05 9:37 AM Page 4-13
Page 72 of 424

4-15
1. Locknut 2. Adjusting screw
a. No more than 12 mm
1. Contre-écrou 2. Vis de réglage
a. Pas plus que 12 mm
1. Contratuerca 2. Tornillo de ajuste
a. No más de 12 mm
EBU11980
Speed limiter
The speed limiter keeps the throttle from fully
opening, even when the throttle lever is pushed
to the maximum. Turning in the adjusting screw
limits the maximum engine power available and
decreases the maximum speed of the ATV.
w
Improper adjustment of the speed limiter and
throttle could cause throttle cable damage or
improper throttle operation. You could lose
control, have an accident or be injured. Do
not turn the adjusting screw out more than
12 mm or the throttle cable could be dam-
aged. Always make sure the throttle lever
free play is adjusted to 2–4 mm. See page
8-69.
1S3-9-60 4 6/7/05 9:37 AM Page 4-15
Page 74 of 424

4-17
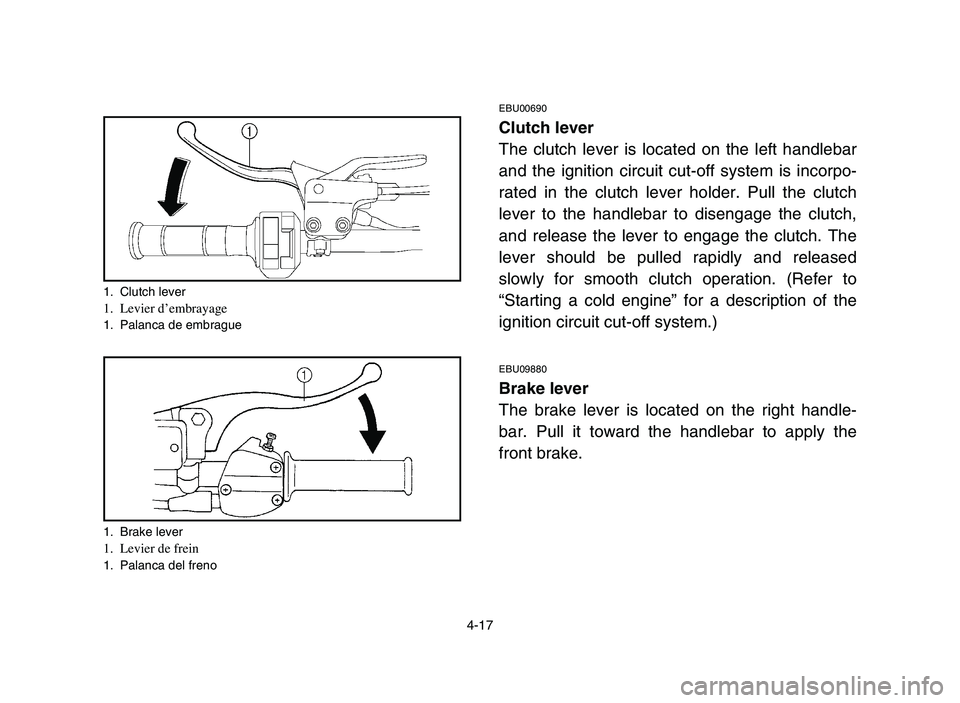
1. Clutch lever1. Levier d’embrayage1. Palanca de embrague
1. Brake lever
1. Levier de frein1. Palanca del freno
EBU00690
Clutch lever
The clutch lever is located on the left handlebar
and the ignition circuit cut-off system is incorpo-
rated in the clutch lever holder. Pull the clutch
lever to the handlebar to disengage the clutch,
and release the lever to engage the clutch. The
lever should be pulled rapidly and released
slowly for smooth clutch operation. (Refer to
“Starting a cold engine” for a description of the
ignition circuit cut-off system.)
EBU09880
Brake lever
The brake lever is located on the right handle-
bar. Pull it toward the handlebar to apply the
front brake.
1S3-9-60 4 6/7/05 9:37 AM Page 4-17
Page 78 of 424

4-21
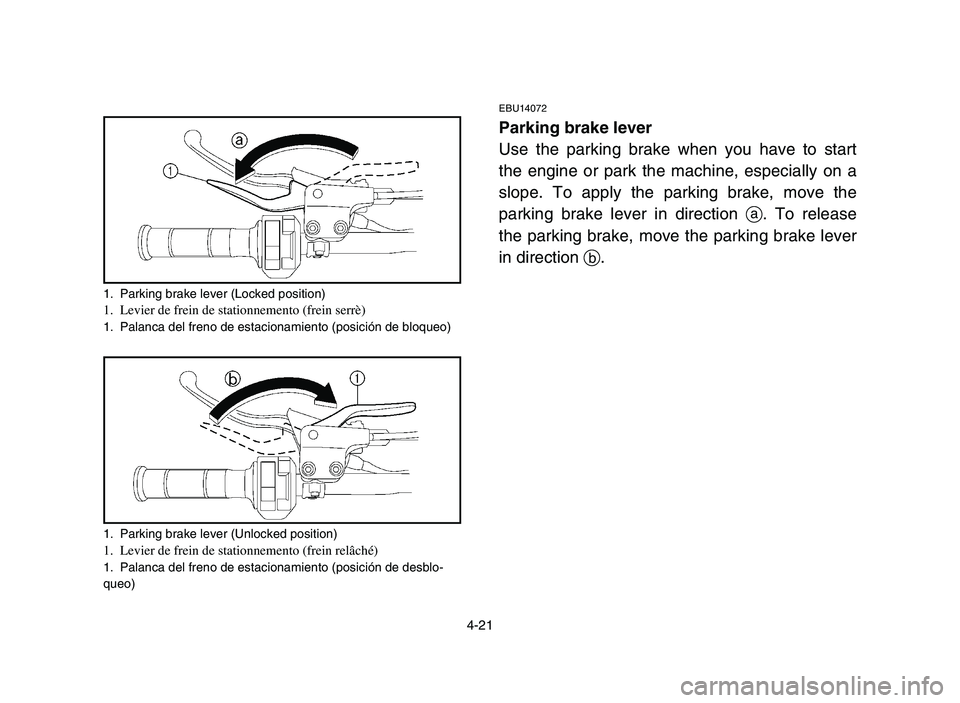
1. Parking brake lever (Locked position)1. Levier de frein de stationnemento (frein serrè)1. Palanca del freno de estacionamiento (posición de bloqueo)
1. Parking brake lever (Unlocked position)
1. Levier de frein de stationnemento (frein relâché)1. Palanca del freno de estacionamiento (posición de desblo-
queo)
EBU14072
Parking brake lever
Use the parking brake when you have to start
the engine or park the machine, especially on a
slope. To apply the parking brake, move the
parking brake lever in direction
a. To release
the parking brake, move the parking brake lever
in direction b.
1S3-9-60 4 6/7/05 9:37 AM Page 4-21
Page 80 of 424

4-23
w
8Always set the parking brake before start-
ing the engine. The ATV could start mov-
ing unexpectedly if the parking brake is
not applied. This could cause loss of con-
trol or a collision.
8Always be sure you have released the
parking brake before you begin to ride.
The brake could overheat if you ride the
ATV without releasing the parking brake.
You could lose braking performance
which could cause an accident. You could
also wear out the brakes prematurely.
1S3-9-60 4 6/7/05 9:37 AM Page 4-23
Page 82 of 424

4-25
1
1
1. Shift pedal1. Pédale de sélection1. Pedal del cambio
1. Reverse knob “REV”
1. Bouton de marche arrière “REV”1. Botón de marcha atrás “REV”
EBU07880
Shift pedal
This machine is equipped with a constant-mesh
5-speed forward and 1-speed reverse transmis-
sion. The shift pedal is located on the left side of
the engine and is used in combination with the
clutch when shifting.
EBU10280
Reverse knob “REV”
The reverse knob is used to shift into reverse
gear.
Refer to the “Reverse knob operation and
reverse driving” section (page 6-9) before oper-
ating this machine in reverse gear.
1S3-9-60 4 6/7/05 9:37 AM Page 4-25
Page 100 of 424

5-1
EBU01130
PRE-OPERATION CHECKS
Before using this machine, check the following points:
ITEM ROUTINE PAGE
Front brake9Check operation, free play, fluid level and fluid leakage. 5-7–5-11
9Fill with DOT 4 brake fluid if necessary. 8-71–8-81
Rear brake9Check operation, free play, fluid level and fluid leakage. 5-7–5-11
9Fill with DOT 4 brake fluid if necessary. 8-71–8-81
Clutch9Check operation, condition and lever free play. 8-89
Parking brake9Check operation, condition and cable length. 8-83–8-85
Fuel 9Check fuel level.
9Fill with fuel if necessary.5-13–5-15
Engine oil9Check oil level.
9Fill with oil if necessary.5-17, 8-21
Coolant reservoir 9Check coolant level in reservoir.
9Fill with coolant if necessary.5-19, 8-37–8-47
Drive chain9Check chain slack and condition.
9Adjust if necessary.5-23, 8-91–8-99
Throttle9Check for proper throttle cable operation and free play. 5-23, 8-69
Wheels and tires9Check tire pressure, wear and damage. 5-25–5-31, 8-111–8-113
Fittings and fasteners9Check all fittings and fasteners. 5-31
Lights and switches9Check for proper operation. 5-31, 8-125–8-131
1S3-9-60 5-6 6/7/05 10:22 AM Page 5-1
Page 114 of 424

5-15
cC
Use only unleaded gasoline. The use of lead-
ed gasoline will cause severe damage to
internal engine parts, such as the valves and
piston rings, as well as to the exhaust sys-
tem.
w
8Do not overfill the fuel tank. Fuel expands
when it heats up. If the fuel tank is over-
filled, fuel could spill out due to heat from
the engine or the sun.
8Be careful not to spill fuel, especially on
the engine or exhaust pipe which can
cause a fire and severe injury. Wipe up
any spilled fuel immediately.
8Do not refuel right after the engine has
been running and is still very hot.
8Be sure the fuel tank cap is closed secure-
ly.
q
w
1. Filler tube 2. Fuel level1. Tube de remplissage 2. Niveau de carburant1. Tubo de llenado 2. Nivel de combustible
1S3-9-60 5-6 6/7/05 10:22 AM Page 5-15