engine YAMAHA YFM700R 2006 Workshop Manual
[x] Cancel search | Manufacturer: YAMAHA, Model Year: 2006, Model line: YFM700R, Model: YAMAHA YFM700R 2006Pages: 424, PDF Size: 3.86 MB
Page 288 of 424

8-39
cC
Hard water or salt water is harmful to the
engine. You may use soft water if you can’t
get distilled water.
NOTE:
8If water is added, have a Yamaha dealer
check the antifreeze content of the coolant as
soon as possible.
8The radiator fan operation is completely auto-
matic. It is switched on or off according to the
coolant temperature in the radiator.
If your ATV overheats, see page 8-138 for
details.
1S3-9-60 8 6/7/05 10:25 AM Page 8-39
Page 290 of 424

8-41
EBU10242
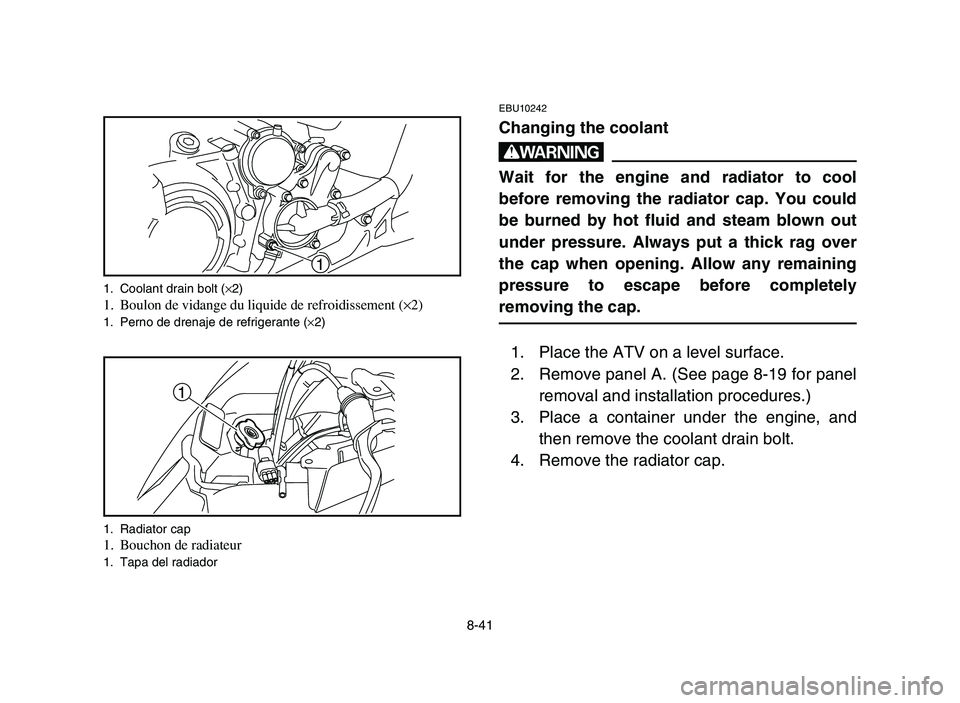
Changing the coolant
w
Wait for the engine and radiator to cool
before removing the radiator cap. You could
be burned by hot fluid and steam blown out
under pressure. Always put a thick rag over
the cap when opening. Allow any remaining
pressure to escape before completely
removing the cap.
1. Place the ATV on a level surface.
2. Remove panel A. (See page 8-19 for panel
removal and installation procedures.)
3. Place a container under the engine, and
then remove the coolant drain bolt.
4. Remove the radiator cap.
1
1
1. Coolant drain bolt (×2)1. Boulon de vidange du liquide de refroidissement (×2)1. Perno de drenaje de refrigerante (×2)
1. Radiator cap
1. Bouchon de radiateur1. Tapa del radiador
1S3-9-60 8 6/7/05 10:25 AM Page 8-41
Page 294 of 424

8-45
cC
Hard water or salt water is harmful to the
engine. You may use soft water if you cannot
get distilled water.
Recommended antifreeze:
High quality ethylene glycol antifreeze
containing corrosion inhibitors for
aluminum engines.
Antifreeze and water mixing ratio:
1:1
Total amount:
1.61 L
Coolant reservoir capacity
(up to the maximum level mark):
0.25 L
1S3-9-60 8 6/7/05 10:25 AM Page 8-45
Page 296 of 424

8-47
12. Install the radiator cap and the coolant
reservoir cap.
13. Start the engine and let it idle for several
minutes. Stop the engine, and then check
the coolant level in the radiator. If it is low,
add more coolant until it reaches the top of
the radiator.
14. Check the coolant level in the reservoir. If it
is low, add coolant to the maximum level
mark.
15. Start the engine and then check for coolant
leakage.
NOTE:
If any leakage is found, have a Yamaha dealer
check the cooling system.
16. Install the panel.
1S3-9-60 8 6/7/05 10:25 AM Page 8-47
Page 298 of 424

8-49
EBU14550
Spark plug inspection
Removal
1. Remove the spark plug cap.
2. Use the spark plug wrench in the owner’s
tool kit to remove the spark plug as shown.
Inspection
The spark plug is an important engine compo-
nent and is easy to inspect. The condition of the
spark plug can indicate the condition of the
engine.
The ideal color on the white insulator around the
center electrode is a medium-to-light tan color
for an ATV that is being ridden normally.
Do not attempt to diagnose such problems your-
self.
Instead, take the ATV to a Yamaha dealer. You
should periodically remove and inspect the
spark plug because heat and deposits will cause
the spark plug to slowly break down and erode.
If electrode erosion becomes excessive, or if
carbon and other deposits are excessive, you
should replace the spark plug with the specified
plug.1
1
1. Spark plug cap1. Capuchon de bougie1. Tapa de bujía
1. Spark plug wrench
1. Clé à bougie1. Llave de bujía
1S3-9-60 8 6/7/05 10:25 AM Page 8-49
Page 308 of 424

8-59
5. Wash the sponge material gently but thor-
oughly in solvent.
w
Always use parts cleaning solvent to clean
the sponge material. Never use low flash
point solvents or gasoline to clean the
sponge material because the engine could
catch fire or explode.
6. Squeeze the excess solvent out of the
sponge material and let it dry.
cC
Do not twist the sponge material when
squeezing it.
7. Inspect the sponge material and replace it
if damaged.
8. Apply foam air filter oil to the sponge mate-
rial.
1S3-9-60 8 6/7/05 10:25 AM Page 8-59
Page 310 of 424

8-61
NOTE:
The sponge material should be wet but not drip-
ping.
9. Pull the sponge material over its frame.
10. Install the air filter element by installing the
wing bolt.
11. Install the air filter case cover by hooking
the holders onto the filter case.
12. Install the seat.
NOTE:
The air filter element should be cleaned every
20-40 hours. It should be cleaned and lubricated
more often if the ATV is operated in extremely
dusty areas. Each time air filter element mainte-
nance is performed, check the air inlet to the air
filter case for obstructions. Check the air intake
duct between the air filter case and the throttle
body and the manifold fittings for an airtight seal.
Tighten all fittings securely to avoid the possibili-
ty of unfiltered air entering the engine.
1S3-9-60 8 6/7/05 10:25 AM Page 8-61
Page 312 of 424

8-63
cC
Never operate the engine with the air filter
element removed. This will allow unfiltered
air to enter the engine, causing rapid engine
wear and possible engine damage.
Additionally, operation without the air filter
element will affect the fuel injection system
with subsequent poor performance and pos-
sible engine overheating.
1S3-9-60 8 6/7/05 10:25 AM Page 8-63
Page 314 of 424

8-65
EBU15980
Idle speed adjustment
NOTE:
A diagnostic tachometer must be used for this
procedure.
1. Start the engine and warm it up for a few
minutes at approximately 1,000 to 2,000
r/min. Occasionally rev the engine to 4,000
to 5,000 r/min. The engine is warm when it
quickly responds to the throttle.
2. Connect the tachometer to the spark plug
lead, and then set the idle to the specified
idling speed by turning the idle adjusting
screw. Turn the screw in direction ato
increase the engine speed, and in direction
bto decrease the engine speed.
1
a
b
1. Idle adjusting screw1. Vis de réglage du ralenti1. Tornillo de ajuste del ralentí
Specified idle speed:
1,500–1,700 r/min
1S3-9-60 8 6/7/05 10:25 AM Page 8-65
Page 316 of 424

8-67
EBU03030
Valve clearance adjustment
The correct valve clearance changes with use,
resulting in improper fuel/air supply or engine
noise. To prevent this, the valve clearance must
be adjusted regularly. This adjustment however,
should be left to a professional Yamaha service
technician.
1S3-9-60 8 6/7/05 10:25 AM Page 8-67