YAMAHA YXZ1000R SS 2019 Service Manual
Manufacturer: YAMAHA, Model Year: 2019, Model line: YXZ1000R SS, Model: YAMAHA YXZ1000R SS 2019Pages: 218, PDF Size: 9.48 MB
Page 41 of 218
4-11
4
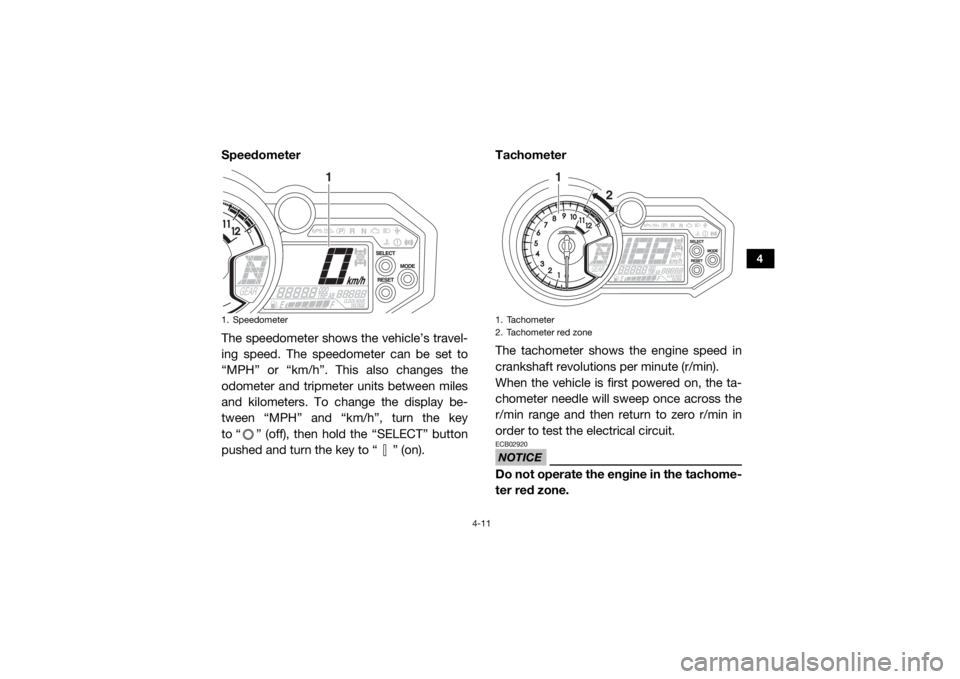
Speedometer
The speedometer shows the vehicle’s travel-
ing speed. The speedometer can be set to
“MPH” or “km/h”. This also changes the
odometer and tripmeter units between miles
and kilometers. To change the display be-
tween “MPH” and “km/h”, turn the key
to “ ” (off), then hold the “SELECT” button
pushed and turn the key to “ ” (on).Tachometer
The tachometer shows the engine speed in
crankshaft revolutions per minute (r/min).
When the vehicle is first powered on, the ta-
chometer needle will sweep once across the
r/min range and then return to zero r/min in
order to test the electrical circuit.
NOTICEECB02920Do not operate the engine in the tachome-
ter red zone.
1. Speedometer
1
1. Tachometer
2. Tachometer red zone
1
2
UB5H7AE0.book Page 11 Wednesday, July 4, 2018 1:37 PM
Page 42 of 218
4-12
4
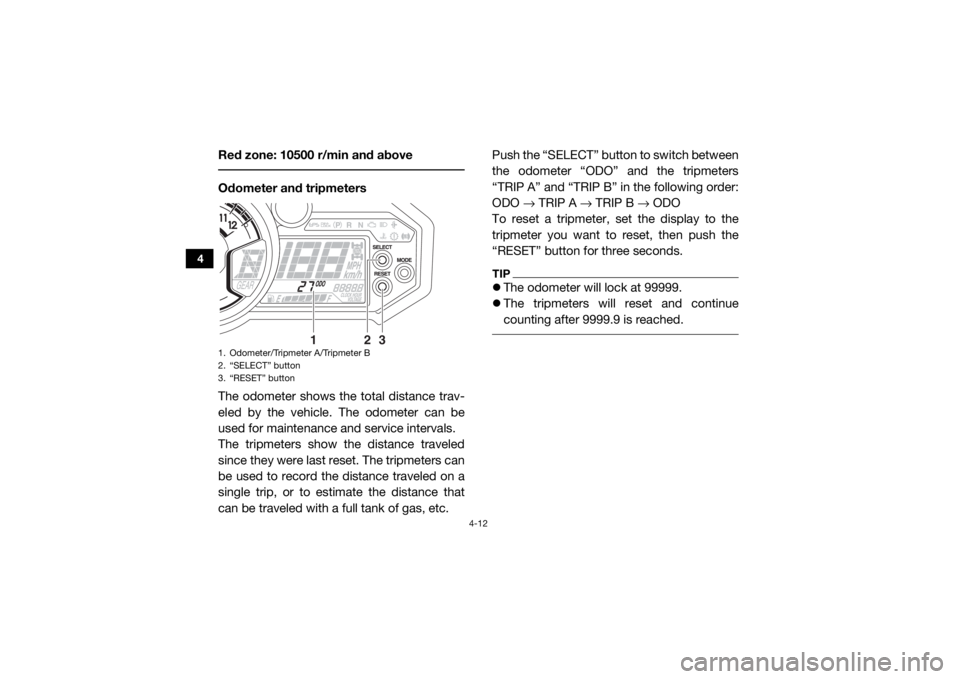
Red zone: 10500 r/min and above Odometer and tripmeters
The odometer shows the total distance trav-
eled by the vehicle. The odometer can be
used for maintenance and service intervals.
The tripmeters show the distance traveled
since they were last reset. The tripmeters can
be used to record the distance traveled on a
single trip, or to estimate the distance that
can be traveled with a full tank of gas, etc.Push the “SELECT” button to switch between
the odometer “ODO” and the tripmeters
“TRIP A” and “TRIP B” in the following order:
ODO
→ TRIP A → TRIP B → ODO
To reset a tripmeter, set the display to the
tripmeter you want to reset, then push the
“RESET” button for three seconds.
TIP The odometer will lock at 99999.
The tripmeters will reset and continue
counting after 9999.9 is reached.
1. Odometer/Tripmeter A/Tripmeter B
2. “SELECT” button
3. “RESET” button
1
2
3
UB5H7AE0.book Page 12 Wednesday, July 4, 2018 1:37 PM
Page 43 of 218
4-13
4
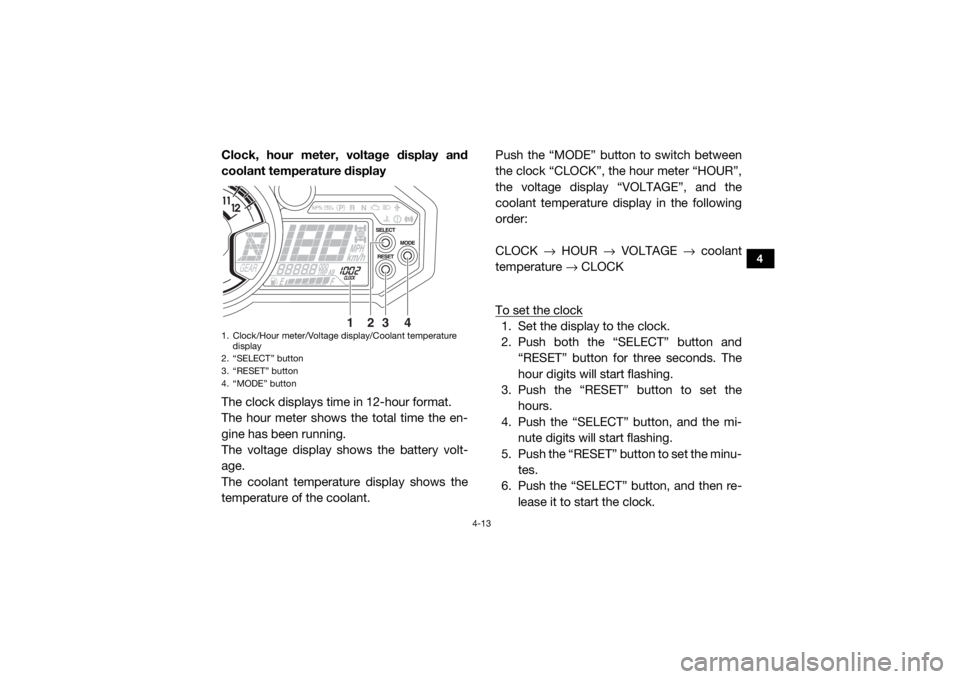
Clock, hour meter, voltage display and
coolant temperature display
The clock displays time in 12-hour format.
The hour meter shows the total time the en-
gine has been running.
The voltage display shows the battery volt-
age.
The coolant temperature display shows the
temperature of the coolant.Push the “MODE” button to switch between
the clock “CLOCK”, the hour meter “HOUR”,
the voltage display “VOLTAGE”, and the
coolant temperature display in the following
order:
CLOCK
→ HOUR → VOLTAGE → coolant
temperature → CLOCK
To set the clock
1. Set the display to the clock.
2. Push both the “SELECT” button and “RESET” button for th ree seconds. The
hour digits will start flashing.
3. Push the “RESET” button to set the
hours.
4. Push the “SELECT” button, and the mi- nute digits will start flashing.
5. Push the “RESET” button to set the minu- tes.
6. Push the “SELECT” button, and then re-
lease it to start the clock.
1. Clock/Hour meter/Voltage display/Coolant temperature display
2. “SELECT” button
3. “RESET” button
4. “MODE” button
1
2
3
4
UB5H7AE0.book Page 13 Wednesday, July 4, 2018 1:37 PM
Page 44 of 218
4-14
4
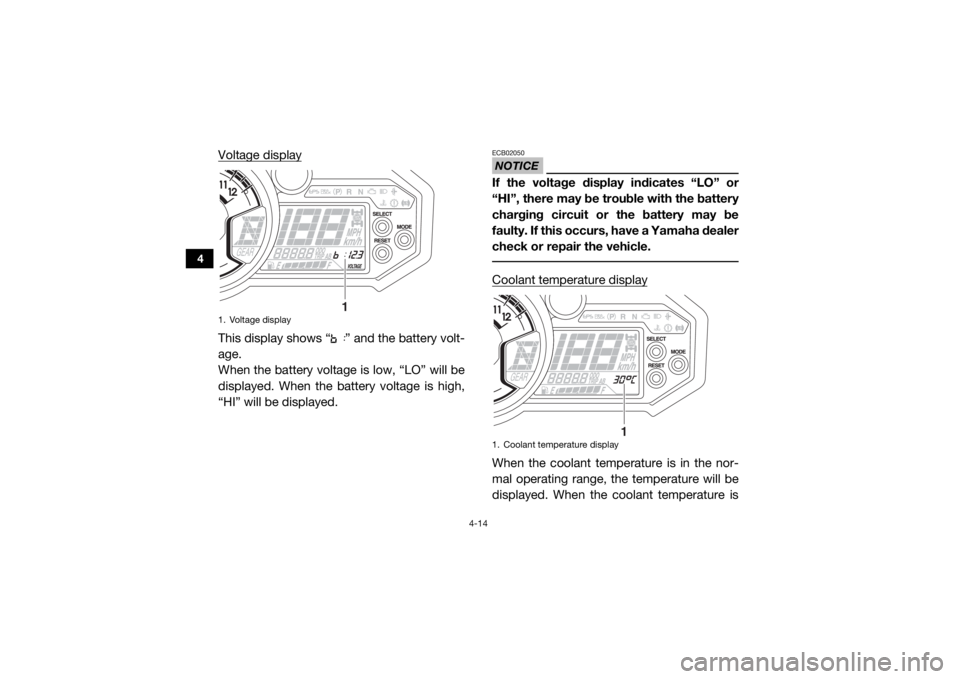
Voltage displayThis display shows “ ” and the battery volt-
age.
When the battery voltage is low, “LO” will be
displayed. When the battery voltage is high,
“HI” will be displayed.
NOTICEECB02050If the voltage display indicates “LO” or
“HI”, there may be trouble with the battery
charging circuit or the battery may be
faulty. If this occurs, have a Yamaha dealer
check or repair the vehicle. Coolant temperature displayWhen the coolant temperature is in the nor-
mal operating range, the temperature will be
displayed. When the coolant temperature is
1. Voltage display
1
1. Coolant temperature display
1
UB5H7AE0.book Page 14 Wednesday, July 4, 2018 1:37 PM
Page 45 of 218
4-15
4
low, “LO” will be displayed. When the coolant
temperature rises, the coolant temperature
display will begin to flash. If the coolant tem-
perature continues to rise, the message “HI”
will flash.TIPThe coolant temperature display can be set
to “°C” or “°F”. To switch the temperature
units, turn the key to “ ” (off), then hold
the “RESET” button pushed and turn the
key to “ ” (on).
The radiator fans turn on and off automati-
cally according to the coolant temperature.
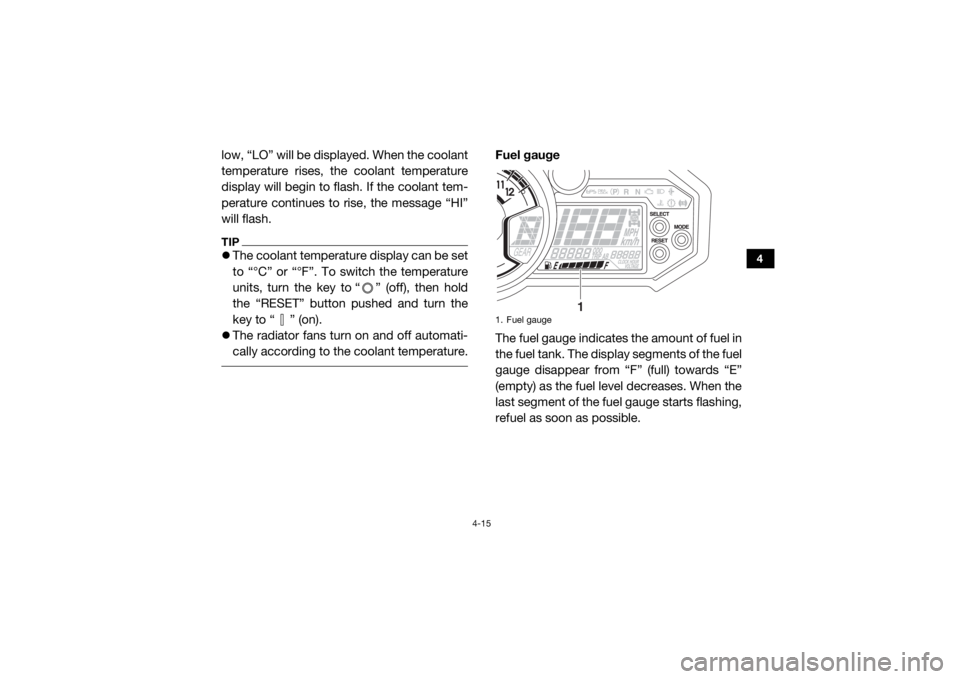
Fuel gauge
The fuel gauge indicates the amount of fuel in
the fuel tank. The display segments of the fuel
gauge disappear from “F” (full) towards “E”
(empty) as the fuel level decreases. When the
last segment of the fuel gauge starts flashing,
refuel as soon as possible.1. Fuel gauge
1
UB5H7AE0.book Page 15 Wednesday, July 4, 2018 1:37 PM
Page 46 of 218
4-16
4
TIPThis fuel gauge is equipped with a self-diag-
nosis system. If a problem is detected in an
electrical circuit, the fuel gauge will flash re-
peatedly. If this occurs, have a Yamaha deal-
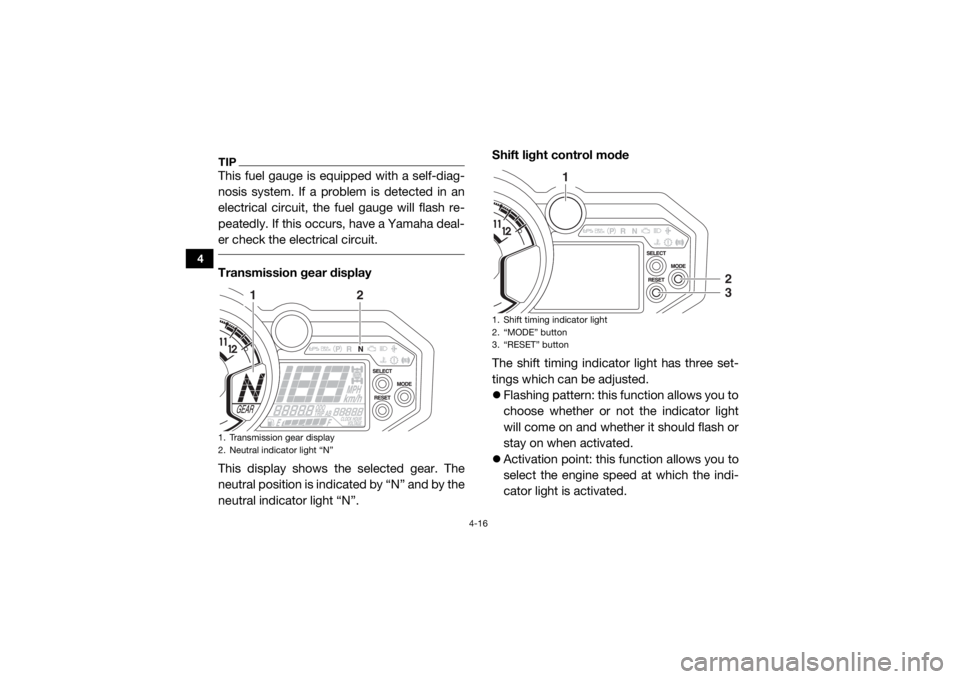
er check the electrical circuit. Transmission gear display
This display shows the selected gear. The
neutral position is indicated by “N” and by the
neutral indicator light “N”.Shift light control mode
The shift timing indicator light has three set-
tings which can be adjusted.
Flashing pattern: this function allows you to
choose whether or not the indicator light
will come on and whether it should flash or
stay on when activated.
Activation point: this function allows you to
select the engine speed at which the indi-
cator light is activated.1. Transmission gear display
2. Neutral indicator light “N”
1
2
1. Shift timing indicator light
2. “MODE” button
3. “RESET” button
1
23
UB5H7AE0.book Page 16 Wednesday, July 4, 2018 1:37 PM
Page 47 of 218

4-17
4
Deactivation point: this function allows you
to select the engine speed at which the in-
dicator light is deactivated.
To adjust the shift timing indicator light1. Turn the key to “ ” (off).
2. Push and hold the “MODE” button.
3. Turn the key to “ ” (on), and then re- lease the “MODE” button after five sec-
onds. After all segments of the display
disappear and the shift timing indicator
light comes on, the shift timing indicator
light can be adjusted.
To set the flashing pattern1. Push the “RESET” button to select one of the following flashing pattern settings:
On: the indicator light stays on when
activated. (The indicator light will con-
firm this setting by staying on.)
Flash: the indicator light flashes when
activated. (The indicator light will con-
firm this setting by flashing four times
per second.)
Off: the indicator light is deactivated; in
other words, it does not come on or
flash. (The indicator light will confirm
this setting by flashing once every two
seconds.)
2. Push the “MODE” button to confirm the selected flashing pattern. The control
mode changes to the activation point set-
ting mode. The shift timing indicator light
remains on and the tachometer shows
the current setting r/min for the activation
point.
To set the shift activation point
TIP The shift timing indicator light activation
point can be set between 7000 r/min and
12000 r/min. The activation point can be set
in increments of 500 r/min.
UB5H7AE0.book Page 17 Wednesday, July 4, 2018 1:37 PM
Page 48 of 218

4-18
4
The tachometer needle will start over at
7000 r/min after 12000 r/min. 1. Push the “RESET” button to select the
desired engine speed for activating the
indicator light.
2. Push the “MODE” button to confirm the selected engine speed. The shift timing
indicator light flashes and the tachometer
shows the current setting r/min for the
deactivation point.
To set the deactivation pointTIP The shift timing indicator light deactivation
point can be set between 7000 r/min and
12000 r/min. The deactivation point can be
set in increments of 500 r/min.
Be sure to set the deactivation point to a
higher engine speed than for the activation
point, otherwise the shift timing indicator
light will not come on.
The tachometer needle will start over at
7000 r/min after 12000 r/min.
1. Push the “RESET” button to select the
desired engine speed for deactivating the
indicator light.
2. Push the “MODE” button to confirm the selected engine speed. The display exits
the shift light control mode and returns to
the standard multi-function display mo-
de.
UB5H7AE0.book Page 18 Wednesday, July 4, 2018 1:37 PM
Page 49 of 218

4-19
4
Error code display
This model is equipped with a self-diagnosis
device for various electrical circuits.
If a problem is detected in any of those cir-
cuits, the engine trouble warning light and/or
the YCC-S system warning light will come on
or flash, and the display will indicate an error
code.
TIPYCC-S system error codes are displayed
only when the engine is stopped.
If the display indicates an error code, note
the code number and have a Yamaha deal-
er check the vehicle. NOTICEECB00812If the multi-function display indicates an
error code, the vehicle should be checked
as soon as possible in order to avoid en-
gine damage.
1. Error code display
2. YCC-S system error code display
3. Engine trouble warning light “ ”
4. YCC-S system warning light “ ”
1
2
3
4
UB5H7AE0.book Page 19 Wednesday, July 4, 2018 1:37 PM
Page 50 of 218
4-20
4
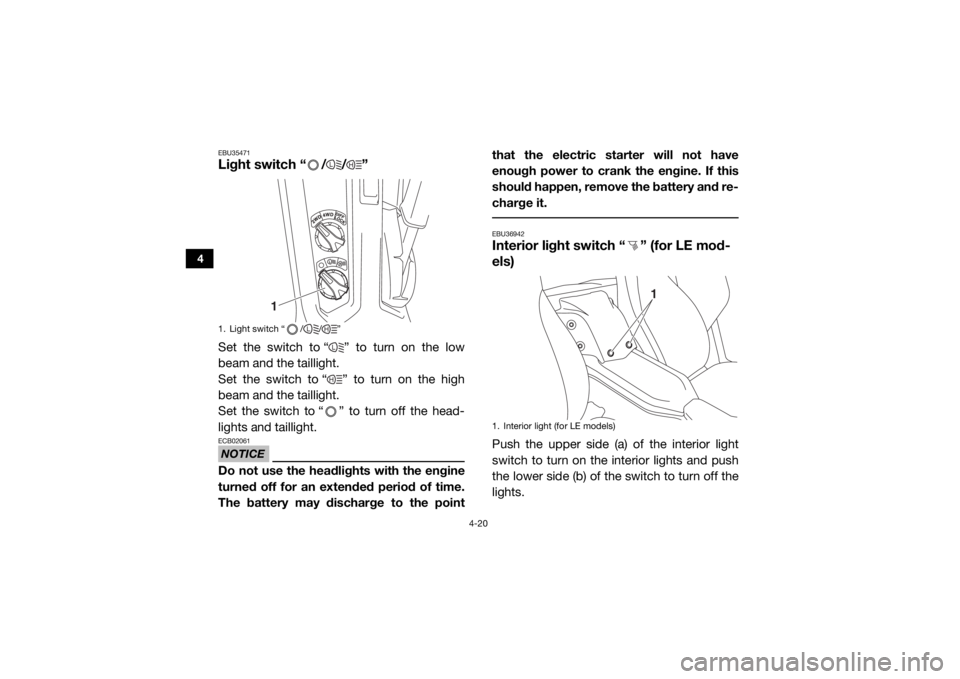
EBU35471Light switch “ / / ”Set the switch to “ ” to turn on the low
beam and the taillight.
Set the switch to “ ” to turn on the high
beam and the taillight.
Set the switch to “ ” to turn off the head-
lights and taillight.NOTICEECB02061Do not use the headlights with the engine
turned off for an extended period of time.
The battery may discharge to the pointthat the electric starter will not have
enough power to crank the engine. If this
should happen, remove the battery and re-
charge it.
EBU36942Interior light switch “ ” (for LE mod-
els)Push the upper side (a) of the interior light
switch to turn on the interior lights and push
the lower side (b) of the switch to turn off the
lights.
1. Light switch “ / / ”
L
H
1
L
HLH
1. Interior light (for LE models)
1
UB5H7AE0.book Page 20 Wednesday, July 4, 2018 1:37 PM