Shift YAMAHA YXZ1000R SS 2020 User Guide
[x] Cancel search | Manufacturer: YAMAHA, Model Year: 2020, Model line: YXZ1000R SS, Model: YAMAHA YXZ1000R SS 2020Pages: 212, PDF Size: 9.36 MB
Page 41 of 212

5-9
5
Do not shift the transmission into neutral
if the vehicle is stopped on an incline un-
less the parking brake is applied or vehi-
cle movement is secured by other
means. Otherwise, when the transmis-
sion is shifted into neutral, the vehicle
may roll downhill and possibly cause an
accident, serious injury or death. EBU31361Helmet reminder light “ ”
The reminder light comes on and stays on
while the key is turned to “ ” (on) to remind
the occupants to always wear a helmet. If the
reminder light does not come on when the
key is turned to “ ” (on), have a Yamaha
dealer check the electrical circuit.EBU31371Seat belt reminder light “ ”
The reminder light comes on when the key is
turned to “ ” (on) to remind the occupants
to fasten their seat belt. The reminder light
stays on until the driver seat belt is properly latched. If the reminder light does not come
on when the key is turned to “ ” (on), or if
the reminder light remains on after the driver
seat belt is properly latched, have a Yamaha
dealer check the electrical circuit.UBAS7AE0.book Page 9 Wednesday, June 19, 2019 11:51 AM
Page 42 of 212

5-10
5
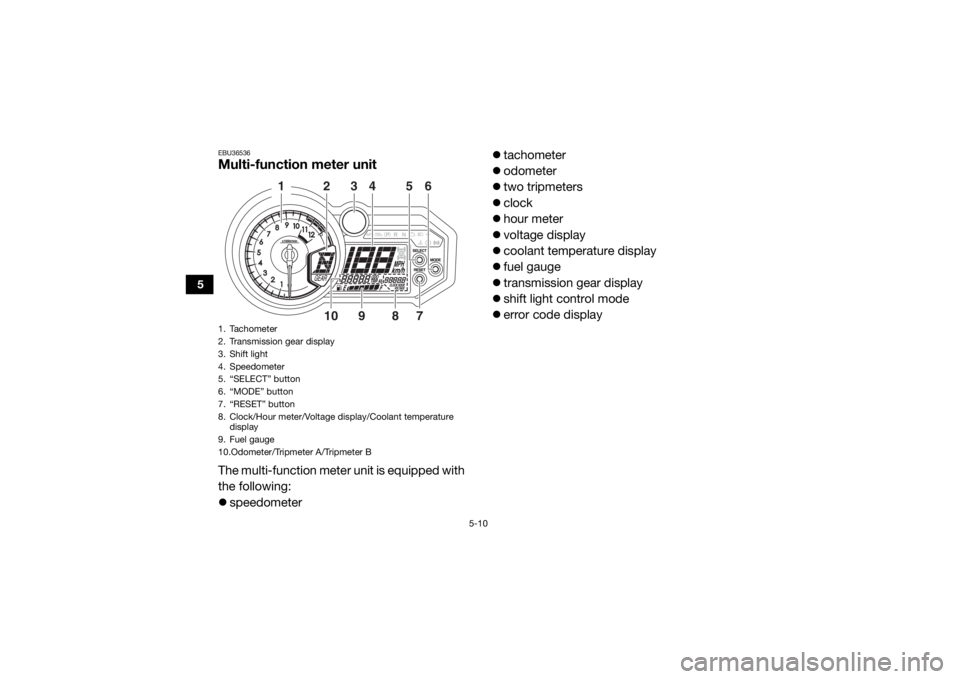
EBU36536Multi-function meter unitThe multi-function meter unit is equipped with
the following:
speedometer
tachometer
odometer
two tripmeters
clock
hour meter
voltage display
coolant temperature display
fuel gauge
transmission gear display
shift light control mode
error code display1. Tachometer
2. Transmission gear display
3. Shift light
4. Speedometer
5. “SELECT” button
6. “MODE” button
7. “RESET” button
8. Clock/Hour meter/Voltage display/Coolant temperature
display
9. Fuel gauge
10.Odometer/Tripmeter A/Tripmeter B
123456
10 9 87
UBAS7AE0.book Page 10 Wednesday, June 19, 2019 11:51 AM
Page 48 of 212

5-16
5
TIPThis fuel gauge is equipped with a self-diag-
nosis system. If a problem is detected in an
electrical circuit, the fuel gauge will flash re-
peatedly. If this occurs, have a Yamaha deal-
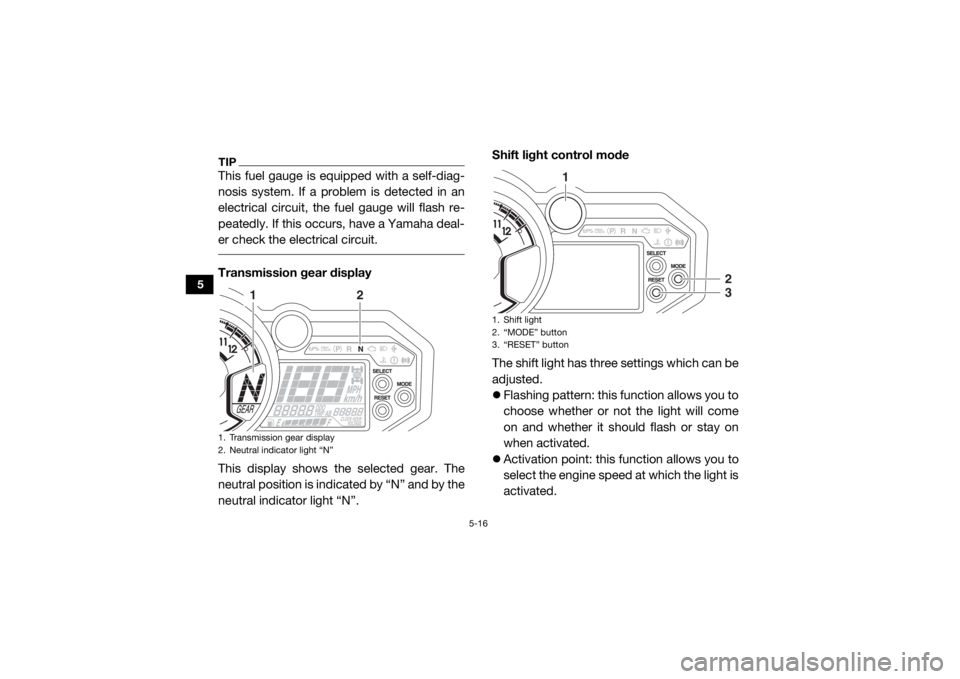
er check the electrical circuit. Transmission gear display
This display shows the selected gear. The
neutral position is indicated by “N” and by the
neutral indicator light “N”.Shift light control mode
The shift light has three settings which can be
adjusted.
Flashing pattern: this function allows you to
choose whether or not the light will come
on and whether it should flash or stay on
when activated.
Activation point: this function allows you to
select the engine speed at which the light is
activated.1. Transmission gear display
2. Neutral indicator light “N”
1
2
1. Shift light
2. “MODE” button
3. “RESET” button
1
23
UBAS7AE0.book Page 16 Wednesday, June 19, 2019 11:51 AM
Page 49 of 212

5-17
5
Deactivation point: this function allows you
to select the engine speed at which the light
is deactivated.
To enter the shift light control mode1. Turn the key to “ ” (off).
2. Push and hold the “MODE” button.
3. Turn the key to “ ” (on), and then re- lease the “MODE” button after all seg-
ments of the display disappear and the
shift light comes on. The shift light can be
adjusted as follows.
To set the flashing pattern1. Push the “RESET” button to select one of the following flashing pattern settings:
On: the shift light stays on when acti-
vated. (The shift light will confirm this
setting by staying on.)
Flash: the shift light flashes when acti-
vated. (The shift light will confirm this
setting by flashing four times per se-
cond.)
Off: the shift light is deactivated; in oth-
er words, it does not come on or flash.
(The shift light will confirm this setting
by flashing once every two seconds.)
2. Push the “MODE” button to confirm the
selected flashing pattern. The control
mode then changes to the activation
point setting function. The shift light re-
mains on and the tachometer shows the
current setting r/min for the activation
point.
To set the activation point
TIP The shift light activation point can be set
between 7000 r/min and 12000 r/min. The
activation point can be set in increments of
500 r/min.
The tachometer needle will start over at
7000 r/min after 12000 r/min.
UBAS7AE0.book Page 17 Wednesday, June 19, 2019 11:51 AM
Page 50 of 212

5-18
5
1. Push the “RESET” button to select thedesired engine speed for activating the
shift light.
2. Push the “MODE” button to confirm the selected engine speed. The shift light
flashes and the tachometer shows the
current setting r/min for the deactivation
point.
To set the deactivation pointTIP Be sure to set the deactivation point to a
higher engine speed than for the activation
point, otherwise the shift light will not come
on.
The shift light deactivation point can be set
between 7000 r/min and 12000 r/min. The
deactivation point can be set in increments
of 500 r/min.
The tachometer needle will start over at
7000 r/min after 12000 r/min.
1. Push the “RESET” button to select the
desired engine speed for deactivating the
shift light.
2. Push the “MODE” button to confirm the selected engine speed. The display exits
the shift light control mode and returns to
the standard multi-function display mo-
de.
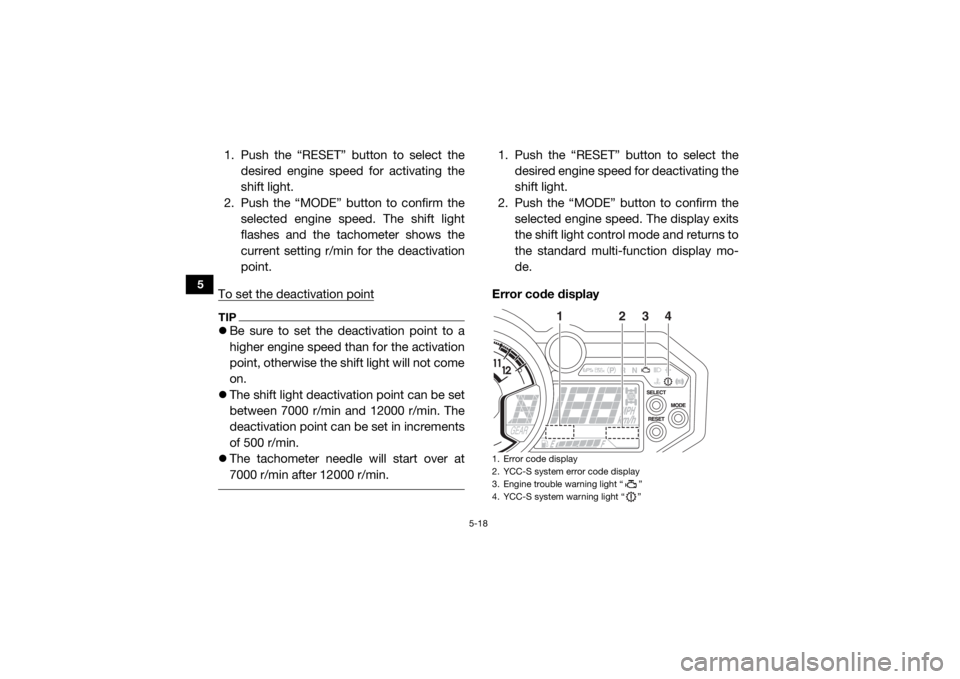
Error code display1. Error code display
2. YCC-S system error code display
3. Engine trouble warning light “ ”
4. YCC-S system warning light “ ”
1
2
3
4
UBAS7AE0.book Page 18 Wednesday, June 19, 2019 11:51 AM
Page 55 of 212

5-23
5
If you drive the vehicle with the parking
brake engaged, a buzzer will sound. EBU36633YCC-S systemThis vehicle is equipped with the Yamaha
Chip Controlled-Shift system (YCC-S) with
AUTO DOWNSHIFT.
YCC-S allows the driver to operate the man-
ual transmission without having to operate
the clutch. AUTO DOWNSHIFT automatically
shifts the transmission into first gear when
coming to a stop under normal conditions.
The transmission is operated using the drive
select lever and the shift paddles. The drive
select lever is used to shift the transmission
into forward drive (first gear), neutral, and re-
verse gear. The shift paddles are used to shift
through the forward gears.
When the drive select lever or shift paddles
are moved, a signal is sent to the MCU (motor
control unit) which disengages the clutch, the
gear shift is made, and then the clutch is re- engaged once the engine is running at proper
speed. Clutch engagement is controlled by
the MCU according to engine speed and oth-
er driving conditions.
TIP
This is not an automatic transmission, only
the clutch system is automatic.
The gears must be shifted by the driver, ex-
cept when AUTO DOWNSHIFT shifts the
transmission into first gear.
See page 7-3 for more information on shift-
ing.
UBAS7AE0.book Page 23 Wednesday, June 19, 2019 11:51 AM
Page 56 of 212

5-24
5
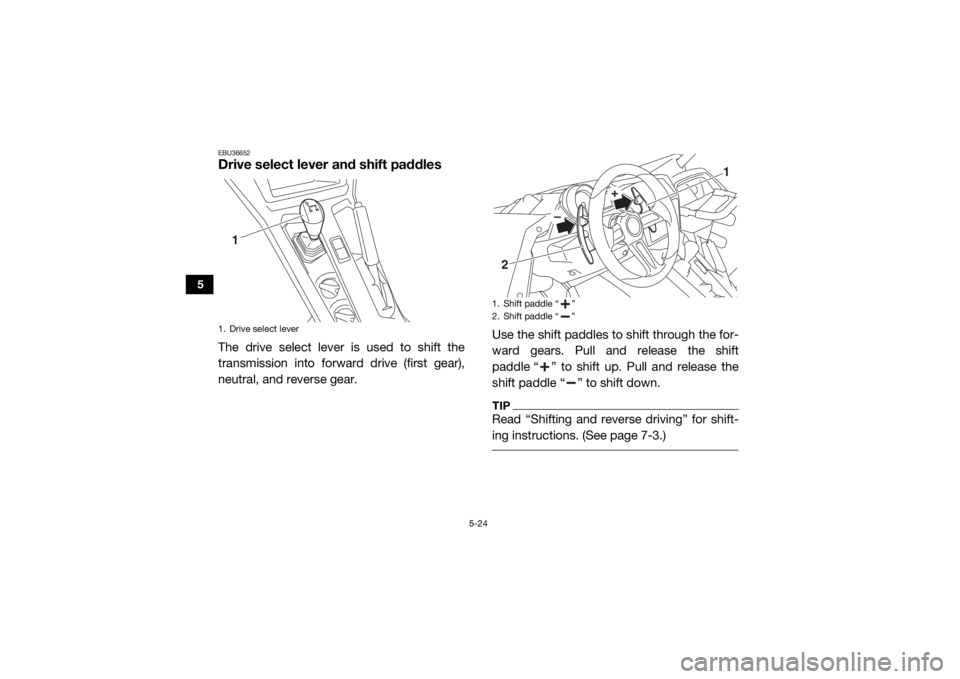
EBU36652Drive select lever and shift paddlesThe drive select lever is used to shift the
transmission into forward drive (first gear),
neutral, and reverse gear.Use the shift paddles to shift through the for-
ward gears. Pull and release the shift
paddle “ ” to shift up. Pull and release the
shift paddle “ ” to shift down.
TIPRead “Shifting and reverse driving” for shift-
ing instructions. (See page 7-3.)
1. Drive select lever
1
1. Shift paddle “ ”
2. Shift paddle “ ”
+
–
2
1
UBAS7AE0.book Page 24 Wednesday, June 19, 2019 11:51 AM
Page 84 of 212

6-2
6
Drivetrain• Check front differential, transmission case, and rear final
gear for leakage. 6-6, 6-6, 6-6, 9-29,
9-31, 9-34
Coolant • Check coolant level in reservoir.
• Fill with coolant if necessary. 6-6, 9-36
Accelerator pedal • Check free play and for proper operation. 6-6
Seat belts • Check for proper operation and belt wear. 6-7
Passenger handhold • Check for stability and proper fastening. 6-7, 8-8
Steering • Check for proper operation. 6-7
Drive select lever and
shift paddles • Check for proper operation. 6-7
YCC-S clutch • Check operation.
• Check fluid level in reservoir.
• If necessary, add specified brake fluid to specified level.
• Check hydraulic system for leakage.
6-8
Fittings and fasteners • Check all fittings and fasteners. 6-8
Instruments, lights and
switches • Check for proper operation. 4-3, 5-2, 6-8, 9-67,
9-68
Wheels and tires • Check tire pressure and for wear and damage. 6-8, 9-57, 9-59
Axle boots • Check for damage. 9-38
ITEM ROUTINE PAGEUBAS7AE0.book Page 2 Wednesday, June 19, 2019 11:51 AM
Page 89 of 212

6-7
6
EBU31800Seat beltsMake sure that the seat belts are not frayed,
torn, stretched, or damaged. The seat belts
must move smoothly when pulled out and re-
tract on its own when released. The seat belts
must also lock up when quickly pulled out.
The latch plate should click securely into the
buckle and release when the release button is
pushed firmly. Wash off any dirt or mud that
could affect operation. Have a Yamaha dealer
repair as necessary for proper operation.
A crash can damage the restraint systems in
your vehicle. A damaged restraint system
may not properly protect the person using it,
resulting in serious injury or death in a crash.
To help make sure your restraint systems are
working properly after a crash, have them in-
spected and any necessary replacements
made as soon as possible.
EBU31810Passenger handholdCheck that the handhold bar and its supports
are in good condition. Confirm that the lock-
ing pins are securely fastened, and then push
and pull on the handhold to make sure that it
is not loose.EBU31820SteeringPark on level ground. Turn the steering wheel
right and left. Check for excessive free play,
abnormal noises, or a rough feeling. Have a
Yamaha dealer repair as necessary for proper operation.EBU36691Drive select lever and shift paddlesThe drive select lever and shift paddles
should move smoothly and return to their
original position.
UBAS7AE0.book Page 7 Wednesday, June 19, 2019 11:51 AM
Page 90 of 212

6-8
6
EBU36672YCC-S clutchCheck the YCC-S clutch fluid level and cor-
rect if necessary. (See page 9-49.)
Check the operation of the drive select lever
and shift paddles at the start of each drive.TIPIf the YCC-S clutch fluid level was low, be
sure to check the clutch system for leak-
age.
If any leakage is found, or if shifting is not
smooth, have a Yamaha dealer service the
vehicle. EBU35700Fittings and fastenersAlways check the tightness of chassis and
wheel fittings and fasteners before starting
off. Take the vehicle to a Yamaha dealer or re-
fer to the Service Manual for correct tighten-
ing torque.
EBU31840Instruments, lights and switchesCheck that all instruments, lights and switch-
es are working properly. Correct if necessary.EBU31851Control cablesWhen driving in cold weather, always make
sure all control cables work smoothly before
starting off. WARNING! Control cables can
freeze in cold weather and you could be
unable to control the vehicle.
[EWB03280]
EBU37893
TiresCheck and adjust the tire pressure before
each ride. Check tires for wear and damage.
UBAS7AE0.book Page 8 Wednesday, June 19, 2019 11:51 AM