fuel YAMAHA YZ250F 2007 Notices Demploi (in French)
[x] Cancel search | Manufacturer: YAMAHA, Model Year: 2007, Model line: YZ250F, Model: YAMAHA YZ250F 2007Pages: 676, PDF Size: 21.24 MB
Page 60 of 676
1 - 15
GEN
INFO
STARTING AND BREAK-IN
6. Return the cold starter knob to its original
position and run the engine at 3,000 ~
5,000 r/min for 1 or 2 minutes.
NOTE:
Since this model is equipped with an accelera-
tor pump, if the engine is raced (the throttle
opened and closed), the air/fuel mixture will be
too rich and the engine may stall. Also unlike a
two-stroke engine, this model can idle.
CAUTION:
Do not warm up the engine for extended
periods of time.
Page 64 of 676
1 - 17
GEN
INFO
STARTING AND BREAK-IN
BREAK-IN PROCEDURES
1. Before starting the engine, fill the fuel tank
with the fuel.
2. Perform the pre-operation checks on the
machine.
3. Start and warm up the engine. Check the
idle speed, and check the operation of the
controls and the engine stop switch. Then,
restart the engine and check its operation
within no more than 5 minutes after it is
restarted.
4. Operate the machine in the lower gears at
moderate throttle openings for five to eight
minutes.
5. Check how the engine runs when the
machine is ridden with the throttle 1/4 to 1/2
open (low to medium speed) for about one
hour.
6. Restart the engine and check the operation
of the machine throughout its entire operat-
ing range. Restart the machine and oper-
ate it for about 10 to 15 more minutes. The
machine will now be ready to race.
CAUTION:
After the break-in or before each race,
you must check the entire machine for
loose fittings and fasteners as per
“TORQUE-CHECK POINTS”.
Tighten all such fasteners as required.
When any of the following parts have
been replaced, they must be broken in.
CYLINDER AND CRANKSHAFT:
About one hour of break-in operation is
necessary.
PISTON, RING, VALVES, CAMSHAFTS
AND GEARS:
These parts require about 30 minutes of
break-in operation at half-throttle or less.
Observe the condition of the engine care-
fully during operation.
Page 66 of 676
GEN
INFO
1 - 18
TORQUE-CHECK POINTS
TORQUE-CHECK POINTS
Frame construction
Combined seat and fuel tank
Exhaust system
Engine mounting
Steering Steering stem to
handlebar
Suspension Front Steering stem to front
fork
Rear For link type
Rear Installation of rear
shock absorber
Rear Installation of swing-
arm
Wheel Installation of wheel Front
Rear
Brake Front
Rear
Fuel system
Lubrication systemFrame to rear frame
Fuel tank to frame
Silencer to rear frame
Frame to engine
Engine bracket to engine
Engine bracket to frame
Steering stem to frame
Steering stem to upper bracket
Upper bracket to handlebar
Front fork to upper bracket
Front fork to lower bracket
Assembly of links
Link to frame
Link to rear shock absorber
Link to swingarm
Rear shock absorber to frame
Tightening of pivot shaft
Tightening of wheel axle
Tightening of axle holder
Tightening of wheel axle
Wheel to rear wheel sprocket
Brake caliper to front fork
Brake disc to wheel
Tightening of union bolt
Brake master cylinder to handlebar
Tightening of bleed screw
Tightening of brake hose holder
Brake pedal to frame
Brake disc to wheel
Tightening of union bolt
Brake master cylinder to frame
Tightening of bleed screw
Tightening of brake hose holder
Fuel tank to fuel cock
Tightening of oil hose clamp
NOTE:
Concerning the tightening torque, refer to
“MAINTENANCE SPECIFICATIONS” section
in the CHAPTER 2.
Page 72 of 676
1 - 20
GEN
INFO
CLEANING AND STORAGE
EC1B2001
STORAGE
If your machine is to be stored for 60 days or
more, some preventive measures must be
taken to avoid deterioration. After cleaning the
machine thoroughly, prepare it for storage as
follows:
1. Drain the fuel tank, fuel lines, and the car-
buretor float bowl.
2. Remove the spark plug, pour a tablespoon
of SAE 10W-30 motor oil in the spark plug
hole, and reinstall the plug. With the engine
stop switch pushed in, kick the engine over
several times to coat the cylinder walls with
oil.
3. Remove the drive chain, clean it thoroughly
with solvent, and lubricate it. Reinstall the
chain or store it in a plastic bag tied to the
frame.
4. Lubricate all control cables.
5. Block the frame up to raise the wheels off
the ground.
6. Tie a plastic bag over the exhaust pipe out-
let to prevent moisture from entering.
7. If the machine is to be stored in a humid or
salt-air environment, coat all exposed
metal surfaces with a film of light oil. Do not
apply oil to rubber parts or the seat cover.
NOTE:
Make any necessary repairs before the
machine is stored.
Page 74 of 676
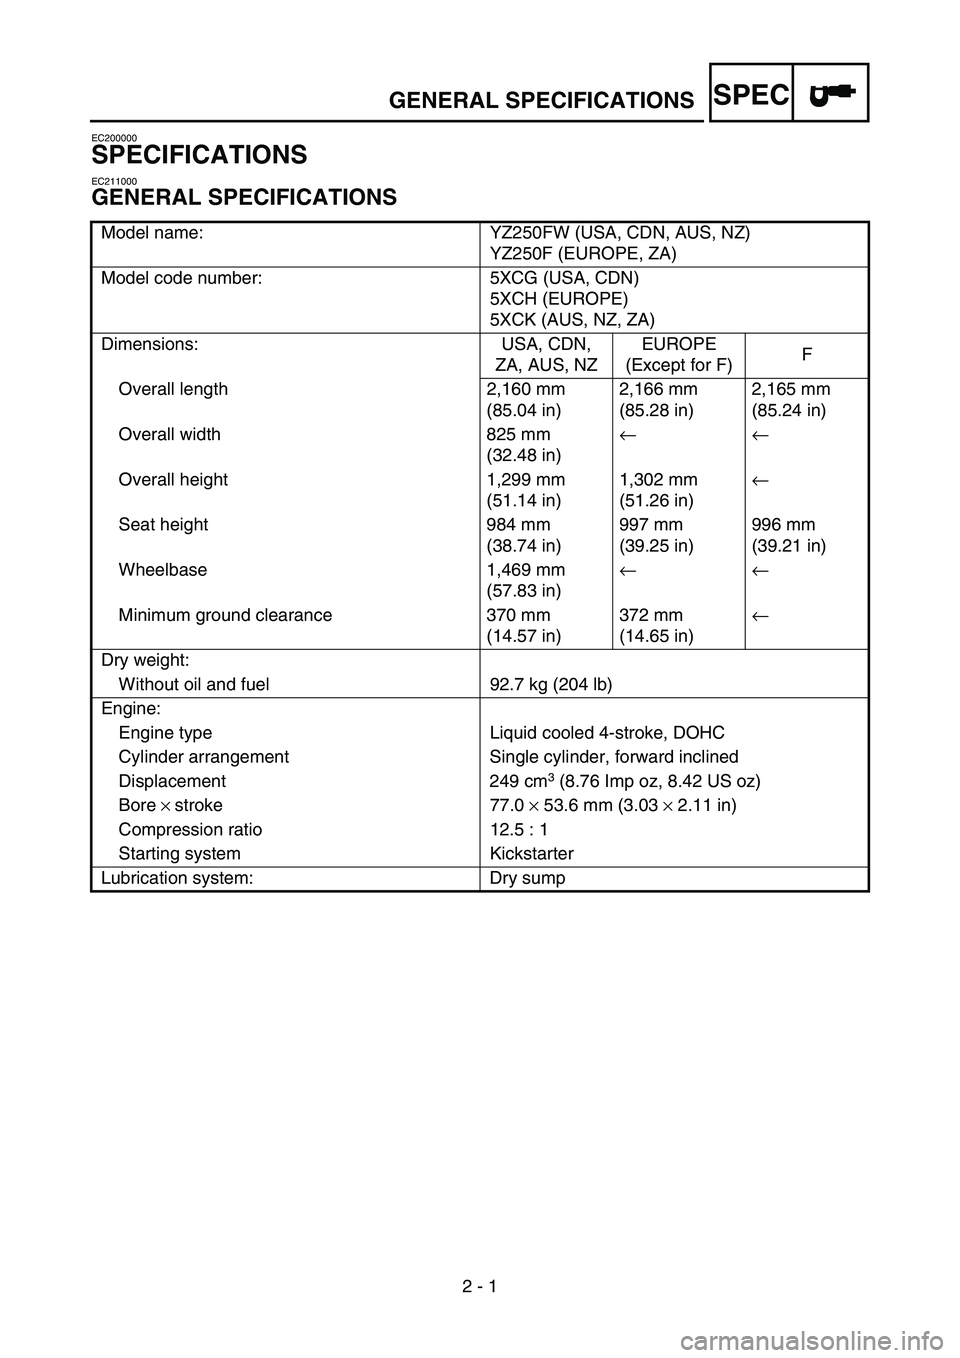
SPEC
2 - 1
EC200000
SPECIFICATIONS
EC211000
GENERAL SPECIFICATIONS
Model name: YZ250FW (USA, CDN, AUS, NZ)
YZ250F (EUROPE, ZA)
Model code number: 5XCG (USA, CDN)
5XCH (EUROPE)
5XCK (AUS, NZ, ZA)
Dimensions: USA, CDN,
ZA, AUS, NZEUROPE
(Except for F)F
Overall length 2,160 mm
(85.04 in)2,166 mm
(85.28 in)2,165 mm
(85.24 in)
Overall width 825 mm
(32.48 in)← ←
Overall height 1,299 mm
(51.14 in)1,302 mm
(51.26 in)←
Seat height 984 mm
(38.74 in)997 mm
(39.25 in)996 mm
(39.21 in)
Wheelbase 1,469 mm
(57.83 in)← ←
Minimum ground clearance 370 mm
(14.57 in)372 mm
(14.65 in)←
Dry weight:
Without oil and fuel 92.7 kg (204 lb)
Engine:
Engine type Liquid cooled 4-stroke, DOHC
Cylinder arrangement Single cylinder, forward inclined
Displacement 249 cm
3 (8.76 Imp oz, 8.42 US oz)
Bore × stroke 77.0 × 53.6 mm (3.03 × 2.11 in)
Compression ratio 12.5 : 1
Starting system Kickstarter
Lubrication system: Dry sump
2
GENERAL SPECIFICATIONS
Page 75 of 676
SPEC
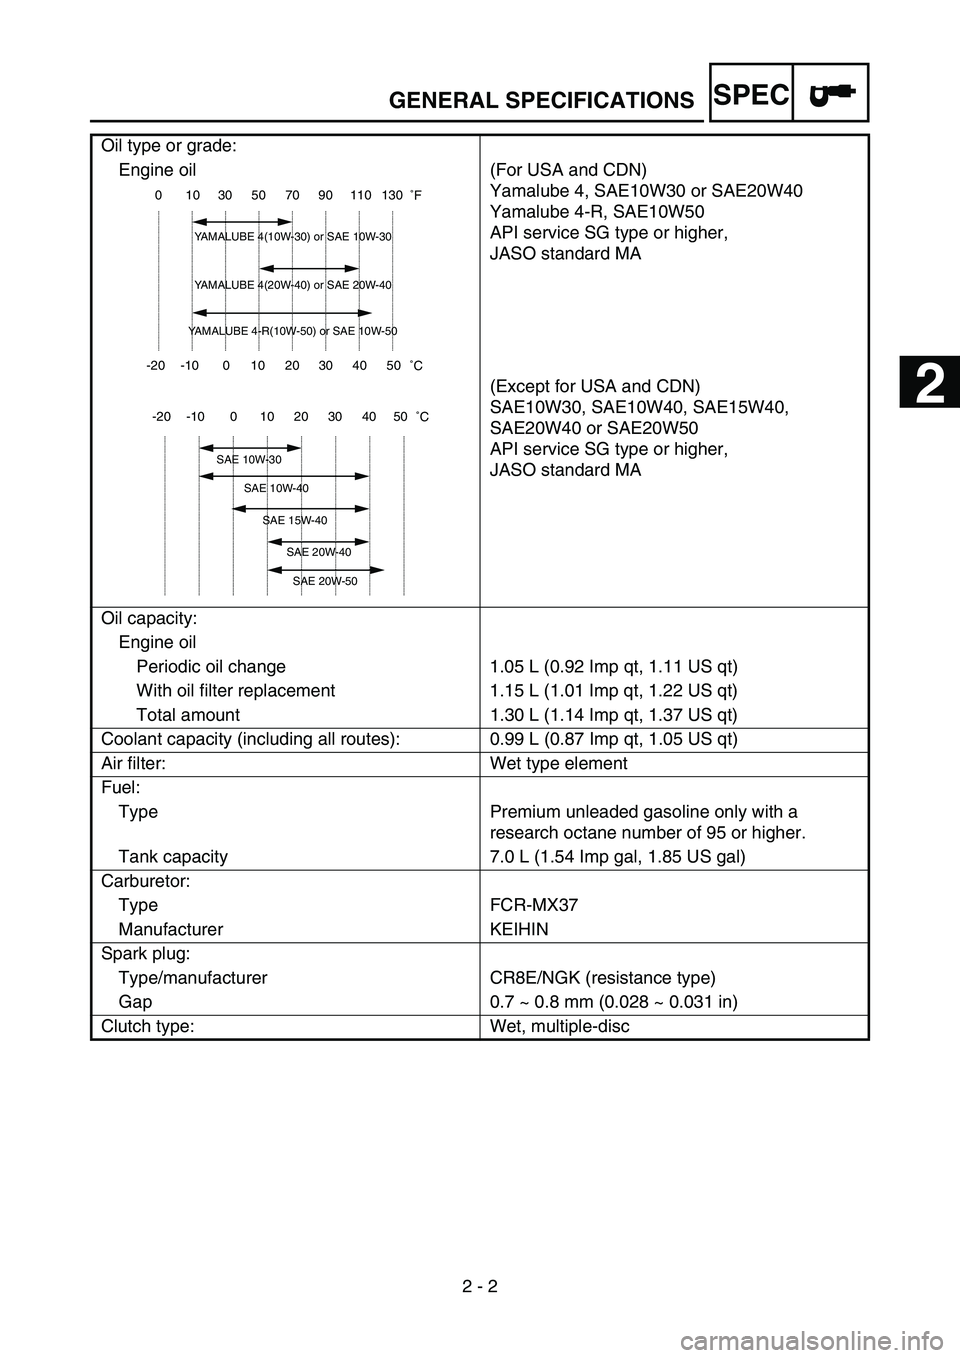
2 - 2 Oil type or grade:
Engine oil (For USA and CDN)
Yamalube 4, SAE10W30 or SAE20W40
Yamalube 4-R, SAE10W50
API service SG type or higher,
JASO standard MA
(Except for USA and CDN)
SAE10W30, SAE10W40, SAE15W40,
SAE20W40 or SAE20W50
API service SG type or higher,
JASO standard MA
Oil capacity:
Engine oil
Periodic oil change 1.05 L (0.92 Imp qt, 1.11 US qt)
With oil filter replacement 1.15 L (1.01 Imp qt, 1.22 US qt)
Total amount 1.30 L (1.14 Imp qt, 1.37 US qt)
Coolant capacity (including all routes): 0.99 L (0.87 Imp qt, 1.05 US qt)
Air filter: Wet type element
Fuel:
Type Premium unleaded gasoline only with a
research octane number of 95 or higher.
Tank capacity 7.0 L (1.54 Imp gal, 1.85 US gal)
Carburetor:
Type FCR-MX37
Manufacturer KEIHIN
Spark plug:
Type/manufacturer CR8E/NGK (resistance type)
Gap 0.7 ~ 0.8 mm (0.028 ~ 0.031 in)
Clutch type: Wet, multiple-disc
-20 -10 0 10 20 30 40 50
˚C 0 10 30 50 70 90 110 130
˚F
YAMALUBE 4(10W-30) or SAE 10W-30
YAMALUBE 4(20W-40) or SAE 20W-40
YAMALUBE 4-R(10W-50) or SAE 10W-50
-20 -10 0 10 20 30 40 50
˚C
SAE 10W-30
SAE 10W-40
SAE 15W-40
SAE 20W-40
SAE 20W-50
GENERAL SPECIFICATIONS
2
Page 88 of 676
SPEC
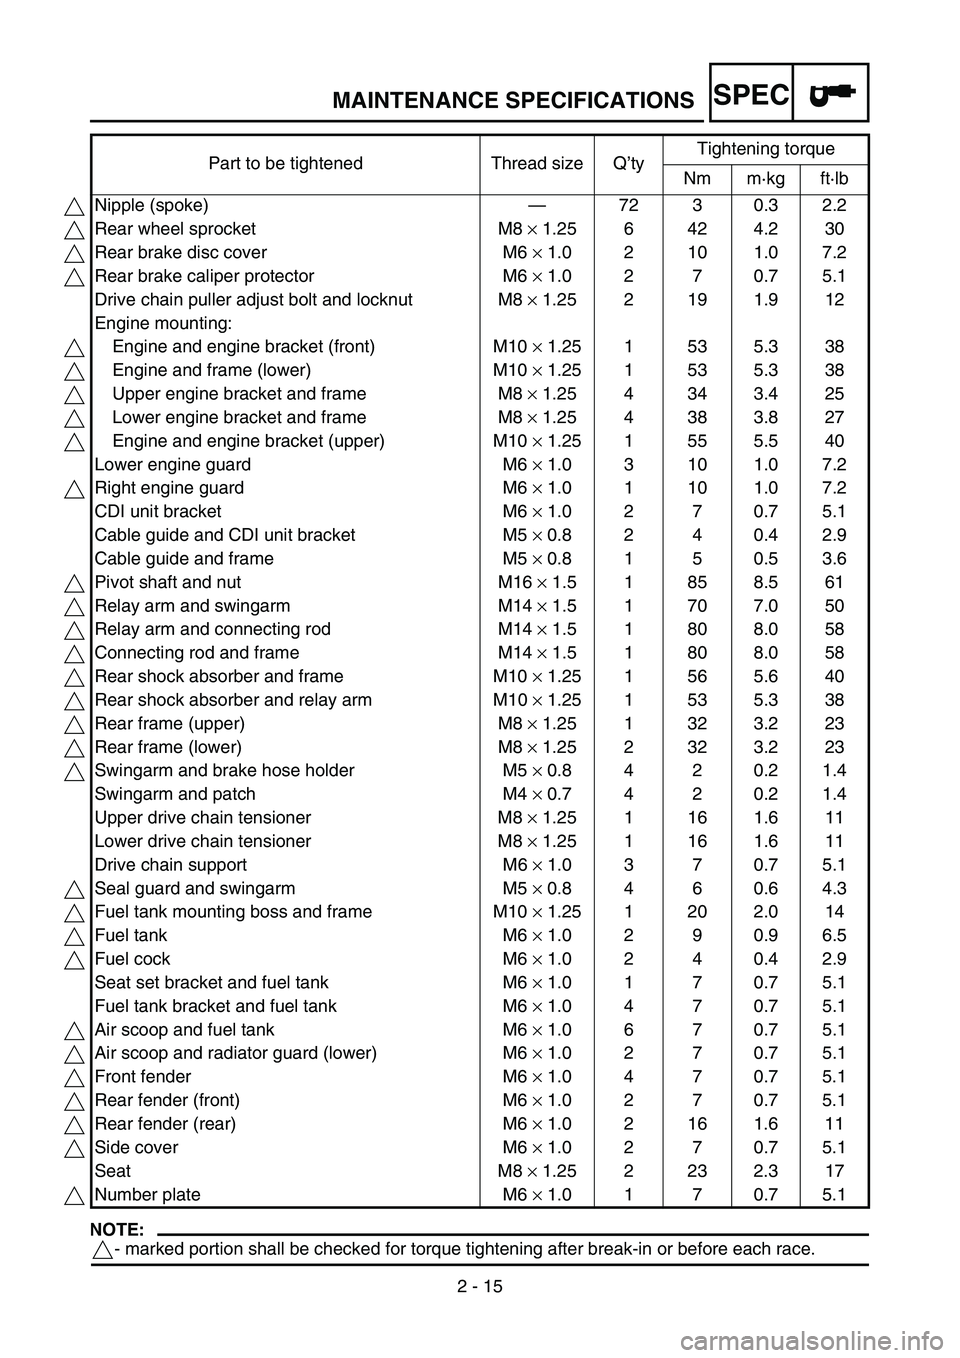
2 - 15
NOTE:
- marked portion shall be checked for torque tightening after break-in or before each race.Part to be tightened Thread size Q’tyTightening torque
Nm m·kg ft·lb
Nipple (spoke)—72 3 0.3 2.2
Rear wheel sprocket M8 × 1.25 6 42 4.2 30
Rear brake disc cover M6 × 1.0 2 10 1.0 7.2
Rear brake caliper protector M6 × 1.0 2 7 0.7 5.1
Drive chain puller adjust bolt and locknut M8 × 1.25 2 19 1.9 12
Engine mounting:
Engine and engine bracket (front) M10 × 1.25 1 53 5.3 38
Engine and frame (lower) M10 × 1.25 1 53 5.3 38
Upper engine bracket and frame M8 × 1.25 4 34 3.4 25
Lower engine bracket and frame M8 × 1.25 4 38 3.8 27
Engine and engine bracket (upper) M10 × 1.25 1 55 5.5 40
Lower engine guard M6 × 1.0 3 10 1.0 7.2
Right engine guard M6 × 1.0 1 10 1.0 7.2
CDI unit bracket M6 × 1.0 2 7 0.7 5.1
Cable guide and CDI unit bracket M5 × 0.8 2 4 0.4 2.9
Cable guide and frame M5 × 0.8 1 5 0.5 3.6
Pivot shaft and nut M16 × 1.5 1 85 8.5 61
Relay arm and swingarm M14 × 1.5 1 70 7.0 50
Relay arm and connecting rod M14 × 1.5 1 80 8.0 58
Connecting rod and frame M14 × 1.5 1 80 8.0 58
Rear shock absorber and frame M10 × 1.25 1 56 5.6 40
Rear shock absorber and relay arm M10 × 1.25 1 53 5.3 38
Rear frame (upper) M8 × 1.25 1 32 3.2 23
Rear frame (lower) M8 × 1.25 2 32 3.2 23
Swingarm and brake hose holder M5 × 0.8 4 2 0.2 1.4
Swingarm and patch M4 × 0.7 4 2 0.2 1.4
Upper drive chain tensioner M8 × 1.25 1 16 1.6 11
Lower drive chain tensioner M8 × 1.25 1 16 1.6 11
Drive chain support M6 × 1.0 3 7 0.7 5.1
Seal guard and swingarm M5 × 0.8 4 6 0.6 4.3
Fuel tank mounting boss and frame M10 × 1.25 1 20 2.0 14
Fuel tank M6 × 1.0 2 9 0.9 6.5
Fuel cock M6 × 1.0 2 4 0.4 2.9
Seat set bracket and fuel tank M6 × 1.0 1 7 0.7 5.1
Fuel tank bracket and fuel tank M6 × 1.0 4 7 0.7 5.1
Air scoop and fuel tank M6 × 1.0 6 7 0.7 5.1
Air scoop and radiator guard (lower) M6 × 1.0 2 7 0.7 5.1
Front fender M6 × 1.0 4 7 0.7 5.1
Rear fender (front) M6 × 1.0 2 7 0.7 5.1
Rear fender (rear) M6 × 1.0 2 16 1.6 11
Side cover M6 × 1.0 2 7 0.7 5.1
Seat M8 × 1.25 2 23 2.3 17
Number plate M6 × 1.0 1 7 0.7 5.1
MAINTENANCE SPECIFICATIONS
Page 146 of 676

2 - 20
SPECCABLE ROUTING DIAGRAM
EC240000
CABLE ROUTING DIAGRAM
1Fuel tank breather hose
2Radiator hose 1
3Connector cover
4Cylinder head breather hose
5Radiator hose 4
6Clutch cable
7Throttle position sensor lead
8Carburetor breather hose
9Upper engine bracket0Hot starter cable
AFuel hose
BCarburetor overflow hose
Page 148 of 676

2 - 21
SPEC
ÈInsert the end of the fuel tank breather hose into
the hole in the steering stem.
ÉInstall the connector cover so that it does not
come in between the radiator hose 1 and radia-
tor.
ÊAligh the paint mark on the cylinder head
breather hose with the front end of the hose
guide.
ËPass the cylinder head breather hose on the out-
side of the radiator hose 1 and then between the
radiator 4 and frame.ÌPass the clutch cable through the cable guide.
ÍPass the clutch cable in front of the radiator
mounting boss.
ÎPass the fuel hose between the hot starter cable
and throttle position sensor lead.
ÏPass the carburetor breater hoses so that they
are not pinched between the upper engine
bracket and carburetor.
ÐPass the carburetor breather hoses and over-
flow hose so that all there hoses do not contact
the rear shock absorber.
CABLE ROUTING DIAGRAM
Page 161 of 676
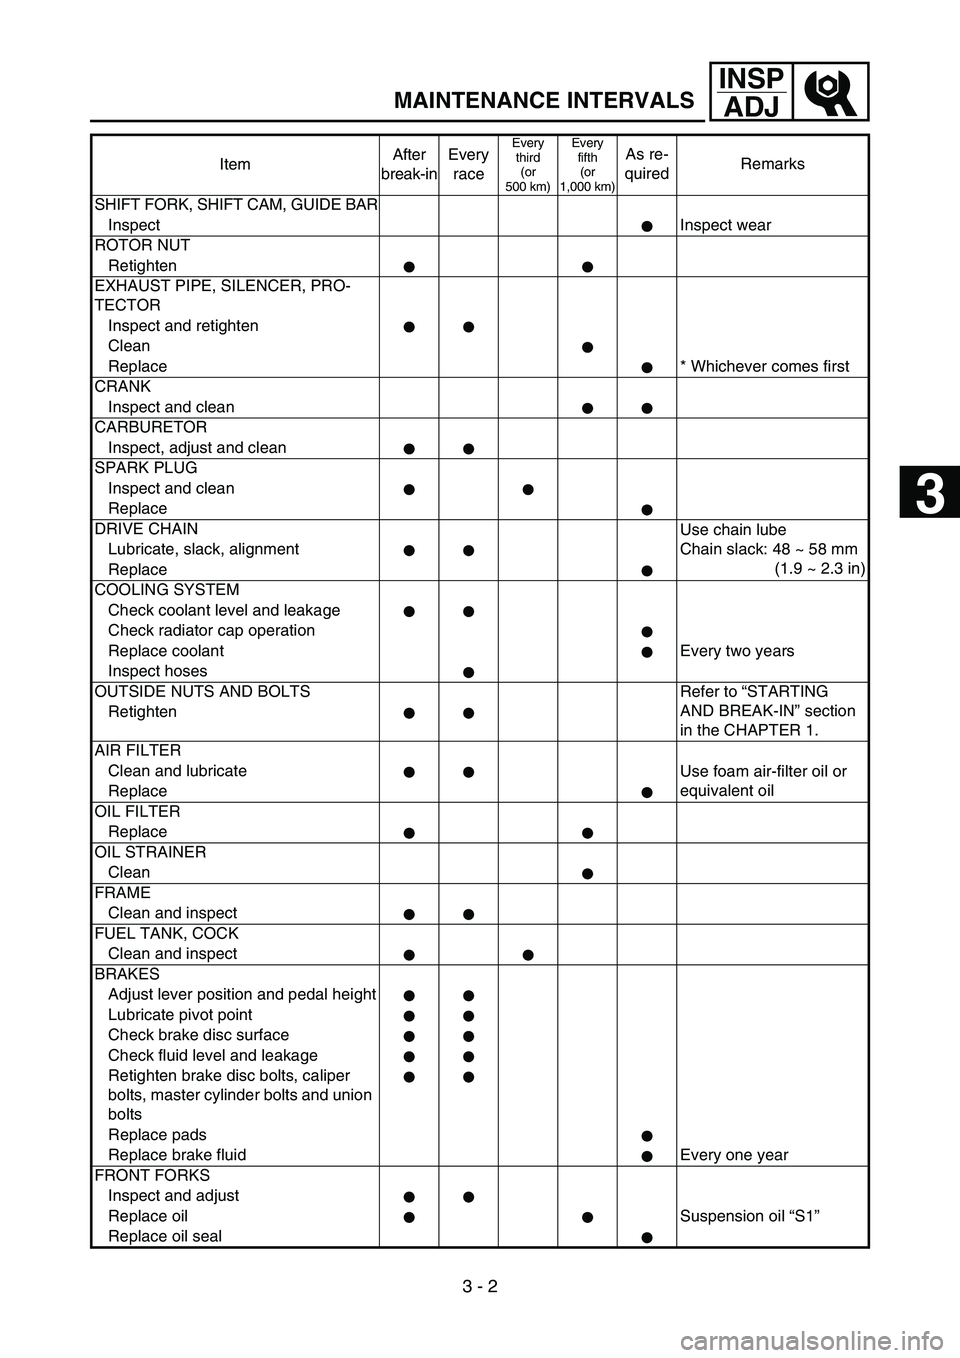
3 - 2
INSP
ADJ
MAINTENANCE INTERVALS
SHIFT FORK, SHIFT CAM, GUIDE BAR
InspectInspect wear
ROTOR NUT
Retighten
EXHAUST PIPE, SILENCER, PRO-
TECTOR
Inspect and retighten
Clean
Replace * Whichever comes first
CRANK
Inspect and clean
CARBURETOR
Inspect, adjust and clean
SPARK PLUG
Inspect and clean
Replace
DRIVE CHAIN
Use chain lube
Chain slack: 48 ~ 58 mm
(1.9 ~ 2.3 in) Lubricate, slack, alignment
Replace
COOLING SYSTEM
Check coolant level and leakage
Check radiator cap operation
Replace coolant Every two years
Inspect hoses
OUTSIDE NUTS AND BOLTS Refer to “STARTING
AND BREAK-IN” section
in the CHAPTER 1. Retighten
AIR FILTER
Clean and lubricate
Use foam air-filter oil or
equivalent oil
Replace
OIL FILTER
Replace
OIL STRAINER
Clean
FRAME
Clean and inspect
FUEL TANK, COCK
Clean and inspect
BRAKES
Adjust lever position and pedal height
Lubricate pivot point
Check brake disc surface
Check fluid level and leakage
Retighten brake disc bolts, caliper
bolts, master cylinder bolts and union
bolts
Replace pads
Replace brake fluid Every one year
FRONT FORKS
Inspect and adjust
Replace oil Suspension oil “S1”
Replace oil sealItemAfter
break-inEvery
race
Every
third
(or
500 km)Every
fifth
(or
1,000 km)As re-
quiredRemarks
3