height YAMAHA YZ250F 2008 Betriebsanleitungen (in German)
[x] Cancel search | Manufacturer: YAMAHA, Model Year: 2008, Model line: YZ250F, Model: YAMAHA YZ250F 2008Pages: 192, PDF-Größe: 7.03 MB
Page 23 of 192

2-1
GENERAL SPECIFICATIONS
SPECIFICATIONS
GENERAL SPECIFICATIONS
Model name:YZ250FX (USA, CDN, AUS, NZ)
YZ250F (EUROPE, ZA)
Model code number: 5XCL (USA,CDN)
5XCM (EUROPE)
5XCP (AUS, NZ, ZA)
Dimensions: USA, CDN, ZA, AUS, NZEUROPE
Overall length 2,162 mm (85.12 in) 2,165 mm (85.24 in)
Overall width 825 mm (32.48 in)
←
Overall height1,300 mm (51.18 in)←
Seat height 985 mm (38.78 in)997 mm (39.25 in)
Wheelbase 1,469 mm (57.83 in)
←
Minimum ground clearance370 mm (14.57 in)372 mm (14.65 in)
Dry weight: Without oil and fuel 92.7 kg (204 lb)
Engine: Engine type Liquid cooled 4-stroke, DOHC
Cylinder arrangement Single cylinder, forward inclined
Displacement 249 cm
3 (8.76 Imp oz, 8.42 US oz)
Bore × stroke 77.0 × 53.6 mm (3.03 × 2.11 in)
Compression ratio 13.5 : 1
Starting system Kickstarter
Lubrication system: Dry sump
Oil type or grade: Engine oil (For USA and CDN)
Yamalube 4, SAE10W30 or SAE20W40
Yamalube 4-R, SAE10W50
API service SG type or higher,
JASO standard MA
(Except for USA and CDN)
SAE10W30, SAE10W40, SAE15W40,
SAE20W40 or SAE20W50
API service SG type or higher,
JASO standard MA
Oil capacity: Engine oilPeriodic oil change 1.05 L (0.92 Imp qt, 1.11 US qt)
With oil filter replacement 1.15 L (1.01 Imp qt, 1.22 US qt)
Total amount 1.30 L (1.14 Imp qt, 1.37 US qt)
Coolant capacity (including all routes): 0.99 L (0.87 Imp qt, 1.05 US qt)
Air filter: Wet type element
2
Page 29 of 192
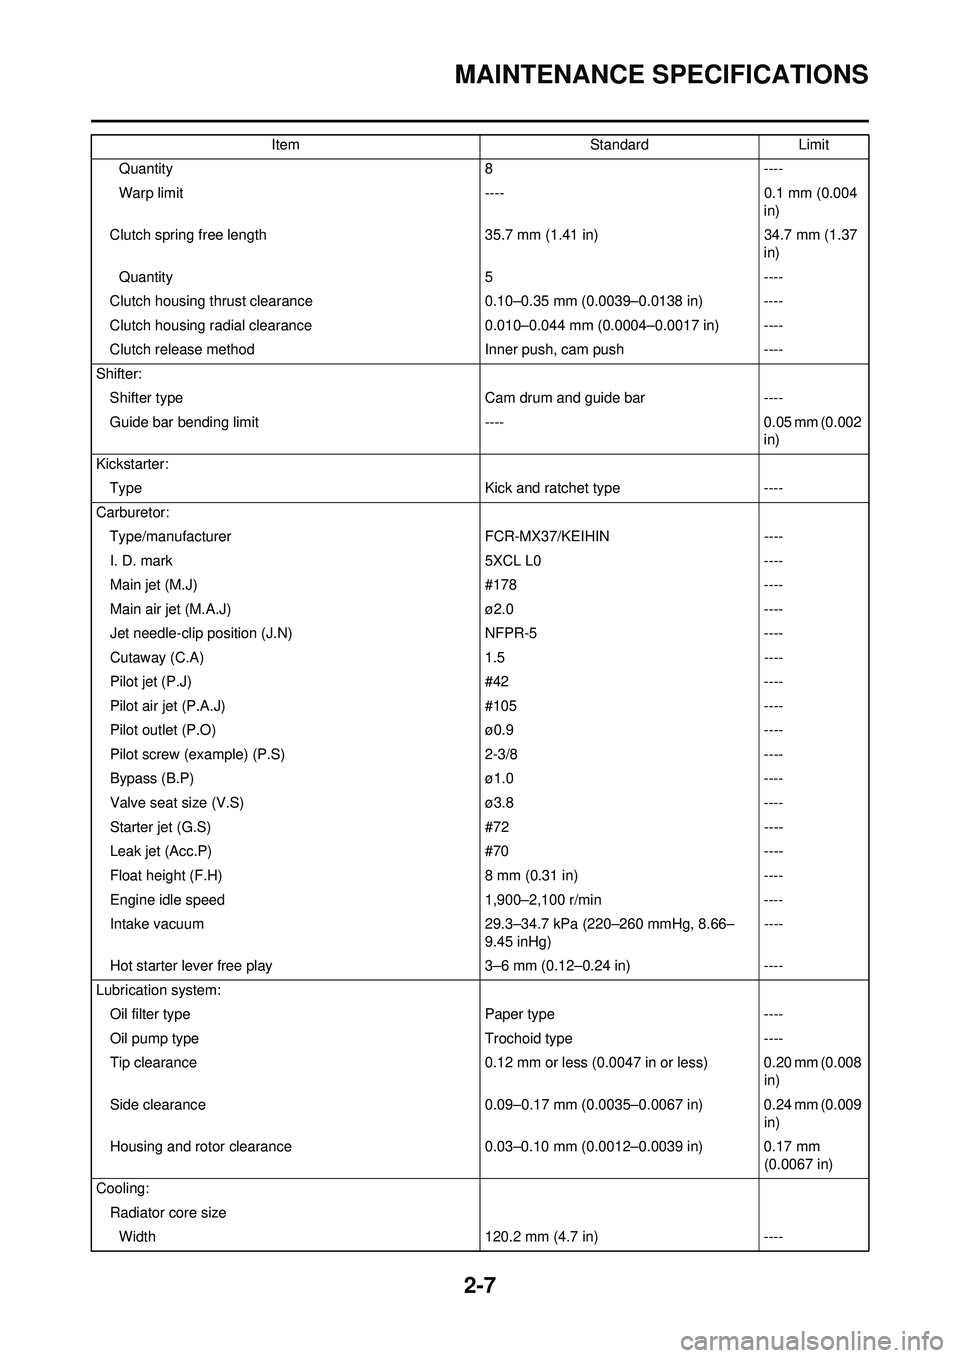
2-7
MAINTENANCE SPECIFICATIONS
Quantity8----
Warp limit ----0.1 mm (0.004
in)
Clutch spring free length 35.7 mm (1.41 in)34.7 mm (1.37
in)
Quantity 5----
Clutch housing thrust clearance 0.10–0.35 mm (0.0039–0.0138 in) ----
Clutch housing radial clearance 0.010–0.044 mm (0.0004–0.0017 in) ----
Clutch release method Inner push, cam push----
Shifter: Shifter type Cam drum and guide bar----
Guide bar bending limit ----0.05 mm (0.002
in)
Kickstarter: Type Kick and ratchet type----
Carburetor: Type/manufacturer FCR-MX37/KEIHIN----
I. D. mark 5XCL L0----
Main jet (M.J) #178----
Main air jet (M.A.J) ø2.0----
Jet needle-clip position (J.N) NFPR-5----
Cutaway (C.A) 1.5----
Pilot jet (P.J) #42----
Pilot air jet (P.A.J) #105----
Pilot outlet (P.O) ø0.9----
Pilot screw (example) (P.S) 2-3/8----
Bypass (B.P) ø1.0----
Valve seat size (V.S) ø3.8----
Starter jet (G.S) #72----
Leak jet (Acc.P) #70----
Float height (F.H) 8 mm (0.31 in)----
Engine idle speed 1,900–2,100 r/min----
Intake vacuum 29.3–34.7 kPa (220–260 mmHg, 8.66–
9.45 inHg) ----
Hot starter lever free play 3–6 mm (0.12–0.24 in)----
Lubrication system: Oil filter type Paper type----
Oil pump type Trochoid type----
Tip clearance 0.12 mm or less (0.0047 in or less) 0.20 mm (0.008
in)
Side clearance 0.09–0.17 mm (0.0035–0.0067 in) 0.24 mm (0.009
in)
Housing and rotor clearance 0.03–0.10 mm (0.0012–0.0039 in) 0.17 mm
(0.0067 in)
Cooling: Radiator core sizeWidth 120.2 mm (4.7 in)----
Item
StandardLimit
Page 30 of 192
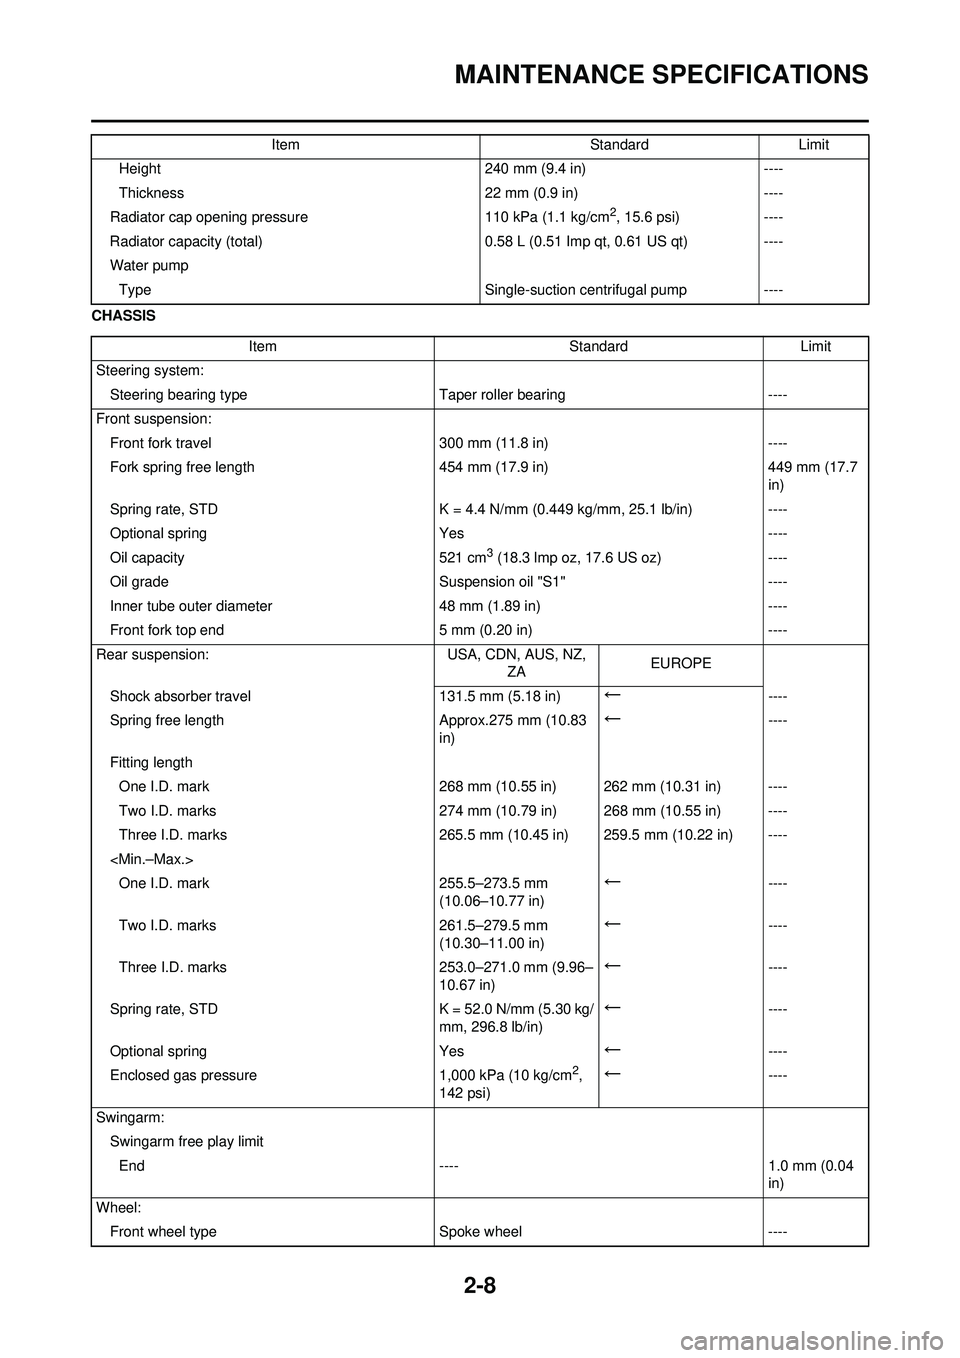
2-8
MAINTENANCE SPECIFICATIONS
CHASSISHeight
240 mm (9.4 in)----
Thickness 22 mm (0.9 in)----
Radiator cap opening pressure 110 kPa (1.1 kg/cm
2, 15.6 psi)----
Radiator capacity (total) 0.58 L (0.51 Imp qt, 0.61 US qt)----
Water pump Type Single-suction centrifugal pump----
Item
StandardLimit
Item StandardLimit
Steering system: Steering bearing type Taper roller bearing----
Front suspension: Front fork travel 300 mm (11.8 in)----
Fork spring free length 454 mm (17.9 in)449 mm (17.7
in)
Spring rate, STD K = 4.4 N/mm (0.449 kg/mm, 25.1 lb/in)----
Optional spring Yes----
Oil capacity 521 cm
3 (18.3 lmp oz, 17.6 US oz)----
Oil grade Suspension oil "S1"----
Inner tube outer diameter 48 mm (1.89 in)----
Front fork top end 5 mm (0.20 in)----
Rear suspension: USA, CDN, AUS, NZ,
ZA EUROPE
Shock absorber travel 131.5 mm (5.18 in)
←----
Spring free length Approx.275 mm (10.83 in)
←----
Fitting length One I.D. mark 268 mm (10.55 in) 262 mm (10.31 in) ----
Two I.D. marks 274 mm (10.79 in) 268 mm (10.55 in) ----
Three I.D. marks 265.5 mm (10.45 in) 259.5 mm (10.22 in) ----
←----
Two I.D. marks 261.5–279.5 mm
(10.30–11.00 in)
←----
Three I.D. marks 253.0–271.0 mm (9.96–
10.67 in)
←----
Spring rate, STD K = 52.0 N/mm (5.30 kg/ mm, 296.8 lb/in)
←----
Optional spring Yes
←----
Enclosed gas pressure 1,000 kPa (10 kg/cm
2,
142 psi)←----
Swingarm: Swingarm free play limitEnd ---- 1.0 mm (0.04 in)
Wheel: Front wheel type Spoke wheel----
Page 31 of 192
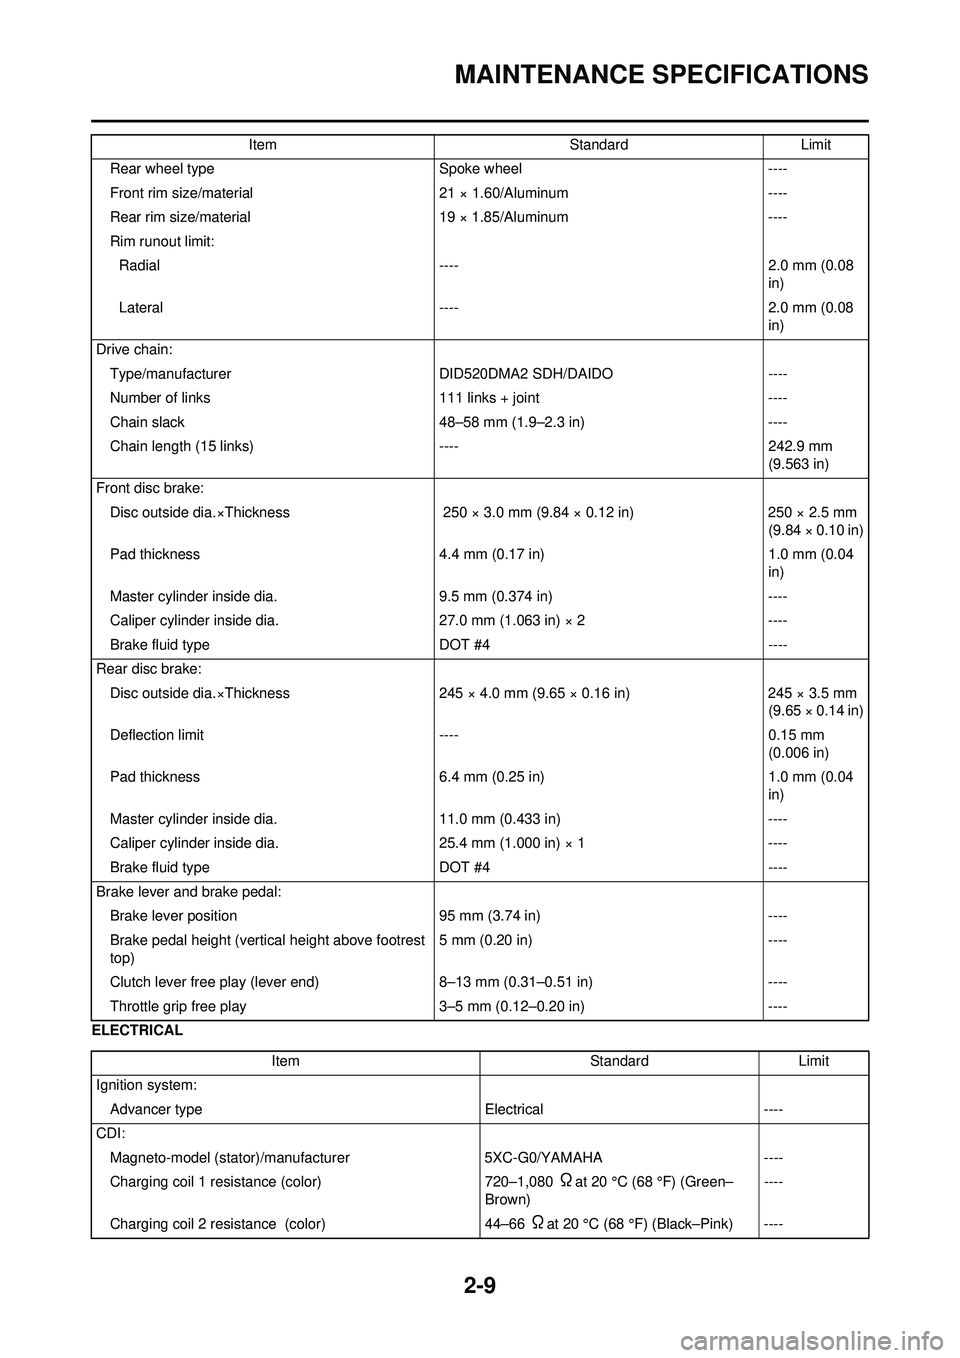
2-9
MAINTENANCE SPECIFICATIONS
ELECTRICALRear wheel type
Spoke wheel----
Front rim size/material 21 × 1.60/Aluminum----
Rear rim size/material 19 × 1.85/Aluminum----
Rim runout limit: Radial ---- 2.0 mm (0.08
in)
Lateral ---- 2.0 mm (0.08
in)
Drive chain: Type/manufacturer DID520DMA2 SDH/DAIDO ----
Number of links 111 links + joint----
Chain slack 48–58 mm (1.9–2.3 in)----
Chain length (15 links) ----242.9 mm
(9.563 in)
Front disc brake: Disc outside dia.×Thickness 250 × 3.0 mm (9.84 × 0.12 in)250 × 2.5 mm
(9.84 × 0.10 in)
Pad thickness 4.4 mm (0.17 in)1.0 mm (0.04
in)
Master cylinder inside dia. 9.5 mm (0.374 in)----
Caliper cylinder inside dia. 27.0 mm (1.063 in) × 2----
Brake fluid type DOT #4----
Rear disc brake: Disc outside dia.×Thickness 245 × 4.0 mm (9.65 × 0.16 in)245 × 3.5 mm
(9.65 × 0.14 in)
Deflection limit ----0.15 mm
(0.006 in)
Pad thickness 6.4 mm (0.25 in)1.0 mm (0.04
in)
Master cylinder inside dia. 11.0 mm (0.433 in)----
Caliper cylinder inside dia. 25.4 mm (1.000 in) × 1----
Brake fluid type DOT #4----
Brake lever and brake pedal: Brake lever position 95 mm (3.74 in)----
Brake pedal height (vertical height above footrest
top) 5 mm (0.20 in)
----
Clutch lever free play (lever end) 8–13 mm (0.31–0.51 in)----
Throttle grip free play 3–5 mm (0.12–0.20 in)----
Item
StandardLimit
Item StandardLimit
Ignition system: Advancer type Electrical----
CDI: Magneto-model (stator)/manufacturer 5XC-G0/YAMAHA----
Charging coil 1 resistance (color) 720–1,080
Ωat 20 °C (68 °F) (Green–
Brown) ----
Charging coil 2 resistance (color) 44–66
Ωat 20 °C (68 °F) (Black–Pink) ----
Page 49 of 192

3-3
MAINTENANCE INTERVALS
OIL STRAINERClean
●
FRAMEClean and inspect
●●
FUEL TANK, COCKClean and inspect
●●
BRAKESAdjust lever position and pedal
height
●●
Lubricate pivot point●●
Check brake disc surface●●
Check fluid level and leakage●●
Retighten brake disc bolts, cali-
per bolts, master cylinder bolts
and union bolts●●
Replace pads●
Replace brake fluid●Every one year
FRONT FORKS Inspect and adjust
●●
Replace oil●●Suspension oil "S1"
Replace oil seal
●
FRONT FORK OIL SEAL AND
DUST SEAL Clean and lube
●●Lithium base grease
PROTECTOR GUIDE Replace
●
REAR SHOCK ABSORBERInspect and adjust
●●
Lube●
(After rain
ride)
●Molybdenum disulfide grease
Replace spring seat
●Every one year
Retighten
●●
DRIVE CHAIN GUIDE AND
ROLLERS Inspect
●●
SWINGARMInspect, lube and retighten
●●Molybdenum disulfide grease
RELAY ARM, CONNECTING
ROD Inspect, lube and retighten
●●Molybdenum disulfide grease
STEERING HEAD Inspect free play and retighten
●●
Clean and lube●Lithium base grease
Replace bearing
●
Item After
break-
in Every
race
Every third
(or 500 km) Every
fifth (or 1,000 km)
As re-
quired Remarks
Page 60 of 192
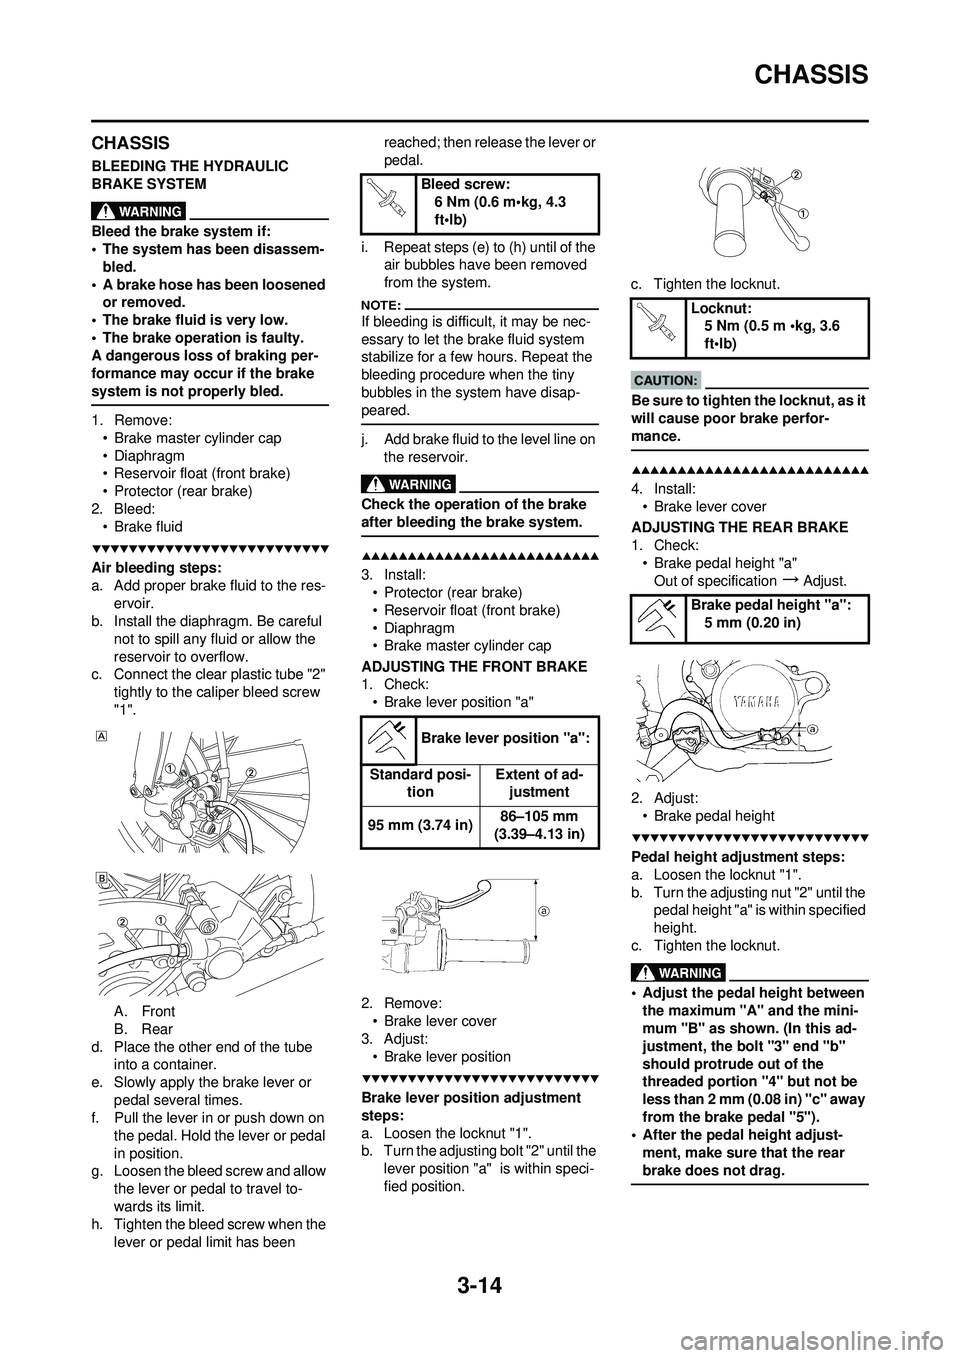
3-14
CHASSIS
CHASSIS
BLEEDING THE HYDRAULIC
BRAKE SYSTEM
Bleed the brake system if:
• The system has been disassem-bled.
• A brake hose has been loosened or removed.
• The brake fluid is very low.
• The brake operation is faulty.
A dangerous loss of braking per-
formance may occur if the brake
system is not properly bled.
1. Remove: • Brake master cylinder cap
• Diaphragm
• Reservoir float (front brake)
• Protector (rear brake)
2. Bleed: • Brake fluid
Air bleeding steps:
a. Add proper brake fluid to the res-
ervoir.
b. Install the diaphragm. Be careful
not to spill any fluid or allow the
reservoir to overflow.
c. Connect the clear plastic tube "2"
tightly to the caliper bleed screw
"1".
A. Front
B. Rear
d. Place the other end of the tube into a container.
e. Slowly apply the brake lever or pedal several times.
f. Pull the lever in or push down on
the pedal. Hold the lever or pedal
in position.
g. Loosen the bleed screw and allow
the lever or pedal to travel to-
wards its limit.
h. Tighten the bleed screw when the
lever or pedal limit has been reached; then release the lever or
pedal.
i. Repeat steps (e) to (h) until of the air bubbles have been removed
from the system.
If bleeding is difficult, it may be nec-
essary to let the brake fluid system
stabilize for a few hours. Repeat the
bleeding procedure when the tiny
bubbles in the system have disap-
peared.
j. Add brake fluid to the level line on
the reservoir.
Check the operation of the brake
after bleeding the brake system.
3. Install:• Protector (rear brake)
• Reservoir float (front brake)
• Diaphragm
• Brake master cylinder cap
ADJUSTING THE FRONT BRAKE
1. Check: • Brake lever position "a"
2. Remove: • Brake lever cover
3. Adjust: • Brake lever position
Brake lever position adjustment
steps:
a. Loosen the locknut "1".
b. Turn the adjusting bolt "2" until the lever position "a" is within speci-
fied position. c. Tighten the locknut.
Be sure to tighten the locknut, as it
will cause poor brake perfor-
mance.
4. Install:
• Brake lever cover
ADJUSTING THE REAR BRAKE
1. Check: • Brake pedal height "a"Out of specification
→Adjust.
2. Adjust: • Brake pedal height
Pedal height adjustment steps:
a. Loosen the locknut "1".
b. Turn the adjusting nut "2" until the pedal height "a" is within specified
height.
c. Tighten the locknut.
• Adjust the pedal height between the maximum "A" and the mini-
mum "B" as shown. (In this ad-
justment, the bolt "3" end "b"
should protrude out of the
threaded portion "4" but not be
less than 2 mm (0.08 in) "c" away
from the brake pedal "5").
• After the pedal height adjust-
ment, make sure that the rear
brake does not drag.
Bleed screw: 6 Nm (0.6 m•kg, 4.3
ft•lb)
Brake lever position "a":
Standard posi- tion Extent of ad-
justment
95 mm (3.74 in) 86–105 mm
(3.39–4.13 in)
Locknut: 5 Nm (0.5 m •kg, 3.6
ft•lb)
Brake pedal height "a": 5 mm (0.20 in)
Page 79 of 192

4-10
CARBURETOR
HANDLING NOTE
Do not loosen the screw (throttle
position sensor) "1" except when
changing the throttle position sen-
sor due to failure because it will
cause a drop in engine perfor-
mance.
REMOVING THE PILOT SCREW
1. Remove:• Pilot screw "1"
To optimize the fuel flow at a small
throttle opening, each machine's pilot
screw has been individually set at the
factory. Before removing the pilot
screw, turn it in fully and count the
number of turns. Record this number
as the factory-set number of turns
out.
CHECKING THE CARBURETOR
1. Inspect:• Carburetor bodyContamination
→Clean.
• Use a petroleum based solvent for
cleaning. Blow out all passages and
jets with compressed air.
• Never use a wire.
2. Inspect:
•Main jet "1"
• Pilot jet "2"
• Needle jet "3"
• Starter jet "4"
• Pilot air jet "5"
• Leak jet "6" Damage
→Replace.
Contamination
→Clean.
• Use a petroleum based solvent for cleaning. Blow out all passages and
jets with compressed air.
• Never use a wire.
CHECKING THE NEEDLE VALVE
1. Inspect: • Needle valve "1"
• Valve seat "2"Grooved wear "a"
→Replace.
Dust "b"
→Clean.
•Filter "c" Clogged
→Clean.
CHECKING THE THROTTLE
VALVE
1. Check: • Free movementStick
→Repair or replace.
Insert the throttle valve "1" into the
carburetor body, and check for free
movement.
CHECKING THE JET NEEDLE
1. Inspect:• Jet needle "1"Bends/wear
→Replace.
• Clip groove
Free play exists/wear
→Replace.
• Clip position MEASURING AND ADJUSTING
THE FLOAT HEIGHT
1. Measure:
• Float height "a"
Out of specification
→Adjust.
Measurement and adjustment
steps:
a. Hold the carburetor in an upside down position.
• Slowly tilt the carburetor in the op-posite direction, then take the mea-
surement when the needle valve
aligns with the float arm.
• If the carburetor is level, the weight
of the float will push in the needle
valve, resulting in an incorrect mea-
surement.
b. Measure the distance between the mating surface of the float
chamber and top of the float using
a vernier calipers.
The float arm should be resting on the
needle valve, but not compressing
the needle valve.
c. If the float height is not within specification, inspect the valve
seat and needle valve.
d. If either is worn, replace them
both.
e. If both are fine, adjust the float height by bending the float tab "b"
on the float.
Standard clip position:No.5 Groove
Float height:
8.0 mm (0.31 in)
Page 80 of 192

4-11
CARBURETOR
f. Recheck the float height.
CHECKING THE FLOAT
1. Inspect:•Float "1"Damage
→Replace.
CHECKING THE STARTER
PLUNGER
1. Inspect: • Cold starter plunger "1"
• Hot starter plunger "2"
Wear/damage
→Replace.
CHECKING THE ACCELERATOR
PUMP
1. Inspect: • Diaphragm (accelerator pump)
"1"
• Spring (accelerator pump) "2"
• Accelerator pump cover "3"
• O-ring "4"
• Push rod "5" Tears (diaphragm)/damage
→
Replace.
Dirt
→Clean.
2. Inspect: • Throttle shaft "1"
• Spring "2"
• Lever 1 "3"
• Spring 1 "4"
• Lever 2 "5" • Spring 2 "6"
Dirt
→Clean.
ASSEMBLING THE CARBURETOR
1. Install: • Cold starter plunger "1"
2. Install: • Pilot air jet "1"
3. Install: • Spring 1 "1"
• Lever 1 "2"
To lever 2 "3".
Make sure the spring 1 fits on the
stopper "a" of the lever 2.
4. Install:• Spring 2 "1"To lever 2 "2". 5. Install:
• Push rod link lever assembly "1"
Make sure the stopper "a" of the
spring 2 fits into the recess "b" in the
carburetor.
6. Install:• Washer "1"
•Circlip "2"
7. Install: • Spring "1"To throttle shaft "2".
Install the bigger hook "a" of the
spring fits on the stopper "b" of the
throttle shaft pulley.
8. Install:
• Throttle shaft assembly "1"
• Washer (metal) "2"
• Washer (resin) "3"
• Valve lever "4"
• Apply the fluorochemical grease on the bearings.
• Fit the projection "a" on the throttle
shaft assembly into the slot "b" in
the throttle position sensor.
• Make sure the stopper "c" of the
spring fits into the recess in the car-
buretor.
• Turn the throttle shaft assembly left
while holding down the lever 1 "5"
and fit the throttle stop screw tip "d"
to the stopper "e" of the throttle
shaft assembly pulley.
Page 82 of 192

4-13
CARBURETOR
18. Install:• Carburetor breather hose "1"
Install the carburetor breather hoses
to the carburetor so that the hoses do
not bend near where they are in-
stalled.
ADJUSTING THE ACCELERATOR
PUMP TIMING
Adjustment steps:
In order for the throttle valve height
"a" to achieve the specified value,
tuck under the throttle valve plate "1"
the rod "2" etc. with the same outer di-
ameter as the specified value.
a. Fully turn in the accelerator pump adjusting screw "3".
b. Check that the link lever "4" has free play "b" by pushing lightly on
it.
c. Gradually turn out the adjusting screw while moving the link lever
until it has no more free play.
INSTALLING THE CARBURETOR
1. Install:
• Carburetor joint "1" 2. Install:
• Carburetor "1"
Install the projection "a" between the
carburetor joint slots.
3. Install:• Hot starter plunger "1"
4. Tighten: • Bolt (carburetor joint) "1"
• Bolt (air filter joint) "2"
5. Install: • Throttle cable (pull) "1" • Throttle cable (return) "2"
6. Adjust: • Throttle grip free playRefer to "ADJUSTING THE
THROTTLE CABLE FREE PLAY"
section in the CHAPTER 3.
7. Install: • Throttle cable cover "1"
• Bolt (throttle cable cover) "2"
8. Install: • Throttle position sensor lead cou-
pler "1"
•Clamp "2" Refer to "CABLE ROUTING DIA-
GRAM" section in the CHAPTER
2.
Throttle valve height:
0.8 mm (0.031 in)
Carburetor joint: 10 Nm (1.0 m•kg, 7.2
ft•lb)
Hot starter plunger:2 Nm (0.2 m•kg, 1.4
ft•lb)
Bolt (carburetor joint): 3 Nm (0.3 m•kg, 2.2
ft•lb)
Bolt (air filter joint): 3 Nm (0.3 m•kg, 2.2
ft•lb)
Throttle cable (pull): 4 Nm (0.4 m•kg, 2.9
ft•lb)
Throttle cable (return):11 Nm (1.1 m•kg, 8.0
ft•lb)
Bolt (throttle cable cov-
er): 4 Nm (0.4 m•kg, 2.9
ft•lb)
Page 145 of 192
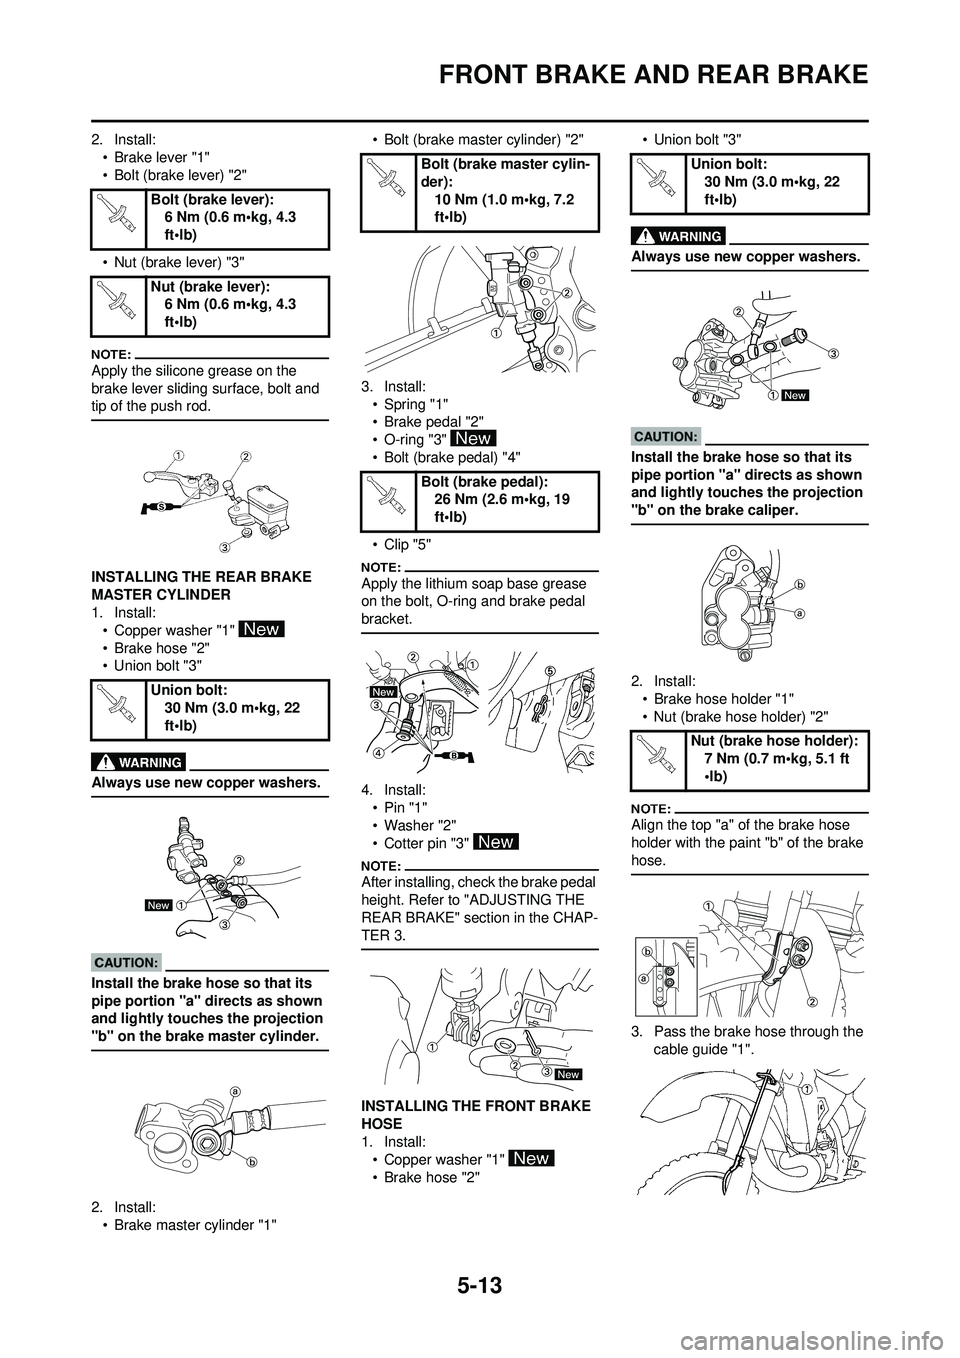
5-13
FRONT BRAKE AND REAR BRAKE
2. Install:• Brake lever "1"
• Bolt (brake lever) "2"
• Nut (brake lever) "3"
Apply the silicone grease on the
brake lever sliding surface, bolt and
tip of the push rod.
INSTALLING THE REAR BRAKE
MASTER CYLINDER
1. Install:• Copper washer "1"
•Brake hose "2"
• Union bolt "3"
Always use new copper washers.
Install the brake hose so that its
pipe portion "a" directs as shown
and lightly touches the projection
"b" on the brake master cylinder.
2. Install:• Brake master cylinder "1" • Bolt (brake master cylinder) "2"
3. Install: • Spring "1"
• Brake pedal "2"
• O-ring "3"
• Bolt (brake pedal) "4"
•Clip "5"
Apply the lithium soap base grease
on the bolt, O-ring and brake pedal
bracket.
4. Install:•Pin "1"
•Washer "2"
• Cotter pin "3"
After installing, check the brake pedal
height. Refer to "ADJUSTING THE
REAR BRAKE" section in the CHAP-
TER 3.
INSTALLING THE FRONT BRAKE
HOSE
1. Install:• Copper washer "1"
• Brake hose "2" • Union bolt "3"
Always use new copper washers.
Install the brake hose so that its
pipe portion "a" directs as shown
and lightly touches the projection
"b" on the brake caliper.
2. Install:
• Brake hose holder "1"
• Nut (brake hose holder) "2"
Align the top "a" of the brake hose
holder with the paint "b" of the brake
hose.
3. Pass the brake hose through the
cable guide "1".
Bolt (brake lever):
6 Nm (0.6 m•kg, 4.3
ft•lb)
Nut (brake lever): 6 Nm (0.6 m•kg, 4.3
ft•lb)
Union bolt: 30 Nm (3.0 m•kg, 22
ft•lb)
Bolt (brake master cylin-
der):
10 Nm (1.0 m•kg, 7.2
ft•lb)
Bolt (brake pedal): 26 Nm (2.6 m•kg, 19
ft•lb)Union bolt:
30 Nm (3.0 m•kg, 22
ft•lb)
Nut (brake hose holder): 7 Nm (0.7 m•kg, 5.1 ft
•lb)