lock YAMAHA YZ250F 2010 User Guide
[x] Cancel search | Manufacturer: YAMAHA, Model Year: 2010, Model line: YZ250F, Model: YAMAHA YZ250F 2010Pages: 196, PDF Size: 13.74 MB
Page 61 of 196
3-11
ENGINE
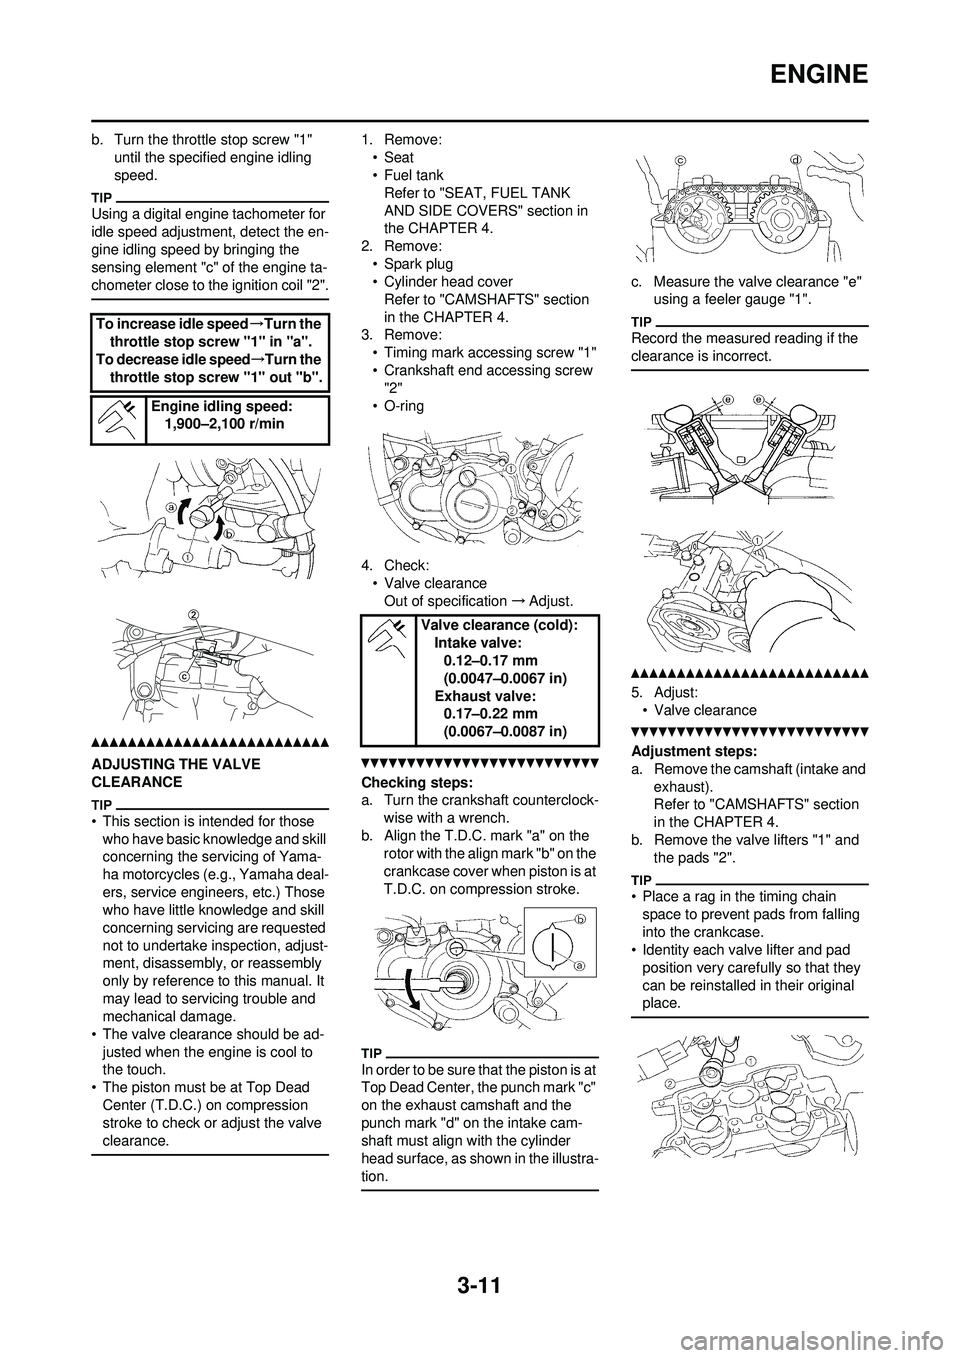
b. Turn the throttle stop screw "1" until the specified engine idling
speed.
Using a digital engine tachometer for
idle speed adjustment, detect the en-
gine idling speed by bringing the
sensing element "c" of the engine ta-
chometer close to the ignition coil "2".
ADJUSTING THE VALVE
CLEARANCE
• This section is intended for those who have basic knowledge and skill
concerning the servicing of Yama-
ha motorcycles (e.g., Yamaha deal-
ers, service engineers, etc.) Those
who have little knowledge and skill
concerning servicing are requested
not to undertake inspection, adjust-
ment, disassembly, or reassembly
only by reference to this manual. It
may lead to servicing trouble and
mechanical damage.
• The valve clearance should be ad-
justed when the engine is cool to
the touch.
• The piston must be at Top Dead
Center (T.D.C.) on compression
stroke to check or adjust the valve
clearance.
1. Remove:•Seat
•Fuel tankRefer to "SEAT, FUEL TANK
AND SIDE COVERS" section in
the CHAPTER 4.
2. Remove:
• Spark plug
• Cylinder head coverRefer to "CAMSHAFTS" section
in the CHAPTER 4.
3. Remove: • Timing mark accessing screw "1"
• Crankshaft end accessing screw "2"
• O-ring
4. Check: • Valve clearanceOut of specification →Adjust.
Checking steps:
a. Turn the crankshaft counterclock-
wise with a wrench.
b. Align the T.D.C. mark "a" on the rotor with the align mark "b" on the
crankcase cover when piston is at
T.D.C. on compression stroke.
In order to be sure that the piston is at
Top Dead Center, the punch mark "c"
on the exhaust camshaft and the
punch mark "d" on the intake cam-
shaft must align with the cylinder
head surface, as shown in the illustra-
tion.
c. Measure the valve clearance "e" using a feeler gauge "1".
Record the measured reading if the
clearance is incorrect.
5. Adjust:
• Valve clearance
Adjustment steps:
a. Remove the camshaft (intake and exhaust).
Refer to "CAMSHAFTS" section
in the CHAPTER 4.
b. Remove the valve lifters "1" and the pads "2".
• Place a rag in the timing chain
space to prevent pads from falling
into the crankcase.
• Identity each valve lifter and pad
position very carefully so that they
can be reinstalled in their original
place.
To increase idle speed →Turn the
throttle stop screw "1" in "a".
To decrease idle speed →Turn the
throttle stop screw "1" out "b".
Engine idling speed:1,900–2,100 r/min
Valve clearance (cold):Intake valve:
0.12–0.17 mm
(0.0047–0.0067 in)
Exhaust valve: 0.17–0.22 mm
(0.0067–0.0087 in)
Page 64 of 196
3-14
CHASSIS
CHASSIS
BLEEDING THE HYDRAULIC
BRAKE SYSTEM
Bleed the brake system if:
• The system has been disassem-bled.
• A brake hose has been loosened or removed.
• The brake fluid is very low.
• The brake operation is faulty.
A dangerous loss of braking per-
formance may occur if the brake
system is not properly bled.
1. Remove:
• Brake master cylinder cap
• Diaphragm
• Reservoir float (front brake)
• Protector (rear brake)
2. Bleed: • Brake fluid
Air bleeding steps:
a. Add proper brake fluid to the res- ervoir.
b. Install the diaphragm. Be careful
not to spill any fluid or allow the
reservoir to overflow.
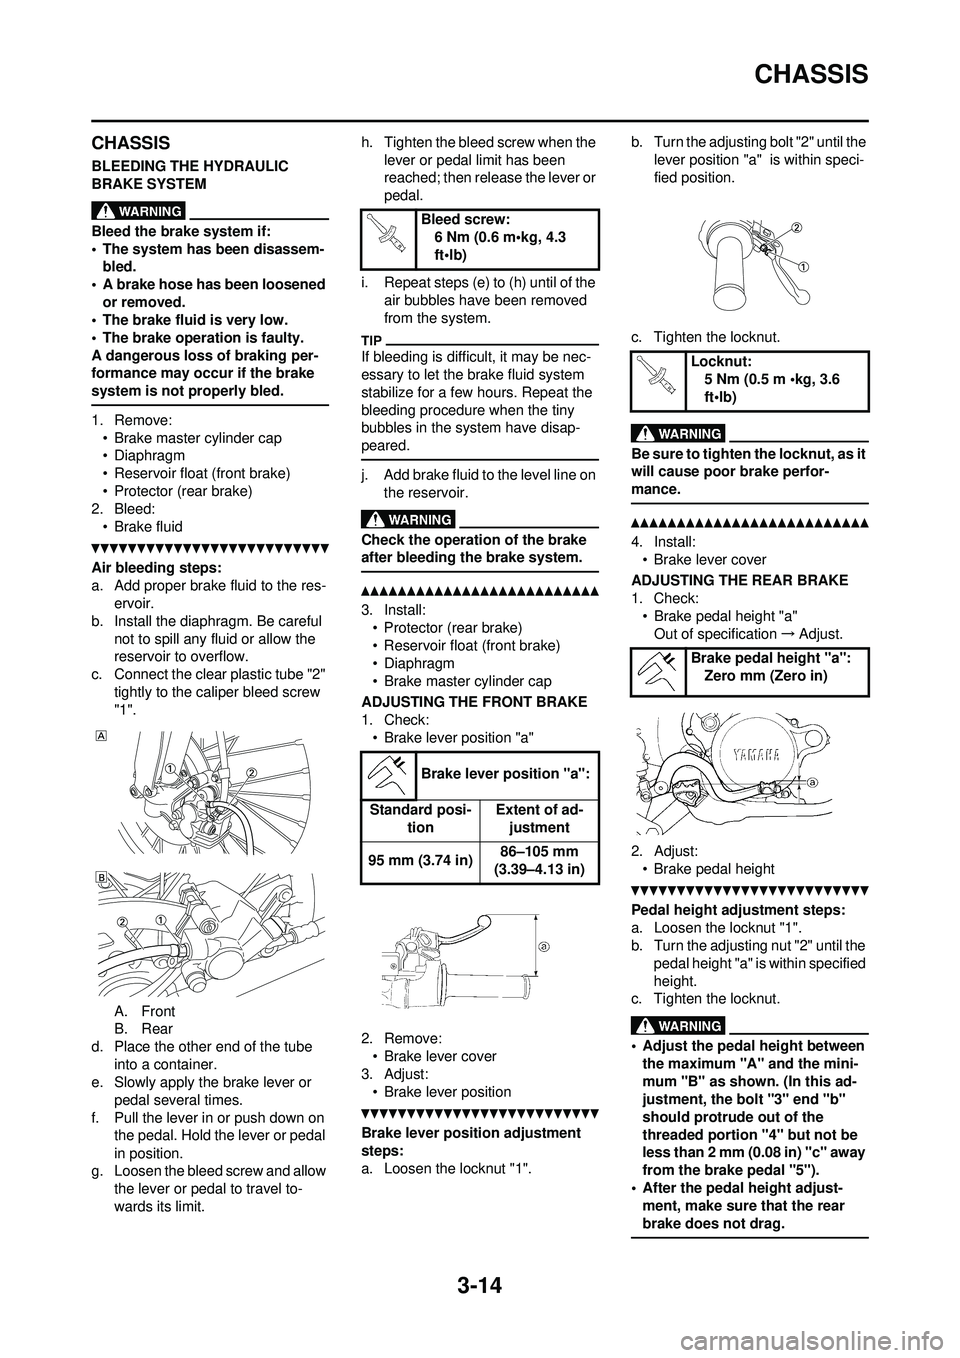
c. Connect the clear plastic tube "2"
tightly to the caliper bleed screw
"1".
A. Front
B. Rear
d. Place the other end of the tube
into a container.
e. Slowly apply the brake lever or
pedal several times.
f. Pull the lever in or push down on the pedal. Hold the lever or pedal
in position.
g. Loosen the bleed screw and allow the lever or pedal to travel to-
wards its limit. h. Tighten the bleed screw when the
lever or pedal limit has been
reached; then release the lever or
pedal.
i. Repeat steps (e) to (h) until of the air bubbles have been removed
from the system.
If bleeding is difficult, it may be nec-
essary to let the brake fluid system
stabilize for a few hours. Repeat the
bleeding procedure when the tiny
bubbles in the system have disap-
peared.
j. Add brake fluid to the level line on the reservoir.
Check the operation of the brake
after bleeding the brake system.
3. Install:• Protector (rear brake)
• Reservoir float (front brake)
• Diaphragm
• Brake master cylinder cap
ADJUSTING THE FRONT BRAKE
1. Check: • Brake lever position "a"
2. Remove: • Brake lever cover
3. Adjust: • Brake lever position
Brake lever position adjustment
steps:
a. Loosen the locknut "1". b. Turn the adjusting bolt "2" until the
lever position "a" is within speci-
fied position.
c. Tighten the locknut.
Be sure to tighten the locknut, as it
will cause poor brake perfor-
mance.
4. Install: • Brake lever cover
ADJUSTING THE REAR BRAKE
1. Check: • Brake pedal height "a"
Out of specification →Adjust.
2. Adjust: • Brake pedal height
Pedal height adjustment steps:
a. Loosen the locknut "1".
b. Turn the adjusting nut "2" until the pedal height "a" is within specified
height.
c. Tighten the locknut.
• Adjust the pedal height between
the maximum "A" and the mini-
mum "B" as shown. (In this ad-
justment, the bo lt "3" end "b"
should protrude out of the
threaded portion "4" but not be
less than 2 mm (0.08 in) "c" away
from the brake pedal "5").
• After the pedal height adjust- ment, make sure that the rear
brake does not drag.
Bleed screw:
6 Nm (0.6 m•kg, 4.3
ft•lb)
Brake lever position "a":
Standard posi- tion Extent of ad-
justment
95 mm (3.74 in) 86–105 mm
(3.39–4.13 in)
Locknut: 5 Nm (0.5 m •kg, 3.6
ft•lb)
Brake pedal height "a": Zero mm (Zero in)
Page 67 of 196
3-17
CHASSIS
CHECKING THE SPROCKET
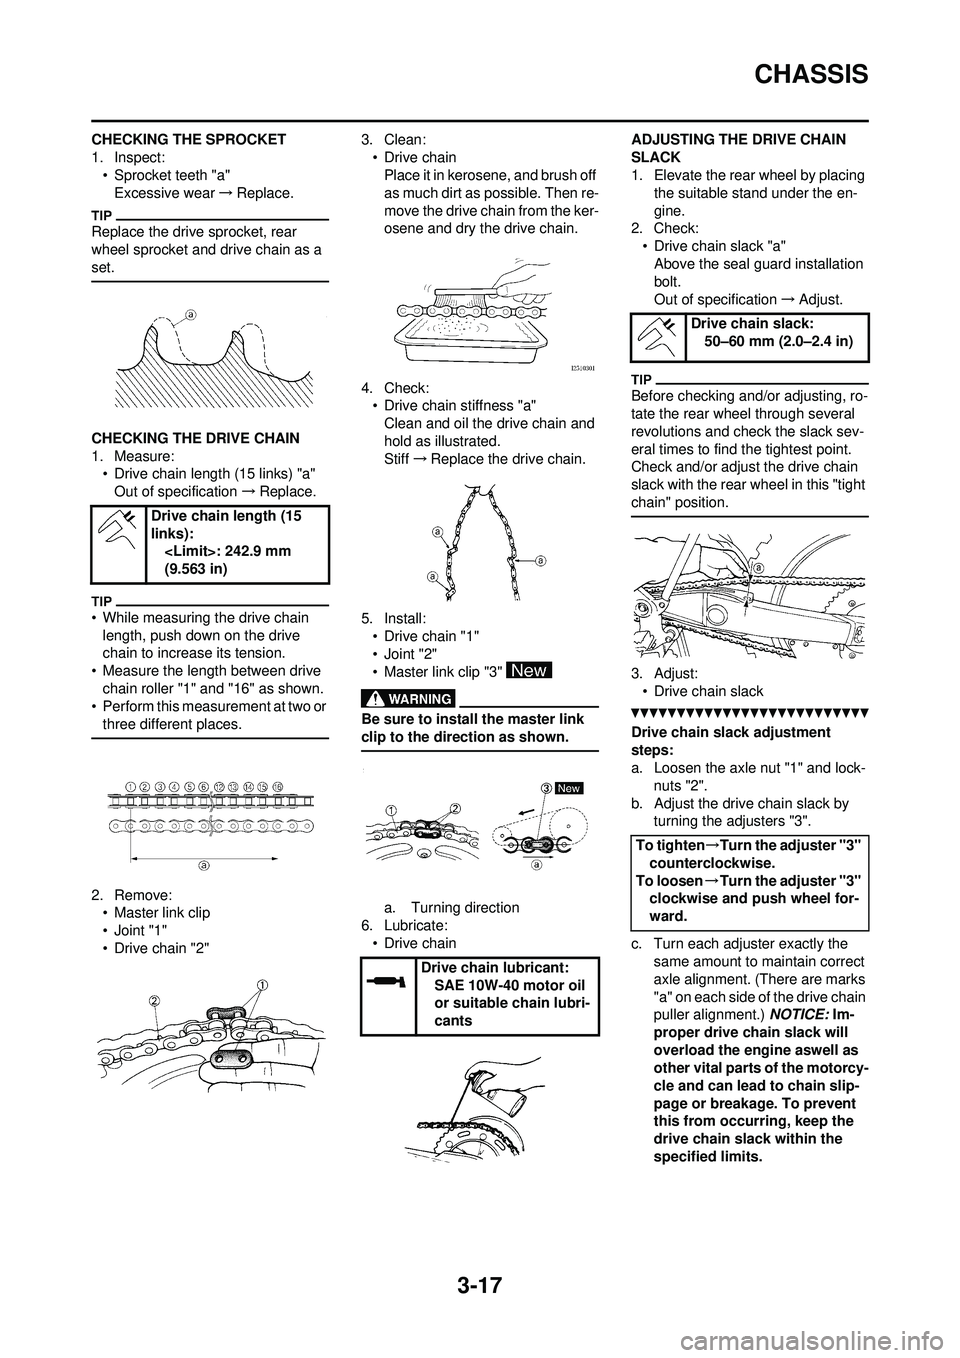
1. Inspect:• Sprocket teeth "a"Excessive wear →Replace.
Replace the drive sprocket, rear
wheel sprocket and drive chain as a
set.
CHECKING THE DRIVE CHAIN
1. Measure:
• Drive chain length (15 links) "a"Out of specification →Replace.
• While measuring the drive chain
length, push down on the drive
chain to increase its tension.
• Measure the length between drive
chain roller "1" and "16" as shown.
• Perform this measurement at two or three different places.
2. Remove:• Master link clip
•Joint "1"
• Drive chain "2" 3. Clean:
• Drive chainPlace it in kerosene, and brush off
as much dirt as possible. Then re-
move the drive chain from the ker-
osene and dry the drive chain.
4. Check: • Drive chain stiffness "a"
Clean and oil the drive chain and
hold as illustrated.
Stiff →Replace the drive chain.
5. Install: • Drive chain "1"
•Joint "2"
• Master link clip "3"
Be sure to install the master link
clip to the direction as shown.
a. Turning direction
6. Lubricate: • Drive chain ADJUSTING THE DRIVE CHAIN
SLACK
1. Elevate the rear wheel by placing
the suitable stand under the en-
gine.
2. Check: • Drive chain slack "a"
Above the seal guard installation
bolt.
Out of specification →Adjust.
Before checking and/or adjusting, ro-
tate the rear wheel through several
revolutions and check the slack sev-
eral times to find the tightest point.
Check and/or adjust the drive chain
slack with the rear wheel in this "tight
chain" position.
3. Adjust:
• Drive chain slack
Drive chain slack adjustment
steps:
a. Loosen the axle nut "1" and lock- nuts "2".
b. Adjust the drive chain slack by turning the adjusters "3".
c. Turn each adjuster exactly the same amount to maintain correct
axle alignment. (There are marks
"a" on each side of the drive chain
puller alignment.) NOTICE: Im-
proper drive chain slack will
overload the engine aswell as
other vital parts of the motorcy-
cle and can lead to chain slip-
page or breakage. To prevent
this from occurring, keep the
drive chain slack within the
specified limits.
Drive chain length (15
links):
(9.563 in)
Drive chain lubricant:
SAE 10W-40 motor oil
or suitable chain lubri-
cants
Drive chain slack: 50–60 mm (2.0–2.4 in)
To tighten →Turn the adjuster "3"
counterclockwise.
To loosen →Turn the adjuster "3"
clockwise and push wheel for-
ward.
Page 68 of 196
3-18
CHASSIS
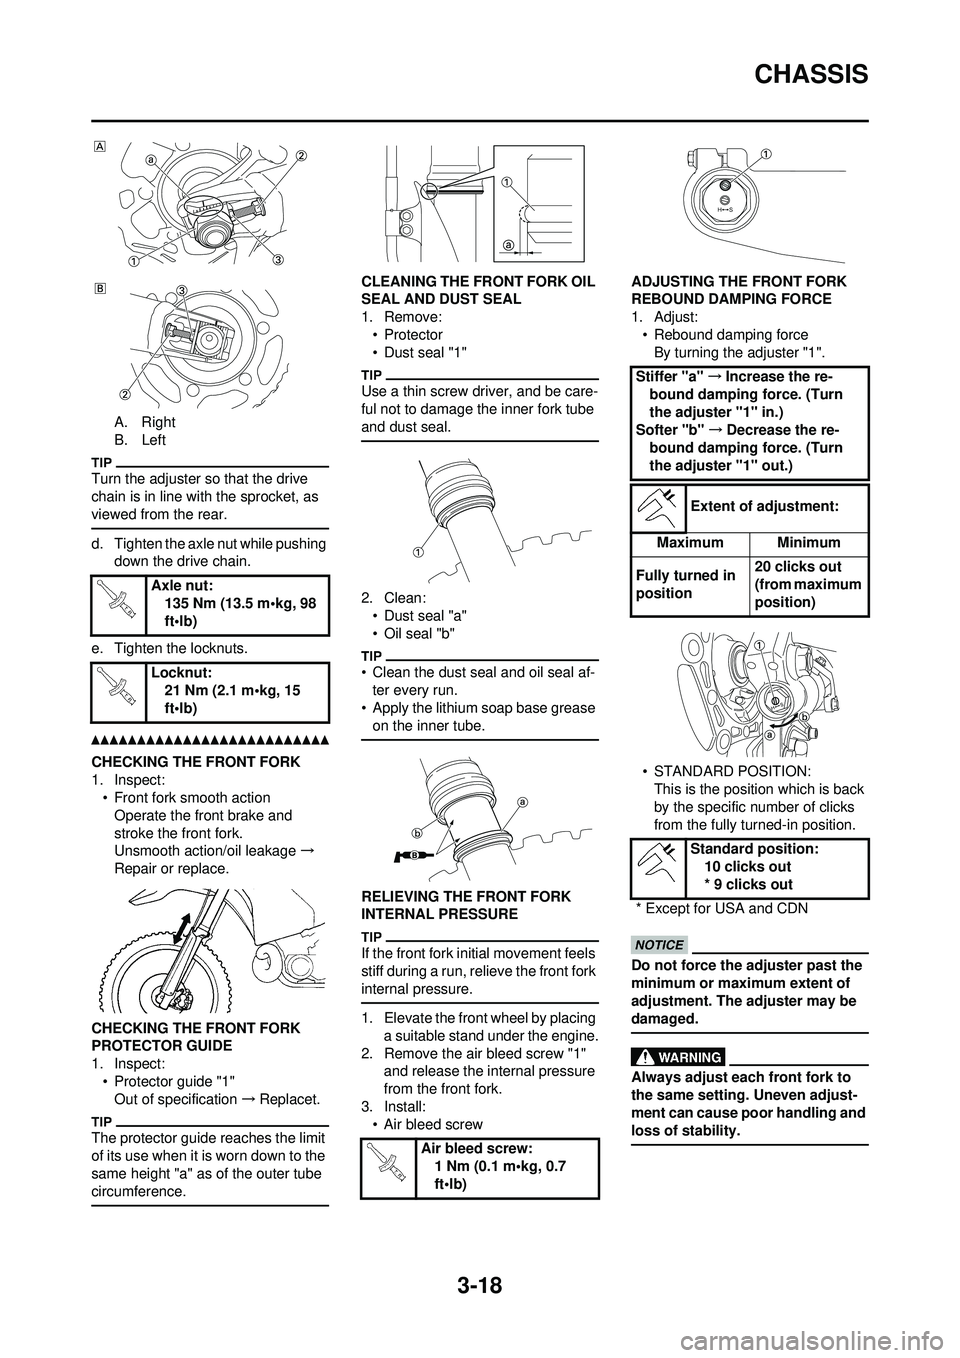
A. Right
B. Left
Turn the adjuster so that the drive
chain is in line with the sprocket, as
viewed from the rear.
d. Tighten the axle nut while pushing down the drive chain.
e. Tighten the locknuts.
CHECKING THE FRONT FORK
1. Inspect: • Front fork smooth action
Operate the front brake and
stroke the front fork.
Unsmooth action/oil leakage →
Repair or replace.
CHECKING THE FRONT FORK
PROTECTOR GUIDE
1. Inspect: • Protector guide "1"Out of specification →Replacet.
The protector guide reaches the limit
of its use when it is worn down to the
same height "a" as of the outer tube
circumference.
CLEANING THE FRONT FORK OIL
SEAL AND DUST SEAL
1. Remove:
•Protector
• Dust seal "1"
Use a thin screw driver, and be care-
ful not to damage the inner fork tube
and dust seal.
2. Clean:• Dust seal "a"
• Oil seal "b"
• Clean the dust seal and oil seal af-
ter every run.
• Apply the lithium soap base grease on the inner tube.
RELIEVING THE FRONT FORK
INTERNAL PRESSURE
If the front fork initial movement feels
stiff during a run, re lieve the front fork
internal pressure.
1. Elevate the front wheel by placing a suitable stand under the engine.
2. Remove the air bleed screw "1" and release the internal pressure
from the front fork.
3. Install: • Air bleed screw ADJUSTING THE FRONT FORK
REBOUND DAMPING FORCE
1. Adjust:
• Rebound damping forceBy turning the adjuster "1".
• STANDARD POSITION: This is the position which is back
by the specific number of clicks
from the fully turned-in position.
Do not force the adjuster past the
minimum or maximum extent of
adjustment. The adjuster may be
damaged.
Always adjust each front fork to
the same setting. Uneven adjust-
ment can cause poor handling and
loss of stability.
Axle nut: 135 Nm (13.5 m•kg, 98
ft•lb)
Locknut: 21 Nm (2.1 m•kg, 15
ft•lb)
Air bleed screw:
1 Nm (0.1 m•kg, 0.7
ft•lb)
Stiffer "a" →Increase the re-
bound damping force. (Turn
the adjuster "1" in.)
Softer "b" →Decrease the re-
bound damping force. (Turn
the adjuster "1" out.)
Extent of adjustment:
Maximum Minimum
Fully turned in
position 20 clicks out
(from maximum
position)
Standard position: 10 clicks out
* 9 clicks out
* Except for USA and CDN
Page 69 of 196
3-19
CHASSIS
ADJUSTING THE FRONT FORK
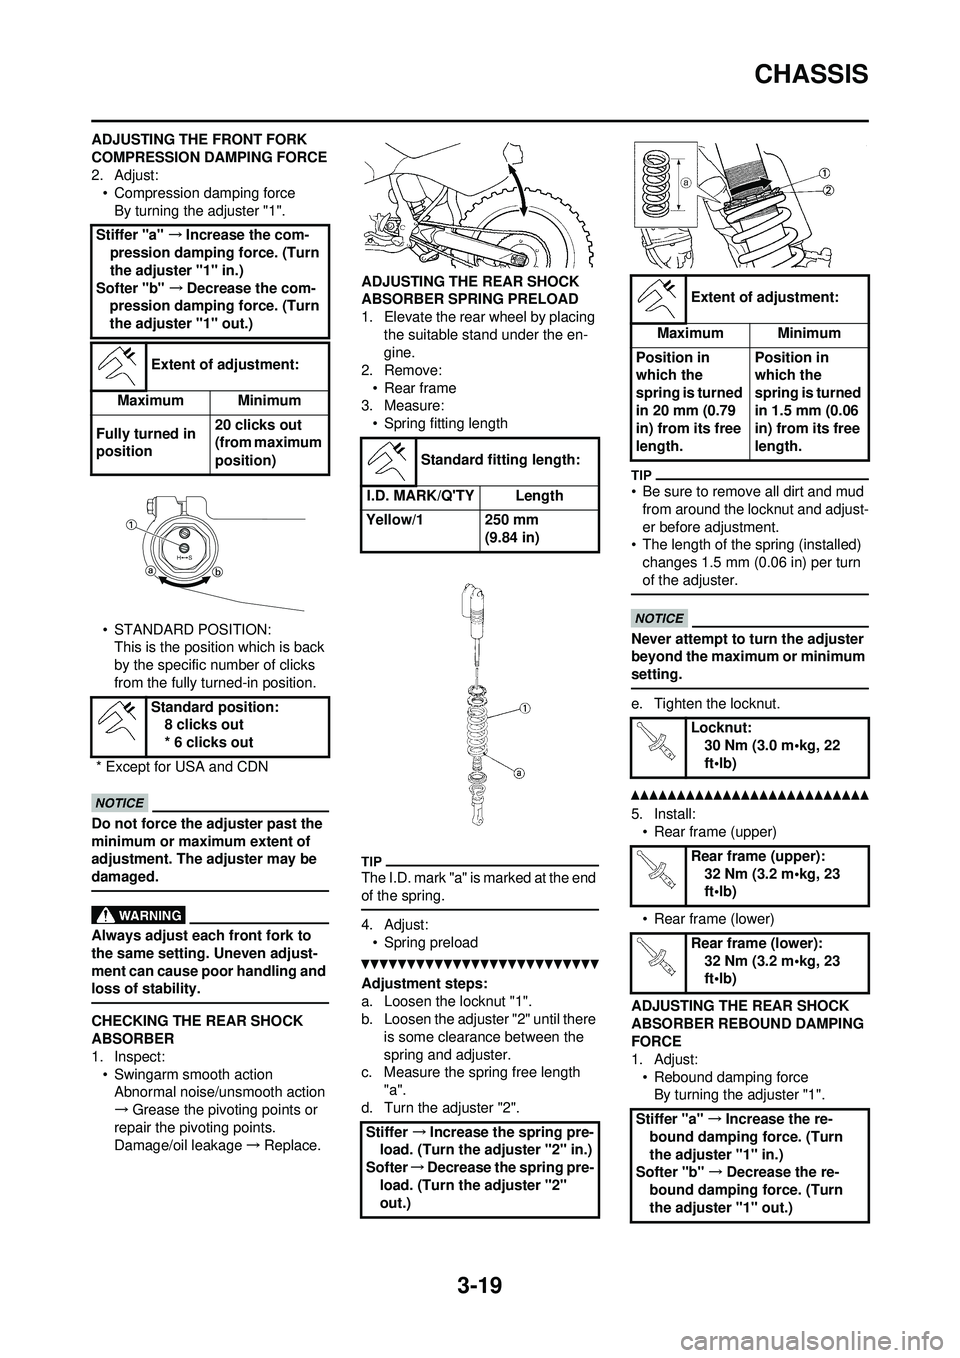
COMPRESSION DAMPING FORCE
2. Adjust:• Compression damping force
By turning the adjuster "1".
• STANDARD POSITION: This is the position which is back
by the specific number of clicks
from the fully turned-in position.
Do not force the adjuster past the
minimum or maximum extent of
adjustment. The adjuster may be
damaged.
Always adjust each front fork to
the same setting. Uneven adjust-
ment can cause poor handling and
loss of stability.
CHECKING THE REAR SHOCK
ABSORBER
1. Inspect:• Swingarm smooth actionAbnormal noise/unsmooth action
→ Grease the pivoting points or
repair the pivoting points.
Damage/oil leakage →Replace. ADJUSTING THE REAR SHOCK
ABSORBER SPRING PRELOAD
1. Elevate the rear wheel by placing
the suitable stand under the en-
gine.
2. Remove: • Rear frame
3. Measure:
• Spring fitting length
The I.D. mark "a" is marked at the end
of the spring.
4. Adjust: • Spring preload
Adjustment steps:
a. Loosen the locknut "1".
b. Loosen the adjuster "2" until there is some clearance between the
spring and adjuster.
c. Measure the spring free length
"a".
d. Turn the adjuster "2".
• Be sure to remove all dirt and mud from around the locknut and adjust-
er before adjustment.
• The length of the spring (installed) changes 1.5 mm (0.06 in) per turn
of the adjuster.
Never attempt to tu rn the adjuster
beyond the maximum or minimum
setting.
e. Tighten the locknut.
5. Install: • Rear frame (upper)
• Rear frame (lower)
ADJUSTING THE REAR SHOCK
ABSORBER REBOUND DAMPING
FORCE
1. Adjust: • Rebound damping forceBy turning the adjuster "1".
Stiffer "a"
→Increase the com-
pression damping force. (Turn
the adjuster "1" in.)
Softer "b" →Decrease the com-
pression damping force. (Turn
the adjuster "1" out.)
Extent of adjustment:
Maximum Minimum
Fully turned in
position 20 clicks out
(from maximum
position)
Standard position: 8 clicks out
* 6 clicks out
* Except for USA and CDN
Standard fitti ng length:
I.D. MARK/Q'TY Length
Yellow/1 250 mm (9.84 in)
Stiffer →Increase the spring pre-
load. (Turn the adjuster "2" in.)
Softer →Decrease the spring pre-
load. (Turn the adjuster "2"
out.)
Extent of adjustment:
Maximum Minimum
Position in
which the
spring is turned
in 20 mm (0.79
in) from its free
length. Position in
which the
spring is turned
in 1.5 mm (0.06
in) from its free
length.
Locknut: 30 Nm (3.0 m•kg, 22
ft•lb)
Rear frame (upper): 32 Nm (3.2 m•kg, 23
ft•lb)
Rear frame (lower): 32 Nm (3.2 m•kg, 23
ft•lb)
Stiffer "a" →Increase the re-
bound damping force. (Turn
the adjuster "1" in.)
Softer "b" →Decrease the re-
bound damping force. (Turn
the adjuster "1" out.)
Page 71 of 196
3-21
CHASSIS
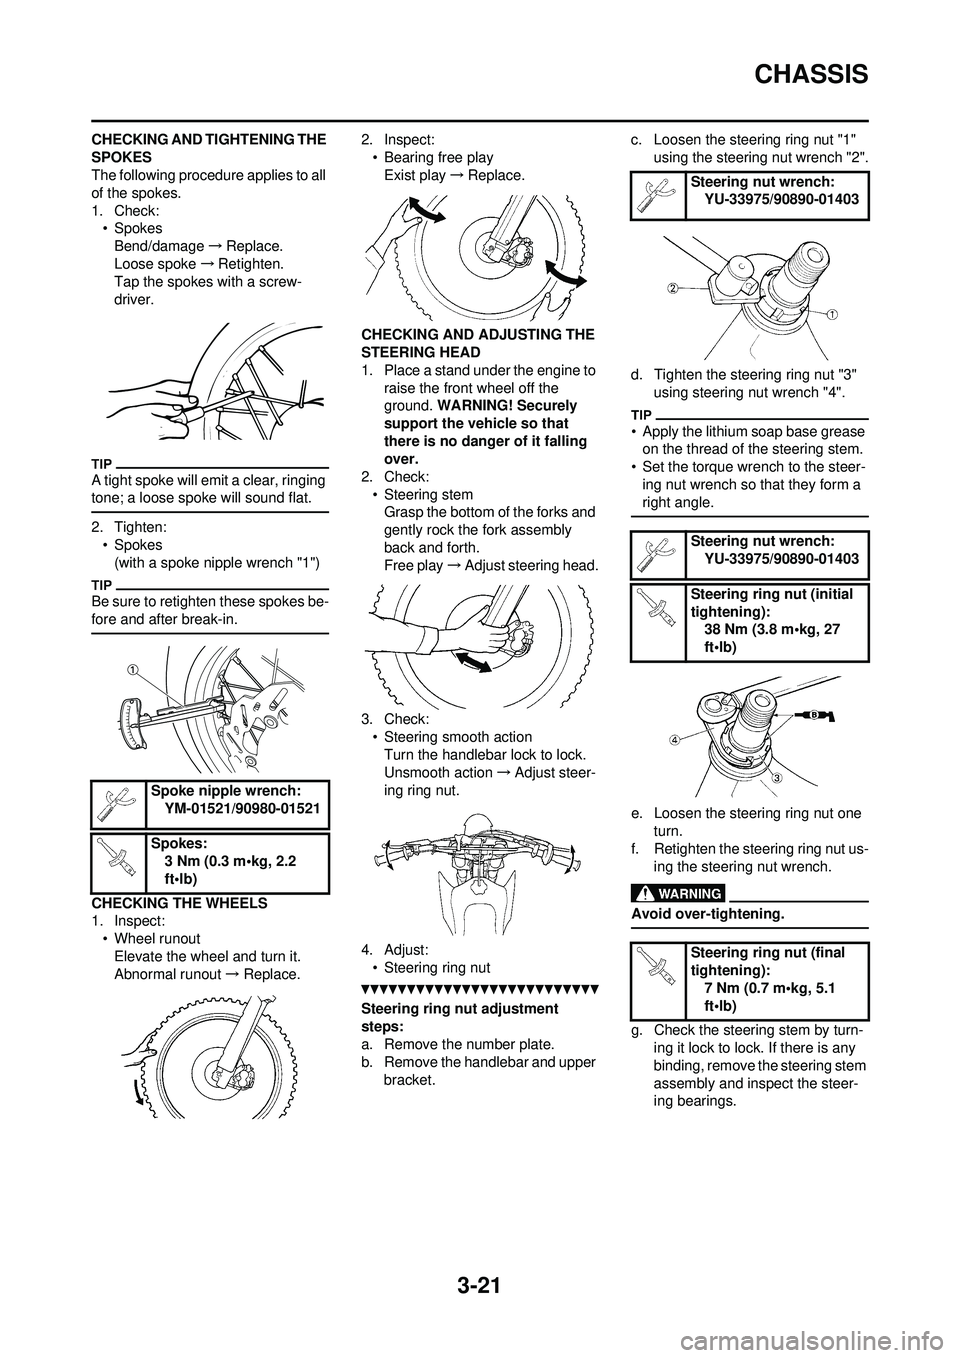
CHECKING AND TIGHTENING THE
SPOKES
The following procedure applies to all
of the spokes.
1. Check:• SpokesBend/damage →Replace.
Loose spoke →Retighten.
Tap the spokes with a screw-
driver.
A tight spoke will emit a clear, ringing
tone; a loose spoke will sound flat.
2. Tighten: • Spokes
(with a spoke nipple wrench "1")
Be sure to retighten these spokes be-
fore and after break-in.
CHECKING THE WHEELS
1. Inspect:• Wheel runout
Elevate the wheel and turn it.
Abnormal runout → Replace. 2. Inspect:
• Bearing free playExist play →Replace.
CHECKING AND ADJUSTING THE
STEERING HEAD
1. Place a stand under the engine to raise the front wheel off the
ground. WARNING! Securely
support the vehicle so that
there is no danger of it falling
over.
2. Check: • Steering stemGrasp the bottom of the forks and
gently rock the fork assembly
back and forth.
Free play →Adjust steering head.
3. Check: • Steering smooth actionTurn the handlebar lock to lock.
Unsmooth action →Adjust steer-
ing ring nut.
4. Adjust: • Steering ring nut
Steering ring nut adjustment
steps:
a. Remove the number plate.
b. Remove the handlebar and upper
bracket. c. Loosen the steering ring nut "1"
using the steering nut wrench "2".
d. Tighten the steering ring nut "3" using steering nut wrench "4".
• Apply the lithium soap base grease on the thread of the steering stem.
• Set the torque wrench to the steer-
ing nut wrench so that they form a
right angle.
e. Loosen the steering ring nut one turn.
f. Retighten the steering ring nut us- ing the steering nut wrench.
Avoid over-tightening.
g. Check the steering stem by turn-ing it lock to lock. If there is any
binding, remove the steering stem
assembly and inspect the steer-
ing bearings.
Spoke nipple wrench:
YM-01521/90980-01521
Spokes: 3 Nm (0.3 m•kg, 2.2
ft•lb)
Steering nut wrench:YU-33975/90890-01403
Steering nut wrench: YU-33975/90890-01403
Steering ring nut (initial
tightening): 38 Nm (3.8 m•kg, 27
ft•lb)
Steering ring nut (final
tightening): 7 Nm (0.7 m•kg, 5.1
ft•lb)
Page 80 of 196
4-6
RADIATOR
HANDLING NOTE
Do not remove the radiator cap
when the engine and radiator are
hot. Scalding hot fluid and steam
may be blown out under pressure,
which could cause serious injury.
When the engine has cooled, open
the radiator cap by the following
procedure:
Place a thick rag, like a towel, over
the radiator cap, slowly rotate the
cap counterclockwise to the de-
tent. This procedure allows any re-
sidual pressure to escape. When
the hissing sound has stopped,
press down on the cap while turn-
ing counterclockwise and remove
it.
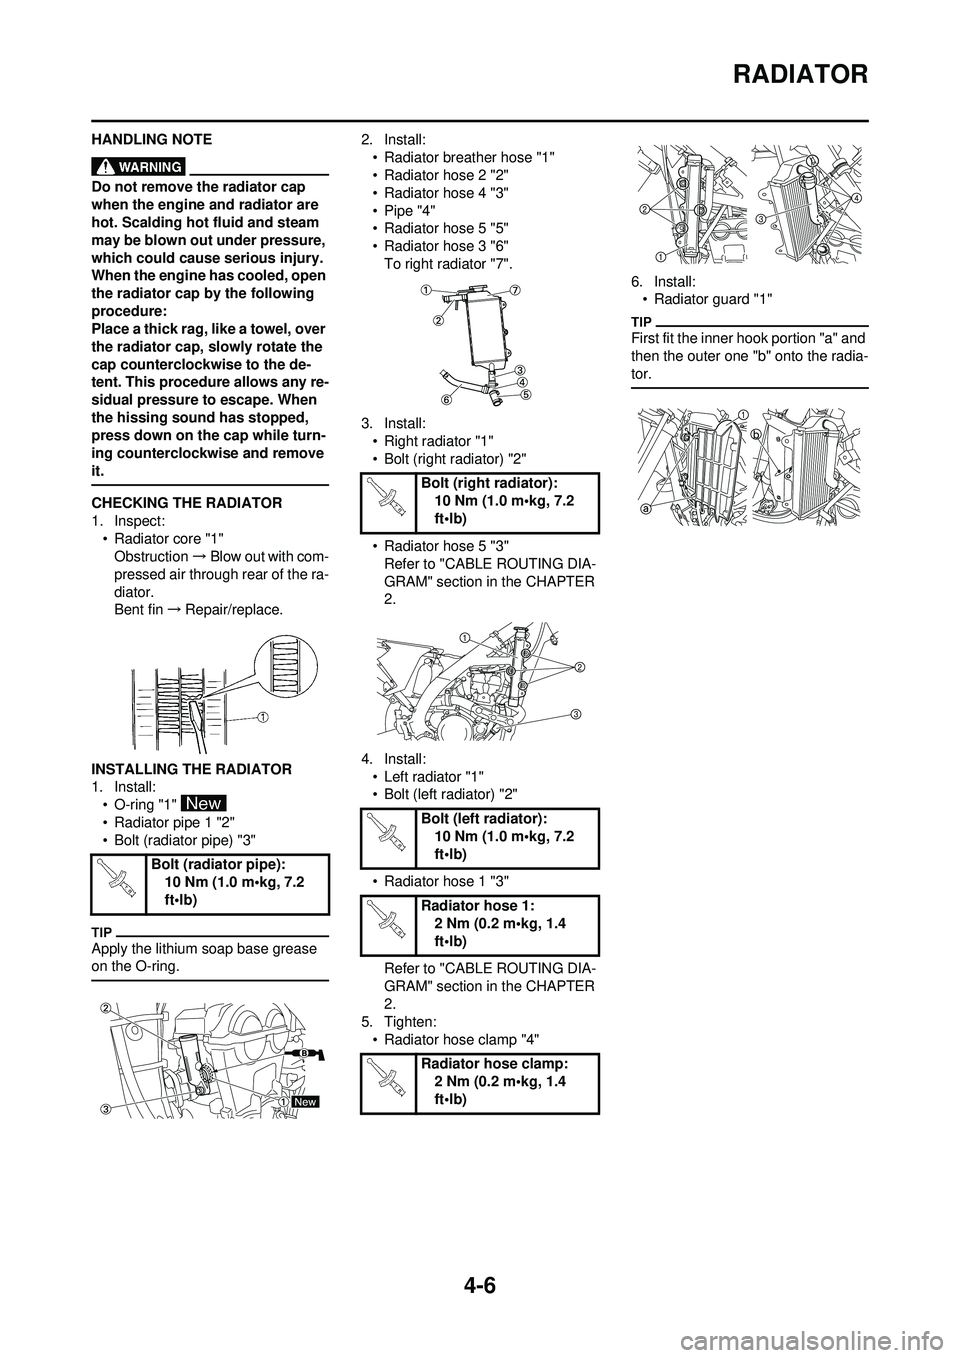
CHECKING THE RADIATOR
1. Inspect:• Radiator core "1"
Obstruction →Blow out with com-
pressed air through rear of the ra-
diator.
Bent fin →Repair/replace.
INSTALLING THE RADIATOR
1. Install: • O-ring "1"
• Radiator pipe 1 "2"
• Bolt (radiator pipe) "3"
Apply the lithium soap base grease
on the O-ring.
2. Install:• Radiator breather hose "1"
• Radiator hose 2 "2"
• Radiator hose 4 "3"
• Pipe "4"
• Radiator hose 5 "5"
• Radiator hose 3 "6"To right radiator "7".
3. Install: • Right radiator "1"
• Bolt (right radiator) "2"
• Radiator hose 5 "3"
Refer to "CABLE ROUTING DIA-
GRAM" section in the CHAPTER
2.
4. Install: • Left radiator "1"
• Bolt (left radiator) "2"
• Radiator hose 1 "3"
Refer to "CABLE ROUTING DIA-
GRAM" section in the CHAPTER
2.
5. Tighten:
• Radiator hose clamp "4" 6. Install:
• Radiator guard "1"
First fit the inner hook portion "a" and
then the outer one "b" onto the radia-
tor.
Bolt (radiator pipe):
10 Nm (1.0 m•kg, 7.2
ft•lb)
Bolt (right radiator):10 Nm (1.0 m•kg, 7.2
ft•lb)
Bolt (left radiator): 10 Nm (1.0 m•kg, 7.2
ft•lb)
Radiator hose 1: 2 Nm (0.2 m•kg, 1.4
ft•lb)
Radiator hose clamp: 2 Nm (0.2 m•kg, 1.4
ft•lb)
Page 90 of 196
4-16
CAMSHAFTS
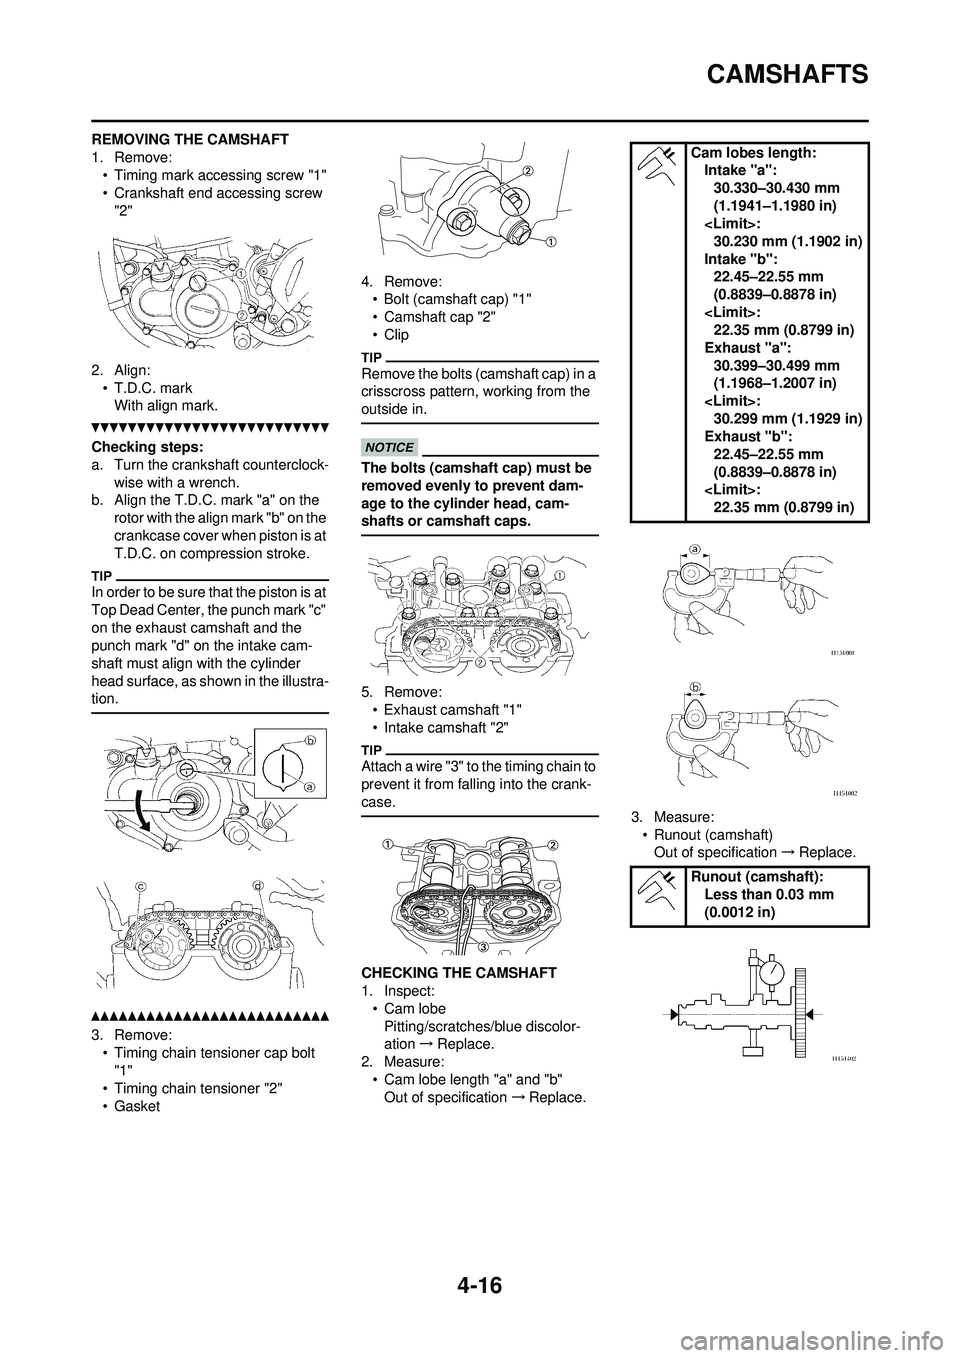
REMOVING THE CAMSHAFT
1. Remove:• Timing mark accessing screw "1"
• Crankshaft end accessing screw
"2"
2. Align: • T.D.C. markWith align mark.
Checking steps:
a. Turn the crankshaft counterclock-
wise with a wrench.
b. Align the T.D.C. mark "a" on the rotor with the align mark "b" on the
crankcase cover when piston is at
T.D.C. on compression stroke.
In order to be sure t hat the piston is at
Top Dead Center, the punch mark "c"
on the exhaust camshaft and the
punch mark "d" on the intake cam-
shaft must align with the cylinder
head surface, as shown in the illustra-
tion.
3. Remove: • Timing chain tensioner cap bolt
"1"
• Timing chain tensioner "2"
• Gasket 4. Remove:
• Bolt (camshaft cap) "1"
• Camshaft cap "2"
• Clip
Remove the bolts (camshaft cap) in a
crisscross pattern, working from the
outside in.
The bolts (camshaft cap) must be
removed evenly to prevent dam-
age to the cylinder head, cam-
shafts or camshaft caps.
5. Remove:• Exhaust camshaft "1"
• Intake camshaft "2"
Attach a wire "3" to the timing chain to
prevent it from falling into the crank-
case.
CHECKING THE CAMSHAFT
1. Inspect:• Cam lobe
Pitting/scratches/blue discolor-
ation →Replace.
2. Measure:
• Cam lobe length "a" and "b"Out of specification →Replace. 3. Measure:
• Runout (camshaft)Out of specification →Replace.
Cam lobes length:
Intake "a":30.330–30.430 mm
(1.1941–1.1980 in)
Intake "b": 22.45–22.55 mm
(0.8839–0.8878 in)
Exhaust "a":
30.399–30.499 mm
(1.1968–1.2007 in)
30.299 mm (1.1929 in)
Exhaust "b": 22.45–22.55 mm
(0.8839–0.8878 in)
Runout (camshaft): Less than 0.03 mm
(0.0012 in)
Page 91 of 196

4-17
CAMSHAFTS
4. Measure:• Camshaft-to-cap clearanceOut of specification →Measure
camshaft outside diameter.
Measurement steps:
a. Install the camshaft onto the cylin- der head.
b. Position a strip of Plastigauge
®
"1" onto the camshaft.
c. Install the clip, dowel pins and camshaft caps.
• Tighten the bolts (camshaft cap) in a crisscross pattern from innermost
to outer caps.
• Do not turn the camshaft when
measuring clearance with the
Plastigauge
®.
d. Remove the camshaft caps and measure the width of the Plasti-
gauge
® "1".
5. Measure:• Camshaft outside diameter "a"
Out of specification →Replace the
camshaft.
Within specification →Replace
camshaft case and camshaft
caps as a set. CHECKING THE CAMSHAFT
SPROCKET
1. Inspect:
• Camshaft sprocket "1"Wear/damage →Replace the
camshaft assemb ly and timing
chain as a set.
CHECKING THE
DECOMPRESSION SYSTEM
1. Check: • Decompression system
Checking steps:
a. Check that the decompression
mechanism cam "1" moves
smoothly.
b. Check that the decompression
mechanism cam lever pin "2" proj-
ects from the camshaft.
CHECKING THE TIMING CHAIN
TENSIONER
1. Check:• While pressing the tensioner rod lightly with fingers, use a thin
screwdriver "1" and wind the ten-
sioner rod up fully clockwise.
• When releasing the screwdriver
by pressing lightly with fingers,
make sure that the tensioner rod
will come out smoothly.
• If not, replace the tensioner as- sembly. INSTALLING THE CAMSHAFT
1. Install:
• Exhaust camshaft "1"
• Intake camshaft "2"
Installation steps:
a. Turn the crankshaft counterclock- wise with a wrench.
• Apply the molybdenum disulfide oil on the camshafts.
• Apply the engine oil on the decom- pression system.
• Squeezing the decompression le-
ver allows the crankshaft to be
turned easily.
b. Align the T.D.C. mark "a" on the rotor with the align mark "b" on the
crankcase cover when piston is at
T.D.C. on compression stroke.
Camshaft-to-cap clear-
ance:
0.028–0.062 mm
(0.0011–0.0024 in)
in)
Bolt (camshaft cap): 10 Nm (1.0 m•kg, 7.2
ft•lb)
Camshaft outside diame-
ter: 21.959–21.972 mm
(0.8645–0.8650 in)
Page 92 of 196
4-18
CAMSHAFTS
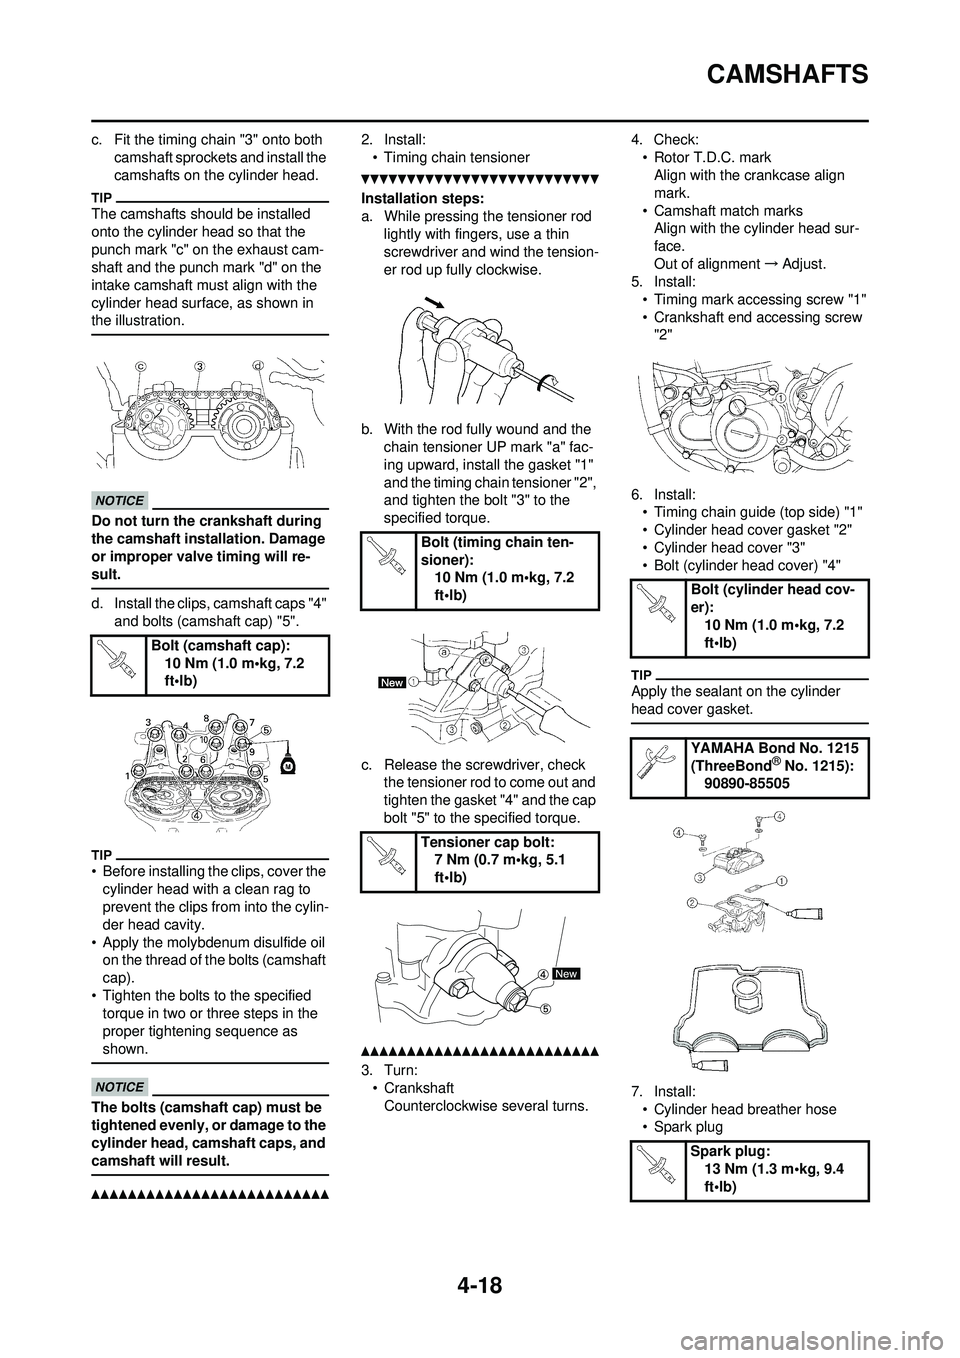
c. Fit the timing chain "3" onto both camshaft sprockets and install the
camshafts on the cylinder head.
The camshafts should be installed
onto the cylinder head so that the
punch mark "c" on the exhaust cam-
shaft and the punch mark "d" on the
intake camshaft must align with the
cylinder head surface, as shown in
the illustration.
Do not turn the crankshaft during
the camshaft installation. Damage
or improper valve timing will re-
sult.
d. Install the clips, camshaft caps "4"
and bolts (camshaft cap) "5".
• Before installing the clips, cover the cylinder head with a clean rag to
prevent the clips from into the cylin-
der head cavity.
• Apply the molybdenum disulfide oil on the thread of the bolts (camshaft
cap).
• Tighten the bolts to the specified torque in two or three steps in the
proper tightening sequence as
shown.
The bolts (camshaft cap) must be
tightened evenly, or damage to the
cylinder head, camshaft caps, and
camshaft will result.
2. Install:
• Timing chain tensioner
Installation steps:
a. While pressing the tensioner rod lightly with fingers, use a thin
screwdriver and wind the tension-
er rod up fully clockwise.
b. With the rod fully wound and the chain tensioner UP mark "a" fac-
ing upward, install the gasket "1"
and the timing chain tensioner "2",
and tighten the bolt "3" to the
specified torque.
c. Release the screwdriver, check the tensioner rod to come out and
tighten the gasket "4" and the cap
bolt "5" to the specified torque.
3. Turn:• Crankshaft
Counterclockwise several turns. 4. Check:
• Rotor T.D.C. markAlign with the crankcase align
mark.
• Camshaft match marks Align with the cylinder head sur-
face.
Out of alignment →Adjust.
5. Install: • Timing mark accessing screw "1"
• Crankshaft end accessing screw "2"
6. Install: • Timing chain guide (top side) "1"
• Cylinder head cover gasket "2"
• Cylinder head cover "3"
• Bolt (cylinder head cover) "4"
Apply the sealant on the cylinder
head cover gasket.
7. Install:• Cylinder head breather hose
• Spark plug
Bolt (camshaft cap):
10 Nm (1.0 m•kg, 7.2
ft•lb)
Bolt (timing chain ten-
sioner):10 Nm (1.0 m•kg, 7.2
ft•lb)
Tensioner cap bolt: 7 Nm (0.7 m•kg, 5.1
ft•lb)
Bolt (cylinder head cov-
er): 10 Nm (1.0 m•kg, 7.2
ft•lb)
YAMAHA Bond No. 1215
(ThreeBond
® No. 1215):
90890-85505
Spark plug: 13 Nm (1.3 m•kg, 9.4
ft•lb)