YAMAHA YZ250F 2015 Owners Manual
Manufacturer: YAMAHA, Model Year: 2015, Model line: YZ250F, Model: YAMAHA YZ250F 2015Pages: 356, PDF Size: 11.39 MB
Page 181 of 356
REAR SHOCK ABSORBER ASSEMBLY
4-57
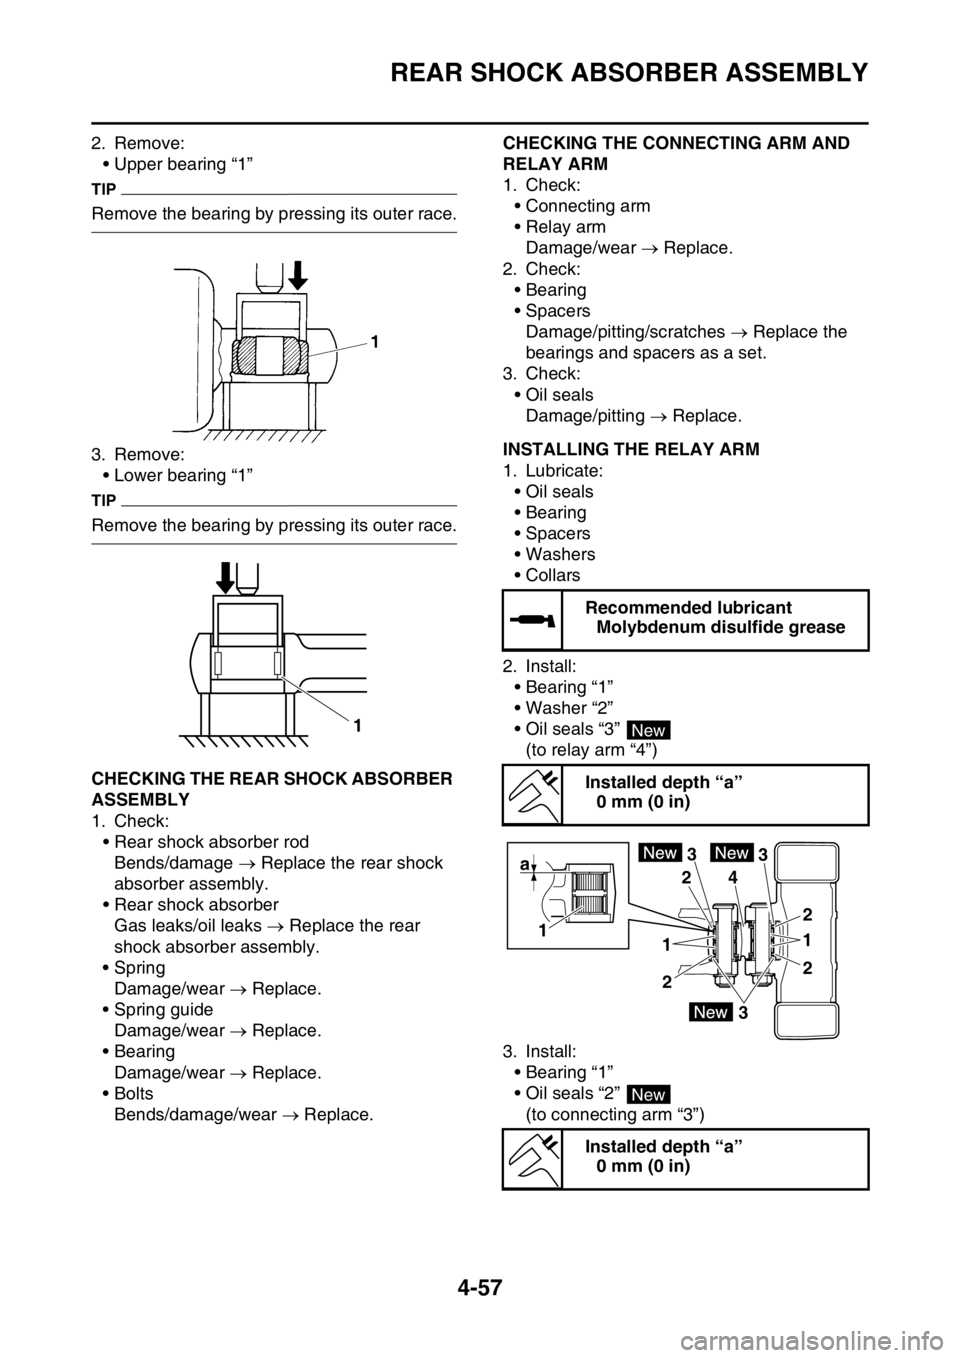
2. Remove:
• Upper bearing “1”
TIP
Remove the bearing by pressing its outer race.
3. Remove:
• Lower bearing “1”
TIP
Remove the bearing by pressing its outer race.
EAS1SM5181CHECKING THE REAR SHOCK ABSORBER
ASSEMBLY
1. Check:
• Rear shock absorber rod
Bends/damage Replace the rear shock
absorber assembly.
• Rear shock absorber
Gas leaks/oil leaks Replace the rear
shock absorber assembly.
•Spring
Damage/wear Replace.
• Spring guide
Damage/wear Replace.
• Bearing
Damage/wear Replace.
•Bolts
Bends/damage/wear Replace.
EAS1SM5182
CHECKING THE CONNECTING ARM AND
RELAY ARM
1. Check:
• Connecting arm
• Relay arm
Damage/wear Replace.
2. Check:
• Bearing
• Spacers
Damage/pitting/scratches Replace the
bearings and spacers as a set.
3. Check:
• Oil seals
Damage/pitting Replace.
EAS1SM5183INSTALLING THE RELAY ARM
1. Lubricate:
• Oil seals
• Bearing
• Spacers
• Washers
•Collars
2. Install:
• Bearing “1”
• Washer “2”
• Oil seals “3”
(to relay arm “4”)
3. Install:
• Bearing “1”
• Oil seals “2”
(to connecting arm “3”)
1
Recommended lubricant
Molybdenum disulfide grease
Installed depth “a”
0 mm (0 in)
Installed depth “a”
0 mm (0 in)
New
3 3
43
2 2
22
a
1
11
New
Page 182 of 356
REAR SHOCK ABSORBER ASSEMBLY
4-58
EAS1SM5184INSTALLING THE REAR SHOCK ABSORB-
ER ASSEMBLY
1. Lubricate:
• Bearing (lower side)
•Dust seal
•Collars
• Bushing
ECA1DX1012
NOTICE
Do not apply the grease to the bearing outer
race because it will wear the rear shock ab-
sorber surface on which the bearing is
press fitted.
2. Lubricate:
• O-ring
3. Install:
• Bearing
• Stopper ring
(to rear shock absorber assembly (upper
side))
TIP
• Install the bearing parallel until the stopper
ring groove appears by pressing its outer
race.
• After installing the stopper ring, push back the
bearing unit it contacts the stopper ring.
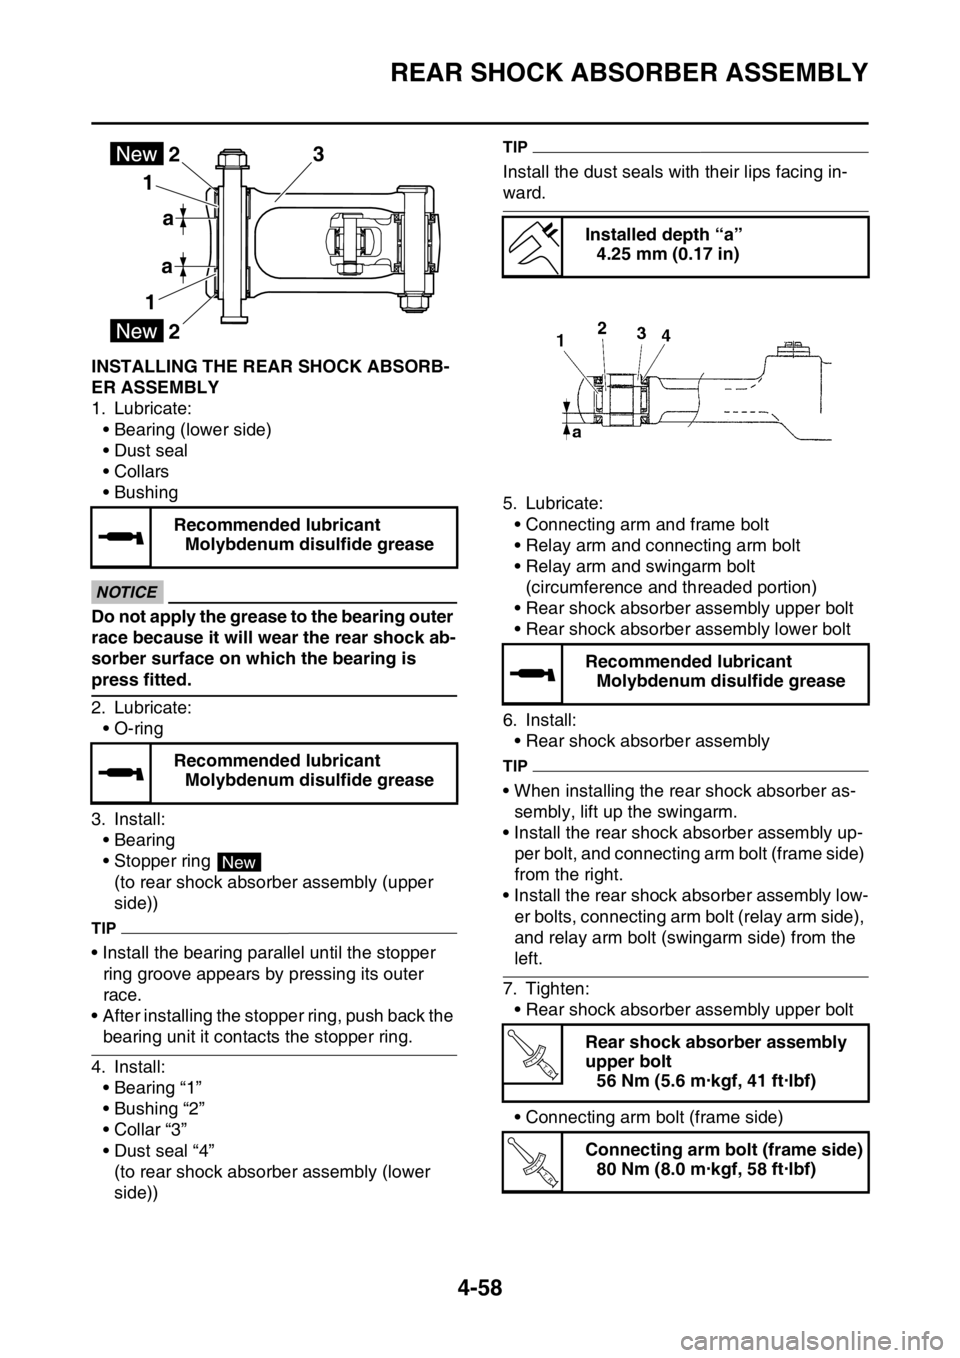
4. Install:
• Bearing “1”
• Bushing “2”
• Collar “3”
• Dust seal “4”
(to rear shock absorber assembly (lower
side))
TIP
Install the dust seals with their lips facing in-
ward.
5. Lubricate:
• Connecting arm and frame bolt
• Relay arm and connecting arm bolt
• Relay arm and swingarm bolt
(circumference and threaded portion)
• Rear shock absorber assembly upper bolt
• Rear shock absorber assembly lower bolt
6. Install:
• Rear shock absorber assembly
TIP
• When installing the rear shock absorber as-
sembly, lift up the swingarm.
• Install the rear shock absorber assembly up-
per bolt, and connecting arm bolt (frame side)
from the right.
• Install the rear shock absorber assembly low-
er bolts, connecting arm bolt (relay arm side),
and relay arm bolt (swingarm side) from the
left.
7. Tighten:
• Rear shock absorber assembly upper bolt
• Connecting arm bolt (frame side) Recommended lubricant
Molybdenum disulfide grease
Recommended lubricant
Molybdenum disulfide grease
3
a 1
12
a
2
New
Installed depth “a”
4.25 mm (0.17 in)
Recommended lubricant
Molybdenum disulfide grease
Rear shock absorber assembly
upper bolt
56 Nm (5.6 m·kgf, 41 ft·lbf)
Connecting arm bolt (frame side)
80 Nm (8.0 m·kgf, 58 ft·lbf)
T R..
T R..
Page 183 of 356
REAR SHOCK ABSORBER ASSEMBLY
4-59
• Connecting arm bolt (relay arm side)
• Relay arm bolt (swingarm side)
• Rear shock absorber assembly lower boltConnecting arm bolt (relay arm
side)
80 Nm (8.0 m·kgf, 58 ft·lbf)
Relay arm bolt (swingarm side)
70 Nm (7.0 m·kgf, 51 ft·lbf)
Rear shock absorber assembly
lower bolt
53 Nm (5.3 m·kgf, 38 ft·lbf)
T R..
T R..
T R..
Page 184 of 356

SWINGARM
4-60
EAS1SM5185
SWINGARM
Removing the swingarm
Order Part name Q’ty Remarks
Use a suitable stand to raise the front wheel
off the ground.
Brake hose holder Refer to “REAR BRAKE” on page 4-21.
Rear brake caliper Refer to “REAR BRAKE” on page 4-21.
Bolt (brake pedal)
Drive chain
1Collars 2
2Oil seals 2
3Thrust bearing 2
4Bushing 2
5Oil seals 2
6Bearing 4
For installation, reverse the removal proce-
dure.
1
2
3
6
4
6
4
1
3
6
2
5
T.R.70 Nm (7.0 mlbf) kgf, 51 ft
T.R.4.0 Nm (0.40 mlbf) kgf, 2.9 ft
Page 185 of 356

SWINGARM
4-61
EAS1SM5186REMOVING THE SWINGARM
1. Use a suitable stand to raise the rear wheel
off the ground.
EWA13120
WARNING
Securely support the vehicle so that there is
no danger of it falling over.
2. Measure:
• Swingarm side play
• Swingarm vertical movement
▼▼▼▼▼▼▼▼▼▼▼▼▼▼▼▼▼▼▼▼▼▼▼▼▼▼▼▼▼▼▼▼
a. Measure the tightening torque of the pivot
shaft nut.
b. Measure the swingarm side play “a” by mov-
ing the swingarm from side to side.
c. If the swingarm side play is out of specifica-
tion, check the spacers, the bearings, and
the collars.
d. Check the swingarm vertical movement “b”
by moving the swingarm up and down.
If swingarm vertical movement is not smooth
or if there is binding, check the spacers, the
bearings, and the collars.
▲▲▲▲▲▲▲▲▲▲▲▲▲▲▲▲▲▲▲▲▲▲▲▲▲▲▲▲▲▲▲▲
EAS1SM5187REMOVING THE BEARING
1. Remove:
• Bearing “1”
TIP
Remove the bearing by pressing its outer race.
EAS1SM5188CHECKING THE SWINGARM
1. Check:
• Swingarm
Bends/cracks/damage Replace.
2. Check:
• Pivot shaft
Roll the pivot shaft on a flat surface.
Bends Replace.
EWA13770
WARNING
Do not attempt to straighten a bent pivot
shaft.
3. Wash with kerosene:
• Pivot shaft
• Spacers
•Collars
• Bearing
4. Check:
• Oil seals
Damage Replace.
• Bearing
• Spacers
Free play exists/unsmooth revolution/rust
Replace bearing and bushing as a set. Pivot shaft nut
85 Nm (8.5 m·kgf, 61 ft·lbf)
Swingarm end free play limit (ra-
dial)
1.0 mm (0.04 in)
T R..
Page 186 of 356

SWINGARM
4-62
EAS1SM5189INSTALLING THE SWINGARM
1. Lubricate:
• Bearing
•Collars
• Spacers
• Oil seal
• Pivot shaft
2. Install:
• Bearing “1”
• Oil seals “2”
(to the swingarm)
TIP
First install the outer and then the inner bear-
ings to a specified depth from inside.
3. Install:
• Swingarm
TIP
Install the pivot shaft from the right.
4. Install:
• Rear wheel
Refer to “REAR WHEEL” on page 4-7.
5. Adjust:
• Drive chain slack
Refer to “ADJUSTING THE DRIVE CHAIN
SLACK” on page 3-27.Recommended lubricant
Molybdenum disulfide grease
Installed depth “a”
0–0.5 mm (0–0.02 in)
Installed depth “b”
6.5 mm (0.26 in)
Pivot shaft nut
85 Nm (8.5 m·kgf, 61 ft·lbf)
Drive chain slack
50–60 mm (1.97–2.36 in)
New
New
2 22
1 1
aaa
b ba
NewNewNew
T R..
Page 187 of 356
CHAIN DRIVE
4-63
EAS1SM5190
CHAIN DRIVE
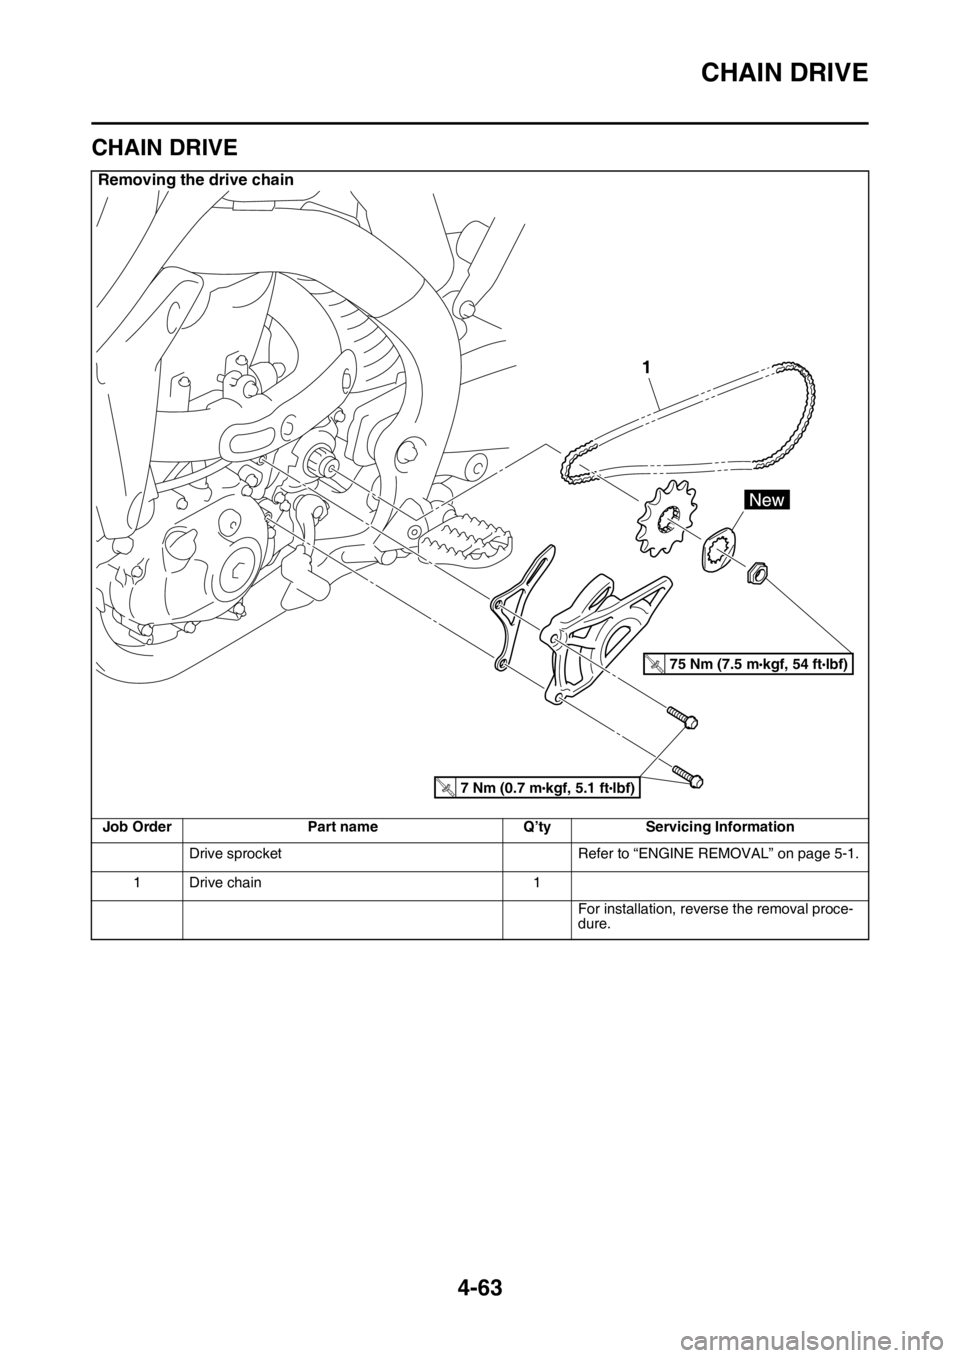
Removing the drive chain
Job Order Part name Q’ty Servicing Information
Drive sprocket Refer to “ENGINE REMOVAL” on page 5-1.
1 Drive chain 1
For installation, reverse the removal proce-
dure.
1
T.R.75 Nm (7.5 mlbf) kgf, 54 ft
T.R.7 Nm (0.7 mlbf) kgf, 5.1 ft
Page 188 of 356
CHAIN DRIVE
4-64
EAS1SM5191REMOVING THE DRIVE CHAIN
1. Use a suitable stand to raise the rear wheel
off the ground.
EWA13120
WARNING
Securely support the vehicle so that there is
no danger of it falling over.
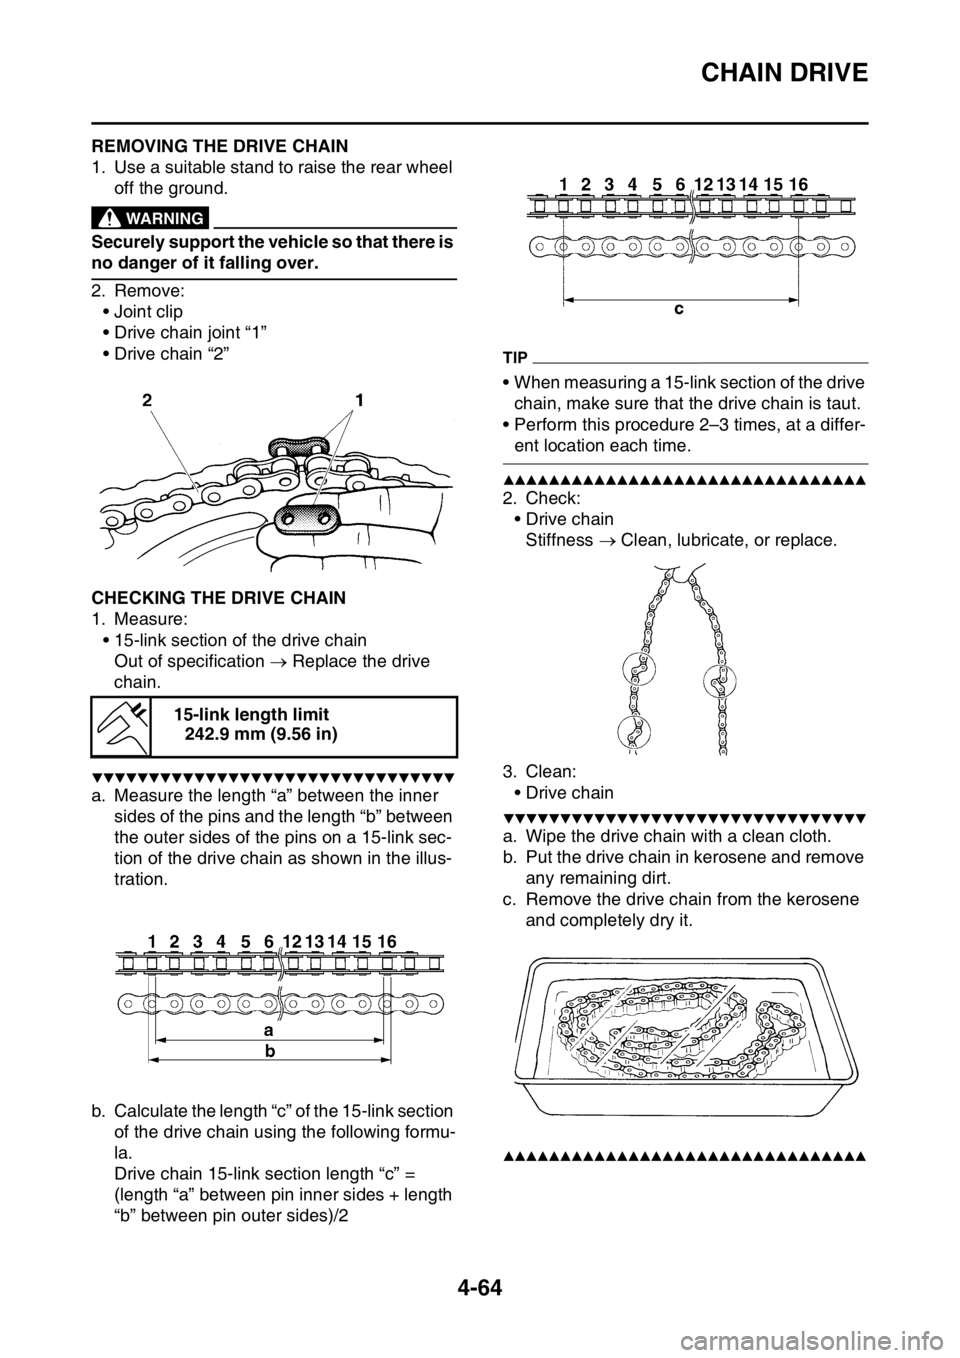
2. Remove:
• Joint clip
• Drive chain joint “1”
• Drive chain “2”
EAS1SM5192CHECKING THE DRIVE CHAIN
1. Measure:
• 15-link section of the drive chain
Out of specification Replace the drive
chain.
▼▼▼▼▼▼▼▼▼▼▼▼▼▼▼▼▼▼▼▼▼▼▼▼▼▼▼▼▼▼▼▼
a. Measure the length “a” between the inner
sides of the pins and the length “b” between
the outer sides of the pins on a 15-link sec-
tion of the drive chain as shown in the illus-
tration.
b. Calculate the length “c” of the 15-link section
of the drive chain using the following formu-
la.
Drive chain 15-link section length “c” =
(length “a” between pin inner sides + length
“b” between pin outer sides)/2
TIP
• When measuring a 15-link section of the drive
chain, make sure that the drive chain is taut.
• Perform this procedure 2–3 times, at a differ-
ent location each time.
▲▲▲▲▲▲▲▲▲▲▲▲▲▲▲▲▲▲▲▲▲▲▲▲▲▲▲▲▲▲▲▲
2. Check:
•Drive chain
Stiffness Clean, lubricate, or replace.
3. Clean:
•Drive chain
▼▼▼▼▼▼▼▼▼▼▼▼▼▼▼▼▼▼▼▼▼▼▼▼▼▼▼▼▼▼▼▼
a. Wipe the drive chain with a clean cloth.
b. Put the drive chain in kerosene and remove
any remaining dirt.
c. Remove the drive chain from the kerosene
and completely dry it.
▲▲▲▲▲▲▲▲▲▲▲▲▲▲▲▲▲▲▲▲▲▲▲▲▲▲▲▲▲▲▲▲
15-link length limit
242.9 mm (9.56 in)
Page 189 of 356
CHAIN DRIVE
4-65
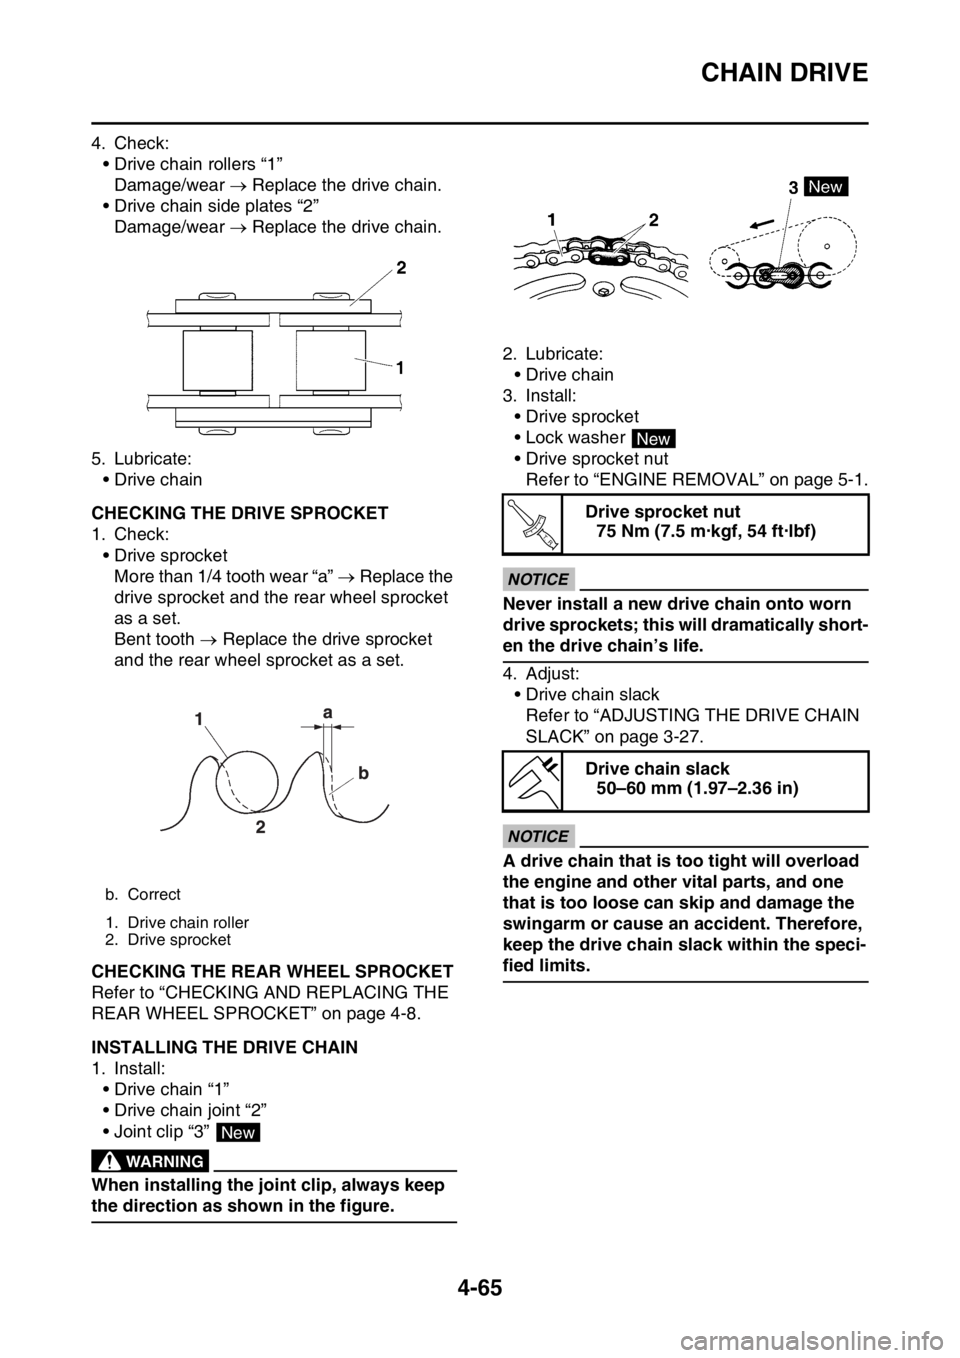
4. Check:
• Drive chain rollers “1”
Damage/wear Replace the drive chain.
• Drive chain side plates “2”
Damage/wear Replace the drive chain.
5. Lubricate:
•Drive chain
EAS1SM5193CHECKING THE DRIVE SPROCKET
1. Check:
• Drive sprocket
More than 1/4 tooth wear “a” Replace the
drive sprocket and the rear wheel sprocket
as a set.
Bent tooth Replace the drive sprocket
and the rear wheel sprocket as a set.
EAS1SM5194CHECKING THE REAR WHEEL SPROCKET
Refer to “CHECKING AND REPLACING THE
REAR WHEEL SPROCKET” on page 4-8.
EAS1SM5195INSTALLING THE DRIVE CHAIN
1. Install:
• Drive chain “1”
• Drive chain joint “2”
• Joint clip “3”
EWA
WARNING
When installing the joint clip, always keep
the direction as shown in the figure.2. Lubricate:
•Drive chain
3. Install:
• Drive sprocket
• Lock washer
• Drive sprocket nut
Refer to “ENGINE REMOVAL” on page 5-1.
ECA1DX1014
NOTICE
Never install a new drive chain onto worn
drive sprockets; this will dramatically short-
en the drive chain’s life.
4. Adjust:
• Drive chain slack
Refer to “ADJUSTING THE DRIVE CHAIN
SLACK” on page 3-27.
ECA13550
NOTICE
A drive chain that is too tight will overload
the engine and other vital parts, and one
that is too loose can skip and damage the
swingarm or cause an accident. Therefore,
keep the drive chain slack within the speci-
fied limits.
b. Correct
1. Drive chain roller
2. Drive sprocket
New
Drive sprocket nut
75 Nm (7.5 m·kgf, 54 ft·lbf)
Drive chain slack
50–60 mm (1.97–2.36 in)
New
T R..
Page 190 of 356

CHAIN DRIVE
4-66