transmission oil YAMAHA YZ250LC 2001 Notices Demploi (in French)
[x] Cancel search | Manufacturer: YAMAHA, Model Year: 2001, Model line: YZ250LC, Model: YAMAHA YZ250LC 2001Pages: 578, PDF Size: 14.12 MB
Page 154 of 578

INSP
ADJ
3-12
TRANSMISSION OIL LEVEL CHECK
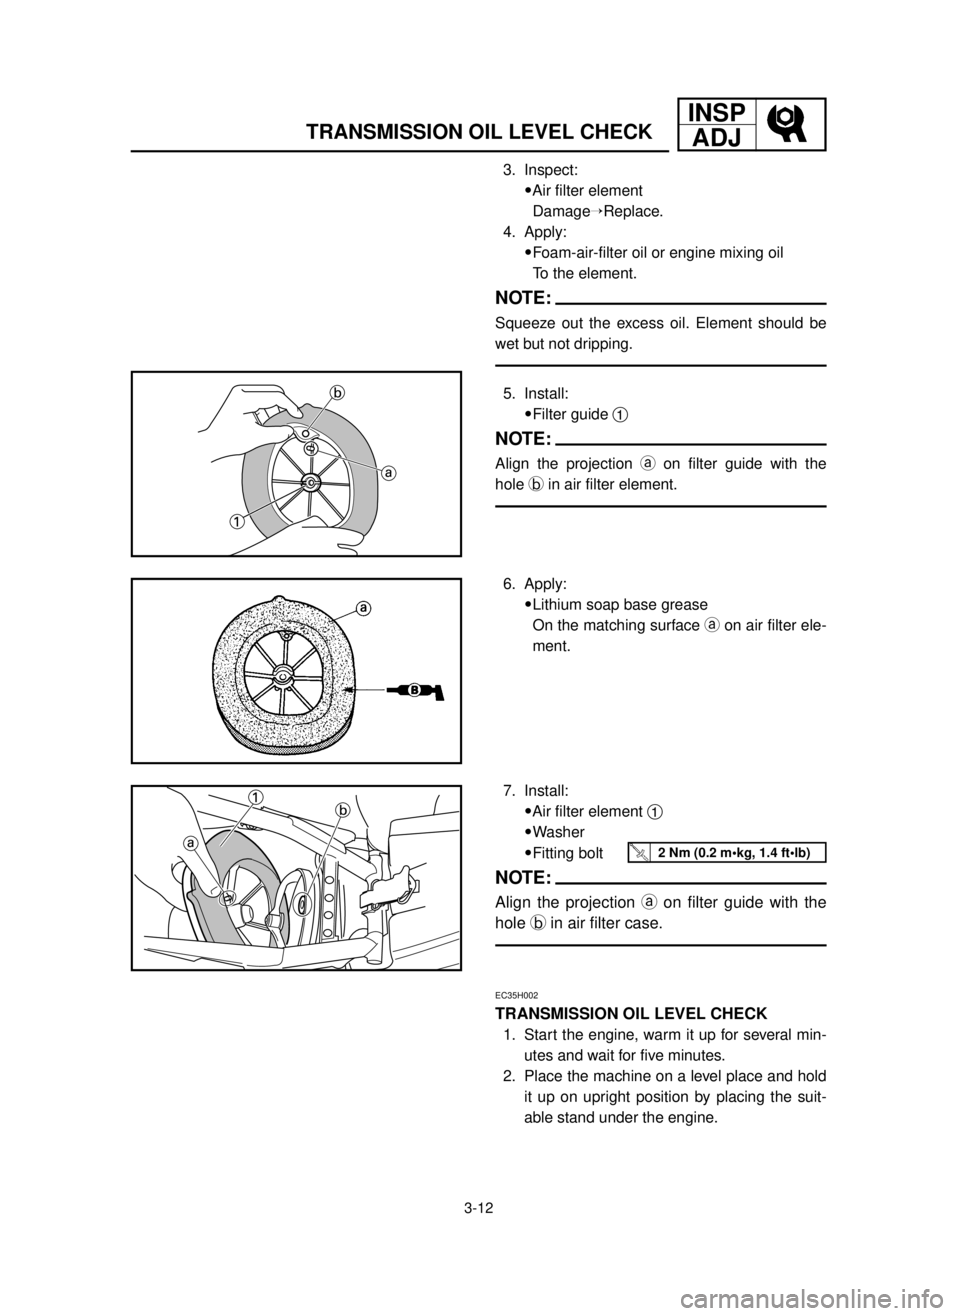
3. Inspect:
9Air filter element
DamageÕReplace.
4. Apply:
9Foam-air-filter oil or engine mixing oil
To the element.
NOTE:
Squeeze out the excess oil. Element should be
wet but not dripping.
5. Install:
9Filter guide 1
NOTE:
Align the projection aon filter guide with the
hole bin air filter element.
6. Apply:
9Lithium soap base grease
On the matching surface aon air filter ele-
ment.
7. Install:
9Air filter element 1
9Washer
9Fitting bolt
NOTE:
Align the projection aon filter guide with the
hole bin air filter case.
EC35H002
TRANSMISSION OIL LEVEL CHECK
1. Start the engine, warm it up for several min-
utes and wait for five minutes.
2. Place the machine on a level place and hold
it up on upright position by placing the suit-
able stand under the engine.
2 Nm (0.2 m•kg, 1.4 ft•lb)
5MW-9-30-3A 7/3/00 2:51 PM Page 32
Page 156 of 578

INSP
ADJ
3-13
TRANSMISSION OIL REPLACEMENT
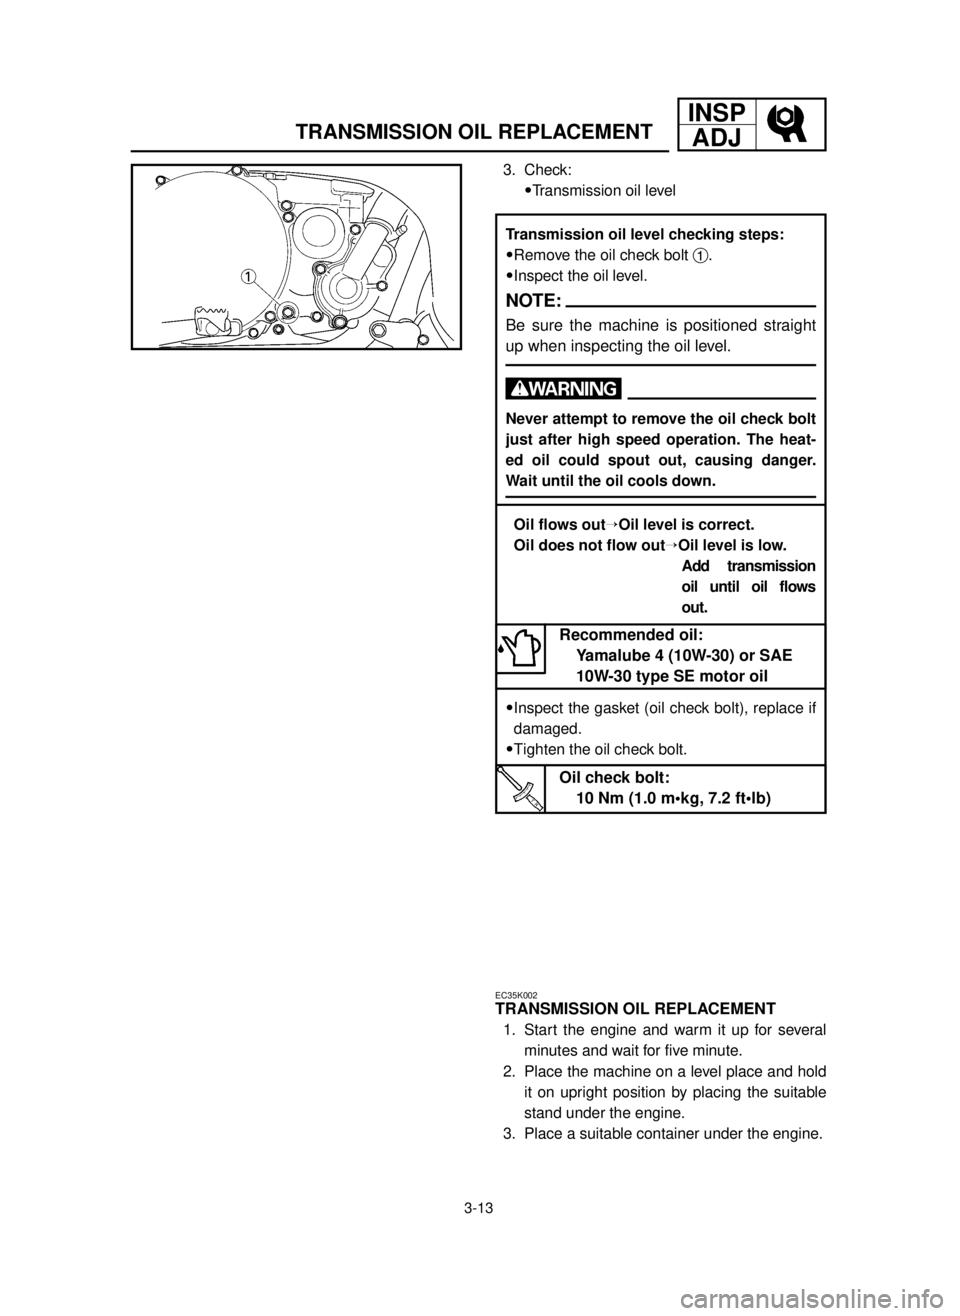
3. Check:
9Transmission oil level
EC35K002
TRANSMISSION OIL REPLACEMENT
1. Start the engine and warm it up for several
minutes and wait for five minute.
2. Place the machine on a level place and hold
it on upright position by placing the suitable
stand under the engine.
3. Place a suitable container under the engine.
Transmission oil level checking steps:
9Remove the oil check bolt 1.
9Inspect the oil level.
NOTE:
Be sure the machine is positioned straight
up when inspecting the oil level.
w
Never attempt to remove the oil check bolt
just after high speed operation. The heat-
ed oil could spout out, causing danger.
Wait until the oil cools down.
Oil flows outÕOil level is correct.
Oil does not flow outÕOil level is low.
Add transmission
oil until oil flows
out.
9Inspect the gasket (oil check bolt), replace if
damaged.
9Tighten the oil check bolt.
Recommended oil:
Yamalube 4 (10W-30) or SAE
10W-30 type SE motor oil
Oil check bolt:
10 Nm (1.0 m•kg, 7.2 ft•lb)
5MW-9-30-3A 7/3/00 2:51 PM Page 34
Page 158 of 578

INSP
ADJ
3-14
PILOT AIR SCREW ADJUSTMENT
4. Remove:
9Oil drain bolt 1
9Oil filler cap 2
Drain the transmission oil.
5. Install:
9Aluminum washer
9Oil drain bolt 1
6. Fill:
9Transmission oil
Recommended oil:
Yamalube 4 (10W-30) or SAE
10W-30 type SE motor oil
Oil capacity
(periodic oil change):
0.75 L (0.66 Imp qt, 0.79 US qt)
20 Nm (2.0 m•kg, 14 ft•lb)
7. Check:
9Oil leakage
8. Check:
9Transmission oil level
9. Install:
9Oil filler cap 2
EC35L021
PILOT AIR SCREW ADJUSTMENT
1. Adjust:
9Pilot air screw 1
Adjusting steps:
9Turn in the pilot air screw until it is lightly
seated.
9Turn out the pilot air screw by the factory-set
number of turns.
NOTE:
To optimize the fuel flow at a smaller throttle
opening, each machine’s pilot air screw has
been individually set at the factory. Before
adjusting the pilot air screw, turn it in fully and
count the number of turns. Record this num-
ber as the factory-set number of turns out.
Pilot air screw:
1 turn out
*1-3/4 turns out
(for reference only)
*For EUROPE
5MW-9-30-3A 7/3/00 2:52 PM Page 36
Page 274 of 578

4-32
CLUTCH AND PRIMARY DRIVEN GEARENG
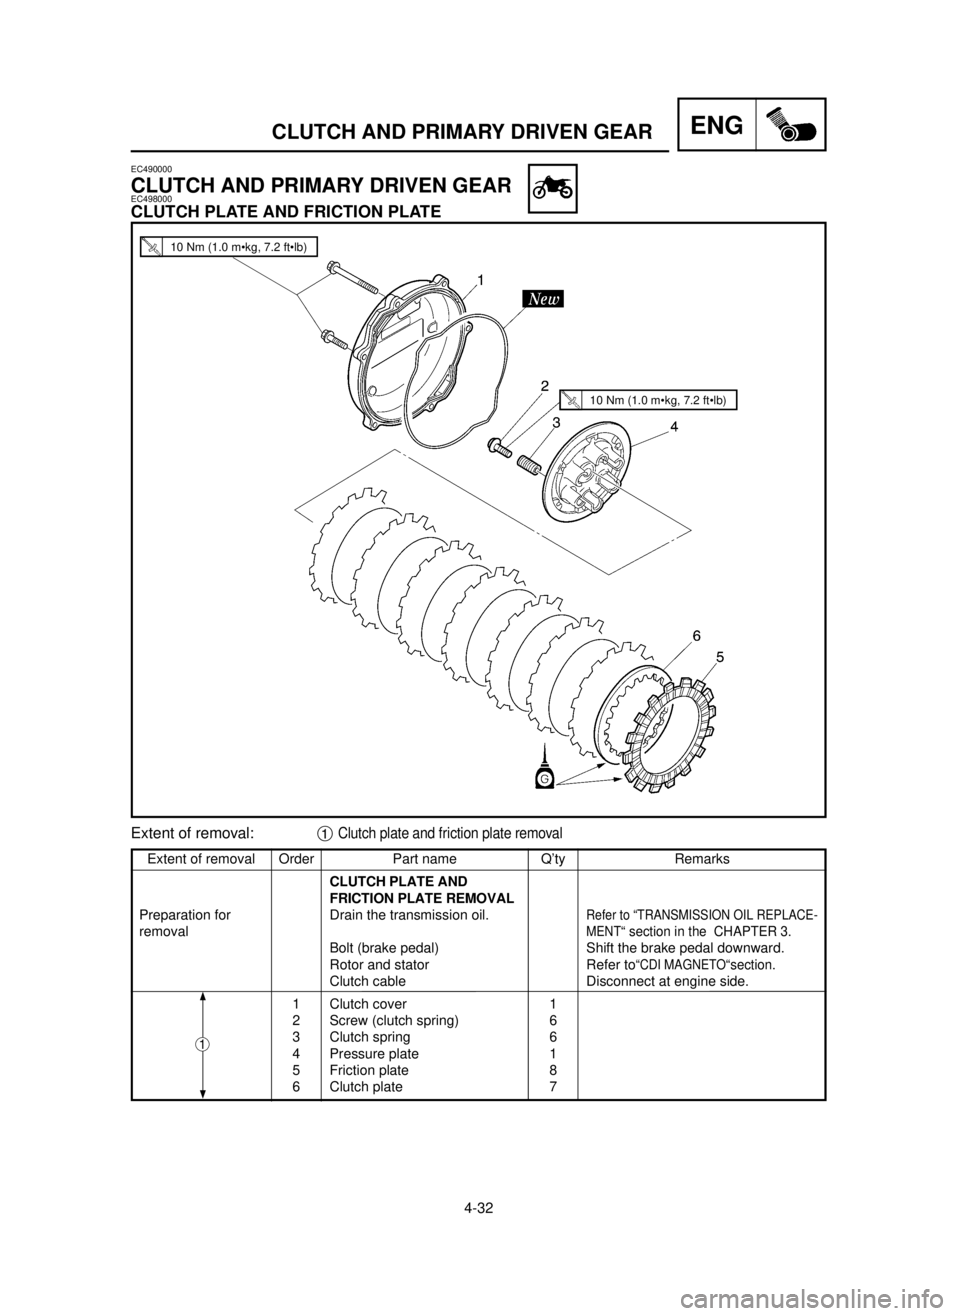
Extent of removal Order Part name Q’ty Remarks
CLUTCH PLATE AND
FRICTION PLATE REMOVAL
Preparation for Drain the transmission oil.
Refer to “TRANSMISSION OIL REPLACE-
removalMENT“ section in the CHAPTER 3.
Bolt (brake pedal) Shift the brake pedal downward.
Rotor and stator Refer to
“CDI MAGNETO“section.
Clutch cable Disconnect at engine side.
1 Clutch cover 1
2 Screw (clutch spring) 6
3 Clutch spring 6
4 Pressure plate 1
5 Friction plate 8
6 Clutch plate 7
Extent of removal:1Clutch plate and friction plate removal
EC490000
CLUTCH AND PRIMARY DRIVEN GEAREC498000
CLUTCH PLATE AND FRICTION PLATE
1
10 Nm (1.0 m•kg, 7.2 ft•lb)
10 Nm (1.0 m•kg, 7.2 ft•lb)
5MW-9-30-4B 7/3/00 6:27 PM Page 12
Page 282 of 578
![YAMAHA YZ250LC 2001 Notices Demploi (in French) 4-36
CLUTCH AND PRIMARY DRIVEN GEARENG
EC495230
Clutch
1. Install:
9Thrust plate [D=ø 42 mm (1.65 in)] 1
9Spacer 2
9Bearing 3
9Primary driven gear 4
NOTE:
Apply the transmission oil on the bearing, s YAMAHA YZ250LC 2001 Notices Demploi (in French) 4-36
CLUTCH AND PRIMARY DRIVEN GEARENG
EC495230
Clutch
1. Install:
9Thrust plate [D=ø 42 mm (1.65 in)] 1
9Spacer 2
9Bearing 3
9Primary driven gear 4
NOTE:
Apply the transmission oil on the bearing, s](/img/51/53969/w960_53969-281.png)
4-36
CLUTCH AND PRIMARY DRIVEN GEARENG
EC495230
Clutch
1. Install:
9Thrust plate [D=ø 42 mm (1.65 in)] 1
9Spacer 2
9Bearing 3
9Primary driven gear 4
NOTE:
Apply the transmission oil on the bearing, spacer
and primary driven gear inner circumference.
2. Install:
9Thrust plate [D=ø 44 mm (1.73 in)] 1
9Clutch boss 2
3. Install:
9Lock washer 1
9Nut (clutch boss) 2
NOTE:
Use the clutch holding tool 3, 4to hold the
clutch boss.
ŒFor USA and CDN
ºExcept for USA and CDN
4. Bend the lock washer 1tab.
75 Nm (7.5 m•kg, 54 ft•lb)
Clutch holding tool:
YM-91042 ..............................3 3
90890-04086 ..........................4 4
Œ
º
5MW-9-30-4B 7/3/00 6:31 PM Page 20
Page 284 of 578

4-37
CLUTCH AND PRIMARY DRIVEN GEARENG
5. Install:
9Friction plate 1
9Clutch plate 2
NOTE:
9Install the clutch plates and friction plates alter-
nately on the clutch boss, starting with a friction
plate and ending with a friction plate.
9Apply the transmission oil on the friction plates
and clutch plates.
6. Install:
9Bearing 1
9Plain washer 2
9Circlip 3
To push rod 1 4.
NOTE:
Apply the lithium soap base grease on the bear-
ing and plain washer.
7. Install:
9Push rod 2 1
9Push rod 1 2
NOTE:
9Apply the transmission oil on the ends of the
push rod 2.
9Install the push rod 2 with its smaller end a
toward you.
8. Install:
9Pressure plate 1
9. Install:
9Clutch spring 1
9Screw (clutch spring) 2
NOTE:
Tighten the screws in stage, using a crisscross
pattern.
10 Nm (1.0 m•kg, 7.2 ft•lb)
5MW-9-30-4B 7/3/00 6:32 PM Page 22
Page 288 of 578

4-39
KICK AXLE, SHIFT SHAFT AND PRIMARY DRIVE GEARENG
Extent of removal Order Part name Q’ty Remarks
RPIMARY DRIVE GEAR REMOVAL
Preparation for Drain the transmission oil.Refer to “TRANSMISSION OIL REPLACE-
removalMENT“ section in the CHAPTER 3.
Bolt (brake pedal) Shift the brake pedal downward.
Radiator hose 4 Disconnect at water pump side.
Bolt (push rod)
Refer to “CYLINDER HEAD, CYLINDER
AND PISTON” section.
1 Kick starter 1
2 Crankcase cover (right) 1
3 Bolt (Primary drive gear) 1 Only loosening
Refer to “REMOVAL POINTS”.
4 Primary driven gear 1 Refer to “CLUTCH AND PRIMARY
DRIVEN GEAR”section.
5 Primary drive gear 1
6 Thrust plate 1
EC4C0000
KICK AXLE, SHIFT SHAFT AND PRIMARY DRIVE GEAREC4C8000
PRIMARY DRIVE GEAR
1
Extent of removal:1Primary drive gear removal
30 Nm (3.0 m•kg, 22 ft•lb)
10 Nm (1.0 m•kg, 7.2 ft•lb)
55 Nm (5.5 m•kg, 40 ft•lb)
5MW-9-30-4B 7/3/00 7:05 PM Page 26
Page 296 of 578

4-43
KICK AXLE, SHIFT SHAFT AND PRIMARY DRIVE GEARENG
3. Install:
9Shift lever assembly 1
9Shift guide 2
NOTE:
9The shift lever assembly is installed at the
same time as the shift guide.
9Apply the transmission oil on the bolt (segment)
shaft.
2. Install:
9Shift lever assembly 1
To shift guide 2.
EC4C5202
Shift guide and shift lever assembly
1. Install:
9Spring 1
9Pawl pin 2
9Pawl 3
To shift lever 4.
EC4C5000
ASSEMBLY AND INSTALLATION
EC4C5130
Stopper lever
1. Install:
9Tension spring 1
9Holder 2
9Bolt (holder) 3
9Plain washer 4
9Stopper lever 5
9Bolt (stopper lever) 6
NOTE:
Align the stopper lever roller with the slot on seg-
ment.
10 Nm (1.0 m•kg, 7.2 ft•lb)
10 Nm (1.0 m•kg, 7.2 ft•lb)
5MW-9-30-4B 7/3/00 7:08 PM Page 34
Page 298 of 578

4-44
KICK AXLE, SHIFT SHAFT AND PRIMARY DRIVE GEARENG
EC4C5310
Shift shaft
1. Install:
9Roller 1
9Plain washer 2
9Shift shaft 3
NOTE:
Apply the transmission oil on the roller and shift
shaft.
2. Install:
9Torsion spring 1
To kick axle 2.
NOTE:
Make sure the stopper aof the torsion spring
fits into the hole bon the kick axle.
EC4C5601
Kick axle assembly
1. Install:
9Kick gear 1
9Plain washer 2
9Circlip 3
9Ratchet wheel 4
9Spring 5
9Plain washer 6
9Circlip 7
To kick axle 8.
NOTE:
9Apply the transmission oil on the kick gear
inner circumference.
9Align the punch mark aon the ratchet wheel
with the punck mark bon the kick axle.
4. Install:
9Bolt (shift guide) 1
10 Nm (1.0 m•kg, 7.2 ft•lb)
5MW-9-30-4B 7/3/00 7:09 PM Page 36
Page 300 of 578

4-45
KICK AXLE, SHIFT SHAFT AND PRIMARY DRIVE GEARENG
EC4C5420
Kick idle gear
1. Install:
9Kick idle gear 1
9Plain washer 2
9Circlip 3
NOTE:
9Apply the transmission oil on the kick idle gear
inner circumference.
9Install the kick idle gear with its depressed side
atoward you.
3. Install:
9Spring guide 1
NOTE:
Slide the spring guide into the kick axle, make
sure the groove ain the spring guide fits on the
stopper of the torsion spring.
4. Install:
9Plain washer 1
9Kick axle assembly 2
NOTE:
9Apply the transmission oil on the kick axle.
9Slide the kick axle assembly into the crankcase
and make sure the kick axle stopper afits into
its home position 3.
5. Hook:
9Torsion spring 1
NOTE:
Turn the torsion spring clockwise and hook into
the proper hole ain the crankcase.
5MW-9-30-4B 7/3/00 7:10 PM Page 38