width YAMAHA YZ426F 2000 Owners Manual
[x] Cancel search | Manufacturer: YAMAHA, Model Year: 2000, Model line: YZ426F, Model: YAMAHA YZ426F 2000Pages: 608, PDF Size: 45.52 MB
Page 70 of 608
SPEC
2 - 1
GENERAL SPECIFICATIONS
EC200000
SPECIFICATIONS
EC211000
GENERAL SPECIFICATIONS
Model name: YZ426FLC (EUROPE)
YZ426FM (USA)
YZ426F(M) (CDN, AUS, NZ, ZA)
Model code number: 5JG1 (USA)
5JG2 (EUROPE)
5JG4 (CDN, AUS, NZ, ZA)
Dimensions:
Overall length 2,171 mm (85.5 in)
Overall width 827 mm (32.6 in)
Overall height 1,303 mm (51.3 in)
Seat height 998 mm (39.3 in)
Wheelbase 1,490 mm (58.7 in)
Minimum ground clearance 373 mm (14.7 in)
Basic weight:
With oil and full fuel tank 113.5 kg (250 lb)
Engine:
Engine type Liquid cooled 4-stroke, DOHC
Cylinder arrangement Single cylinder, forward inclined
Displacement 426 cm
3
(15.0 Imp oz, 14.4 US oz)
Bore
´
stroke 95.0
´
60.1 mm (3.74
´
2.37 in)
Compression ratio 12.5 : 1
Starting system Kick starter
Lubrication system: Dry sump
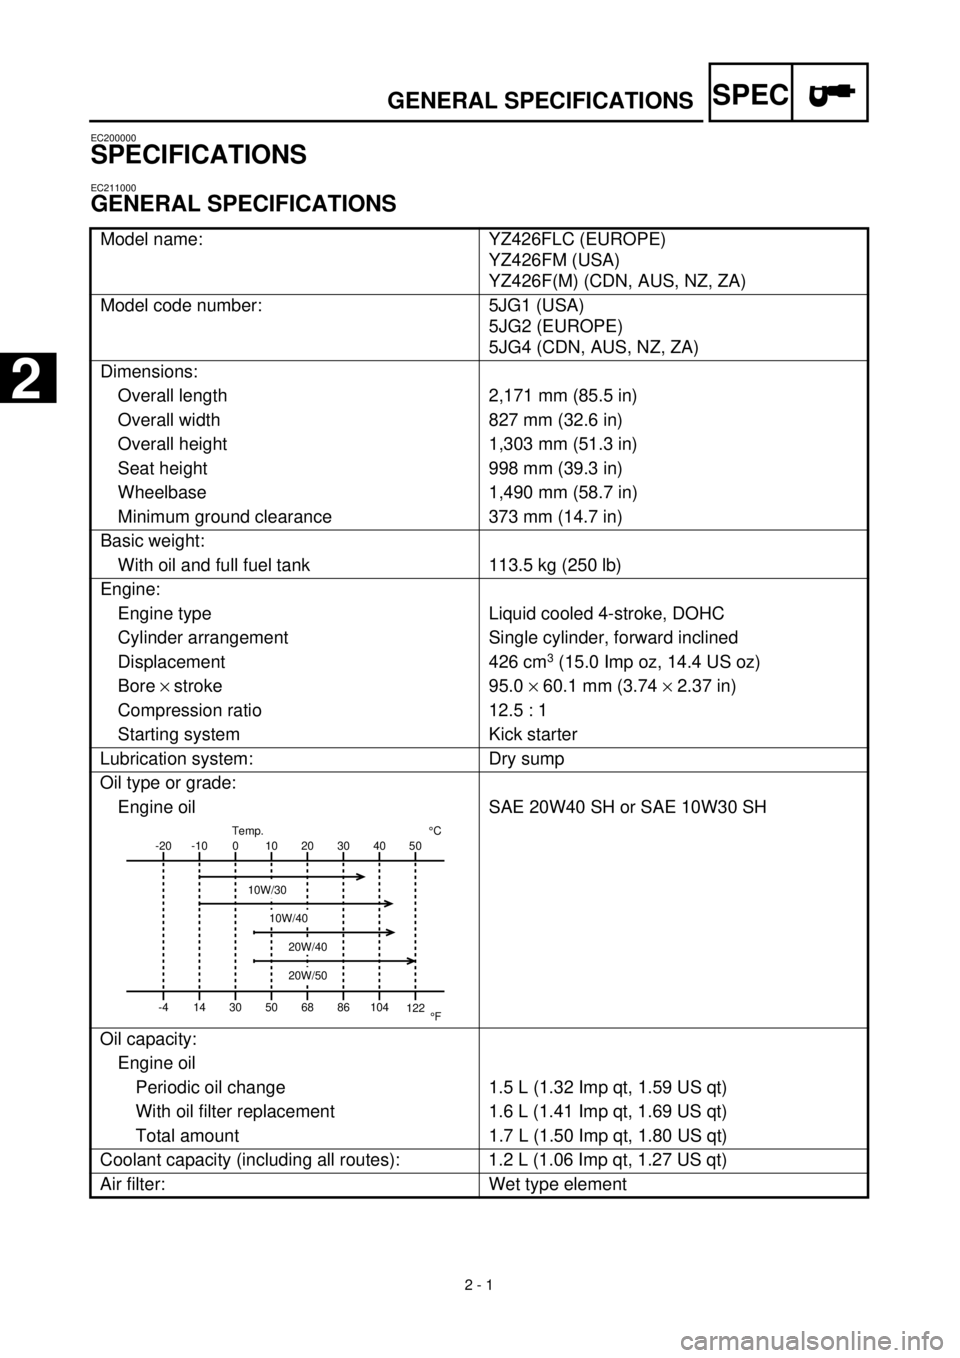
Oil type or grade:
Engine oil SAE 20W40 SH or SAE 10W30 SH
Oil capacity:
Engine oil
Periodic oil change 1.5 L (1.32 Imp qt, 1.59 US qt)
With oil filter replacement 1.6 L (1.41 Imp qt, 1.69 US qt)
Total amount 1.7 L (1.50 Imp qt, 1.80 US qt)
Coolant capacity (including all routes): 1.2 L (1.06 Imp qt, 1.27 US qt)
Air filter: Wet type element
-20
-4-10
140
3010
5020
6830
8640 50
104
122¡CTemp.
¡F
10W/30
10W/40
20W/40
20W/50
2
Page 74 of 608
SPEC
2 - 5
MAINTENANCE SPECIFICATIONS
Camshaft runout limit ---- 0.03 mm
(0.0012 in)
Cam chain:
Cam chain type/No. of links 92RH2010-120MPX/120 ----
Cam chain adjustment method Automatic ----
Valve, valve seat, valve guide:
Valve clearance (cold) IN 0.15 ~ 0.20 mm
(0.0059 ~ 0.0079 in)----
EX 0.25 ~ 0.30 mm
(0.0098 ~ 0.0118 in)----
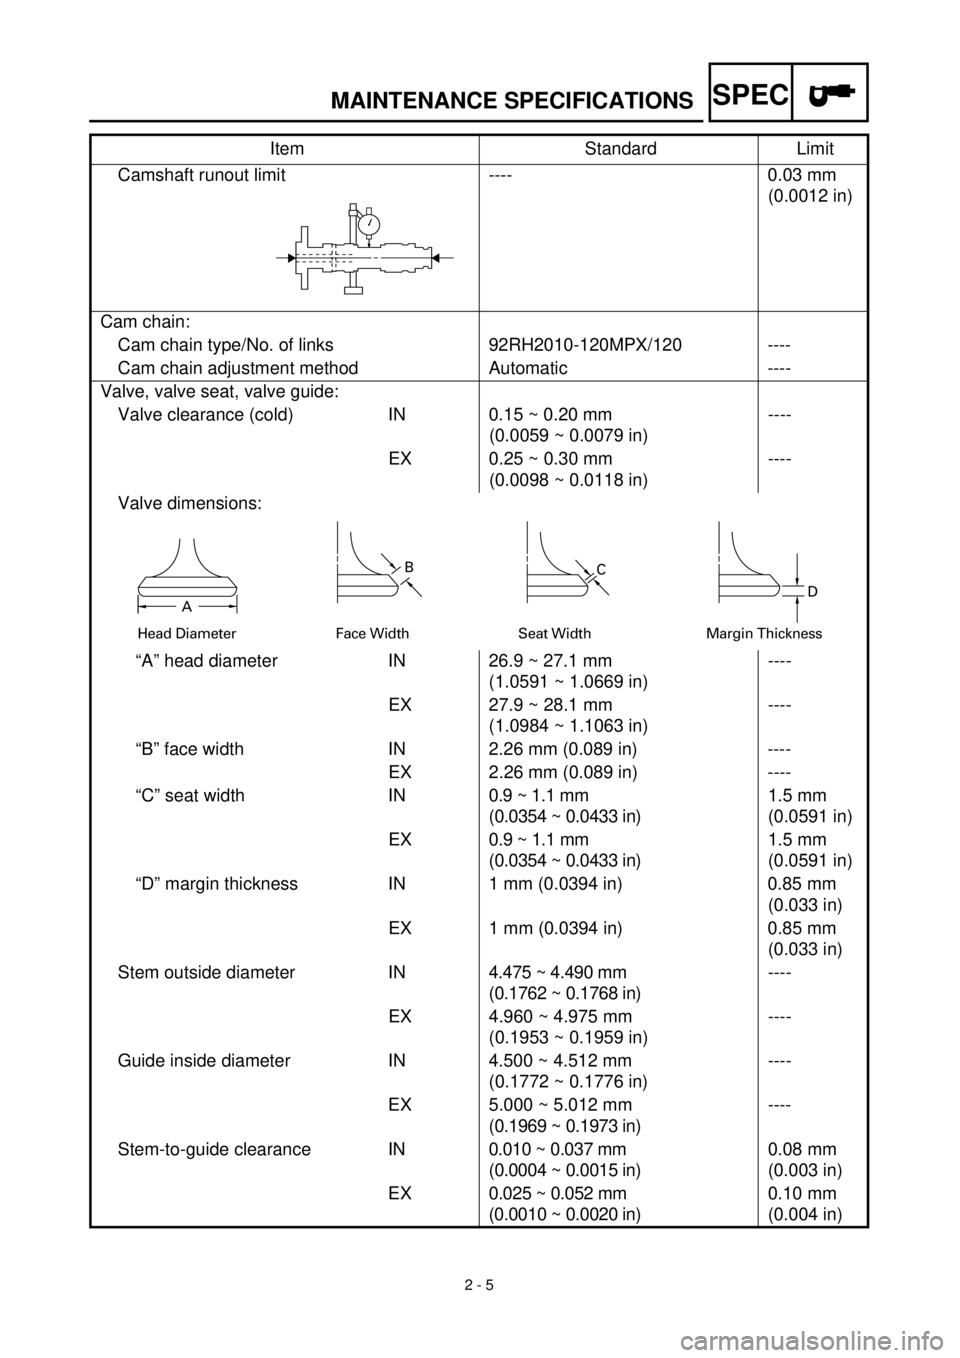
Valve dimensions:
“A” head diameter IN 26.9 ~ 27.1 mm
(1.0591 ~ 1.0669 in)----
EX 27.9 ~ 28.1 mm
(1.0984 ~ 1.1063 in)----
“B” face width IN 2.26 mm (0.089 in) ----
EX 2.26 mm (0.089 in) ----
“C” seat width IN0.9 ~ 1.1 mm
(0.0354 ~ 0.0433 in)1.5 mm
(0.0591 in)
EX 0.9 ~ 1.1 mm
(0.0354 ~ 0.0433 in)1.5 mm
(0.0591 in)
“D” margin thickness IN 1 mm (0.0394 in) 0.85 mm
(0.033 in)
EX 1 mm (0.0394 in) 0.85 mm
(0.033 in)
Stem outside diameter IN4.475 ~ 4.490 mm
(0.1762 ~ 0.1768 in)----
EX 4.960 ~ 4.975 mm
(0.1953 ~ 0.1959 in)----
Guide inside diameter IN 4.500 ~ 4.512 mm
(0.1772 ~ 0.1776 in)----
EX 5.000 ~ 5.012 mm
(0.1969 ~ 0.1973 in)----
Stem-to-guide clearance IN0.010 ~ 0.037 mm
(0.0004 ~ 0.0015 in)0.08 mm
(0.003 in)
EX 0.025 ~ 0.052 mm
(0.0010 ~ 0.0020 in)0.10 mm
(0.004 in) Item Standard Limit
Head Diameter
B
Face WidthC
Seat Width
D
Margin ThicknessA
Page 75 of 608
SPEC
2 - 6
MAINTENANCE SPECIFICATIONS
Stem runout limit ---- 0.01 mm
(0.0004 in)
Valve seat width IN0.9 ~ 1.1 mm (0.0354 ~ 0.0433 in)----
EX 0.9 ~ 1.1 mm (0.0354 ~ 0.0433 in)----
Valve spring:
Free length IN 39.42 mm (1.55 in) 37.5 mm
(1.48 in)
EX 41.80 mm (1.65 in) 39.8 mm
(1.57 in)
Set length (valve closed) IN 32.87 mm (1.29 in) ----
EX 35.35 mm (1.39 in) ----
Compressed pressure
(installed) IN 124 ~ 136 N
(12.6 ~ 13.8 kg, 27.78 ~ 30.42 lb)----
EX 123 ~ 143 N
(12.6 ~ 14.6 kg, 27.78 ~ 32.19 lb)----
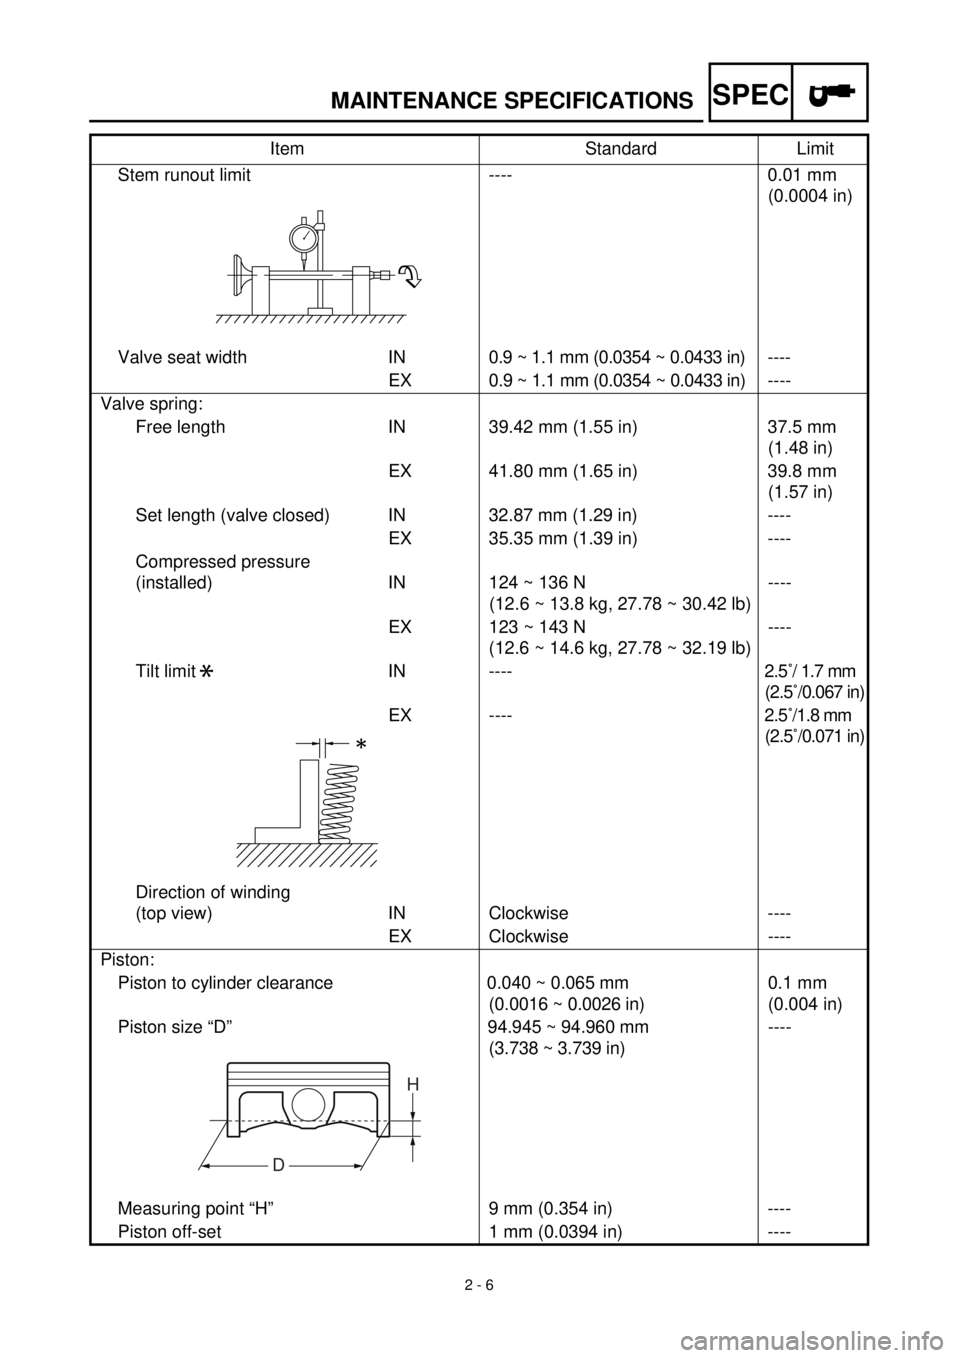
Tilt limit IN ----2.5˚/ 1.7 mm
(2.5˚/0.067 in)
EX ----2.5˚/1.8 mm
(2.5˚/0.071 in)
Direction of winding
(top view) IN Clockwise ----
EX Clockwise ----
Piston:
Piston to cylinder clearance 0.040 ~ 0.065 mm
(0.0016 ~ 0.0026 in)0.1 mm
(0.004 in)
Piston size “D” 94.945 ~ 94.960 mm
(3.738 ~ 3.739 in)----
Measuring point “H” 9 mm (0.354 in) ----
Piston off-set 1 mm (0.0394 in) ----Item Standard Limit
*
H
D
Page 76 of 608
SPEC
2 - 7
MAINTENANCE SPECIFICATIONS
Piston pin bore inside diameter19.004 ~ 19.015 mm
(0.7482 ~ 0.7486 in)19.045 mm
(0.7498 in)
Piston pin outside diameter18.991 ~ 19.000 mm
(0.7477 ~ 0.7480 in)18.971 mm
(0.7469 in)
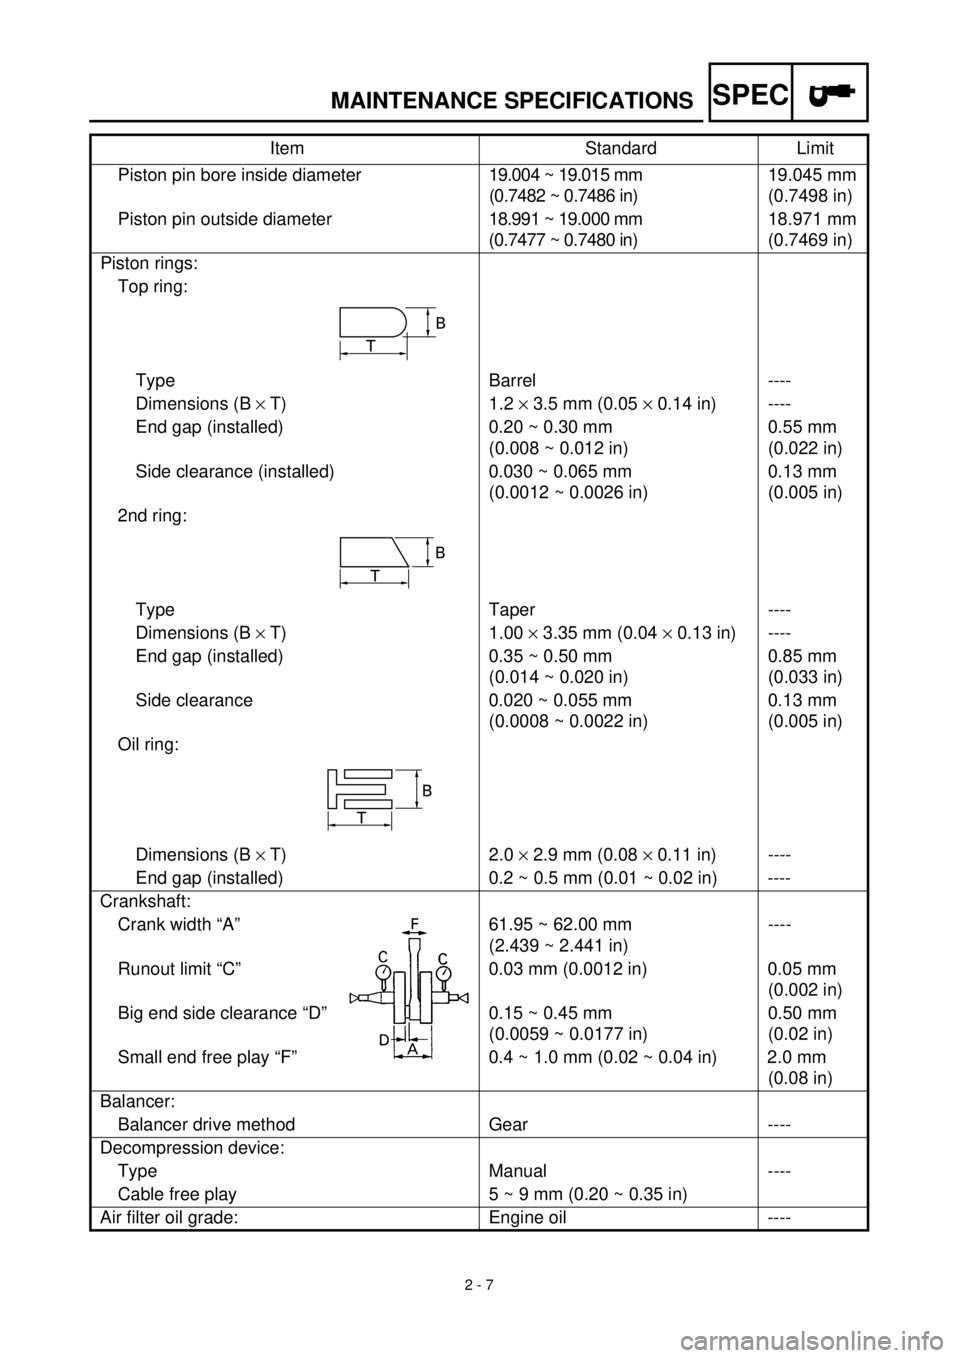
Piston rings:
Top ring:
Type Barrel ----
Dimensions (B
´
T) 1.2
´
3.5 mm (0.05
´
0.14 in) ----
End gap (installed) 0.20 ~ 0.30 mm
(0.008 ~ 0.012 in)0.55 mm
(0.022 in)
Side clearance (installed) 0.030 ~ 0.065 mm
(0.0012 ~ 0.0026 in)0.13 mm
(0.005 in)
2nd ring:
Type Taper ----
Dimensions (B
´
T) 1.00
´
3.35 mm (0.04
´
0.13 in) ----
End gap (installed) 0.35 ~ 0.50 mm
(0.014 ~ 0.020 in)0.85 mm
(0.033 in)
Side clearance 0.020 ~ 0.055 mm
(0.0008 ~ 0.0022 in)0.13 mm
(0.005 in)
Oil ring:
Dimensions (B
´
T) 2.0
´
2.9 mm (0.08
´
0.11 in) ----
End gap (installed) 0.2 ~ 0.5 mm (0.01 ~ 0.02 in) ----
Crankshaft:
Crank width “A” 61.95 ~ 62.00 mm
(2.439 ~ 2.441 in)----
Runout limit “C” 0.03 mm (0.0012 in) 0.05 mm
(0.002 in)
Big end side clearance “D” 0.15 ~ 0.45 mm
(0.0059 ~ 0.0177 in)0.50 mm
(0.02 in)
Small end free play “F” 0.4 ~ 1.0 mm (0.02 ~ 0.04 in) 2.0 mm
(0.08 in)
Balancer:
Balancer drive method Gear ----
Decompression device:
Type Manual ----
Cable free play 5 ~ 9 mm (0.20 ~ 0.35 in)
Air filter oil grade: Engine oil ----Item Standard Limit
T
B
B
T
B
T
Page 78 of 608
SPEC
2 - 9
MAINTENANCE SPECIFICATIONS
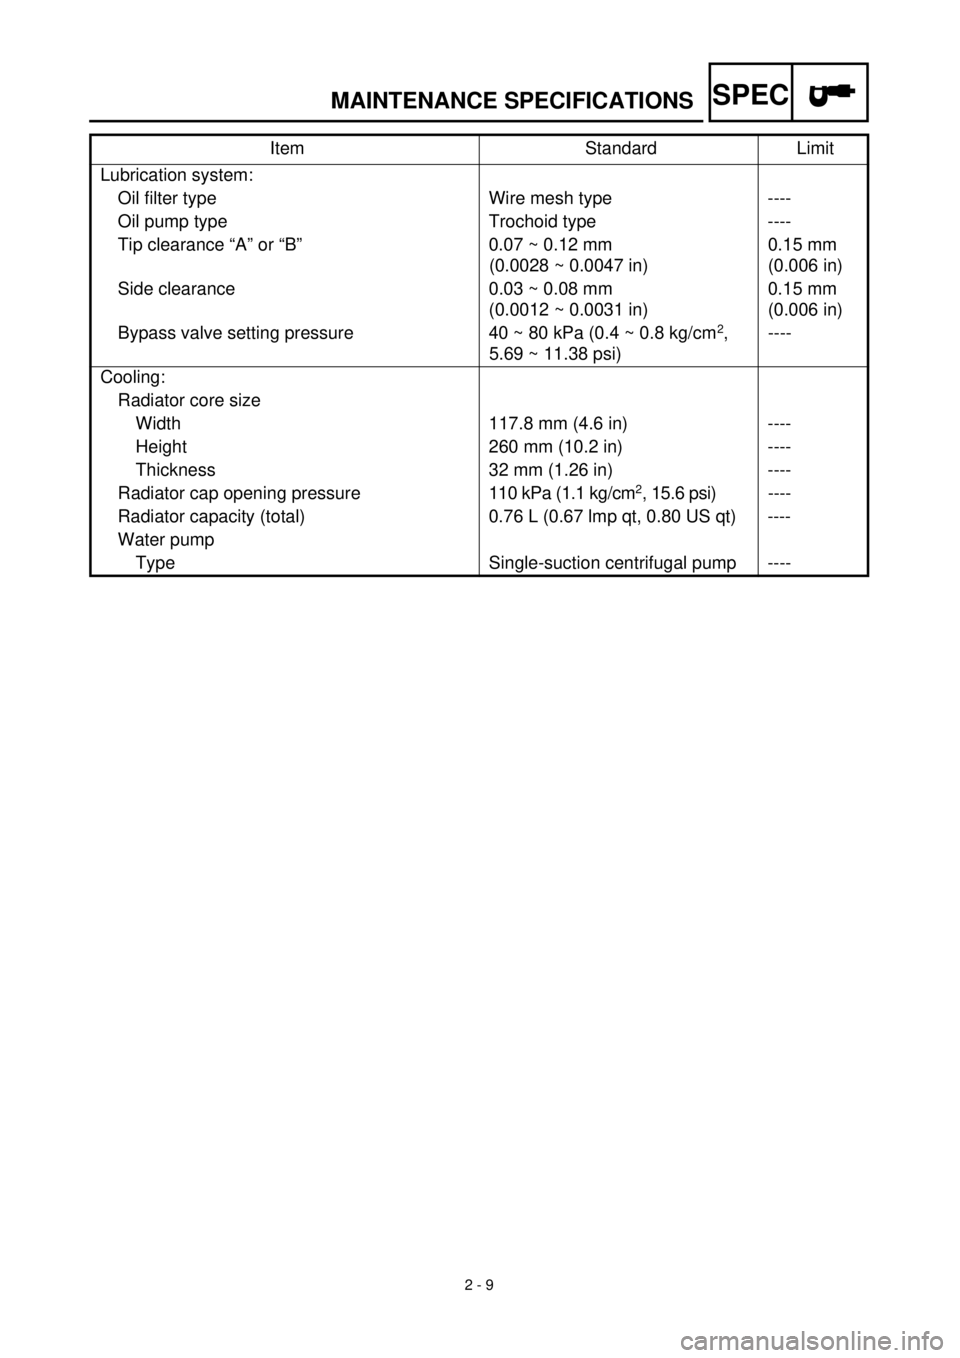
Lubrication system:
Oil filter type Wire mesh type ----
Oil pump type Trochoid type ----
Tip clearance “A” or “B” 0.07 ~ 0.12 mm
(0.0028 ~ 0.0047 in)0.15 mm
(0.006 in)
Side clearance 0.03 ~ 0.08 mm
(0.0012 ~ 0.0031 in)0.15 mm
(0.006 in)
Bypass valve setting pressure 40 ~ 80 kPa (0.4 ~ 0.8 kg/cm
2
,
5.69 ~ 11.38 psi)----
Cooling:
Radiator core size
Width 117.8 mm (4.6 in) ----
Height 260 mm (10.2 in) ----
Thickness 32 mm (1.26 in) ----
Radiator cap opening pressure110 kPa (1.1 kg/cm
2
, 15.6 psi)----
Radiator capacity (total) 0.76 L (0.67 lmp qt, 0.80 US qt) ----
Water pump
Type Single-suction centrifugal pump ----Item Standard Limit
Page 276 of 608
4 - 21
ENG
CAMSHAFTS
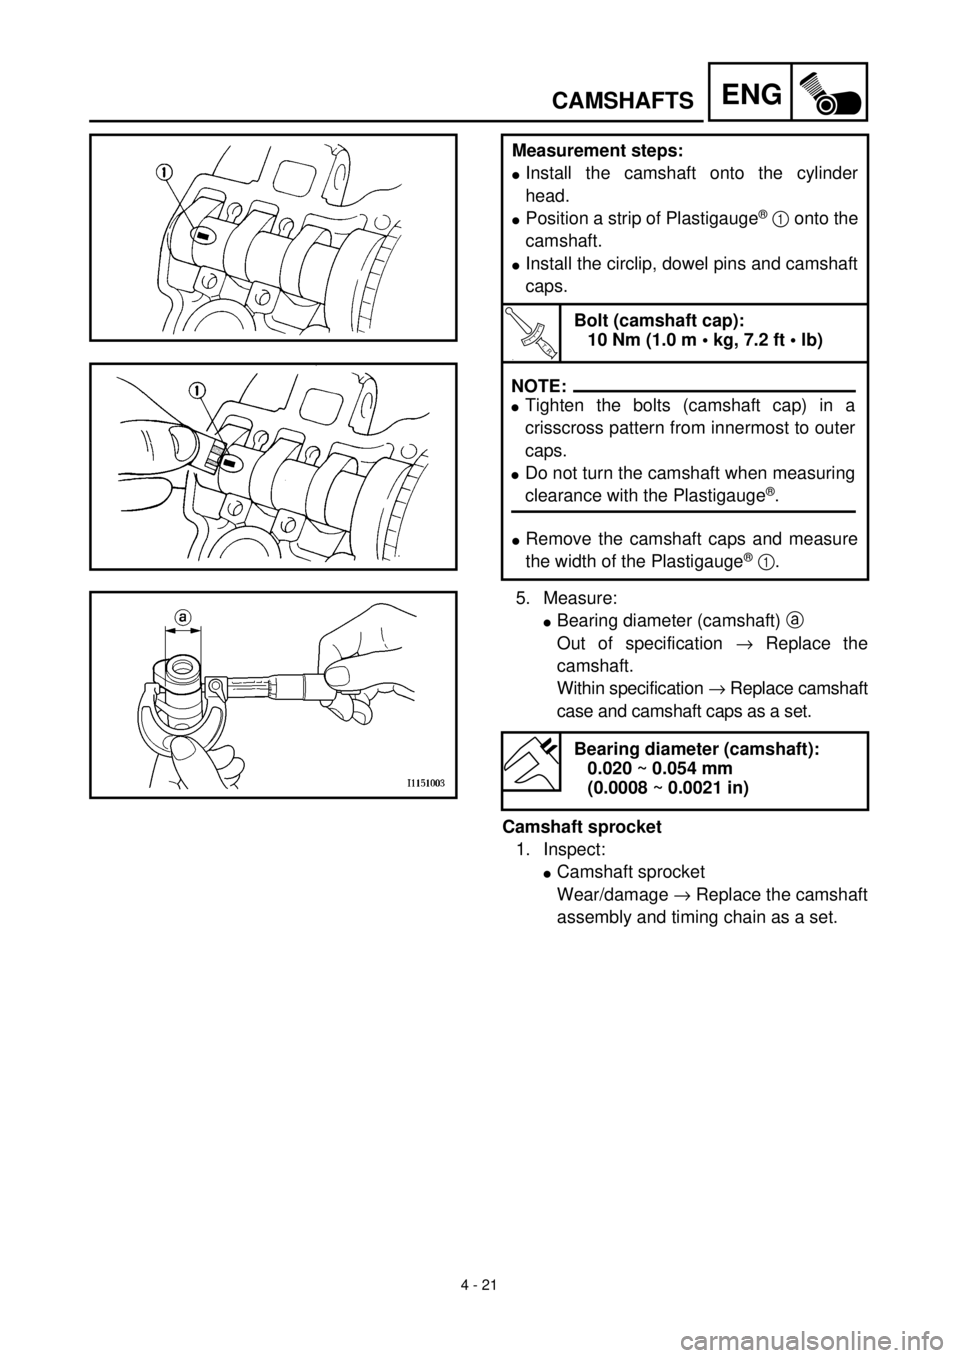
Measurement steps:
l
Install the camshaft onto the cylinder
head.
l
Position a strip of Plastigauge
®
1
onto the
camshaft.
l
Install the circlip, dowel pins and camshaft
caps.
T R..
Bolt (camshaft cap):
10 Nm (1.0 m • kg, 7.2 ft • lb)
.
l
Remove the camshaft caps and measure
the width of the Plastigauge
®
1
.
NOTE:
lTighten the bolts (camshaft cap) in a
crisscross pattern from innermost to outer
caps.
lDo not turn the camshaft when measuring
clearance with the Plastigauge®.
5. Measure:
l
Bearing diameter (camshaft)
a
Out of specification
®
Replace the
camshaft.
Within specification
®
Replace camshaft
case and camshaft caps as a set.
Bearing diameter (camshaft):
0.020 ~ 0.054 mm
(0.0008 ~ 0.0021 in)
Camshaft sprocket
1. Inspect:
l
Camshaft sprocket
Wear/damage
®
Replace the camshaft
assembly and timing chain as a set.
Page 290 of 608
4 - 28
ENGVALVES AND VALVE SPRINGS
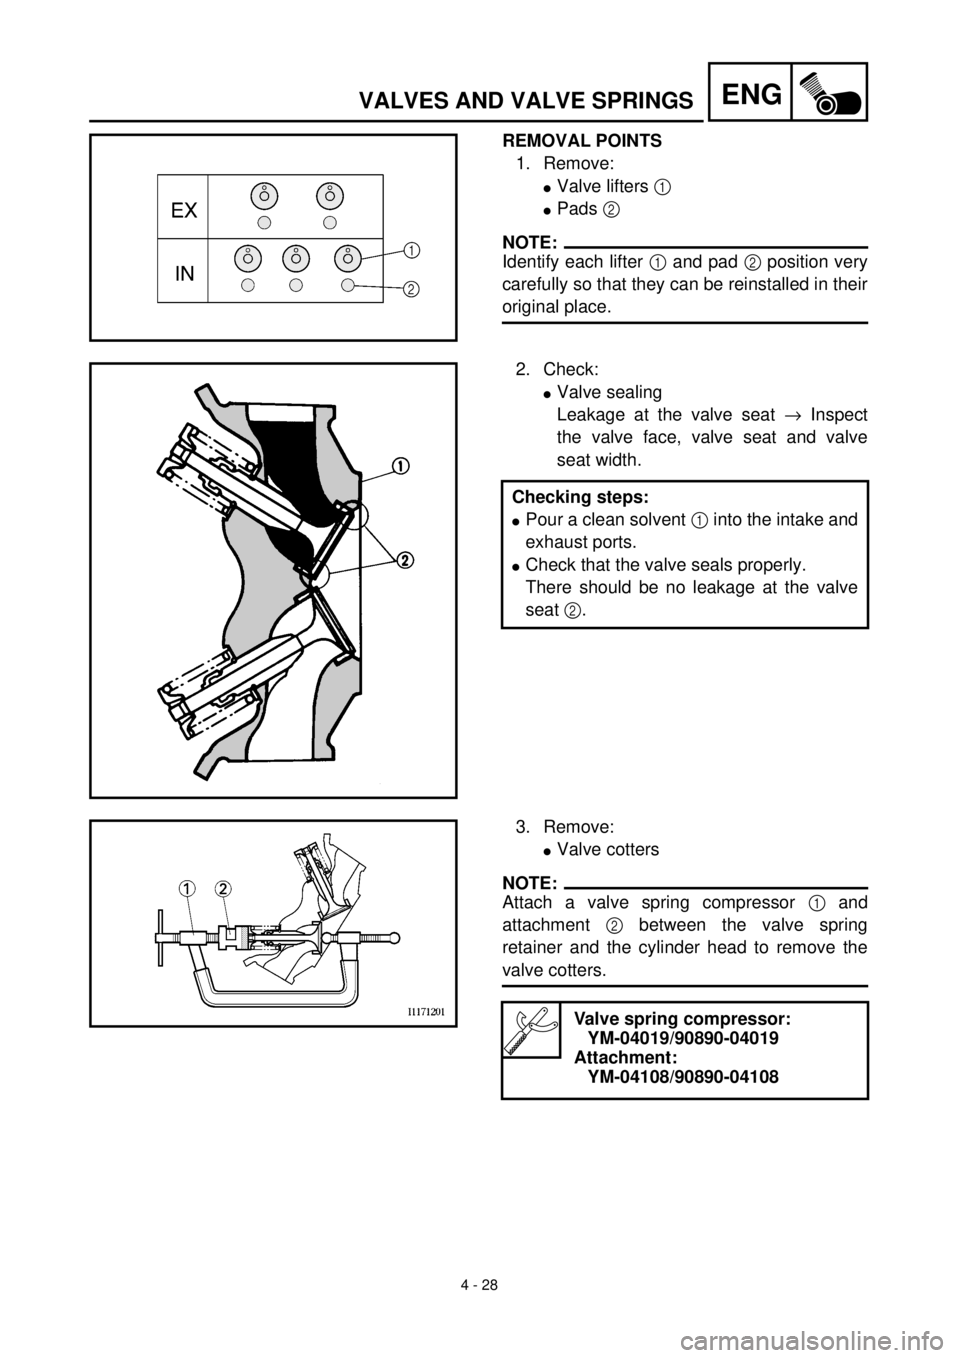
REMOVAL POINTS
1. Remove:
lValve lifters 1
lPads 2
NOTE:
Identify each lifter 1 and pad 2 position very
carefully so that they can be reinstalled in their
original place.
2. Check:
lValve sealing
Leakage at the valve seat ® Inspect
the valve face, valve seat and valve
seat width.
Checking steps:
lPour a clean solvent 1 into the intake and
exhaust ports.
lCheck that the valve seals properly.
There should be no leakage at the valve
seat 2.
3. Remove:
lValve cotters
NOTE:
Attach a valve spring compressor 1 and
attachment 2 between the valve spring
retainer and the cylinder head to remove the
valve cotters.
Valve spring compressor:
YM-04019/90890-04019
Attachment:
YM-04108/90890-04108
Page 294 of 608
4 - 30
ENGVALVES AND VALVE SPRINGS
3. Inspect:
lValve face
Pitting/wear ® Grind the face.
lValve stem end
Mushroom shape or diameter larger
than the body of the stem ® Replace.
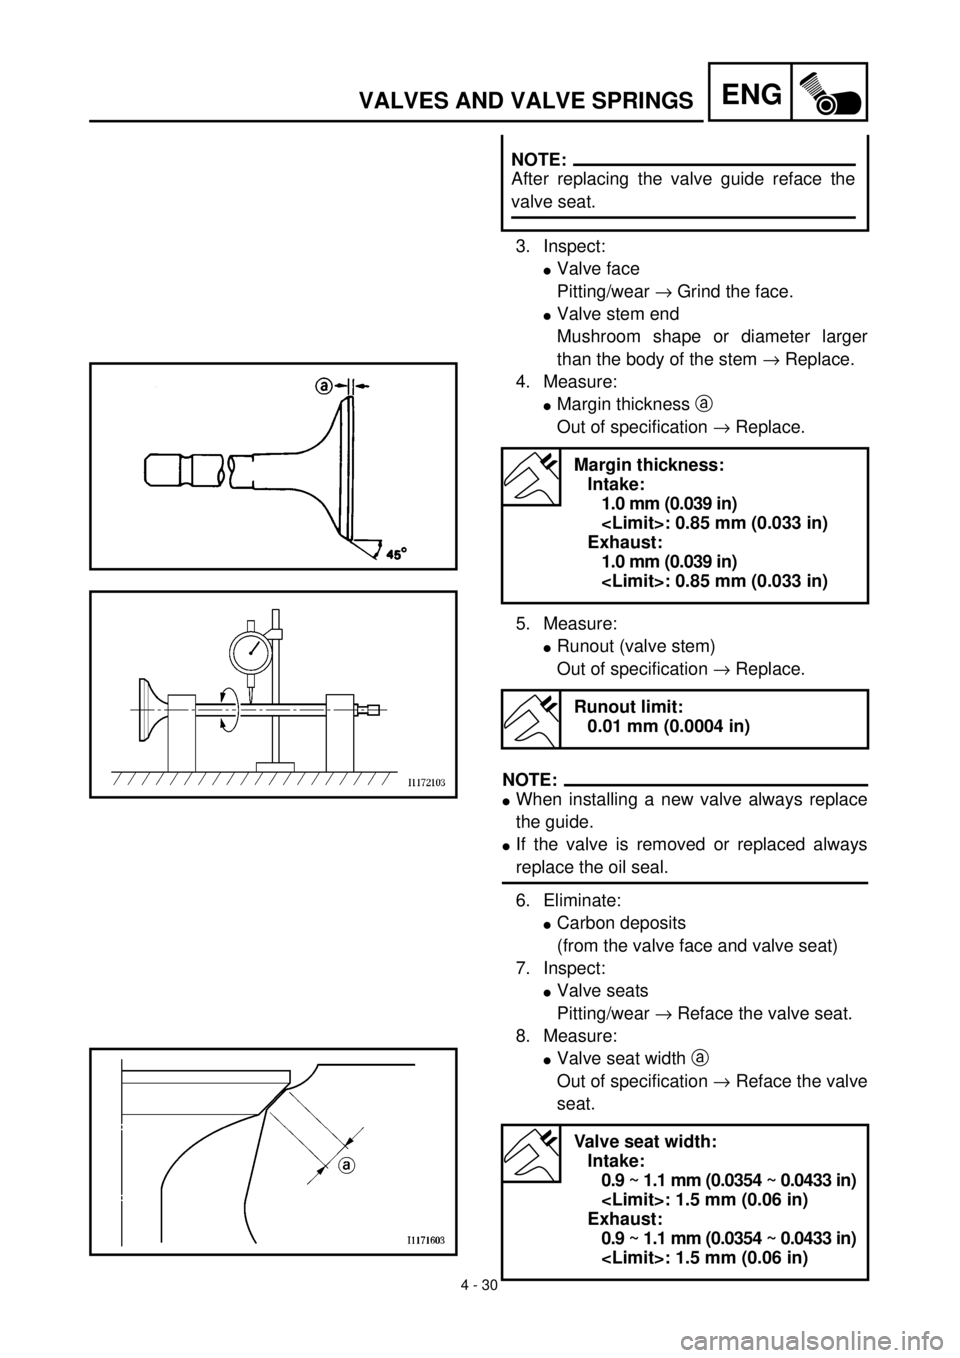
4. Measure:
lMargin thickness a
Out of specification ® Replace.
5. Measure:
lRunout (valve stem)
Out of specification ® Replace.
NOTE:
lWhen installing a new valve always replace
the guide.
lIf the valve is removed or replaced always
replace the oil seal.
6. Eliminate:
lCarbon deposits
(from the valve face and valve seat)
7. Inspect:
lValve seats
Pitting/wear ® Reface the valve seat.
8. Measure:
lValve seat width a
Out of specification ® Reface the valve
seat.
Margin thickness:
Intake:
1.0 mm (0.039 in)
Exhaust:
1.0 mm (0.039 in)
Runout limit:
0.01 mm (0.0004 in)
Valve seat width:
Intake:
0.9 ~ 1.1 mm (0.0354 ~ 0.0433 in)
Exhaust:
0.9 ~ 1.1 mm (0.0354 ~ 0.0433 in)
NOTE:
After replacing the valve guide reface the
valve seat.
Page 296 of 608
4 - 31
ENGVALVES AND VALVE SPRINGS
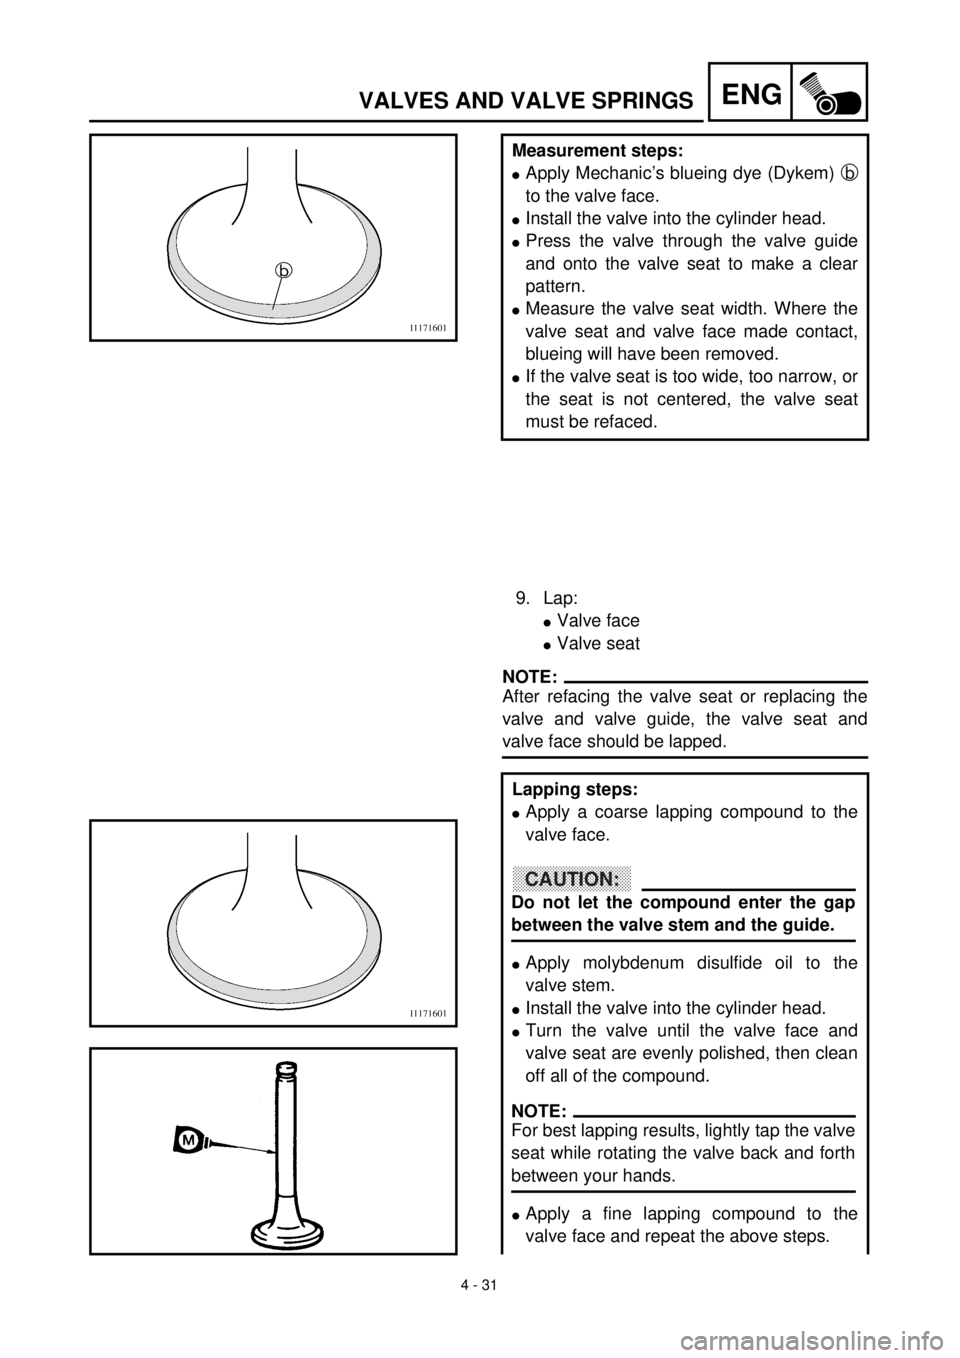
Measurement steps:
lApply Mechanic’s blueing dye (Dykem) b
to the valve face.
lInstall the valve into the cylinder head.
lPress the valve through the valve guide
and onto the valve seat to make a clear
pattern.
lMeasure the valve seat width. Where the
valve seat and valve face made contact,
blueing will have been removed.
lIf the valve seat is too wide, too narrow, or
the seat is not centered, the valve seat
must be refaced.
9. Lap:
lValve face
lValve seat
NOTE:
After refacing the valve seat or replacing the
valve and valve guide, the valve seat and
valve face should be lapped.
Lapping steps:
lApply a coarse lapping compound to the
valve face.
lApply molybdenum disulfide oil to the
valve stem.
lInstall the valve into the cylinder head.
lTurn the valve until the valve face and
valve seat are evenly polished, then clean
off all of the compound.
lApply a fine lapping compound to the
valve face and repeat the above steps.
CAUTION:
Do not let the compound enter the gap
between the valve stem and the guide.
NOTE:
For best lapping results, lightly tap the valve
seat while rotating the valve back and forth
between your hands.
Page 298 of 608
4 - 32
ENGVALVES AND VALVE SPRINGS
lApply Mechanic’s blueing dye (Dykem) to
the valve face.
lInstall the valve into the cylinder head.
lPress the valve through the valve guide
and onto the valve seat to make a clear
pattern.
lMeasure the valve seat width again. If the
valve seat width is out of specification,
reface and relap the valve seat.
NOTE:
After every lapping operation be sure to
clean off all of the compound from the valve
face and valve seat.
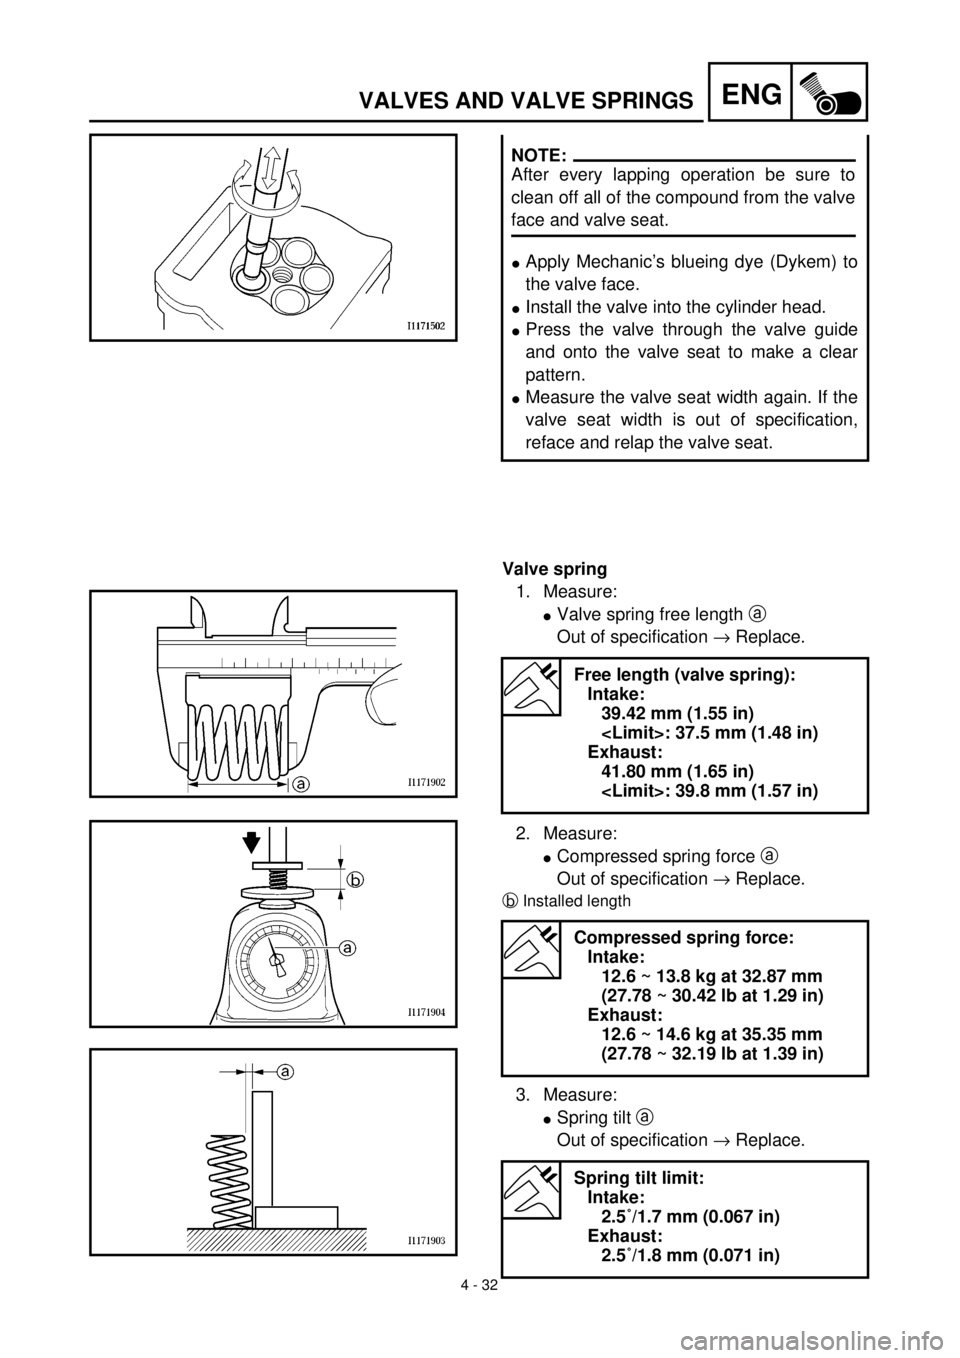
Valve spring
1. Measure:
lValve spring free length a
Out of specification ® Replace.
2. Measure:
lCompressed spring force a
Out of specification ® Replace.
bInstalled length
3. Measure:
lSpring tilt a
Out of specification ® Replace.
Free length (valve spring):
Intake:
39.42 mm (1.55 in)
Exhaust:
41.80 mm (1.65 in)
Compressed spring force:
Intake:
12.6 ~ 13.8 kg at 32.87 mm
(27.78 ~ 30.42 lb at 1.29 in)
Exhaust:
12.6 ~ 14.6 kg at 35.35 mm
(27.78 ~ 32.19 lb at 1.39 in)
Spring tilt limit:
Intake:
2.5˚/1.7 mm (0.067 in)
Exhaust:
2.5˚/1.8 mm (0.071 in)