check YAMAHA YZ450F 2007 User Guide
[x] Cancel search | Manufacturer: YAMAHA, Model Year: 2007, Model line: YZ450F, Model: YAMAHA YZ450F 2007Pages: 650, PDF Size: 20.67 MB
Page 82 of 650

SPEC
2 - 11 Part to be tightened Thread size Q’tyTightening torque
Nm m·kg ft·lb
Spark plug M10S × 1.0 1 13 1.3 9.4
Camshaft cap M6 × 1.0 10 10 1.0 7.2
Cylinder head blind plug screw M12 × 1.0 1 28 2.8 20
Cylinder head (stud bolt) M8 × 1.25 1 15 1.5 11
(bolt) M10 × 1.25 4 Refer to NOTE.*
1
(bolt) M6 × 1.0 2 10 1.0 7.2
Cylinder head cover M6 × 1.0 2 10 1.0 7.2
Cylinder M6 × 1.0 1 10 1.0 7.2
Timing chain tensioner M6 × 1.0 2 10 1.0 7.2
Tensioner cap bolt M6 × 1.0 1 7 0.7 5.1
Timing chain guide (rear) M6 × 1.0 2 10 1.0 7.2
Exhaust pipe (nut) M8 × 1.25 1 20 2.0 14
(bolt) M8 × 1.25 1 20 2.0 14
Silencer M8 × 1.25 2 30 3.0 22
Silencer clamp M8 × 1.25 1 14 1.4 10
Exhaust pipe protector M6 × 1.0 3 10 1.0 7.2
Carburetor joint M6 × 1.0 3 10 1.0 7.2
Carburetor joint clamp M4 × 0.7 1 3 0.3 2.2
Air filter case M6 × 1.0 2 8 0.8 5.8
Air filter joint clamp M6 × 1.0 1 3 0.3 2.2
Air filter joint and air filter case M5 × 0.8 1 4 0.4 2.9
Throttle cable adjust bolt and locknut M6 × 0.75 1 4 0.4 2.9
Throttle cable (pull) M6 × 1.0 1 4 0.4 2.9
Throttle cable (return) M12 × 1.0 1 11 1.1 8.0
Throttle cable cover M5 × 0.8 2 4 0.4 2.9
Hot starter plunger M12 × 1.0 1 2 0.2 1.4
Hot starter cable adjust bolt and locknut M6 × 0.75 1 4 0.4 2.9
Air filter element M6 × 1.0 1 2 0.2 1.4
Radiator stay M6 × 1.0 6 7 0.7 5.1
Radiator M6 × 1.0 4 10 1.0 7.2
Radiator hose clamp M6 × 1.0 8 2 0.2 1.4
Radiator pipe 1, 2 M6 × 1.0 2 10 1.0 7.2
Impeller M8 × 1.25 1 14 1.4 10
Water pump housing cover M6 × 1.0 3 10 1.0 7.2
Coolant drain bolt M6 × 1.0 1 10 1.0 7.2
Oil pump cover M4 × 0.7 1 2 0.2 1.4
Oil pump M6 × 1.0 2 10 1.0 7.2
Oil pump drive gear shaft M6 × 1.0 1 10 1.0 7.2
Engine oil drain bolt (oil filter) M6 × 1.0 1 10 1.0 7.2
Oil filter cover M6 × 1.0 2 10 1.0 7.2
Oil check bolt (cylinder head) M6 × 1.0 1 10 1.0 7.2
Oil hose clamp—220.21.4
Clutch cover M6 × 1.0 7 10 1.0 7.2
MAINTENANCE SPECIFICATIONS
Page 83 of 650

SPEC
2 - 12
NOTE:
- marked portion shall be checked for torque tightening after break-in or before each race.
NOTE:
*1: Tighten the cylinder head bolts to 30 Nm (3.0 m kg, 22 ft lb) in the proper tightening sequence,
remove and retighten the cylinder head bolts to 20 Nm (2.0 m kg, 14 ft lb) in the proper tightening
sequence, and then tighten the cylinder head bolts further to reach the specified angle 180° in the
proper tightening sequence.Crankcase cover (right) M6 × 1.0 8 10 1.0 7.2
M6 × 1.0 2 12 1.2 8.7
Crankcase cover (left) M6 × 1.0 8 10 1.0 7.2
Crankcase M6 × 1.0 12 12 1.2 8.7
Clutch cable holder M6 × 1.0 2 10 1.0 7.2
Oil drain bolt (crankcase right) M10 × 1.25 1 20 2.0 14
(crankcase left) M8 × 1.25 1 20 2.0 14
Oil check bolt (crankcase) M6 × 1.0 1 10 1.0 7.2
Oil strainer M6 × 1.0 1 10 1.0 7.2
Crankcase bearing stopper M6 × 1.0 4 14 1.4 10
Crankcase bearing stopper M6 × 1.0 8 10 1.0 7.2
Drive axle oil seal stopper M6 × 1.0 2 10 1.0 7.2
Ratchet wheel guide M6 × 1.0 2 12 1.2 8.7
Kick starter M8 × 1.25 1 33 3.3 24
Screw (kick starter) M6 × 1.0 1 7 0.7 5.1
Primary drive gear M20 × 1.0 1 110 11.0 80
Clutch boss M20 × 1.0 1 75 7.5 54
Clutch cable adjust bolt and locknut M6 × 0.75 1 4 0.4 2.9
Clutch spring M6 × 1.0 6 10 1.0 7.2
Balancer M10 × 1.0 1 45 4.5 32
Balancer driven gear M14 × 1.0 1 50 5.0 36
Balancer weight plate M6 × 1.0 3 10 1.0 7.2
Drive sprocket M20 × 1.0 1 75 7.5 54
Drive sprocket cover M6 × 1.0 2 8 0.8 5.8
Shift pedal M6 × 1.0 1 12 1.2 8.7
Shift guide M6 × 1.0 2 10 1.0 7.2
Stopper lever M6 × 1.0 1 10 1.0 7.2
Segment M8 × 1.25 1 30 3.0 22 Part to be tightened Thread size Q’tyTightening torque
Nm m·kg ft·lb
MAINTENANCE SPECIFICATIONS
Page 87 of 650

SPEC
2 - 16
NOTE:
- marked portion shall be checked for torque tightening after break-in or before each race.Part to be tightened Thread size Q’tyTightening torque
Nm m·kg ft·lb
Rear wheel axle and nut M20 × 1.5 1 125 12.5 90
Driven sprocket and wheel hub M8 × 1.25 6 42 4.2 30
Nipple (spoke)—72 3 0.3 2.2
Disc cover and rear brake caliper M6 × 1.0 2 10 1.0 7.2
Protector and rear brake caliper M6 × 1.0 2 7 0.7 5.1
Chain puller adjust bolt and locknut M8 × 1.25 2 19 1.9 13
Engine mounting:
Engine upper bracket and frame M10 × 1.25 4 55 5.5 40
Engine lower bracket and frame M8 × 1.25 4 34 3.4 24
Engine and engine bracket (front) M10 × 1.25 1 53 5.3 38
Engine and engine bracket (upper) M10 × 1.25 1 55 5.5 40
Engine and frame (lower) M10 × 1.25 1 53 5.3 38
Engine guard M6 × 1.0 1 10 1.0 7.2
Engine skid plate mounting M6 × 1.0 3 10 1.0 7.2
CDI unit bracket mounting M6 × 1.0 2 7 0.7 5.1
Cable guide and CDI unit bracket M5 × 0.8 2 4 0.4 2.9
Cable guide and frame M5 × 0.8 1 5 0.5 3.6
Pivot shaft and nut M16 × 1.5 1 85 8.5 61
Relay arm and swingarm M14 × 1.5 1 70 7.0 50
Relay arm and connecting rod M14 × 1.5 1 80 8.0 58
Connecting rod and frame M14 × 1.5 1 80 8.0 58
Rear shock absorber and frame M10 × 1.25 1 56 5.6 40
Rear shock absorber and relay arm M10 × 1.25 1 53 5.3 38
Rear frame and frame (upper) M8 × 1.25 1 32 3.2 23
Rear frame and frame (lower) M8 × 1.25 2 32 3.2 23
Swingarm and brake hose holder M5 × 0.8 4 2 0.2 1.4
Swingarm and patch M4 × 0.7 4 2 0.2 1.4
Drive chain tensioner mounting (upper) M8 × 1.25 1 16 1.6 11
Drive chain tensioner mounting (lower) M8 × 1.25 1 16 1.6 11
Chain support and swingarm M6 × 1.0 3 7 0.7 5.1
Seal guard and swingarm M5 × 0.8 4 6 0.6 4.3
Fuel tank mounting boss and frame M10 × 1.25 1 20 2.0 14
Fuel tank mounting M6 × 1.0 2 9 0.9 6.5
Fuel tank and fuel cock M6 × 1.0 2 4 0.4 2.9
Fuel tank and seat set bracket M6 × 1.0 1 7 0.7 5.1
Fuel tank and fuel tank bracket M6 × 1.0 4 7 0.7 5.1
Seat mounting M8 × 1.25 2 23 2.3 17
Side cover mounting M6 × 1.0 2 7 0.7 5.1
Air scoop and fuel tank M6 × 1.0 6 7 0.7 5.1
Air scoop and radiator panel (lower) M6 × 1.0 2 7 0.7 5.1
Front fender mounting M6 × 1.0 4 7 0.7 5.1
Rear fender mounting (front) M6 × 1.0 2 7 0.7 5.1
Rear fender mounting (rear) M6 × 1.0 2 16 1.6 11
Number plate M6 × 1.0 1 7 0.7 5.1
MAINTENANCE SPECIFICATIONS
Page 142 of 650

3 - 1
INSP
ADJ
MAINTENANCE INTERVALS
EC300000
REGULAR INSPECTION AND ADJUSTMENTS
MAINTENANCE INTERVALS
The following schedule is intended as a general guide to maintenance and lubrication. Bear in mind
that such factors as weather, terrain, geographical location, and individual usage will alter the
required maintenance and lubrication intervals. If you are a doubt as to what intervals to follow in
maintaining and lubricating your machine, consult your Yamaha dealer.
ItemAfter
break-inEvery
race
Every
third
(or
500 km)Every
fifth
(or
1,000 km)As re-
quiredRemarks
ENGINE OIL
Replace
VALVES
The engine must be cold.
Check the valve seats
and valve stems for wear. Check the valve clearances
Inspect
Replace
VALVE SPRINGS
Check the free length and
the tilt. Inspect
Replace
VALVE LIFTERS
Check for scratches and
wear. Inspect
Replace
CAMSHAFTS Inspect the camshaft sur-
face.
Inspect the decompres-
sion system Inspect
Replace
CAMSHAFT SPROCKETS
Check for wear on the
teeth and for damage. Inspect
Replace
PISTON
Inspect crack
Inspect carbon deposits
and eliminate them. Inspect
Clean
Replace
PISTON RING
Check ring end gap Inspect
Replace
PISTON PIN
Inspect
Replace
CYLINDER HEAD Inspect carbon deposits
and eliminate them.
Change gasket Inspect and clean
CYLINDER
Inspect and clean
Inspect score marks
Inspect wear
Replace
CLUTCH
Inspect housing, friction
plate, clutch plate and
spring Inspect and adjust
Replace
TRANSMISSION
Inspect
Replace bearing
Page 143 of 650
3 - 2
INSP
ADJ
MAINTENANCE INTERVALS
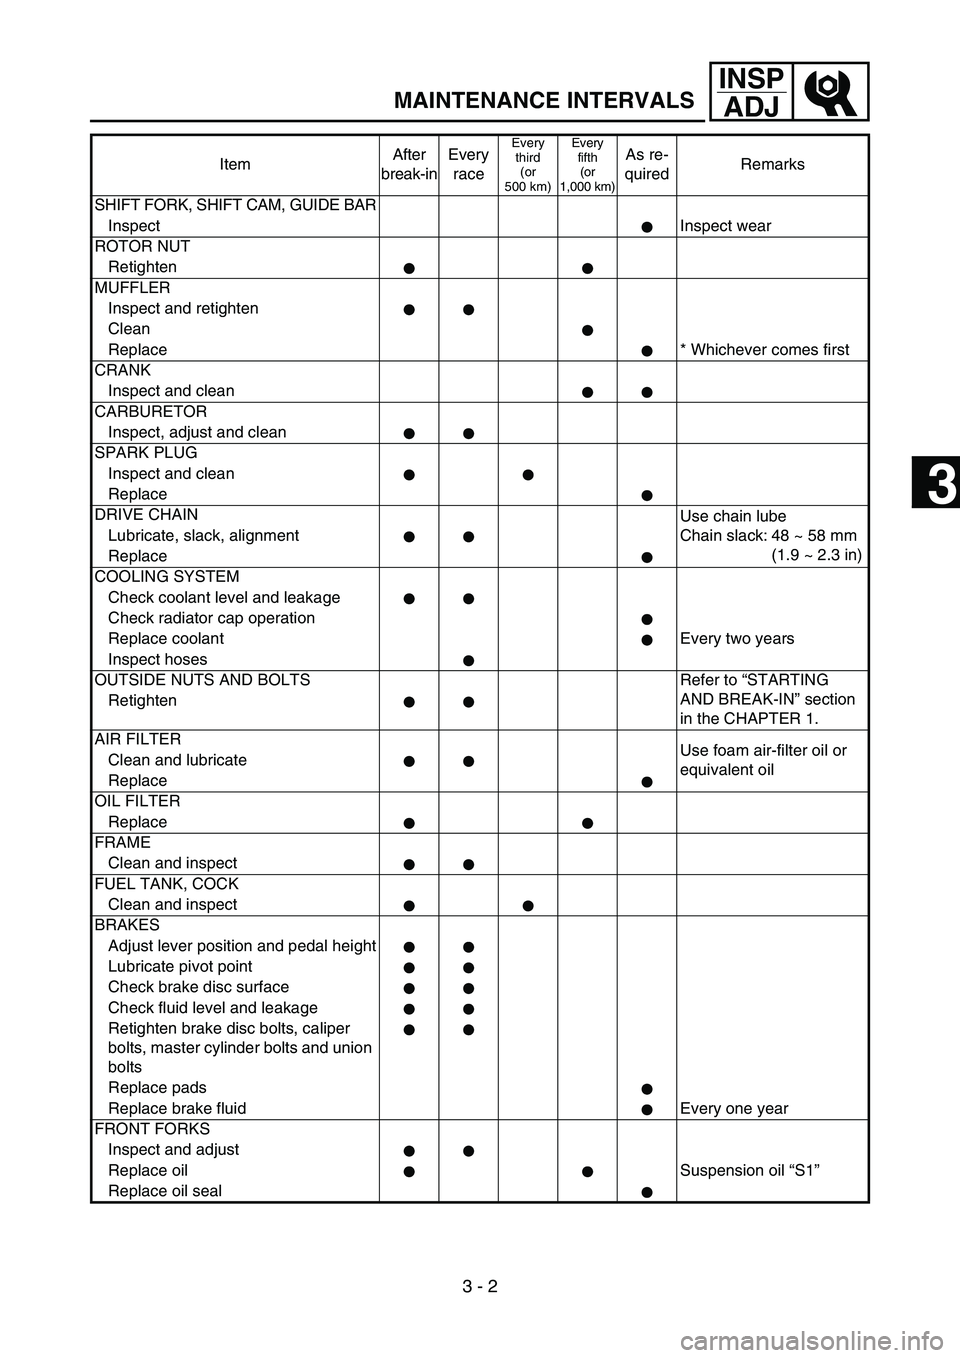
SHIFT FORK, SHIFT CAM, GUIDE BAR
InspectInspect wear
ROTOR NUT
Retighten
MUFFLER
Inspect and retighten
Clean
Replace * Whichever comes first
CRANK
Inspect and clean
CARBURETOR
Inspect, adjust and clean
SPARK PLUG
Inspect and clean
Replace
DRIVE CHAIN
Use chain lube
Chain slack: 48 ~ 58 mm
(1.9 ~ 2.3 in) Lubricate, slack, alignment
Replace
COOLING SYSTEM
Check coolant level and leakage
Check radiator cap operation
Replace coolant Every two years
Inspect hoses
OUTSIDE NUTS AND BOLTS Refer to “STARTING
AND BREAK-IN” section
in the CHAPTER 1. Retighten
AIR FILTER
Use foam air-filter oil or
equivalent oil Clean and lubricate
Replace
OIL FILTER
Replace
FRAME
Clean and inspect
FUEL TANK, COCK
Clean and inspect
BRAKES
Adjust lever position and pedal height
Lubricate pivot point
Check brake disc surface
Check fluid level and leakage
Retighten brake disc bolts, caliper
bolts, master cylinder bolts and union
bolts
Replace pads
Replace brake fluid Every one year
FRONT FORKS
Inspect and adjust
Replace oil Suspension oil “S1”
Replace oil sealItemAfter
break-inEvery
race
Every
third
(or
500 km)Every
fifth
(or
1,000 km)As re-
quiredRemarks
3
Page 144 of 650

3 - 3
INSP
ADJ
MAINTENANCE INTERVALS
FRONT FORK OIL SEAL AND DUST
SEAL
Clean and lube Lithium base grease
PROTECTOR GUIDE
Replace
REAR SHOCK ABSORBER
(After
rain ride)
Inspect and adjust
LubeMolybdenum disulfide
grease
Replace spring seat Every one year
Retighten
CHAIN GUARD AND ROLLERS
Inspect
SWINGARM
Molybdenum disulfide
grease
Inspect, lube and retighten
RELAY ARM, CONNECTING ROD
Molybdenum disulfide
grease
Inspect, lube and retighten
STEERING HEAD
Inspect free play and retighten
Clean and lube Lithium base grease
Replace bearing
TIRE, WHEELS
Inspect air pressure, wheel run-out,
tire wear and spoke looseness
Retighten sprocket bolt
Inspect bearings
Replace bearings
Lubricate Lithium base grease
THROTTLE, CONTROL CABLE
Yamaha cable lube or
SAE 10W-30 motor oil Check routing and connection
Lubricate
HOT STARTER, CLUTCH LEVER
Inspect free playItemAfter
break-inEvery
race
Every
third
(or
500 km)Every
fifth
(or
1,000 km)As re-
quiredRemarks
Page 151 of 650
3 - 4
INSP
ADJ
PRE-OPERATION INSPECTION AND MAINTENANCE
EC320000
PRE-OPERATION INSPECTION AND MAINTENANCE
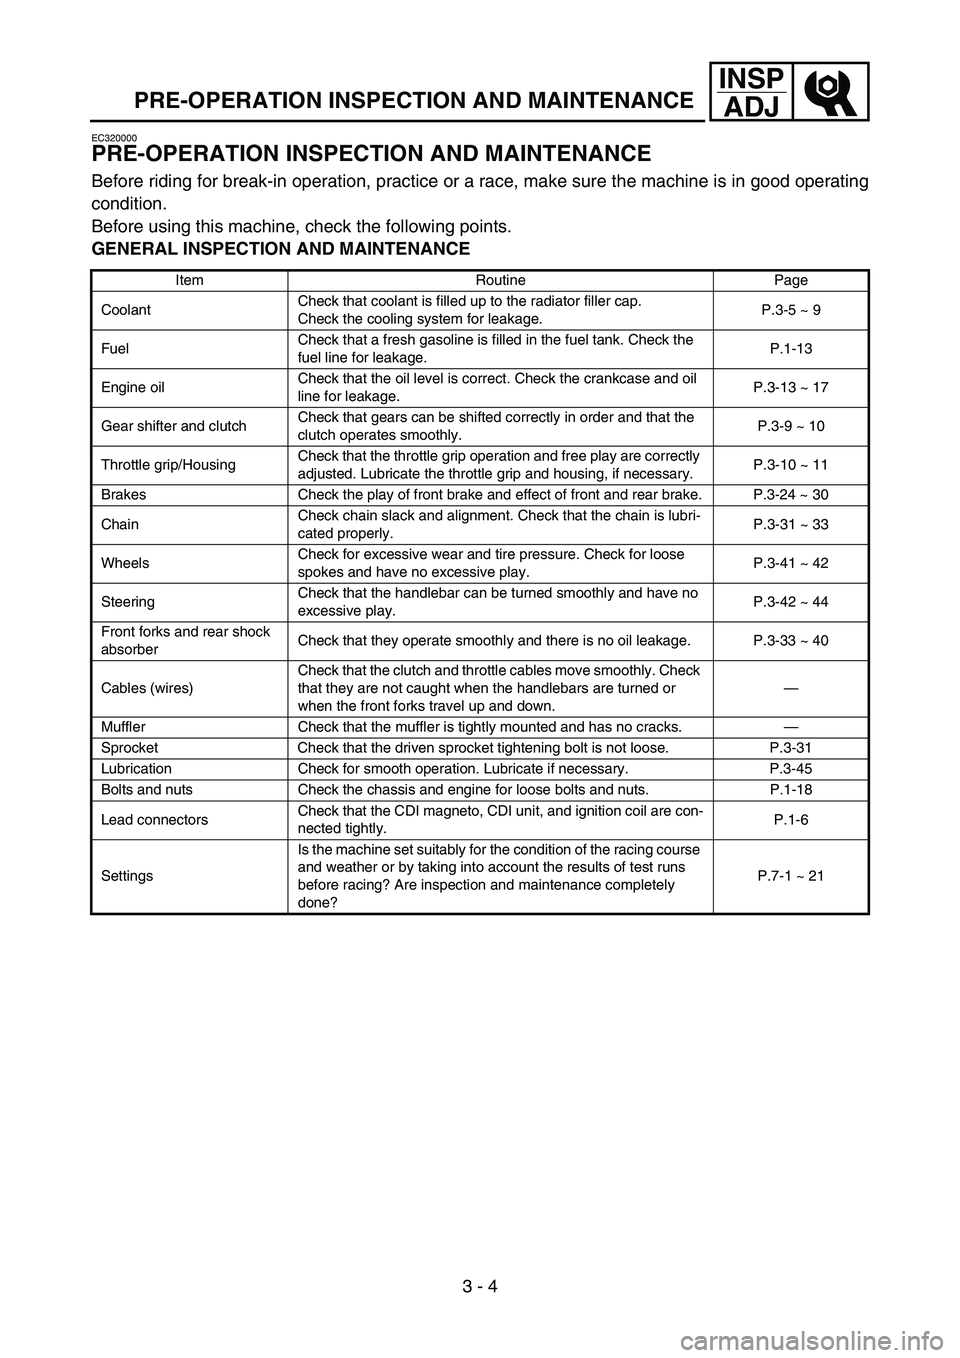
Before riding for break-in operation, practice or a race, make sure the machine is in good operating
condition.
Before using this machine, check the following points.
GENERAL INSPECTION AND MAINTENANCE
Item Routine Page
CoolantCheck that coolant is filled up to the radiator filler cap.
Check the cooling system for leakage.P.3-5 ~ 9
FuelCheck that a fresh gasoline is filled in the fuel tank. Check the
fuel line for leakage.P.1-13
Engine oilCheck that the oil level is correct. Check the crankcase and oil
line for leakage.P.3-13 ~ 17
Gear shifter and clutchCheck that gears can be shifted correctly in order and that the
clutch operates smoothly.P.3-9 ~ 10
Throttle grip/HousingCheck that the throttle grip operation and free play are correctly
adjusted. Lubricate the throttle grip and housing, if necessary.P.3-10 ~ 11
Brakes Check the play of front brake and effect of front and rear brake. P.3-24 ~ 30
ChainCheck chain slack and alignment. Check that the chain is lubri-
cated properly.P.3-31 ~ 33
WheelsCheck for excessive wear and tire pressure. Check for loose
spokes and have no excessive play.P.3-41 ~ 42
SteeringCheck that the handlebar can be turned smoothly and have no
excessive play.P.3-42 ~ 44
Front forks and rear shock
absorberCheck that they operate smoothly and there is no oil leakage. P.3-33 ~ 40
Cables (wires)Check that the clutch and throttle cables move smoothly. Check
that they are not caught when the handlebars are turned or
when the front forks travel up and down.—
Muffler Check that the muffler is tightly mounted and has no cracks.—
Sprocket Check that the driven sprocket tightening bolt is not loose. P.3-31
Lubrication Check for smooth operation. Lubricate if necessary. P.3-45
Bolts and nuts Check the chassis and engine for loose bolts and nuts. P.1-18
Lead connectorsCheck that the CDI magneto, CDI unit, and ignition coil are con-
nected tightly.P.1-6
SettingsIs the machine set suitably for the condition of the racing course
and weather or by taking into account the results of test runs
before racing? Are inspection and maintenance completely
done?P.7-1 ~ 21
Page 154 of 650

3 - 5
INSP
ADJ
EC350000
ENGINE
EC351011
COOLANT LEVEL INSPECTION
WARNING
Do not remove the radiator cap
1, drain
bolt and hoses when the engine and radia-
tor are hot. Scalding hot fluid and steam
may be blown out under pressure, which
could cause serious injury.
When the engine has cooled, place a thick
towel over the radiator cap, slowly rotate
the cap counterclockwise to the detent.
This procedure allows any residual pres-
sure to escape. When the hissing sound
has stopped, press down on the cap while
turning counterclockwise and remove it.
CAUTION:
Hard water or salt water is harmful to the
engine parts. You may use distilled water, if
you can’t get soft water.
1. Place the machine on a level place, and
hold it in an upright position.
2. Remove:
Radiator cap
3. Check:
Coolant level a
Coolant level low → Add coolant.
1Radiator
ENGINE/COOLANT LEVEL INSPECTION
Page 158 of 650

3 - 7
INSP
ADJ
RADIATOR CAP INSPECTION
CAUTION:
Do not mix more than one type of ethyl-
ene glycol antifreeze containing corro-
sion inhibitors for aluminum engine.
Do not use water containing impurities or
oil.
7. Install:
Radiator cap
Start the engine and warm it up for a sev-
eral minutes.
8. Check:
Coolant level
Coolant level low → Add coolant. Handling notes of coolant:
The coolant is harmful so it should be han-
dled with special care.
WARNING
When coolant splashes to your eye.
Thoroughly wash your eye with water
and see your doctor.
When coolant splashes to your clothes.
Quickly wash it away with water and
then with soap.
When coolant is swallowed.
Quickly make him vomit and take him
to a doctor.
EC355000
RADIATOR CAP INSPECTION
1. Inspect:
Seal (radiator cap) 1
Valve and valve seat 2
Crack/damage → Replace.
Exist fur deposits 3 → Clean or replace.
Page 162 of 650

3 - 9
INSP
ADJ
CLUTCH ADJUSTMENT
NOTE:
Do not apply pressure more than specified
pressure.
Radiator should be filled fully.
4. Inspect:
Pressure
Impossible to maintain the specified pres-
sure for 10 seconds → Repair.
Radiator
Radiator hose joint
Coolant leakage → Repair or replace.
Radiator hose
Swelling → Replace.
EC359020
CLUTCH ADJUSTMENT
1. Check:
Clutch lever free play a
Out of specification → Adjust.
Clutch lever free play
a:
8 ~ 13 mm (0.31 ~ 0.51 in)
2. Adjust:
Clutch lever free play
NOTE:
Before adjustment, expose the adjuster by
moving the boot 3 and cap 4 away.
Make minute adjustment on the lever side
using the adjuster 5.
After adjustment, check proper operation of
clutch lever. Clutch lever free play adjustment steps:
Loosen the locknut 1.
Turn the adjuster 2 until free play a is
within the specified limits.
Tighten the locknut.
T R..
Locknut:
4 Nm (0.4 m kg, 2.9 ft lb)