check YAMAHA YZ450F 2007 Owner's Manual
[x] Cancel search | Manufacturer: YAMAHA, Model Year: 2007, Model line: YZ450F, Model: YAMAHA YZ450F 2007Pages: 650, PDF Size: 20.67 MB
Page 164 of 650

3 - 10
INSP
ADJTHROTTLE CABLE ADJUSTMENT/
THROTTLE LUBRICATION
3. Install:
Cap 1
Boot 2
NOTE:
Place the tip a of the cap in the boot.
EC35A001
THROTTLE CABLE ADJUSTMENT
1. Check:
Throttle grip free play a
Out of specification → Adjust.
2. Adjust:
Throttle grip free play
Throttle grip free play
a:
3 ~ 5 mm (0.12 ~ 0.20 in)
Throttle grip free play adjustment steps:
Slide the adjuster cover.
Loosen the locknut 1.
Turn the adjuster 2 until the specified free
play is obtained.
Tighten the locknut.
T R..
Locknut:
4 Nm (0.4 m kg, 2.9 ft lb)
NOTE:
Before adjusting the throttle cable free play,
the engine idle speed should be adjusted.
WARNING
After adjusting, turn the handlebar to
right and left and make sure that the
engine idling does not run faster.
1 2
THROTTLE LUBRICATION
1. Remove:
Cover (throttle cable cap) 1
Cover (grip cap) 2
Throttle cable cap 3
Page 166 of 650

3 - 11
INSP
ADJHOT STARTER LEVER ADJUSTMENT/
AIR FILTER CLEANING
2. Apply:
Lithium soap base grease
On the throttle cable end a.
3. Install:
Throttle cable cap
Screw (throttle cable cap)
Cover (grip cap)
Cover (throttle cable cap)
HOT STARTER LEVER ADJUSTMENT
1. Check:
Hot starter lever free play a
Out of specification → Adjust.
2. Adjust:
Hot starter lever free play
NOTE:
After adjustment, check proper operation of
hot starter.
EC35G040
AIR FILTER CLEANING
NOTE:
Proper air filter maintenance is the biggest key
to preventing premature engine wear and
damage.
CAUTION:
Never run the engine without the air filter
element in place; this would allow dirt and
dust to enter the engine and cause rapid
wear and possible engine damage.
1. Remove:
Seat
Fitting bolt 1
Washer 2
Air filter element 3
Filter guide 4
Hot starter lever free play
a:
3 ~ 6 mm (0.12 ~ 0.24 in)
Hot starter lever free play adjustment
steps:
Loosen the locknut 1.
Turn the adjuster 2 until free play a is
within the specified limits.
Tighten the locknut.
T R..
Locknut:
4 Nm (0.4 m kg, 2.9 ft lb)
T R..4 Nm (0.4 m · kg, 2.9 ft · lb)
Page 170 of 650

3 - 13
INSP
ADJ
7. Install:
Air filter element 1
Washer
Fitting bolt
NOTE:
Align the projection a on filter guide with the
hole b in air filter case.
T R..2 Nm (0.2 m · kg, 1.4 ft · lb)
ENGINE OIL LEVEL INSPECTION
1. Stand the machine on a level surface.
NOTE:
When checking the oil level make sure that
the machine is upright.
Place the machine on a suitable stand.
WARNING
Never remove the oil tank cap just after
high speed operation. The heated oil could
spurt out. causing danger. Wait until the oil
cools down to approximately 70 °C (158 °F).
2. Idle the engine more than 3 minutes while
keeping the machine upright. Then stop the
engine and inspect the oil level.
3. Remove:
Oil tank cap 1
ENGINE OIL LEVEL INSPECTION
Page 172 of 650

3 - 14
INSP
ADJ
ENGINE OIL LEVEL INSPECTION
4. Inspect:
Oil level
Check that the engine oil is above the
level mark a and that the oil does not
come out when the check bolt 1 is
removed.
Below the level mark a → Add oil
through the filler cap hole until it is above
the level mark a.
Oil comes out at the check bolt → Drain
the oil until it stops coming out.
NOTE:
When inspecting the oil level, do not screw the
oil level gauge into the oil tank.
Insert the gauge lightly.
(For USA and CDN)
CAUTION:
Do not add any chemical additives.
Engine oil also lubricates the clutch and
additives could cause clutch slippage.
Do not allow foreign material to enter the
crankcase.
(Except for USA and CDN)
CAUTION:
Do not add any chemical additives or use
oils with a grade of CD
a or higher.
Do not use oils labeled “ENERGY CON-
SERVING II”
b or higher. Engine oil also
lubricates the clutch and additives could
cause clutch slippage.
Do not allow foreign materials to enter the
crankcase.
Recommended oil:
Yamalube 4, SAE10W30 or
SAE 20W40
Yamalube 4-R, SAE10W50
API service SG type or higher
JASO standard MA
Recommended oil:
SAE10W30, SAE10W40,
SAE15W40, SAE20W40 or
SAE20W50
API service SG type or higher
JASO standard MA
-20 -10 0 10 20 30 40 50
˚C 0 10 30 50 70 90 110 130
˚F
YAMALUBE 4(10W-30) or SAE 10W-30
YAMALUBE 4(20W-40) or SAE 20W-40
YAMALUBE 4-R(10W-50) or SAE 10W-50
-20 -10 0 10 20 30 40 50
˚C
SAE 10W-30
SAE 10W-40
SAE 15W-40
SAE 20W-40
SAE 20W-50
a
b
Page 176 of 650

3 - 16
INSP
ADJ
ENGINE OIL REPLACEMENT
4. If the oil filter is to be replaced during this
oil change, remove the following parts and
reinstall them.
Replacement steps:
Remove the oil filter cover 1 and oil filter
element 2.
Check the O-rings 3, if cracked or dam-
aged, replace them with a new one.
Install the oil filter element and oil filter
cover.
T R..
Oil filter cover:
10 Nm (1.0 m kg, 7.2 ft lb)
5. Install:
Gaskets
Oil filter drain bolt
Drain bolt (crankcase right)
Drain bolt (crankcase left)
New
T R..10 Nm (1.0 m · kg, 7.2 ft · lb)
T R..20 Nm (2.0 m · kg, 14 ft · lb)
T R..20 Nm (2.0 m · kg, 14 ft · lb)
6. Fill:
Engine oil
Oil quantity:
Periodic oil change:
0.95 L (0.84 Imp qt, 1.00 US qt)
With oil filter replacement:
1.0 L (0.88 Imp qt, 1.06 US qt)
Total amount:
1.2 L (1.06 Imp qt, 1.27 US qt)
Page 178 of 650

3 - 17
INSP
ADJ
PILOT SCREW ADJUSTMENT
7. Install:
Oil filler cap
8. Inspect:
Engine (for oil leaks)
Oil level
Refer to “ENGINE OIL LEVEL INSPEC-
TION”.
9. Check:
Oil pressure
Checking steps:
Slightly loosen the oil gallery bolt 1.
Start the engine and keep it idling until oil
starts to seep from the oil gallery bolt. If no
oil comes out after one minute, turn the
engine off so it will not seize.
Check oil passages, oil filter and oil pump
for damage or leakage.
Start the engine after solving the prob-
lem(s) and recheck the oil pressure.
Tighten the oil gallery bolt to specification.
T R..
Oil gallery bolt:
10 Nm (1.0 m kg, 7.2 ft lb)
PILOT SCREW ADJUSTMENT
1. Adjust:
Pilot screw 1
Adjusting steps:
NOTE:
To optimize the fuel flow at a smaller throttle
opening, each machine’s pilot screw has
been individually set at the factory. Before
adjusting the pilot screw, turn it in fully and
count the number of turns. Record this num-
ber as the factory-set number of turns out.
Turn in the pilot screw until it is lightly
seated.
Turn out the pilot screw by the factory-set
number of turns.
Pilot screw (example):
1-1/4 turns out
Page 180 of 650

3 - 18
INSP
ADJIDLE SPEED ADJUSTMENT/
VALVE CLEARANCE ADJUSTMENT
EC35M021
IDLE SPEED ADJUSTMENT
1. Start the engine and thoroughly warm it up.
2. Adjust:
Idle speed
VALVE CLEARANCE ADJUSTMENT
NOTE:
The valve clearance should be adjusted
when the engine is cool to the touch.
The piston must be at Top Dead Center
(T.D.C.) on compression stroke to check or
adjust the valve clearance.
1. Remove:
Seat
Fuel tank
Refer to “SEAT, FUEL TANK AND SIDE
COVERS” section in the CHAPTER 4.
2. Remove:
Spark plug
Engine upper bracket
Hot starter plunger
Refer to “CARBURETOR” section in the
CHAPTER 4.
Cylinder head cover
Refer to “CAMSHAFTS” section in the
CHAPTER 4. Adjustment steps:
Adjust the pilot screw.
Refer to “PILOT SCREW ADJUSTMENT”
section.
Turn the throttle stop screw 1 until the
specified engine idling speed.
NOTE:
Using a digital engine tachometer for idle
speed adjustment, detect the engine idling
speed by bringing the sensing element c of
the engine tachometer close to the ignition
coil 2.
To increase idle speed
→
Turn the throttle stop screw
1 in
a.
To decrease idle speed
→
Turn the throttle stop screw
1 out
b.
Engine idling speed:
1,900 ~ 2,100 r/min
c2
Page 182 of 650

3 - 19
INSP
ADJ
VALVE CLEARANCE ADJUSTMENT
3. Remove:
Timing plug 1
Straight plug 2
O-ring
4. Check:
Valve clearance
Out of specification → Adjust.
Valve clearance (cold):
Intake valve:
0.10 ~ 0.15 mm
(0.0039 ~ 0.0059 in)
Exhaust valve:
0.20 ~ 0.25 mm
(0.0079 ~ 0.0098 in)
Checking steps:
Turn the crankshaft counterclockwise with
a wrench.
Align the T.D.C. mark a on the rotor with
the align mark b on the crankcase cover
when piston is at T.D.C. on compression
stroke.
NOTE:
In order to be sure that the piston is at Top
Dead Center, the punch mark c on the
exhaust camshaft and the punch mark d on
the intake camshaft must align with the cyl-
inder head surface, as shown in the illustra-
tion.
Measure the valve clearance e using a
feeler gauge 1.
NOTE:
Record the measured reading if the clear-
ance is incorrect.
Page 188 of 650

3 - 22
INSP
ADJ
6. Install:
All removed parts
NOTE:
Install all removed parts in reversed order of
their removal.Install the timing chain tensioner.
Refer to “CAMSHAFTS” section in the
CHAPTER 4.
NOTE:
Turn the crankshaft counterclockwise sev-
eral turns so that the installed parts settle
into the right position.
Recheck the valve clearance.
If the clearance is still incorrect, repeat all
the clearance adjustment steps until the
specified clearance is obtained.
VALVE CLEARANCE ADJUSTMENT
Page 196 of 650
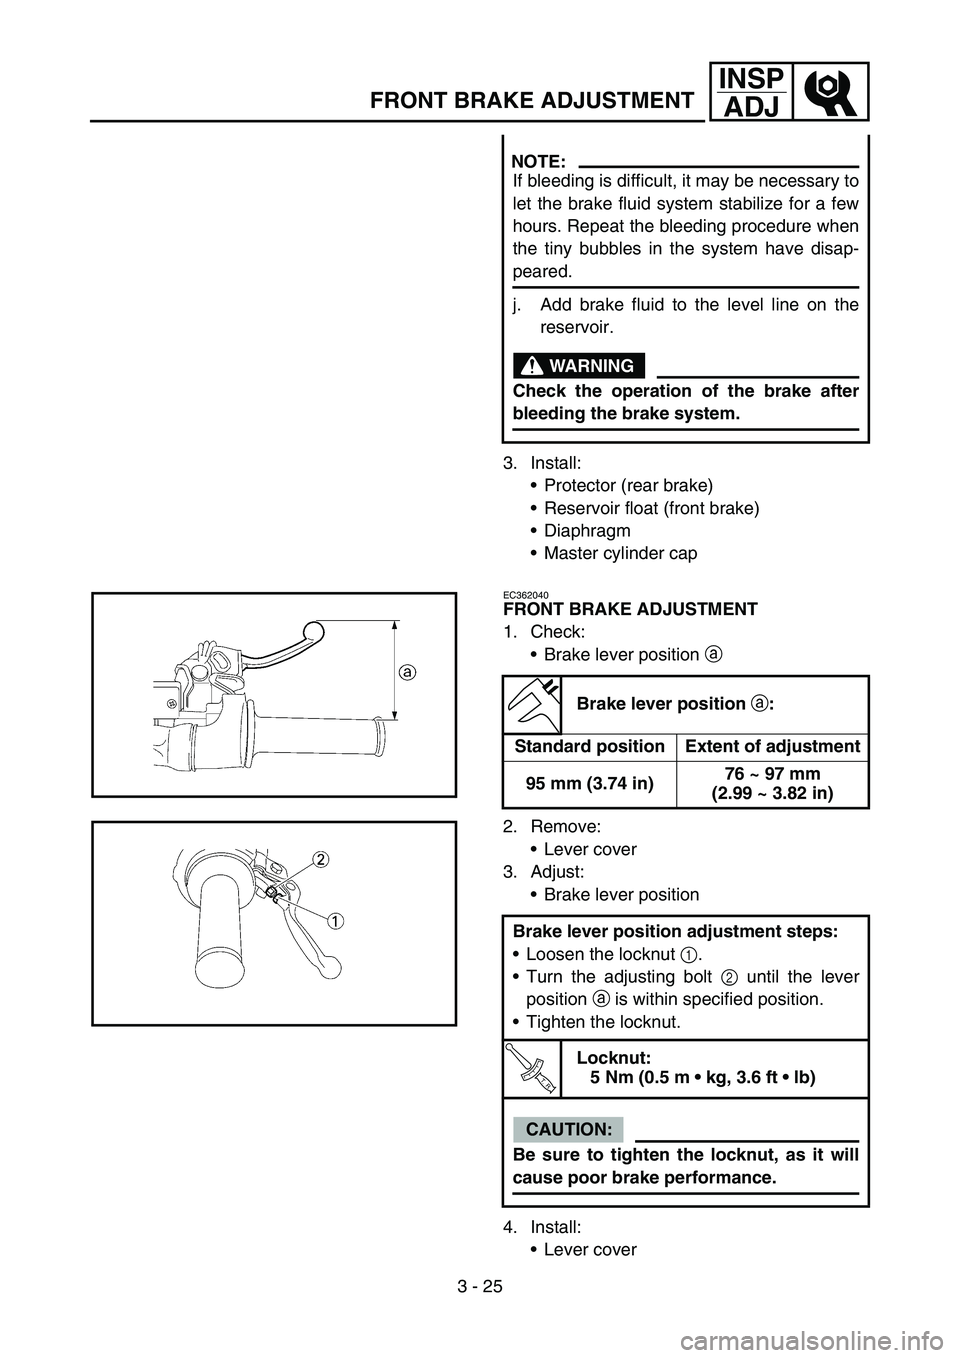
3 - 25
INSP
ADJ
FRONT BRAKE ADJUSTMENT
3. Install:
Protector (rear brake)
Reservoir float (front brake)
Diaphragm
Master cylinder cap
NOTE:
If bleeding is difficult, it may be necessary to
let the brake fluid system stabilize for a few
hours. Repeat the bleeding procedure when
the tiny bubbles in the system have disap-
peared.
j. Add brake fluid to the level line on the
reservoir.
WARNING
Check the operation of the brake after
bleeding the brake system.
EC362040
FRONT BRAKE ADJUSTMENT
1. Check:
Brake lever position a
Brake lever position
a:
Standard position Extent of adjustment
95 mm (3.74 in)76 ~ 97 mm
(2.99 ~ 3.82 in)
2. Remove:
Lever cover
3. Adjust:
Brake lever position
4. Install:
Lever cover Brake lever position adjustment steps:
Loosen the locknut 1.
Turn the adjusting bolt 2 until the lever
position a is within specified position.
Tighten the locknut.
T R..
Locknut:
5 Nm (0.5 m kg, 3.6 ft lb)
CAUTION:
Be sure to tighten the locknut, as it will
cause poor brake performance.