check YAMAHA YZ450F 2007 Service Manual
[x] Cancel search | Manufacturer: YAMAHA, Model Year: 2007, Model line: YZ450F, Model: YAMAHA YZ450F 2007Pages: 650, PDF Size: 20.67 MB
Page 268 of 650

4 - 14
ENGCARBURETOR
EC464511
Float height
1. Measure:
Float height a
Out of specification → Adjust.
Float height:
8.0 mm (0.31 in)
Measurement and adjustment steps:
Hold the carburetor in an upside down
position.
NOTE:
Slowly tilt the carburetor in the opposite
direction, then take the measurement
when the needle valve aligns with the float
arm.
If the carburetor is level, the weight of the
float will push in the needle valve, resulting
in an incorrect measurement.
Measure the distance between the mating
surface of the float chamber and top of the
float using a vernier calipers.
NOTE:
The float arm should be resting on the nee-
dle valve, but not compressing the needle
valve.
If the float height is not within specification,
inspect the valve seat and needle valve.
If either is worn, replace them both.
If both are fine, adjust the float height by
bending the float tab b on the float.
Recheck the float height.
EC464600
Float
1. Inspect:
Float 1
Damage → Replace.
Page 276 of 650

4 - 18
ENGCARBURETOR
11. Install:
Needle valve 1
Float 2
Float pin 3
NOTE:
After installing the needle valve to the float,
install them to the carburetor.
Check the float for smooth movement.
12. Install:
Pilot screw 1
Spring 2
Washer 3
O-ring 4
Note the following installation points:
Turn in the pilot screw until it is lightly
seated.
Turn out the pilot screw by the number of
turns recorded before removing.
Pilot screw (example):
1-1/4 turns out
13. Install:
O-ring
Leak jet 1
Float chamber 2
Bolt (float chamber) 3
Cable holder (throttle stop screw cable)
4
Hose holder (carburetor breather hose)
5
Page 280 of 650

4 - 20
ENGCARBURETOR
Accelerator pump timing adjustment
Adjustment steps:
NOTE:
In order for the throttle valve height a to
achieve the specified value, tuck under the
throttle valve plate 1 the rod 2 etc. with the
same outer diameter as the specified value.
Throttle valve height:
1.25 mm (0.049 in)
Fully turn in the accelerator pump adjust-
ing screw 3.
Check that the link lever 4 has free play
b by pushing lightly on it.
Gradually turn out the adjusting screw
while moving the link lever until it has no
more free play.
Carburetor installation
1. Install:
Carburetor joint 1
T R..10 Nm (1.0 m · kg, 7.2 ft · lb)
2. Install:
Carburetor 1
NOTE:
Install the projection a between the carburetor
joint slots.
3. Install:
Hot starter plunger 1
1
T R..2 Nm (0.2 m · kg, 1.4 ft · lb)
Page 288 of 650

4 - 24
ENGCAMSHAFTS
REMOVAL POINTS
Camshaft
1. Remove:
Timing plug 1
Straight plug 2
2. Align:
“I” mark
With stationary pointer.
Checking steps:
Turn the crankshaft counterclockwise with
a wrench.
Align the “I” mark a on the rotor with the
stationary pointer b on the crankcase
cover. When the “I” mark is aligned with
the stationary pointer, the piston is at the
Top Dead Center (T.D.C.).
NOTE:
In order to be sure that the piston is at Top
Dead Center, the punch mark c on the
exhaust camshaft and the punch mark d
on the intake camshaft must align with the
cylinder head surface, as shown in the
illustration.
If there is no clearance, rotate the crank-
shaft counterclockwise one turn.
3. Loosen:
Tensioner cap bolt 1
4. Remove:
Timing chain tensioner 2
5. Remove:
Bolt (camshaft cap) 1
Camshaft caps 2
NOTE:
Remove the bolts (camshaft cap) in a criss-
cross pattern, working from the outside in.
CAUTION:
The bolts (camshaft cap) must be removed
evenly to prevent damage to the cylinder
head, camshafts or camshaft caps.
1
2
1
2
Page 294 of 650

4 - 27
ENGCAMSHAFTS
Decompression system
1. Check:
Decompression system
Checking steps:
Check that the decompressor cam 1
moves smoothly.
Check that the decompressor lever pin 2
projects from the camshaft.
Timing chain tensioner
1. Check:
While pressing the tensioner rod lightly
with fingers, use a thin screwdriver 1
and wind the tensioner rod up fully clock-
wise.
When releasing the screwdriver by press-
ing lightly with fingers, make sure that the
tensioner rod will come out smoothly.
If not, replace the tensioner assembly.
ASSEMBLY AND INSTALLATION
1. Install:
Exhaust camshaft 1
Intake camshaft 2
Installation steps:
Turn the crankshaft counterclockwise until
the “I” mark a on the rotor is aligned with
the stationary pointer b on the crankcase
cover.
NOTE:
Apply the molybdenum disulfide oil on the
camshafts.
Apply the engine oil on the decompression
system.
Page 298 of 650

4 - 29
ENG
With the rod fully wound and the chain ten-
sioner UP mark a facing upward, install
the gasket 1, the chain tensioner 2 and
the gasket 3, and tighten the bolt 4 to the
specified torque.
T R..
Bolt (timing chain tensioner):
10 Nm (1.0 m kg, 7.2 ft lb)
Release the screwdriver, check the ten-
sioner rod to come out and tighten the
gasket 5 and the cap bolt 6 to the speci-
fied torque.
T R..
Tensioner cap bolt:
7 Nm (0.7 m kg, 5.1 ft lb)
6
5New
3. Turn:
Crankshaft
Counterclockwise several turns
4. Check:
Rotor “I” mark
Align with the crankcase stationary
pointer.
Camshaft match marks
Align with the cylinder head surface.
Out of alignment → Adjust.
CAMSHAFTS
Page 310 of 650

4 - 35
ENGVALVES AND VALVE SPRINGS
REMOVAL POINTS
Valve lifter and valve cotter
1. Remove:
Valve lifters 1
Pads 2
NOTE:
Identify each lifter 1 and pad 2 position very
carefully so that they can be reinstalled in their
original place.
2. Check:
Valve sealing
Leakage at the valve seat → Inspect the
valve face, valve seat and valve seat
width.
Checking steps:
Pour a clean solvent 1 into the intake and
exhaust ports.
Check that the valve seals properly.
There should be no leakage at the valve
seat 2.
3. Remove:
Valve cotters
NOTE:
Attach a valve spring compressor 1 between
the valve spring retainer and the cylinder head
to remove the valve cotters.
Valve spring compressor:
YM-4019/90890-04019
Page 342 of 650
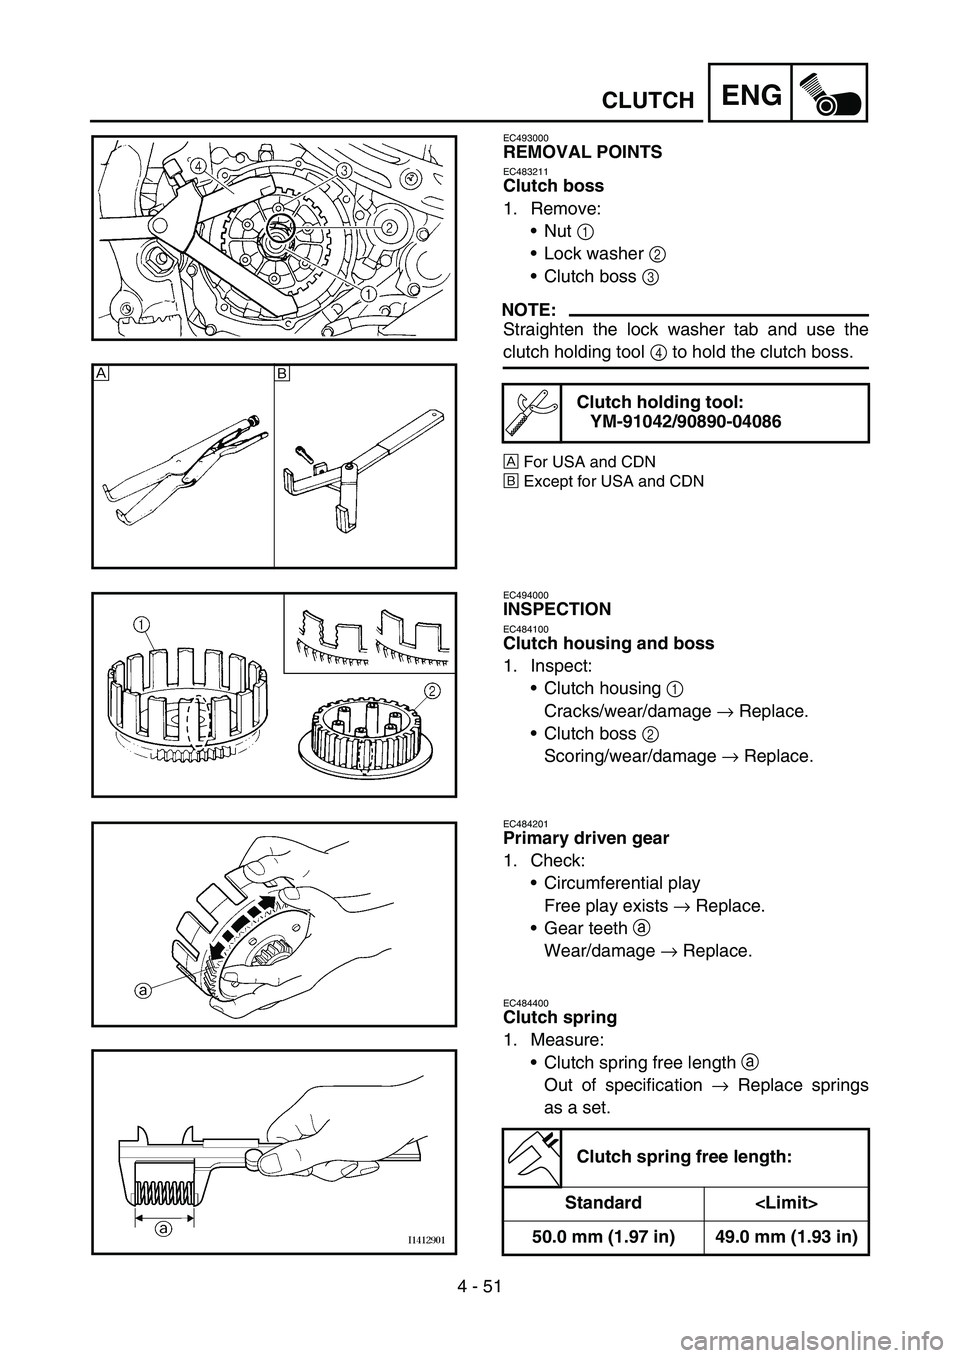
4 - 51
ENGCLUTCH
EC493000
REMOVAL POINTS
EC483211
Clutch boss
1. Remove:
Nut 1
Lock washer 2
Clutch boss 3
NOTE:
Straighten the lock washer tab and use the
clutch holding tool 4 to hold the clutch boss.
ÈFor USA and CDN
ÉExcept for USA and CDN
Clutch holding tool:
YM-91042/90890-04086
È
É
EC494000
INSPECTION
EC484100
Clutch housing and boss
1. Inspect:
Clutch housing 1
Cracks/wear/damage → Replace.
Clutch boss 2
Scoring/wear/damage → Replace.
EC484201
Primary driven gear
1. Check:
Circumferential play
Free play exists → Replace.
Gear teeth
a
Wear/damage → Replace.
EC484400
Clutch spring
1. Measure:
Clutch spring free length
a
Out of specification → Replace springs
as a set.
Clutch spring free length:
Standard
50.0 mm (1.97 in) 49.0 mm (1.93 in)
Page 376 of 650

4 - 68
ENGOIL PUMP
INSPECTION
Oil pump
1. Inspect:
Oil pump drive gear
Oil pump driven gear
Rotor housing
Oil pump cover
Cracks/wear/damage → Replace.
2. Measure:
Tip clearance a
Between the inner rotor 1 and the outer
rotor 2.
Tip clearance b
Between the outer rotor 2 and the rotor
housing 3.
Out of specification → Replace the oil
pump.
Tip clearance
a:
0.12 mm or less
(0.0047 in or less)
Tip clearance
b:
0.09 ~ 0.17 mm (0.0035 ~ 0.0067 in)
Side clearance
c:
0.03 ~ 0.10 mm (0.0012 ~ 0.0039 in)
3. Check:
Unsmooth → Repeat steps #1 and #2 or
replace the defective parts.
ASSEMBLY AND INSTALLATION
Oil pump
1. Install:
Oil pump drive shaft 1
Washer 2
Pin 3
Inner rotor 1 4
NOTE:
Apply the engine oil on the oil pump drive
shaft and inner rotor 1.
Fit the pin into the groove in the inner rotor 1.
Page 384 of 650

4 - 72
ENGKICK AXLE AND SHIFT SHAFT
REMOVAL POINTS
EC4B3101
Kick axle assembly
1. Remove:
Kick axle assembly 1
NOTE:
Unhook the torsion spring 2 from the hole a
in the crankcase.
EC4C3101
Shift guide and shift lever assembly
1. Remove:
Bolt (shift guide)
Shift guide 1
Shift lever assembly 2
NOTE:
The shift lever assembly is disassembled at
the same time as the shift guide.
EC4N3100
Segment
1. Remove:
Bolt (segment) 1
Segment 2
NOTE:
Turn the segment counterclockwise until it
stops and loosen the bolt.
CAUTION:
If the segment gets an impact, it may be
damaged. Take care not to give an impact
to the segment when removing the bolt.
INSPECTION
EC4C4200
Kick axle and ratchet wheel
1. Check:
Ratchet wheel 1 smooth movement
Unsmooth movement → Replace.
Kick axle 2
Wear/damage → Replace.
Spring 3
Broken → Replace.