YAMAHA YZ450F 2010 Owners Manual
Manufacturer: YAMAHA, Model Year: 2010, Model line: YZ450F, Model: YAMAHA YZ450F 2010Pages: 230, PDF Size: 14.09 MB
Page 121 of 230
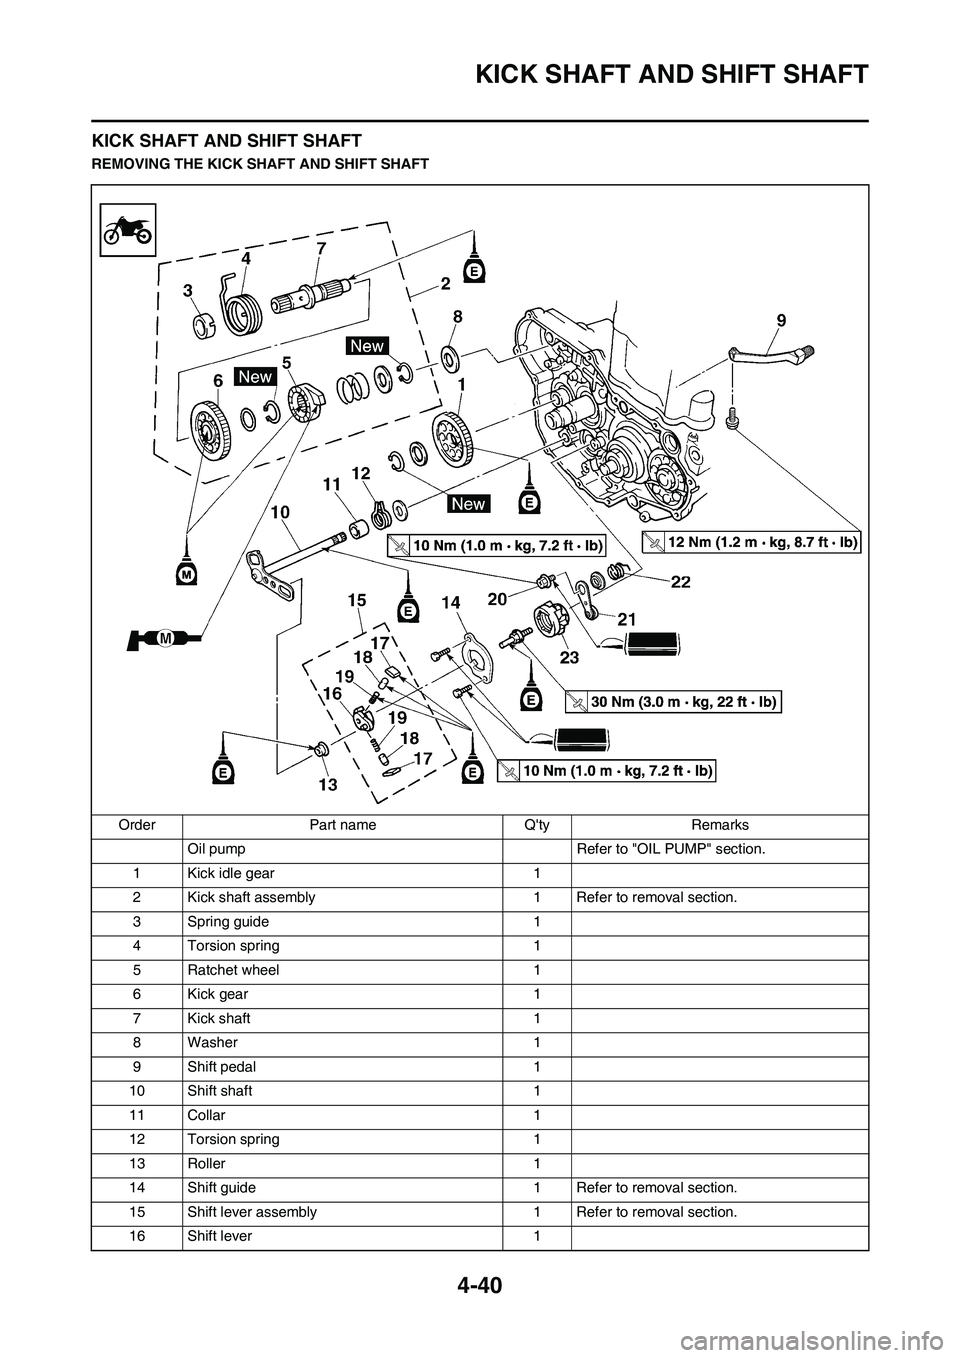
4-40
KICK SHAFT AND SHIFT SHAFT
KICK SHAFT AND SHIFT SHAFT
REMOVING THE KICK SHAFT AND SHIFT SHAFT
Order Part name Q'ty Remarks
Oil pump Refer to "OIL PUMP" section.
1 Kick idle gear 1
2 Kick shaft assembly 1 Refer to removal section.
3 Spring guide 1
4 Torsion spring 1
5 Ratchet wheel 1
6 Kick gear 1
7 Kick shaft 1
8 Washer 1
9 Shift pedal 1
10 Shift shaft 1
11 Collar 1
12 Torsion spring 1
13 Roller 1
14 Shift guide 1 Refer to removal section.
15 Shift lever assembly 1 Refer to removal section.
16 Shift lever 1
Page 122 of 230
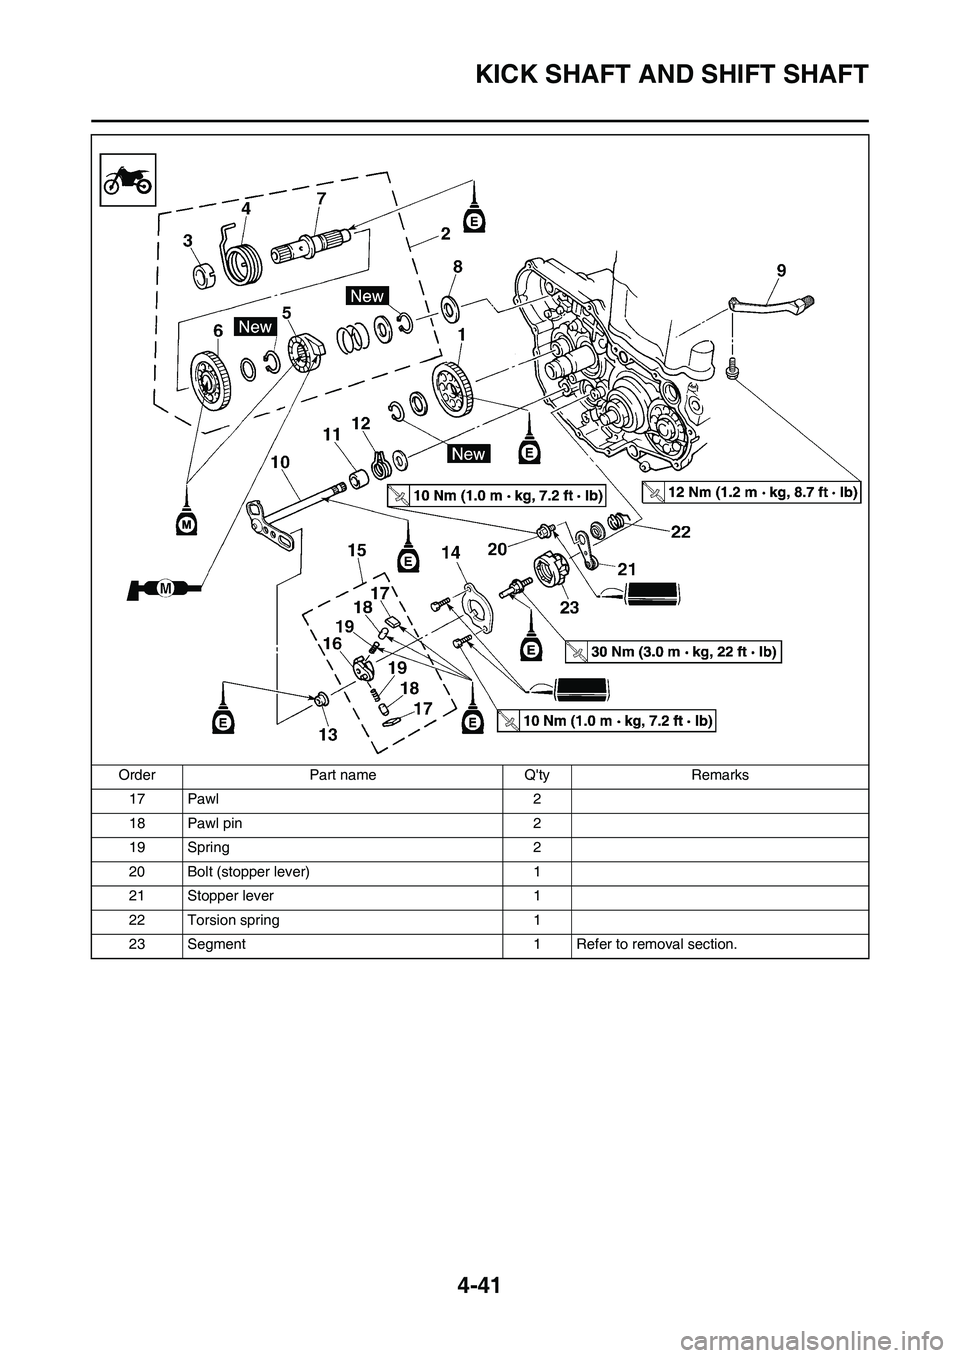
4-41
KICK SHAFT AND SHIFT SHAFT
17 Pawl 2
18 Pawl pin 2
19 Spring 2
20 Bolt (stopper lever) 1
21 Stopper lever 1
22 Torsion spring 1
23 Segment 1 Refer to removal section. Order Part name Q'ty Remarks
Page 123 of 230
4-42
KICK SHAFT AND SHIFT SHAFT
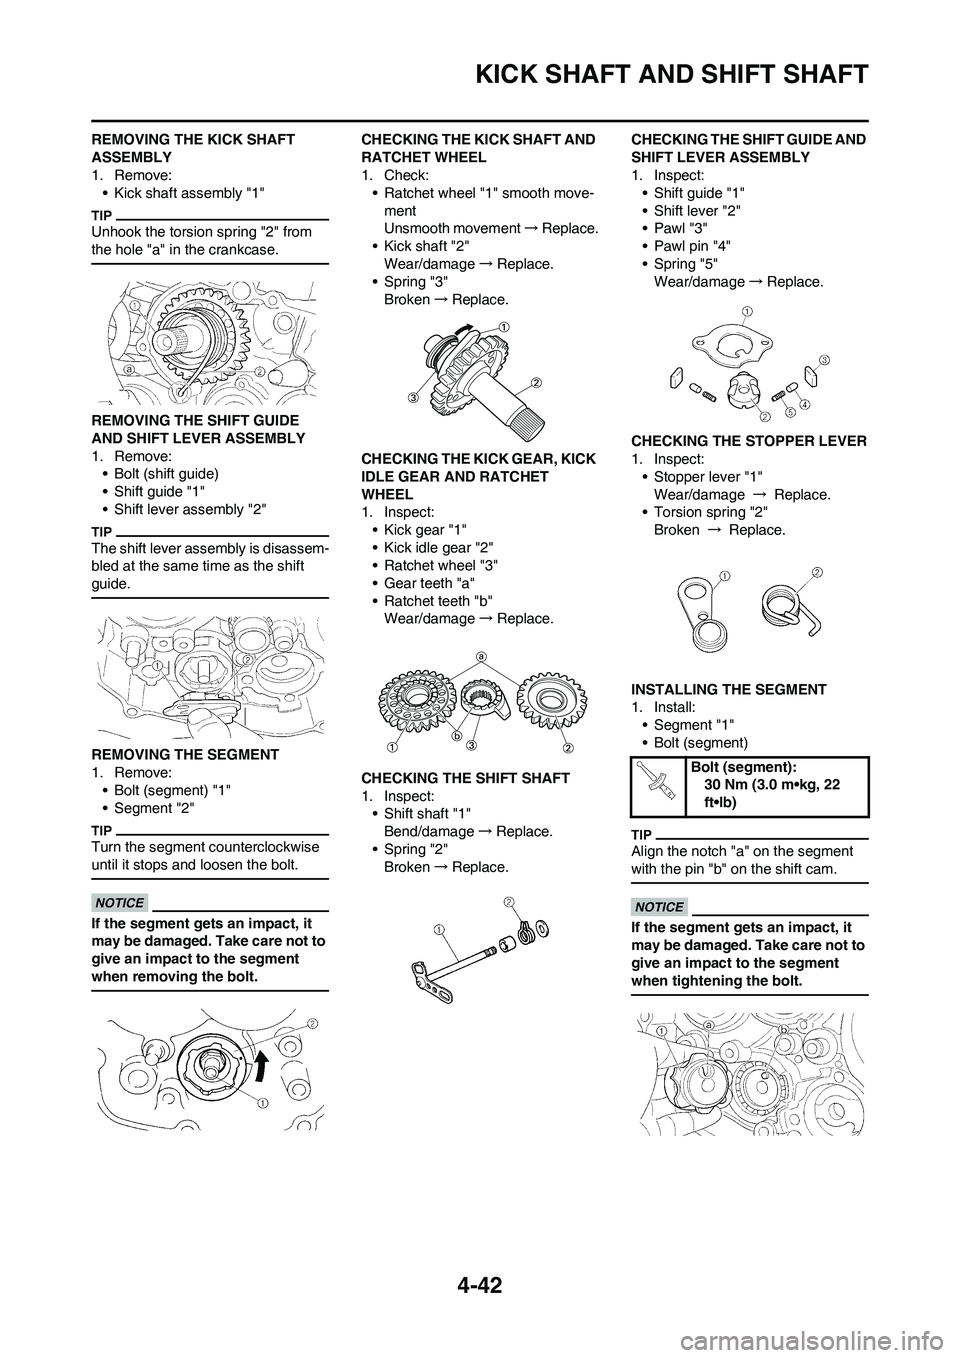
REMOVING THE KICK SHAFT
ASSEMBLY
1. Remove:
• Kick shaft assembly "1"
Unhook the torsion spring "2" from
the hole "a" in the crankcase.
REMOVING THE SHIFT GUIDE
AND SHIFT LEVER ASSEMBLY
1. Remove:
• Bolt (shift guide)
• Shift guide "1"
• Shift lever assembly "2"
The shift lever assembly is disassem-
bled at the same time as the shift
guide.
REMOVING THE SEGMENT
1. Remove:
• Bolt (segment) "1"
• Segment "2"
Turn the segment counterclockwise
until it stops and loosen the bolt.
If the segment gets an impact, it
may be damaged. Take care not to
give an impact to the segment
when removing the bolt.
CHECKING THE KICK SHAFT AND
RATCHET WHEEL
1. Check:
• Ratchet wheel "1" smooth move-
ment
Unsmooth movement→Replace.
• Kick shaft "2"
Wear/damage→Replace.
• Spring "3"
Broken→Replace.
CHECKING THE KICK GEAR, KICK
IDLE GEAR AND RATCHET
WHEEL
1. Inspect:
• Kick gear "1"
• Kick idle gear "2"
• Ratchet wheel "3"
• Gear teeth "a"
• Ratchet teeth "b"
Wear/damage→Replace.
CHECKING THE SHIFT SHAFT
1. Inspect:
• Shift shaft "1"
Bend/damage→Replace.
• Spring "2"
Broken→Replace.CHECKING THE SHIFT GUIDE AND
SHIFT LEVER ASSEMBLY
1. Inspect:
• Shift guide "1"
• Shift lever "2"
•Pawl "3"
• Pawl pin "4"
• Spring "5"
Wear/damage→Replace.
CHECKING THE STOPPER LEVER
1. Inspect:
• Stopper lever "1"
Wear/damage → Replace.
• Torsion spring "2"
Broken → Replace.
INSTALLING THE SEGMENT
1. Install:
• Segment "1"
• Bolt (segment)
Align the notch "a" on the segment
with the pin "b" on the shift cam.
If the segment gets an impact, it
may be damaged. Take care not to
give an impact to the segment
when tightening the bolt.
Bolt (segment):
30 Nm (3.0 m•kg, 22
ft•lb)
Page 124 of 230
4-43
KICK SHAFT AND SHIFT SHAFT
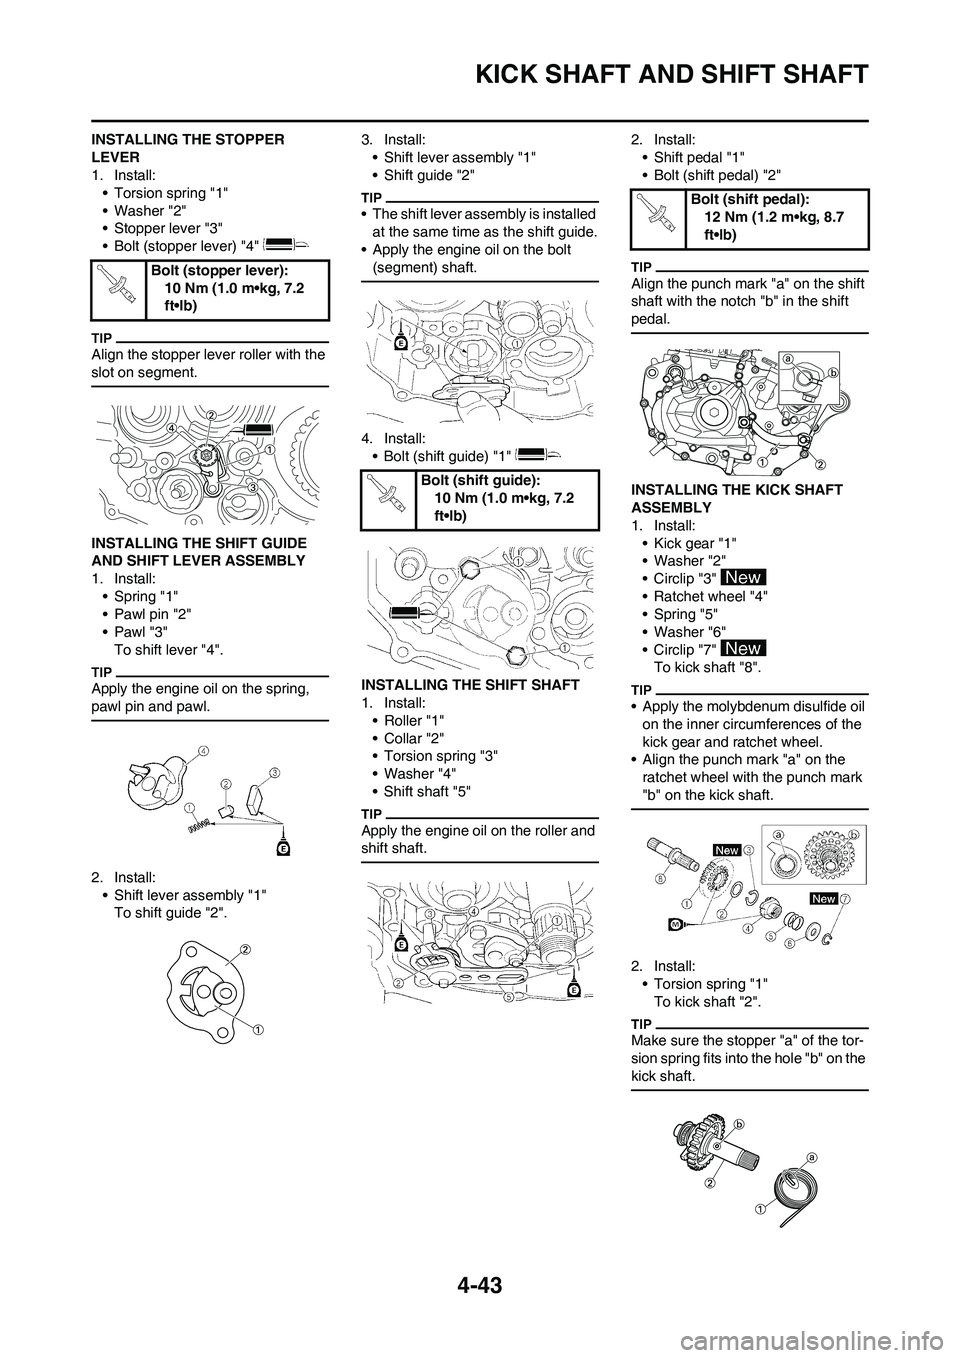
INSTALLING THE STOPPER
LEVER
1. Install:
• Torsion spring "1"
• Washer "2"
• Stopper lever "3"
• Bolt (stopper lever) "4"
Align the stopper lever roller with the
slot on segment.
INSTALLING THE SHIFT GUIDE
AND SHIFT LEVER ASSEMBLY
1. Install:
• Spring "1"
• Pawl pin "2"
•Pawl "3"
To shift lever "4".
Apply the engine oil on the spring,
pawl pin and pawl.
2. Install:
• Shift lever assembly "1"
To shift guide "2".3. Install:
• Shift lever assembly "1"
• Shift guide "2"
• The shift lever assembly is installed
at the same time as the shift guide.
• Apply the engine oil on the bolt
(segment) shaft.
4. Install:
• Bolt (shift guide) "1"
INSTALLING THE SHIFT SHAFT
1. Install:
• Roller "1"
• Collar "2"
• Torsion spring "3"
• Washer "4"
• Shift shaft "5"
Apply the engine oil on the roller and
shift shaft.
2. Install:
• Shift pedal "1"
• Bolt (shift pedal) "2"
Align the punch mark "a" on the shift
shaft with the notch "b" in the shift
pedal.
INSTALLING THE KICK SHAFT
ASSEMBLY
1. Install:
• Kick gear "1"
• Washer "2"
• Circlip "3"
• Ratchet wheel "4"
• Spring "5"
• Washer "6"
• Circlip "7"
To kick shaft "8".
• Apply the molybdenum disulfide oil
on the inner circumferences of the
kick gear and ratchet wheel.
• Align the punch mark "a" on the
ratchet wheel with the punch mark
"b" on the kick shaft.
2. Install:
• Torsion spring "1"
To kick shaft "2".
Make sure the stopper "a" of the tor-
sion spring fits into the hole "b" on the
kick shaft.
Bolt (stopper lever):
10 Nm (1.0 m•kg, 7.2
ft•lb)
Bolt (shift guide):
10 Nm (1.0 m•kg, 7.2
ft•lb)
Bolt (shift pedal):
12 Nm (1.2 m•kg, 8.7
ft•lb)
Page 125 of 230
4-44
KICK SHAFT AND SHIFT SHAFT
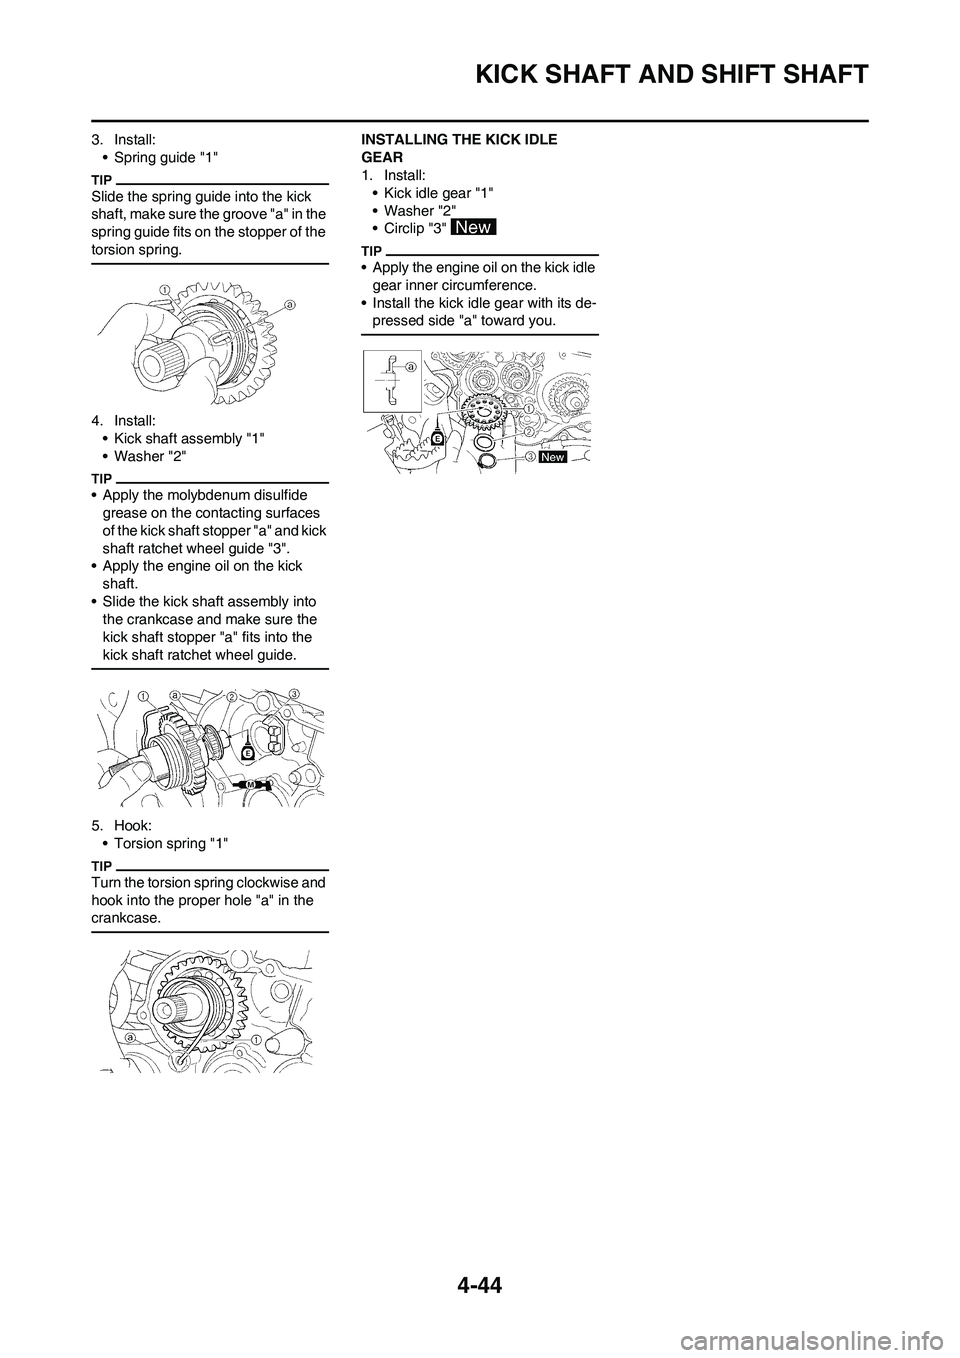
3. Install:
• Spring guide "1"
Slide the spring guide into the kick
shaft, make sure the groove "a" in the
spring guide fits on the stopper of the
torsion spring.
4. Install:
• Kick shaft assembly "1"
• Washer "2"
• Apply the molybdenum disulfide
grease on the contacting surfaces
of the kick shaft stopper "a" and kick
shaft ratchet wheel guide "3".
• Apply the engine oil on the kick
shaft.
• Slide the kick shaft assembly into
the crankcase and make sure the
kick shaft stopper "a" fits into the
kick shaft ratchet wheel guide.
5. Hook:
• Torsion spring "1"
Turn the torsion spring clockwise and
hook into the proper hole "a" in the
crankcase.
INSTALLING THE KICK IDLE
GEAR
1. Install:
• Kick idle gear "1"
• Washer "2"
• Circlip "3"
• Apply the engine oil on the kick idle
gear inner circumference.
• Install the kick idle gear with its de-
pressed side "a" toward you.
Page 126 of 230

4-45
AC MAGNETO
AC MAGNETO
REMOVING THE AC MAGNETO
Order Part name Q'ty Remarks
Seat Refer to "SEAT AND SIDE COVERS" sec-
tion.
Fuel tank Refer to "FUEL TANK" section in the
CHAPER 6.
Disconnect the AC magneto lead
1 Left crankcase cover 1
2 Gasket 1
3 Dowel pin 2
4 Nut (rotor) 1 Refer to removal section.
5 Rotor 1 Refer to removal section.
6 Stator 1
7 Woodruff key 1
Page 127 of 230
4-46
AC MAGNETO
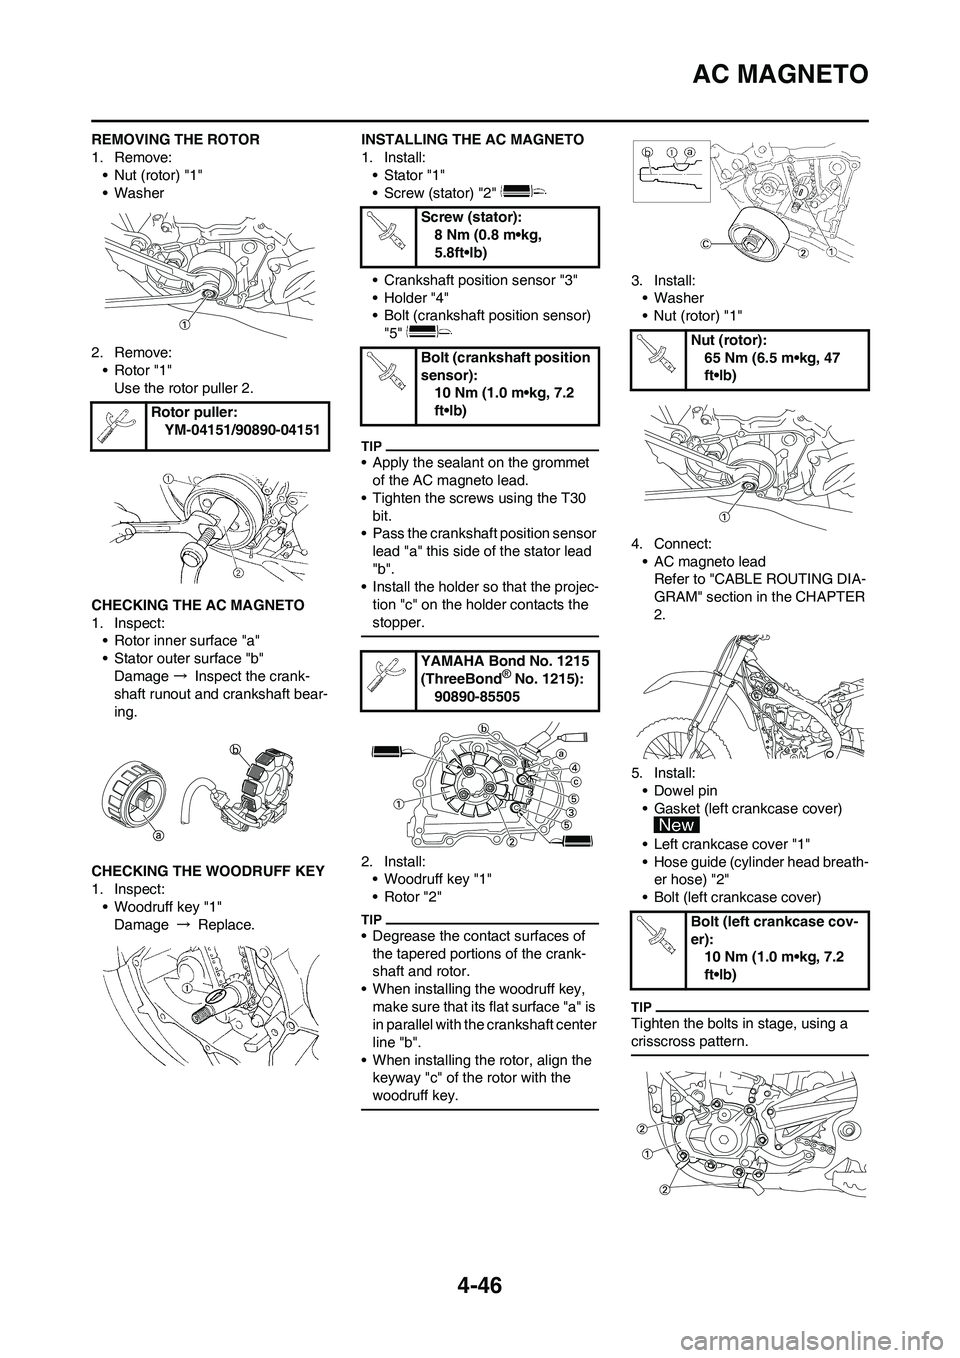
REMOVING THE ROTOR
1. Remove:
• Nut (rotor) "1"
• Washer
2. Remove:
• Rotor "1"
Use the rotor puller 2.
CHECKING THE AC MAGNETO
1. Inspect:
• Rotor inner surface "a"
• Stator outer surface "b"
Damage → Inspect the crank-
shaft runout and crankshaft bear-
ing.
CHECKING THE WOODRUFF KEY
1. Inspect:
• Woodruff key "1"
Damage → Replace.INSTALLING THE AC MAGNETO
1. Install:
• Stator "1"
• Screw (stator) "2"
• Crankshaft position sensor "3"
• Holder "4"
• Bolt (crankshaft position sensor)
"5"
• Apply the sealant on the grommet
of the AC magneto lead.
• Tighten the screws using the T30
bit.
• Pass the crankshaft position sensor
lead "a" this side of the stator lead
"b".
• Install the holder so that the projec-
tion "c" on the holder contacts the
stopper.
2. Install:
• Woodruff key "1"
• Rotor "2"
• Degrease the contact surfaces of
the tapered portions of the crank-
shaft and rotor.
• When installing the woodruff key,
make sure that its flat surface "a" is
in parallel with the crankshaft center
line "b".
• When installing the rotor, align the
keyway "c" of the rotor with the
woodruff key.
3. Install:
• Washer
• Nut (rotor) "1"
4. Connect:
• AC magneto lead
Refer to "CABLE ROUTING DIA-
GRAM" section in the CHAPTER
2.
5. Install:
• Dowel pin
• Gasket (left crankcase cover)
• Left crankcase cover "1"
• Hose guide (cylinder head breath-
er hose) "2"
• Bolt (left crankcase cover)
Tighten the bolts in stage, using a
crisscross pattern.
Rotor puller:
YM-04151/90890-04151
Screw (stator):
8 Nm (0.8 m•kg,
5.8ft•lb)
Bolt (crankshaft position
sensor):
10 Nm (1.0 m•kg, 7.2
ft•lb)
YAMAHA Bond No. 1215
(ThreeBond
® No. 1215):
90890-85505
Nut (rotor):
65 Nm (6.5 m•kg, 47
ft•lb)
Bolt (left crankcase cov-
er):
10 Nm (1.0 m•kg, 7.2
ft•lb)
Page 128 of 230
4-47
ENGINE REMOVAL
ENGINE REMOVAL
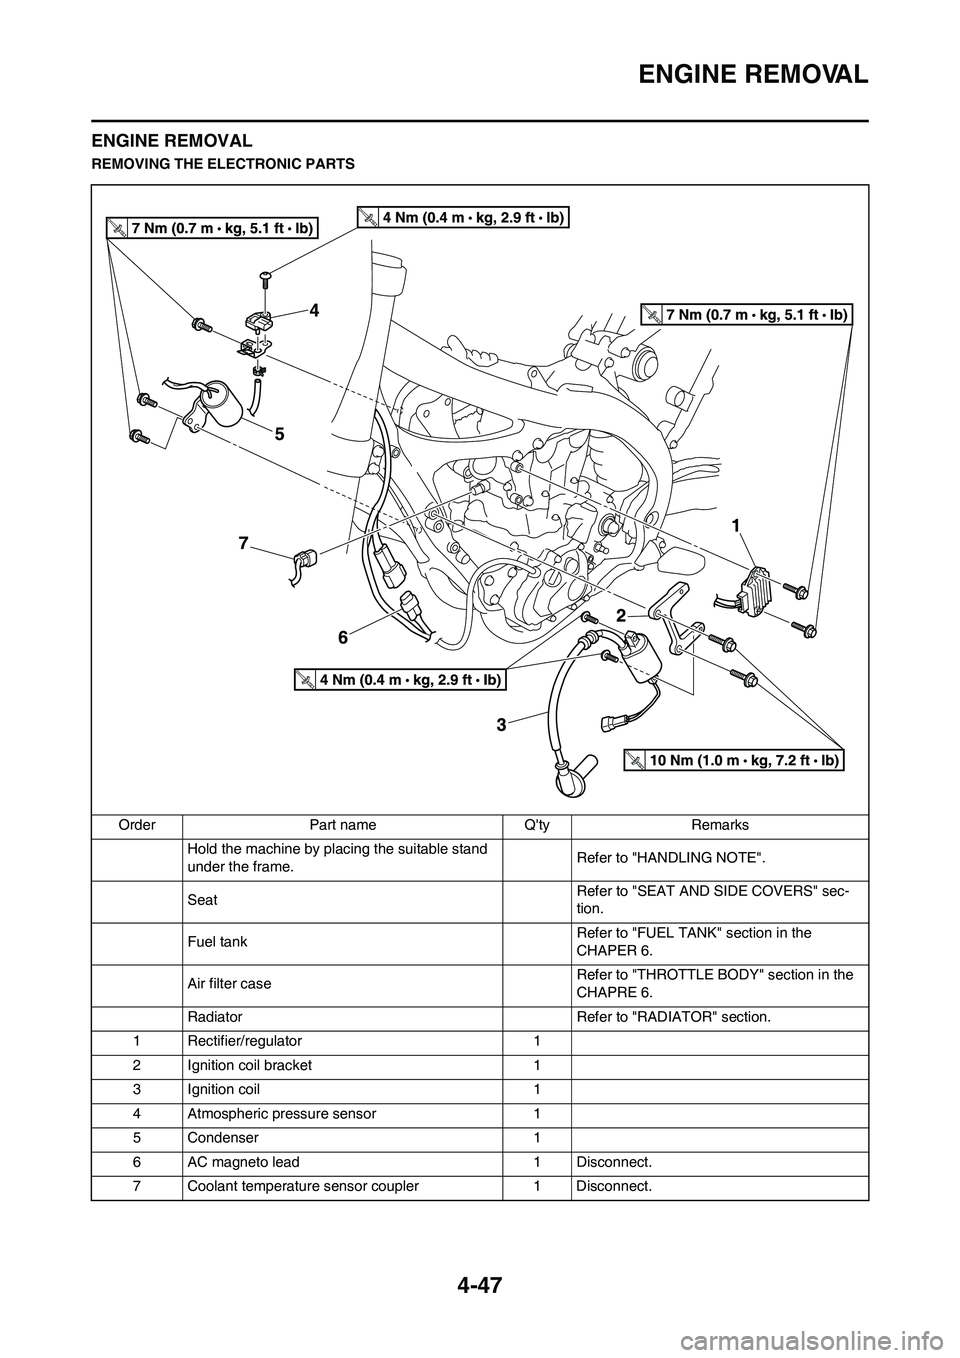
REMOVING THE ELECTRONIC PARTS
Order Part name Q'ty Remarks
Hold the machine by placing the suitable stand
under the frame.Refer to "HANDLING NOTE".
SeatRefer to "SEAT AND SIDE COVERS" sec-
tion.
Fuel tankRefer to "FUEL TANK" section in the
CHAPER 6.
Air filter caseRefer to "THROTTLE BODY" section in the
CHAPRE 6.
Radiator Refer to "RADIATOR" section.
1 Rectifier/regulator 1
2 Ignition coil bracket 1
3 Ignition coil 1
4 Atmospheric pressure sensor 1
5 Condenser 1
6 AC magneto lead 1 Disconnect.
7 Coolant temperature sensor coupler 1 Disconnect.
Page 129 of 230
4-48
ENGINE REMOVAL
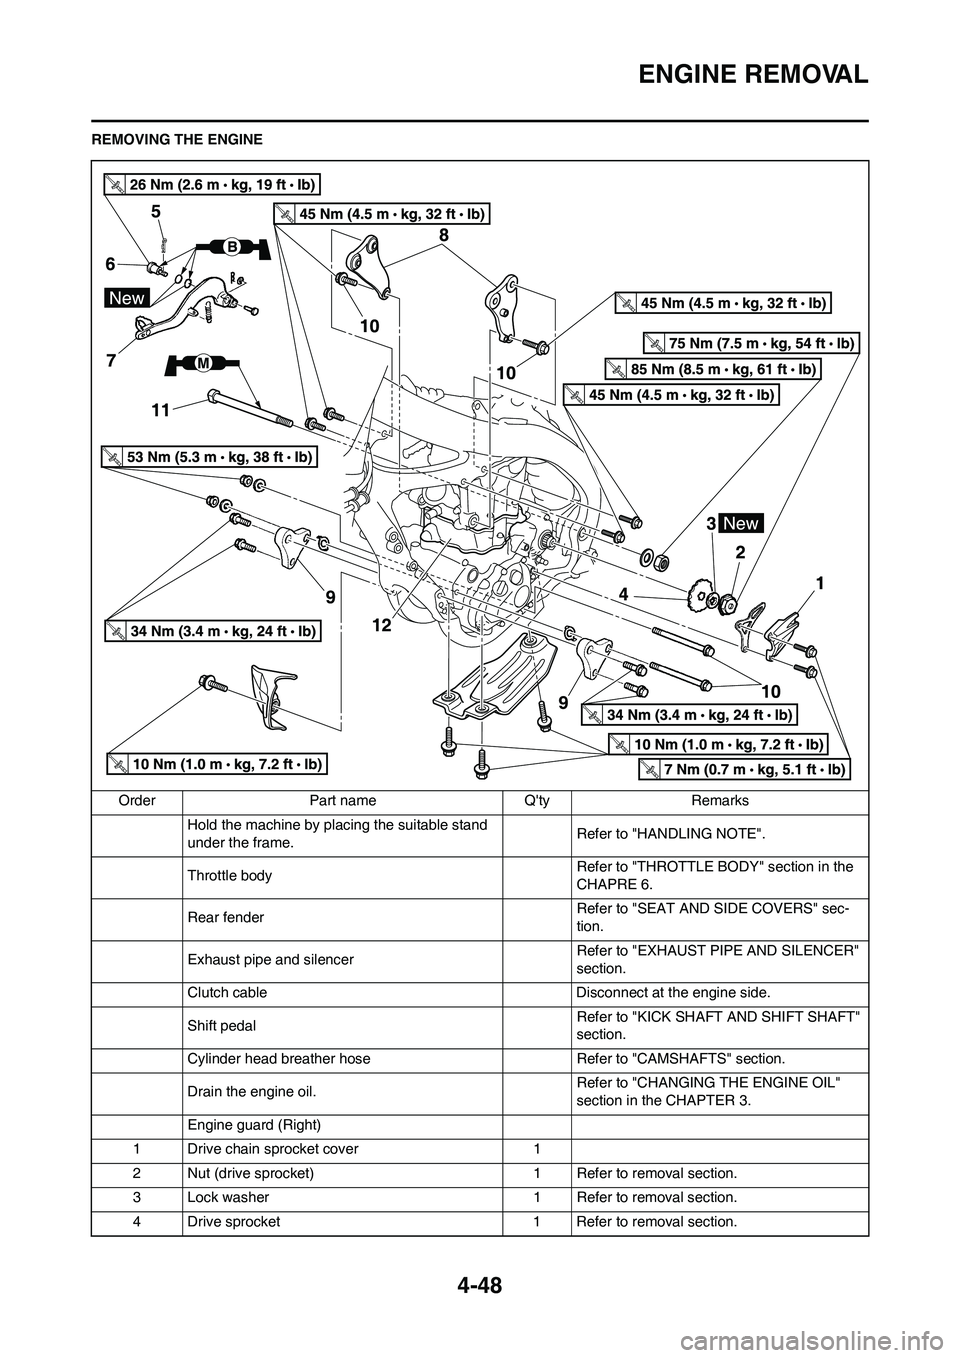
REMOVING THE ENGINE
Order Part name Q'ty Remarks
Hold the machine by placing the suitable stand
under the frame.Refer to "HANDLING NOTE".
Throttle body Refer to "THROTTLE BODY" section in the
CHAPRE 6.
Rear fenderRefer to "SEAT AND SIDE COVERS" sec-
tion.
Exhaust pipe and silencer Refer to "EXHAUST PIPE AND SILENCER"
section.
Clutch cable Disconnect at the engine side.
Shift pedalRefer to "KICK SHAFT AND SHIFT SHAFT"
section.
Cylinder head breather hose Refer to "CAMSHAFTS" section.
Drain the engine oil.Refer to "CHANGING THE ENGINE OIL"
section in the CHAPTER 3.
Engine guard (Right)
1 Drive chain sprocket cover 1
2 Nut (drive sprocket) 1 Refer to removal section.
3 Lock washer 1 Refer to removal section.
4 Drive sprocket 1 Refer to removal section.
Page 130 of 230
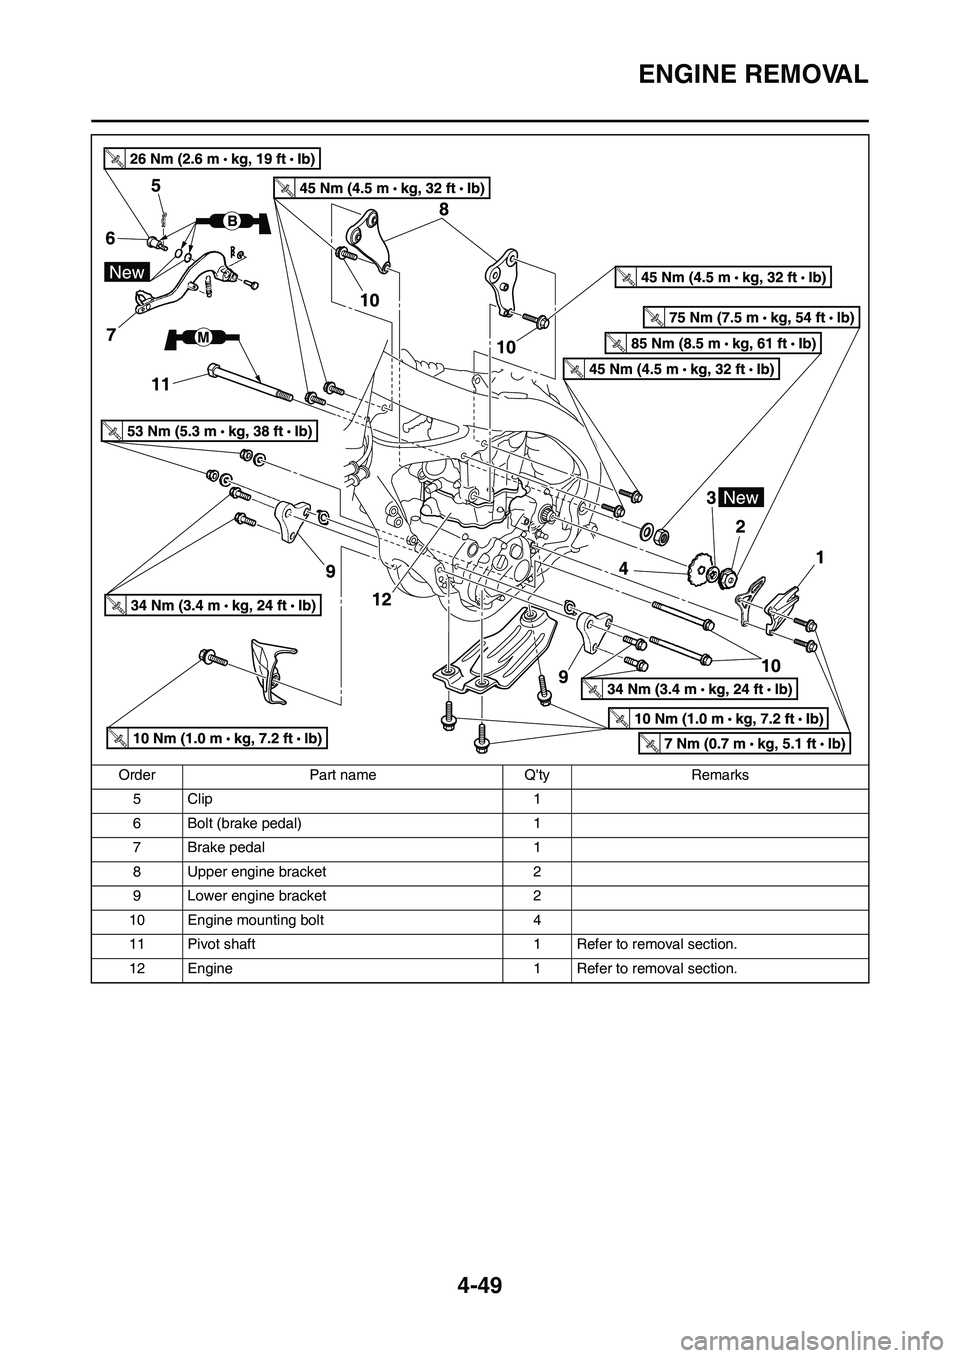
4-49
ENGINE REMOVAL
5Clip 1
6 Bolt (brake pedal) 1
7 Brake pedal 1
8 Upper engine bracket 2
9 Lower engine bracket 2
10 Engine mounting bolt 4
11 Pivot shaft 1 Refer to removal section.
12 Engine 1 Refer to removal section. Order Part name Q'ty Remarks