YAMAHA YZ450F 2010 Owners Manual
Manufacturer: YAMAHA, Model Year: 2010, Model line: YZ450F, Model: YAMAHA YZ450F 2010Pages: 230, PDF Size: 14.09 MB
Page 101 of 230
4-20
VALVES AND VALVE SPRINGS
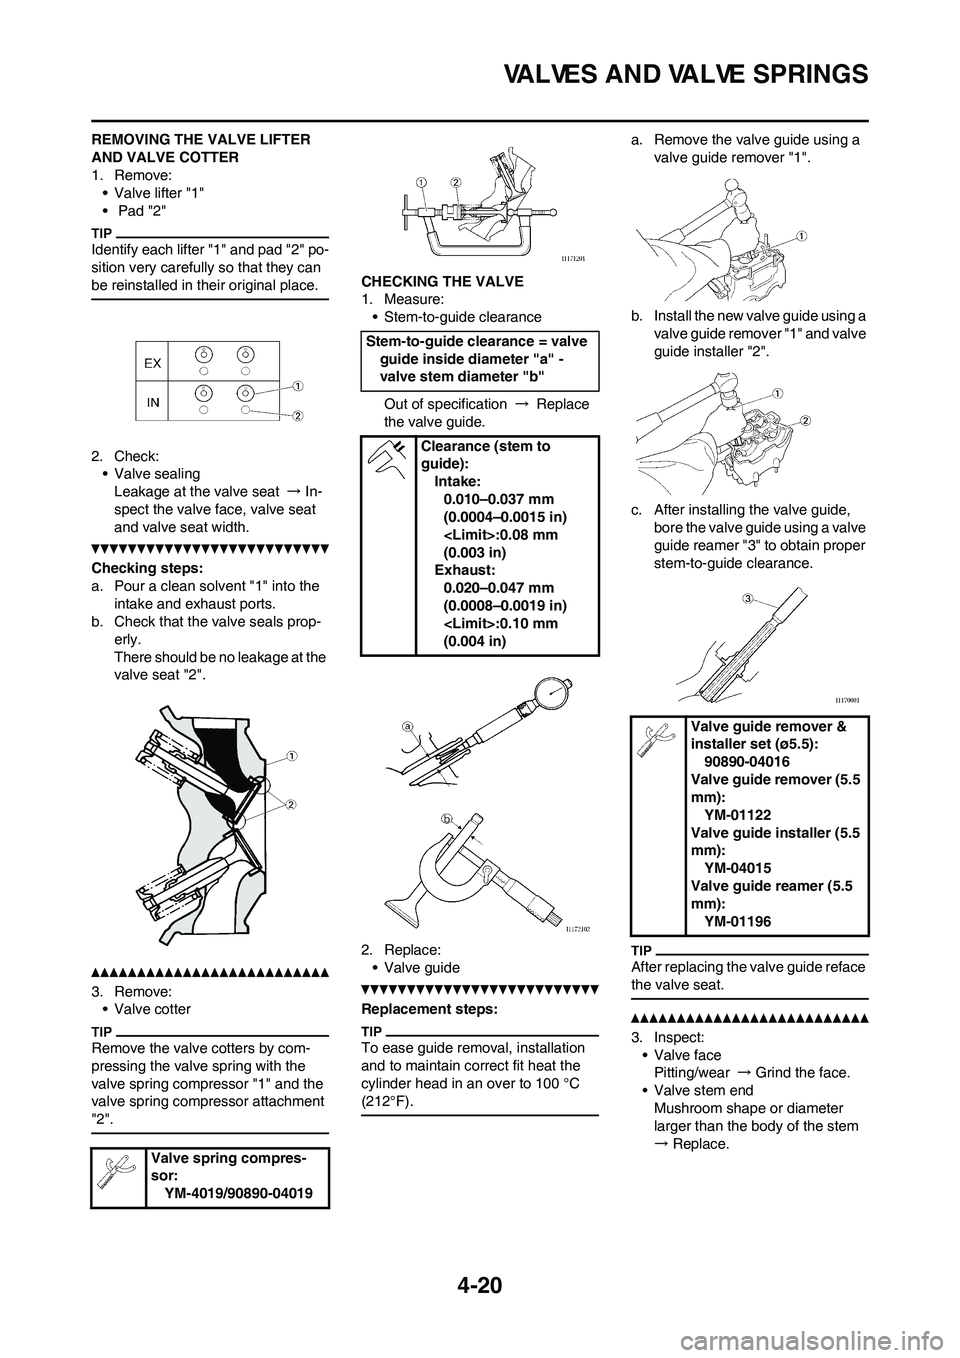
REMOVING THE VALVE LIFTER
AND VALVE COTTER
1. Remove:
• Valve lifter "1"
• Pad "2"
Identify each lifter "1" and pad "2" po-
sition very carefully so that they can
be reinstalled in their original place.
2. Check:
• Valve sealing
Leakage at the valve seat → In-
spect the valve face, valve seat
and valve seat width.
Checking steps:
a. Pour a clean solvent "1" into the
intake and exhaust ports.
b. Check that the valve seals prop-
erly.
There should be no leakage at the
valve seat "2".
3. Remove:
• Valve cotter
Remove the valve cotters by com-
pressing the valve spring with the
valve spring compressor "1" and the
valve spring compressor attachment
"2".
CHECKING THE VALVE
1. Measure:
• Stem-to-guide clearance
Out of specification → Replace
the valve guide.
2. Replace:
• Valve guide
Replacement steps:
To ease guide removal, installation
and to maintain correct fit heat the
cylinder head in an over to 100 °C
(212°F).
a. Remove the valve guide using a
valve guide remover "1".
b. Install the new valve guide using a
valve guide remover "1" and valve
guide installer "2".
c. After installing the valve guide,
bore the valve guide using a valve
guide reamer "3" to obtain proper
stem-to-guide clearance.
After replacing the valve guide reface
the valve seat.
3. Inspect:
• Valve face
Pitting/wear → Grind the face.
• Valve stem end
Mushroom shape or diameter
larger than the body of the stem
→ Replace.
Valve spring compres-
sor:
YM-4019/90890-04019
Stem-to-guide clearance = valve
guide inside diameter "a" -
valve stem diameter "b"
Clearance (stem to
guide):
Intake:
0.010–0.037 mm
(0.0004–0.0015 in)
(0.003 in)
Exhaust:
0.020–0.047 mm
(0.0008–0.0019 in)
(0.004 in)
Valve guide remover &
installer set (ø5.5):
90890-04016
Valve guide remover (5.5
mm):
YM-01122
Valve guide installer (5.5
mm):
YM-04015
Valve guide reamer (5.5
mm):
YM-01196
Page 102 of 230
4-21
VALVES AND VALVE SPRINGS
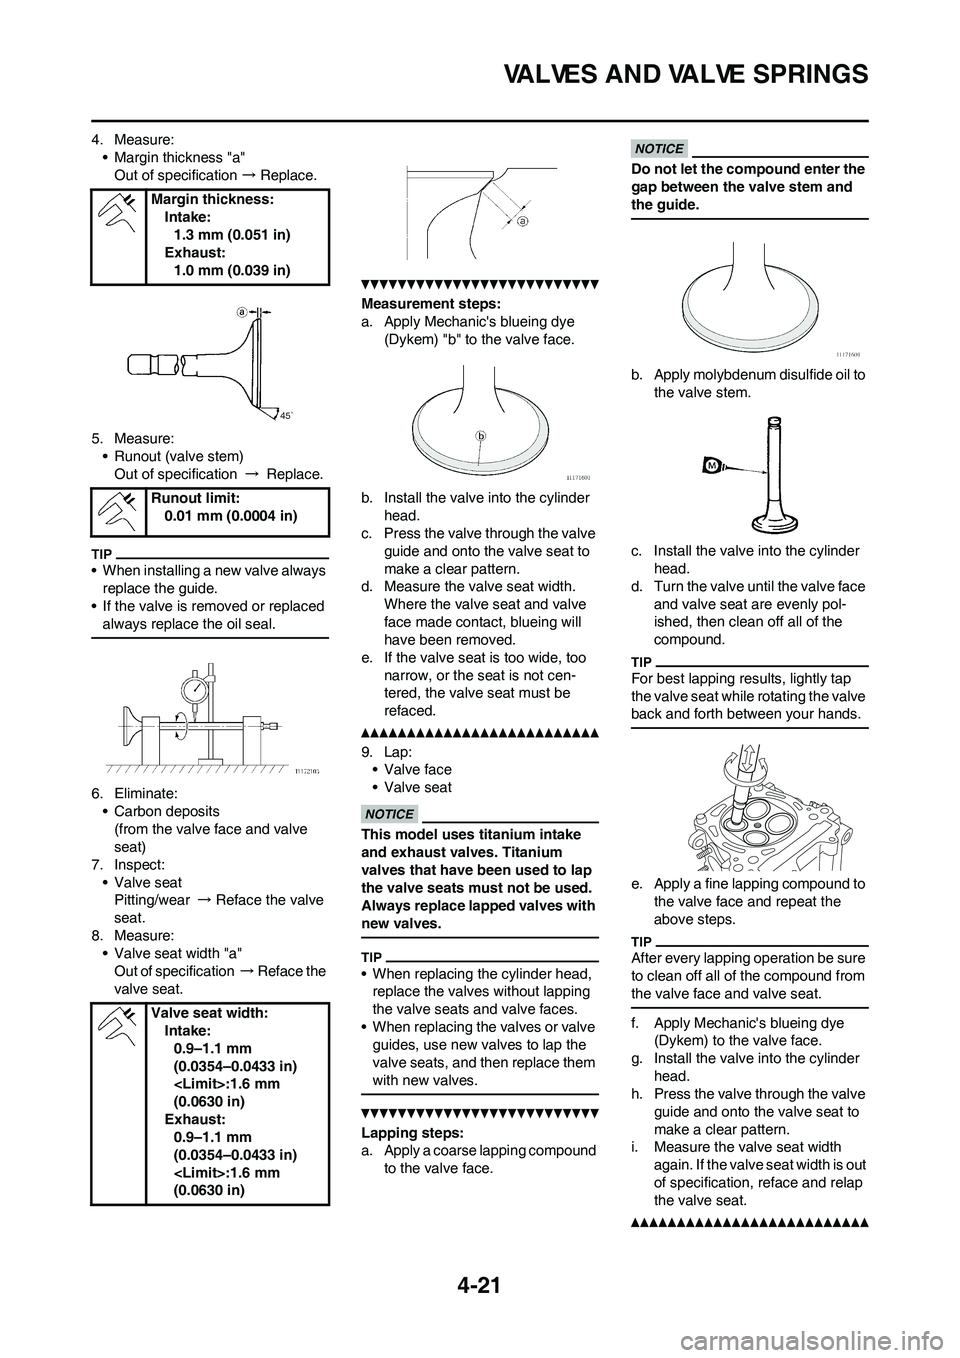
4. Measure:
• Margin thickness "a"
Out of specification → Replace.
5. Measure:
• Runout (valve stem)
Out of specification → Replace.
• When installing a new valve always
replace the guide.
• If the valve is removed or replaced
always replace the oil seal.
6. Eliminate:
• Carbon deposits
(from the valve face and valve
seat)
7. Inspect:
• Valve seat
Pitting/wear → Reface the valve
seat.
8. Measure:
• Valve seat width "a"
Out of specification → Reface the
valve seat.
Measurement steps:
a. Apply Mechanic's blueing dye
(Dykem) "b" to the valve face.
b. Install the valve into the cylinder
head.
c. Press the valve through the valve
guide and onto the valve seat to
make a clear pattern.
d. Measure the valve seat width.
Where the valve seat and valve
face made contact, blueing will
have been removed.
e. If the valve seat is too wide, too
narrow, or the seat is not cen-
tered, the valve seat must be
refaced.
9. Lap:
• Valve face
• Valve seat
This model uses titanium intake
and exhaust valves. Titanium
valves that have been used to lap
the valve seats must not be used.
Always replace lapped valves with
new valves.
• When replacing the cylinder head,
replace the valves without lapping
the valve seats and valve faces.
• When replacing the valves or valve
guides, use new valves to lap the
valve seats, and then replace them
with new valves.
Lapping steps:
a. Apply a coarse lapping compound
to the valve face.
Do not let the compound enter the
gap between the valve stem and
the guide.
b. Apply molybdenum disulfide oil to
the valve stem.
c. Install the valve into the cylinder
head.
d. Turn the valve until the valve face
and valve seat are evenly pol-
ished, then clean off all of the
compound.
For best lapping results, lightly tap
the valve seat while rotating the valve
back and forth between your hands.
e. Apply a fine lapping compound to
the valve face and repeat the
above steps.
After every lapping operation be sure
to clean off all of the compound from
the valve face and valve seat.
f. Apply Mechanic's blueing dye
(Dykem) to the valve face.
g. Install the valve into the cylinder
head.
h. Press the valve through the valve
guide and onto the valve seat to
make a clear pattern.
i. Measure the valve seat width
again. If the valve seat width is out
of specification, reface and relap
the valve seat.
Margin thickness:
Intake:
1.3 mm (0.051 in)
Exhaust:
1.0 mm (0.039 in)
Runout limit:
0.01 mm (0.0004 in)
Valve seat width:
Intake:
0.9–1.1 mm
(0.0354–0.0433 in)
(0.0630 in)
Exhaust:
0.9–1.1 mm
(0.0354–0.0433 in)
(0.0630 in)
Page 103 of 230
4-22
VALVES AND VALVE SPRINGS
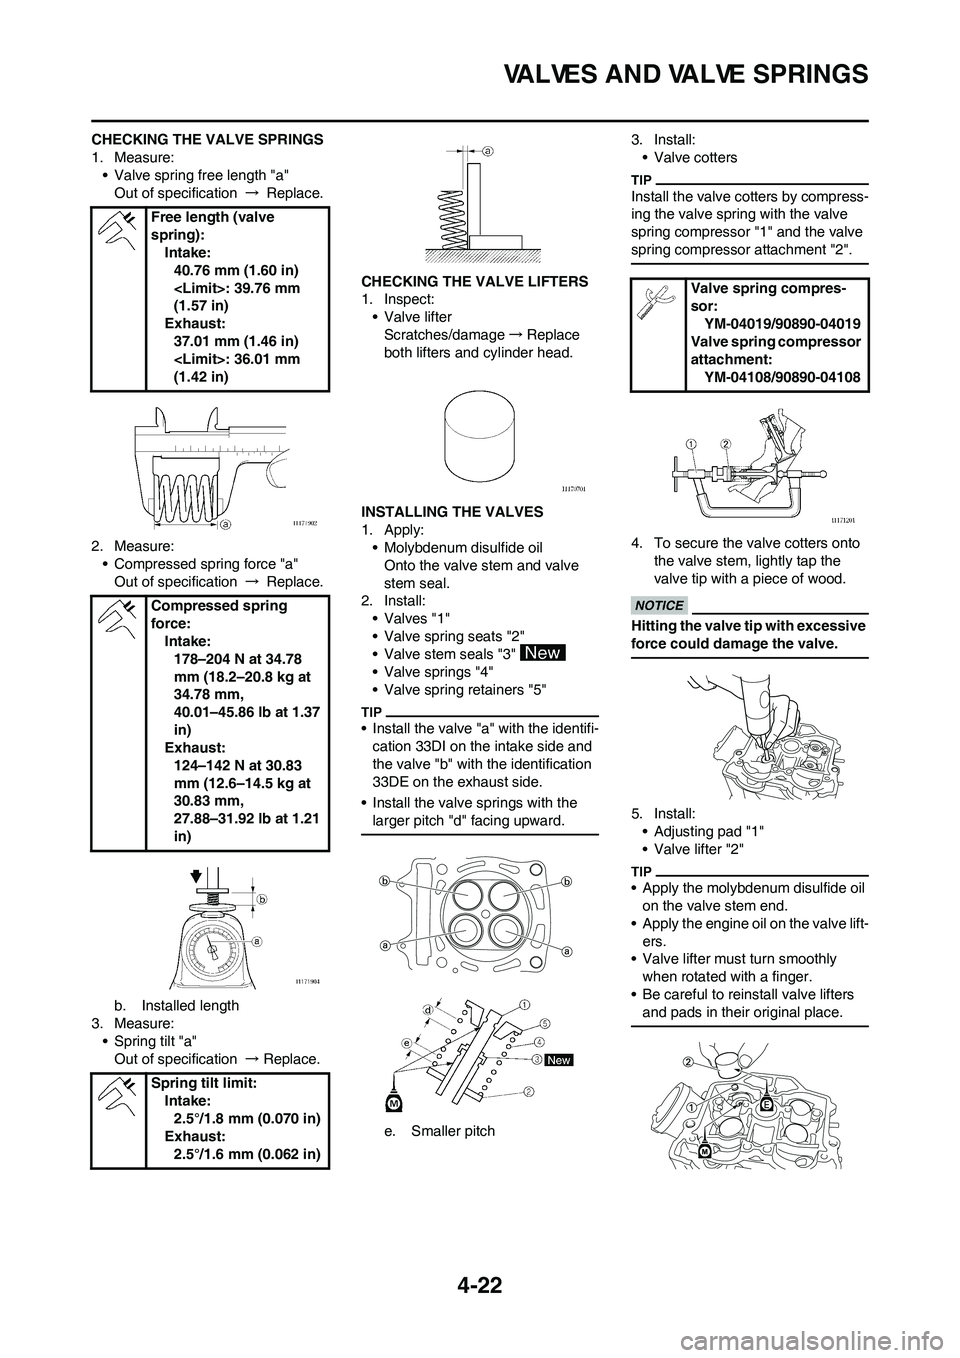
CHECKING THE VALVE SPRINGS
1. Measure:
• Valve spring free length "a"
Out of specification → Replace.
2. Measure:
• Compressed spring force "a"
Out of specification → Replace.
b. Installed length
3. Measure:
• Spring tilt "a"
Out of specification → Replace.CHECKING THE VALVE LIFTERS
1. Inspect:
• Valve lifter
Scratches/damage→Replace
both lifters and cylinder head.
INSTALLING THE VALVES
1. Apply:
• Molybdenum disulfide oil
Onto the valve stem and valve
stem seal.
2. Install:
• Valves "1"
• Valve spring seats "2"
• Valve stem seals "3"
• Valve springs "4"
• Valve spring retainers "5"
• Install the valve "a" with the identifi-
cation 33DI on the intake side and
the valve "b" with the identification
33DE on the exhaust side.
• Install the valve springs with the
larger pitch "d" facing upward.
e. Smaller pitch3. Install:
• Valve cotters
Install the valve cotters by compress-
ing the valve spring with the valve
spring compressor "1" and the valve
spring compressor attachment "2".
4. To secure the valve cotters onto
the valve stem, lightly tap the
valve tip with a piece of wood.
Hitting the valve tip with excessive
force could damage the valve.
5. Install:
• Adjusting pad "1"
• Valve lifter "2"
• Apply the molybdenum disulfide oil
on the valve stem end.
• Apply the engine oil on the valve lift-
ers.
• Valve lifter must turn smoothly
when rotated with a finger.
• Be careful to reinstall valve lifters
and pads in their original place.
Free length (valve
spring):
Intake:
40.76 mm (1.60 in)
(1.57 in)
Exhaust:
37.01 mm (1.46 in)
(1.42 in)
Compressed spring
force:
Intake:
178–204 N at 34.78
mm (18.2–20.8 kg at
34.78 mm,
40.01–45.86 lb at 1.37
in)
Exhaust:
124–142 N at 30.83
mm (12.6–14.5 kg at
30.83 mm,
27.88–31.92 lb at 1.21
in)
Spring tilt limit:
Intake:
2.5°/1.8 mm (0.070 in)
Exhaust:
2.5°/1.6 mm (0.062 in)
Valve spring compres-
sor:
YM-04019/90890-04019
Valve spring compressor
attachment:
YM-04108/90890-04108
Page 104 of 230
4-23
CYLINDER AND PISTON
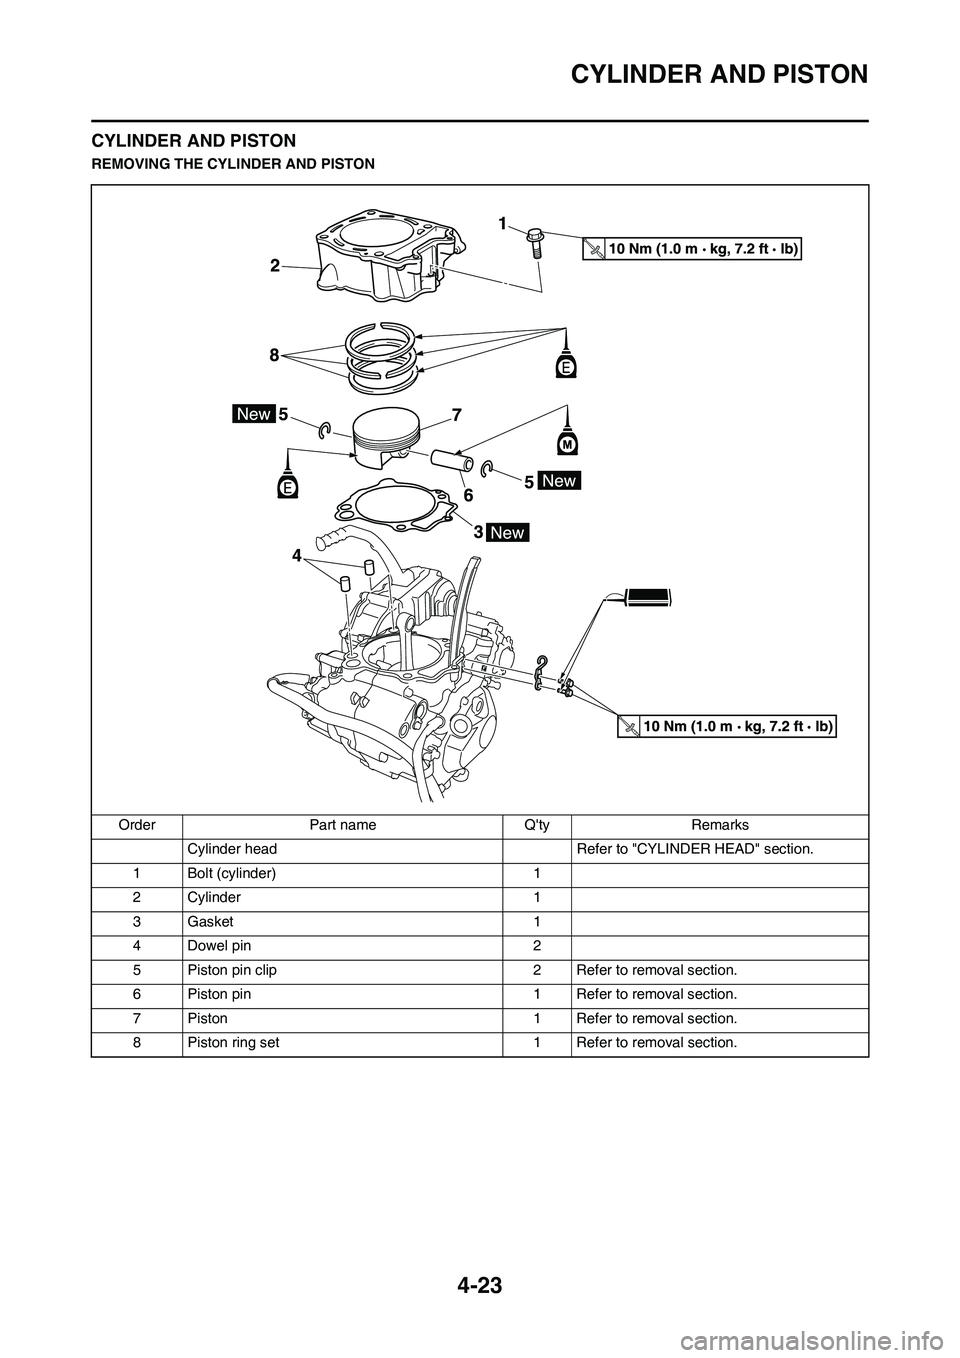
CYLINDER AND PISTON
REMOVING THE CYLINDER AND PISTON
Order Part name Q'ty Remarks
Cylinder head Refer to "CYLINDER HEAD" section.
1 Bolt (cylinder) 1
2 Cylinder 1
3 Gasket 1
4 Dowel pin 2
5 Piston pin clip 2 Refer to removal section.
6 Piston pin 1 Refer to removal section.
7 Piston 1 Refer to removal section.
8 Piston ring set 1 Refer to removal section.
Page 105 of 230
4-24
CYLINDER AND PISTON
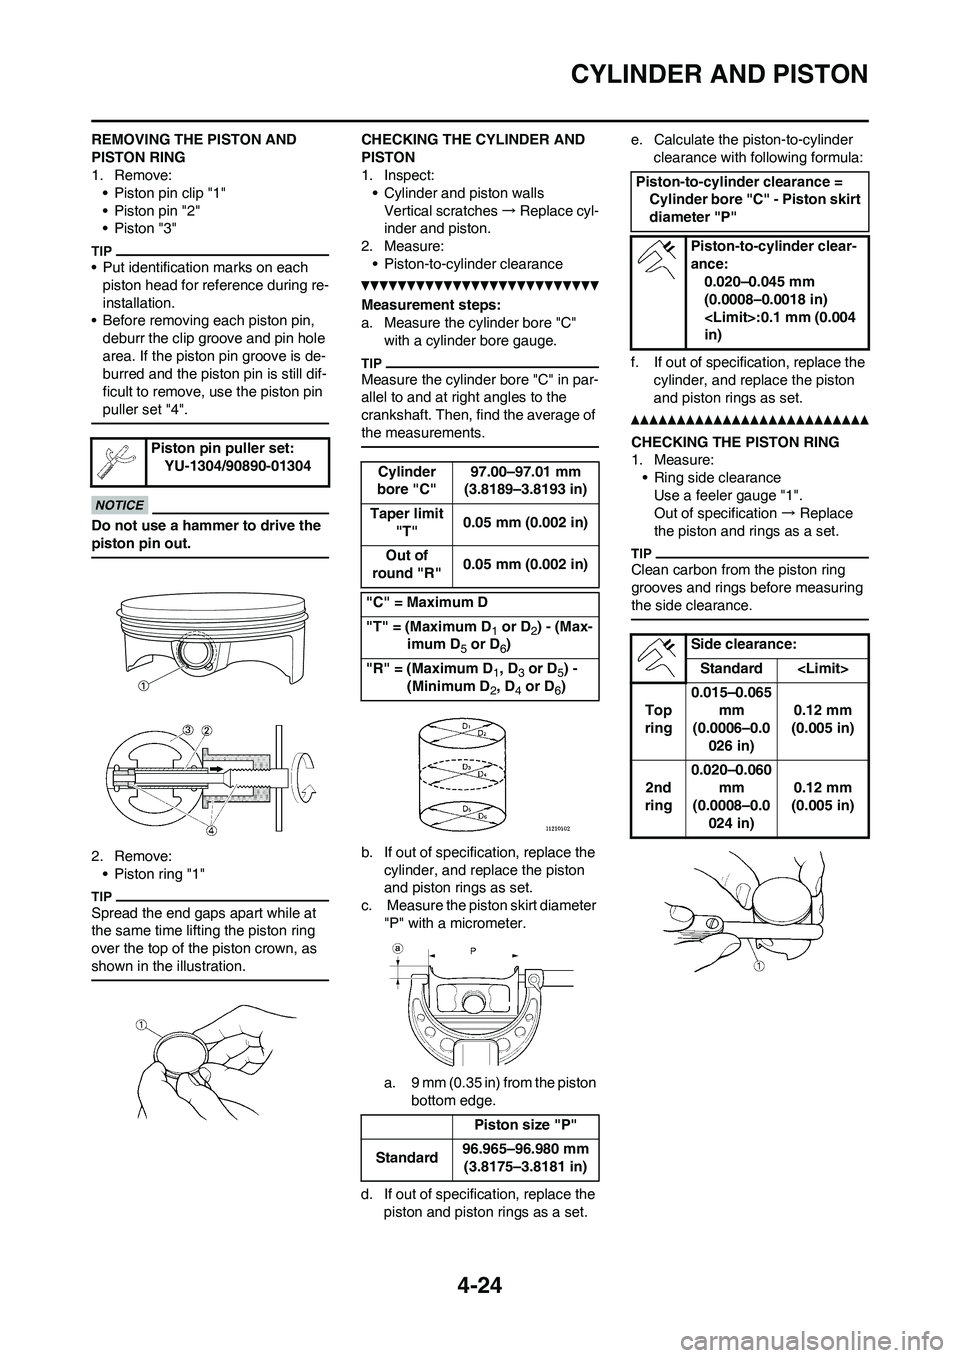
REMOVING THE PISTON AND
PISTON RING
1. Remove:
• Piston pin clip "1"
• Piston pin "2"
• Piston "3"
• Put identification marks on each
piston head for reference during re-
installation.
• Before removing each piston pin,
deburr the clip groove and pin hole
area. If the piston pin groove is de-
burred and the piston pin is still dif-
ficult to remove, use the piston pin
puller set "4".
Do not use a hammer to drive the
piston pin out.
2. Remove:
• Piston ring "1"
Spread the end gaps apart while at
the same time lifting the piston ring
over the top of the piston crown, as
shown in the illustration.
CHECKING THE CYLINDER AND
PISTON
1. Inspect:
• Cylinder and piston walls
Vertical scratches→Replace cyl-
inder and piston.
2. Measure:
• Piston-to-cylinder clearance
Measurement steps:
a. Measure the cylinder bore "C"
with a cylinder bore gauge.
Measure the cylinder bore "C" in par-
allel to and at right angles to the
crankshaft. Then, find the average of
the measurements.
b. If out of specification, replace the
cylinder, and replace the piston
and piston rings as set.
c. Measure the piston skirt diameter
"P" with a micrometer.
a. 9 mm (0.35 in) from the piston
bottom edge.
d. If out of specification, replace the
piston and piston rings as a set.e. Calculate the piston-to-cylinder
clearance with following formula:
f. If out of specification, replace the
cylinder, and replace the piston
and piston rings as set.
CHECKING THE PISTON RING
1. Measure:
• Ring side clearance
Use a feeler gauge "1".
Out of specification → Replace
the piston and rings as a set.
Clean carbon from the piston ring
grooves and rings before measuring
the side clearance.
Piston pin puller set:
YU-1304/90890-01304
Cylinder
bore "C"97.00–97.01 mm
(3.8189–3.8193 in)
Taper limit
"T"0.05 mm (0.002 in)
Out of
round "R"0.05 mm (0.002 in)
"C" = Maximum D
"T" = (Maximum D
1 or D2) - (Max-
imum D
5 or D6)
"R" = (Maximum D
1, D3 or D5) -
(Minimum D
2, D4 or D6)
Piston size "P"
Standard96.965–96.980 mm
(3.8175–3.8181 in)
Piston-to-cylinder clearance =
Cylinder bore "C" - Piston skirt
diameter "P"
Piston-to-cylinder clear-
ance:
0.020–0.045 mm
(0.0008–0.0018 in)
in)
Side clearance:
Standard
Top
ring0.015–0.065
mm
(0.0006–0.0
026 in)0.12 mm
(0.005 in)
2nd
ring0.020–0.060
mm
(0.0008–0.0
024 in)0.12 mm
(0.005 in)
Page 106 of 230
4-25
CYLINDER AND PISTON
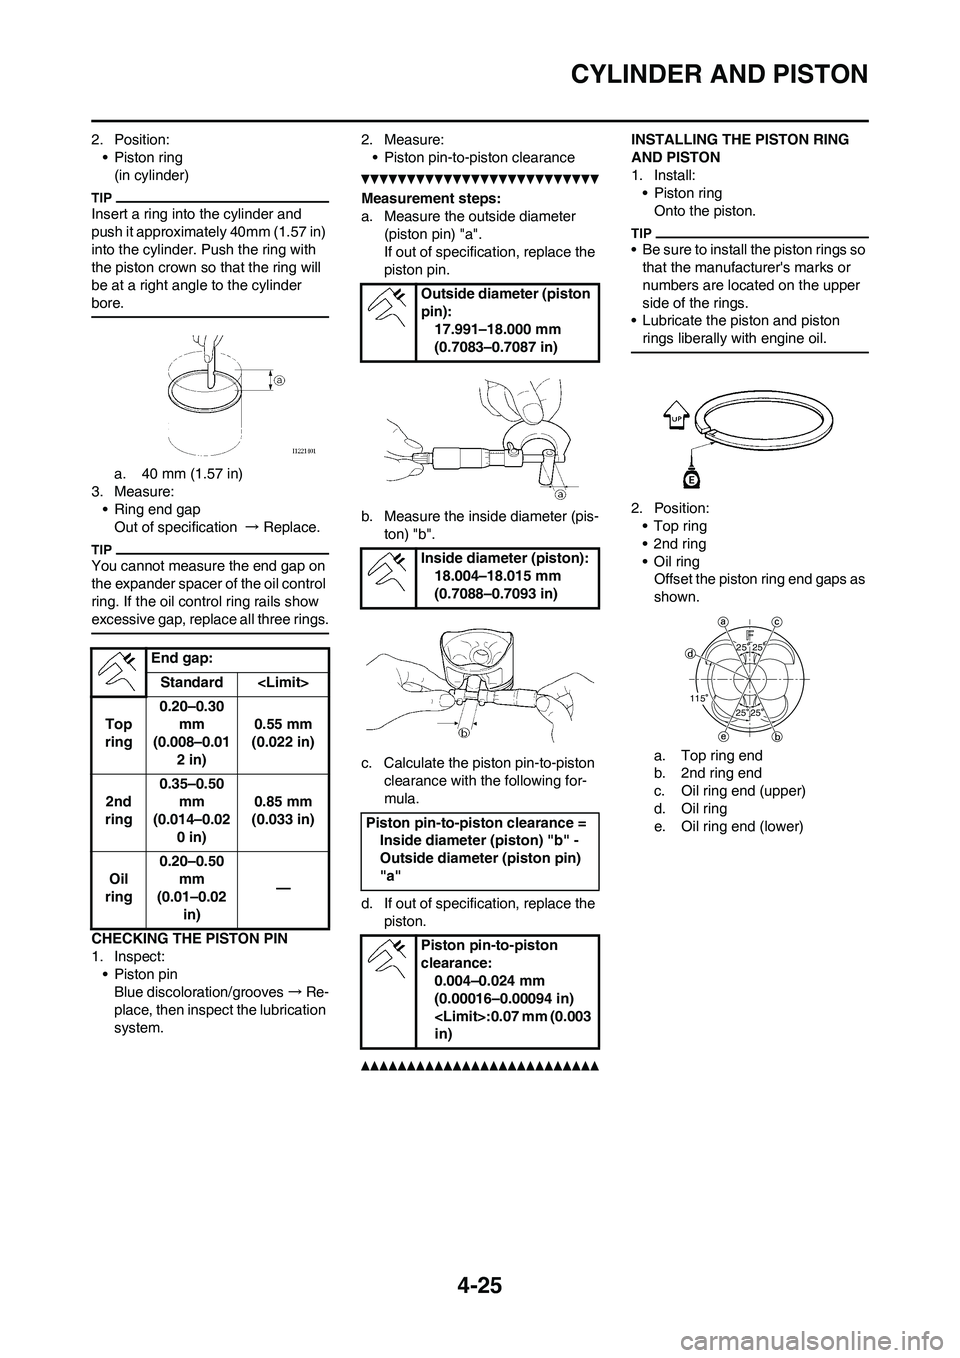
2. Position:
• Piston ring
(in cylinder)
Insert a ring into the cylinder and
push it approximately 40mm (1.57 in)
into the cylinder. Push the ring with
the piston crown so that the ring will
be at a right angle to the cylinder
bore.
a. 40 mm (1.57 in)
3. Measure:
• Ring end gap
Out of specification → Replace.
You cannot measure the end gap on
the expander spacer of the oil control
ring. If the oil control ring rails show
excessive gap, replace all three rings.
CHECKING THE PISTON PIN
1. Inspect:
• Piston pin
Blue discoloration/grooves→Re-
place, then inspect the lubrication
system.2. Measure:
• Piston pin-to-piston clearance
Measurement steps:
a. Measure the outside diameter
(piston pin) "a".
If out of specification, replace the
piston pin.
b. Measure the inside diameter (pis-
ton) "b".
c. Calculate the piston pin-to-piston
clearance with the following for-
mula.
d. If out of specification, replace the
piston.
INSTALLING THE PISTON RING
AND PISTON
1. Install:
• Piston ring
Onto the piston.
• Be sure to install the piston rings so
that the manufacturer's marks or
numbers are located on the upper
side of the rings.
• Lubricate the piston and piston
rings liberally with engine oil.
2. Position:
•Top ring
•2nd ring
•Oil ring
Offset the piston ring end gaps as
shown.
a. Top ring end
b. 2nd ring end
c. Oil ring end (upper)
d. Oil ring
e. Oil ring end (lower) End gap:
Standard
Top
ring0.20–0.30
mm
(0.008–0.01
2 in)0.55 mm
(0.022 in)
2nd
ring0.35–0.50
mm
(0.014–0.02
0 in)0.85 mm
(0.033 in)
Oil
ring0.20–0.50
mm
(0.01–0.02
in)—
Outside diameter (piston
pin):
17.991–18.000 mm
(0.7083–0.7087 in)
Inside diameter (piston):
18.004–18.015 mm
(0.7088–0.7093 in)
Piston pin-to-piston clearance =
Inside diameter (piston) "b" -
Outside diameter (piston pin)
"a"
Piston pin-to-piston
clearance:
0.004–0.024 mm
(0.00016–0.00094 in)
in)
2525
2525115
Page 107 of 230
4-26
CYLINDER AND PISTON
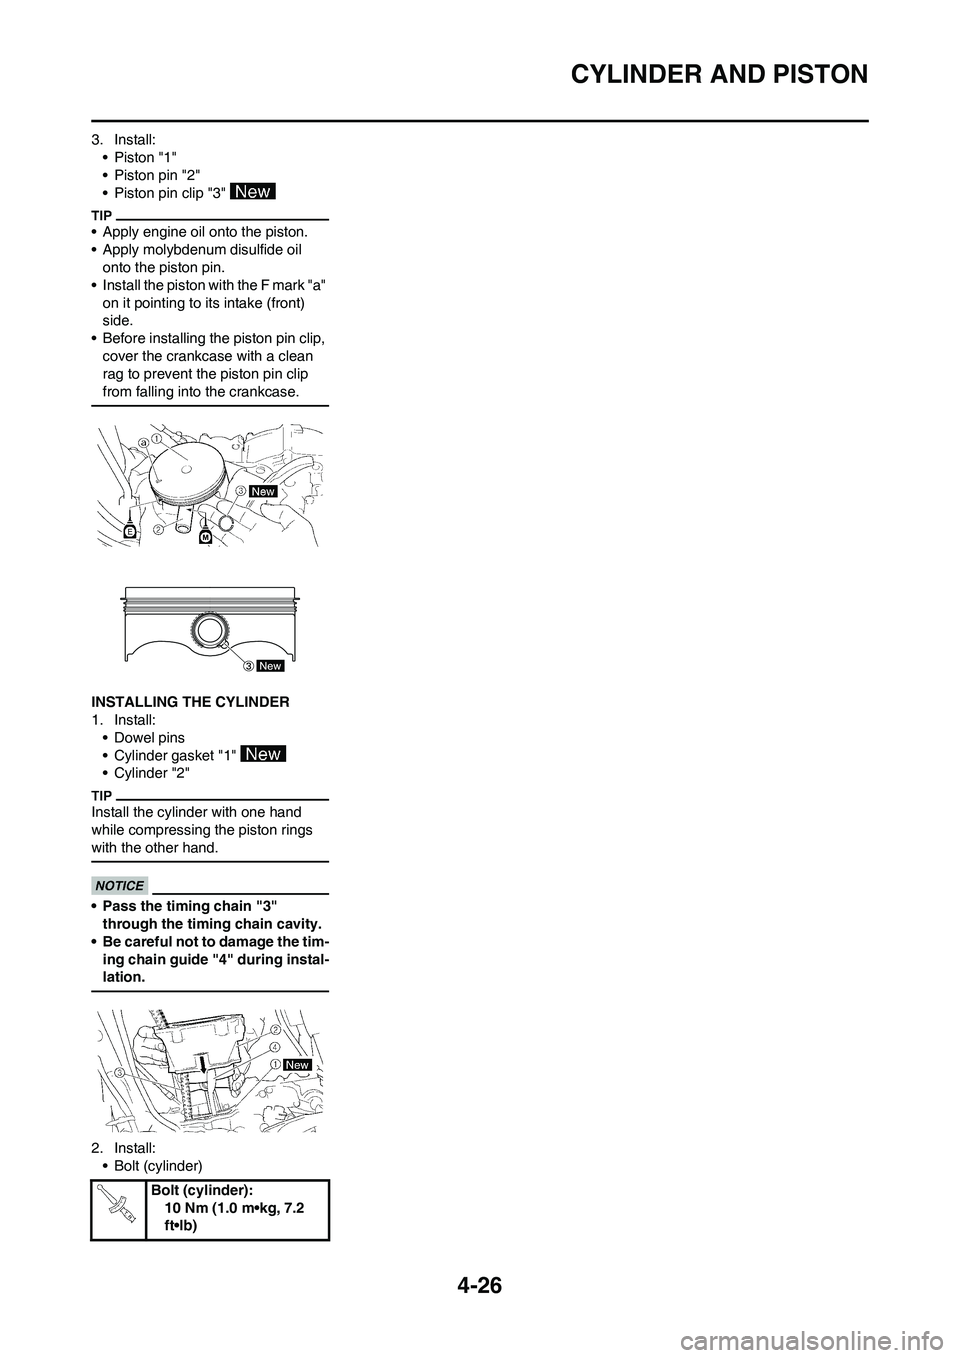
3. Install:
• Piston "1"
• Piston pin "2"
• Piston pin clip "3"
• Apply engine oil onto the piston.
• Apply molybdenum disulfide oil
onto the piston pin.
• Install the piston with the F mark "a"
on it pointing to its intake (front)
side.
• Before installing the piston pin clip,
cover the crankcase with a clean
rag to prevent the piston pin clip
from falling into the crankcase.
INSTALLING THE CYLINDER
1. Install:
• Dowel pins
• Cylinder gasket "1"
• Cylinder "2"
Install the cylinder with one hand
while compressing the piston rings
with the other hand.
• Pass the timing chain "3"
through the timing chain cavity.
• Be careful not to damage the tim-
ing chain guide "4" during instal-
lation.
2. Install:
• Bolt (cylinder)
Bolt (cylinder):
10 Nm (1.0 m•kg, 7.2
ft•lb)
Page 108 of 230
4-27
CLUTCH
CLUTCH
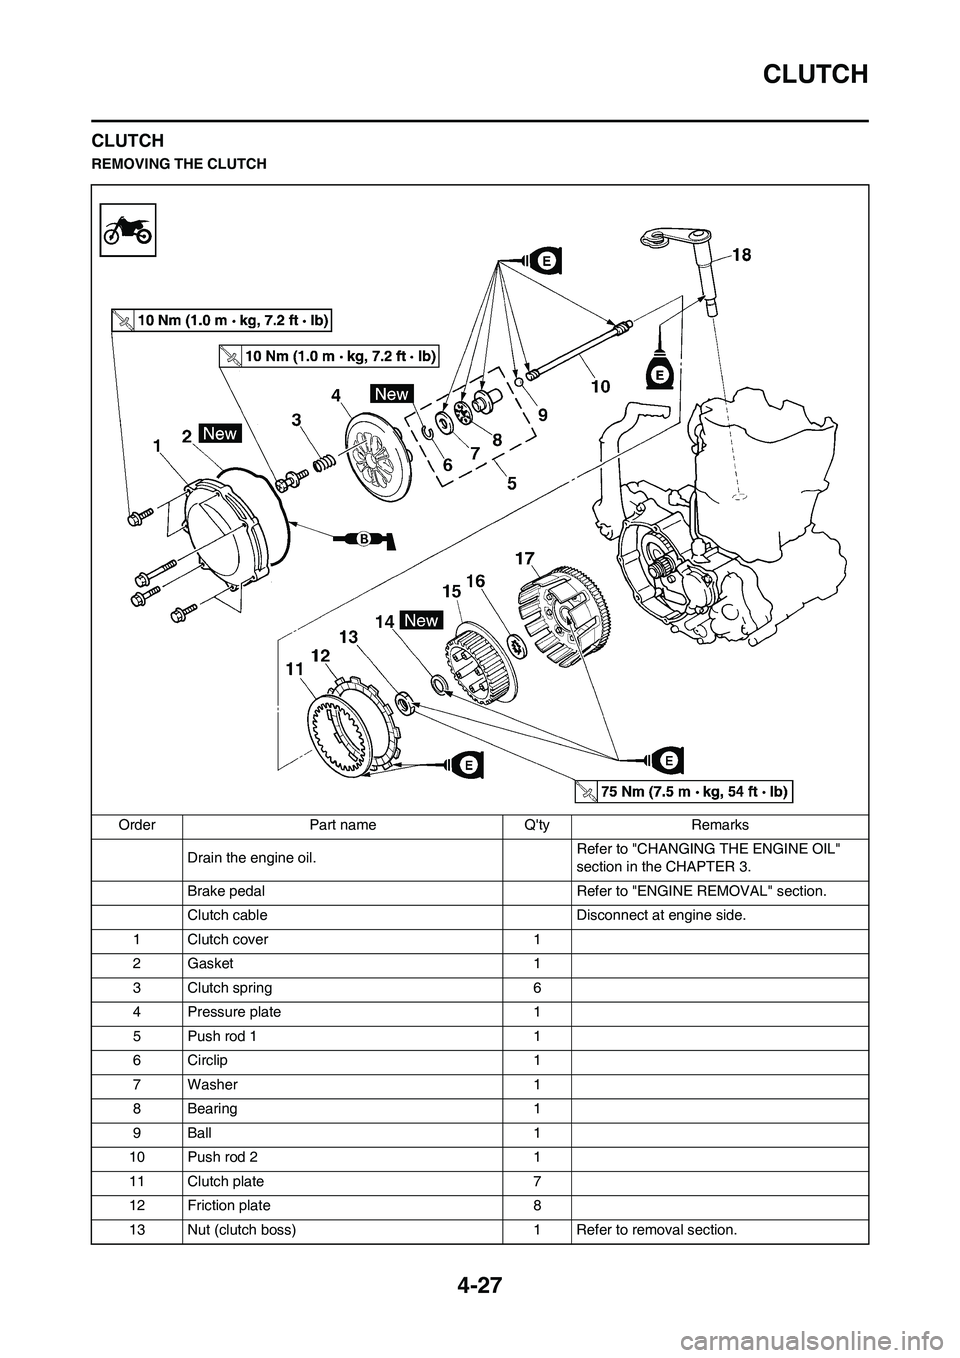
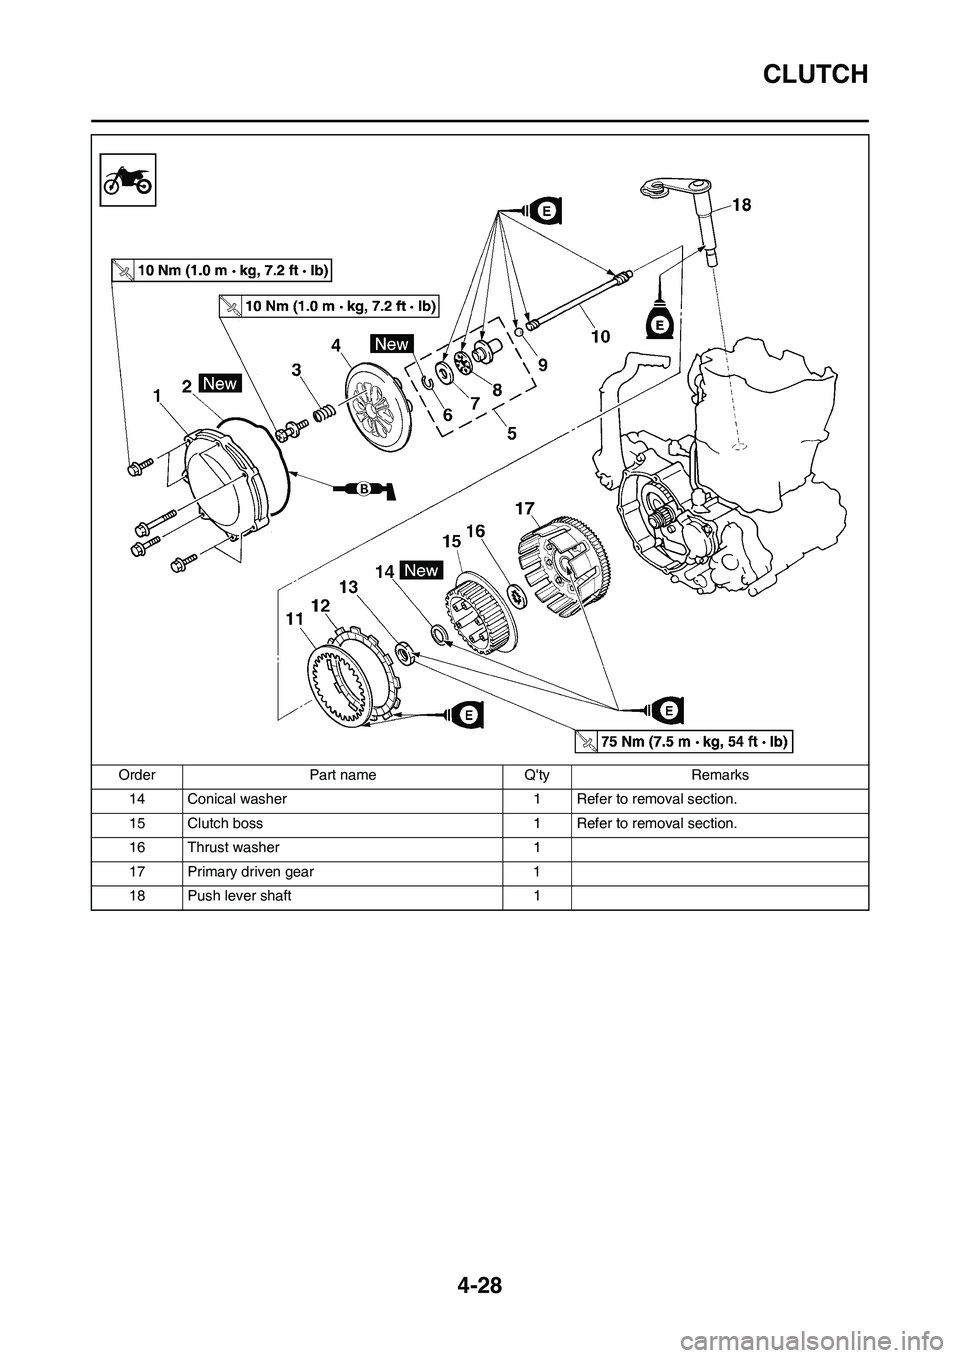
REMOVING THE CLUTCH
Order Part name Q'ty Remarks
Drain the engine oil. Refer to "CHANGING THE ENGINE OIL"
section in the CHAPTER 3.
Brake pedal Refer to "ENGINE REMOVAL" section.
Clutch cable Disconnect at engine side.
1 Clutch cover 1
2 Gasket 1
3 Clutch spring 6
4 Pressure plate 1
5 Push rod 1 1
6 Circlip 1
7 Washer 1
8 Bearing 1
9Ball 1
10 Push rod 2 1
11 Clutch plate 7
12 Friction plate 8
13 Nut (clutch boss) 1 Refer to removal section.
Page 109 of 230
4-28
CLUTCH
14 Conical washer 1 Refer to removal section.
15 Clutch boss 1 Refer to removal section.
16 Thrust washer 1
17 Primary driven gear 1
18 Push lever shaft 1 Order Part name Q'ty Remarks
Page 110 of 230
4-29
CLUTCH
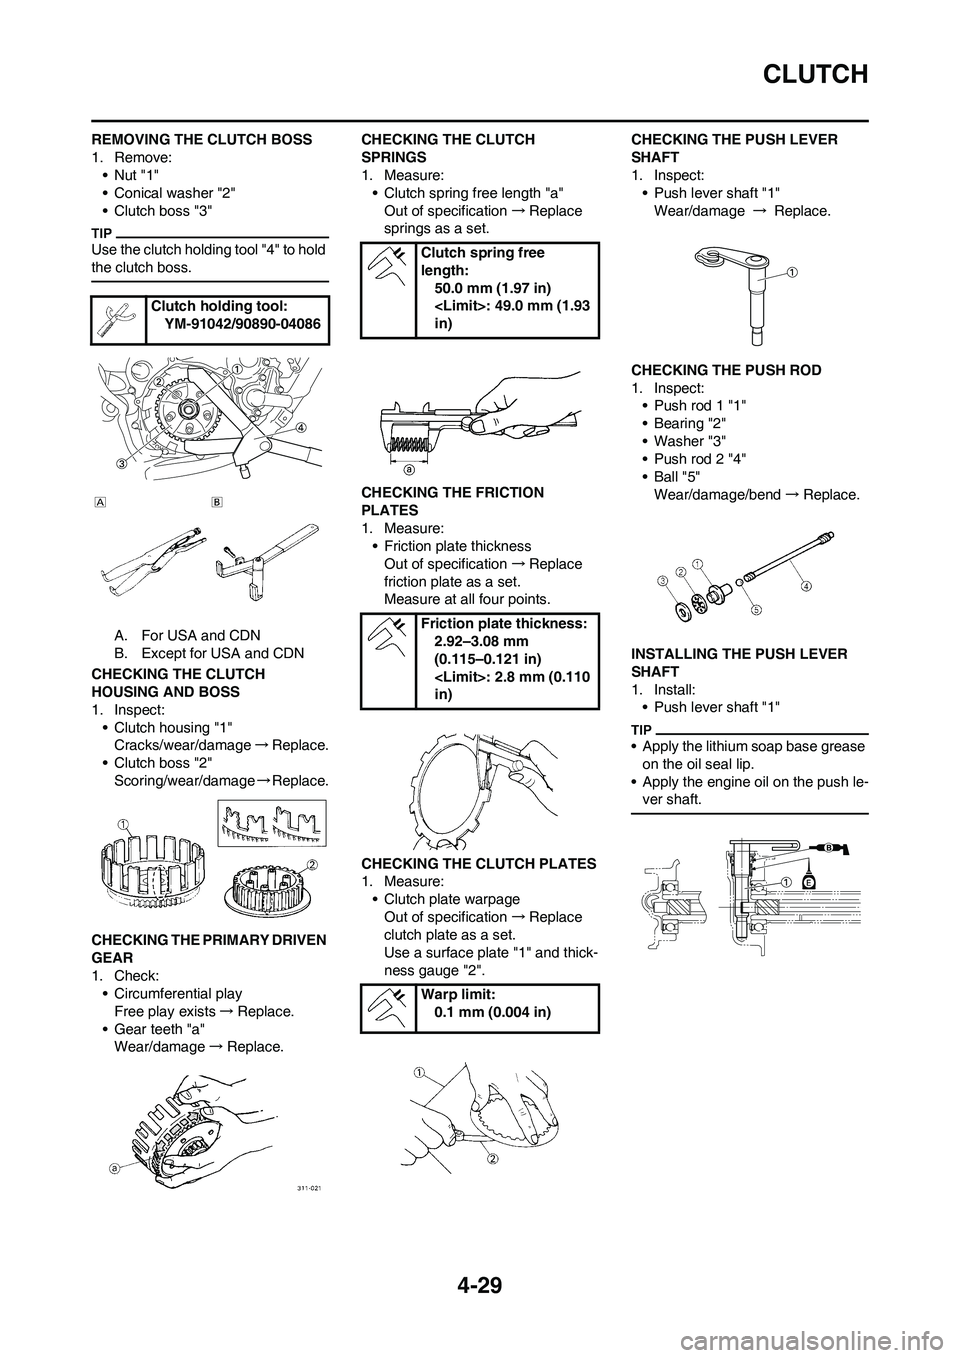
REMOVING THE CLUTCH BOSS
1. Remove:
•Nut "1"
• Conical washer "2"
• Clutch boss "3"
Use the clutch holding tool "4" to hold
the clutch boss.
A. For USA and CDN
B. Except for USA and CDN
CHECKING THE CLUTCH
HOUSING AND BOSS
1. Inspect:
• Clutch housing "1"
Cracks/wear/damage→Replace.
• Clutch boss "2"
Scoring/wear/damage→Replace.
CHECKING THE PRIMARY DRIVEN
GEAR
1. Check:
• Circumferential play
Free play exists→Replace.
• Gear teeth "a"
Wear/damage→Replace.CHECKING THE CLUTCH
SPRINGS
1. Measure:
• Clutch spring free length "a"
Out of specification→Replace
springs as a set.
CHECKING THE FRICTION
PLATES
1. Measure:
• Friction plate thickness
Out of specification→Replace
friction plate as a set.
Measure at all four points.
CHECKING THE CLUTCH PLATES
1. Measure:
• Clutch plate warpage
Out of specification→Replace
clutch plate as a set.
Use a surface plate "1" and thick-
ness gauge "2".CHECKING THE PUSH LEVER
SHAFT
1. Inspect:
• Push lever shaft "1"
Wear/damage → Replace.
CHECKING THE PUSH ROD
1. Inspect:
• Push rod 1 "1"
• Bearing "2"
• Washer "3"
• Push rod 2 "4"
•Ball "5"
Wear/damage/bend→Replace.
INSTALLING THE PUSH LEVER
SHAFT
1. Install:
• Push lever shaft "1"
• Apply the lithium soap base grease
on the oil seal lip.
• Apply the engine oil on the push le-
ver shaft.
Clutch holding tool:
YM-91042/90890-04086
Clutch spring free
length:
50.0 mm (1.97 in)
in)
Friction plate thickness:
2.92–3.08 mm
(0.115–0.121 in)
in)
Warp limit:
0.1 mm (0.004 in)