YAMAHA YZ450F 2016 Owners Manual
Manufacturer: YAMAHA, Model Year: 2016, Model line: YZ450F, Model: YAMAHA YZ450F 2016Pages: 362, PDF Size: 10.49 MB
Page 211 of 362
CAMSHAFT
5-16
▼▼▼▼▼▼▼▼▼▼▼▼▼▼▼▼▼▼▼▼▼▼▼▼▼▼▼▼▼▼▼▼
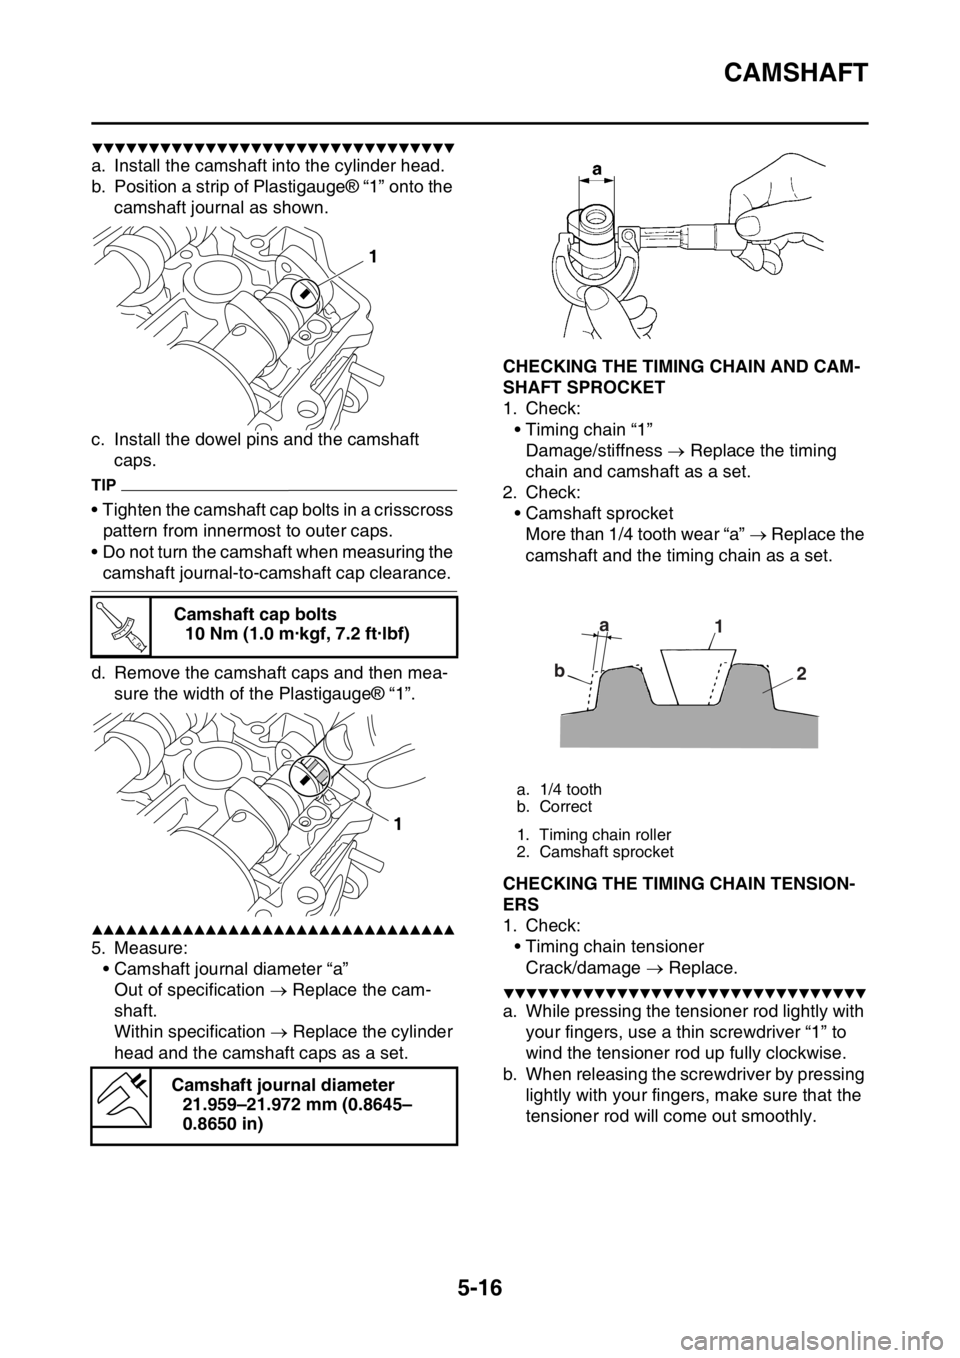
a. Install the camshaft into the cylinder head.
b. Position a strip of Plastigauge® “1” onto the
camshaft journal as shown.
c. Install the dowel pins and the camshaft
caps.
TIP
• Tighten the camshaft cap bolts in a crisscross
pattern from innermost to outer caps.
• Do not turn the camshaft when measuring the
camshaft journal-to-camshaft cap clearance.
d. Remove the camshaft caps and then mea-
sure the width of the Plastigauge® “1”.
▲▲▲▲▲▲▲▲▲▲▲▲▲▲▲▲▲▲▲▲▲▲▲▲▲▲▲▲▲▲▲▲
5. Measure:
• Camshaft journal diameter “a”
Out of specification Replace the cam-
shaft.
Within specification Replace the cylinder
head and the camshaft caps as a set.
EASB111209CHECKING THE TIMING CHAIN AND CAM-
SHAFT SPROCKET
1. Check:
• Timing chain “1”
Damage/stiffness Replace the timing
chain and camshaft as a set.
2. Check:
• Camshaft sprocket
More than 1/4 tooth wear “a” Replace the
camshaft and the timing chain as a set.
EASB111210CHECKING THE TIMING CHAIN TENSION-
ERS
1. Check:
• Timing chain tensioner
Crack/damage Replace.
▼▼▼▼▼▼▼▼▼▼▼▼▼▼▼▼▼▼▼▼▼▼▼▼▼▼▼▼▼▼▼▼
a. While pressing the tensioner rod lightly with
your fingers, use a thin screwdriver “1” to
wind the tensioner rod up fully clockwise.
b. When releasing the screwdriver by pressing
lightly with your fingers, make sure that the
tensioner rod will come out smoothly. Camshaft cap bolts
10 Nm (1.0 m·kgf, 7.2 ft·lbf)
Camshaft journal diameter
21.959–21.972 mm (0.8645–
0.8650 in)
1
T R..
1
a. 1/4 tooth
b. Correct
1. Timing chain roller
2. Camshaft sprocket
a
b1
2
Page 212 of 362
CAMSHAFT
5-17
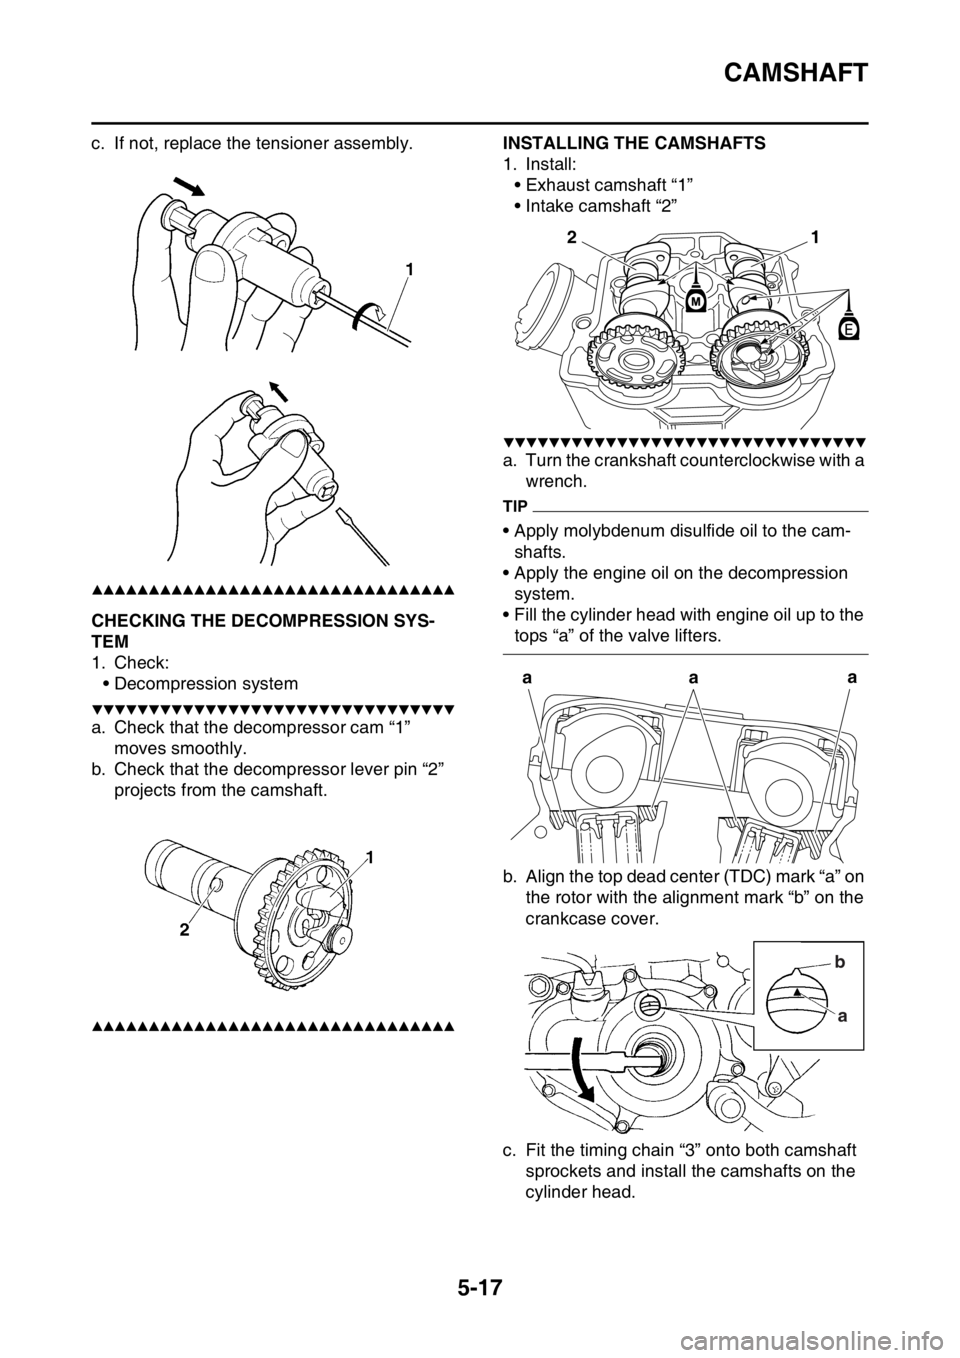
c. If not, replace the tensioner assembly.
▲▲▲▲▲▲▲▲▲▲▲▲▲▲▲▲▲▲▲▲▲▲▲▲▲▲▲▲▲▲▲▲
EASB111211CHECKING THE DECOMPRESSION SYS-
TEM
1. Check:
• Decompression system
▼▼▼▼▼▼▼▼▼▼▼▼▼▼▼▼▼▼▼▼▼▼▼▼▼▼▼▼▼▼▼▼
a. Check that the decompressor cam “1”
moves smoothly.
b. Check that the decompressor lever pin “2”
projects from the camshaft.
▲▲▲▲▲▲▲▲▲▲▲▲▲▲▲▲▲▲▲▲▲▲▲▲▲▲▲▲▲▲▲▲
EASB111212
INSTALLING THE CAMSHAFTS
1. Install:
• Exhaust camshaft “1”
• Intake camshaft “2”
▼▼▼▼▼▼▼▼▼▼▼▼▼▼▼▼▼▼▼▼▼▼▼▼▼▼▼▼▼▼▼▼
a. Turn the crankshaft counterclockwise with a
wrench.
TIP
• Apply molybdenum disulfide oil to the cam-
shafts.
• Apply the engine oil on the decompression
system.
• Fill the cylinder head with engine oil up to the
tops “a” of the valve lifters.
b. Align the top dead center (TDC) mark “a” on
the rotor with the alignment mark “b” on the
crankcase cover.
c. Fit the timing chain “3” onto both camshaft
sprockets and install the camshafts on the
cylinder head.
1
2
a
aa
b
a
Page 213 of 362
CAMSHAFT
5-18
TIP
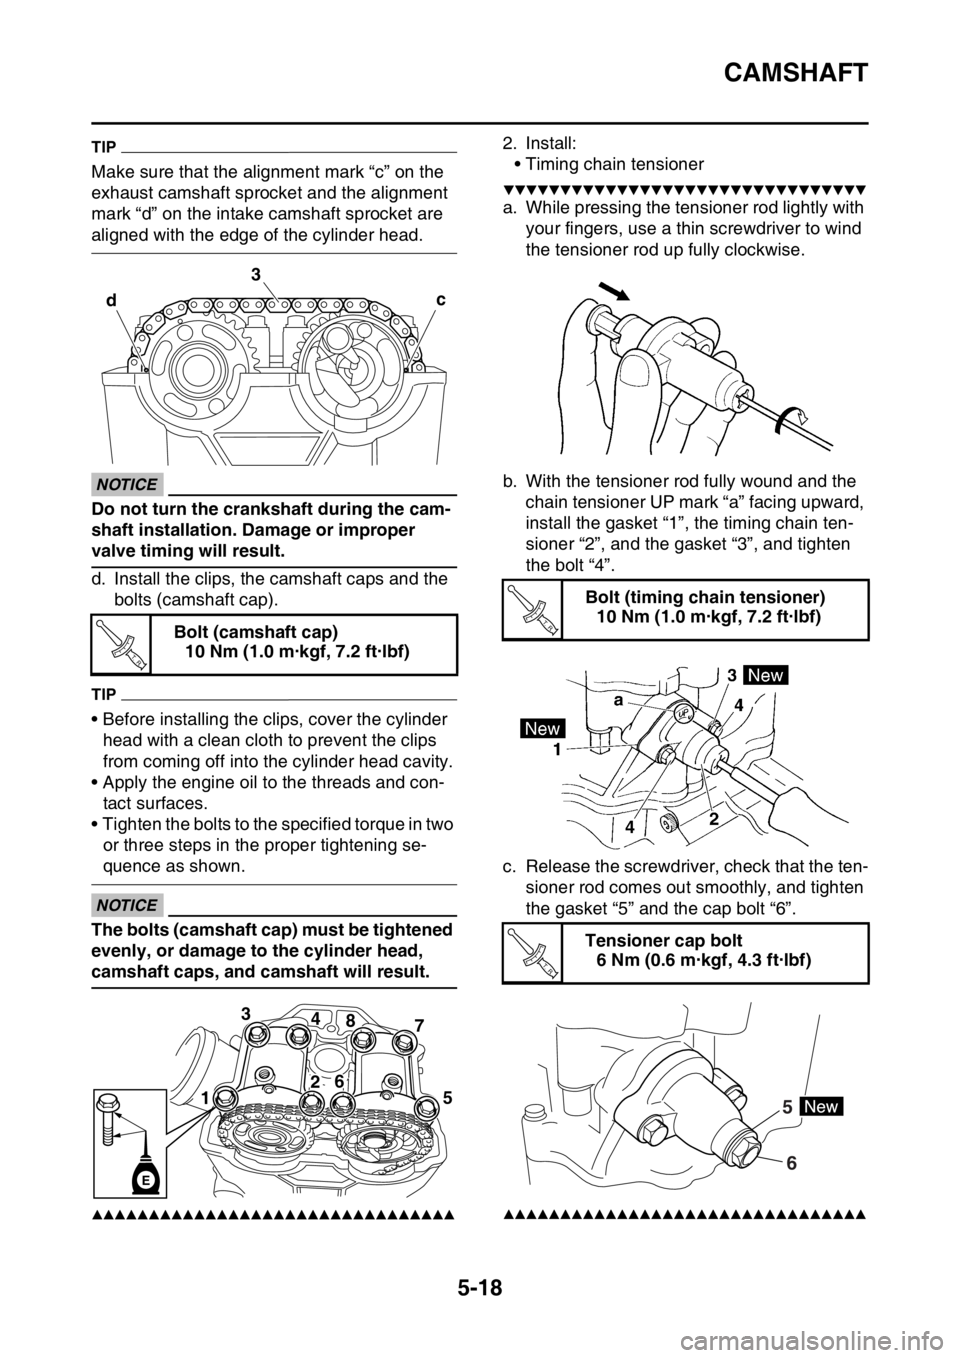
Make sure that the alignment mark “c” on the
exhaust camshaft sprocket and the alignment
mark “d” on the intake camshaft sprocket are
aligned with the edge of the cylinder head.
ECA33DD029
NOTICE
Do not turn the crankshaft during the cam-
shaft installation. Damage or improper
valve timing will result.
d. Install the clips, the camshaft caps and the
bolts (camshaft cap).
TIP
• Before installing the clips, cover the cylinder
head with a clean cloth to prevent the clips
from coming off into the cylinder head cavity.
• Apply the engine oil to the threads and con-
tact surfaces.
• Tighten the bolts to the specified torque in two
or three steps in the proper tightening se-
quence as shown.
ECA33DD030
NOTICE
The bolts (camshaft cap) must be tightened
evenly, or damage to the cylinder head,
camshaft caps, and camshaft will result.
▲▲▲▲▲▲▲▲▲▲▲▲▲▲▲▲▲▲▲▲▲▲▲▲▲▲▲▲▲▲▲▲
2. Install:
• Timing chain tensioner
▼▼▼▼▼▼▼▼▼▼▼▼▼▼▼▼▼▼▼▼▼▼▼▼▼▼▼▼▼▼▼▼
a. While pressing the tensioner rod lightly with
your fingers, use a thin screwdriver to wind
the tensioner rod up fully clockwise.
b. With the tensioner rod fully wound and the
chain tensioner UP mark “a” facing upward,
install the gasket “1”, the timing chain ten-
sioner “2”, and the gasket “3”, and tighten
the bolt “4”.
c. Release the screwdriver, check that the ten-
sioner rod comes out smoothly, and tighten
the gasket “5” and the cap bolt “6”.
▲▲▲▲▲▲▲▲▲▲▲▲▲▲▲▲▲▲▲▲▲▲▲▲▲▲▲▲▲▲▲▲
Bolt (camshaft cap)
10 Nm (1.0 m·kgf, 7.2 ft·lbf)
c 3
d
T R..
3
4
8
7
15
26
E
Bolt (timing chain tensioner)
10 Nm (1.0 m·kgf, 7.2 ft·lbf)
Tensioner cap bolt
6 Nm (0.6 m·kgf, 4.3 ft·lbf)
T R..
T R..
6 5
Page 214 of 362
CAMSHAFT
5-19
3. Turn:
• Crankshaft
Counterclockwise several turns.
4. Check:
• Top dead center (TDC) mark on the rotor
Align with the crankcase alignment mark.
• Camshaft match marks
Align with the cylinder head surface.
Out of alignment Adjust.
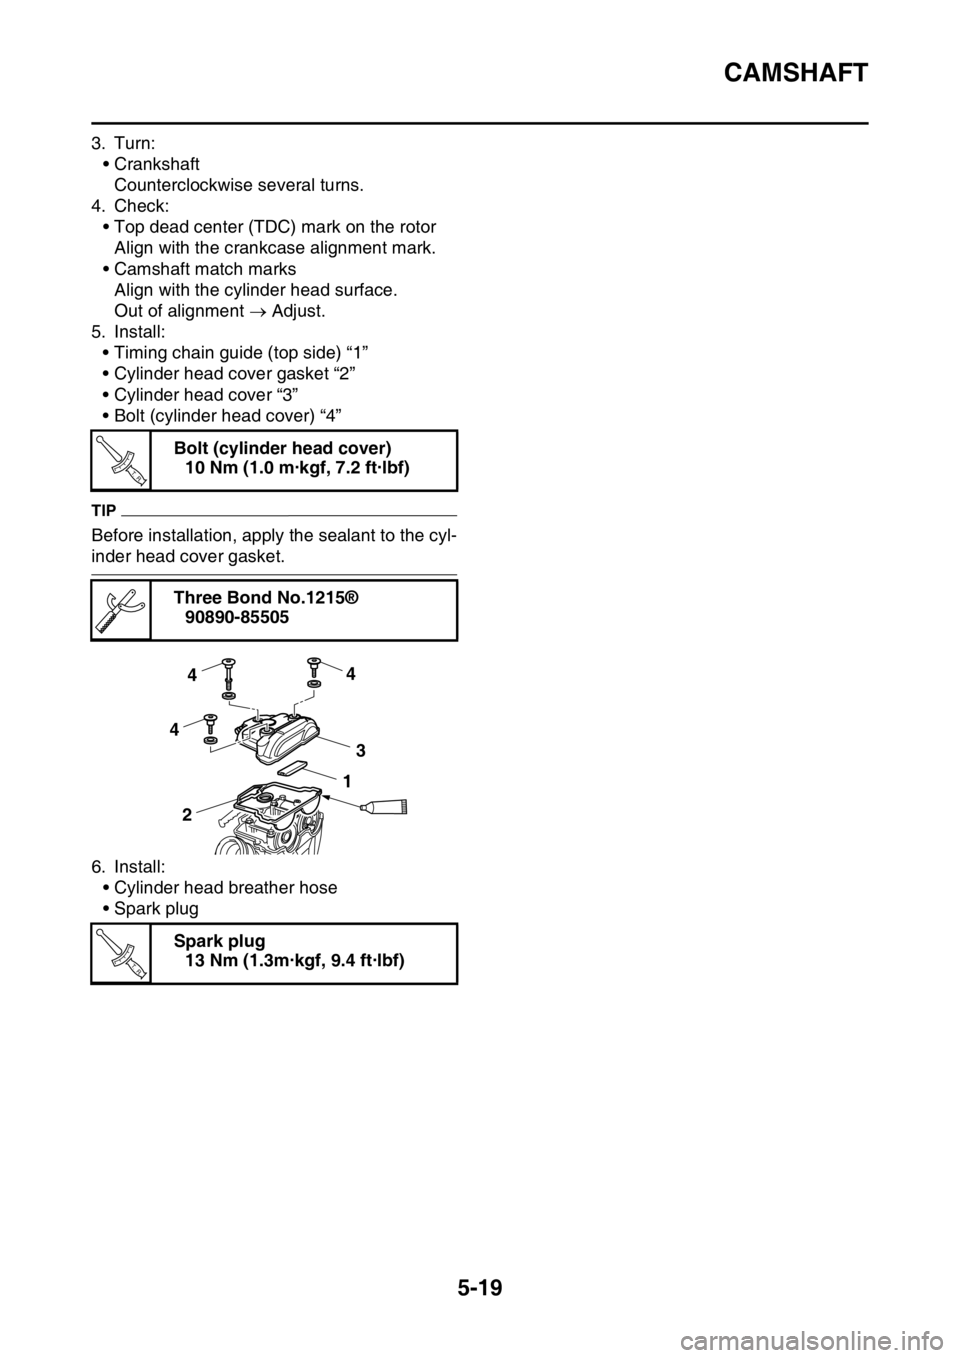
5. Install:
• Timing chain guide (top side) “1”
• Cylinder head cover gasket “2”
• Cylinder head cover “3”
• Bolt (cylinder head cover) “4”
TIP
Before installation, apply the sealant to the cyl-
inder head cover gasket.
6. Install:
• Cylinder head breather hose
• Spark plugBolt (cylinder head cover)
10 Nm (1.0 m·kgf, 7.2 ft·lbf)
Three Bond No.1215®
90890-85505
Spark plug
13 Nm (1.3m·kgf, 9.4 ft·lbf)
T R..
4
4
4
3
21
T R..
Page 215 of 362
CYLINDER HEAD
5-20
EASB111213
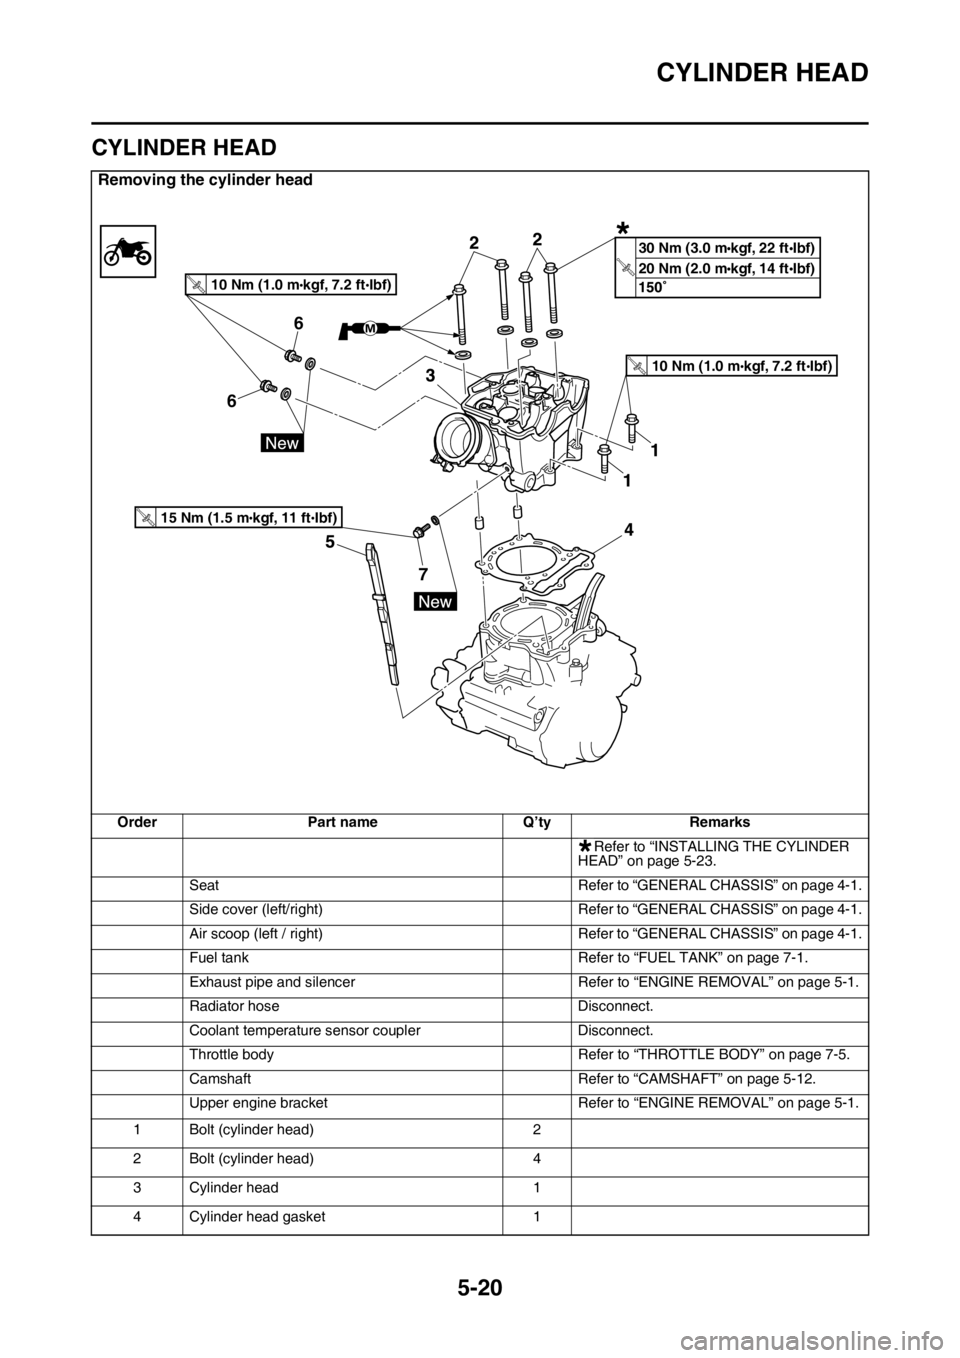
CYLINDER HEAD
Removing the cylinder head
Order Part name Q’ty Remarks
Refer to “INSTALLING THE CYLINDER
HEAD” on page 5-23.
Seat Refer to “GENERAL CHASSIS” on page 4-1.
Side cover (left/right) Refer to “GENERAL CHASSIS” on page 4-1.
Air scoop (left / right) Refer to “GENERAL CHASSIS” on page 4-1.
Fuel tank Refer to “FUEL TANK” on page 7-1.
Exhaust pipe and silencer Refer to “ENGINE REMOVAL” on page 5-1.
Radiator hose Disconnect.
Coolant temperature sensor coupler Disconnect.
Throttle body Refer to “THROTTLE BODY” on page 7-5.
Camshaft Refer to “CAMSHAFT” on page 5-12.
Upper engine bracket Refer to “ENGINE REMOVAL” on page 5-1.
1 Bolt (cylinder head) 2
2 Bolt (cylinder head) 4
3 Cylinder head 1
4 Cylinder head gasket 1
7 66
10 Nm (1.0 m kgf, 7.2 ft Ibf)T.R.
10 Nm (1.0 m kgf, 7.2 ft Ibf)T.R.
15 Nm (1.5 m kgf, 11 ft Ibf)T.R.
*
20 Nm (2.0 mkgf, 14 ftIbf)T.
R.
30 Nm (3.0 mkgf, 22 ftIbf)
*
Page 216 of 362
CYLINDER HEAD
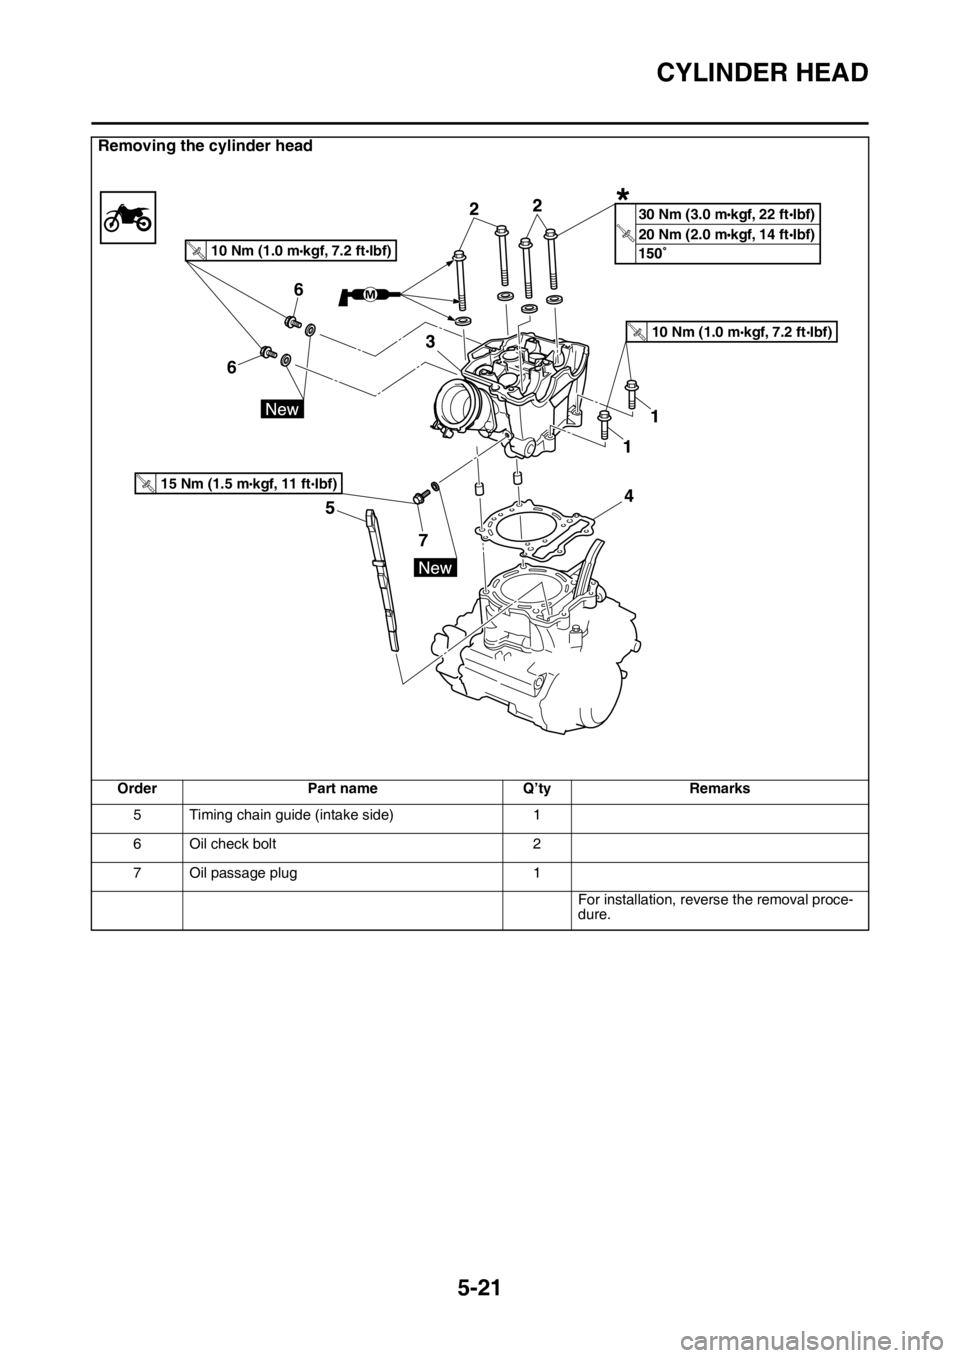
5-21
5 Timing chain guide (intake side) 1
6 Oil check bolt 2
7 Oil passage plug 1
For installation, reverse the removal proce-
dure.
Removing the cylinder head
Order Part name Q’ty Remarks
7 66
10 Nm (1.0 m kgf, 7.2 ft Ibf)T.R.
10 Nm (1.0 m kgf, 7.2 ft Ibf)T.R.
15 Nm (1.5 m kgf, 11 ft Ibf)T.R.
*
20 Nm (2.0 mkgf, 14 ftIbf)T.
R.
30 Nm (3.0 mkgf, 22 ftIbf)
Page 217 of 362
CYLINDER HEAD
5-22
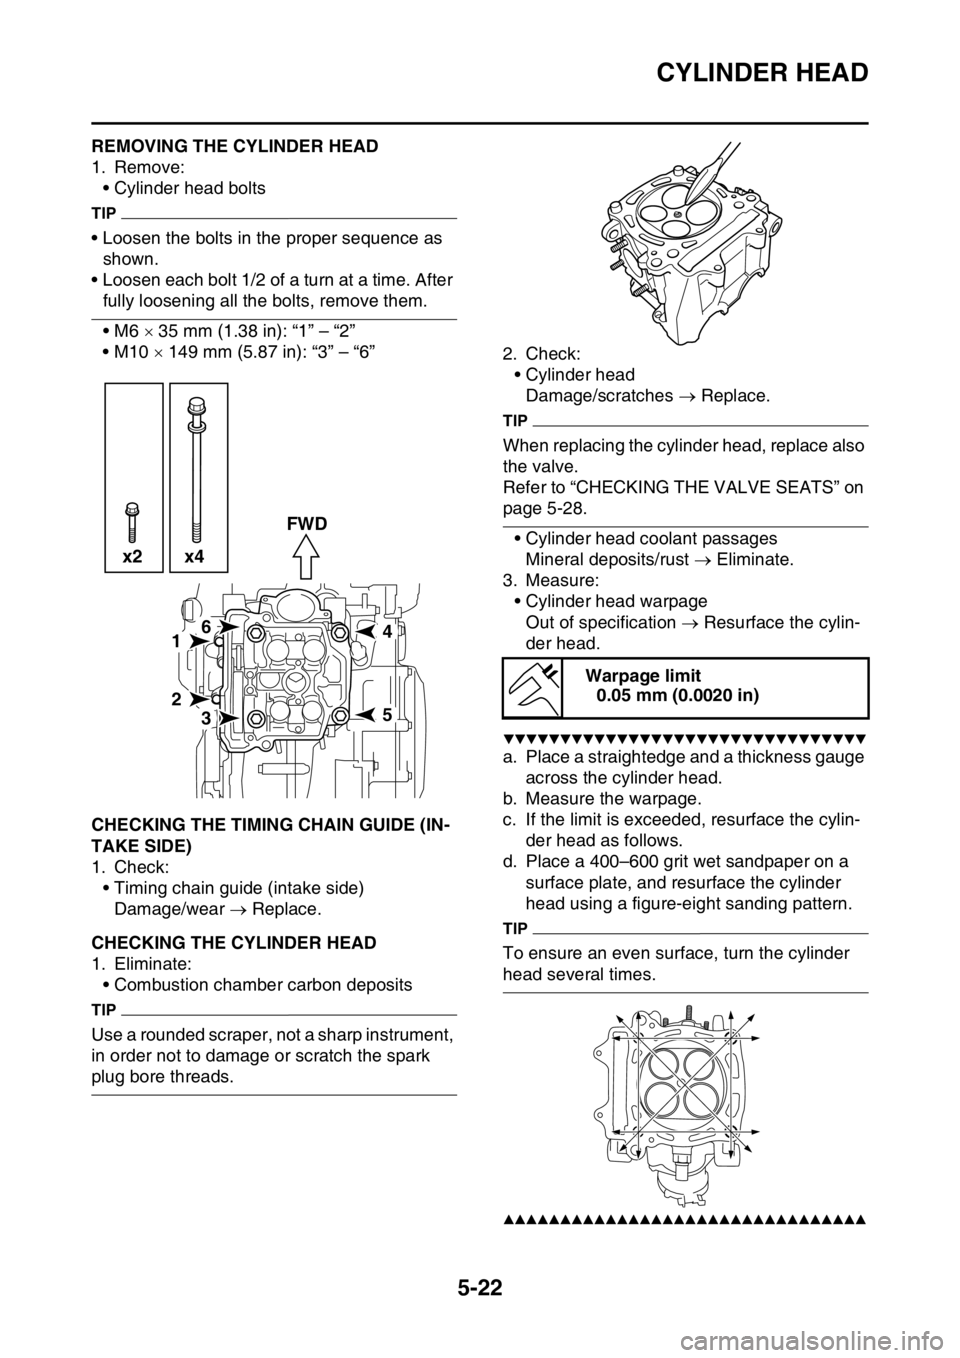
EASB111214REMOVING THE CYLINDER HEAD
1. Remove:
• Cylinder head bolts
TIP
• Loosen the bolts in the proper sequence as
shown.
• Loosen each bolt 1/2 of a turn at a time. After
fully loosening all the bolts, remove them.
•M6 35 mm (1.38 in): “1” – “2”
• M10 149 mm (5.87 in): “3” – “6”
EASB111215CHECKING THE TIMING CHAIN GUIDE (IN-
TAKE SIDE)
1. Check:
• Timing chain guide (intake side)
Damage/wear Replace.
EASB111216CHECKING THE CYLINDER HEAD
1. Eliminate:
• Combustion chamber carbon deposits
TIP
Use a rounded scraper, not a sharp instrument,
in order not to damage or scratch the spark
plug bore threads.2. Check:
• Cylinder head
Damage/scratches Replace.
TIP
When replacing the cylinder head, replace also
the valve.
Refer to “CHECKING THE VALVE SEATS” on
page 5-28.
• Cylinder head coolant passages
Mineral deposits/rust Eliminate.
3. Measure:
• Cylinder head warpage
Out of specification Resurface the cylin-
der head.
▼▼▼▼▼▼▼▼▼▼▼▼▼▼▼▼▼▼▼▼▼▼▼▼▼▼▼▼▼▼▼▼
a. Place a straightedge and a thickness gauge
across the cylinder head.
b. Measure the warpage.
c. If the limit is exceeded, resurface the cylin-
der head as follows.
d. Place a 400–600 grit wet sandpaper on a
surface plate, and resurface the cylinder
head using a figure-eight sanding pattern.
TIP
To ensure an even surface, turn the cylinder
head several times.
▲▲▲▲▲▲▲▲▲▲▲▲▲▲▲▲▲▲▲▲▲▲▲▲▲▲▲▲▲▲▲▲
61
2
35
4 x2 x4FWD
Warpage limit
0.05 mm (0.0020 in)
Page 218 of 362
CYLINDER HEAD
5-23
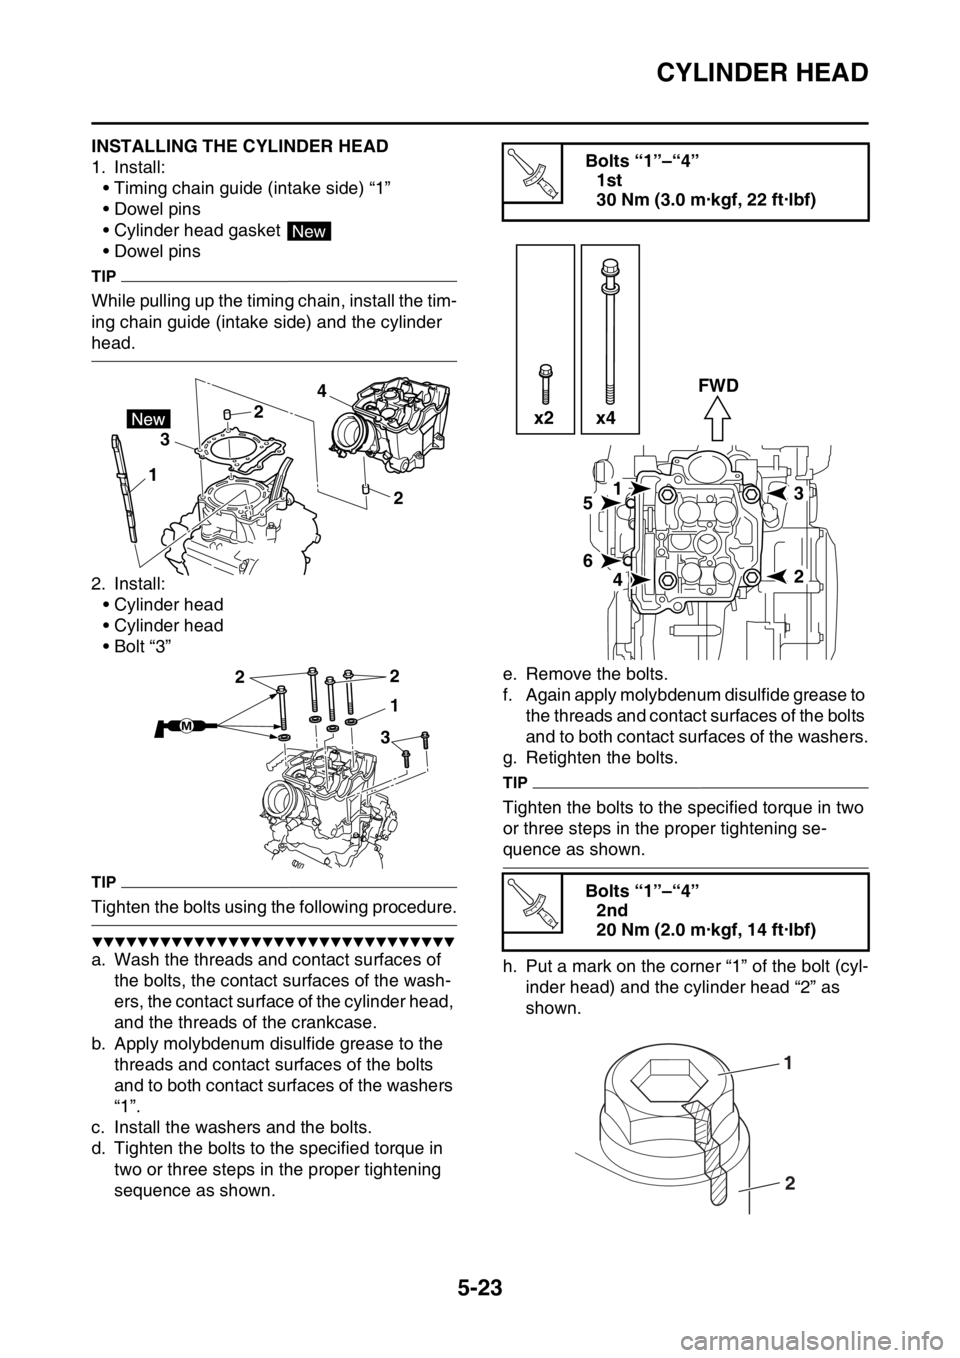
EASB111217INSTALLING THE CYLINDER HEAD
1. Install:
• Timing chain guide (intake side) “1”
• Dowel pins
• Cylinder head gasket
• Dowel pins
TIP
While pulling up the timing chain, install the tim-
ing chain guide (intake side) and the cylinder
head.
2. Install:
• Cylinder head
• Cylinder head
•Bolt “3”
TIP
Tighten the bolts using the following procedure.
▼▼▼▼▼▼▼▼▼▼▼▼▼▼▼▼▼▼▼▼▼▼▼▼▼▼▼▼▼▼▼▼
a. Wash the threads and contact surfaces of
the bolts, the contact surfaces of the wash-
ers, the contact surface of the cylinder head,
and the threads of the crankcase.
b. Apply molybdenum disulfide grease to the
threads and contact surfaces of the bolts
and to both contact surfaces of the washers
“1”.
c. Install the washers and the bolts.
d. Tighten the bolts to the specified torque in
two or three steps in the proper tightening
sequence as shown.e. Remove the bolts.
f. Again apply molybdenum disulfide grease to
the threads and contact surfaces of the bolts
and to both contact surfaces of the washers.
g. Retighten the bolts.
TIP
Tighten the bolts to the specified torque in two
or three steps in the proper tightening se-
quence as shown.
h. Put a mark on the corner “1” of the bolt (cyl-
inder head) and the cylinder head “2” as
shown.
New
12
2 4
3
1
3 22
Bolts “1”–“4”
1st
30 Nm (3.0 m·kgf, 22 ft·lbf)
Bolts “1”–“4”
2nd
20 Nm (2.0 m·kgf, 14 ft·lbf)
T R..
15
6
42
3 FWD
x2 x4
T R..
1
2
Page 219 of 362
CYLINDER HEAD
5-24
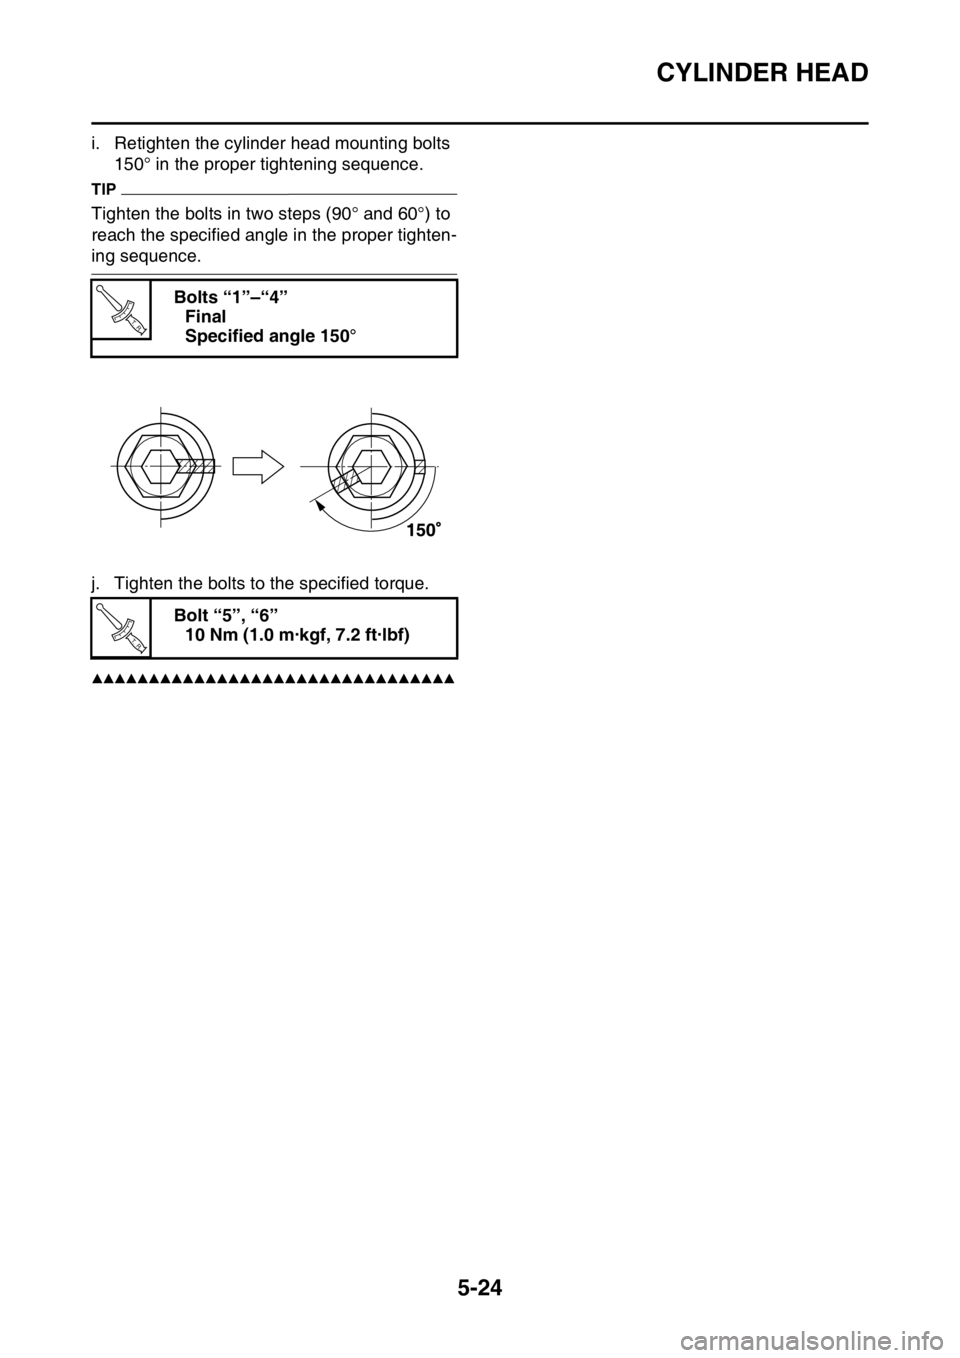
i. Retighten the cylinder head mounting bolts
150° in the proper tightening sequence.
TIP
Tighten the bolts in two steps (90° and 60°) to
reach the specified angle in the proper tighten-
ing sequence.
j. Tighten the bolts to the specified torque.
▲▲▲▲▲▲▲▲▲▲▲▲▲▲▲▲▲▲▲▲▲▲▲▲▲▲▲▲▲▲▲▲
Bolts “1”–“4”
Final
Specified angle 150°
Bolt “5”, “6”
10 Nm (1.0 m·kgf, 7.2 ft·lbf)
T R..
T R..
Page 220 of 362
VALVES AND VALVE SPRINGS
5-25
EASB111218
VALVES AND VALVE SPRINGS
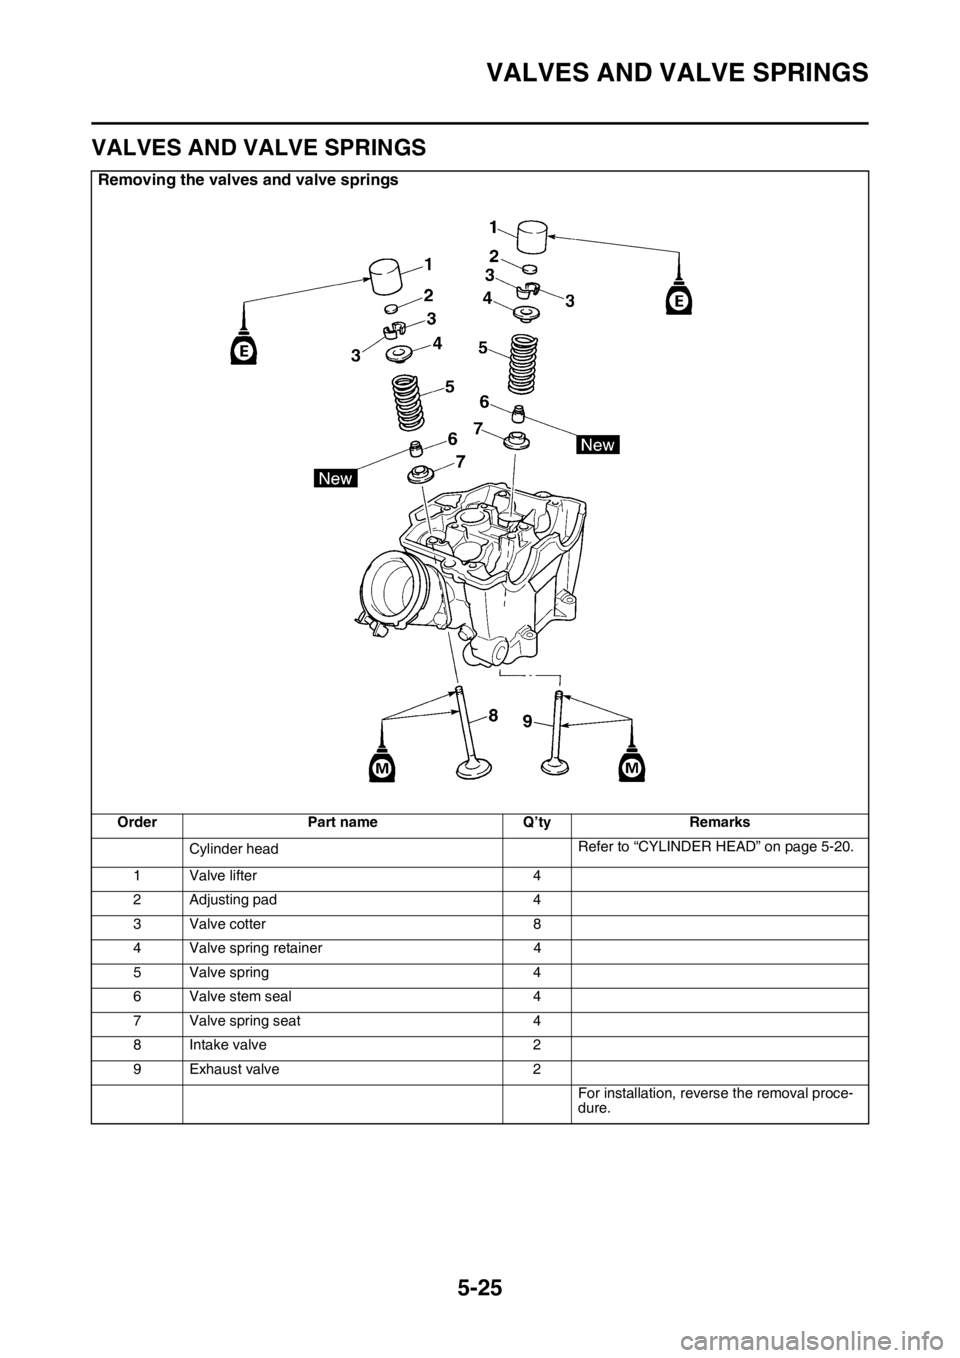
Removing the valves and valve springs
Order Part name Q’ty Remarks
Cylinder headRefer to “CYLINDER HEAD” on page 5-20.
1 Valve lifter 4
2 Adjusting pad 4
3 Valve cotter 8
4 Valve spring retainer 4
5 Valve spring 4
6 Valve stem seal 4
7 Valve spring seat 4
8 Intake valve 2
9 Exhaust valve 2
For installation, reverse the removal proce-
dure.