YAMAHA YZ85 2002 Notices Demploi (in French)
Manufacturer: YAMAHA, Model Year: 2002, Model line: YZ85, Model: YAMAHA YZ85 2002Pages: 504, PDF Size: 40.45 MB
Page 111 of 504
2 - 16
SPEC
MEMO
Page 112 of 504
2 - 16
SPEC
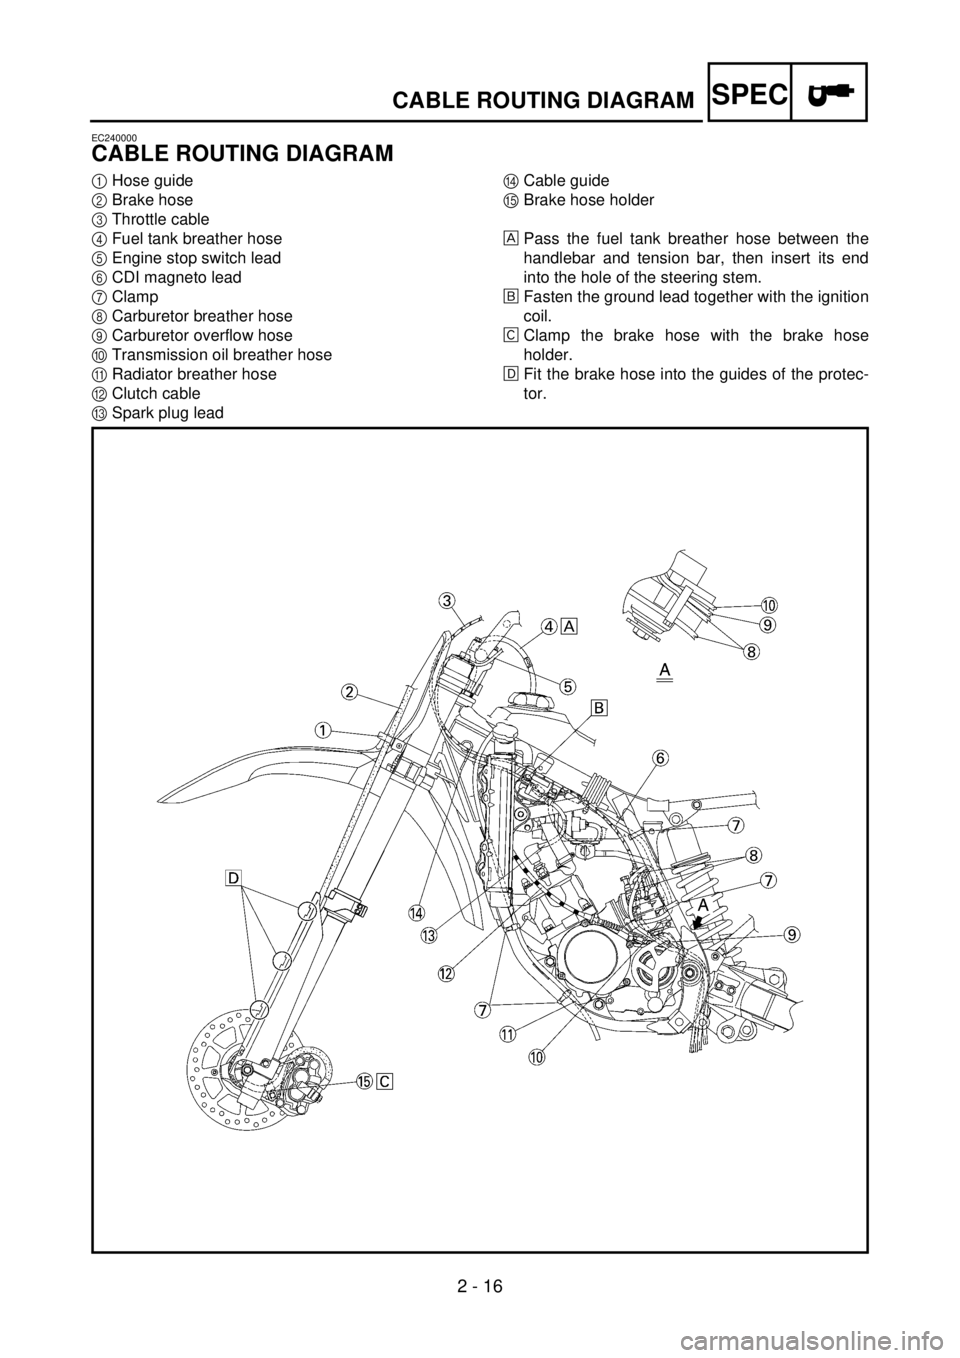
EC240000
CABLE ROUTING DIAGRAM
1Hose guide
2Brake hose
3Throttle cable
4Fuel tank breather hose
5Engine stop switch lead
6CDI magneto lead
7Clamp
8Carburetor breather hose
9Carburetor overflow hose
0Transmission oil breather hose
ARadiator breather hose
BClutch cable
CSpark plug leadDCable guide
EBrake hose holder
ÈPass the fuel tank breather hose between the
handlebar and tension bar, then insert its end
into the hole of the steering stem.
ÉFasten the ground lead together with the ignition
coil.
ÊClamp the brake hose with the brake hose
holder.
ËFit the brake hose into the guides of the protec-
tor.
CABLE ROUTING DIAGRAM
Page 113 of 504
2 - 16
SPEC
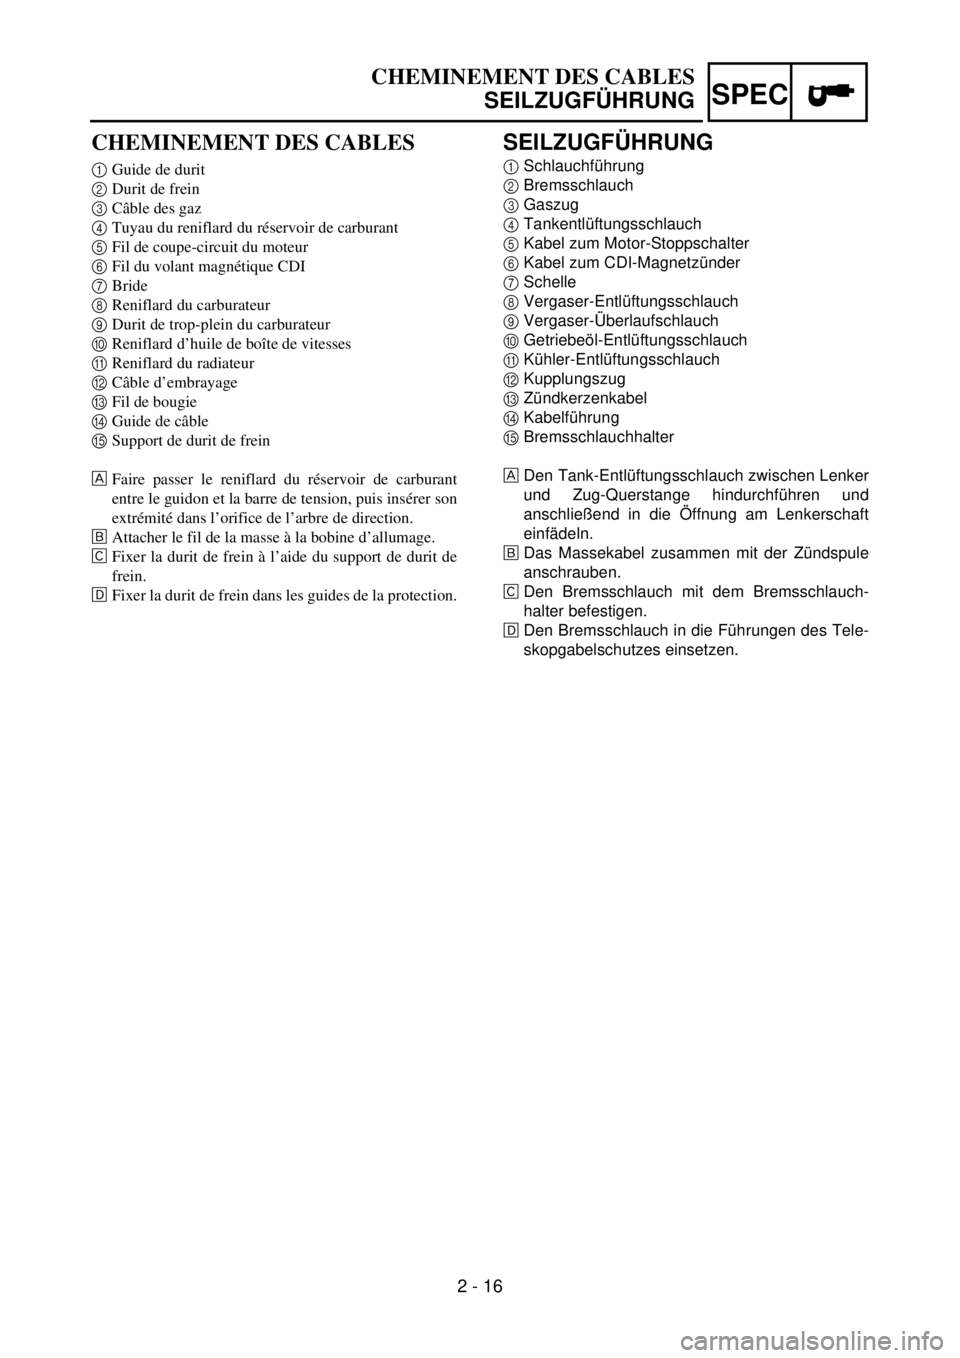
CHEMINEMENT DES CABLES
1Guide de durit
2Durit de frein
3Câble des gaz
4Tuyau du reniflard du réservoir de carburant
5Fil de coupe-circuit du moteur
6Fil du volant magnétique CDI
7Bride
8Reniflard du carburateur
9Durit de trop-plein du carburateur
0Reniflard d’huile de boîte de vitesses
AReniflard du radiateur
BCâble d’embrayage
CFil de bougie
DGuide de câble
ESupport de durit de frein
ÈFaire passer le reniflard du réservoir de carburant
entre le guidon et la barre de tension, puis insérer son
extrémité dans l’orifice de l’arbre de direction.
ÉAttacher le fil de la masse à la bobine d’allumage.
ÊFixer la durit de frein à l’aide du support de durit de
frein.
ËFixer la durit de frein dans les guides de la protection.
CHEMINEMENT DES CABLES
SEILZUGFÜHRUNG
SEILZUGFÜHRUNG
1Schlauchführung
2Bremsschlauch
3Gaszug
4Tankentlüftungsschlauch
5Kabel zum Motor-Stoppschalter
6Kabel zum CDI-Magnetzünder
7Schelle
8Vergaser-Entlüftungsschlauch
9Vergaser-Überlaufschlauch
0Getriebeöl-Entlüftungsschlauch
AKühler-Entlüftungsschlauch
BKupplungszug
CZündkerzenkabel
DKabelführung
EBremsschlauchhalter
ÈDen Tank-Entlüftungsschlauch zwischen Lenker
und Zug-Querstange hindurchführen und
anschließend in die Öffnung am Lenkerschaft
einfädeln.
ÉDas Massekabel zusammen mit der Zündspule
anschrauben.
ÊDen Bremsschlauch mit dem Bremsschlauch-
halter befestigen.
ËDen Bremsschlauch in die Führungen des Tele-
skopgabelschutzes einsetzen.
Page 114 of 504
2 - 17
SPEC
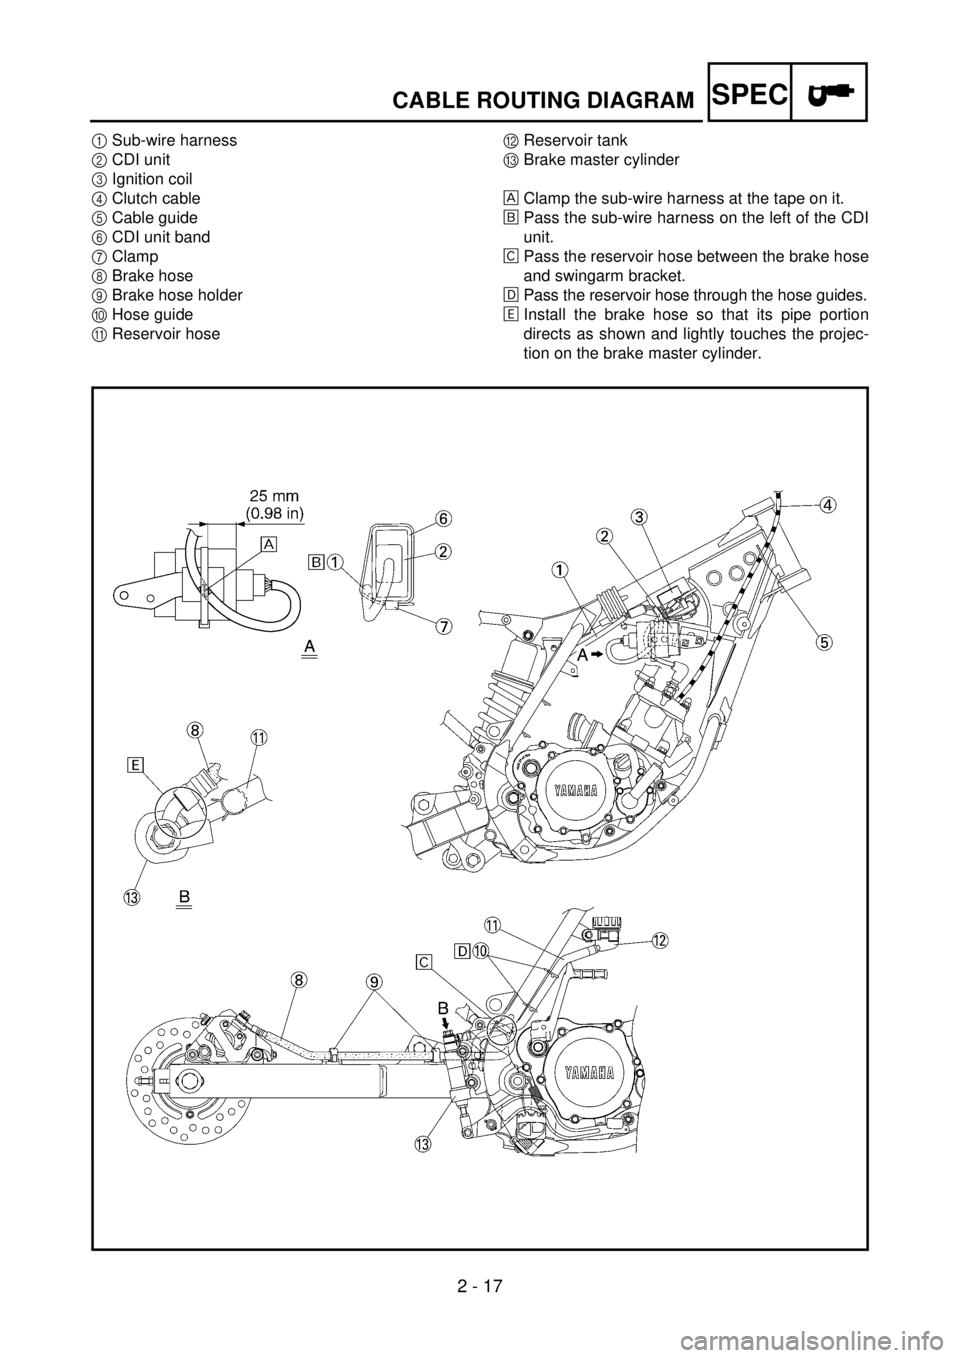
1Sub-wire harness
2CDI unit
3Ignition coil
4Clutch cable
5Cable guide
6CDI unit band
7Clamp
8Brake hose
9Brake hose holder
0Hose guide
AReservoir hoseBReservoir tank
CBrake master cylinder
ÈClamp the sub-wire harness at the tape on it.
ÉPass the sub-wire harness on the left of the CDI
unit.
ÊPass the reservoir hose between the brake hose
and swingarm bracket.
ËPass the reservoir hose through the hose guides.
ÌInstall the brake hose so that its pipe portion
directs as shown and lightly touches the projec-
tion on the brake master cylinder.
5PA20070
CABLE ROUTING DIAGRAM
Page 115 of 504
2 - 17
SPEC
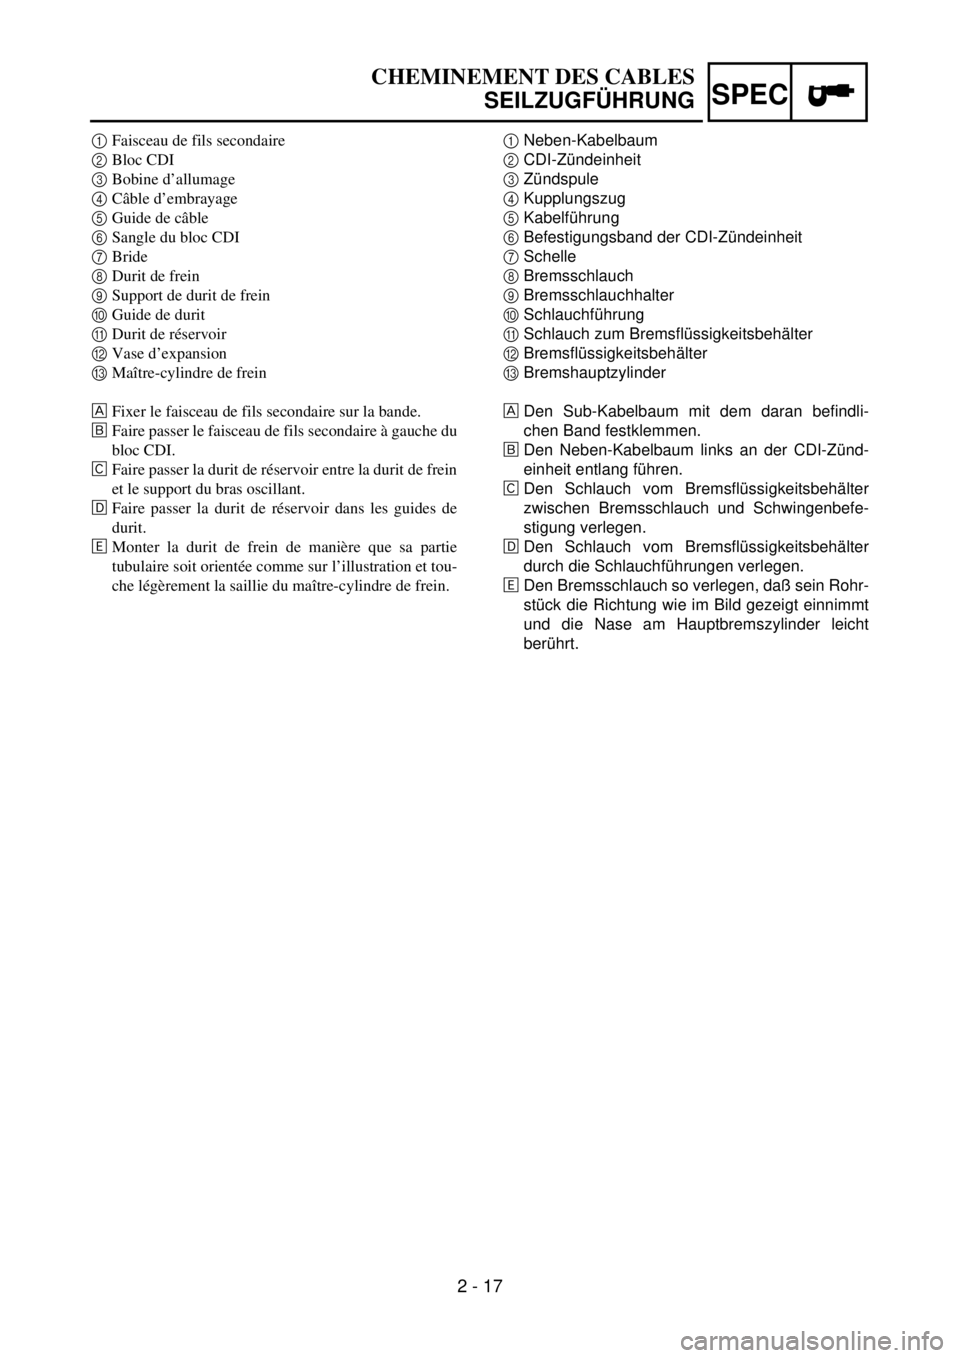
1Faisceau de fils secondaire
2Bloc CDI
3Bobine d’allumage
4Câble d’embrayage
5Guide de câble
6Sangle du bloc CDI
7Bride
8Durit de frein
9Support de durit de frein
0Guide de durit
ADurit de réservoir
BVase d’expansion
CMaître-cylindre de frein
ÈFixer le faisceau de fils secondaire sur la bande.
ÉFaire passer le faisceau de fils secondaire à gauche du
bloc CDI.
ÊFaire passer la durit de réservoir entre la durit de frein
et le support du bras oscillant.
ËFaire passer la durit de réservoir dans les guides de
durit.
ÌMonter la durit de frein de manière que sa partie
tubulaire soit orientée comme sur l’illustration et tou-
che légèrement la saillie du maître-cylindre de frein.
CHEMINEMENT DES CABLES
SEILZUGFÜHRUNG
1Neben-Kabelbaum
2CDI-Zündeinheit
3Zündspule
4Kupplungszug
5Kabelführung
6Befestigungsband der CDI-Zündeinheit
7Schelle
8Bremsschlauch
9Bremsschlauchhalter
0Schlauchführung
ASchlauch zum Bremsflüssigkeitsbehälter
BBremsflüssigkeitsbehälter
CBremshauptzylinder
ÈDen Sub-Kabelbaum mit dem daran befindli-
chen Band festklemmen.
ÉDen Neben-Kabelbaum links an der CDI-Zünd-
einheit entlang führen.
ÊDen Schlauch vom Bremsflüssigkeitsbehälter
zwischen Bremsschlauch und Schwingenbefe-
stigung verlegen.
ËDen Schlauch vom Bremsflüssigkeitsbehälter
durch die Schlauchführungen verlegen.
ÌDen Bremsschlauch so verlegen, daß sein Rohr-
stück die Richtung wie im Bild gezeigt einnimmt
und die Nase am Hauptbremszylinder leicht
berührt.
Page 116 of 504
2 - 18
SPEC
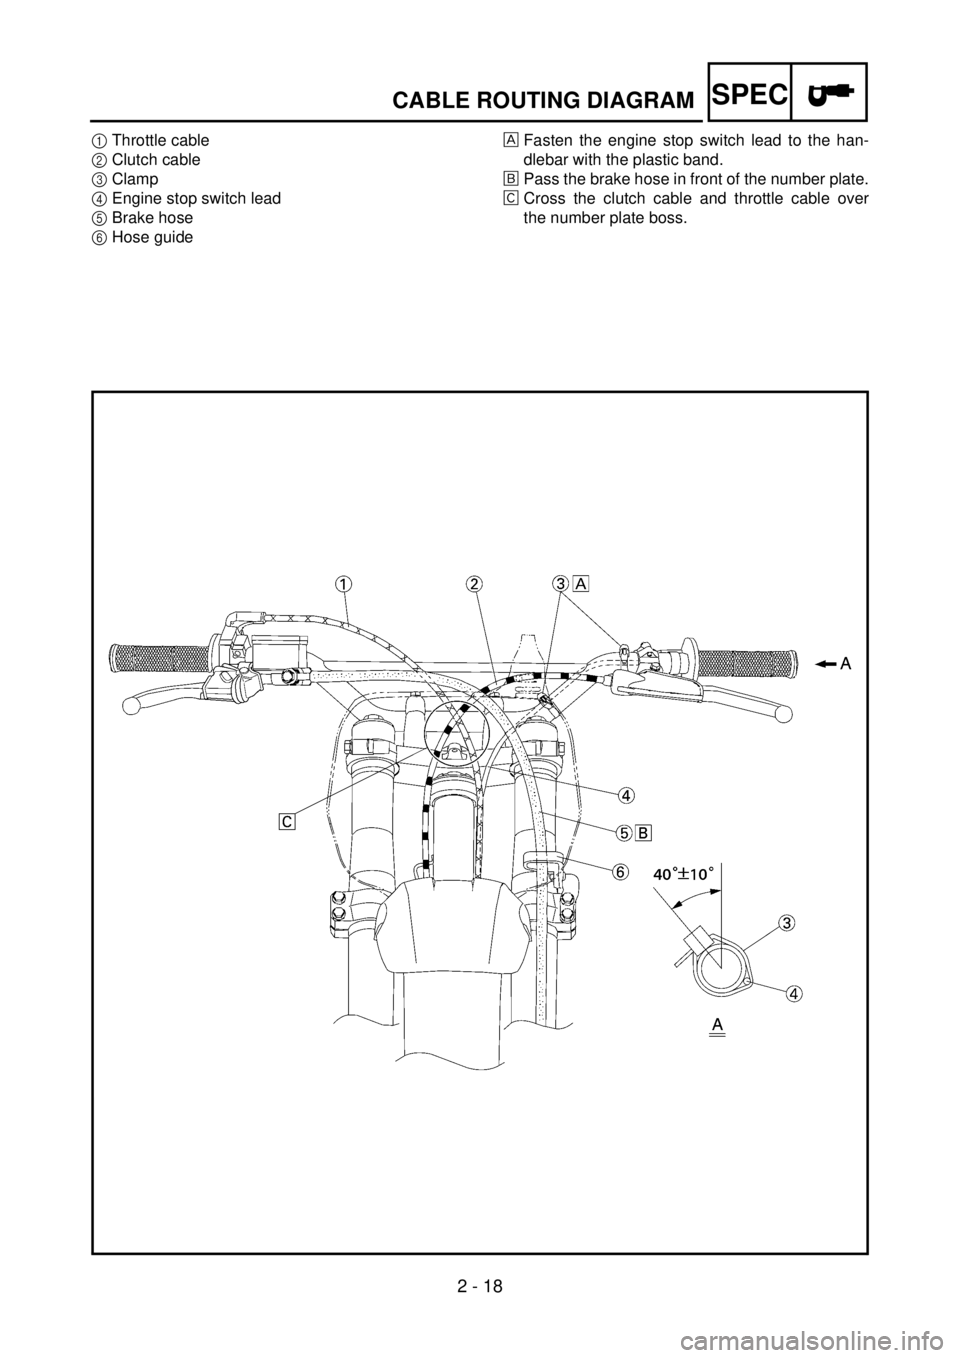
1Throttle cable
2Clutch cable
3Clamp
4Engine stop switch lead
5Brake hose
6Hose guideÈFasten the engine stop switch lead to the han-
dlebar with the plastic band.
ÉPass the brake hose in front of the number plate.
ÊCross the clutch cable and throttle cable over
the number plate boss.
5PA20070
CABLE ROUTING DIAGRAM
Page 117 of 504
2 - 18
SPEC
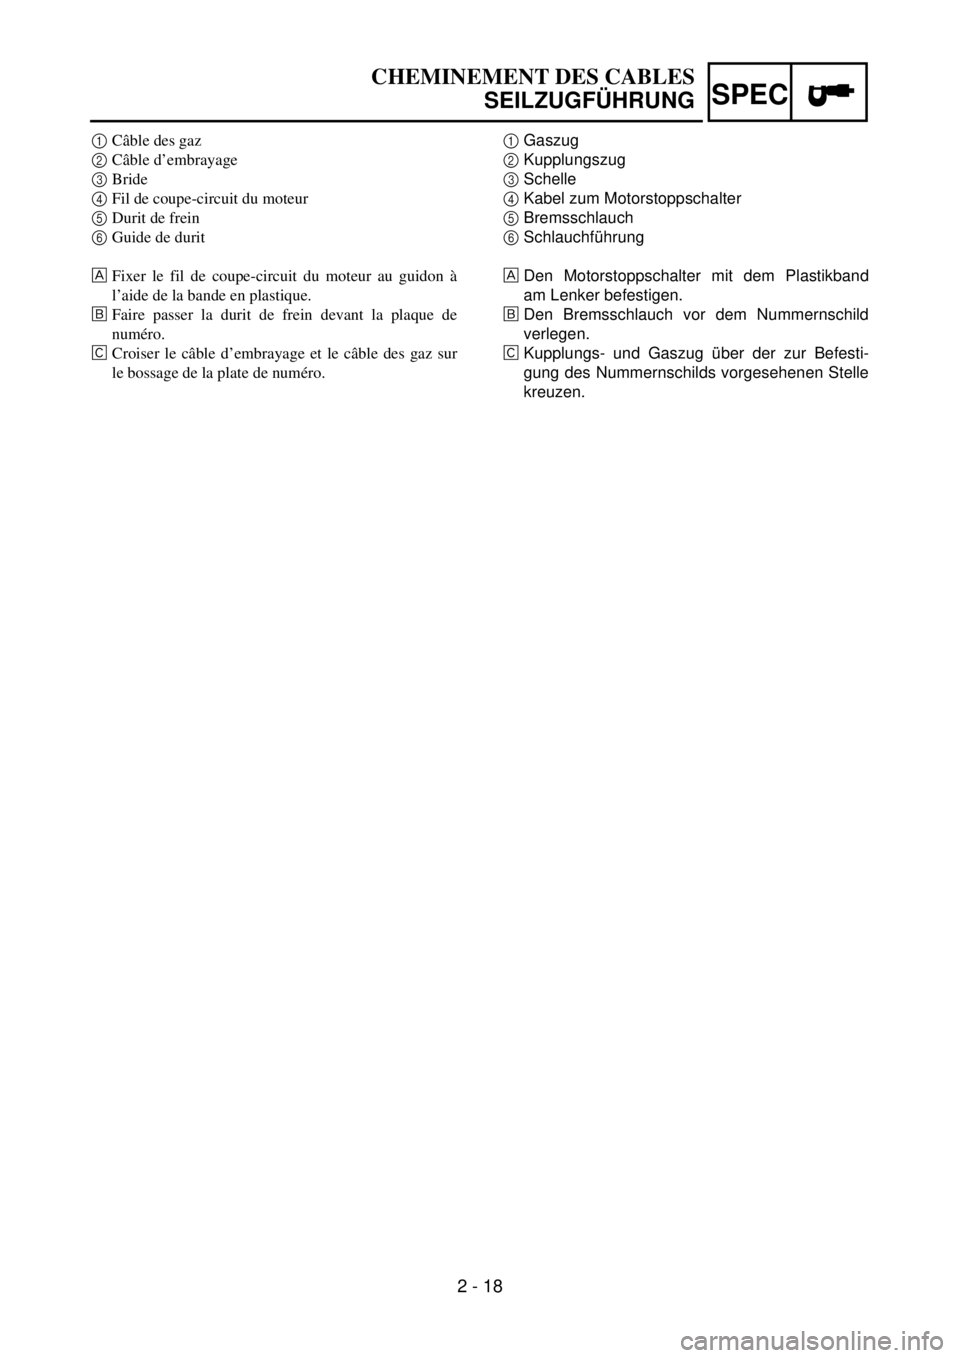
1Câble des gaz
2Câble d’embrayage
3Bride
4Fil de coupe-circuit du moteur
5Durit de frein
6Guide de durit
ÈFixer le fil de coupe-circuit du moteur au guidon à
l’aide de la bande en plastique.
ÉFaire passer la durit de frein devant la plaque de
numéro.
ÊCroiser le câble d’embrayage et le câble des gaz sur
le bossage de la plate de numéro.
CHEMINEMENT DES CABLES
SEILZUGFÜHRUNG
1Gaszug
2Kupplungszug
3Schelle
4Kabel zum Motorstoppschalter
5Bremsschlauch
6Schlauchführung
ÈDen Motorstoppschalter mit dem Plastikband
am Lenker befestigen.
ÉDen Bremsschlauch vor dem Nummernschild
verlegen.
ÊKupplungs- und Gaszug über der zur Befesti-
gung des Nummernschilds vorgesehenen Stelle
kreuzen.
Page 118 of 504
3 - 1
INSP
ADJ
MAINTENANCE INTERVALS
EC300000
REGULAR INSPECTION AND ADJUSTMENTS
MAINTENANCE INTERVALS
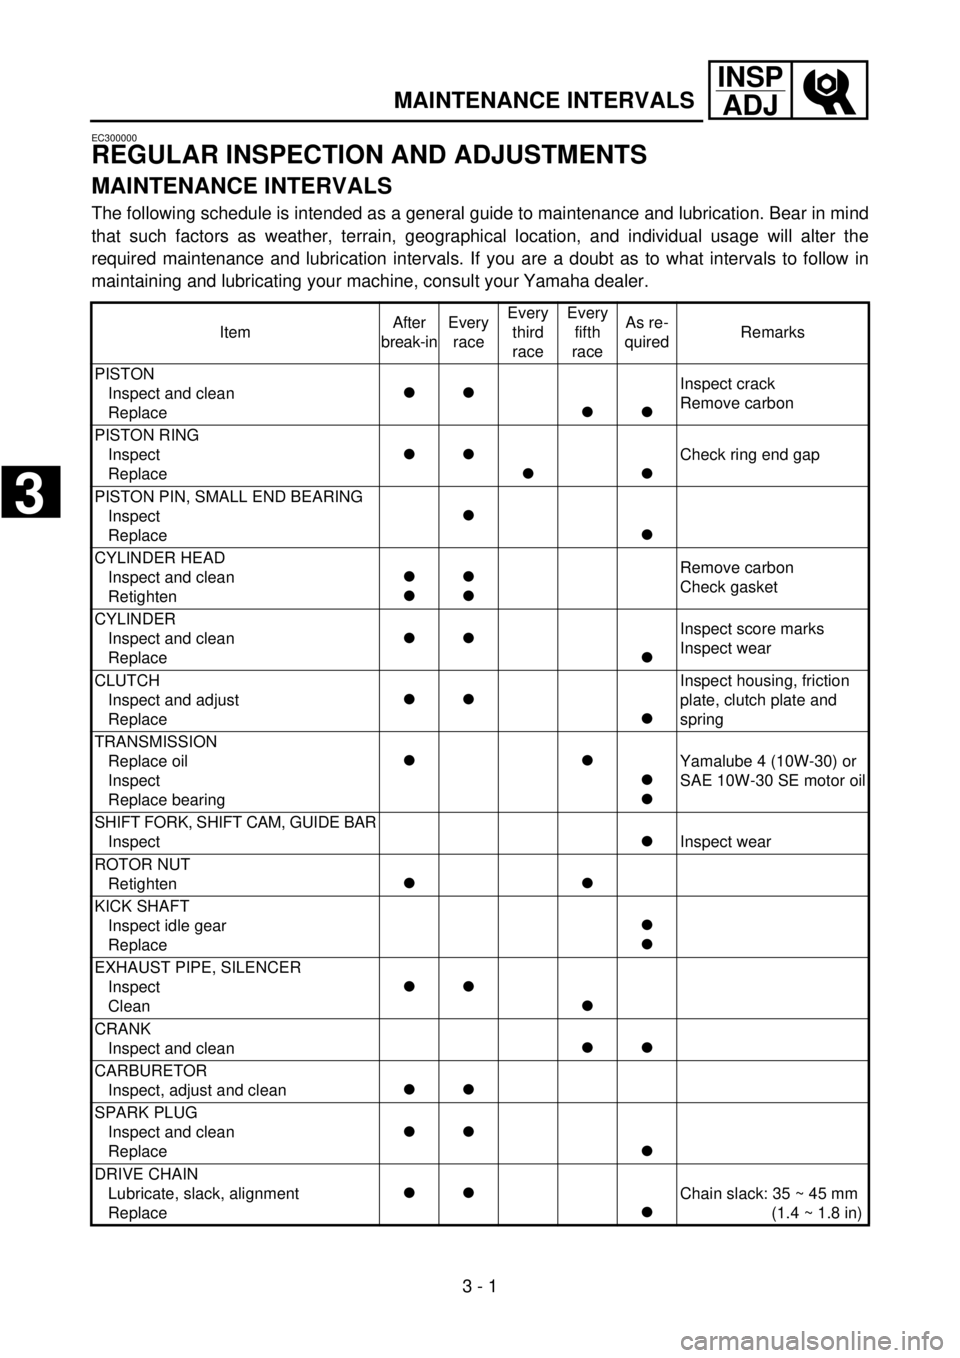
The following schedule is intended as a general guide to maintenance and lubrication. Bear in mind
that such factors as weather, terrain, geographical location, and individual usage will alter the
required maintenance and lubrication intervals. If you are a doubt as to what intervals to follow in
maintaining and lubricating your machine, consult your Yamaha dealer.
ItemAfter
break-inEvery
raceEvery
third
raceEvery
fifth
raceAs re-
quiredRemarks
PISTON
Inspect and clean
Replace
ll
l
lInspect crack
Remove carbon
PISTON RING
Inspect
Replace
ll
llCheck ring end gap
PISTON PIN, SMALL END BEARING
Inspect
Replace
l
l
CYLINDER HEAD
Inspect and clean
Retighten
l
ll
lRemove carbon
Check gasket
CYLINDER
Inspect and clean
Replace
ll
lInspect score marks
Inspect wear
CLUTCH
Inspect and adjust
Replace
ll
l
Inspect housing, friction
plate, clutch plate and
spring
TRANSMISSION
Replace oil
Inspect
Replace bearing
ll
l
lYamalube 4 (10W-30) or
SAE 10W-30 SE motor oil
SHIFT FORK, SHIFT CAM, GUIDE BAR
Inspect
l Inspect wear
ROTOR NUT
Retighten
l
l
KICK SHAFT
Inspect idle gear
Replace
l
l
EXHAUST PIPE, SILENCER
Inspect
Clean
ll
l
CRANK
Inspect and clean
ll
CARBURETOR
Inspect, adjust and clean
ll
SPARK PLUG
Inspect and clean
Replace
ll
l
DRIVE CHAIN
Lubricate, slack, alignment
Replace
ll
lChain slack: 35 ~ 45 mm
(1.4 ~ 1.8 in)
3
Page 119 of 504

3 - 2
INSP
ADJ
MAINTENANCE INTERVALS
COOLING SYSTEM
Check coolant level and leakage
Check radiator cap operation
Replace coolant
Inspect hoses
ll
ll
l
Every two years
OUTSIDE NUTS AND BOLTS
Retighten
ll
AIR FILTER
Clean and lubricate
Replace
ll
lUse foam air-filter oil
FRAME
Clean and inspect
ll
FUEL TANK, COCK
Clean and inspect
ll
BRAKES
Adjust lever position and pedal height
Lubricate pivot point
Check brake disc surface
Check fluid level and leakage
Retighten brake disc bolts, caliper
bolts, master cylinder bolts and union
bolts
Replace pads
Replace brake fluid
l
l
l
l
ll
l
l
l
l
l
l
Every one year
FRONT FORKS
Inspect and adjust
Replace oil
Replace oil seal
l
ll
l
l
Suspension oil “01”
FRONT FORK OIL SEAL AND DUST
SEAL
Clean and lube
llLithium base grease
REAR SHOCK ABSORBER
Inspect and adjust
Lube
Retighten
l
ll
ll(After
rain ride)
l
Molybdenum disulfide
grease
CHAIN GUARD AND ROLLERS
Inspect
l
SWINGARM
Inspect and retighten
Lube
l
ll
l
Molybdenum disulfide
grease
RELAY ARM, CONNECTING ROD
Inspect and retighten
Lube
l
ll
l
Molybdenum disulfide
grease
STEERING HEAD
Inspect free play and retighten
Clean and lube
Replace bearing
ll
l
l
Lithium base grease ItemAfter
break-inEvery
raceEvery
third
raceEvery
fifth
raceAs re-
quiredRemarks
3
Page 120 of 504
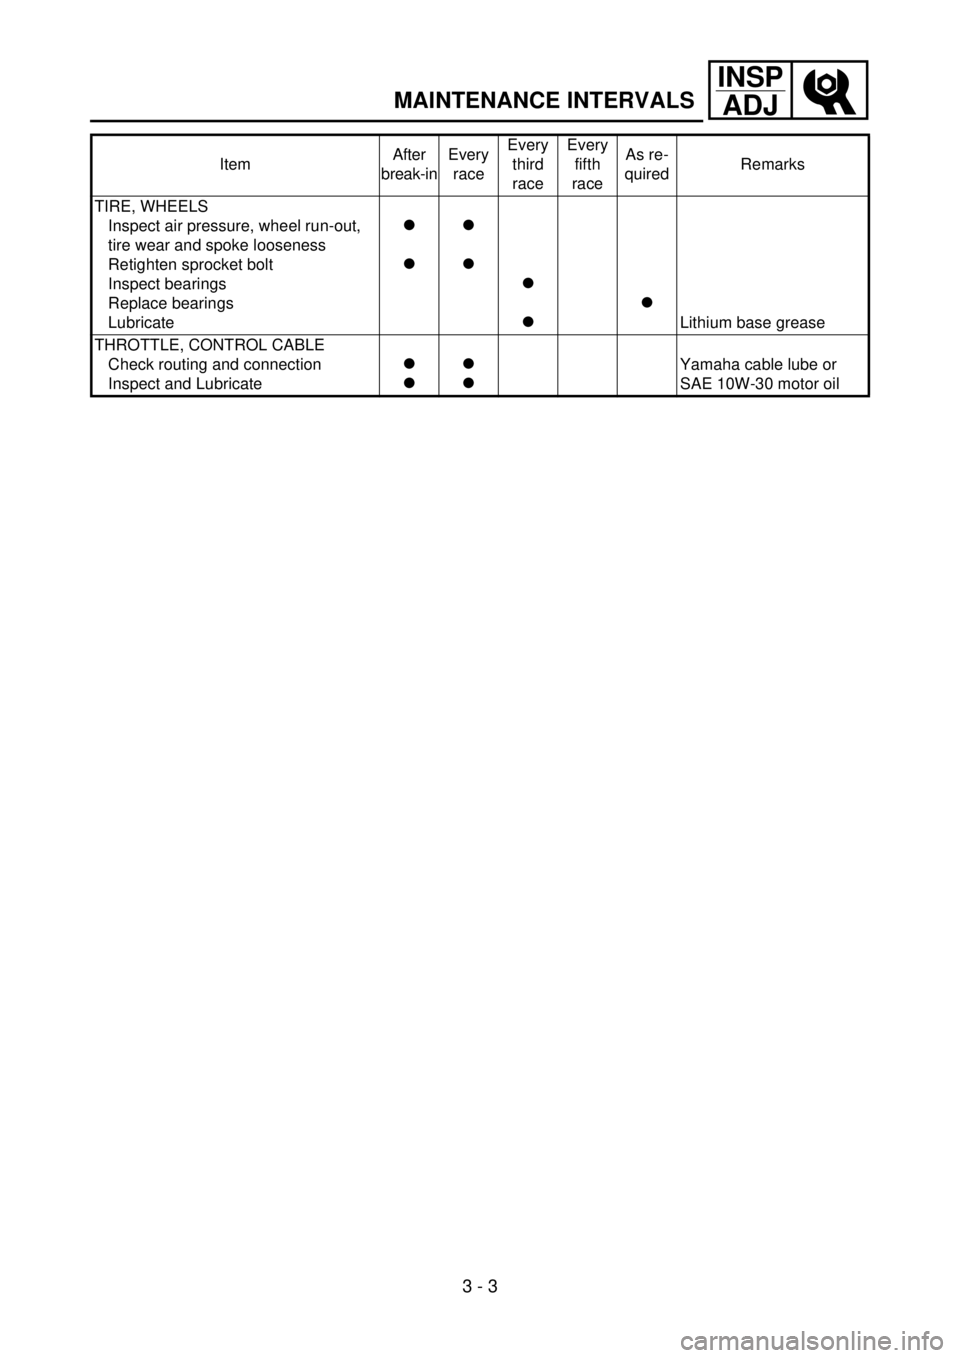
3 - 3
INSP
ADJ
MAINTENANCE INTERVALS
TIRE, WHEELS
Inspect air pressure, wheel run-out,
tire wear and spoke looseness
Retighten sprocket bolt
Inspect bearings
Replace bearings
Lubricate
l
ll
l
l
ll
Lithium base grease
THROTTLE, CONTROL CABLE
Check routing and connection
Inspect and Lubricate
l
ll
lYamaha cable lube or
SAE 10W-30 motor oil ItemAfter
break-inEvery
raceEvery
third
raceEvery
fifth
raceAs re-
quiredRemarks