steering YAMAHA YZF-R7 1999 User Guide
[x] Cancel search | Manufacturer: YAMAHA, Model Year: 1999, Model line: YZF-R7, Model: YAMAHA YZF-R7 1999Pages: 381, PDF Size: 18.88 MB
Page 114 of 381

3 - 45
CHK
ADJ
CHECKING AND ADJUSTING THE STEERING HEAD
c. Loosen the lower ring nut completely,
then tighten it to specification.
WARNINGWARNING
Do not overtighten the lower ring nut.
d. Check the steering head for looseness
or binding by turning the front fork all
the way in both directions. If any
binding is felt, remove the lower
bracket and check the upper and
lower bearings.
Refer to “STEERING HEAD” in chap-
ter 7.
e. Install the rubber washer 3.
f. Install the upper ring nut 2.
g. Finger tighten the upper ring nut 2,
then align the slots of both ring nuts.
If necessary, hold the lower ring nut
and tighten the upper ring nut until
their slots are aligned.
h. Install the lock washer 1.
NOTE:
Make sure that the lock washer tabs a
sit correctly in the ring nut slots b.
s s s s s s s s s s s s s s s s s s s s s s s s s s s
T R..
Lower ring nut (final tightening
torque)
9 Nm (0.9 m • kg, 6.5 ft • lb)
9. Install:
• steering stem nut
• upper bracket bolt
• handlebar pinch bolt
• upper bracket pinch bolt
10.Measure:
• steering head tension
(with the motorcycle still on the stand)
t t t t t t t t t t t t t t t t t t t t t t t t t t t
NOTE:
Make sure that all of the cables and
wires are properly routed.
a. Point the front wheel straight ahead.
b. Install a plastic locking tie 1 loosely
around the end of the handlebar as
shown.
c. Hook a spring gauge 2 onto the plas-
tic locking tie.
T R..115 Nm (11.5 m · kg, 85 ft · lb)
T R..13 Nm (1.3 m · kg, 9.4 ft · lb)
T R..13 Nm (1.3 m · kg, 9.4 ft · lb)
T R..26 Nm (2.6 m · kg, 16 ft · lb)
Page 115 of 381
3 - 46
CHK
ADJCHECKING AND ADJUSTING THE STEERING HEAD/
CHECKING THE FRONT FORK
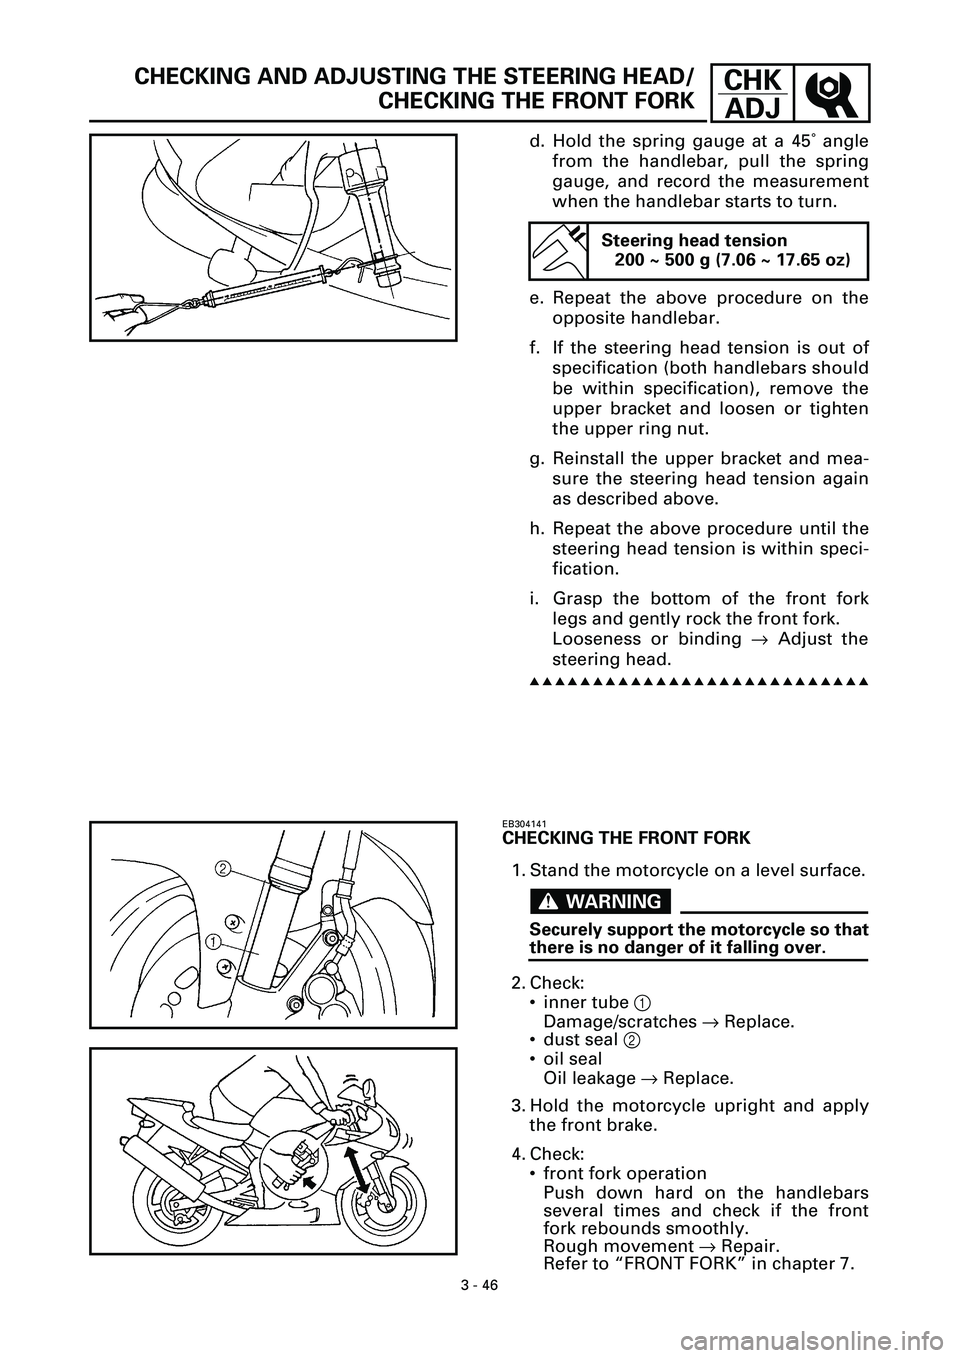
d. Hold the spring gauge at a 45˚ angle
from the handlebar, pull the spring
gauge, and record the measurement
when the handlebar starts to turn.
e. Repeat the above procedure on the
opposite handlebar.
f. If the steering head tension is out of
specification (both handlebars should
be within specification), remove the
upper bracket and loosen or tighten
the upper ring nut.
g. Reinstall the upper bracket and mea-
sure the steering head tension again
as described above.
h. Repeat the above procedure until the
steering head tension is within speci-
fication.
i. Grasp the bottom of the front fork
legs and gently rock the front fork.
Looseness or binding ® Adjust the
steering head.
s s s s s s s s s s s s s s s s s s s s s s s s s s s
Steering head tension
200 ~ 500 g (7.06 ~ 17.65 oz)
EB304141
CHECKING THE FRONT FORK
1. Stand the motorcycle on a level surface.
WARNINGWARNING
Securely support the motorcycle so that
there is no danger of it falling over.
2. Check:
• inner tube 1
Damage/scratches ® Replace.
• dust seal 2
• oil seal
Oil leakage ® Replace.
3. Hold the motorcycle upright and apply
the front brake.
4. Check:
• front fork operation
Push down hard on the handlebars
several times and check if the front
fork rebounds smoothly.
Rough movement ® Repair.
Refer to “FRONT FORK” in chapter 7.
Page 318 of 381
7 - 68
CHAS
T R..26 Nm (2.6 m • kg, 19 ft • Ib)
T R..4 Nm (0.4 m • kg, 2.9 ft • Ib)
T R..13 Nm (1.3 m • kg, 9.4 ft • Ib)
T R..4 Nm (0.4 m • kg, 2.9 ft • Ib)
T R..4 Nm (0.4 m • kg, 2.9 ft • Ib)
T R..115 Nm (11.5 m • kg, 85 ft • Ib)
LS
LS
1
2
7 10 8 11 13
12 17 16 16 18
17
19
2015
14
9 2
563 4
T R..13 Nm (1.3 m • kg, 9.4 ft • Ib)
15
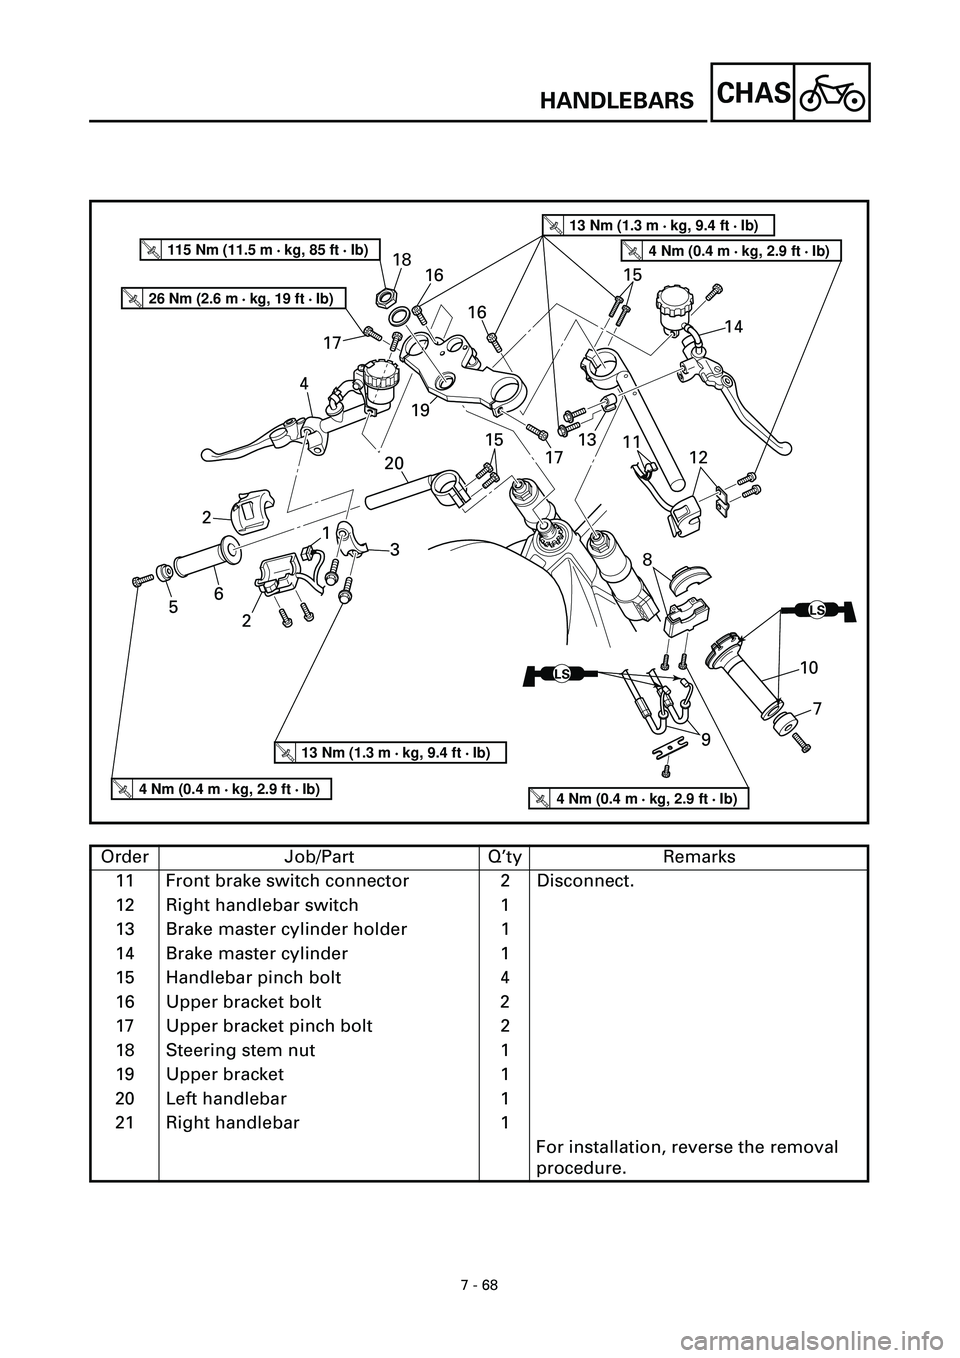
Order Job/Part Q’ty Remarks
11 Front brake switch connector 2 Disconnect.
12 Right handlebar switch 1
13 Brake master cylinder holder 1
14 Brake master cylinder 1
15 Handlebar pinch bolt 4
16 Upper bracket bolt 2
17 Upper bracket pinch bolt 2
18 Steering stem nut 1
19 Upper bracket 1
20 Left handlebar 1
21 Right handlebar 1
For installation, reverse the removal
procedure.
HANDLEBARS
Page 322 of 381
7 - 72
CHAS
EB705001
STEERING HEAD
T R..13 Nm (1.3 m • kg, 9.4 ft • Ib)
T R..115 Nm (11.5 m • kg, 85 ft • Ib)
T R..18 Nm (1.8 kg •
m, 13 ft •
Ib)
9 Nm (0.9 kg
•
m, 6.5 ft •
Ib)
1st.
2nd.T R..19 Nm (1.9 m • kg, 13 ft • Ib)
LS1842
2 5
6
1 8
9
11
13
14
15
1810
3 16
14
17
12
7
20
LS
LS
19
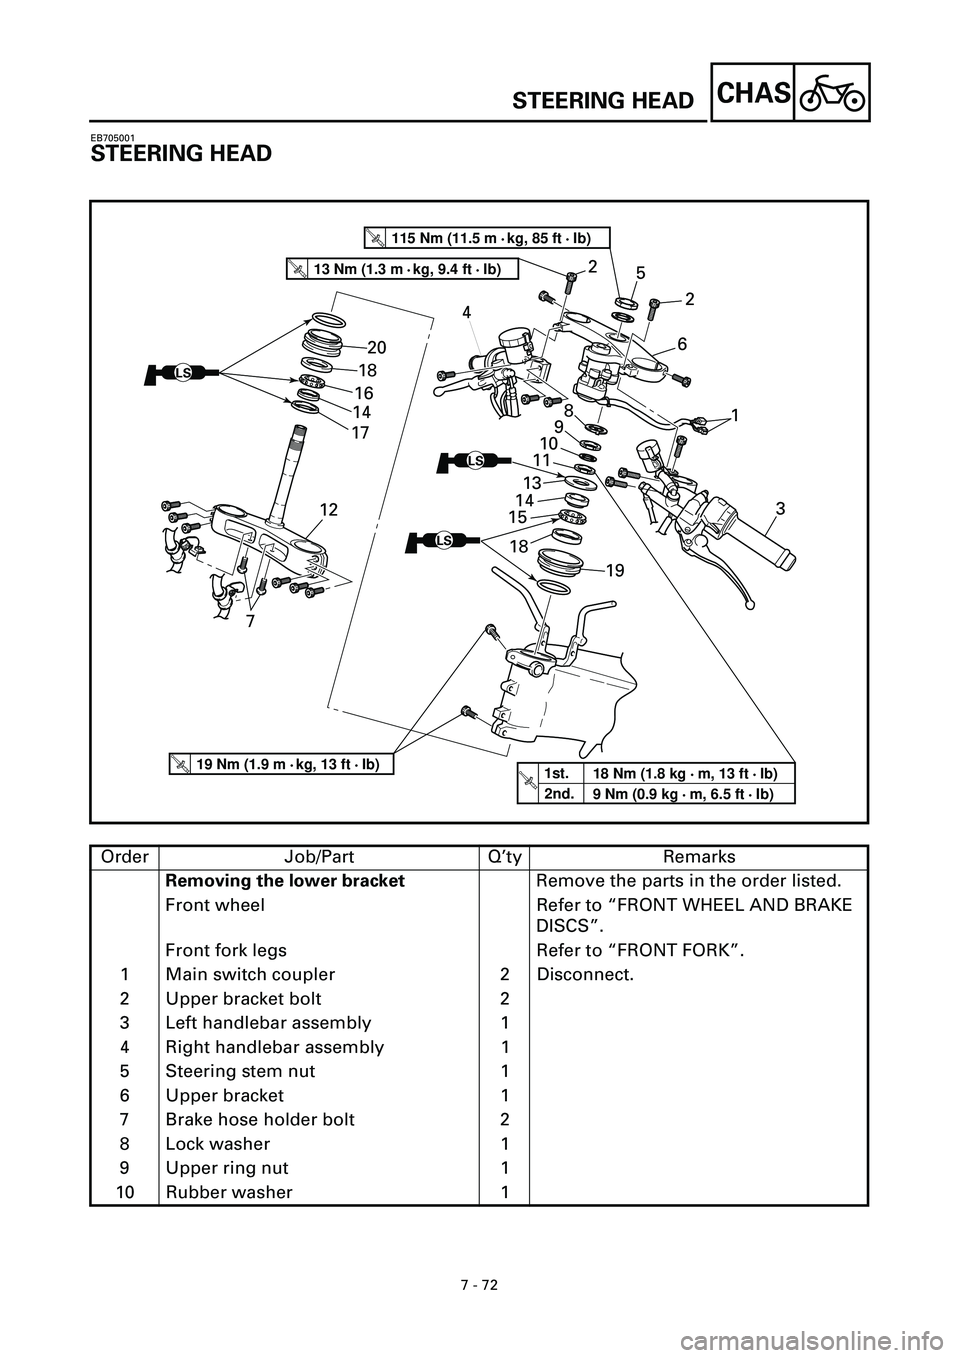
Order Job/Part Q’ty Remarks
Removing the lower bracketRemove the parts in the order listed.
Front wheel Refer to “FRONT WHEEL AND BRAKE
DISCS”.
Front fork legs Refer to “FRONT FORK”.
1 Main switch coupler 2 Disconnect.
2 Upper bracket bolt 2
3 Left handlebar assembly 1
4 Right handlebar assembly 1
5 Steering stem nut 1
6 Upper bracket 1
7 Brake hose holder bolt 2
8 Lock washer 1
9 Upper ring nut 1
10 Rubber washer 1
STEERING HEAD
Page 323 of 381
7 - 73
CHAS
T R..13 Nm (1.3 m • kg, 9.4 ft • Ib)
T R..115 Nm (11.5 m • kg, 85 ft • Ib)
T R..18 Nm (1.8 kg •
m, 13 ft •
Ib)
9 Nm (0.9 kg
•
m, 6.5 ft •
Ib)
1st.
2nd.T R..19 Nm (1.9 m • kg, 13 ft • Ib)
LS1842
2 5
6
1 8
9
11
13
14
15
1810
3 16
14
17
12
7
20
LS
LS
19
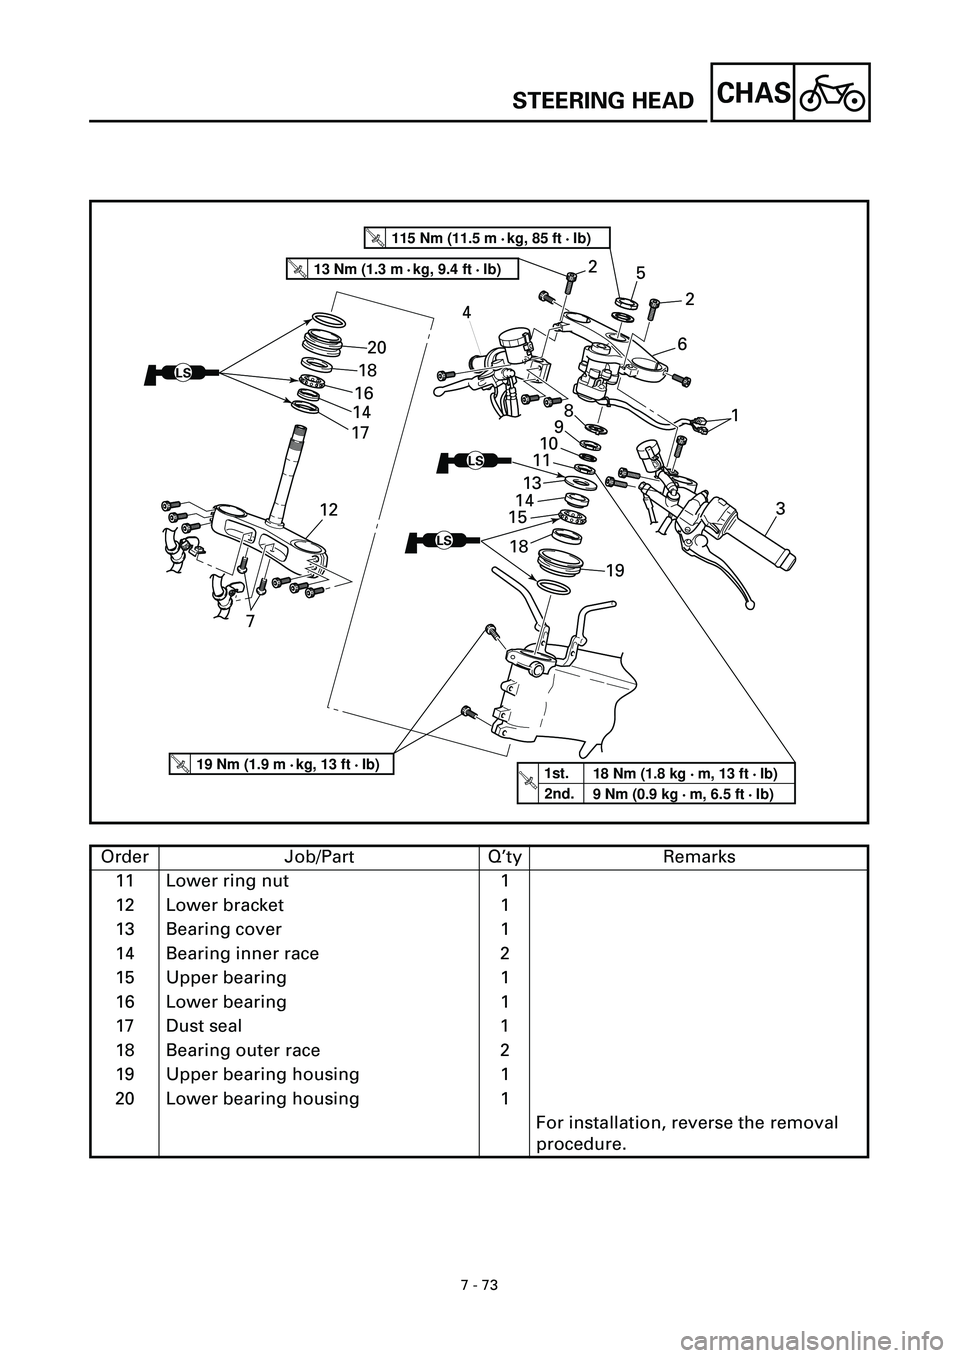
Order Job/Part Q’ty Remarks
11 Lower ring nut 1
12 Lower bracket 1
13 Bearing cover 1
14 Bearing inner race 2
15 Upper bearing 1
16 Lower bearing 1
17 Dust seal 1
18 Bearing outer race 2
19 Upper bearing housing 1
20 Lower bearing housing 1
For installation, reverse the removal
procedure.
STEERING HEAD
Page 324 of 381
7 - 74
CHAS
EB705100
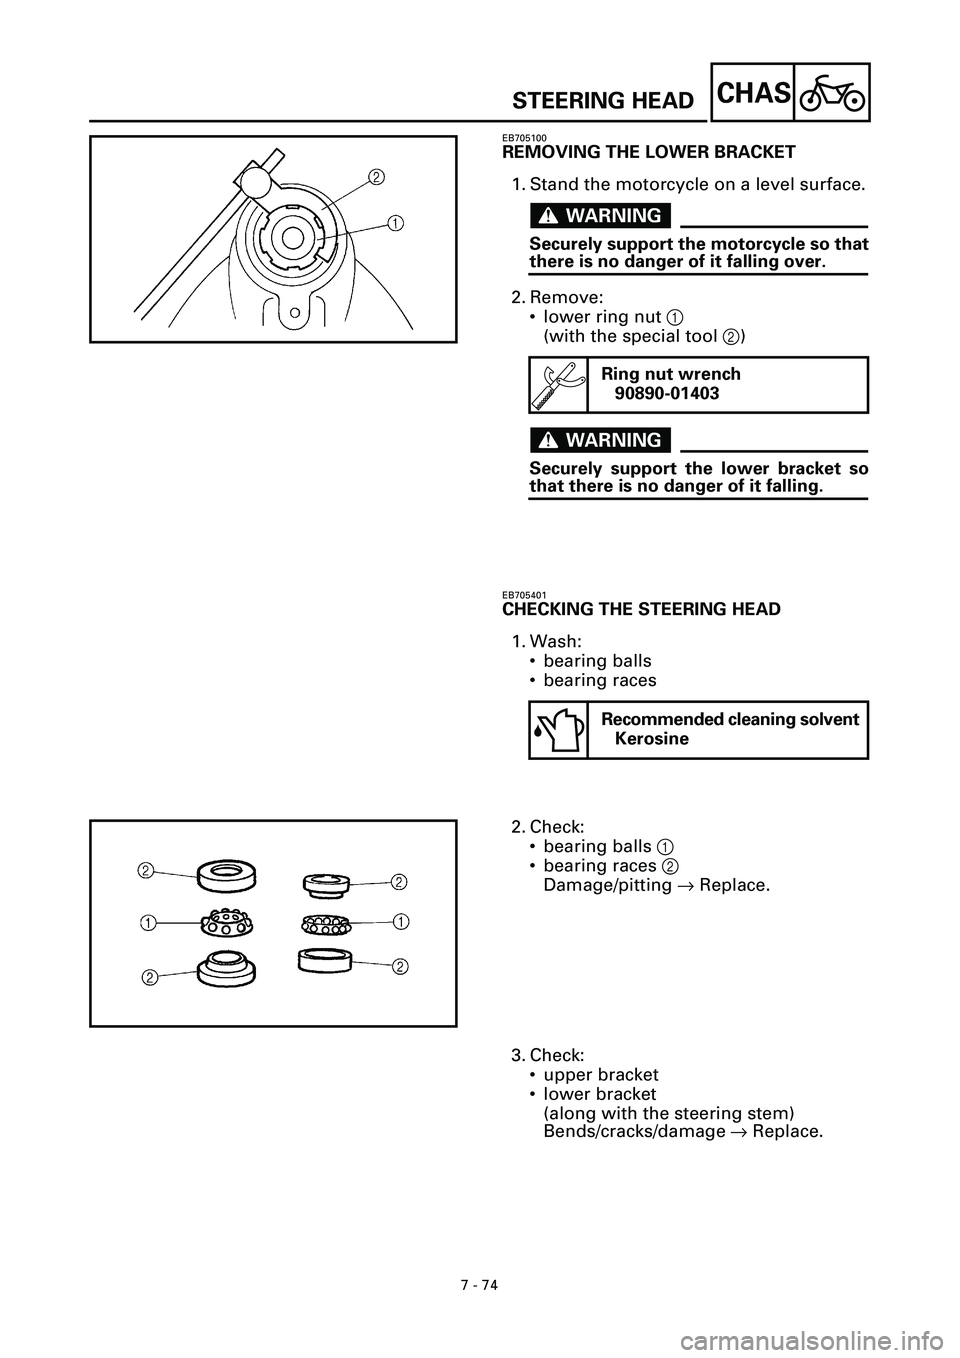
REMOVING THE LOWER BRACKET
1. Stand the motorcycle on a level surface.
WARNINGWARNING
Securely support the motorcycle so that
there is no danger of it falling over.
2. Remove:
• lower ring nut 1
(with the special tool 2)
WARNINGWARNING
Securely support the lower bracket so
that there is no danger of it falling.
Ring nut wrench
90890-01403
EB705401
CHECKING THE STEERING HEAD
1. Wash:
• bearing balls
• bearing races
Recommended cleaning solvent
Kerosine
2. Check:
• bearing balls 1
• bearing races 2
Damage/pitting ® Replace.
3. Check:
• upper bracket
• lower bracket
(along with the steering stem)
Bends/cracks/damage ® Replace.
STEERING HEAD
Page 325 of 381
7 - 75
CHAS
EB705700
INSTALLING THE STEERING HEAD
1. Lubricate:
• upper bearing
• lower bearing
• bearing races
• O-ring
• dust seat lips
• bearing cover lips
• steering stem shreads
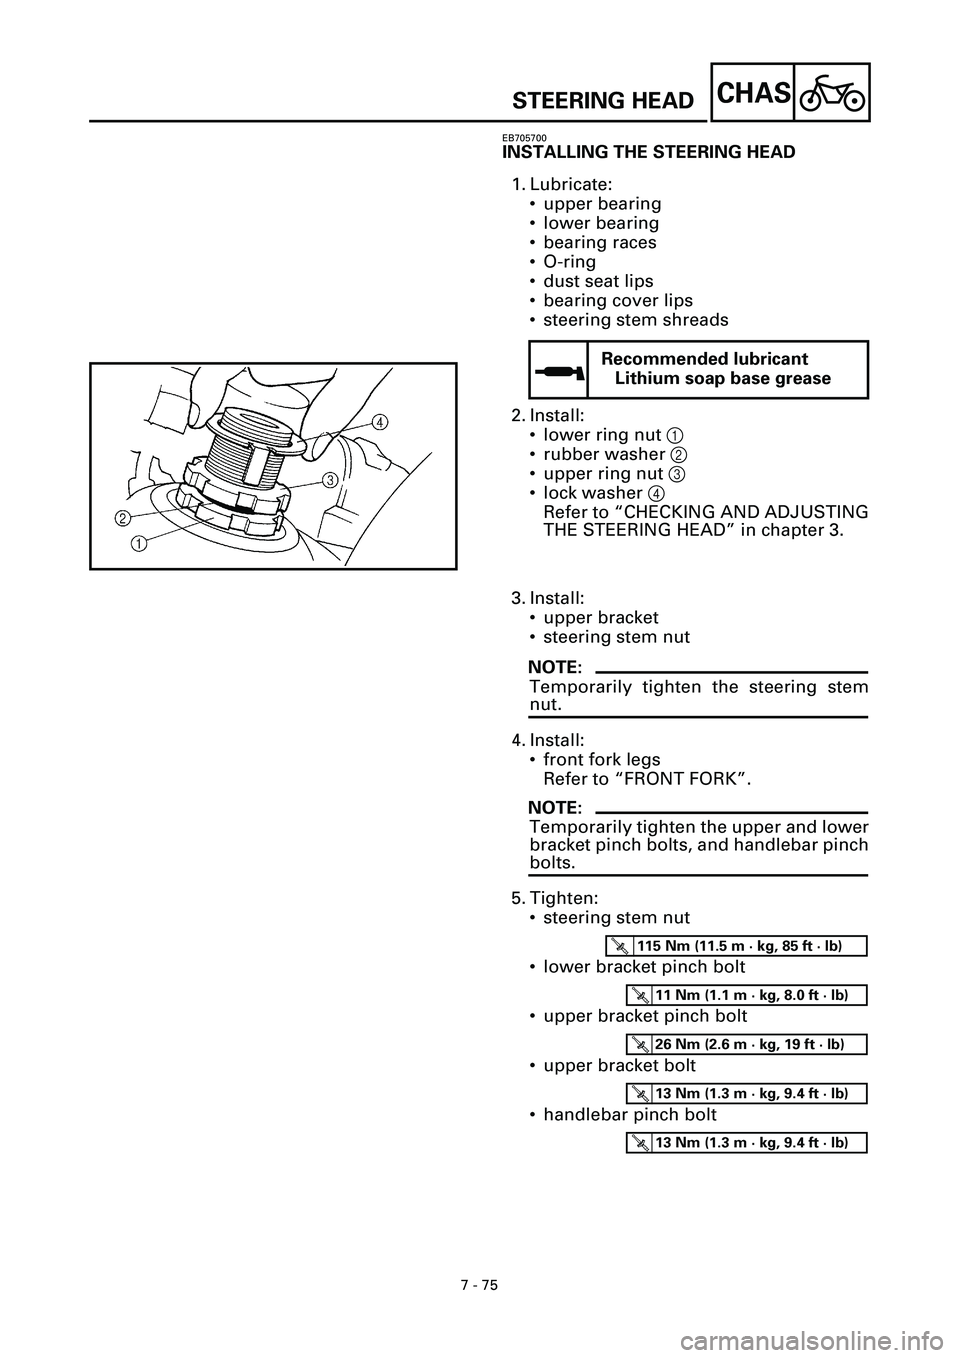
2. Install:
• lower ring nut 1
• rubber washer 2
• upper ring nut 3
• lock washer 4
Refer to “CHECKING AND ADJUSTING
THE STEERING HEAD” in chapter 3.
Recommended lubricant
Lithium soap base grease
3. Install:
• upper bracket
• steering stem nut
NOTE:
Temporarily tighten the steering stem
nut.
4. Install:
• front fork legs
Refer to “FRONT FORK”.
NOTE:
Temporarily tighten the upper and lower
bracket pinch bolts, and handlebar pinch
bolts.
5. Tighten:
• steering stem nut
• lower bracket pinch bolt
• upper bracket pinch bolt
• upper bracket bolt
• handlebar pinch bolt
T R..115 Nm (11.5 m · kg, 85 ft · lb)
T R..11 Nm (1.1 m · kg, 8.0 ft · lb)
T R..26 Nm (2.6 m · kg, 19 ft · lb)
T R..13 Nm (1.3 m · kg, 9.4 ft · lb)
T R..13 Nm (1.3 m · kg, 9.4 ft · lb)
STEERING HEAD