display Abarth 500 2015 Owner handbook (in English)
[x] Cancel search | Manufacturer: ABARTH, Model Year: 2015, Model line: 500, Model: Abarth 500 2015Pages: 215, PDF Size: 19.08 MB
Page 77 of 215

Trip B activation
This function may be used to activate
("On") or deactivate ("Off") the Trip B
(partial trip) display.
For further information see "Trip
Computer" in this chapter.
Proceed as follows to switch the
function on/off:
❒press the MENU button
briefly,
the display will flash "On" or "Off"
depending on the previous setting;
❒press button+or–to select;
❒press the MENU button
briefly to
return to the menu screen or hold the
button down to return to the
standard screen without storing.
Set Time (Setting the
clock)
This function enables the clock to be
set through two submenus: "Time" and
"Format".
To adjust, proceed as follows:
❒briefly press the MENU button
:
the display will show the two
submenus "Time" and "Format";
❒press button+or–to switch
between the two submenus;
❒once you have selected a submenu,
press the MENU button
briefly;❒when you select the "Time"
submenu, pressing the button
briefly the display shows
the
❒press+or–to set the value;
❒briefly press the MENU button
:
"minutes" will appear on the display;
❒press+or–to set the value.
NoteThe setting will increase or
decrease by one unit each time the
button+or–is pressed. Hold down
the button to increase/decrease the
setting rapidly and automatically.
Complete the adjustment with single
presses of the button when you
approach the desired value.
❒When you select the "Format"
submenu, pressing the MENU button
briefly the mode is displayed;
❒press button+or–to select "24h" or
"12h" mode. When you have made
the adjustment, press SAVE to return
to the submenu screen or hold the
button down to return to the main
menu screen without storing.
❒hold the MENU button
down
again to return to the standard
screen or to the main menu
according to where you are in the
menu.Set Date (Setting the
date)
This function may be used to update
the date (year/month/day).
To adjust, proceed as follows:
❒briefly press the MENU button
:
"year" will be displayed;
❒press+or–to set the value;
❒briefly press the MENU button
:
"month" is displayed;
❒press+or–to set the value;
❒briefly press the MENU button
:
"day" is displayed
❒press+or–to set the value;
NoteThe setting will increase or
decrease by one unit each time the
button+or–is pressed. Hold down
the button to increase/decrease the
setting rapidly and automatically.
Complete the adjustment with single
presses of the button when you
approach the desired value.
Press SAVE to return to the menu
screen or hold the button down to
return to the standard screen without
storing.
73
MENU
"hours";
Page 78 of 215

See radio (audio
information repetition)
With this function the display shows
information about the radio.
❒Radio: selected radio station
frequency or RDS message,
automatic tuning activation or
AutoSTore;
❒Audio CD, MP3 CDs: track number.
To show the radio information on the
display ("On") or clear it ("Off"), proceed
as follows:
❒press the MENU button
briefly,
the display will flash "On" or "Off"
depending on the previous setting;
❒press button+or–to select;
❒press the MENU button
briefly to
return to the menu screen or hold the
button down to return to the
standard screen without storing.Autoclose (Automatic
central locking with car
running)
(for versions/markets, where provided)
When activated (On), this function locks
the doors automatically when the
vehicle speed exceeds 20 km/h.
Proceed as follows to activate or
deactivate this function:
❒press the MENU button
briefly to
display a submenu;
❒press the MENU button
briefly,
the display will flash "On" or "Off"
depending on the previous setting;
❒press button+or–to select;
❒press the MENU button
briefly to
return to the submenu screen or hold
the button down to return to the
main menu screen without saving;
❒hold the MENU button
down
again to return to the standard
screen or to the main menu
according to where you are in the
menu.Units of measurement
(Setting)
With this function it is possible to set
the units of measurement through two
submenus: "Distance" and
"Consumption".
To set the required unit of measurement
proceed as follows:
❒briefly press the MENU button
:
the display will show the two
submenus;
❒press button+or–to switch
between the two submenus;
❒once you have selected a submenu,
press the MENU button
briefly;
❒when you select "Distances", briefly
pressing the MENU button
makes the display show "km" or
"mi" depending on the previous
setting;
❒press button+or–to select;
❒when you select "Consumption",
briefly pressing the MENU button
makes "km/l", "l/100km" or
"mpg" appear on the display
depending on the previous setting;
If the set distance unit of measurement
is "km", the fuel consumption unit will
be displayed in km/l or l/100 km.
74
KNOWING THE INSTRUMENT PANEL
Page 79 of 215

If the set distance unit of measurement
is "mi" the fuel consumption unit will
be displayed in "mpg".
❒Press button+or–to select.
When you have made the adjustment,
press the MENU button
briefly
to return to the submenu screen or hold
the button down to return to the main
menu screen without storing.
❒Hold the MENU button
down
again to return to the standard
screen or to the main menu
according to where you are in the
menu.
Language (Language
selection)
Display messages can be shown in
different languages: Italian, English,
German, Portuguese, Spanish, French,
Dutch, Polish, Turkish and Russian.
To set the desired language, proceed
as follows:
❒briefly press the MENU button
:
the previously set "language" will
flash on the display;
❒press button+or–to select;
❒press the MENU button
briefly to
return to the menu screen or hold the
button down to return to the
standard screen without storing.Warnings volume
(Adjusting the
failure/warning acoustic
signal volume)
With this function the volume of the
acoustic signal which accompanies the
display of failure/warning can be
adjusted according to 8 levels.
To set the desired volume, proceed as
follows:
❒briefly press the MENU button
:
the previously set volume level will
flash on the display;
❒press+or–to set the value;
❒press the MENU button
briefly to
return to the menu screen or hold the
button down to return to the
standard screen without storing.
Button volume
(Adjustment)
This function may be used to adjust (to
8 levels) the volume of the acoustic
signal made when the
MENU,+
and–buttons are pressed.
To set the desired volume, proceed as
follows:
❒briefly press the MENU button
:
the previously set volume level will
flash on the display;
❒press+or–to set the value;❒press the MENU button
briefly to
return to the menu screen or hold the
button down to return to the
standard screen without storing.
Seat belt buzzer
(Reactivation of buzzer
for SBR signal)
This function can be only displayed
after an Abarth Dealership has
deactivated the SBR system (see
paragraph "SBR system" in the "Safety
devices" chapter).
To reactivate this function, proceed as
follows:
❒press the MENU button
briefly
and the display will flash "Off". Press
the+or–button to display "On";
❒press the MENU button
briefly to
return to the submenu screen or hold
the button down to return to the
main menu screen without saving.
75
Page 80 of 215

Service (Scheduled
servicing)
Using this function you can display
information about the mileage intervals
for vehicle servicing.
To consult this information, proceed as
follows:
❒press the
button: the display
shows when servicing is due in
km/mi or days (where provided)
according to the previous setting (see
paragraph "Units of measurement");
❒press the
button to return to the
menu screen; press the button again
to return to the standard screen.
IMPORTANT The "Scheduled Servicing
Plan" includes car maintenance at
fixed intervals (refer to the "Maintenance
and care" chapter).This is displayed automatically, with
ignition key at MAR, 2000 km (or
equivalent value in miles) before
servicing or, where provided, 30 days
before servicing. It is also displayed
each time the key is turned to MAR or,
for versions/markets, where provided,
every 200 km (or equivalent value in
miles). Below this threshold servicing
indications are more frequent.
The display will be in km or miles
according to the unit of measurement
set. When the next scheduled servicing
is approaching, the word "Service"
will appear on the display, followed by
the number of kilometres/miles or
days (where provided) left, when the
ignition key is turned to MAR. Go to an
Abarth Dealership, where the
operations of the "Scheduled Servicing
Plan" will be performed and the
message will be reset.
When the service interval is reached
and for about 1000 km/600 mi or
30 days, a service due message is
displayed.Passenger airbag (front
passenger side airbag
and side bag for pelvis,
chest and shoulder
protection - Side bag -
activation/deactivation)
This function is used to activate/
deactivate the front passenger's airbag.
Proceed as follows:
❒press the MENU button
and
then, after displaying the message
("Bag pass: Off") (to deactivate)
or ("Bag pass: On") (to activate) by
means of buttons+and–press the
MENU button
again;
❒a confirmation request message will
appear on the display;
❒press buttons+or–to select (Yes)
(confirming activation/deactivation)
or (No) (to abort);
❒press the MENU button
briefly, a
message confirming the selection will
be displayed and you will return to
the menu screen or hold the button
down to return to the standard
screen without storing.
76
KNOWING THE INSTRUMENT PANEL
Page 81 of 215

Daytime running lights
(DRL)
(for versions/markets, where provided)
With this function it is possible to turn
the daytime running lights on and off.
Proceed as follows to activate or
deactivate this function:
❒press the MENU button
briefly to
display a submenu;
❒press the MENU button
briefly,
the display will flash "On" or "Off"
depending on the previous setting;
❒press button+or–to select;
❒press the MENU button
briefly to
return to the submenu screen or hold
the button down to return to the
main menu screen without saving;
❒hold the MENU button
down
again to return to the standard
screen or to the main menu
according to where you are in the
menu.Tyre reset (iTPMS reset)
(For versions/markets, where provided)
With this function it is possible to reset
the iTPMS (see paragraph “iTPMS”).
To carry out the Reset procedure
proceed as follows:
❒briefly press the MENU
button:
the display will show Reset;
❒press the+or–button to select
(“Yes” or “No”);
❒briefly press the MENU
button:
the display will show “Confirm”;
❒press the+or–button to select
("Yes" to reset or "No" to exit the
video page);
❒hold the MENU button
down
again to return to the standard
screen or to the main menu
according to where you are in the
menu.Exit Menu
This is the last function that closes the
cycle of settings listed in the menu
screen.
Pressing the MENU button
briefly
will return the display to the standard
screen without storing.
Press the–button to go back to the
first menu option ("Speed warning").
77
Page 82 of 215

CONTROL PANEL AND ON-BOARD INSTRUMENTS.
COLOUR DISPLAY
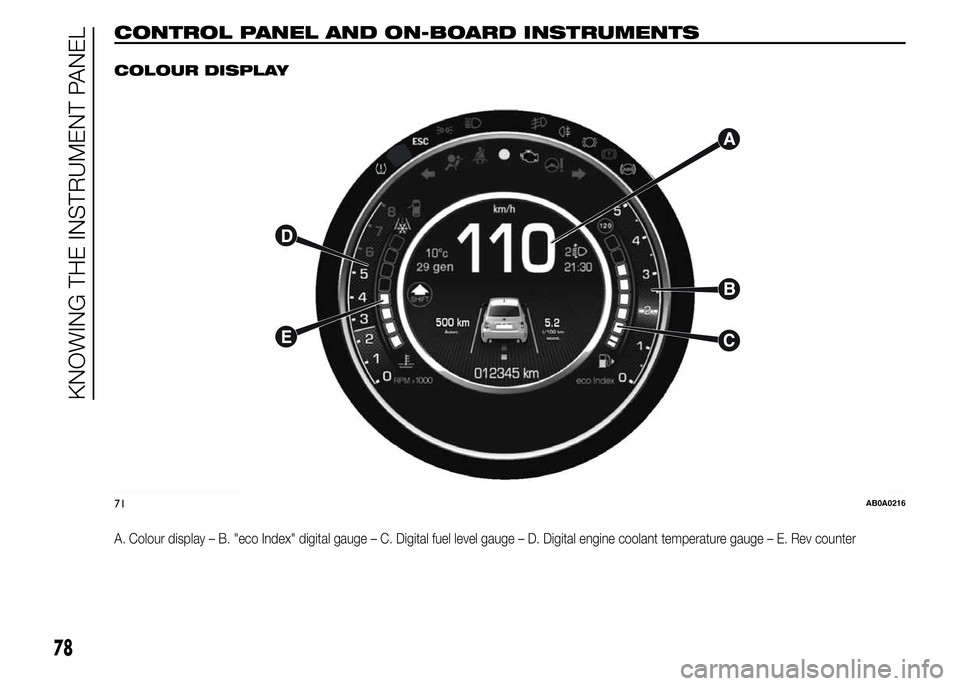
A. Colour display – B. "eco Index" digital gauge – C. Digital fuel level gauge – D. Digital engine coolant temperature gauge – E. Rev counter
71AB0A0216
78
KNOWING THE INSTRUMENT PANEL
Page 83 of 215

SPEEDOMETER (SPEED
INDICATOR)
Shows the car speed (speedometer).
REV COUNTER
This indicates the engine rpm.
ANALOGUE PRESSURE
GAUGE
The car is equipped with a pressure
gauge for measuring the turbocharger
pressure by means of the analogue
indicator A fig. 72.
NoteThe turbocharger supercharging
pressure reading on the pressure gauge
should never exceed 1 – 1.2 bar even
in the case of sporty driving and
maximum performance.Sport mode display
If the SPORT function is used, the
display fig. 72 inside the turbocharger
pressure gauge will show the word
SPORT.
DIGITAL FUEL LEVEL
GAUGE
The digital gauge A fig. 73 indicates the
amount of fuel in the tank.
The warning light
switches on to
indicate that approximately 5 litres of
fuel are left in the tank.
Do not travel with the fuel tank almost
empty: any gaps in fuel delivery could
damage the catalytic converter.DIGITAL ENGINE
COOLANT TEMPERATURE
GAUGE
The digital gauge B fig. 73 indicates the
temperature of the engine coolant and
starts supplying indications when the
coolant temperature exceeds 50°C
approx.
The first reference, which is always on,
is blue and indicates a low temperature
of the engine coolant.
When the temperature increases the
reference becomes white and other
references come on as well.
If the references become red the
temperature of the engine coolant is too
high: in this case, see paragraph
"Warning lights and messages" in this
chapter.
The warning light
(for versions/
markets, where provided) (on a few
versions together with the displayed
message) on indicates an excessive
temperature increase of the coolant. In
this case, stop the engine and contact
an Abarth Dealership.
72AB0A0127
73AB0A0136
79
Page 84 of 215

INSTRUMENT PANEL
LIGHTING ADJUSTMENT
(Brightness sensor)
Versions with colour display are
equipped with a brightness sensor
(fitted inside the instrument panel)
capable of detecting ambient
light conditions and adjusting the
brightness of the instrument panel
accordingly.
The behaviour of the instrument is as
follow:
❒"daytime" mode: the display can be
set to 8 levels;
❒"nighttime" mode: the display can be
set to 8 levels. The brightness of the
radio and automatic dual zone
climate control display is also
adjusted.
For adjusting, see paragraph "Menu
items" in this chapter.TRIP COMPUTER
IN BRIEF
The Trip Computer can be used to
display information on car operation
when the key is turned to MAR-ON.
This function is characterised by
two separate memories, called "Trip
A" and "Trip B", where the car's
"complete missions" (journeys) are
recorded in a reciprocally
independent manner, as well as, for
versions where provided, "Instant
info" and "Best average
consumption".
Both memories can be reset: i.e. start
of a new journey.
"Trip A" can be used to display the
values relating to:
❒Range (for versions/markets, where
provided)
❒Distance travelled A
❒Average consumption A
❒Instant consumption (for versions/
markets, where provided)
❒Average speed A
❒Trip time A (driving time)❒Reset Trip A.
"Trip B" can be used to display the
values relating to:
❒Distance travelled B
❒Average consumption B
❒Average speed B
❒Trip time B (driving time)
❒Reset Trip B.
The "Trip B" function may be disabled
(see "Activating Trip B"). "Range" and
"Instant consumption" values cannot be
reset.
"Instant info" displays the following
values (when they are not displayed in
the main screen, depending on
versions/markets):
❒Range
❒Instant consumption
"Best average consumption" displays a
screen summarising the best average
consumption (for versions/markets,
where provided). This information can
be reset.
80
KNOWING THE INSTRUMENT PANEL
Page 85 of 215

VALUES DISPLAYED
Range (for versions/markets, where
provided)
This indicates the distance that can still
be travelled with the fuel in the tank,
assuming that driving style remains
unvaried. The display will show the
reading "----"when the following
events take place:
❒range value lower than 50 km (or 30
mi)
❒car parked with engine running for a
long period.
IMPORTANT The range can be affected
by several factors: driving style (see
"Driving style" paragraph in the
"Starting and driving" chapter), type of
route (motorway, towns and cities,
mountain roads, etc.), conditions of use
(load, tyre pressure, etc.). Trip planning
must therefore take the above into
account.
Distance travelled
This value shows the distance covered
from the start of the new journey.Average consumption
This value shows the approximate
average fuel consumption from the start
of the new journey.
Instant consumption (for versions/
markets, where provided)
This value shows the fuel consumption.
The value is constantly updated. The
display will show "----"ifthecar
is parked with the engine running.
Average speed
This value shows the car's average
speed based on the overall time
elapsed since the start of the new
journey.
Trip time
Time elapsed since the start of the new
journey.TRIP BUTTON
The TRIP button is located on the
right-hand stalk fig. 74. With the ignition
key turned to MAR-ON, this button
allows you to view the previously
described values and also zero them to
begin a new mission:
❒brief pressto access the various
value displays;
❒long pressto reset and then start a
new mission.
TRIPTRIP
74AB0A0140
81
Page 86 of 215

New mission
This begins after a reset:
❒"manual" resetting by the user, by
pressing the relevant button;
❒"automatic" resetting, when the
"Distance travelled" reaches 99999.9
km or when the "Trip time" reaches
999:59 (999 hours and 59 minutes);
❒after disconnection/reconnection of
the battery.IMPORTANT The reset operation when
"Trip A" or "Trip B" details are being
displayed only resets the values
associated with the function displayed.
Start of journey
procedure
With the ignition key in the MAR-ON
position, reset by pressing the TRIP
button and keeping it pressed for more
than 2 seconds.Trip Exit
You can automatically exit the TRIP
function once all the values have been
displayed or by holding the MENU
button
down for more than 1
second.
82
KNOWING THE INSTRUMENT PANEL