warning lights Abarth 500 2017 Owner handbook (in English)
[x] Cancel search | Manufacturer: ABARTH, Model Year: 2017, Model line: 500, Model: Abarth 500 2017Pages: 192, PDF Size: 6.46 MB
Page 22 of 192
EXTERNAL LIGHTS
DAYTIME RUNNING
LIGHTS (DRL) "Daytime
Running Lights"
(where provided)
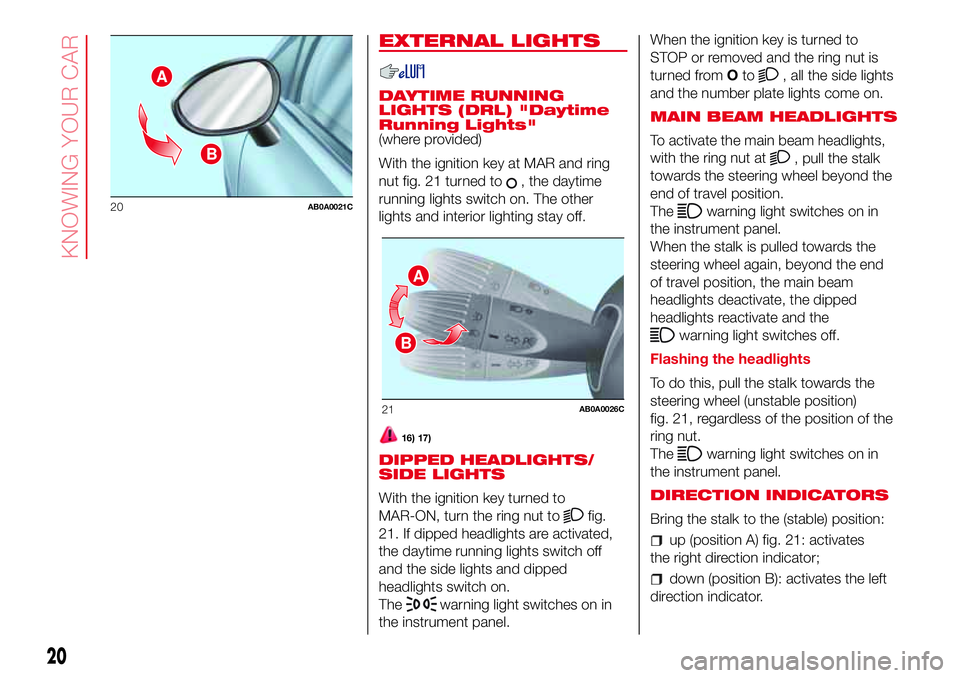
With the ignition key at MAR and ring
nut fig. 21 turned to
, the daytime
running lights switch on. The other
lights and interior lighting stay off.
16) 17)
DIPPED HEADLIGHTS/
SIDE LIGHTS
With the ignition key turned to
MAR-ON, turn the ring nut to
fig.
21. If dipped headlights are activated,
the daytime running lights switch off
and the side lights and dipped
headlights switch on.
The
warning light switches on in
the instrument panel.When the ignition key is turned to
STOP or removed and the ring nut is
turned fromOto
, all the side lights
and the number plate lights come on.
MAIN BEAM HEADLIGHTS
To activate the main beam headlights,
with the ring nut at
, pull the stalk
towards the steering wheel beyond the
end of travel position.
The
warning light switches on in
the instrument panel.
When the stalk is pulled towards the
steering wheel again, beyond the end
of travel position, the main beam
headlights deactivate, the dipped
headlights reactivate and the
warning light switches off.
Flashing the headlights
To do this, pull the stalk towards the
steering wheel (unstable position)
fig. 21, regardless of the position of the
ring nut.
The
warning light switches on in
the instrument panel.
DIRECTION INDICATORS
Bring the stalk to the (stable) position:
up (position A) fig. 21: activates
the right direction indicator;
down (position B): activates the left
direction indicator.
A
B
20AB0A0021C
A
B
21AB0A0026C
20
KNOWING YOUR CAR
Page 23 of 192
Theorwarning light will blink on
the instrument panel. The direction
indicators are switched off automatically
when the steering wheel is
straightened.
"FOLLOW ME HOME"
DEVICE
This allows the space in front of the
vehicle to be lit for a set time.
Activation
With the ignition key in the STOP
position or extracted, pull the lever
towards the steering wheel and move it
within 2 minutes of the engine switching
off.
At each single movement of the stalk,
the lights will remain on for an extra
30 seconds up to a maximum of 210
seconds: then the lights are switched
off automatically. The display shows the
time for which the functions remains
active.
The
warning light on the
instrument panel switches on when the
stalk is pulled for the first time and
stays lit until the function switches off
automatically.Deactivation
This function is deactivated turning on
again the headlights, sidelights or
pulling the left lever towards the
steering wheel (unstable position) for
more than 2 seconds, or switching the
starter to MAR.
FRONT FOG
LIGHTS/REAR FOG
LIGHTS
(where provided)
The fog lights can be activated only
when the dipped beam headlights are
on.
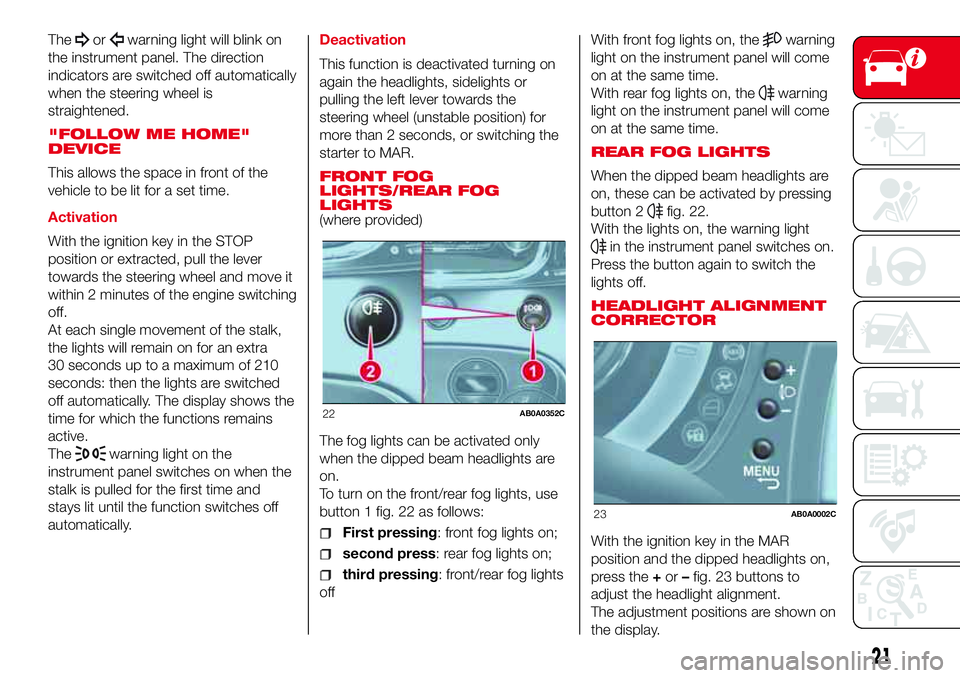
To turn on the front/rear fog lights, use
button 1 fig. 22 as follows:
First pressing: front fog lights on;
second press: rear fog lights on;
third pressing: front/rear fog lights
offWith front fog lights on, the
warning
light on the instrument panel will come
on at the same time.
With rear fog lights on, the
warning
light on the instrument panel will come
on at the same time.
REAR FOG LIGHTS
When the dipped beam headlights are
on, these can be activated by pressing
button 2
fig. 22.
With the lights on, the warning light
in the instrument panel switches on.
Press the button again to switch the
lights off.
HEADLIGHT ALIGNMENT
CORRECTOR
With the ignition key in the MAR
position and the dipped headlights on,
press the+or–fig. 23 buttons to
adjust the headlight alignment.
The adjustment positions are shown on
the display.
22AB0A0352C
23AB0A0002C
21
Page 24 of 192
Position 0 - one or two people in the
front seats.
Position1-4passengers.
Position2-4passengers + load in the
luggage compartment.
Position 3 - driver + maximum
permitted load stowed in the luggage
compartment.
IMPORTANT Gas discharge headlights
(Xenon headlights) are automatically
adjusted. Headlight alignment
adjustment is electronic and therefore
cannot be manually adjusted using
the+and–buttons.
WARNING
16)The daytime running lights are an
alternative to the dipped headlights for
driving during the daytime in countries
where it is compulsory to have lights on
during the day; where it is not compulsory,
the use of daytime running lights is
permitted.
17)Daytime running lights cannot replace
dipped beam headlights when driving at
night or through tunnels. The use of
daytime running lights is governed by the
highway code of the country in which
you are driving. Comply with legal
requirements.
ROOF LIGHTS
FRONT CEILING LIGHT
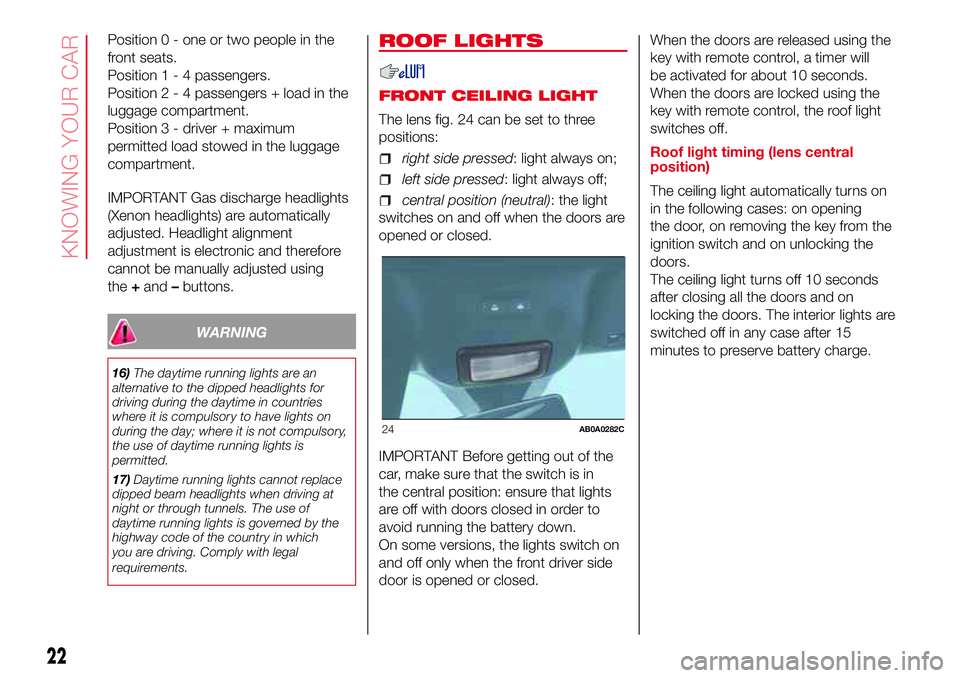
The lens fig. 24 can be set to three
positions:
right side pressed: light always on;
left side pressed: light always off;
central position (neutral): the light
switches on and off when the doors are
opened or closed.
IMPORTANT Before getting out of the
car, make sure that the switch is in
the central position: ensure that lights
are off with doors closed in order to
avoid running the battery down.
On some versions, the lights switch on
and off only when the front driver side
door is opened or closed.When the doors are released using the
key with remote control, a timer will
be activated for about 10 seconds.
When the doors are locked using the
key with remote control, the roof light
switches off.
Roof light timing (lens central
position)
The ceiling light automatically turns on
in the following cases: on opening
the door, on removing the key from the
ignition switch and on unlocking the
doors.
The ceiling light turns off 10 seconds
after closing all the doors and on
locking the doors. The interior lights are
switched off in any case after 15
minutes to preserve battery charge.
24AB0A0282C
22
KNOWING YOUR CAR
Page 40 of 192
KNOWING THE INSTRUMENT PANEL
This section of the handbook gives you
all the information you need to
understand, interpret and use the
instrument panel correctly.CONTROL PANEL AND
ON-BOARD INSTRUMENTS ........... 39
MENU OPTIONS ............................. 41
TRIP COMPUTER ........................... 42
WARNING LIGHTS AND
MESSAGES .................................... 45
-SEAT BELTS NOT FASTENED ........... 45
-EBD FAILURE .................................... 45
-AIRBAG FAILURE ............................... 46
-LOW BRAKE FLUID/HANDBRAKE
ENGAGED........................................... 46
-“DUALDRIVE” ELECTRIC POWER
STEERING FAILURE ............................ 47
-BRAKE PAD WEAR ............................ 47
-ESC SYSTEM .................................... 48
-INJECTION / EOBD SYSTEM
FAILURE .............................................. 48
-REAR FOG LIGHT .............................. 49
-ABS FAILURE..................................... 49
-iTPMS ................................................ 49
-SIDE LIGHTS AND DIPPED BEAM
HEADLIGHTS/FOLLOW ME HOME ..... 50
-FRONT FOG LIGHTS ......................... 50
- LEFT DIRECTION INDICATOR ........... 50
-RIGHT DIRECTION INDICATOR ......... 50
-MAIN BEAM HEADLIGHTS ................ 50
-DOORS/BONNET/LUGGAGE
COMPARTMENT OPEN ...................... 51
- LOW BATTERY CHARGE .................. 51
-INSUFFICIENT ENGINE OIL
PRESSURE/ENGINE OIL
DETERIORATED .................................. 51
-ENGINE COOLANT TEMPERATURE
TOO HIGH........................................... 52
- ROBOTISED SEQUENTIAL
GEARBOX FAILURE ............................ 52
-SPEED LIMIT EXCEEDED .................. 52- POSSIBLE ICE ON ROAD ................. 53
-PARKING SENSOR FAILURE ............. 53
-SERVICE (SCHEDULED SERVICING)
EXPIRED ............................................. 53
-ASR SYSTEM .................................... 53
-HILL HOLDER FAILURE ..................... 53
-FUEL CUT-OFF SYSTEM.................... 53
-FUEL CUT-OFF SYSTEM FAILURE ..... 54
-EXTERIOR LIGHTS FAILURE .............. 54
-BRAKE LIGHT FAILURE ..................... 54
-FIAT CODE SYSTEM FAILURE ........... 54
- FUEL RESERVE - LIMITED RANGE ... 55
-ENGINE OIL PRESSURE SENSOR
FAILURE INDICATOR........................... 55
-OIL CHANGE ..................................... 55
-PRESS THE CLUTCH PEDAL TO
START ................................................. 55
-FUEL LEVEL SENSOR FAILURE......... 55
-HEADLIGHT ALIGNMENT
CORRECTOR ...................................... 55
38
KNOWING THE INSTRUMENT PANEL
Page 44 of 192
NoteButtons+and–activate different
functions according to the following
situations:
within the menu, they allow you to
scroll up or down through the options;
during setting operations, they
increase or decrease values.
The menu comprises the following
functions:
LIGHTING: adjusts the dashboard
and instrument panel lighting
SPEED BEEP: sets the vehicle
speed limit (km/h or mph). The driver is
alerted when this speed is exceeded.
TRIP B ACTIVATION/DATA: activates
(”On”) and deactivates (”Off”) the Trip
B display (partial trip counter)
SET TIME: set the display clock
SET DATE: sets the display date
AUTOCLOSE: enables or disables
automatic door locking on exceeding a
speed of 20 km/h
MEASUREMENT UNITS: sets the
measurement units for distance and
fuel consumption
LANGUAGE: sets the display
language
WARNING VOLUME: sets the
volume (on 8 levels) of the audible
warning (buzzer) that accompanies the
failure/warning display
SEAT BELT BUZZER: reactivation of
the SBR buzzer (displayed only if the
SBR system was disabled by the
Abarth Dealership)
SERVICE: displays mileage intervals
for scheduled servicing
AIRBAG/PASSENGER BAG:
enables/disables the passenger side
airbag
DAYTIME RUNNING LIGHTS:
enables/disables daytime running lights
ITPMS RESET: resets the iTPMS
system (”self-learning”, see the “iTPMS
System” paragraph)
SEE RADIO (if present): enables/
disables duplicating some of the radio
information shown on theUconnect™
system display on the instrument panel
display.
SEE PHONE (if present): enables/
disables duplicating some of the call
information shown on theUconnect™
system display on the instrument panel
display.
SEE NAVIGATION (if present):
enables/disables duplicating some of
the navigation information shown on
theUconnect™system display on the
instrument panel display.
EXIT MENU
TRIP COMPUTER
The Trip computer is used to display
information on car operation when the
key is turned to MAR.
This function is characterised by two
separate memories, called "Trip A" and
"Trip B", where the car's "complete
missions" (journeys) are recorded in a
reciprocally independent manner, as
well as, for versions where present,
"Instant info" and "Best average
consumption".
Both memories can be reset: i.e. start
of a new journey.
"Trip A" can be used to display the
values relating to:
Range (where present)
Distance travelled A
Average consumption A
Instantaneous fuel consumption
(where present)
Average speed A
Trip time A (driving time)
Reset Trip A.
“Trip B” may be used to display the
figures relating to:
Distance travelled B
Average consumption B
Average speed B
Trip time B (driving time)
Reset Trip B.
42
KNOWING THE INSTRUMENT PANEL
Page 47 of 192
WARNING LIGHTS AND MESSAGES
IMPORTANT The warning light switches on in the instrument panel together with a dedicated message and/or acoustic signal
when applicable. These indications are indicative and precautionary and as such must not be considered as exhaustive and/or
alternative to the information contained in the Owner Handbook, which you are advised to read carefully in all cases. Always
refer to the information in this section in the event of a failure indication.
IMPORTANT Failure indications displayed are divided into two categories: very serious and less serious failures. Serious faults
are indicated by a repeated and prolonged warning "cycle". Less serious faults are indicated by a warning "cycle" with a shorter
duration. The display cycle of both categories can be interrupted. The instrument panel warning light will stay on until the
cause of the malfunction is eliminated.
WARNING LIGHTS ON INSTRUMENT PANEL
Warning light What it means
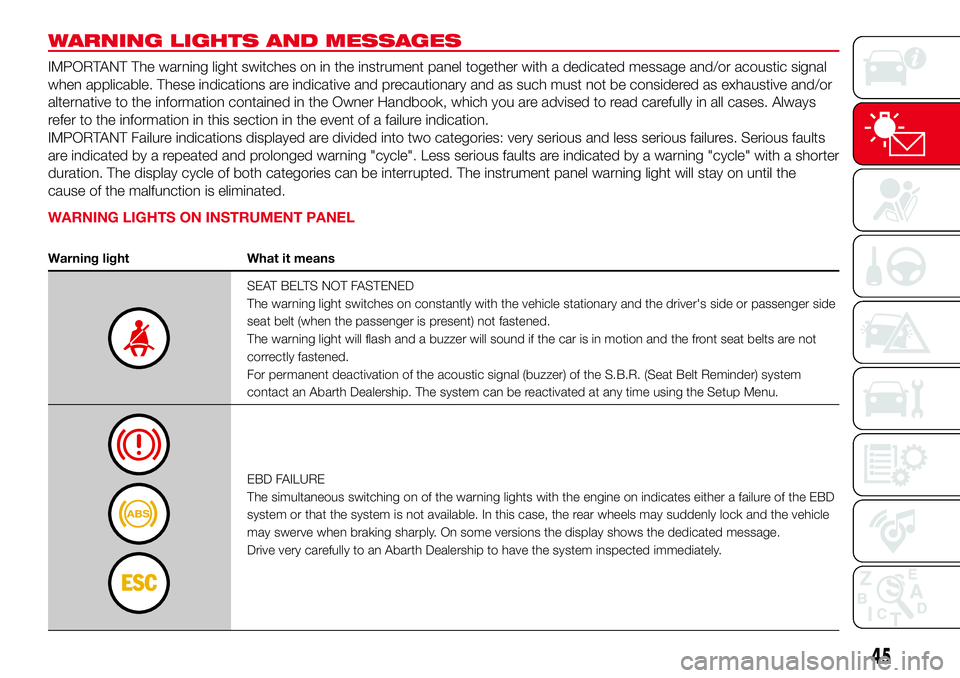
SEAT BELTS NOT FASTENED
The warning light switches on constantly with the vehicle stationary and the driver's side or passenger side
seat belt (when the passenger is present) not fastened.
The warning light will flash and a buzzer will sound if the car is in motion and the front seat belts are not
correctly fastened.
For permanent deactivation of the acoustic signal (buzzer) of the S.B.R. (Seat Belt Reminder) system
contact an Abarth Dealership. The system can be reactivated at any time using the Setup Menu.
EBD FAILURE
The simultaneous switching on of the warning lights with the engine on indicates either a failure of the EBD
system or that the system is not available. In this case, the rear wheels may suddenly lock and the vehicle
may swerve when braking sharply. On some versions the display shows the dedicated message.
Drive very carefully to an Abarth Dealership to have the system inspected immediately.
45
Page 52 of 192
Warning light What it means
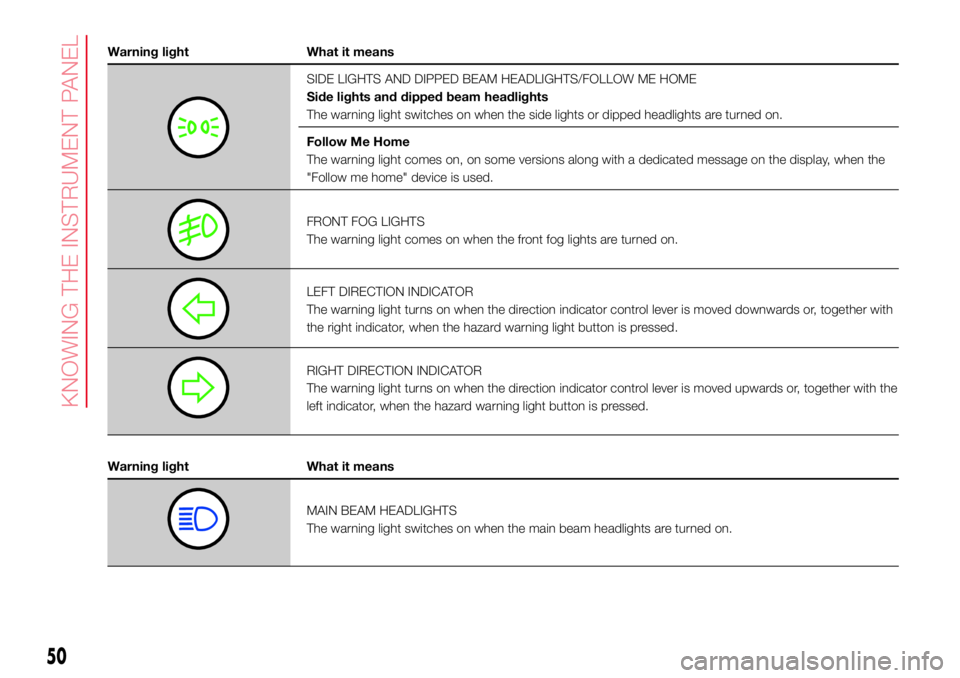
SIDE LIGHTS AND DIPPED BEAM HEADLIGHTS/FOLLOW ME HOME
Side lights and dipped beam headlights
The warning light switches on when the side lights or dipped headlights are turned on.
Follow Me Home
The warning light comes on, on some versions along with a dedicated message on the display, when the
"Follow me home" device is used.
FRONT FOG LIGHTS
The warning light comes on when the front fog lights are turned on.
LEFT DIRECTION INDICATOR
The warning light turns on when the direction indicator control lever is moved downwards or, together with
the right indicator, when the hazard warning light button is pressed.
RIGHT DIRECTION INDICATOR
The warning light turns on when the direction indicator control lever is moved upwards or, together with the
left indicator, when the hazard warning light button is pressed.
Warning light What it means
MAIN BEAM HEADLIGHTS
The warning light switches on when the main beam headlights are turned on.
50
KNOWING THE INSTRUMENT PANEL
Page 54 of 192
Symbol What it means
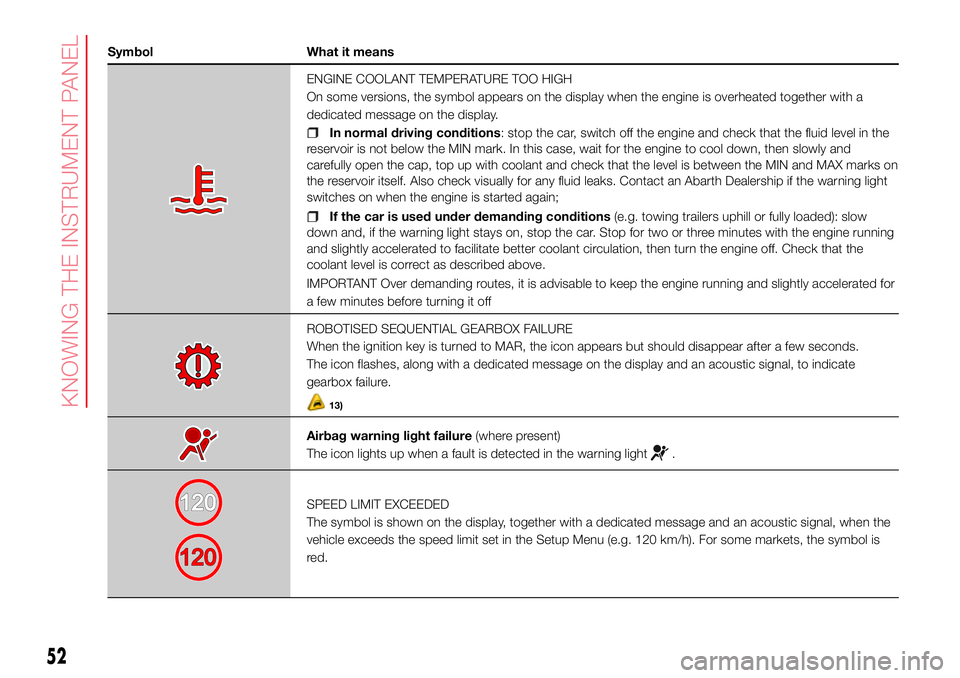
ENGINE COOLANT TEMPERATURE TOO HIGH
On some versions, the symbol appears on the display when the engine is overheated together with a
dedicated message on the display.
In normal driving conditions: stop the car, switch off the engine and check that the fluid level in the
reservoir is not below the MIN mark. In this case, wait for the engine to cool down, then slowly and
carefully open the cap, top up with coolant and check that the level is between the MIN and MAX marks on
the reservoir itself. Also check visually for any fluid leaks. Contact an Abarth Dealership if the warning light
switches on when the engine is started again;
If the car is used under demanding conditions(e.g. towing trailers uphill or fully loaded): slow
down and, if the warning light stays on, stop the car. Stop for two or three minutes with the engine running
and slightly accelerated to facilitate better coolant circulation, then turn the engine off. Check that the
coolant level is correct as described above.
IMPORTANT Over demanding routes, it is advisable to keep the engine running and slightly accelerated for
a few minutes before turning it off
ROBOTISED SEQUENTIAL GEARBOX FAILURE
When the ignition key is turned to MAR, the icon appears but should disappear after a few seconds.
The icon flashes, along with a dedicated message on the display and an acoustic signal, to indicate
gearbox failure.
13)
Airbag warning light failure(where present)
The icon lights up when a fault is detected in the warning light
.
SPEED LIMIT EXCEEDED
The symbol is shown on the display, together with a dedicated message and an acoustic signal, when the
vehicle exceeds the speed limit set in the Setup Menu (e.g. 120 km/h). For some markets, the symbol is
red.
52
KNOWING THE INSTRUMENT PANEL
Page 56 of 192
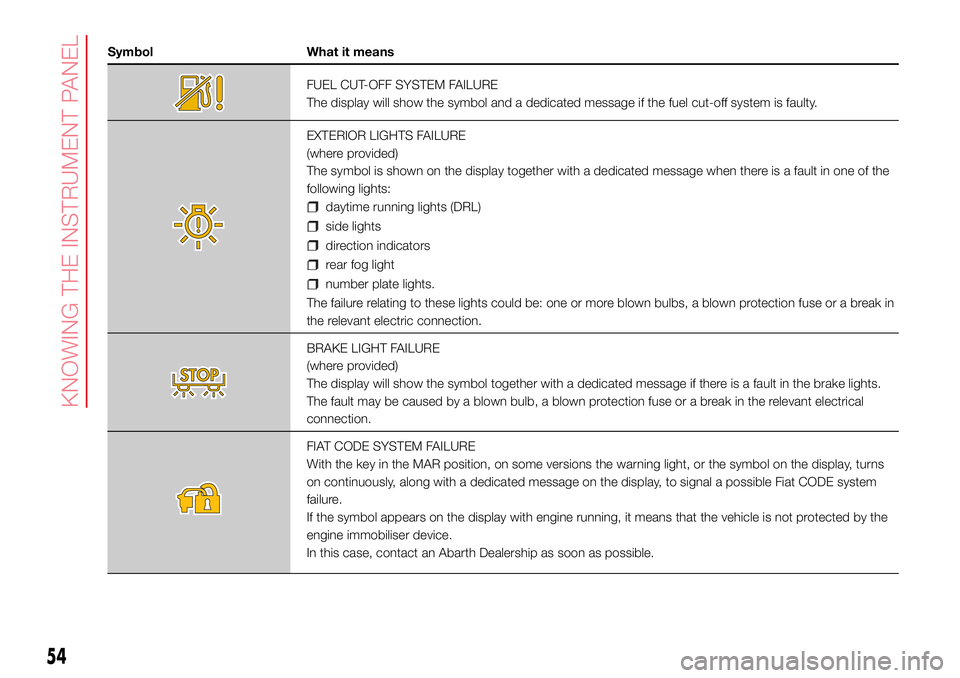
Symbol What it means
FUEL CUT-OFF SYSTEM FAILURE
The display will show the symbol and a dedicated message if the fuel cut-off system is faulty.
EXTERIOR LIGHTS FAILURE
(where provided)
The symbol is shown on the display together with a dedicated message when there is a fault in one of the
following lights:
daytime running lights (DRL)
side lights
direction indicators
rear fog light
number plate lights.
The failure relating to these lights could be: one or more blown bulbs, a blown protection fuse or a break in
the relevant electric connection.
BRAKE LIGHT FAILURE
(where provided)
The display will show the symbol together with a dedicated message if there is a fault in the brake lights.
The fault may be caused by a blown bulb, a blown protection fuse or a break in the relevant electrical
connection.
FIAT CODE SYSTEM FAILURE
With the key in the MAR position, on some versions the warning light, or the symbol on the display, turns
on continuously, along with a dedicated message on the display, to signal a possible Fiat CODE system
failure.
If the symbol appears on the display with engine running, it means that the vehicle is not protected by the
engine immobiliser device.
In this case, contact an Abarth Dealership as soon as possible.
54
KNOWING THE INSTRUMENT PANEL
Page 67 of 192

SBR SYSTEM (Seat
Belt Reminder)
The SBR system warns the front seat
occupants if their seat belt is not
fastened.
The system signals unfastened seat
belts with visual warnings (warning
lights on in the instrument panel and
icons on the display) and an acoustic
signal (see the following paragraphs).
NOTE Contact an Abarth Dealership to
deactivate this acoustic warning
permanently. The acoustic warning can
be reactivated at any time through the
display Setup Menu.
Seat belts warning light operation
The system warns the driver and the
front passenger if their seat belt is
not fastened, as follows:
flashingwarning light and
intermittent acoustic warning for about
100 seconds;
once the cycle has finished, the
warning light remains on constantly until
the seat belts are fastened.
PRE-TENSIONERS
The car is equipped with front seat
belts pretensioners, that reduce slack in
the belts in the event of a severe frontal
impact. This guarantees the perfect
adherence of the seat belts to the
occupants' bodies before the
restraining action begins.
The retractors lock to indicate that the
pretensioner has intervened.
This car is also equipped with a second
pretensioner (fitted in the kick plate
area). Its activation is signalled by the
shortening of the metal cable.
A slight discharge of smoke may be
produced during the activation of the
pretensioner which is not harmful and
does not involve any fire hazard.
IMPORTANT To obtain the highest
degree of protection from the action of
the pretensioner, wear the seat belt
tight to the chest and pelvis.
The pretensioner does not require any
maintenance or lubrication: any
changes to its original conditions will
invalidate its efficiency. If, due to
unusual natural events (floods, sea
storms, etc.), the device has been
affected by water and mud, it must be
replaced.
74)
14)
LOAD LIMITERS
To increase passenger safety, the front
seat belt reels contain a load limiter
which allows the force acting on the
chest and shoulders to be modulated
during the belt restraining action in
the event of a frontal impact.
GENERAL
INSTRUCTIONS FOR
USING THE SEAT BELTS
The driver must comply with (and have
all car passengers follow) any local
regulations in force concerning the use
of seat belts. Always fasten the seat
belts before setting off.
75) 76) 77)
Seat belts are also to be worn by
pregnant women: the risk of injury in
the case of accident is greatly reduced
for them and the unborn child if they
are wearing a seat belt.
Pregnant women must position the
lower part of the belt very low down so
that it passes over the pelvis and under
the abdomen (see fig. 54). While
pregnancy increases, the driver must
adjust both seat and steering wheel to
have full control over the vehicle (pedals
and steering wheel should be easily
accessed). The maximum clearance
should be kept between the abdomen
and the steering wheel.
65