warning light Abarth Punto 2012 Owner handbook (in English)
[x] Cancel search | Manufacturer: ABARTH, Model Year: 2012, Model line: Punto, Model: Abarth Punto 2012Pages: 271, PDF Size: 8.46 MB
Page 163 of 271

159
KNOWING
YOUR VEHICLE
SAFETY
STARTING
AND DRIVING
WARNING LIGHTS
AND MESSAGES
IN AN
EMERGENCY
MAINTENANCE
AND CARE
TECHNICAL
SPECIFICATIONS
CONTENTS
Halogen bulbs must be handled by holding
the metallic part only. Touching the
transparent part of the bulb with your
fingers may reduce the intensity of the light
emitted and even compromise the life of the bulb
itself. In the event of accidental contact, wipe the
bulb with an alcohol-soaked cloth and leave to dry.
fig. 135F0U137Ab
IMPORTANT The internal surface of the light may
appear slightly misty: this does not indicate a fault, and is
actually caused by low temperature and the degree of
humidity in the air. Misting will rapidly disappear when
the headlights are switched on. The presence of drops
inside the headlights indicates infiltration of water.
Contact an Abarth Dealership.
TYPES OF BULBS
Different types of bulbs fig. 135 are installed on the car:
A Glass bulbs: clipped into position. Pull to remove.
B Bayonet type bulbs: to remove this type of bulb from its holder, press the bulb and turn it anticlockwise. C Tubular bulbs: release them from their contacts to
remove.
D-E Halogen bulbs: to remove the bulb, release the clip holding the bulb in place.
151-182 GPUNTO EVO Abarth GB 2ed 8-11-2010 14:45 Pagina 159
Page 164 of 271

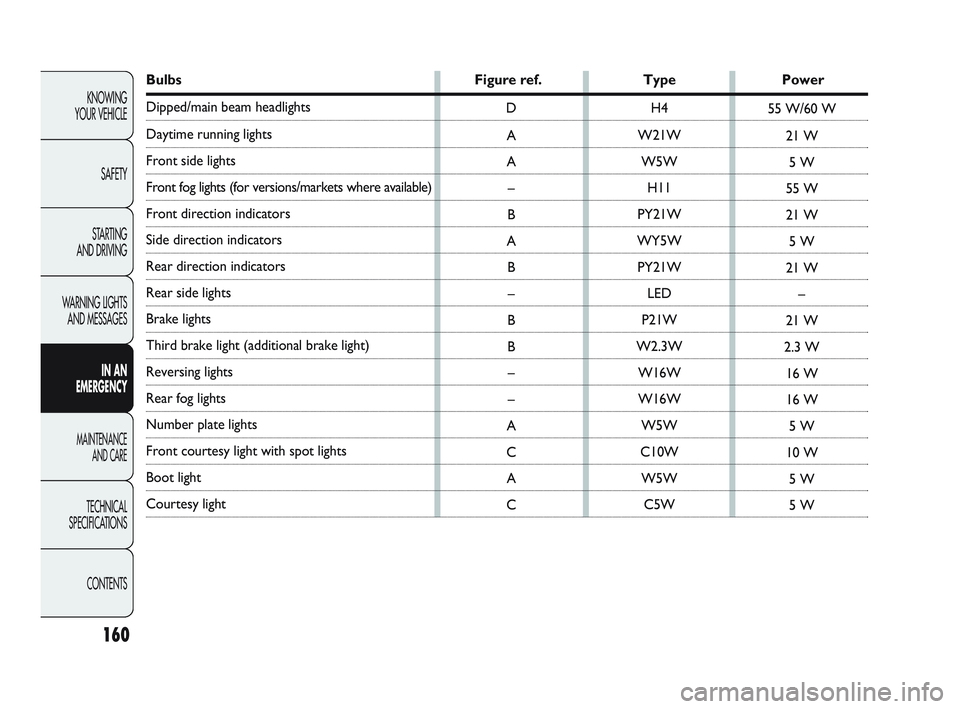
BulbsFigure ref.TypePower
Dipped/main beam headlights
Daytime running lights
Front side lights
Front fog lights (for versions/markets where available)
Front direction indicators
Side direction indicators
Rear direction indicators
Rear side lights
Brake lights
Third brake light (additional brake light)
Reversing lights
Rear fog lights
Number plate lights
Front courtesy light with spot lights
Boot light
Courtesy light H4
W21W W5W H11
PY21W
WY5W PY21W LED
P21W
W2.3W W16W
W16W W5W
C10W W5W C5W
D
A
A –
B
A B–
B
B –
–
A
C A
C 55 W/60 W
21 W5 W
55 W
21 W 5 W
21 W –
21 W
2.3 W 16 W
16 W 5 W
10 W 5 W
5 W
160
KNOWING
YOUR VEHICLE
SAFETY
STARTING
AND DRIVING
WARNING LIGHTS AND MESSAGES
IN AN
EMERGENCY
MAINTENANCE AND CARE
TECHNICAL
SPECIFICATIONS
CONTENTS
151-182 GPUNTO EVO Abarth GB 2ed 8-11-2010 14:45 Pagina 160
Page 165 of 271

F0U138Abfig. 136F0U139Abfig. 137
IMPORTANT You can replace the front direction
indicator, main beam and dipped beam headlight bulbs
through the access flap (see “Direction indicators” in
this section).
SIDE LIGHTS fig. 137
To change the bulb, proceed as follows:
❒remove the rubber cap using the tab;
❒press in tabs B and remove the bulb holder;
❒remove the bulb C and replace it;
❒refit the bulb holder and then refit the cap, ensuring
that it locks into place.
REPLACING EXTERIOR BULBS
For the type of bulb and power rating, see “Changing
a bulb”.
FRONT LIGHT CLUSTERS fig. 136
The front light clusters contain sidelights, dipped beam,
main beam and direction indicator bulbs.
The bulbs are arranged inside the light cluster as
follows:
A sidelights
B daytime running lights
C direction indicators
D main beam/dipped beam headlights
161
KNOWING
YOUR VEHICLE
SAFETY
STARTING
AND DRIVING
WARNING LIGHTS
AND MESSAGES
IN AN
EMERGENCY
MAINTENANCE
AND CARE
TECHNICAL
SPECIFICATIONS
CONTENTS
151-182 GPUNTO EVO Abarth GB 2ed 8-11-2010 14:45 Pagina 161
Page 166 of 271

162
F0U140Abfig. 138
DAY LIGHTS (DRL)
To change the bulb, proceed as follows:
❒turn the bulb holder A-fig. 138 anticlockwise using
the tab and pull it out;
❒remove the bulb B by pushing it in slightly and
turning it anticlockwise;
❒refit the bulb holder by putting it in its housing and
turning it clockwise until it locks into place.
KNOWING
YOUR VEHICLE
SAFETY
STARTING
AND DRIVING
WARNING LIGHTS AND MESSAGES
IN AN
EMERGENCY
MAINTENANCE AND CARE
TECHNICAL
SPECIFICATIONS
CONTENTS
F0U141Abfig. 139
MAIN/DIPPED BEAM HEADLIGHTS
To change the bulb, proceed as follows:
❒remove the rubber cap;
❒disconnect the central electric connector B-fig. 139
and release the bulb holder catch;
❒remove the bulb A and replace it;
❒fit the new bulb, aligning the outlines of the metallic
part with the grooves on the reflector;
❒refit the bulb holder catch and reconnect the
electrical connector;
❒refit the cap A, ensuring that it locks into place.
151-182 GPUNTO EVO Abarth GB 2ed 8-11-2010 14:45 Pagina 162
Page 167 of 271

163
KNOWING
YOUR VEHICLE
SAFETY
STARTING
AND DRIVING
WARNING LIGHTS
AND MESSAGES
IN AN
EMERGENCY
MAINTENANCE
AND CARE
TECHNICAL
SPECIFICATIONS
CONTENTS
F0U143Abfig. 141
A
A
B
F0U142Abfig. 140
DIRECTION INDICATORS
Front fig. 140
To change the bulb, proceed as follows:
❒steer the right/left wheel inwards;
D
F0U144Abfig. 142
❒unscrew the catch A-fig. 140, then lift off the access
lid B;
❒remove the bulb holder cover C-fig. 141 by turning
it anticlockwise;
❒remove the bulb D-fig. 142 by pushing it in gently
and turning anticlockwise (“bayonet” fitting), then
replace it;
❒refit the bulb holder cover C-fig. 141 by turning it
clockwise and locking it correctly;
❒close the flap B-fig.140 then screw in the catch A.
151-182 GPUNTO EVO Abarth GB 2ed 8-11-2010 14:45 Pagina 163
Page 168 of 271

164
KNOWING
YOUR VEHICLE
SAFETY
STARTING
AND DRIVING
WARNING LIGHTS AND MESSAGES
IN AN
EMERGENCY
MAINTENANCE AND CARE
TECHNICAL
SPECIFICATIONS
CONTENTS
C
AC
B
C
F0U147Abfig. 144
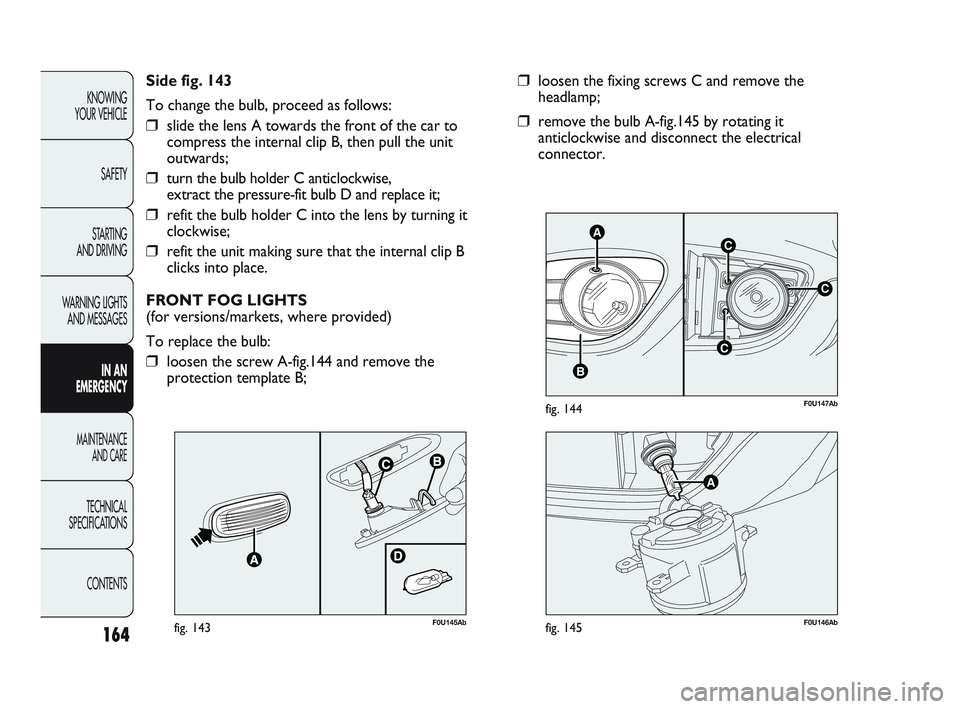
❒loosen the fixing screws C and remove the
headlamp;
❒remove the bulb A-fig.145 by rotating it
anticlockwise and disconnect the electrical
connector.
F0U145Abfig. 143
Side fig. 143
To change the bulb, proceed as follows:
❒slide the lens A towards the front of the car to
compress the internal clip B, then pull the unit
outwards;
❒turn the bulb holder C anticlockwise,
extract the pressure-fit bulb D and replace it;
❒refit the bulb holder C into the lens by turning it
clockwise;
❒refit the unit making sure that the internal clip B
clicks into place.
FRONT FOG LIGHTS
(for versions/markets, where provided)
To replace the bulb:
❒loosen the screw A-fig.144 and remove the
protection template B;
A
F0U146Abfig. 145
151-182 GPUNTO EVO Abarth GB 2ed 8-11-2010 14:45 Pagina 164
Page 169 of 271

165
KNOWING
YOUR VEHICLE
SAFETY
STARTING
AND DRIVING
WARNING LIGHTS
AND MESSAGES
IN AN
EMERGENCY
MAINTENANCE
AND CARE
TECHNICAL
SPECIFICATIONS
CONTENTS
REAR LIGHT CLUSTERS
The rear light clusters contain side light (LED), brake
light and direction indicator bulbs.
The bulbs are arranged inside the light cluster fig. 146 as
follows:
D direction indicators
E brake lights
F0U148Abfig. 146F0U149Abfig. 147
To change a bulb proceed as follows:
❒undo both fixing screws A-fig 146;
❒disconnect the central electric connector B and pull
the lens unit outwards;
❒detach the bulb holder by unclipping the fasteners C-
fig. 147;
❒remove the bulb by pushing it in gently and turning
anticlockwise (“bayonet” fitting), then replace it;
151-182 GPUNTO EVO Abarth GB 2ed 8-11-2010 14:45 Pagina 165
Page 170 of 271

166
KNOWING
YOUR VEHICLE
SAFETY
STARTING
AND DRIVING
WARNING LIGHTS AND MESSAGES
IN AN
EMERGENCY
MAINTENANCE AND CARE
TECHNICAL
SPECIFICATIONS
CONTENTS
❒refit the bulb holder;
❒reconnect the electric connector, correctly realign
the unit with the car body and then tighten the fixing
screws A.
IMPORTANT To replace the LED side lights you must
contact an Abarth Dealership.
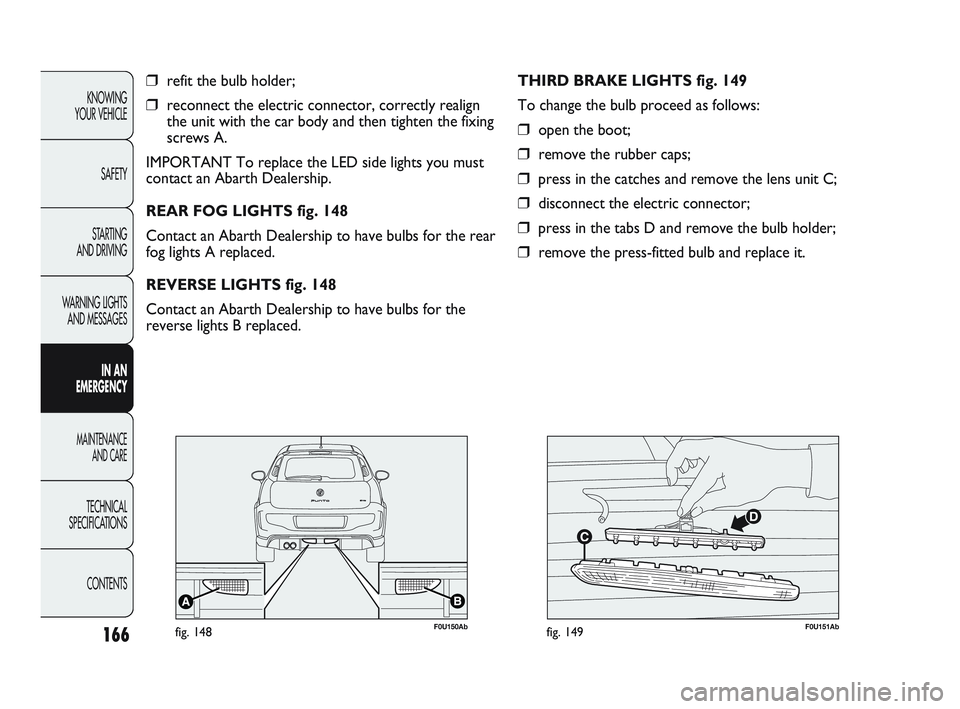
REAR FOG LIGHTS fig. 148
Contact an Abarth Dealership to have bulbs for the rear
fog lights A replaced.
REVERSE LIGHTS fig. 148
Contact an Abarth Dealership to have bulbs for the
reverse lights B replaced.
F0U150Abfig. 148F0U151Abfig. 149
THIRD BRAKE LIGHTS fig. 149
To change the bulb proceed as follows:
❒open the boot;
❒remove the rubber caps;
❒press in the catches and remove the lens unit C;
❒disconnect the electric connector;
❒press in the tabs D and remove the bulb holder;
❒remove the press-fitted bulb and replace it.
151-182 GPUNTO EVO Abarth GB 2ed 8-11-2010 14:45 Pagina 166
Page 171 of 271

167
KNOWING
YOUR VEHICLE
SAFETY
STARTING
AND DRIVING
WARNING LIGHTS
AND MESSAGES
IN AN
EMERGENCY
MAINTENANCE
AND CARE
TECHNICAL
SPECIFICATIONS
CONTENTS
NUMBER PLATE LIGHTS
To change the bulb proceed as follows:
❒act on the point shown by the arrow and remove
the lens unit A-fig. 150;
❒change the bulb fig.151 by releasing it from the side
contacts and making sure that the new bulb is
correctly fastened between these contacts;
❒refit the snap-fitted lens unit.
F0U152Abfig. 150F0U153Abfig. 151
151-182 GPUNTO EVO Abarth GB 2ed 8-11-2010 14:45 Pagina 167
Page 172 of 271

168
KNOWING
YOUR VEHICLE
SAFETY
STARTING
AND DRIVING
WARNING LIGHTS AND MESSAGES
IN AN
EMERGENCY
MAINTENANCE AND CARE
TECHNICAL
SPECIFICATIONS
CONTENTS
F0U154Abfig. 152
INTERNAL BULB REPLACEMENT
For the type of bulb and relevant power rating, see
“Changing a bulb”. FRONT COURTESY LIGHT
Proceed as follows to replace the bulbs:
❒act on the points shown by the arrows and remove
light A-fig. 152;
❒open the protective flap B-fig 153;
❒replace bulbs C-fig. 153 by releasing them from the
side contacts and making sure that new bulbs are
correctly locked between these contacts;
❒close the flap B-fig. 153 and fix the courtesy light A-
fig. 152 in its housing, making sure it is locked
correctly.
F0U155Abfig. 153
151-182 GPUNTO EVO Abarth GB 2ed 8-11-2010 14:45 Pagina 168