Acura ILX 2014 Owner's Manual
Manufacturer: ACURA, Model Year: 2014, Model line: ILX, Model: Acura ILX 2014Pages: 351, PDF Size: 7.94 MB
Page 171 of 351
170Features
Audio Error Messages
*
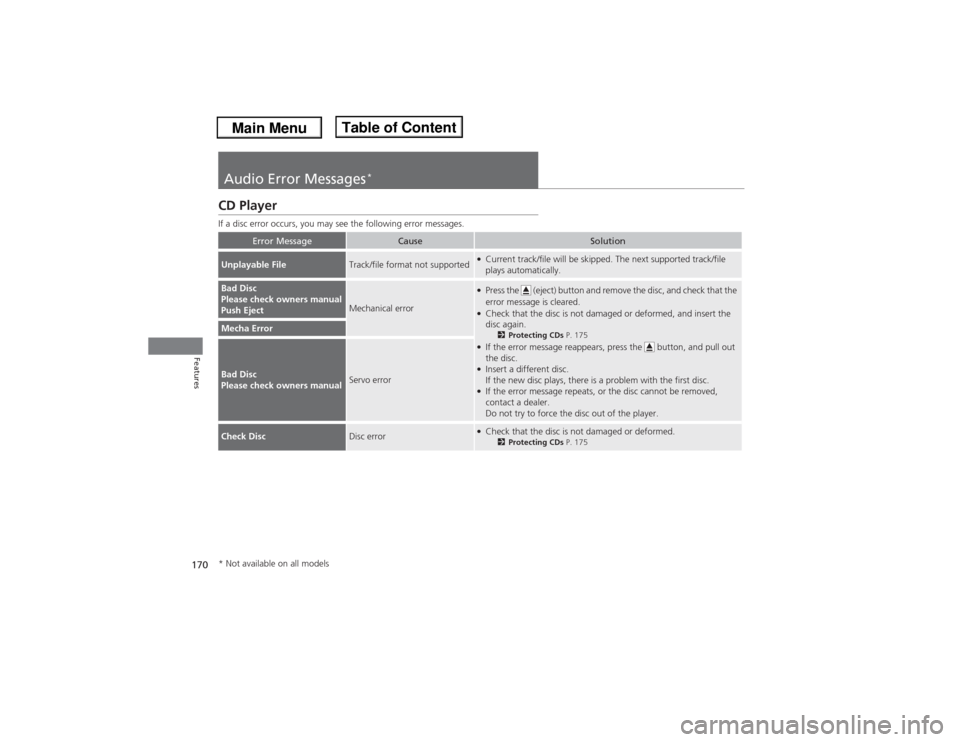
CD PlayerIf a disc error occurs, you may see the following error messages.
Error Message
Cause
Solution
Unplayable File
Track/file format not supported
●Current track/file will be skipped. The next supported track/file
plays automatically.
Bad Disc
Please check owners manual
Push Eject
Mechanical error
●Press the (eject) button and remove the disc, and check that the
error message is cleared.●Check that the disc is not damaged or deformed, and insert the
disc again.
2Protecting CDs P. 175
●If the error message reappears, press the button, and pull out
the disc.●Insert a different disc.
If the new disc plays, there is a problem with the first disc.●If the error message repeats, or the disc cannot be removed,
contact a dealer.
Do not try to force the disc out of the player.
Mecha ErrorBad Disc
Please check owners manual
Servo error
Check Disc
Disc error
●Check that the disc is not damaged or deformed.
2Protecting CDs P. 175
* Not available on all models
Page 172 of 351

171
uuAudio Error Messages
*uiPod®/USB Flash Drive
Continued
Features
iPod®/USB Flash DriveIf an error occurs while playing an iPod® or USB flash drive, you may see the
following error messages. If you cannot clear the error message, contact a dealer.
Error Message
Solution
USB Error
Appears when there is a problem with the USB adapter unit. Check if the device is compatible with the
USB adapter unit.
Bad USB Device
Please Check Owners
Manual.
Appears when an incompatible device is connected. Disconnect the device. Then turn the audio system
off, and turn it on again. Do not reconnect the device that caused the error.
No Song
Appears when the iPod® is empty. Check that compatible files are stored on the device.
Unsupported Ver
Appears when an unsupported iPod® is connected. If it appears when a supported iPod® is connected,
update the iPod® software to the newer version.
Retry Connection
Appears when the system does not acknowledge the iPod®. Reconnect the iPod®.
Unplayable File
Appears when the files in the USB flash drive are DRM or an unsupported format. This error message
appears for about 3 seconds, then plays the next song.
No Data
Appears when the USB flash drive is empty or there are no MP3, WMA, or AAC files in the USB flash
drive. Check that compatible files are stored on the device.
Unsupported
Appears when an unsupported device is connected. If it appears when a supported device is
connected, reconnect the device.
Page 173 of 351
172
uuAudio Error Messages
*uPandora®
Features
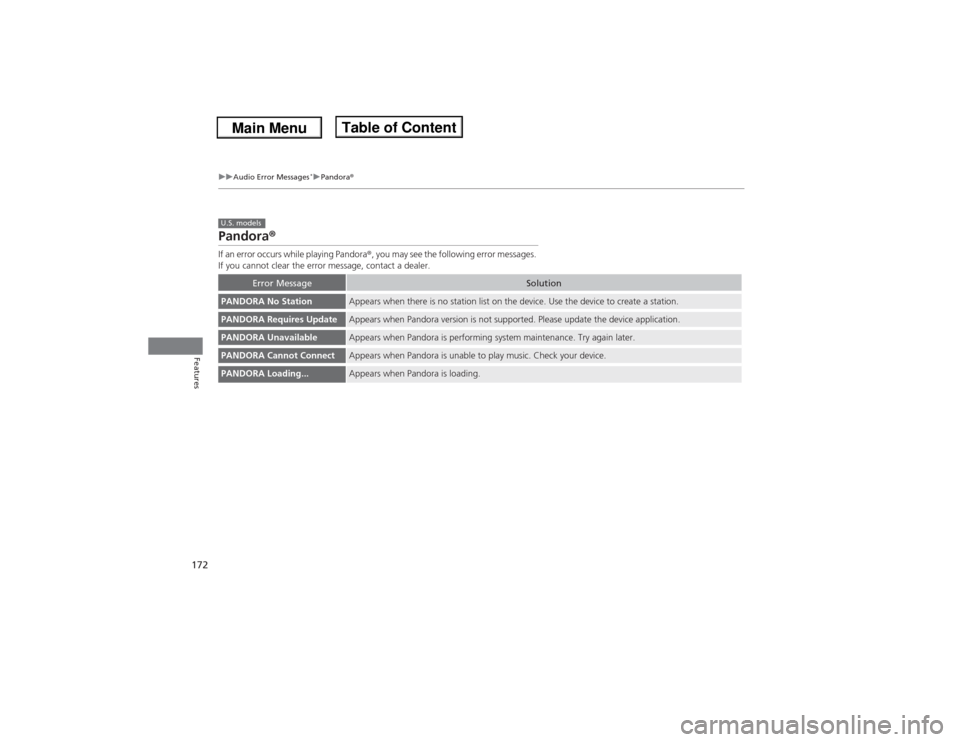
Pandora®If an error occurs while playing Pandora®, you may see the following error messages.
If you cannot clear the error message, contact a dealer.
Error Message
Solution
PANDORA No Station
Appears when there is no station list on the device. Use the device to create a station.
PANDORA Requires Update
Appears when Pandora version is not supported. Please update the device application.
PANDORA Unavailable
Appears when Pandora is performing system maintenance. Try again later.
PANDORA Cannot Connect
Appears when Pandora is unable to play music. Check your device.
PANDORA Loading...
Appears when Pandora is loading.
U.S. models
Page 174 of 351
173Features
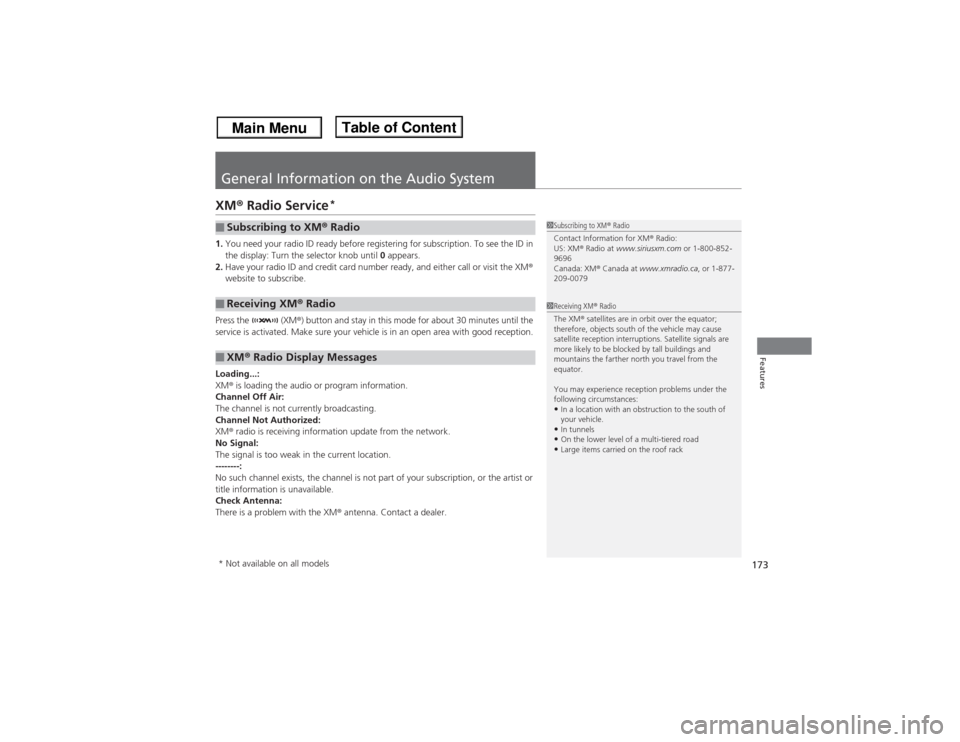
General Information on the Audio SystemXM® Radio Service
*
1.You need your radio ID ready before registering for subscription. To see the ID in
the display: Turn the selector knob until 0 appears.
2.Have your radio ID and credit card number ready, and either call or visit the XM®
website to subscribe.
Press the (XM®) button and stay in this mode for about 30 minutes until the
service is activated. Make sure your vehicle is in an open area with good reception.
Loading...:
XM® is loading the audio or program information.
Channel Off Air:
The channel is not currently broadcasting.
Channel Not Authorized:
XM® radio is receiving information update from the network.
No Signal:
The signal is too weak in the current location.
--------:
No such channel exists, the channel is not part of your subscription, or the artist or
title information is unavailable.
Check Antenna:
There is a problem with the XM® antenna. Contact a dealer.■Subscribing to XM® Radio■Receiving XM® Radio■XM® Radio Display Messages
1Subscribing to XM® Radio
Contact Information for XM® Radio:
US: XM® Radio at www.siriusxm.com or 1-800-852-
9696
Canada: XM® Canada at www.xmradio.ca, or 1-877-
209-00791Receiving XM® Radio
The XM® satellites are in orbit over the equator;
therefore, objects south of the vehicle may cause
satellite reception interruptions. Satellite signals are
more likely to be blocked by tall buildings and
mountains the farther north you travel from the
equator.
You may experience reception problems under the
following circumstances:•In a location with an obstruction to the south of
your vehicle.•In tunnels•On the lower level of a multi-tiered road•Large items carried on the roof rack
* Not available on all models
Page 175 of 351

174
uuGeneral Information on the Audio SystemuRecommended CDs
Features
Recommended CDs•Use only high-quality CD-R or CD-RW discs labeled for audio use.
•Use only CD-R or CD-RW discs on which the recordings are closed.
•Play only standard round-shaped CDs.
•Some software files may not allow for audio play or text data display.
•Some versions of MP3, WMA or AAC formats may be unsupported.
1Recommended CDs
A Dual-disc cannot play on this audio unit. If recorded
under certain conditions, a CD-R or CD-RW may not
play either.
■CDs with MP3, WMA or AAC filesThe CD packages or jackets should have one of these marks.
Page 176 of 351
175
uuGeneral Information on the Audio SystemuRecommended CDs
Features
■Protecting CDs
Follow these precautions when handling or storing CDs:
•Store a CD in its case when it is not being played.
•When wiping a CD, use a soft clean cloth from the center to the outside edge.
•Handle a CD by its edge. Never touch either surface.
•Never insert foreign objects into the CD player.
•Keep CDs out of direct sunlight and extreme heat.
•Do not place stabilizer rings or labels on the CD.
•Avoid fingerprints, liquids, and felt-tip pens on the CD.
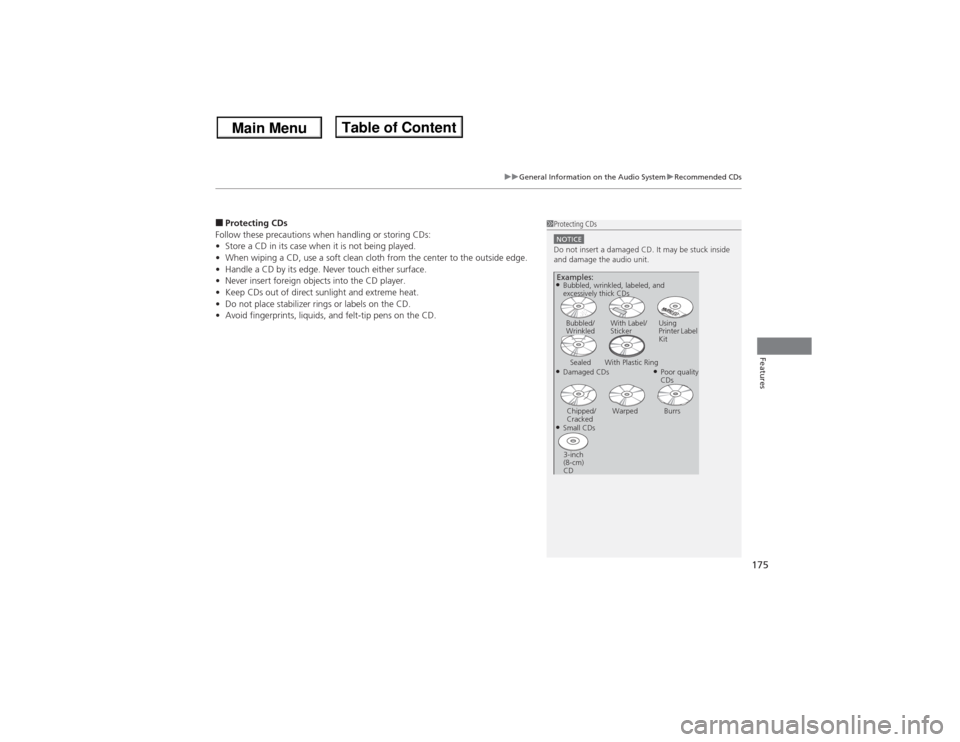
1Protecting CDsNOTICEDo not insert a damaged CD. It may be stuck inside
and damage the audio unit.Examples:●Damaged CDsBubbled/
WrinkledWith Label/
StickerUsing
Printer Label
Kit
Sealed With Plastic Ring
●Poor quality
CDs
Chipped/
CrackedWarped Burrs
●Small CDs
3-inch
(8-cm)
CD●Bubbled, wrinkled, labeled, and
excessively thick CDs
Page 177 of 351
176
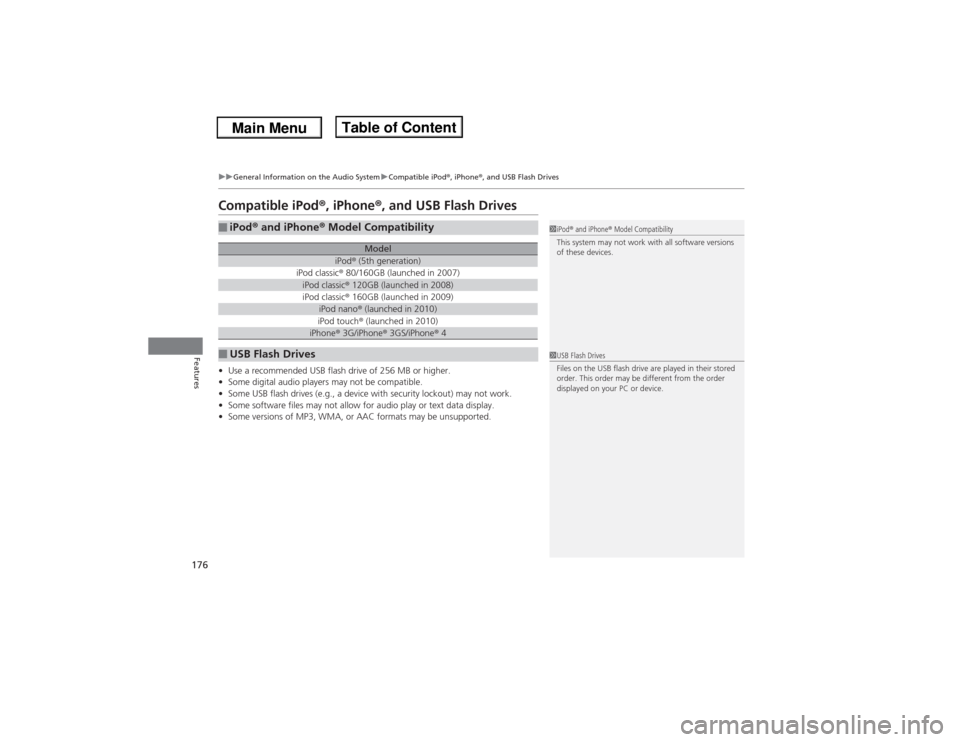
uuGeneral Information on the Audio SystemuCompatible iPod®, iPhone®, and USB Flash Drives
Features
Compatible iPod®, iPhone®, and USB Flash Drives•Use a recommended USB flash drive of 256 MB or higher.
•Some digital audio players may not be compatible.
•Some USB flash drives (e.g., a device with security lockout) may not work.
•Some software files may not allow for audio play or text data display.
•Some versions of MP3, WMA, or AAC formats may be unsupported.■iPod® and iPhone® Model Compatibility
Model
iPod® (5th generation)
iPod classic® 80/160GB (launched in 2007)iPod classic® 120GB (launched in 2008)iPod classic® 160GB (launched in 2009)
iPod nano® (launched in 2010)iPod touch® (launched in 2010)iPhone® 3G/iPhone® 3GS/iPhone® 4
■USB Flash Drives
1iPod® and iPhone® Model Compatibility
This system may not work with all software versions
of these devices.1USB Flash Drives
Files on the USB flash drive are played in their stored
order. This order may be different from the order
displayed on your PC or device.
Page 178 of 351

177
Continued
Features
HomeLink® Universal Transceiver
*
The HomeLink® Universal Transceiver can be programmed to operate up to three
remote controlled devices around your home, such as garage doors, lighting, or
home security systems.
Refer to the safety information that comes with your garage door opener to test that
the safety features are functioning properly. If you do not have the safety
information, contact the manufacturer.
Before programming HomeLink, make sure that people and objects are out of the
way of the garage or gate to prevent potential injury or damage.
When programming a garage door opener, park just outside the garage door’s
path.Training HomeLink
If you have not trained any of the buttons in
HomeLink before, you should erase any
previously learned codes. To do this:
•Press and hold the two outside buttons for
about 20 seconds, until the red indicator
blinks. Release the buttons, and proceed to
step 1.
•If you are training the second or third
button, go directly to step 1.
■Important Safety Precautions
1HomeLink® Universal Transceiver
*
HomeLink® is a registered trademark of Johnson
Controls., Inc.
Before programming HomeLink to operate a garage
door opener, confirm that the opener has an external
entrapment protection system, such as an “electronic
eye,” or other safety and reverse stop features. If it
does not, HomeLink may not be able to operate it.
Red Indicator
* Not available on all models
Page 179 of 351

uuHomeLink® Universal Transceiver
*uTraining HomeLink
178Features
■Training a Button
1Training HomeLink
Retraining a Button
If you want to retrain a programmed button for a
new device, you do not have to erase all button
memory. You can replace the existing memory code
using this procedure:
Erasing Codes
To erase all the codes, press and hold the two outside
buttons until the HomeLink indicator begins to blink
(about 10 to 20 secs). You should erase all codes
before selling the vehicle.
If you have any problems, see the device’s
instructions, visit www.homelink.com, or call
HomeLink at 1-800-355-3515.1.
Press and hold the desired HomeLink button until the
HomeLink indicator begins to blink.
2.
Continue to hold the HomeLink button and follow steps
1 - 3 under “Training a Button.”
Indicator remains on for
about 25 secs.Standard transmitter
Indicator blinks rapidly for
two secs, then remains on
for about 23 secs.Rolling code transmitter
1.
Position the remote transmitter you wish to link 1 to 3 inches (3-8 cm) from the HomeLink
button you want to program.
2.3.
Press and hold the desired HomeLink button and the button on
the remote transmitter.
Does the HomeLink indicator (LED) blink after 10 secs?Press and hold the
programmed HomeLink
button for about a sec.
Does the device (garage
door opener) work?
a.
4.
5.
a.b.
Training
CompletePress and hold the
HomeLink button again.
The remote-controlled
device should operate.
The remote has a rolling code. Press the
“learn” button on the remote-controlled
device (e.g. garage door opener).Within 30 secs, press and hold the
programmed HomeLink button for 2 secs.
Press and hold the HomeLink button again.
Training Complete
Press and hold the remote and the HomeLink
button at the same time. Then, while
continuing to hold the HomeLink button,
press and release the button on the remote
every 2 secs.
Dose the LED blink within 20 secs?
HomeLink LED
is on.
HomeLink indicator blinks for 2 secs,
then remains on.
YES
NO
NO
YES
YES
NO
Page 180 of 351

179
Continued
Features
Bluetooth® HandsFreeLink®For models with the navigation system, see Navigation System Manual for how to
operate the Bluetooth® HandsFreeLink®.
Bluetooth® HandsFreeLink® (HFL) allows you to place and receive phone calls using
your vehicle's audio system, without handling your cell phone.Using HFL
(Pick-up) button: Press to go directly to the Phone screen or to answer an
incoming call.
(Hang-up) button: Press to end a call.
(Talk) button: Press to call a number with a stored voice tag.
(Back) button: Press to cancel a command.
PHONE button: Press to go directly to the Phone screen.
Selector knob: Rotate to select an item on the screen, then press .
■HFL Buttons
1Bluetooth® HandsFreeLink®
To use HFL, you need a Bluetooth-compatible cell
phone. For a list of compatible phones, pairing
procedures, and special feature capabilities:•U.S.: Visit www.acura.com/handsfreelink, or call 1-
888-528-7876.•Canada: Visit www.handsfreelink.ca, or call 1-888-
528-7876.
Voice control tips•Aim the vents away from the ceiling and close the
windows, as noise coming from them may interfere
with the microphone.•Press and release the button when you want to
call a number using a stored voice tag. Speak
clearly and naturally after a beep.•If the microphone picks up voices other than yours,
the command may be misinterpreted.•To change the volume level, use the audio system's
volume knob or the remote audio controls on the
steering wheel.
Models with navigation systemModels without navigation system
Microphone Pick-up
Button
Selector
KnobPHONE
Button
Hang-up Button
Volume up
Volume
down
Back ButtonTalk Button