lights Acura MDX 2007 Navigation Manual
[x] Cancel search | Manufacturer: ACURA, Model Year: 2007, Model line: MDX, Model: Acura MDX 2007Pages: 166, PDF Size: 4.21 MB
Page 93 of 166

Navigation System92
System Set-up
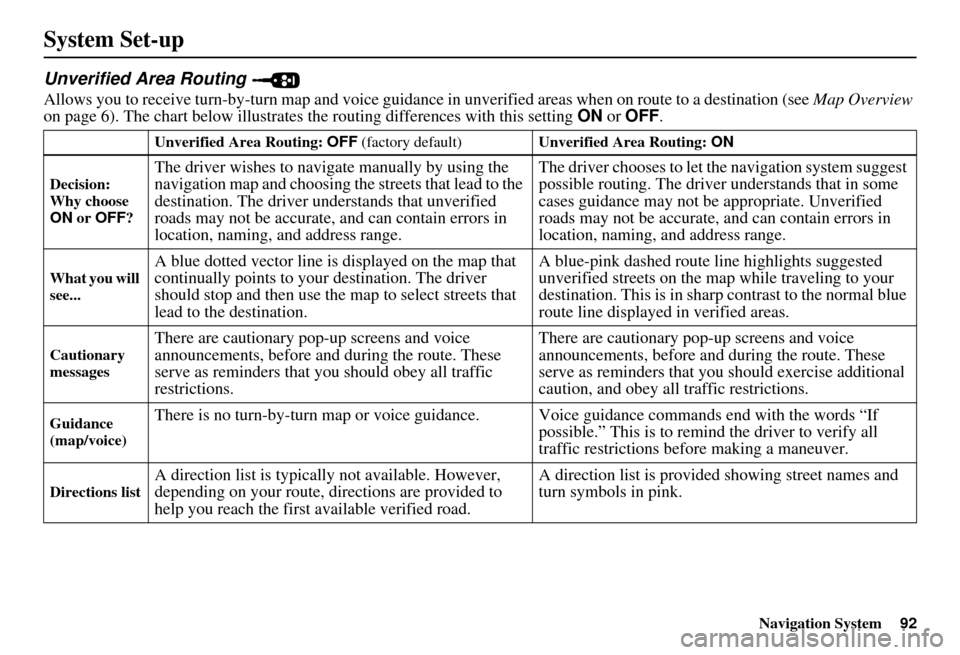
Unverified Area Routing
Allows you to receive turn-by-turn map and voice guidance in unverified areas when on route to a destination (see Map Overview
on page 6). The chart below illustrates th e routing differences with this setting ON or OFF .
Unverified Area Routing: OFF (factory default) Unverified Area Routing: ON
Decision:
Why choose
ON or OFF ?
The driver wishes to navigate manually by using the
navigation map and choosing th e streets that lead to the
destination. The driver un derstands that unverified
roads may not be accurate, and can contain errors in
location, naming, and address range. The driver chooses to let th
e navigation system suggest
possible routing. The driver understands that in some
cases guidance may not be appropriate. Unverified
roads may not be accurate, and can contain errors in
location, naming, and address range.
What you will
see...A blue dotted vector line is displayed on the map that
continually points to your destination. The driver
should stop and then use the map to select streets that
lead to the destination. A blue-pink dashed route line highlights suggested
unverified streets on the ma
p while traveling to your
destination. This is in sharp contrast to the normal blue
route line displayed in verified areas.
Cautionary
messagesThere are cautionary pop-up screens and voice
announcements, before and during the route. These
serve as reminders that you should obey all traffic
restrictions. There are cautionary pop-
up screens and voice
announcements, before and during the route. These
serve as reminders that you should exercise additional
caution, and obey all traffic restrictions.
Guidance
(map/voice)There is no turn-by-turn map or voice guidan ce. Voice guidance commands end with the words “If
possible.” This is to remind the driver to verify all
traffic restrictions before making a maneuver.
Directions listA direction list is typically not available. However,
depending on your route, directions are provided to
help you reach the first available verified road. A direction list is provided showing street names and
turn symbols in pink.
Page 106 of 166

105Navigation System
System Set-up
I
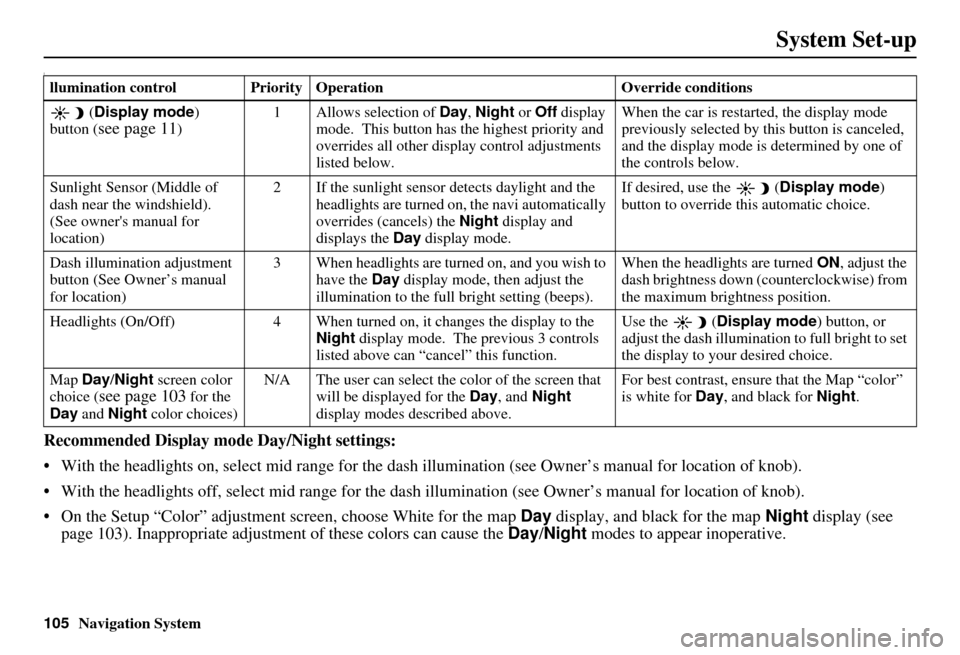
Recommended Display mode Day/Night settings:
With the headlights on, select mid range for the dash illumination (see Own er’s manual for location of knob).
With the headlights off, select mid range for the dash illumination (see Owner’s manual for location of knob).
On the Setup “Color” adjustment screen, choose White for the map Day display, and black for the map Night display (see
page 103). Inappropriate adjustment of these colors can cause the Day/Night modes to appear inoperative.
llumination control Priority Operation Override conditions
( Display mode )
button (
see page 11) 1 Allows selection of
Day, Night or Off display
mode. This button has the highest priority and
overrides all other displa y control adjustments
listed below. When the car is restarted, the display mode
previously selected by th
is button is canceled,
and the display mode is determined by one of
the controls below.
Sunlight Sensor (Middle of
dash near the windshield).
(See owner's manual for
location) 2 If the sunlight sensor
detects daylight and the
headlights are turned on, the navi automatically
overrides (cancels) the Night display and
displays the Day display mode. If desired, use the
(
Display mode )
button to override this automatic choice.
Dash illumination adjustment
button (See Owner’s manual
for location) 3 When headlights are turned on, and you wish to
have the Day display mode, then adjust the
illumination to the full bright setting (beeps). When the headlights are turned
ON, adjust the
dash brightness down (counterclockwise) from
the maximum brightness position.
Headlights (On/Off) 4 When turned on, it changes the display to the Night display mode. The previous 3 controls
listed above can “cancel” this function. Use the
(
Display mode ) button, or
adjust the dash illuminati on to full bright to set
the display to your desired choice.
Map Day/Night screen color
choice (
see page 103 for the
Day and Night color choices) N/A The user can select the color of the screen that
will be displayed for the Day, and Night
display modes described above. For best contrast
, ensure that the Map “color”
is white for Day, and black for Night.
Page 130 of 166

Navigation System129
Frequently Asked Questions
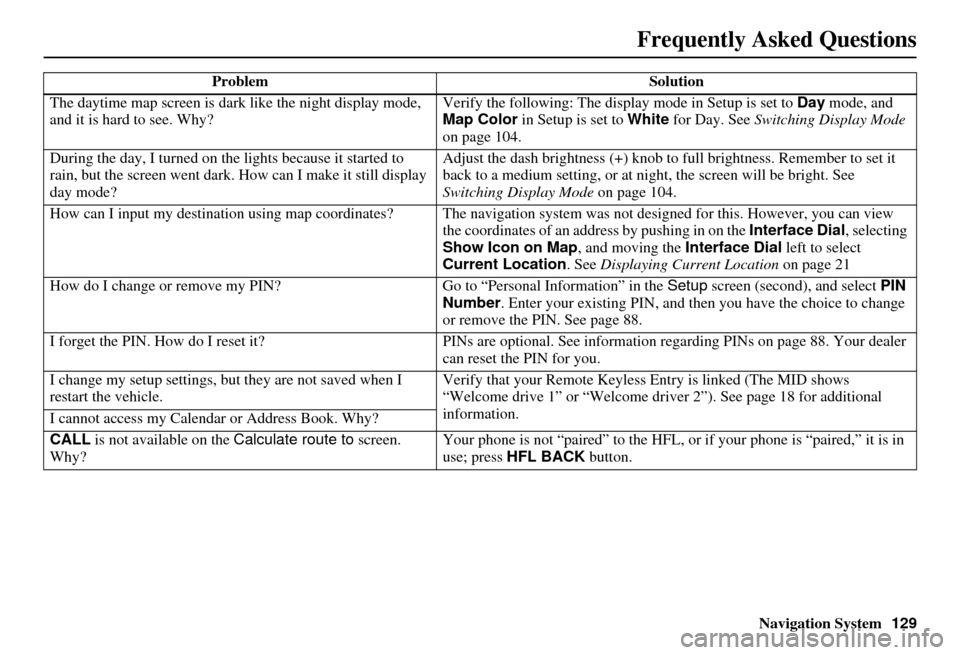
The daytime map screen is dark like the night display mode,
and it is hard to see. Why? Verify the following: The disp
lay mode in Setup is set to Day mode, and
Map Color in Setup is set to White for Day. See Switching Display Mode
on page 104.
During the day, I turned on the lights because it started to
rain, but the screen went dark. How can I make it still display
day mode? Adjust the dash brightness (+) knob to fu
ll brightness. Remember to set it
back to a medium setting, or at ni ght, the screen will be bright. See
Switching Display Mode on page 104.
How can I input my destination using map coordinates? The navigation system was not designed for this. However, you can view
the coordinates of an address by pushing in on the Interface Dial, selecting
Show Icon on Map , and moving the Interface Dial left to select
Current Location . See Displaying Current Location on page 21
How do I change or remove my PIN? Go to “Personal Information” in the Setup screen (second) , and select PIN
Number . Enter your existing PIN, and then you have the choice to change
or remove the PIN. See page 88.
I forget the PIN. How do I reset it? PINs are optional. See information regarding PINs on page 88. Your dealer
can reset the PIN for you.
I change my setup settings, bu t they are not saved when I
restart the vehicle. Verify that your Remote Keyless
Entry is linked (The MID shows
“Welcome drive 1” or “Welcome dr iver 2”). See page 18 for additional
information.
I cannot access my Calendar or Address Book. Why?
CALL is not available on the Calculate route to screen.
Why? Your phone is not “paired” to the HFL,
or if your phone is “paired,” it is in
use; press HFL BACK button.
Problem
Solution