Acura MDX 2011 Owner's Manual
Manufacturer: ACURA, Model Year: 2011, Model line: MDX, Model: Acura MDX 2011Pages: 609, PDF Size: 12.7 MB
Page 151 of 609
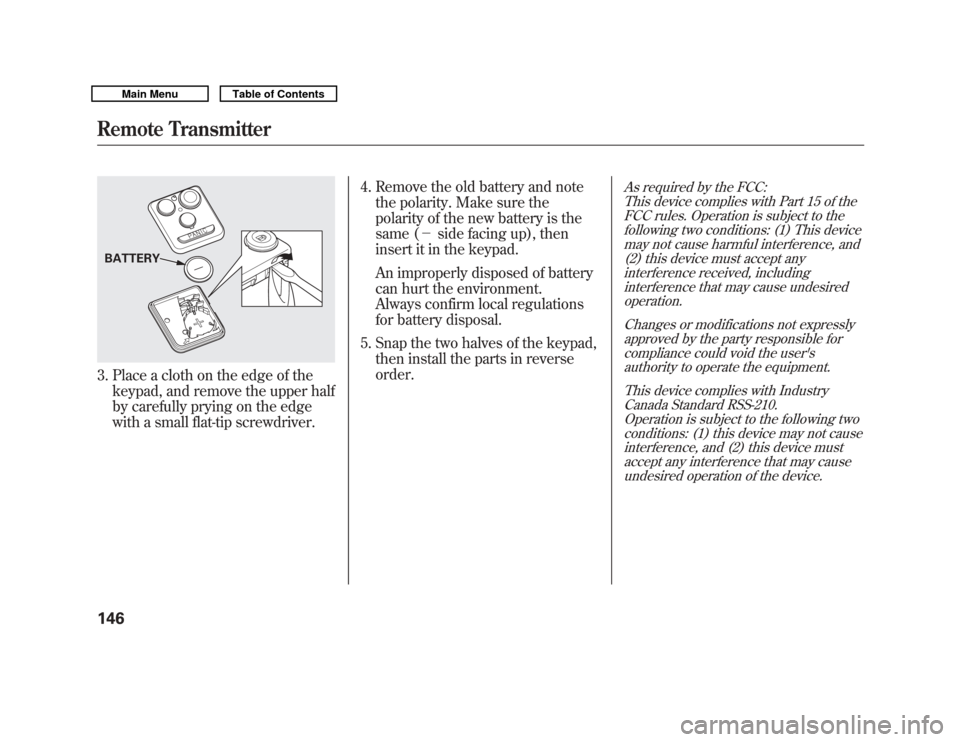
3. Place a cloth on the edge of thekeypad, and remove the upper half
by carefully prying on the edge
with a small flat-tip screwdriver. 4. Remove the old battery and note
the polarity. Make sure the
polarity of the new battery is the
same (- side facing up), then
insert it in the keypad.
An improperly disposed of battery
can hurt the environment.
Always confirm local regulations
for battery disposal.
5. Snap the two halves of the keypad, then install the parts in reverse
order.
As required by the FCC:
This device complies with Part 15 of theFCC rules. Operation is subject to the
following two conditions: (1) This devicemay not cause harmful interference, and(2) this device must accept any
interference received, includinginterference that may cause undesiredoperation.
Changes or modifications not expresslyapproved by the party responsible for
compliance could void the user'sauthority to operate the equipment.
This device complies with IndustryCanada Standard RSS-210.
Operation is subject to the following twoconditions: (1) this device may not causeinterference, and (2) this device must
accept any interference that may causeundesired operation of the device.
BATTERYRemote Transmitter14610/06/29 11:59:04 11 ACURA MDX MMC North America Owner's M 50 31STX640 enu
Page 152 of 609
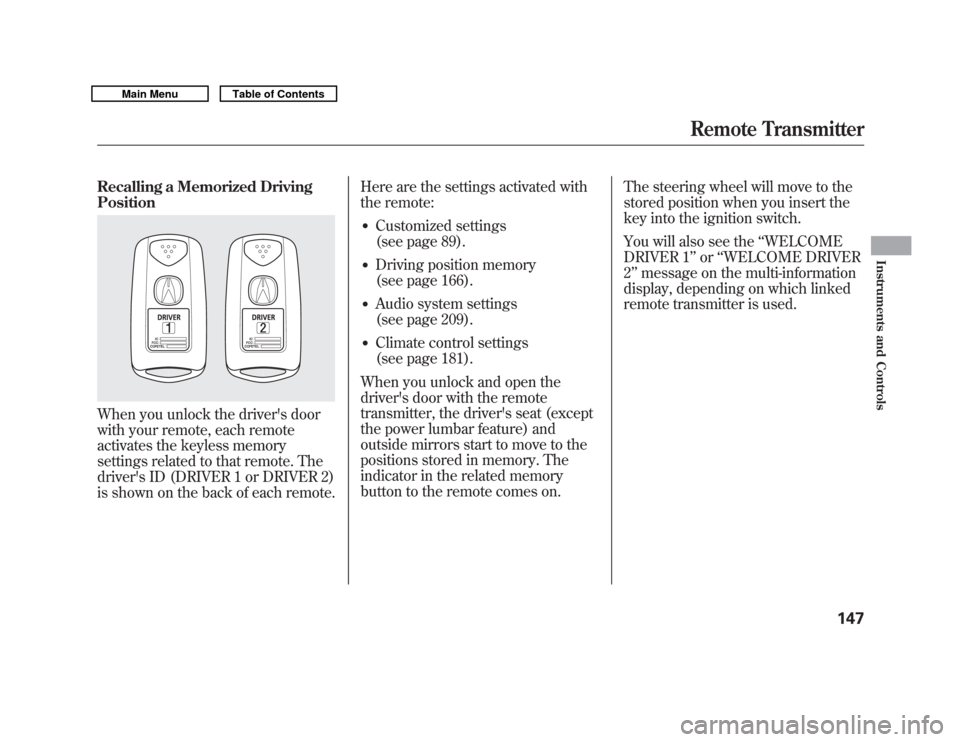
Recalling a Memorized Driving
PositionWhen you unlock the driver's door
with your remote, each remote
activates the keyless memory
settings related to that remote. The
driver's ID (DRIVER 1 or DRIVER 2)
is shown on the back of each remote.Here are the settings activated with
the remote:
●
Customized settings
(see page 89).
●
Driving position memory
(see page 166).
●
Audio system settings
(see page 209).
●
Climate control settings
(see page 181).
When you unlock and open the
driver's door with the remote
transmitter, the driver's seat (except
the power lumbar feature) and
outside mirrors start to move to the
positions stored in memory. The
indicator in the related memory
button to the remote comes on. The steering wheel will move to the
stored position when you insert the
key into the ignition switch.
You will also see the
‘‘WELCOME
DRIVER 1’’ or‘‘WELCOME DRIVER
2’’ message on the multi-information
display, depending on which linked
remote transmitter is used.
Remote Transmitter
147
Instruments and Controls
10/06/29 11:59:04 11 ACURA MDX MMC North America Owner's M 50 31STX640 enu
Page 153 of 609
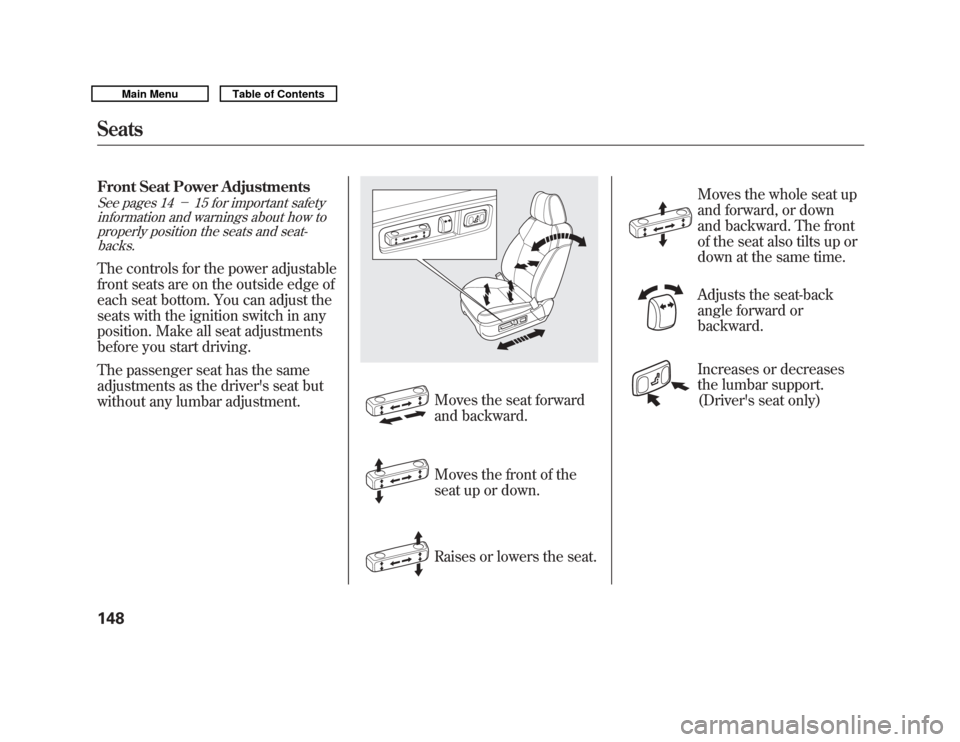
Front Seat Power AdjustmentsSee pages 14-15 for important safety
information and warnings about how to properly position the seats and seat-backs.The controls for the power adjustable
front seats are on the outside edge of
each seat bottom. You can adjust the
seats with the ignition switch in any
position. Make all seat adjustments
before you start driving.
The passenger seat has the same
adjustments as the driver's seat but
without any lumbar adjustment.
Moves the seat forward
and backward.
Moves the front of the
seat up or down.
Raises or lowers the seat. Moves the whole seat up
and forward, or down
and backward. The front
of the seat also tilts up or
down at the same time.
Adjusts the seat-back
angle forward or
backward.
Increases or decreases
the lumbar support.
(Driver's seat only)
Seats14810/06/29 11:59:04 11 ACURA MDX MMC North America Owner's M 50 31STX640 enu
Page 154 of 609
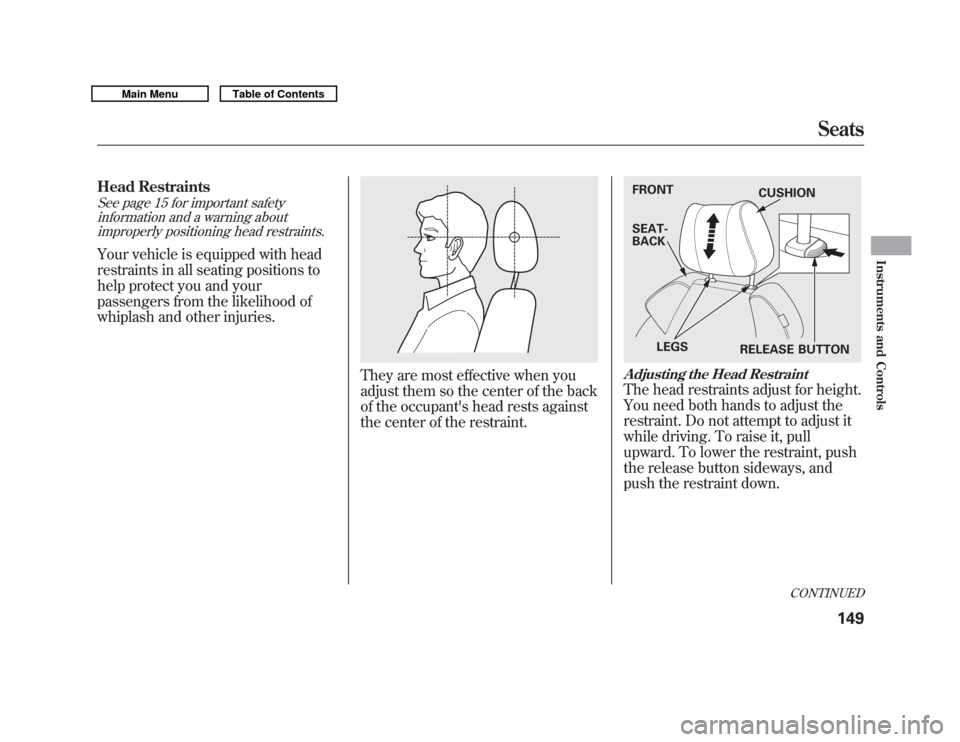
Head RestraintsSee page 15 for important safetyinformation and a warning aboutimproperly positioning head restraints.Your vehicle is equipped with head
restraints in all seating positions to
help protect you and your
passengers from the likelihood of
whiplash and other injuries.
They are most effective when you
adjust them so the center of the back
of the occupant's head rests against
the center of the restraint.
Adjusting the Head RestraintThe head restraints adjust for height.
You need both hands to adjust the
restraint. Do not attempt to adjust it
while driving. To raise it, pull
upward. To lower the restraint, push
the release button sideways, and
push the restraint down.FRONT
SEAT-
BACK
LEGS RELEASE BUTTONCUSHION
CONTINUED
Seats
149
Instruments and Controls
10/06/29 11:59:04 11 ACURA MDX MMC North America Owner's M 50 31STX640 enu
Page 155 of 609
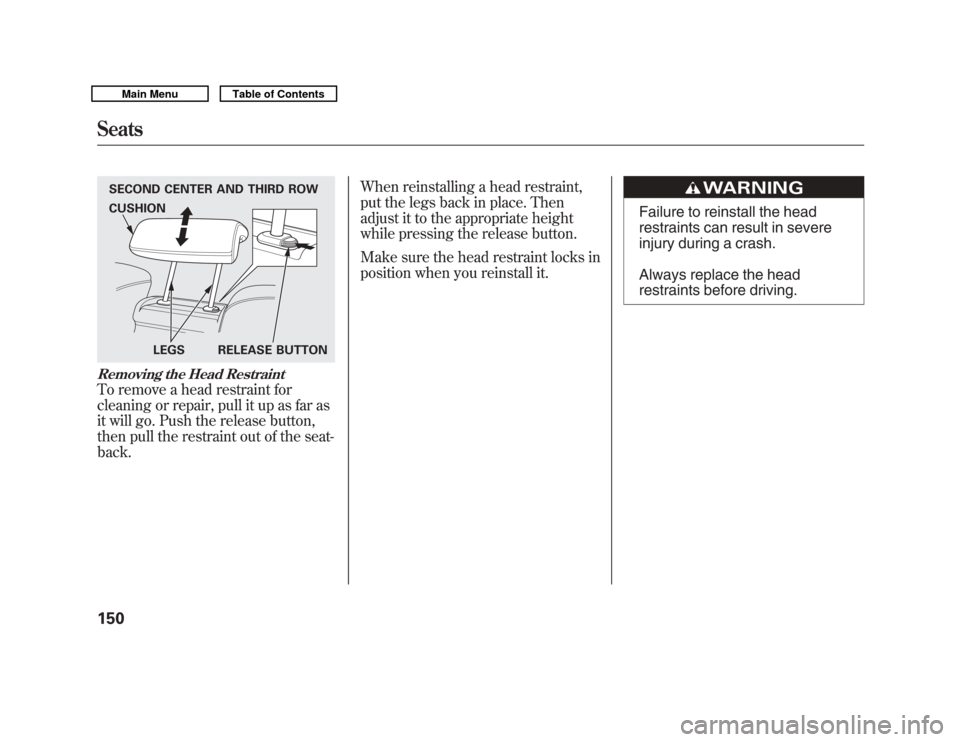
Removing the Head RestraintTo remove a head restraint for
cleaning or repair, pull it up as far as
it will go. Push the release button,
then pull the restraint out of the seat-
back.When reinstalling a head restraint,
put the legs back in place. Then
adjust it to the appropriate height
while pressing the release button.
Make sure the head restraint locks in
position when you reinstall it.
Failure to reinstall the head
restraints can result in severe
injury during a crash.
Always replace the head
restraints before driving.
SECOND CENTER AND THIRD ROW
LEGS RELEASE BUTTON
CUSHIONSeats15010/06/29 11:59:04 11 ACURA MDX MMC North America Owner's M 50 31STX640 enu
Page 156 of 609

Active Head RestraintsThe driver's and front passenger's
seats have active head restraints. If
the vehicle is struck severely from
the rear, the occupant properly
secured with the seat belt will be
pushed against the seat-back and the
head restraint will automatically
move forward.This reduces the distance between
the restraint and the occupant's
head. It also helps protect the
occupants against the likelihood of
whiplash and injuries to the neck and
upper spine.
After a collision, the activated
restraint should return to its normal
position.
If the restraints do not return to their
normal position, or in the event of a
severe collision, have the vehicle
inspected by an Acura dealer.
For a head restraint system to work
properly:
●
Do not hang any items on the head
restraints, or from the restraint
legs.
●
Do not place any object between
an occupant and the seat-back.
●
Install each restraint in its proper
location.
●
Only use genuine Acura
replacement head restraints.
CONTINUED
Seats
151
Instruments and Controls
10/06/29 11:59:04 11 ACURA MDX MMC North America Owner's M 50 31STX640 enu
Page 157 of 609

Adjusting the Second Row SeatsTo change the seat-back angle of the
seats in the second row, pull up on
the handle on the outside of the seat-
back, and push the seat-back.
Overall, the seat-back has six
different positions.Folding the Second Row Seats
The left and right halves can be
folded separately.
1. To unlatch the detachable anchor
before folding the seat-back, insert
the latch plate into the slot on the
side of the anchor buckle (see
page 154) and allow the seat belt to
retract. Store the detachable
anchor and seat belt latch plates in
the retractor housing.
2. Lower the head restraints to their lowest positions.
3. Pull up the handle on the outside of the seat-back.
4. Fold the seat-back forward.
Reverse this procedure to return the
seat to the upright position. Make
sure the seat is locked securely
before driving. Make sure that the folded seat-back
does not press against the front
passenger's seat, as this could cause
the weight sensors to work
improperly.
HANDLE
Seats15210/06/29 11:59:04 11 ACURA MDX MMC North America Owner's M 50 31STX640 enu
Page 158 of 609

Third Row AccessTo get into the third row seats, pull
up the lever on the side of the
passenger's side second row seat-
back. The seat-back will tilt forward,
and then can be slid forward.
After you return the seat-back to the
upright position, push the whole seat
backwards until it latches. Make sure
the seat is fully latched before sitting
in it.Folding the Third Row Seat
1. Use the latch plate to release the
seat belt from the detachable
anchor (see page 154).
2. Lower the head restraints to their lowest positions.
NOTE: To fold the third row seat, the
second row seat-back must be folded
down or in the full up right position.
3. Unlock the seat-back by pulling the handle. Push the seat-back
forward.
Make sure the outer shoulder belts
are positioned on each hook on the
side panel whenever the third seat is
folded.
RELEASE LEVER
THIRD ROW SEAT HANDLE
CONTINUED
Seats
153
Instruments and Controls
10/06/29 11:59:04 11 ACURA MDX MMC North America Owner's M 50 31STX640 enu
Page 159 of 609

Reverse this procedure to return the
seat to the upright position. Make
sure the seat is locked securely
before driving. Reconnect the seat
belts to the detachable anchors.
Make sure all items in the cargo area
are secured. Loose items can fly
forward and cause injury if you have
to brake hard (SeeCarrying Cargo
on page 428). Detachable Anchor
The seat belts in the second row
center seat and the third row seats
are equipped with detachable
anchors.
To unlatch the detachable anchor,
insert the latch plate into the slot on
the side of the anchor buckle. Store
the detachable anchor and seat belt
latch plates in the retractor housing.When the seats are returned to the
upright position, these detachable
anchors should be latched back
properly.
Using the seat belt with the
detachable anchor unlatched
increases the chance of serious
injury or death in a crash.
Before using the seat belt,
make sure the detachable
anchor is correctly latched.
LATCH PLATE
Seats15410/06/29 11:59:04 11 ACURA MDX MMC North America Owner's M 50 31STX640 enu
Page 160 of 609

Pull out the small latch plate and the
latch plate from each holding slot in
the ceiling, and pull out the seat belt
to extend it.
Pull out the outer shoulder belts
from the hook. Both of the third-row
hooks should only be used when the
seat belt is detached.
Line up the triangle marks on the
small latch plate and anchor buckle
when reattaching the belt and
buckle.
Tug on the seat belt to verify that the
detachable anchor is securely
latched. Make sure the seat belt is
not twisted.
SECOND ROW CENTER SEATLATCH PLATE
SMALL LATCH PLATE
THIRD ROW SEATS HOOK
SMALL LATCH PLATE
ANCHOR BUCKLE TRIANGLE
MARKS
Seats
155
Instruments and Controls
10/06/29 11:59:04 11 ACURA MDX MMC North America Owner's M 50 31STX640 enu