Acura MDX 2011 Owner's Manual
Manufacturer: ACURA, Model Year: 2011, Model line: MDX, Model: Acura MDX 2011Pages: 609, PDF Size: 12.7 MB
Page 191 of 609

Temperature ControlPress the▲temperature control
button to increase the temperature of
airflow, and the ▼button to decrease
it. The temperature you adjust is
shown in the system display.
Fan ControlPress the
▲ fan control button to
increase the fan speed and airflow.
Press the▼ button to decrease it.
The level of the fan speed is shown in
the display.
Mode ControlEach time you press the mode
button, the mode display changes
from
to
.
When
is selected, air flows from
the upper vents on the back of the
center console.
Whenis selected, air flows from
the lower vents.
Automatic OperationPressing the AUTO button puts the
system in automatic operation mode.
The rear system automatically
adjusts the fan speed and airflow
levels to maintain the selected
temperature of the rear passenger
compartment. You will see AUTO in
the display.
Pressing the ON/OFF button shuts
off the rear climate control system.
Climate Control System18610/06/29 11:59:04 11 ACURA MDX MMC North America Owner's M 50 31STX640 enu
Page 192 of 609

Triple Zone Temperature Control
The temperatures of the driver's side
and the front passenger's side can be
controlled independently when the
indicator in the DUAL button is on.
When the indicator in the REAR
button is on, the temperature of the
rear passenger compartment can be
controlled independently.
To adjust each temperature, press
either of the temperature control
buttons (▲or▼ ) on the climate
control panel.
Driver's Side Passenger's Side
Rear Passenger Compartment
CONTINUED
Climate Control System
187
Features
10/06/29 11:59:04 11 ACURA MDX MMC North America Owner's M 50 31STX640 enu
Page 193 of 609

Push AUTO or
. The selected
temperatures appear in the display.
When the indicator in the DUAL
button is off, you can adjust both
sides to the same temperature by
adjusting the driver's temperature
control buttons.
To set the driver's side temperature
to a different value than the
passenger's side, press the DUAL
button, then press either of the
driver's temperature control button
(▲ or▼ ). To set the passenger's side
to a different value than the driver's
side, press either of the front
passenger's temperature control
button (▲ or▼ ). You can adjust the
passenger's side without pressing
the DUAL button first. When the indicator in the REAR
button is off, the temperature of the
rear passenger compartment is
synchronized to the driver's side set
temperature. You will see AUTO
SYNC on the system display of the
rear control panel.
To set the temperature of the rear
passenger compartment to a different
value than the driver's side, press the
REAR button, then press either
temperature control buttons on the
back of the center console. The word
‘‘
SYNC ’’in the display goes out. You
can also adjust the rear temperature
without pressing the REAR button
first. Pressing either button causes
the indicator of the REAR button to
turn on.
When you set each temperature to its
lower limit or its upper limit, it will be
displayed as ‘‘
’’or ‘‘
’’.
Climate Control System18810/06/29 11:59:04 11 ACURA MDX MMC North America Owner's M 50 31STX640 enu
Page 194 of 609

Sunlight and Temperature
SensorsTo regulate the interior temperature
and humidity, the climate control
system has two sensors. A sunlight
sensor is located in the top of the
dashboard and a temperature/
humidity sensor is next to the
steering column. Do not cover the
sensors or spill any liquid on them.
SUNLIGHT SENSOR
TEMPERATURE/HUMIDITY SENSOR
Climate Control System
189
Features
10/06/29 11:59:04 11 ACURA MDX MMC North America Owner's M 50 31STX640 enu
Page 195 of 609
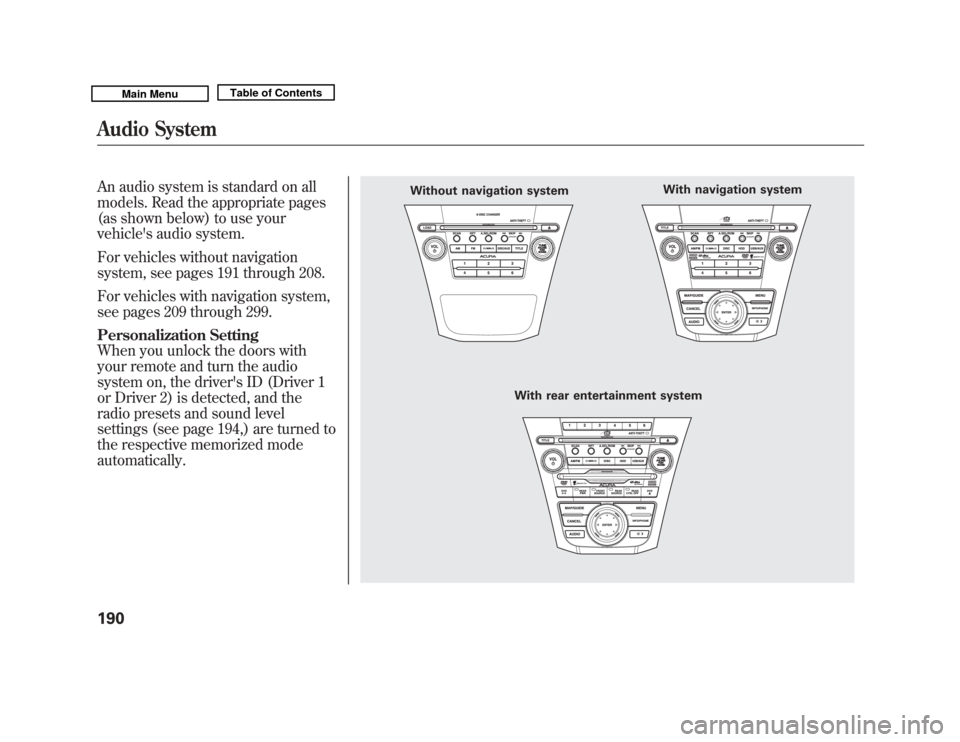
An audio system is standard on all
models. Read the appropriate pages
(as shown below) to use your
vehicle's audio system.
For vehicles without navigation
system, see pages 191 through 208.
For vehicles with navigation system,
see pages 209 through 299.
Personalization Setting
When you unlock the doors with
your remote and turn the audio
system on, the driver's ID (Driver 1
or Driver 2) is detected, and the
radio presets and sound level
settings (see page 194,) are turned to
the respective memorized mode
automatically.
Without navigation systemWith rear entertainment system With navigation system
Audio System19010/06/29 11:59:04 11 ACURA MDX MMC North America Owner's M 50 31STX640 enu
Page 196 of 609
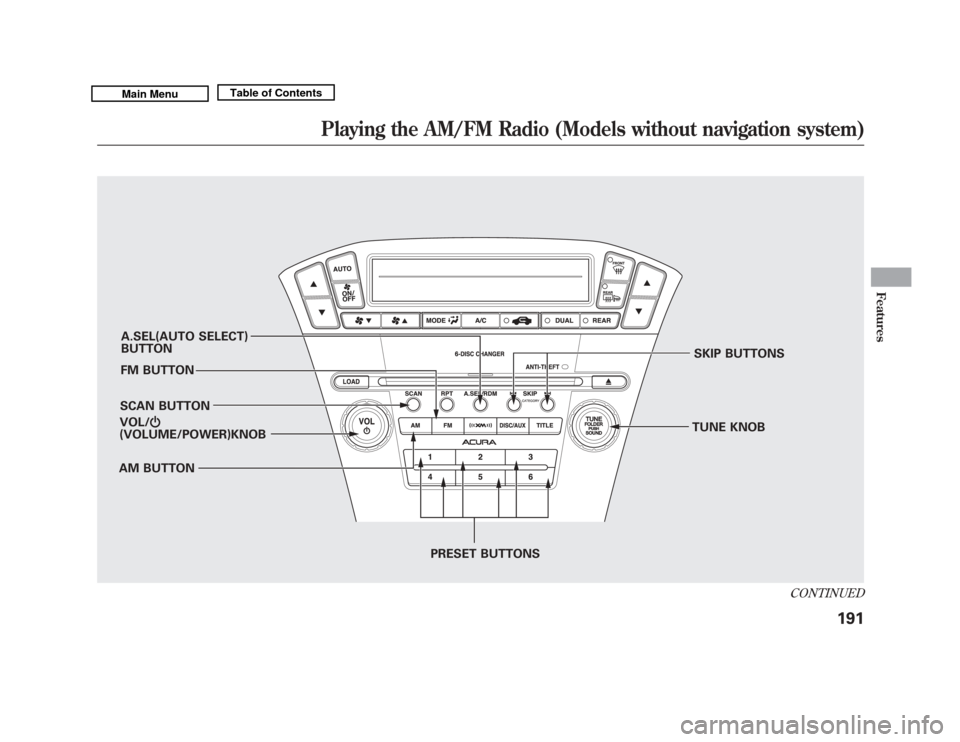
A.SEL(AUTO SELECT)
BUTTON
FM BUTTON
SCAN BUTTON
AM BUTTON SKIP BUTTONS
TUNE KNOB
PRESET BUTTONS
VOL/
ꂻ
(VOLUME/POWER)KNOB
CONTINUED
Playing the AM/FM Radio (Models without navigation system)
191
Features
10/06/29 11:59:04 11 ACURA MDX MMC North America Owner's M 50 31STX640 enu
Page 197 of 609
To Play the Radio
The ignition switch must be in the
ACCESSORY (I) or ON (II) position.
Turn the system on by pushing the
VOL/
knob or the AM or FM
button. Adjust the volume by turning
the VOL/
knob.
The band and frequency that the
radio was last tuned to are displayed.
To change bands, press the AM or
FM button. On the FM band, ST will
be displayed if the station is
broadcasting in stereo. Stereo
reproduction in AM is not available. To Select a Station
You can use any of five methods to
find radio stations on the selected
band: tune, skip(seek), scan, the
preset buttons, and auto select.
TUNE
-Use the TUNE knob to
tune the radio to a desired frequency.
Turn the knob right to tune to a
higher frequency, or left to tune to a
lower frequency.
SKIP(SEEK) -The skip(seek)
function searches up and down from
the current frequency to find a
station with a strong signal. To
activate it, press and hold the
or
side of the button, then release it. SCAN
-The scan function samples
all stations with strong signals on the
selected band. To activate it, press
the SCAN button, then release it.
You will see SCAN in the display.
When the system finds a strong
signal, it will stop and play that
station for about 10 seconds.
If you do nothing, the system will
scan for the next strong station and
play it for 10 seconds. When it plays
a station that you want to listen to,
press the SCAN button again.
Playing the AM/FM Radio (Models without navigation system)19210/06/29 11:59:04 11 ACURA MDX MMC North America Owner's M 50 31STX640 enu
Page 198 of 609
Preset-Each preset button can
store one frequency on AM and two
frequencies on FM.
1. Select the desired band, AM or FM. FM1 and FM2 let you store
two frequencies with each preset
button.
2. Use the tune, skip(seek), or scan function to tune the radio to a
desired station.
3. Pick a preset button, and hold it until you hear a beep.
4. Repeat steps 1 through 3 to store a total of six stations on AM and
twelve stations on FM. AUTO SELECT
-If you are
traveling and can no longer receive
your preset stations, you can use the
auto select feature to find stations in
the local area.
Press the A.SEL button. ‘‘A.SEL ’’
flashes in the display, and the system
goes into scan mode for several
seconds. It stores the frequencies of
six AM and twelve FM stations in the
preset buttons.
You will see a ‘‘0 ’’ displayed after
pressing a preset button if auto select
cannot find a strong station for that
preset button.
If you do not like the stations auto
select has stored, you can store other
frequencies on the preset buttons as
previously described.
To turn off auto select,
press the A.SEL
(auto select) button. This restores
the presets you originally set.
The presets may be lost if your
vehicle's battery goes dead, is
disconnected, or the radio fuse is
removed.
For information on AM/FM radio
frequencies and reception, see page
300.
CONTINUED
Playing the AM/FM Radio (Models without navigation system)
193
Features
10/06/29 11:59:04 11 ACURA MDX MMC North America Owner's M 50 31STX640 enu
Page 199 of 609
Adjusting the Sound
Press the TUNE (SOUND) knob
repeatedly to display the BASS,
TREBLE, FADER, BALANCE,
SUBWOOFER, and SVC (speed-
sensitive volume compensation)
settings.
BASS-Adjusts the bass.
TREBLE -Adjusts the treble.
FADER -Adjusts the front-to-back
strength of the sound.
BALANCE -Adjusts the side-to-
side strength of the sound.
SUBWOOFER -Adjusts the
strength of sound from the
subwoofer speaker.
CENTER -Adjusts the strength of
sound from the center speaker. SVC
-Adjusts the volume level
based on the vehicle speed.
Each mode is shown in the display as
it changes. Turn the TUNE knob to
adjust the setting to your liking.
When the level reaches the center,
you will see ‘‘C ’’in the display.
The system will return to the audio
display about 5 seconds after you
stop adjusting a mode.
Speed-sensitive Volume Compensation (SVC)The SVC mode controls the volume
based on vehicle speed. The faster
you go, the louder the audio volume
becomes. As you slow down, the
audio volume decreases.
The SVC has four modes; SVC OFF,
SVC LOW, SVC MID, and SVC
HIGH. Turn the TUNE knob to
adjust the setting to your liking. If
you feel the sound is too loud,
choose low. If you feel the sound is
too quiet, choose high. Audio System Lighting
You can use the instrument panel
brightness control buttons to adjust
the illumination of the audio system
(see page 132). The audio system
illuminates when the parking lights
are on, even if the radio is off.
Playing the AM/FM Radio (Models without navigation system)19410/06/29 11:59:04 11 ACURA MDX MMC North America Owner's M 50 31STX640 enu
Page 200 of 609
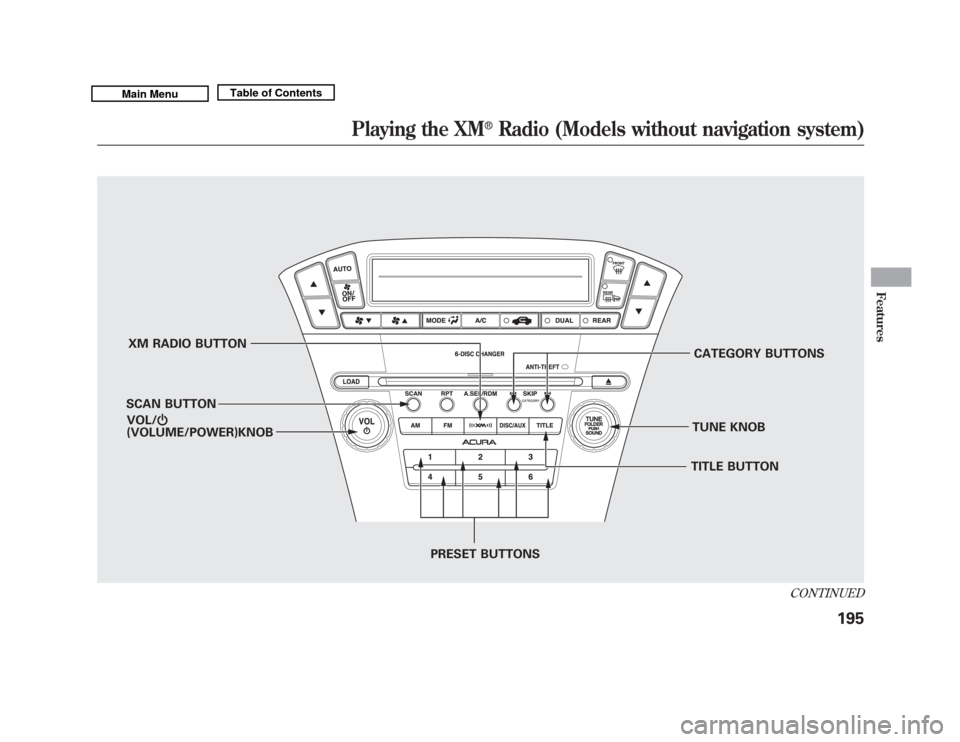
XM RADIO BUTTON
SCAN BUTTON CATEGORY BUTTONS
TUNE KNOB
PRESET BUTTONS
VOL/
ꂻ
(VOLUME/POWER)KNOB
TITLE BUTTON
CONTINUED
Playing the XM
®
Radio (Models without navigation system)
195
Features
10/06/29 11:59:04 11 ACURA MDX MMC North America Owner's M 50 31STX640 enu